文章目录
- 前言
- 模型/视图编程
- 1.先写模型
- 2. 视图
- 3. 委托
- 例子(Qt代码)
- 例1 查询本机文件系统
- 例2 标准模型项操作
- 例3 自定义模型示例:军事武器模型
- 例4 只读模型操作示例
- 例5 选择模型操作
- 例6 自 定 义委 托(在testSelectionModel上修改)
前言
在Qt中,有两种常见的模型/视图架构用于实现大量的数据存储、处理和显示:Model/View和Model/View/Controller。
两者的区别是什么?其实就是看:开发者是否想要自己自定义控制器
下面我举个例子,你就明白了:
QAbstractItemModel属于Model层,负责数据的存储和管理。QAbstractItemDelegate属于View层,负责定制视图中单元格的显示和编辑。控制器(Controller)是开发者自行设计和实现的,用于处理用户输入事件,并更新模型或视图。
这样,可以将Qt中的模型/视图架构描述为Model/View,并通过自定义的控制器来实现Model/View/Controller的设计模式。
下面来详细写一下MVC:
模型/视图编程
Qt 中 的 模 型 / 视 图 架 构 用 来 实 现 大 量 的 数 据 存 储 、 处 理 及 显 示 。
==MVC(Model-View-Controller)==包括了 3 个组件:
- 模型(Model)是应用对象,用来表示数据;
- 视图(View)是模型的用户界面,用来显示数据;
控制(Controller)定义了用户界面对用户输入的反应方式。- 委托(Delegate)用于定制数据的渲染和编辑方式。
(control和Delegate不用分的太清,你就直接理解为:Delegate就是Controller即可)
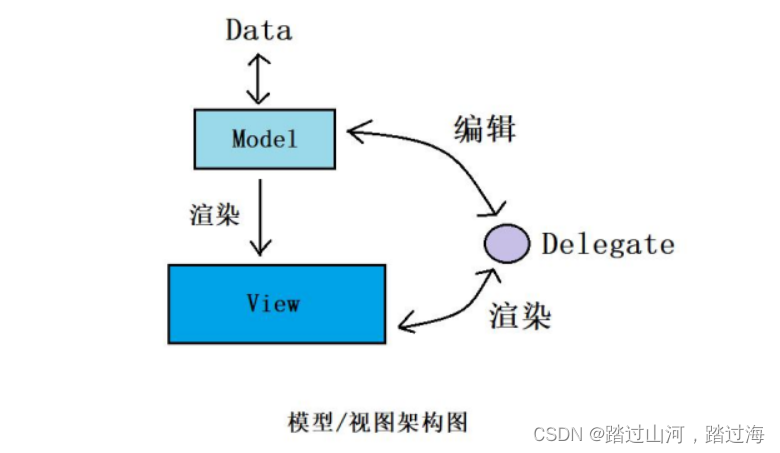
说白了,MVC就是3个部分,一个是Data数据;第二个相当于容器,用来放数据的,然后将数据可视化;第三个是负责数据和容器的交互问题。
菜鸟教程 :https://www.runoob.com/design-pattern/mvc-pattern.html
最后再理解一波:(这个是最正确的!!!)mvc是经典的三层结构,将数据,视图和逻辑分离,这个不是Qt专属,单纯的cpp编程,java编程,python编程,Kotlin编程…都能使用,更像是一种框架模式【注意:框架模式不是设计模式】,而Model/View框架才是qt自己的,查了一下大概是从qt4开始引入,在Qt中这个框架模式中设计到三个类,model类,view类和delegate类。model类保存数据,view负责显示,而delegate负责协调model和view之间的数据edit(编辑)和render(渲染)
然后,再讲一下流程:
- 第一步,用户通过与View进行交互,例如编辑单元格、拖放操作等,触发用户操作事件。
- 第二步,View将用户的操作事件传递给Delegate进行处理。Delegate根据需要对数据进行修改、验证或其他特定操作。
- 第三步,Delegate将更新后的数据传递给Model进行存储和更新。
- 第四步,Model通知View数据的变化,View重新获取更新后的数据并刷新显示。
(举个不太恰当的例子:比如用户编辑了单元格上的数据【在View上操作】,触发了某个功能,比如说是根据已有数据生成新的数据,然后View将这个请求发给Delegate进行委托,Delegate计算出了新生成的数据,并将更新的数据发给了Model,然后Model通知View:数据有变,然后View更新数据(刷新用户界面),这样,用户就看到了新的界面)
然后,不正确的想法,我用横线划掉了,就不删了,全当做一种思考过程了
1.先写模型
所有的模型都基于 $QAbstractItemModel 类,该类提供了十分灵活的接口来处理各种视图,这些视图可以将数据的表现形式为表格( 类,该类提供了十分灵活的接口来处理各种视 图,这些视图可以将数据的表现形式为表格( 类,该类提供了十分灵活的接口来处理各种视图,这些视图可以将数据的表现形式为表格(table )、列表( )、列表( )、列表(list )、树( )、树( )、树(tree$)。
Qt 提供了一些现成的模型来处理数据项:
- $QStringListModel $存储简单的 Q S t r i n g QString QString 项目列表;
- $QStandardItemModel $管理复杂的属性结构数据项,每一个数据项可以包含任意的数据;
- Q F i l e S y s t e m M o d e l QFileSystemModel QFileSystemModel 提供了本地文件系统中文件和目录信息;
- Q S q l Q u e r y M o d e l QSqlQueryModel QSqlQueryModel、 Q S q l T a b l e M o d e l QSqlTableModel QSqlTableModel 和 Q S q l R e l a t i o n T a b l e M o d e l QSqlRelationTableModel QSqlRelationTableModel 用来访问数据库。
若标准模型还无法满足需要时,可子类化 QAbstractItemModel、QAbstractListModel 或
QAbstractTableModel 来创建自定义的模型。
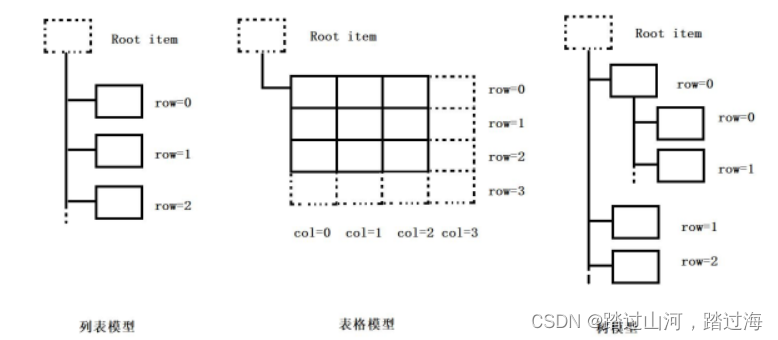
常见的 3 种模型为列表模型、表格模型、树模型,如下图所示:
为确保数据表示与数据获取相分离,Qt 引入了模型索引的概念,输入和委托均可
通过模型索引来请求数据并显示。只有模型需要知道怎样获取数据,被模型管理的数据类型
可以被广泛的定义。模型索引包含一个指针,指向创建他们的模型,使用多个模型时可避免
混淆。模型索引
Q
M
o
d
e
l
I
n
d
e
x
QModelIndex
QModelIndex 类提供对一块数据的临时引用,用来修改或检索模型中的数
据,获取一个数据项的模型索引必须指定模型的 3 个属性:行号、列号和父项的模型索引。
如:
QModelIndex index = model->index(row,column,parent);
也可通过模型指定的相关数据项对应的模型索引以及特定的角色来获取需要的类型数据,如:
QVariant value = model->data(index,role);
常用的角色类型:
| 常量 | 描述 |
|---|---|
| Qt::DisplayRole | 数据被渲染为文本(数据类型为QString类型) |
| Qt::DecorationRole | 数据被渲染为图标等装饰(数据为QColor、Qlcon,或QPixmap类型) |
| Qt::EditRole | 数据可以在编辑器中进行编辑(数据为QSring类型) |
| Qt::ToolTipRole | 数据显示在数据项的工具提示中(数据类型为 QString) |
| Qt::StatusTipRole | 数据显示在状态栏中(数据为 QString 类型) |
| Qt::WhatsThisRole | 数据显示在数据项的“What’s This?”模式下(数据为 QString 类型) |
| Qt::SizeHintRole | 数据项的大小提示,将会应用到视图(数据为 QSize 类型) |
| Qt::FontRole | 默认代理的绘制使用的字体 |
| Qt::TextAlignmentRole | 默认代理的对齐方式 |
| Qt::BackgroundRole | 默认代理的背景画刷 |
| Qt::ForegroundRole | 默认代理的前景画刷 |
| Qt::CheckStateRole | 默认代理的前景画刷 |
| Qt::UserRole(重点) | 用户自定义的数据的起始位置 |
| … | |
| … | |
| … |
2. 视图
Qt 提供了 QListView、QTableView 视图、QTreeView 视图分别实现列表、表格与树视
图效果。
QListView 将数据项显示为一个列表;
QTableView 将模型中的数据显示在一个表格中;
QTreeView 将模型中的数据项显示在具有层次的列表中。
QTableView 和 QTreeView 在显示项目的时候同时还可以显示标头,通过 QHeaderView 类实现。
自定义视图类是基于QAbstractItemView 抽象基类,如实现条形图,饼状图等特殊显示方式。
视图类的选择行为
| 常量 | 描述 |
|---|---|
| QAbstractView::SelectItems | 选择单个项目 |
| QAbstractView::SelectRows | 只选择行 |
| QAbstractView::SelectColumns | 只选择列 |
视图类的选择模式
| 常量 | 描述 |
|---|---|
| QAbstractItemView::SigleSelection | 当用户选择一个项目时,所有已经选择的项目将成为未选择状态,而且用户无法在已经选择的项目上单击来取消选择 |
| QAbstractView::ContiguousSelection | 用户单击一个项目的同时,按 Shift 键,则所有当前项目和单击项目之间的项目都将被选择或取消选择 |
| QAbstractView::ContiguousSelection | 具有 ContiguousSelection 的特性,且可按 Ctrl 键进行不连续选择 |
| QAbstractView::MultiSelection | 用户选择一个项目时不影响其他已经选择的项目 |
| QAbstractView::NoSelection | 项目无法被选择 |
选择模型更新方式
| 常量 | 描述 |
|---|---|
| QItemSelectionModel::NoUpdate | 不做选择 |
| QItemSelectionModel::Clear | 选择被清除 |
| QItemSelectionModel::Select | 选择指定索引 |
| QItemSelectionModel::Deselect | 取消指定索引的选择 |
| QItemSelectionModel::Toggle | 切换指定索引的选择 |
| QItemSelectionModel::Current | 当前选择被更新 |
| QItemSelectionModel::Rows | 索引扩展为跨行 |
| QItemSelectionModel::Columns | 索引扩展为跨列 |
| QItemSelectionModel::SelectCurrent | Select|Current组合 |
| QItemSelectionModel::ToggleCurrent | Toggle|Current组合 |
| QItemSelectionModel::ClearAndSelect | Clear|Select组合 |
3. 委托
在模型/视图框架中,
Q
A
b
s
t
r
a
c
t
I
t
e
m
D
e
l
e
g
a
t
e
QAbstractItemDelegate
QAbstractItemDelegate 是委托类的抽象基类,
Qt 默认的委托实现由
Q
S
t
y
l
e
d
I
t
e
m
D
e
l
e
g
a
t
e
QStyledItemDelegate
QStyledItemDelegate 类 提 供 ,
这 也 被 用 作 Qt 标 准 视 图 的 默 认 委 托 ,
选 择==
Q
S
t
y
l
e
d
I
t
e
m
D
e
l
e
g
a
t
e
QStyledItemDelegate
QStyledItemDelegate== 或者 QItemDelegate 中其一来为视图中的项目 绘制和提供编辑器。
不同的是 : ==
Q
S
t
y
l
e
d
I
t
e
m
D
e
l
e
g
a
t
e
QStyledItemDelegate
QStyledItemDelegate使用当前的样式来绘制项目,实现自定义委托建议使用
Q
S
t
y
l
e
d
I
t
e
m
D
e
l
e
g
a
t
e
QStyledItemDelegate
QStyledItemDelegate==作为基类。
Qt 提供了项目视图的便捷类,这些类底层通过模型/视图框架实现。
这些部件分别是:
-
QListWidget 提供一个项目列表,
-
QTreeWidget 显示一个多层次的树结构,
-
QTableWidget提供了一个以项目作为单元的表格。
它们每一个类都继承了 QAbstractItemView 类的行为。
之所以成为便捷因其用起来比较简单,使用于少量的数据的存储和显示。因没有将视图与模型分离,所以没有视图类灵活,不能和任意的模型一起使用。
例子(Qt代码)
例1 查询本机文件系统
//项目名:testModelView
//效果:查询本机文件系统

//修改内容如下:

//main.cpp
#include "mainwindow.h"

#include <QApplication>
#include <QAbstractItemModel>
#include <QDirModel>
#include <QTreeView>
#include <QListView>
#include <QTableView>
#include <QAbstractItemView>
#include <QItemSelectionModel>
#include <QSplitter>


int main(int argc, char *argv[])
{
    QApplication app(argc, argv);

    //1.创建模型
    QDirModel model;//默认情况下,QDirModel打开的系统上的c,d,e,f盘等(也就是你系统的根目录)

    //2.创建树视图、列表视图、表格视图
    QTreeView tree;
    QListView list;
    QTableView table;

    //3.在视图中设置模型
    tree.setModel(&model);
    list.setModel(&model);
    table.setModel(&model);

    //4.设置视图对象的选择方式为多选,然后list/table选择方式同tree
    tree.setSelectionMode(QAbstractItemView::MultiSelection);
    list.setSelectionMode(tree.selectionMode());
    table.setSelectionMode(tree.selectionMode());


    //5.树视图双击信号发射后,列表以及表格视图都要刷新内容
    QObject::connect(&tree,SIGNAL(doubleClicked(QModelIndex)),
            &list,SLOT(setRootIndex(QModelIndex)));
    QObject::connect(&tree,SIGNAL(doubleClicked(QModelIndex)),
                     &table,SLOT(setRootIndex(QModelIndex)));

    //6.创建分割器,他可以将界面分割成多个子区域
    QSplitter *splitter = new QSplitter;
    splitter->addWidget(&tree);
    splitter->addWidget(&list);
    splitter->addWidget(&table);
    splitter->setWindowTitle(QString("模型/视图"));
    splitter->show();

    //MainWindow w;
    //w.show();
    return app.exec();
}
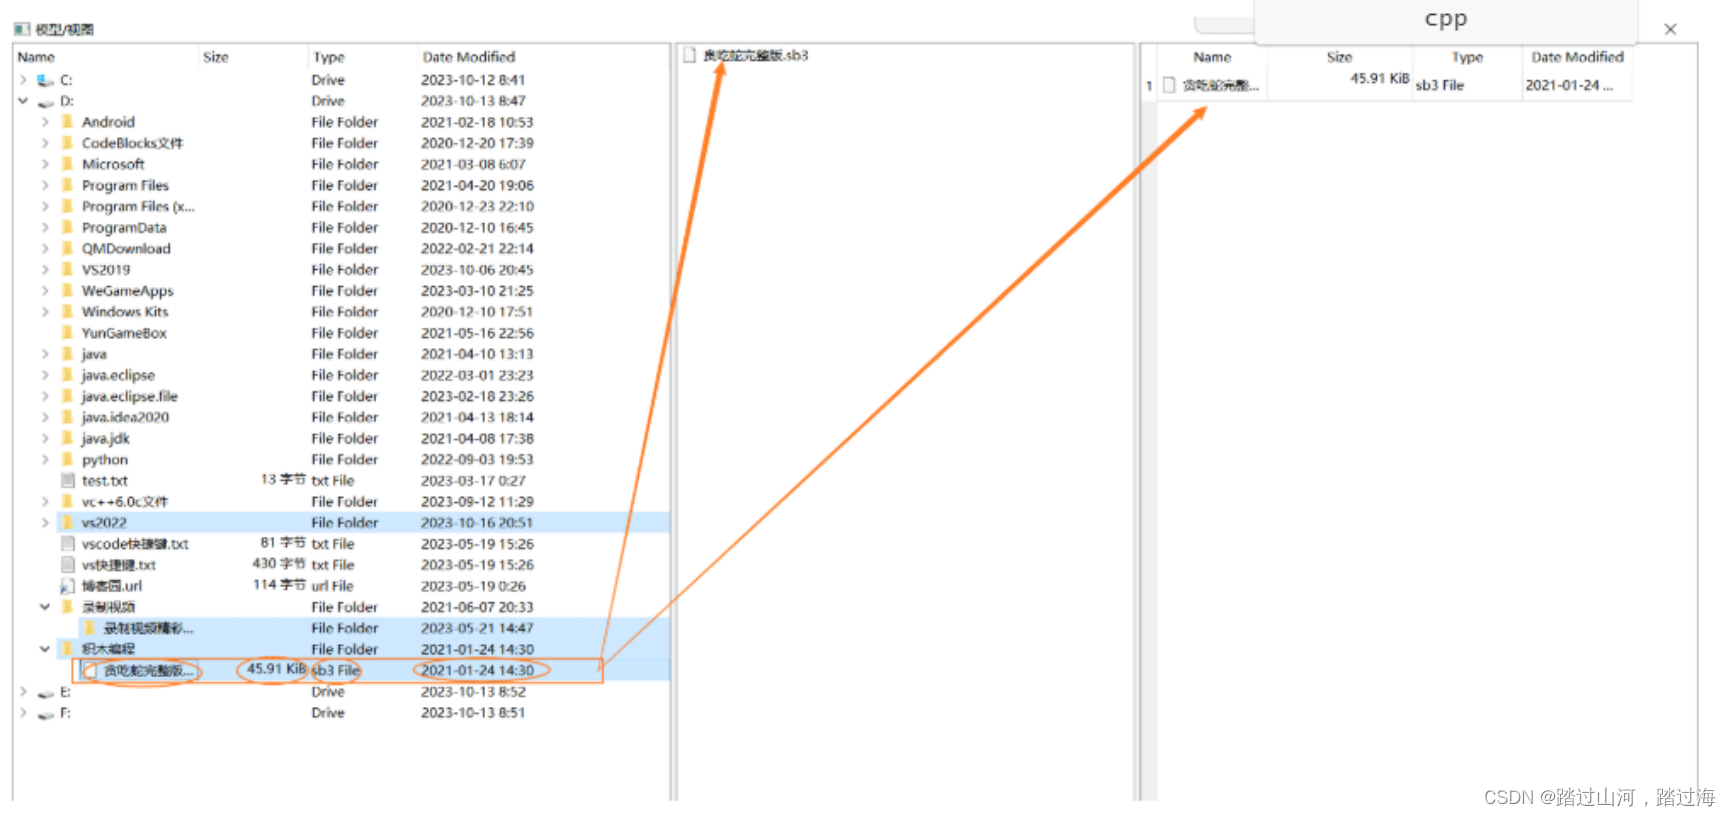
例2 标准模型项操作
//项目名 : testQModelIndex
//效果:标准模型项操作

//修改内容如下:

//main.cpp
#include "mainwindow.h"

#include <QApplication>
#include <QStandardItemModel>
#include <QTreeView>
#include <QDebug>

int main(int argc, char *argv[])
{
    QApplication a(argc, argv);
    //MainWindow w;
    //w.show();

    //1.创建标准项模型
    QStandardItemModel model;

    //2.获取标准项模型的根项,根项是不可见的
    QStandardItem *parentItem = model.invisibleRootItem();

    //3.创建标准项item0,设置文本,设置图标,工具提示
    QStandardItem *item0 = new QStandardItem;
    item0->setText(QString("A"));

    //4.Pixmap
    QPixmap pixmap0(50,50);
    pixmap0.fill(Qt::red);

    item0->setIcon(QIcon(pixmap0));
    item0->setToolTip( QString("A's tips"));

    //将item0作为父项的子项
    parentItem->appendRow(item0);
    parentItem = item0;

    //创建item0的子项
    QStandardItem *item1 = new QStandardItem;
    item1->setText(QString("B"));

    QPixmap pixmap1(50,50);
    pixmap1.fill(Qt::blue);

    item1->setIcon(pixmap1);
    item1->setToolTip(QString("B's ..."));

    parentItem->appendRow(item1);

    QStandardItem * item2 = new QStandardItem;
    QPixmap pixmap2(50,50);
    pixmap2.fill(Qt::green);

    item2->setData("C",Qt::EditRole);
    item2->setData("index C",Qt::ToolTipRole);
    item2->setData(QIcon(pixmap2),Qt::DecorationRole);

    parentItem->appendRow(item2);

    //在树视图中显示数据
    QTreeView view;
    view.setModel(&model);
    view.show();

    QModelIndex indexA = model.index(0,0,QModelIndex());
    qDebug()<<"indexA row coutn:"
             <<model.rowCount(indexA);

    QModelIndex indexB = model.index(0,0,indexA);
    qDebug()<<"indexB text:"
             <<model.data(indexB,Qt::EditRole).toString();
    qDebug() <<"indexB toolTip:"
             <<model.data(indexB,Qt::ToolTipRole).toString();

    return a.exec();
}
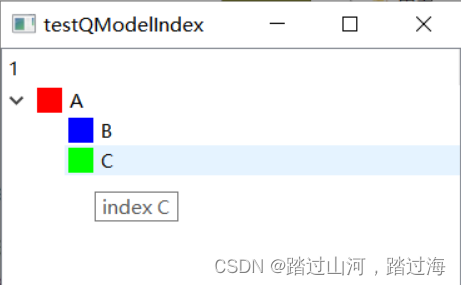
例3 自定义模型示例:军事武器模型
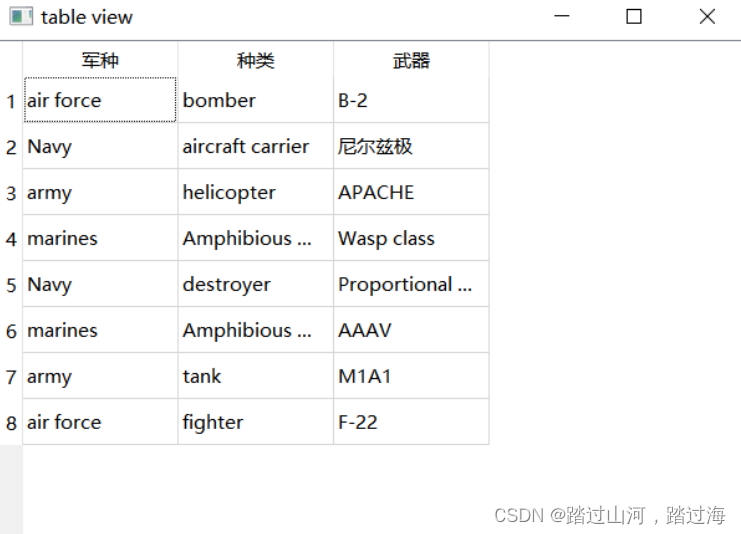
//testCustomModel

//添加 c++类 WeaponModel 继承自 QAbstractTableModel

//weaponmodel.h
#ifndef WEAPONMODEL_H
#define WEAPONMODEL_H

#include <QAbstractTableModel>

class WeaponModel : public QAbstractTableModel
{
public:
    explicit WeaponModel(QObject *parent = nullptr);

    virtual int rowCount(const QModelIndex &parent = QModelIndex()) const;
    virtual int columnCount(const QModelIndex &parent = QModelIndex())const;
    QVariant data(const QModelIndex &index,int role) const;
    QVariant headerData(int section,Qt::Orientation orientation,int role)const;

private:
    QVector<short>army;//军队
    QVector<short>weaponType;//武器类型
    QMap<short,QString>armyMap;    //军队映射
    QMap<short,QString> weaponMap;//武器映射

    QStringList weapon; // 武器
    QStringList header; //表头
    void populateModel();//表格数据的初始化
};

#endif // WEAPONMODEL_H

//weaponmodel.cpp
#include "weaponmodel.h"

WeaponModel::WeaponModel(QObject *parent)
    : QAbstractTableModel{parent}
{
    //请坚持使用英文,英文代码,中文注释
    armyMap[1] = QString("air force");//空军
    armyMap[2] = QString("Navy");//海军
    armyMap[3] = QString("army");//陆军
    armyMap[4] = QString("marines");//海军陆战队

    weaponMap[1] = QString("bomber");//轰炸机
    weaponMap[2] = QString("fighter");//战斗机
    weaponMap[3] = QString("aircraft carrier");//航空母舰
    weaponMap[4] = QString("destroyer");//驱逐舰
    weaponMap[5] = QString("helicopter");//直升机
    weaponMap[6] = QString("tank");//坦克
    weaponMap[7] = QString("Amphibious assault ship");//两栖攻击舰
    weaponMap[8] = QString("Amphibious tank");//两栖战车

    populateModel();

}

int WeaponModel::rowCount(const QModelIndex &parent) const
{
    return army.size();
}

int WeaponModel::columnCount(const QModelIndex &parent) const
{
    return 3;
}

//放置指定索引的数据,将数据映射成文字
QVariant WeaponModel::data(const QModelIndex &index, int role) const
{
    if(!index.isValid())
        return QVariant();

    if(role == Qt::DisplayRole)
    {
        switch(index.column())
        {
        case 0:
            return armyMap[army[index.row()]];
            break;
        case 1:
            return weaponMap[weaponType[index.row()]];
            break;
        case 2:
            return weapon[index.row()];
        default:
            return QVariant();
        }
    }
    return QVariant();
}

QVariant WeaponModel::headerData(int section, Qt::Orientation orientation, int role) const
{
    if(role == Qt::DisplayRole & orientation == Qt::Horizontal)
        return header[section];

    return QAbstractTableModel::headerData(section,
                                           orientation,
                                           role);
}

void WeaponModel::populateModel()
{

    header << QString("军种")//军种
           <<QString("种类")//种类
           <<QString("武器");//武器
    army<<1<<2<<3<<4<<2<<4<<3<<1;//
    weaponType<<1<<3<<5<<7<<4<<8<<6<<2;//8个数据内容随便写
    weapon<<QString("B-2")<<QString("尼尔兹极")//尼尔兹极
           <<QString("APACHE")<<QString("Wasp class")//阿帕奇 黄蜂级
           <<QString("Proportional Burke level")<<QString("AAAV")//比例伯克级 AAAV
           <<QString("M1A1")<<QString("F-22");//M1A1 F-22

}


//main.cpp
#include "mainwindow.h"
#include "weaponmodel.h"
#include <QApplication>
#include <QTableView>

int main(int argc, char *argv[])
{
    QApplication app(argc, argv);

    WeaponModel model;
    QTableView view;
    view.setModel(&model);
    view.setWindowTitle(QString("table view"));//一定不要写中文,空格可以有
    view.resize(600,400);
    view.show();

    //MainWindow w;
    //w.show();
    return app.exec();
}
例4 只读模型操作示例
//testModel

//添加自定义类 StringListModel 继承自 QAbstractListModel
//stringlistmodel.h
#ifndef STRINGLISTMODEL_H
#define STRINGLISTMODEL_H

#include <QAbstractListModel>

class StringListModel : public QAbstractListModel
{
    Q_OBJECT
public:
    StringListModel(const QStringList &strings,QObject *parent = 0)
        :QAbstractListModel(parent),m_stringList(strings){}
    //模型行数
    int rowCount(const QModelIndex &parent = QModelIndex()) const;

    //指定模型索引的数据项
    QVariant data(const QModelIndex &index,int role)const;

    //表头内容(数或表格)
    QVariant headerData(int section,Qt::Orientation orientation,
                        int role = Qt::DisplayRole)const;

    //项目属性
    Qt::ItemFlags flags(const QModelIndex &index)const;

    //编辑数据
    bool setData(const QModelIndex &index,const QVariant &value,
                 int role = Qt::EditRole);
    //插入行
    bool insertRows(int position,int rows,
                    const QModelIndex &index = QModelIndex());

    //删除行
    bool removeRows(int position,int rows,
                    const QModelIndex &index = QModelIndex());
private:
    QStringList m_stringList;
};

#endif // STRINGLISTMODEL_H

//stringlistmodel.cpp
#include "stringlistmodel.h"

//row 行数
int StringListModel::rowCount(const QModelIndex &parent) const
{
    return m_stringList.count();
}

/*
 *用于获取模型中特定索引位置的数据。如果索引无效,它会返回一个空的 QVariant。
 *如果索引是最后一个元素,也会返回一个空的 QVariant。
 *否则,它根据传入的 role 返回对应的数据。
 *
 *Qt::DisplayRole 和 Qt::EditRole 角色用于显示和编辑数据。
 *在这里,它返回了 m_stringList 中相应索引位置的字符串。
*/
QVariant StringListModel::data(const QModelIndex &index, int role) const
{
    if(!index.isValid())return QVariant();

    if(index.row() == m_stringList.size())return QVariant();

    if(role == Qt::DisplayRole || role == Qt::EditRole)
        return m_stringList.at(index.row());
    else
        return QVariant();
}

/*
 * headerData 函数返回表头的数据。在这里,如果 role 不是 Qt::DisplayRole,它会返回一个空的 QVariant。
 * 否则,它会根据传入的 section 和 orientation 返回对应的表头数据。
*/
QVariant StringListModel::headerData(int section, Qt::Orientation orientation, int role) const
{
    if(role != Qt::DisplayRole)
        return QVariant();

    //水平表头
    if(orientation == Qt::Horizontal)
        return QString("Column %1").arg(section);//Column 0...
    else
        return QString("Row %1").arg(section);//Row 0...
}
/*
 * Qt::ItemIsEnabled,表示项目是可用的。
 * 否则,它返回默认标志并添加了 Qt::ItemIsEditable 标志,表示项目可以被编辑。
*/
Qt::ItemFlags StringListModel::flags(const QModelIndex &index) const
{
    if(!index.isValid())return Qt::ItemIsEnabled;
    return QAbstractItemModel::flags(index) | Qt::ItemIsEditable;
}

/*
 * 检查索引是否有效且角色是否为 Qt::EditRole。如果是,它将替换 m_stringList 中相应位置的字符串,
 * 并发出 dataChanged 信号来通知其他组件数据已经改变。
*/
bool StringListModel::setData(const QModelIndex &index, const QVariant &value, int role)
{
    //检测索引有效且项目可编辑
    if(index.isValid()&&role==Qt::EditRole)
    {
        m_stringList.replace(index.row(),value.toString());
        emit dataChanged(index,index);
        return true;
    }
    return false;
}
/*
 * 它首先使用 beginInsertRows 告知其他组件将要开始插入行的操作。然后,在指定的位置插入了指定数量的字符串,
 * 这些字符串都是固定的 "You are coming from Star."。
 * 最后,使用 endInsertRows 告知其他组件插入操作已经完成。
*/
bool StringListModel::insertRows(int position, int rows, const QModelIndex &index)
{
    //告知其他组件指定的行开始插入操作
    beginInsertRows(QModelIndex(),position,position + rows - 1);
    for(int row = 0; row < rows; ++ row)
    {
        m_stringList.insert(position,QString("You are coming from Star."));
    }
    //告知其他组件完成操作
    endInsertRows();
    return true;
}

//从那一行开始,删除多少行
bool StringListModel::removeRows(int position,int rows, const QModelIndex &index)
{
    //告知其他组件指定的行开始删除操作
    beginRemoveRows(QModelIndex(),position,position + rows -1);
    for(int row = 0; row < rows ; ++ row)
    {
        m_stringList.removeAt(position);
    }
    //告知其他组件完成操作
    return true;
}


//main.cpp
#include "mainwindow.h"

#include <QApplication>
#include "stringlistmodel.h"
#include <QListView>
#include <QTableView>

int main(int argc, char *argv[])
{
    QApplication app(argc, argv);

    QStringList list;
    list << QString("Sun")<<QString("the Earth")
         << QString("moon")<<QString("Saturn");
    StringListModel model(list);

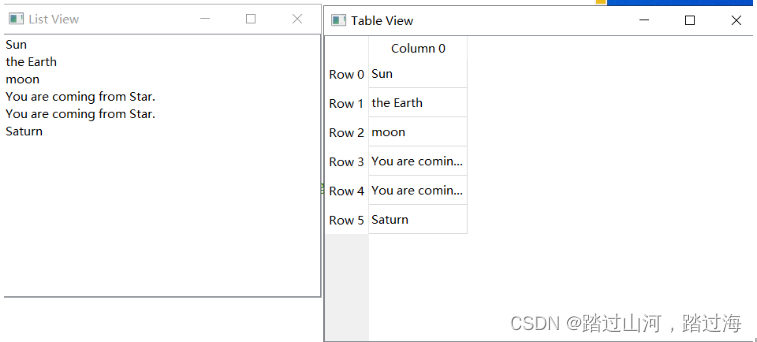
    model.insertRows(3,4);//从第3行开始插入,插入4列(You are coming from Star.)
    model.removeRows(3,2);

    QListView listview;
    listview.setModel(&model);
    listview.setWindowTitle("List View");//在Qt中,你可以通过使用 setWindowTitle() 方法来为任意窗口设置标题名称。
    listview.show();

    QTableView tableview;
    tableview.setModel(&model);
    tableview.setWindowTitle("Table View");
    tableview.show();
    //MainWindow w;
    //w.show();
    return app.exec();
}
例5 选择模型操作
//testSelectionModel
//添加自定义类 MainWindow 继承自 QMainWindow
//mainwindow.h
#ifndef MAINWINDOW_H
#define MAINWINDOW_H
#include <QMainWindow>
QT_BEGIN_NAMESPACE
namespace Ui { class mainwindow; }
QT_END_NAMESPACE
class QTableView;
class QItemSelection;
class QModelIndex;
class mainwindow : public QMainWindow
{
Q_OBJECT
public:
mainwindow(QWidget *parent = nullptr);
~mainwindow();
private slots:
void getCurrentItemData();//当前选择
void toggleSection();//切换选择
//更新选择,selected表新的选择,deselected表以前的选择
void updateSelection(const QItemSelection &selected,
const QItemSelection &deselected);
//改变当前模型索引
void changeCurrent(const QModelIndex ¤t,
const QModelIndex &previous);
private:
Ui::mainwindow *ui;
QTableView *m_tableView;
QTableView *m_tableView2;
};
#endif // MAINWINDOW_H
//mainwindow.cpp
#include "mainwindow.h"
#include "ui_mainwindow.h"
#include <QTableView>
#include <QDebug>
#include <QStandardItemMOdel>
#include <QItemSelection>
//#include "spinboxdelegate.h"
mainwindow::mainwindow(QWidget *parent)
: QMainWindow(parent)
, ui(new Ui::mainwindow)
{
ui->setupUi(this);
//创建标准项模型,7行4列
QStandardItemModel *model = new QStandardItemModel(7,4,this);
for(int row = 0 ; row < 7 ; ++ row)
{
for(int column = 0; column < 4 ;++column)
{
QStandardItem * item =
new QStandardItem(QString("%1").arg(row*4 + column));
//标准模型设置数据项
model->setItem(row,column,item);
}
}
m_tableView = new QTableView;
m_tableView->setModel(model);
setCentralWidget(m_tableView);//设置主窗口的中心部件为表格视图
//获取视图的选择模式
QItemSelectionModel *selectionModel = m_tableView->selectionModel();
QModelIndex topLeft;//左上角模型索引
QModelIndex bottomRight;//右上角模型索引
topLeft = model->index(1,1);//1行1列
bottomRight = model->index(5,2);//5行2列
//创建模型选择
QItemSelection selection(topLeft,bottomRight);
//以选择的方式唉选择项目
selectionModel->select(selection,QItemSelectionModel::Select);
//添加动作addAction(动作文本,响应这,槽方法)
ui->menubar->addAction(QString("Current Project"),this,
&mainwindow::getCurrentItemData);
ui->menubar->addAction(QString("Switch Selection"),this,
&mainwindow::toggleSection);
//关联选择模型的选择改变,当前项改变的信号
connect(selectionModel,&QItemSelectionModel::selectionChanged,
this,&mainwindow::updateSelection);
connect(selectionModel,&QItemSelectionModel::currentChanged,
this,&mainwindow::changeCurrent);
m_tableView2 = new QTableView;
m_tableView2->setWindowTitle("tableView2");
m_tableView2->resize(400,300);
m_tableView2->setModel(model);
m_tableView2->setSelectionModel(selectionModel);
m_tableView2->show();
}
mainwindow::~mainwindow()
{
delete ui;
delete m_tableView2;
}
void mainwindow::getCurrentItemData()
{
qDebug()<< QString("Current Data:")
<<m_tableView->selectionModel()->currentIndex().data();
}
void mainwindow::toggleSection()
{
//左上角模型索引
QModelIndex topLeft = m_tableView->model()->index(0,0,QModelIndex());
//右下角模型索引
QModelIndex bottomRight = m_tableView->model()->index(
m_tableView->model()->rowCount(QModelIndex())-1,
m_tableView->model()->columnCount(QModelIndex())-1,
QModelIndex());
//项选择
QItemSelection curSelection(topLeft,bottomRight);
m_tableView->selectionModel()->select(curSelection,
QItemSelectionModel::Toggle);
}
void mainwindow::updateSelection(const QItemSelection &selected, const QItemSelection &deselected)
{
QModelIndex index;
//indexes()返回所有选择项的模型索引
QModelIndexList list = selected.indexes();
//给现在选择的项目填充数据
foreach (index, list) {
QString text = QString("%1,%2")
.arg(index.row())
.arg(index.column());
m_tableView->model()->setData(index,text);
}
//清空上一次选择的内容
list = deselected.indexes();
foreach (index, list) {
m_tableView->model()->setData(index,"");
}
}
void mainwindow::changeCurrent(const QModelIndex ¤t, const QModelIndex &previous)
{
qDebug()<<QString("from (%1,%2) to (%3,%4)")
.arg(previous.row()).arg(previous.column())
.arg(previous.row()).arg(current.column());
}
//main.cpp

例6 自 定 义委 托(在testSelectionModel上修改)
//testSelectionModel

//testSelectionModel 项 目 中添 加 自 定 义 委托 类 SpinBoxDelegate 继 承 自QItemDelegate

//spinboxdelegate.h
#ifndef SPINBOXDELEGATE_H
#define SPINBOXDELEGATE_H

#include <QItemDelegate>

class SpinBoxDelegate : public QItemDelegate
{
    Q_OBJECT
public:
    SpinBoxDelegate(QObject *parent = 0);

    //创建编辑器
    QWidget *createEditor(QWidget *parent,const QStyleOptionViewItem &option,
                          const QModelIndex &index)const override;
    //设置编辑器数据
    void setEditorData(QWidget *editor,const QModelIndex &index)const override;

    //更新编辑器几何属性
    void updateEditorGeometry(QWidget *editor,const QStyleOptionViewItem &option,
                              const QModelIndex &index)const override;
};

#endif // SPINBOXDELEGATE_H

//spinboxdelegate.cpp
#include "spinboxdelegate.h"

#include <QSpinBox>

SpinBoxDelegate::SpinBoxDelegate(QObject *parent):QItemDelegate(parent)
{

}

QWidget *SpinBoxDelegate::createEditor(QWidget *parent, const QStyleOptionViewItem &option, const QModelIndex &index) const
{
    QSpinBox *editor = new QSpinBox(parent);
    editor->setMinimum(0);
    editor->setMaximum(100);
    return editor;
}

void SpinBoxDelegate::setEditorData(QWidget *editor, const QModelIndex &index) const
{
    int value = index.model()->data(index,Qt::EditRole).toInt();

    //类型转换:QWidget* 转 QSpinBox*
    QSpinBox * spinBox = static_cast<QSpinBox*>(editor);

    //编辑器设置数据
    spinBox->setValue(value);
}

void SpinBoxDelegate::updateEditorGeometry(QWidget *editor, const QStyleOptionViewItem &option, const QModelIndex &index) const
{
    editor->setGeometry(option.rect);
}

//mainwindow.cpp的构造函数中添加
SpinBoxDelegate *delegate = new SpinBoxDelegate(this);
//视图设置自定义委托
m_tableView->setItemDelegate(delegate);
