系列文章目录
【跟小嘉学 Rust 编程】一、Rust 编程基础
【跟小嘉学 Rust 编程】二、Rust 包管理工具使用
【跟小嘉学 Rust 编程】三、Rust 的基本程序概念
【跟小嘉学 Rust 编程】四、理解 Rust 的所有权概念
【跟小嘉学 Rust 编程】五、使用结构体关联结构化数据
【跟小嘉学 Rust 编程】六、枚举和模式匹配
【跟小嘉学 Rust 编程】七、使用包(Packages)、单元包(Crates)和模块(Module)来管理项目
【跟小嘉学 Rust 编程】八、常见的集合
【跟小嘉学 Rust 编程】九、错误处理(Error Handling)
【跟小嘉学 Rust 编程】十一、编写自动化测试
【跟小嘉学 Rust 编程】十二、构建一个命令行程序
【跟小嘉学 Rust 编程】十三、函数式语言特性:迭代器和闭包
【跟小嘉学 Rust 编程】十四、关于 Cargo 和 Crates.io
【跟小嘉学 Rust 编程】十五、智能指针(Smart Point)
【跟小嘉学 Rust 编程】十六、无畏并发(Fearless Concurrency)
【跟小嘉学 Rust 编程】十七、面向对象语言特性
【跟小嘉学 Rust 编程】十八、模式匹配(Patterns and Matching)
【跟小嘉学 Rust 编程】十九、高级特性
【跟小嘉学 Rust 编程】二十、进阶扩展
【跟小嘉学 Rust 编程】二十一、网络编程
【跟小嘉学 Rust 编程】二十三、Cargo 使用指南
【跟小嘉学 Rust 编程】二十四、内联汇编(inline assembly)
【跟小嘉学 Rust 编程】二十五、Rust命令行参数解析库(clap)
【跟小嘉学 Rust 编程】二十六、Rust的序列化解决方案(Serde)
【跟小嘉学 Rust 编程】二十七、Rust 异步编程(Asynchronous Programming)
【跟小嘉学 Rust 编程】二十八、Rust中的日期与时间
【跟小嘉学 Rust 编程】二十九、Rust 中的零拷贝序列化解决方案(rkyv)
【跟小嘉学 Rust 编程】三十、Rust 使用 Slint UI
【跟小嘉学 Rust 编程】三十一、Rust的日志与追踪
【跟小嘉学 Rust 编程】三十二、Rust的设计模式(Design Patterns)
【跟小嘉学 Rust 编程】三十三、Rust的Web开发框架之一: Actix-Web的基础
文章目录
- 系列文章目录
- @[TOC](文章目录)
- 前言
- 一、Rust Web开发框架了解
- 1.1、Hyper
- 1.2、Actix-web
- 1.3、Rocket
- 1.4、Tide
- 1.5、Warp
- 1.6、Axum
- 1.7、Poem
- 二、Actix-Web基础
- 2.1、Actix-Web 介绍
- 2.2、hello world
- 2.2.1、创建工程
- 2.2.2、添加依赖
- 2.2.3、编辑 src/main.rs 文件
- 2.2.4、启动测试
- 2.2.5、代码解读
- 2.3、App对象
- 2.3.1、app对象介绍
- 2.3.2、共享的不可变的状态
- 2.3.2、共享的可变状态
- 2.3.3、可以使用 scope 来组合 app
- 2.3.4、应用守卫和虚拟主机
- 2.3.5、配置
- 2.4、HttpServer
- 2.4.1、HttpServer 介绍
- 2.4.2、多线程(Multi-Threading)
- 2.4.3、TLS/HTTPS
- 2.4.3.1、openssl
- 2.4.4、Keep-Alive
- 2.4.5、优雅关机(Graceful Shutdown)
- 2.5、提取
- 2.5.1、类型安全的信息提取
- 2.5.2、路径参数(Path Parameters)
- 2.5.3、查询参数(Query Parameters)
- 2.5.4、JSON参数
- 2.5.5、URL编码的表单数据
- 2.5.6、其它提取器
- 2.5.7、应用状态提取
- 2.5.7.1、访问状态
- 2.5.7.2、使用原子或ARC
- 2.6、处理器(Handlers)
- 2.6.1、请求处理器
- 2.6.2、使用自定义类型的响应
- 2.6.3、流响应
- 2.6.4、不同的返回类型(Either)
- 总结
前言
本章节讲解 Rust的Web开发框架的介绍和对比。Actix Web、Axum、Rocket、Warp、Tide、Poem、Pavex、Hyper等框架。
主要教材参考 《The Rust Programming Language》
主要教材参考 《Rust For Rustaceans》
主要教材参考 《The Rustonomicon》
主要教材参考 《Rust 高级编程》
主要教材参考 《Cargo 指南》
主要教材参考 《Rust 异步编程》
主要教材参考 《Rust 设计模式》
一、Rust Web开发框架了解
1.1、Hyper
Hyper 是一个受保护的、高效的http库,目前还在开发之中,当前版本在0.14版本;可以用作如下
- 用于 web 服务通信的客户端;
- 用于构建 Web 服务的服务器;
- 极快的响应速度;
- 具有高并发性和非阻塞套接字;
- 支持 http/1 和 http/2;
1.2、Actix-web
Actix-web 是一个强大、实用且速度极快的 Rust web 框架。Actix Web 基于 rust Actor Model。它是一个用 Rust 编写的高性能 Web 框架,具有一组用于构建 Web 应用程序的强大功能。
- 支持多路复用;
- 异步I/O;
- 网络套接字
- 中间件支持
1.3、Rocket
Rocket 是一个简单、快速、类型安全的 Rust Web 框架。目前最新版本是0.5.0.rc.3。与 Rust 生态系统紧密集成,集成现有的库和工具非常容易
支持模板、支持异步流开箱即用。
Rocket 哲学:最少的配置启动和运行。
1.4、Tide
Tide 是一个基于 Rust 构建的最小且实用的 Web 应用程序框架。Tide 是为快速 Web 开发而构建的。Tide 带有一组强大的内置功能,可以轻松构建异步 Web 应用程序和 API。Tide 基于 rust actix Web 框架。
Tide 是功能丰富的 Web 框架。Tide 正在积极开发中,并拥有广泛的社区资源,可让您快速启动和运行
Tide 框架具有以下功能,可帮助快速构建应用程序
- 异步/等待
- 支持类型安全路由
- 请求守卫
- 模板支持
- 会话管理
- 网络套接字支持
1.5、Warp
Warp 是一个超级简单、可组合的 Web 服务器框架,基于 Rust 构建,用于提高速度。Warp 突出的构建块是 Filter,它可以组合和组合以表达对请求的丰富需求.
得益于其过滤系统,warp 提供开箱即用的功能:
- 路径路由和参数提取
- 标头要求和提取
- 查询字符串反序列化
- JSON 和表单正文
- 多部分表单数据
- 静态文件和目录
- 网络套接字
- 访问日志记录
- Gzip、Deflate 和 Brotli 压缩
- 服务器发送的事件 (SSE)
由于它建立在 hyper 和 Tokio - 一个异步 Rust 运行时之上,因此您可以自动获得:
- HTTP/1 和 HTTP/2 支持
- 异步功能
- 最快的 HTTP 实现之一
- 经过测试和正确
1.6、Axum
Axum Web 框架旨在高效、快速和轻量级。Axum 是一个专注人体工程学和模块化的Web应用程序框架。
- 使用无宏 API 将请求路由到处理程序。
- 使用提取程序以声明方式分析请求。
- 简单且可预测的错误处理模型。
- 使用最少的样板生成响应。
- 充分利用中间件、服务和 tower-http。
- 支持 WebSocket 和其他协议
- 异步 I/O
1.7、Poem
Poem 是一个用 Rust 编写的 Web 框架,提供了简洁的 API,并且功能丰富;它可以将自身与 Web 框架 的许多主要功能解耦,从而为开发人员提供尽可能多的灵活性。
是基于 tokio/hyper 的web服务端开发框架。
二、Actix-Web基础
2.1、Actix-Web 介绍
Actix-Web 是 crate 生态系统的一部分。早期 Actix-Web 是建立在 Acti actor 框架之上的。现在 Actix-Web 在很大程度上与 actor 框架无关,并且是使用不同的系统构建的,尽管 Actix 仍然被保留,但是随着 future、async、await 生态系统的成熟,它作为通用工具的用处正在减弱。
现在只有 websocket 端点才需要使用 actix。
2.2、hello world
2.2.1、创建工程
cargo new hello-world
2.2.2、添加依赖
cd hello-world
cargo add actix-web
或者修改 cargo.toml 文件
actix-web = "4.4.0"
2.2.3、编辑 src/main.rs 文件
use actix_web::{get, post, web, App, HttpResponse, HttpServer, Responder};

#[get("/")]
async fn hello() -> impl Responder {
    HttpResponse::Ok().body("Hello world!")
}

#[post("/echo")]
async fn echo(req_body: String) -> impl Responder {
    HttpResponse::Ok().body(req_body)
}

async fn manual_hello() -> impl Responder {
    HttpResponse::Ok().body("Hey there!")
}


#[actix_web::main]
async fn main() -> std::io::Result<()> {
    HttpServer::new(|| {
        App::new()
            .service(hello)
            .service(echo)
            .route("/hey", web::get().to(manual_hello))
    })
    .bind(("127.0.0.1", 8080))?
    .run()
    .await
}
2.2.4、启动测试
1、启动
cargo run
2、测试:浏览器访问
http://localhost:8080/hey
http://localhost:8080
2.2.5、代码解读
- #[actix_web::main] :标注 main 是一个 async的异步函数。
- 使用 HttpServer 可以声明 HttpServer 对象,进行IP地址和端口的绑定;
- 使用 App new 可以创建 app对象,可以定义 endpoint (路由)、注册http 服务等
- 使用 #[get(“/”)]、#[post(“/echo”)] 宏可以标注路由端点以及请求方法。
2.3、App对象
2.3.1、app对象介绍
Actix-Web 提供了使用 Rust 构建 Web服务器和应用程序的各种原语,提供了路由、中间件、请求预处理、响应后处理等功能。
所有的 httpServer 都是围绕 App 对象构建的,它用于为资源和中间件注册路由,他还存储在同一范围的所有处理程序之间共享的应用程序状态。
应用的作用域是所有路由的命名空间,也就是说,特定应用作用域的所有路由都有相同的url路径前缀。应用程序前缀总是包含一个前导“/”斜杠。如果提供的前缀不包含斜杠,则自动插入。前缀应该由值路径段组成。
对于作用域为/app的应用,任何带有/app、/app/或/app/test路径的请求都可以匹配;但是,路径/应用程序将不匹配。
2.3.2、共享的不可变的状态
应用状态被同一个作用域内的所有路由和资源共享,状态可以通过 web::Data<T> 来获取访问,其中 T 是状态的类型,中间件也可以访问状态 State。
我们来看下面这段代码
use actix_web::{get, web, App, HttpServer};

// This struct represents state
struct AppState {
    app_name: String,
}

#[get("/")]
async fn index(data: web::Data<AppState>) -> String {
    let app_name = &data.app_name; // <- get app_name
    format!("Hello {app_name}!") // <- response with app_name
}

#[actix_web::main]
async fn main() -> std::io::Result<()> {
    HttpServer::new(|| {
        App::new()
            .app_data(web::Data::new(AppState {
                app_name: String::from("Actix Web"),
            }))
            .service(index)
    })
        .bind(("127.0.0.1", 8080))?
        .run()
        .await
}
上述代码,我们在app上初始化了 app_name对象,我们get请求中可以直接获取到 对象。
2.3.2、共享的可变状态
HttpServer 可以接受应用程序工厂而不是应用程序实例,HttpServer 为每个线程构造一个应用程序实例。因此,必须多次构造应用程序数据。如果你想在不同的线程之间共享数据,应该使用一个可共享的对象(Send、Sync)。
在内部,Web::Data 使用了 Arc。为了避免创建两个 arc,我们应该在使用 App::app_data() 注册之前创建 Data。
use actix_web::{web, App, HttpServer};
use std::sync::Mutex;

struct AppStateWithCounter {
    counter: Mutex<i32>, // <- Mutex is necessary to mutate safely across threads
}

async fn index(data: web::Data<AppStateWithCounter>) -> String {
    let mut counter = data.counter.lock().unwrap(); // <- get counter's MutexGuard
    *counter += 1; // <- access counter inside MutexGuard

    format!("Request number: {counter}") // <- response with count
}

#[actix_web::main]
async fn main() -> std::io::Result<()> {
    // Note: web::Data created _outside_ HttpServer::new closure
    let counter = web::Data::new(AppStateWithCounter {
        counter: Mutex::new(0),
    });

    HttpServer::new(move || {
        // move counter into the closure
        App::new()
            .app_data(counter.clone()) // <- register the created data
            .route("/", web::get().to(index))
    })
        .bind(("127.0.0.1", 8080))?
        .run()
        .await
}
- 在传递给 httpServer::new 的闭包中初始化的状态对于工作线程来说是本地的,如果被修改,可能会变得不同步。
- 为了实现全局共享状态,必须在传递给 httpServer:: new 并移动/克隆进去的闭包之外创建
2.3.3、可以使用 scope 来组合 app
使用 web::scope() 方法可以为资源设置前缀,这个作用域标识一个资源前缀,它被附加到路由资源配置添加到所有资源上。
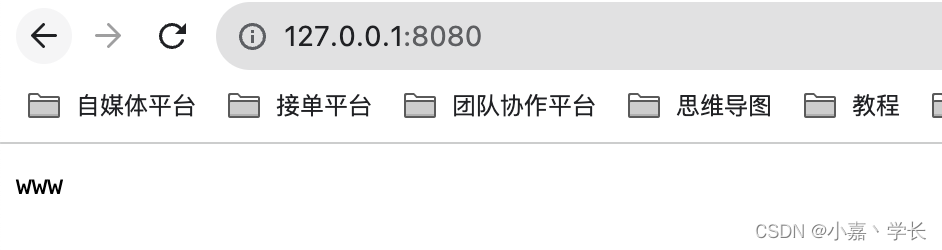
2.3.4、应用守卫和虚拟主机
可以把 Guard 看作是一个简单的函数,它接受请求对象(request)引用并返回 true 或 false。形式上, Guard 是 任何实现了 Guard trait 的对象。
我们可以为应用守卫设置虚拟主机
use actix_web::{web, App, HttpServer, guard, HttpResponse};
#[actix_web::main]
async fn main() -> std::io::Result<()> {
HttpServer::new(|| {
App::new()
.service(
web::scope("/")
.guard(guard::Host("127.0.0.1"))
.route("", web::to(|| async { HttpResponse::Ok().body("www") })),
)
.service(
web::scope("/")
.guard(guard::Host("localhost"))
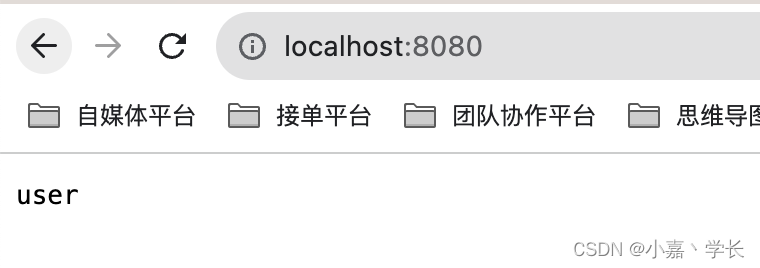
.route("", web::to(|| async { HttpResponse::Ok().body("user") })),
)
.route("/", web::to(HttpResponse::Ok))
})
.bind(("127.0.0.1", 8080))?
.run()
.await
}
我们也可以基于 过滤器获取请求头信息。由于本机情况,我们没有配置本地dns解析,就简单使用 localhost 和 127.0.01 执行结果
2.3.5、配置
为了简洁和可重用,App 和 web::Scope 均提供了 configure 方法,此函数用于配置的部分移动到不同的模块设置库中。例如:资源的某些配置可以移动到其它模块。
use actix_web::{web, App, HttpResponse, HttpServer};

// this function could be located in a different module
fn scoped_config(cfg: &mut web::ServiceConfig) {
    cfg.service(
        web::resource("/test")
            .route(web::get().to(|| async { HttpResponse::Ok().body("test") }))
            .route(web::head().to(HttpResponse::MethodNotAllowed)),
    );
}

// this function could be located in a different module
fn config(cfg: &mut web::ServiceConfig) {
    cfg.service(
        web::resource("/app")
            .route(web::get().to(|| async { HttpResponse::Ok().body("app") }))
            .route(web::head().to(HttpResponse::MethodNotAllowed)),
    );
}

#[actix_web::main]
async fn main() -> std::io::Result<()> {
    HttpServer::new(|| {
        App::new()
            .configure(config)
            .service(web::scope("/api").configure(scoped_config))
            .route(
                "/",
                web::get().to(|| async { HttpResponse::Ok().body("/") }),
            )
    })
        .bind(("127.0.0.1", 8080))?
        .run()
        .await
}
上述代码效果
/         -> "/"
/app      -> "app"
/api/test -> "test"
每个 ServiceConfig 都可以有自己的 data、routes、services。
2.4、HttpServer
2.4.1、HttpServer 介绍
HttpServer 类型负责提供 HTTP 请求。HttpServer 接受应用程序工厂作为参数,并且应用程序工厂必须具有 Send + Sync 边界。
要启动web 服务,我们必须先绑定到一个网络套接字,使用 HttpServer::bind 与套接字地址元组或字符串一起使用,例如 (“127.0.0.1”, 8080) 或 0.0.0.0:8080。
绑定成功之后,使用 run 方法回返回一个 Server 实例。服务器必须等待或生成以开始处理请求,并且将运行直到它接收到关闭信号(默认情况下,可以使用 ctrl+c)。
2.4.2、多线程(Multi-Threading)
HttpServer 自动开启一个 HTTP 工作线程,默认情况下这个数量等于系统中物理 CPU的数量。
我们可以使用 HttpServer::workers 方法来进行修改。
use actix_web::{web, App, HttpResponse, HttpServer};

#[actix_web::main]
async fn main() {
    HttpServer::new(|| App::new().route("/", web::get().to(HttpResponse::Ok))).workers(4);
    // <- Start 4 workers
}
一旦工作线程被创建,他们每个接收一个单独的应用程序实例来处理请求。应用程序状态不会在线程之间共享,处理程序可以自由地操作他们的状态副本,而没有并发性问题。
应用状态不需要 Send 或 Sync,但是应用工厂必须是 Send + Async。
要在工作线程之间共享状态,可以使用 Arc 或 Data。一旦引入共享和同步,就需要特别小心,在许多情况下,由于锁定共享状态以供修改,无意中引入了性能成本。
在某些情况,可以使用更有效的锁策略来减轻这些成本,例如使用读写锁而不是互斥锁来实现非排他性锁,但是性能最好的实现往往是不需要锁。
由于每个工作线程线程顺序处理请求,阻塞当前线程的处理程序将导致当前工作线程停止处理新请求。
由于这个原因,任何长时间或非cpu限制的操作(I/O、数据库操作)等都应该表示为future 或异步函数,异步处理程序由工作线程并发执行,因此 不会阻塞执行。
同样的限制也适用于提取器,当处理程序函数接收到一个实现 FromRequest的参数并且该实现阻塞当前线程,工作线程将在运行处理程序时阻塞,由于这个原因,在实现提取器时必须特别注意,并且在需要时也应该异步实现。
2.4.3、TLS/HTTPS
Actix Web 支持两种 TLS实现: rustls 和 openssl。
2.4.3.1、openssl
[dependencies]
actix-web = {version = "4.4.0", features = ["openssl"]}
openssl = "0.10.57"
use actix_web::{get, App, HttpRequest, HttpServer, Responder};
use openssl::ssl::{SslAcceptor, SslFiletype, SslMethod};

#[get("/")]
async fn index(_req: HttpRequest) -> impl Responder {
    "Welcome!"
}

#[actix_web::main]
async fn main() -> std::io::Result<()> {
    // load TLS keys
    // to create a self-signed temporary cert for testing:
    // `openssl req -x509 -newkey rsa:4096 -nodes -keyout key.pem -out cert.pem -days 365 -subj '/CN=localhost'`
    let mut builder = SslAcceptor::mozilla_intermediate(SslMethod::tls()).unwrap();
    builder
        .set_private_key_file("key.pem", SslFiletype::PEM)
        .unwrap();
    builder.set_certificate_chain_file("cert.pem").unwrap();

    HttpServer::new(|| App::new().service(index))
        .bind_openssl("127.0.0.1:8080", builder)?
        .run()
        .await
}
注意,我们需要使用openssl 创建对象的文件。这里不做过多的讲解。
2.4.4、Keep-Alive
Actix Web 支持保持连接打开以后等待后续请求。 保持连接是服务器定义的行为,所以要设置服务有三种方法
- 1、使用 keep_alive(Duration::from_secs(time)) 来设置开启time 秒保持时间
- 2、使用 OS 保持:keep_alive(KeepAlive::Os);
- 3、使用 None 或 KeepAlive::Disabled,来关闭 keep-alive;
如果选择了第一种,那么响应没有显示地禁止它,例如,将连接设置为 Close 或 Upgrade,则对HTTP/1.1请求启用keep-alive,强制关闭连接可以通过 HttpResponseBuilder 上的 force_close 方法完成。
Keep-Alive 在HTTP/1.1之后默认是开启的。
2.4.5、优雅关机(Graceful Shutdown)
HttpServer 支持安全关闭,在接收到停止信号,工作程序有一定的时间来完成服务器请求。超时后,仍然存活的工作线程将被强制丢弃,默认情况下,关机超时时间设置为30秒,您可以使用 HttpServer:: shutdown_timeout() 方法来修改。
HttpServer 处理多个操作系统信号,Ctrl+C 在所有操作系统上都可用。其它信号在 unix 系统上可用。
- SIGINT - Force shutdown workers
- SIGTERM - Graceful shutdown workers
- SIGQUIT - Force shutdown workers
您也可以使用 HttpServer::disable_signals() 来禁用信号处理。
2.5、提取
2.5.1、类型安全的信息提取
Actix Web 提供了一种用于类型安全请求信息访问的工具叫做提取器(例如 实现了 FromRequest),内置了很多提取器。
提取器可以作为处理程序的函数参数来使用,Actix Web支持每个处理器函数最多12个提取器。参数位置不固定。
例如
async fn index(path: web::Path<(String, String)>, json: web::Json<MyInfo>) -> impl Responder {
    let path = path.into_inner();
    format!("{} {} {} {}", path.0, path.1, json.id, json.username)
}
2.5.2、路径参数(Path Parameters)
Path 提供了 路径参数(Path Parameters)的方法,路径中可提取的部分称为动态段,使用花括号标记,您可以从路径中反序列化任何可变段。
例如
use actix_web::{get, web, App, HttpServer, Result};

/// extract path info from "/users/{user_id}/{friend}" url
/// {user_id} - deserializes to a u32
/// {friend} - deserializes to a String
#[get("/users/{user_id}/{friend}")] // <- define path parameters
async fn index(path: web::Path<(u32, String)>) -> Result<String> {
    let (user_id, friend) = path.into_inner();
    Ok(format!("Welcome {}, user_id {}!", friend, user_id))
}

#[actix_web::main]
async fn main() -> std::io::Result<()> {
    HttpServer::new(|| App::new().service(index))
        .bind(("127.0.0.1", 8080))?
        .run()
        .await
}
通过动态段名称和字段名称匹配之外,还可以序列化成对象。例如我们可以 Serde
use actix_web::{get, web, Result};
use serde::Deserialize;

#[derive(Deserialize)]
struct Info {
    user_id: u32,
    friend: String,
}

/// extract path info using serde
#[get("/users/{user_id}/{friend}")] // <- define path parameters
async fn index(info: web::Path<Info>) -> Result<String> {
    Ok(format!(
        "Welcome {}, user_id {}!",
        info.friend, info.user_id
    ))
}

#[actix_web::main]
async fn main() -> std::io::Result<()> {
    use actix_web::{App, HttpServer};

    HttpServer::new(|| App::new().service(index))
        .bind(("127.0.0.1", 8080))?
        .run()
        .await
}
还有一种非类型安全的的替代方法,我们可以使用 HttpRequest 的 match_info 方法。
#[get("/users/{user_id}/{friend}")] // <- define path parameters
async fn index(req: HttpRequest) -> Result<String> {
    let name: String = req.match_info().get("friend").unwrap().parse().unwrap();
    let userid: i32 = req.match_info().query("user_id").parse().unwrap();

    Ok(format!("Welcome {}, user_id {}!", name, userid))
}

#[actix_web::main]
async fn main() -> std::io::Result<()> {
    use actix_web::{App, HttpServer};

    HttpServer::new(|| App::new().service(index))
        .bind(("127.0.0.1", 8080))?
        .run()
        .await
}
使用场景:路径参数常用于标识资源或指定资源的唯一标识符,例如获取用户信息、获取特定文章。
2.5.3、查询参数(Query Parameters)
查询参数是通过 URL 的查询字符串部分来传递的,以?开头多个参数之间用&分隔。使用场景参数常用于传递筛选、排序、分页等额外的请求参数,例如搜索用户、排序商品列表等。
例子:
use actix_web::{get, web, App, HttpServer};
use serde::Deserialize;

#[derive(Deserialize)]
struct Info {
    username: String,
}

// this handler gets called if the query deserializes into `Info` successfully
// otherwise a 400 Bad Request error response is returned
#[get("/")]
async fn index(info: web::Query<Info>) -> String {
    format!("Welcome {}!", info.username)
}
该例子需要使用 serde_urlencoded 。
2.5.4、JSON参数
使用 JSON<T> 允许反序列化一个请求体到结构体,要抽取的T 必须 实现反序列化。
例如
use actix_web::{post, web, App, HttpServer, Result};
use serde::Deserialize;

#[derive(Deserialize)]
struct Info {
    username: String,
}

/// deserialize `Info` from request's body
#[post("/submit")]
async fn submit(info: web::Json<Info>) -> Result<String> {
    Ok(format!("Welcome {}!", info.username))
}
一些提取器提供了一种配置提取过程的方法,要配置提取器,将其配置对象传递给资源的 app_data() 方法。在JSON 提取器的情况下,返回JsonConfig,配置JSON有效负载的最大大小以及自定义错误处理函数。
use actix_web::{error, web, App, HttpResponse, HttpServer, Responder};
use serde::Deserialize;

#[derive(Deserialize)]
struct Info {
    username: String,
}

/// deserialize `Info` from request's body, max payload size is 4kb
async fn index(info: web::Json<Info>) -> impl Responder {
    format!("Welcome {}!", info.username)
}

#[actix_web::main]
async fn main() -> std::io::Result<()> {
    HttpServer::new(|| {
        let json_config = web::JsonConfig::default()
            .limit(4096)
            .error_handler(|err, _req| {
                // create custom error response
                error::InternalError::from_response(err, HttpResponse::Conflict().finish())
                    .into()
            });

        App::new().service(
            web::resource("/")
                // change json extractor configuration
                .app_data(json_config)
                .route(web::post().to(index)),
        )
    })
    .bind(("127.0.0.1", 8080))?
    .run()
    .await
}
2.5.5、URL编码的表单数据
use actix_web::{post, web, App, HttpServer, Result};
use serde::Deserialize;

#[derive(Deserialize)]
struct FormData {
    username: String,
}

/// extract form data using serde
/// this handler gets called only if the content type is *x-www-form-urlencoded*
/// and the content of the request could be deserialized to a `FormData` struct
#[post("/")]
async fn index(form: web::Form<FormData>) -> Result<String> {
    Ok(format!("Welcome {}!", form.username))
}
2.5.6、其它提取器
Actix Web 还提供了其它的提取器
- Data:用于方法应用程序状态的提取器;
- HttpRequest:能够访问请求对象的抽取器;
- String:可以将有效的负载 payload 转换为字符串;
- Bytes:可以将有效的负载 payload 转换为Bytes;
- Payload:低级有效载荷提取器,主要用于构建其他提取器;
2.5.7、应用状态提取
2.5.7.1、访问状态
应用状态可以通过 web:Data 提取器从处理程序中访问,但是,state 可以作为只读引用访问,如果需要对状态进行可变访问,则必须实现它。
use actix_web::{web, App, HttpServer, Responder};
use std::cell::Cell;

#[derive(Clone)]
struct AppState {
    count: Cell<usize>,
}

async fn show_count(data: web::Data<AppState>) -> impl Responder {
    format!("count: {}", data.count.get())
}

async fn add_one(data: web::Data<AppState>) -> impl Responder {
    let count = data.count.get();
    data.count.set(count + 1);

    format!("count: {}", data.count.get())
}

#[actix_web::main]
async fn main() -> std::io::Result<()> {
    let data = AppState {
        count: Cell::new(0),
    };

    HttpServer::new(move || {
        App::new()
            .app_data(web::Data::new(data.clone()))
            .route("/", web::to(show_count))
            .route("/add", web::to(add_one))
    })
    .bind(("127.0.0.1", 8080))?
    .run()
    .await
}
2.5.7.2、使用原子或ARC
如果要跨线程计算,我们需要使用共享的Arc和原子。
use actix_web::{get, web, App, HttpServer, Responder};
use std::{
    cell::Cell,
    sync::atomic::{AtomicUsize, Ordering},
    sync::Arc,
};

#[derive(Clone)]
struct AppState {
    local_count: Cell<usize>,
    global_count: Arc<AtomicUsize>,
}

#[get("/")]
async fn show_count(data: web::Data<AppState>) -> impl Responder {
    format!(
        "global_count: {}\nlocal_count: {}",
        data.global_count.load(Ordering::Relaxed),
        data.local_count.get()
    )
}

#[get("/add")]
async fn add_one(data: web::Data<AppState>) -> impl Responder {
    data.global_count.fetch_add(1, Ordering::Relaxed);

    let local_count = data.local_count.get();
    data.local_count.set(local_count + 1);

    format!(
        "global_count: {}\nlocal_count: {}",
        data.global_count.load(Ordering::Relaxed),
        data.local_count.get()
    )
}

#[actix_web::main]
async fn main() -> std::io::Result<()> {
    let data = AppState {
        local_count: Cell::new(0),
        global_count: Arc::new(AtomicUsize::new(0)),
    };

    HttpServer::new(move || {
        App::new()
            .app_data(web::Data::new(data.clone()))
            .service(show_count)
            .service(add_one)
    })
    .bind(("127.0.0.1", 8080))?
    .run()
    .await
}
2.6、处理器(Handlers)
2.6.1、请求处理器
请求处理程序是一个异步函数,它可以接受从请求(实现了 FromRequest)中提取零个或多个参数,并返回一个可以转换为 HttpResponse 的类型。
请求处理分两个阶段进行
- 1、处理程序对象,返回实现了 Responder 特征的任何对象;
- 2、在返回对象上调用 response_to 将自身转换为 HttpResponse 或 Error;
默认情况下,Actix Web 提供了一些标准类型的响应器实现,例如 &'static str、String 等
async fn index_01(_req: HttpRequest) -> &'static str {
    "Hello world!"
}
async fn index_02(_req: HttpRequest) -> String {
    "Hello world!".to_owned()
}
您也可以方法签名,返回 impl Responder
async fn index_03(_req: HttpRequest) -> impl Responder {
    web::Bytes::from_static(b"Hello world!")
}
async fn index_04(req: HttpRequest) -> Box<Future<Item=HttpResponse, Error=Error>> {
    ...
}
2.6.2、使用自定义类型的响应
要从处理器函数直接返回自定义类型,该类型需要实现 Responder trait。
例子
use actix_web::{
    body::BoxBody, http::header::ContentType, HttpRequest, HttpResponse, Responder,
};
use serde::Serialize;

#[derive(Serialize)]
struct MyObj {
    name: &'static str,
}

// Responder
impl Responder for MyObj {
    type Body = BoxBody;

    fn respond_to(self, _req: &HttpRequest) -> HttpResponse<Self::Body> {
        let body = serde_json::to_string(&self).unwrap();

        // Create response and set content type
        HttpResponse::Ok()
            .content_type(ContentType::json())
            .body(body)
    }
}

async fn index() -> impl Responder {
    MyObj { name: "user" }
}
2.6.3、流响应
响应体可以异步生成,在这种情况下,响应体必须实现 Stream<Item=Result<Bytes,Error>>
use actix_web::{get, web, App, Error, HttpResponse, HttpServer};
use futures::{future::ok, stream::once};

#[get("/stream")]
async fn stream() -> HttpResponse {
    let body = once(ok::<_, Error>(web::Bytes::from_static(b"test")));

    HttpResponse::Ok()
        .content_type("application/json")
        .streaming(body)
}

#[actix_web::main]
async fn main() -> std::io::Result<()> {
    HttpServer::new(|| App::new().service(stream))
        .bind(("127.0.0.1", 8080))?
        .run()
        .await
}
2.6.4、不同的返回类型(Either)
有些时候,你需要返回不同类型的响应,例如错误校验返回错误,成功就返回 Response,或别的响应结果。在这种情况下,可以使用 Either 类型。
use actix_web::{Either, Error, HttpResponse};

type RegisterResult = Either<HttpResponse, Result<&'static str, Error>>;

async fn index() -> RegisterResult {
    if is_a_variant() {
        // choose Left variant
        Either::Left(HttpResponse::BadRequest().body("Bad data"))
    } else {
        // choose Right variant
        Either::Right(Ok("Hello!"))
    }
}
总结
本节课讲解了各Web开发框架的介绍,以及讲解了 Actix-Web 基础用法,后续将会讲解如何结合数据库进行一个rbac权限系统的开发。


![JWT的封装、[Authorize]的使用](https://img-blog.csdnimg.cn/85870169bd3e43c0909cf35764f5cdb6.png)