基于Kubesphere容器云平台物联网云平台Devops实践
项目背景
公司是做工业物联网相关业务的,现业务是云平台,技术栈 后端为 Springboot2.7+JDK11 ,前端为 Vue3+Ts,需要搭建自动化运维平台以实现业务代码自动部署上线,快速迭代开发,无感升级等功能…(由于公司数据隐私等原因,本文已打码关键业务部分,仅分享实践经历与技术实现。)
工具介绍
以下内容摘自官网:
KubeSphere 是在 Kubernetes 之上构建的面向云原生应用的分布式操作系统,完全开源,支持多云与多集群管理,提供全栈的 IT 自动化运维能力,简化企业的 DevOps 工作流。它的架构可以非常方便地使第三方应用与云原生生态组件进行即插即用 (plug-and-play) 的集成。
作为全栈的多租户容器平台,KubeSphere 提供了运维友好的向导式操作界面,帮助企业快速构建一个强大和功能丰富的容器云平台。KubeSphere 为用户提供构建企业级 Kubernetes 环境所需的多项功能,例如多云与多集群管理、Kubernetes 资源管理、DevOps、应用生命周期管理、微服务治理(服务网格)、日志查询与收集、服务与网络、多租户管理、监控告警、事件与审计查询、存储管理、访问权限控制、GPU 支持、网络策略、镜像仓库管理以及安全管理等。
KubeSphere 还开源了 KubeKey 帮助企业一键在公有云或数据中心快速搭建 Kubernetes 集群,提供单节点、多节点、集群插件安装,以及集群升级与运维。
需要实现的目标
- 前端后端基础服务部署脚本编写,一键上线所有服务✅
- 单个微服务无感迭代升级(CI)✅
- SQL脚本自动导入/一键迁移服务✅
- 镜像仓库管理,管理项目各个版本文件✅
- 可视化运维监控面板查看各个微服务占用情况✅
- 运维报警通知(邮件,钉钉, 企业微信)✅
- 代码质量检测 ✅
- 代码审核拦截✅
- 域名管理,负载均衡,网关拦截链路追踪✅
待实现目标
-
多集群环境搭建
-
日志收集系统
-
企业内部应用商店
…
话不多说,接下来分享整个搭建流程,本文预计需要阅读时长为15分钟
一、搭建Kubesphere 容器云平台(仅适用于能联通外网的情况下)
服务器配置
| 配置项 | 值 |
|---|---|
| CPU (vCPU) | 8 cores |
| 内存 (Memory) | 16 GiB |
| 操作系统 (Operating System) | CentOS 7.9 64-bit |
1.前置操作
# 关闭防火墙
systemctl disable firewalld
systemctl stop firewalld
systemctl status firewalld
# 关闭Swap分区
swapoff -a
echo "vm.swappiness=0" >> /etc/sysctl.conf
sysctl -p /etc/sysctl.conf
# 配置epel源
rpm -ivh http://mirrors.aliyun.com/epel/epel-release-latest-7.noarch.rpm
# 更新yum
yum -y update
# 安装依赖组件
yum install -y ebtables socat ipset conntrack
# 设置主机名为 hostname 防止报错
hostnamectl --static set-hostname master
# 设置完成后使用hostnamectl status命令进行核验
hostnamectl status
2.安装操作
export KKZONE=cn # 指定镜像地址
curl -sfL https://get-kk.kubesphere.io | VERSION=v3.0.7 sh - # 一键安装
chmod +x kk # 为 kk 添加可执行权限
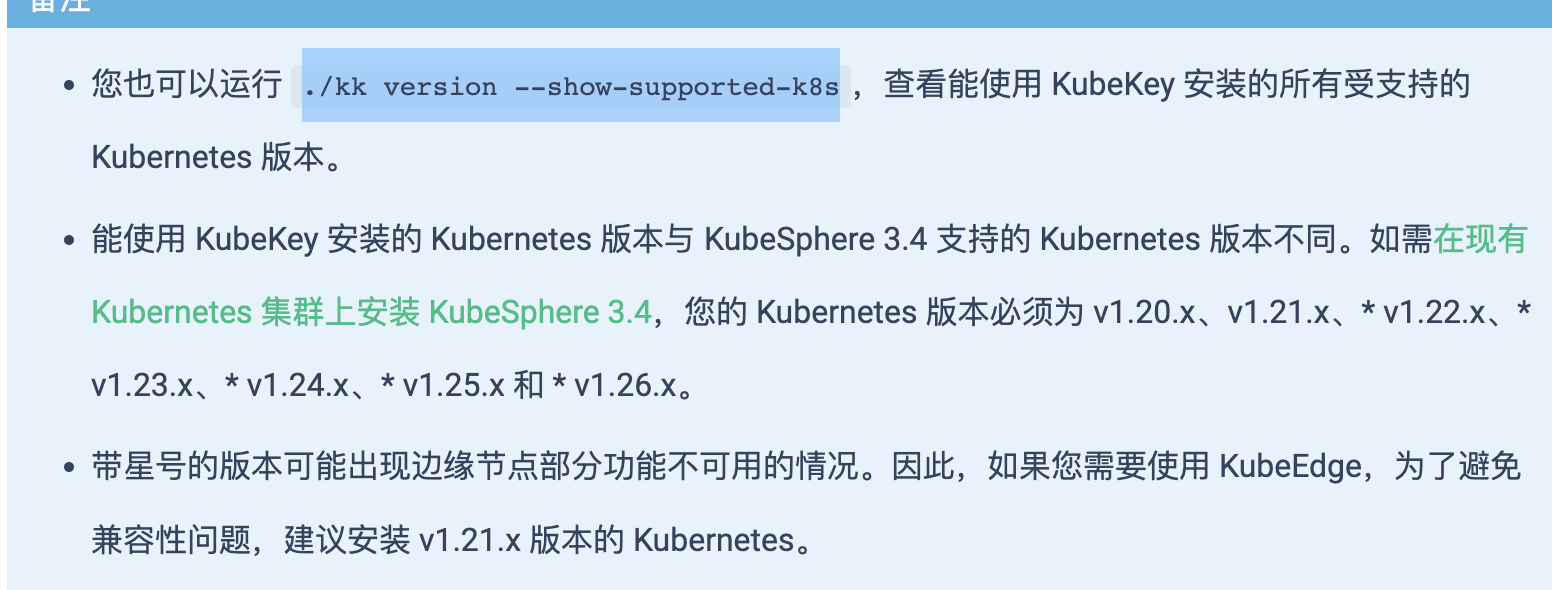
./kk version --show-supported-k8s # 查看当前所支持的 K8s版本
./kk create cluster --with-kubernetes v1.21.14 --with-kubesphere v3.3.2 # 这里到时候x 改完实际的版本号
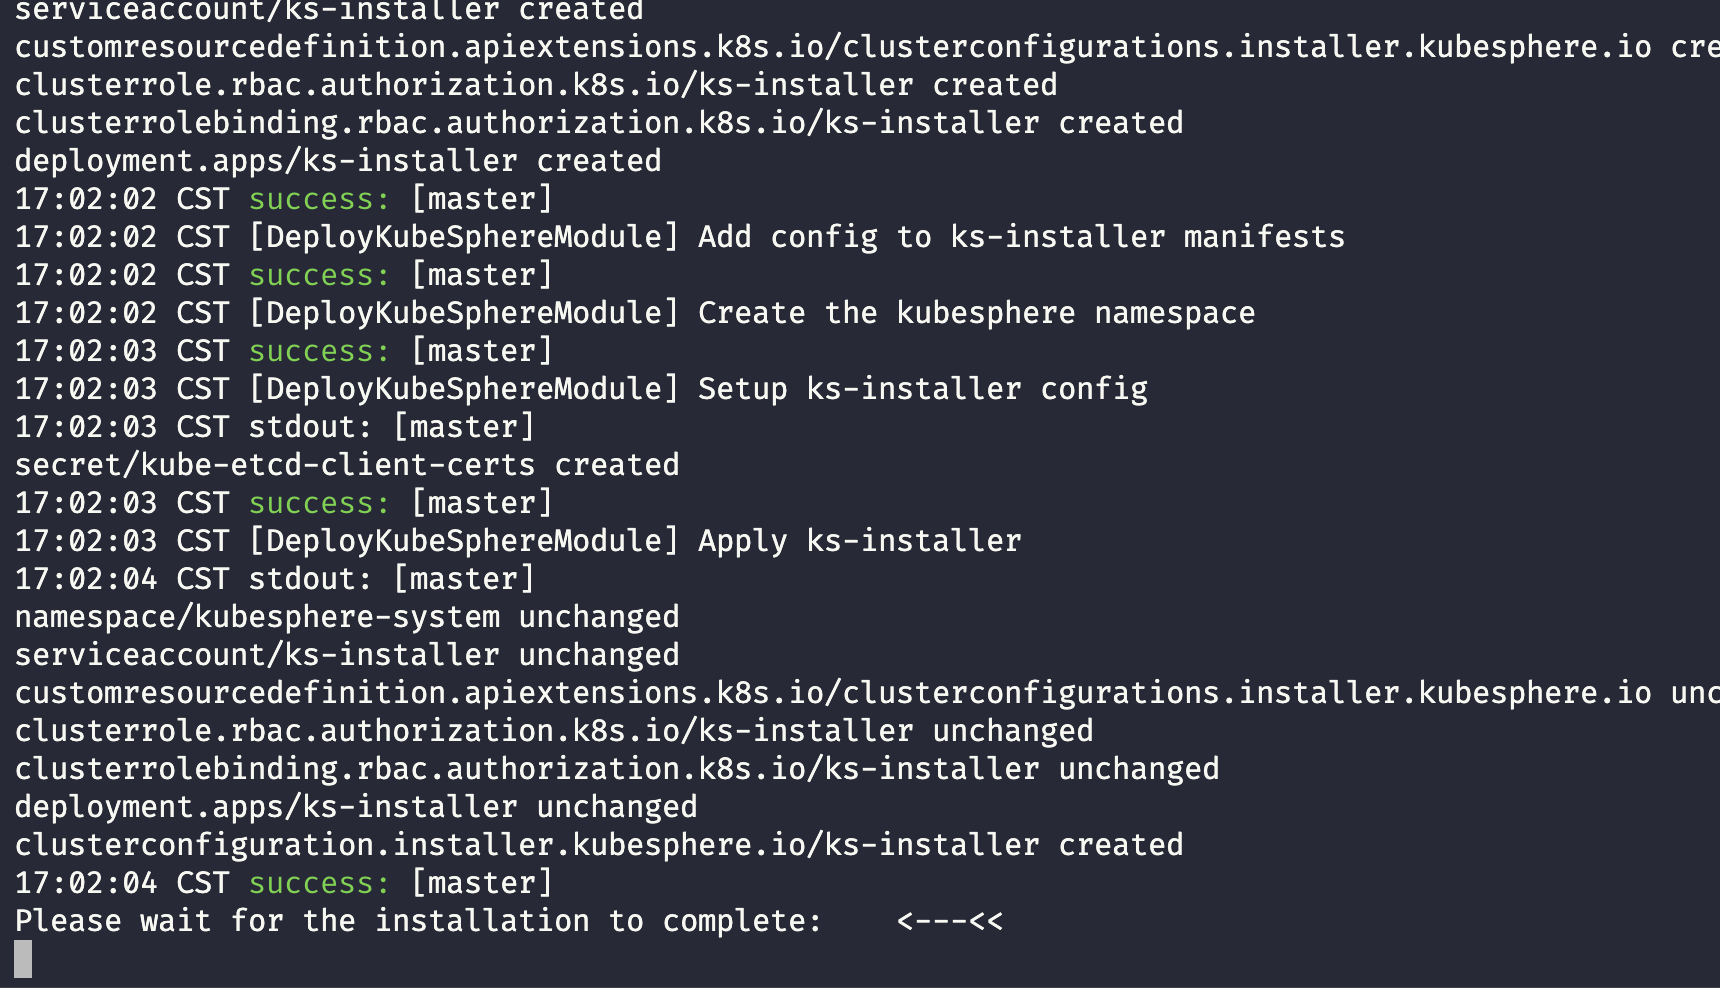
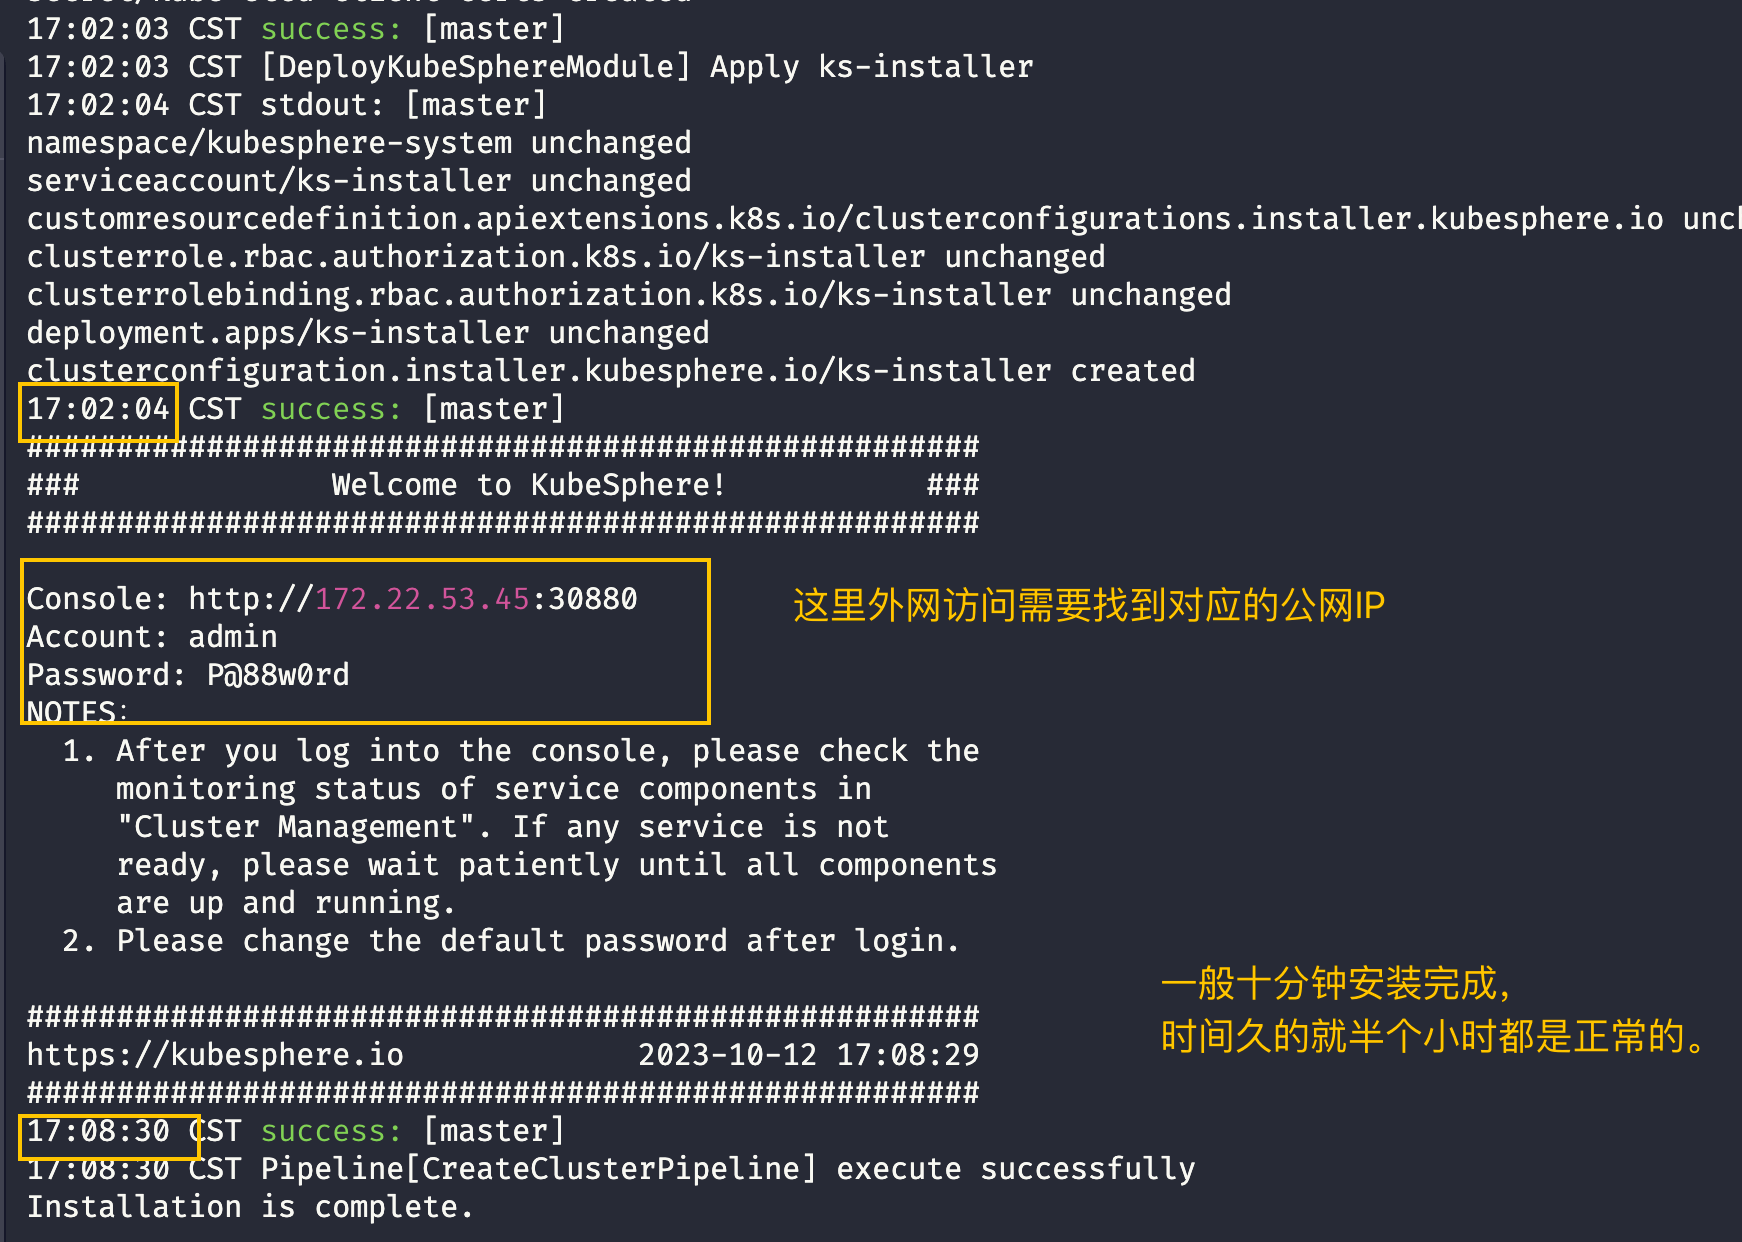
3.验证安装结果
kubectl logs -n kubesphere-system $(kubectl get pod -n kubesphere-system -l 'app in (ks-install, ks-installer)' -o jsonpath='{.items[0].metadata.name}') -f
4.一键部署脚本(复制粘贴去Linux 服务器下任意目录即可执行)
cat <<EOF > run.sh
#!/bin/bash
# 关闭防火墙
systemctl disable firewalld
systemctl stop firewalld
systemctl status firewalld
# 关闭Swap分区
swapoff -a
echo "vm.swappiness=0" >> /etc/sysctl.conf
sysctl -p /etc/sysctl.conf
# 配置epel源
rpm -ivh http://mirrors.aliyun.com/epel/epel-release-latest-7.noarch.rpm
# 更新yum
yum -y update
# 安装依赖组件
yum install -y ebtables socat ipset conntrack
# 设置主机名为 hostname 防止报错
hostnamectl --static set-hostname master
# 设置完成后使用hostnamectl status命令进行核验
hostnamectl status
export KKZONE=cn # 指定镜像地址
curl -sfL https://get-kk.kubesphere.io | VERSION=v3.0.7 sh -  # 一键安装
chmod +x kk # 为 kk 添加可执行权限
./kk version --show-supported-k8s # 查看当前所支持的 K8s版本
./kk create cluster --with-kubernetes v1.21.14 --with-kubesphere v3.3.2 # 这里到时候x 改完实际的版本号
EOF

sh run.sh
5.注意事项
本次搭建为裸机环境,请注意Kubesphere版本与K8s版本对应关系。
安装过程中会出现以下界面,请耐心等待,一个小时以内都是正常的
如果这里等待时间过长,可以看控制台报错情况,或者重新安装
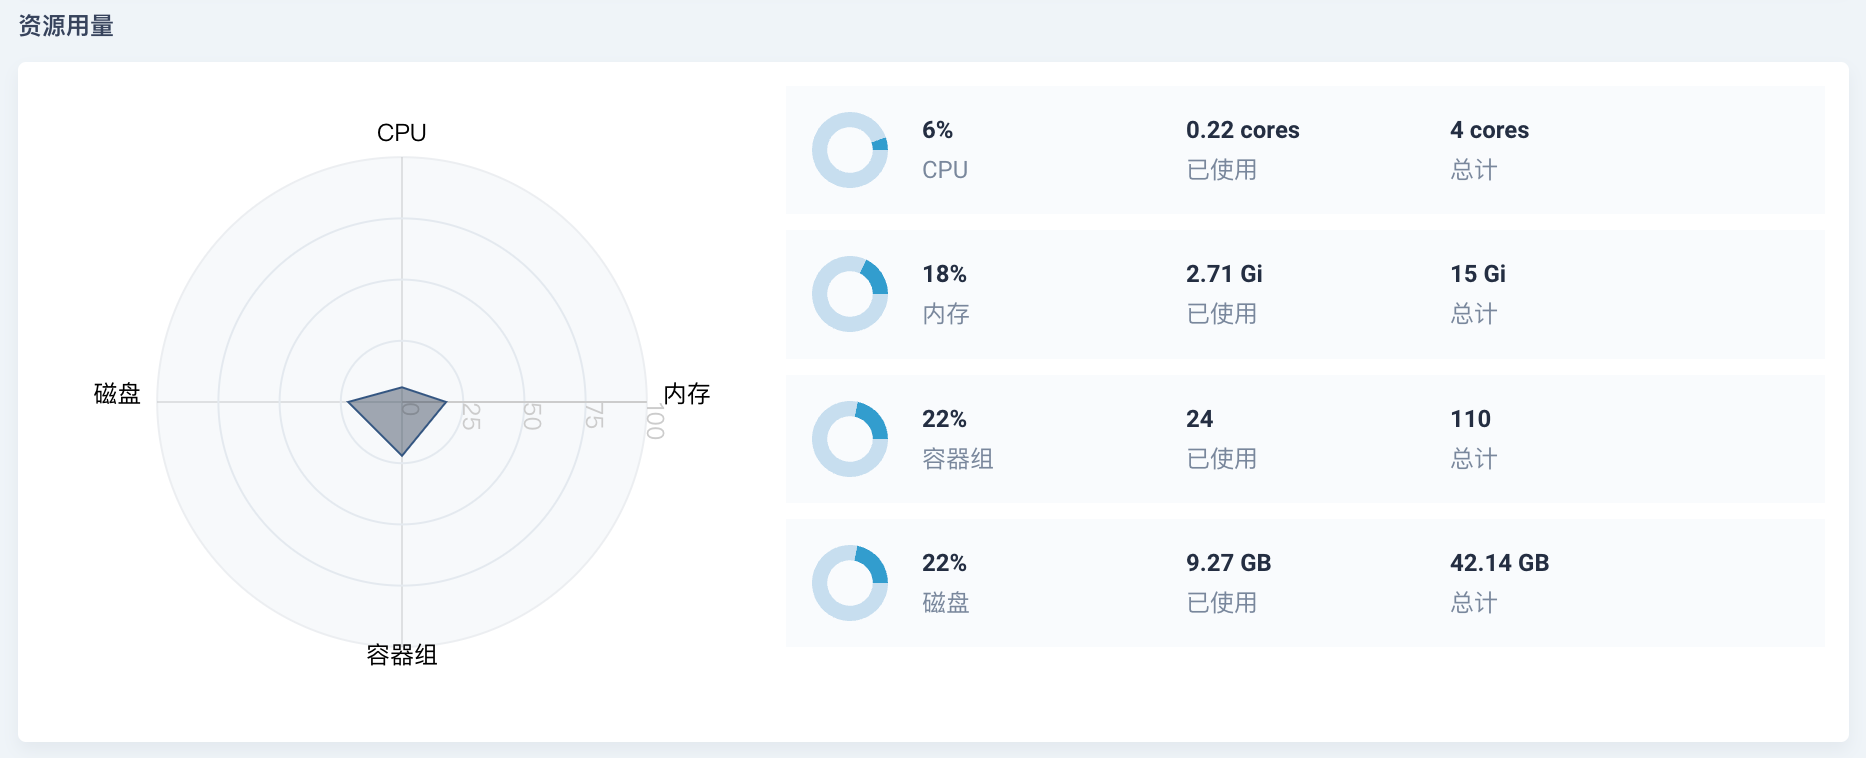
6.初次安装资源占用情况
内存占用:2.71G/15G
磁盘占用:9.27G/42.14G (Centos系统+Kubesphere系统)
7. Docker镜像加速(必须)
sudo mkdir -p /etc/docker
sudo tee /etc/docker/daemon.json <<-'EOF'
{
  "registry-mirrors": ["https://qxvi4bbn.mirror.aliyuncs.com"]
}
EOF
sudo systemctl daemon-reload
sudo systemctl restart docker
8. k8s node节点重启docker后,所有该节点的容器无法运行。(必须)
参考文章:
k8s node节点重启docker后,所有该节点的容器无法运行。
这个问题出现在上一步 配置玩Docker镜像加速之后
由于在master初始化集群之前没有配置cgroup driver为systemd出现的错误。
即,上一步基础上需要添加 一行 "exec-opts": ["native.cgroupdriver=systemd"], 然后修改 k8s kubelet 配置文件
# 配置docker文件
[root@master ~]# cat /etc/docker/daemon.json
{
  "exec-opts": ["native.cgroupdriver=systemd"],
  "registry-mirrors": ["https://qxvi4bbn.mirror.aliyuncs.com"]
}


# 配置k8s文件
# 编辑/etc/sysconfig/kubelet,添加下面的配置
KUBELET_CGROUP_ARGS="--cgroup-driver=systemd"
KUBE_PROXY_MODE="ipvs"   # 若是没有指定就会自动降级别iptable
二、安装Devops
1.前提
进行完成上一步安装Kubesphere操作,并修改好账密,登录云平台
2.安装
参考教程:
https://kubesphere.io/zh/docs/v3.4/pluggable-components/devops/

3.验证
(注意,如果你的机器上4核的,可能会出现以下工作负载无法运行的情况,下面有提到解决办法)
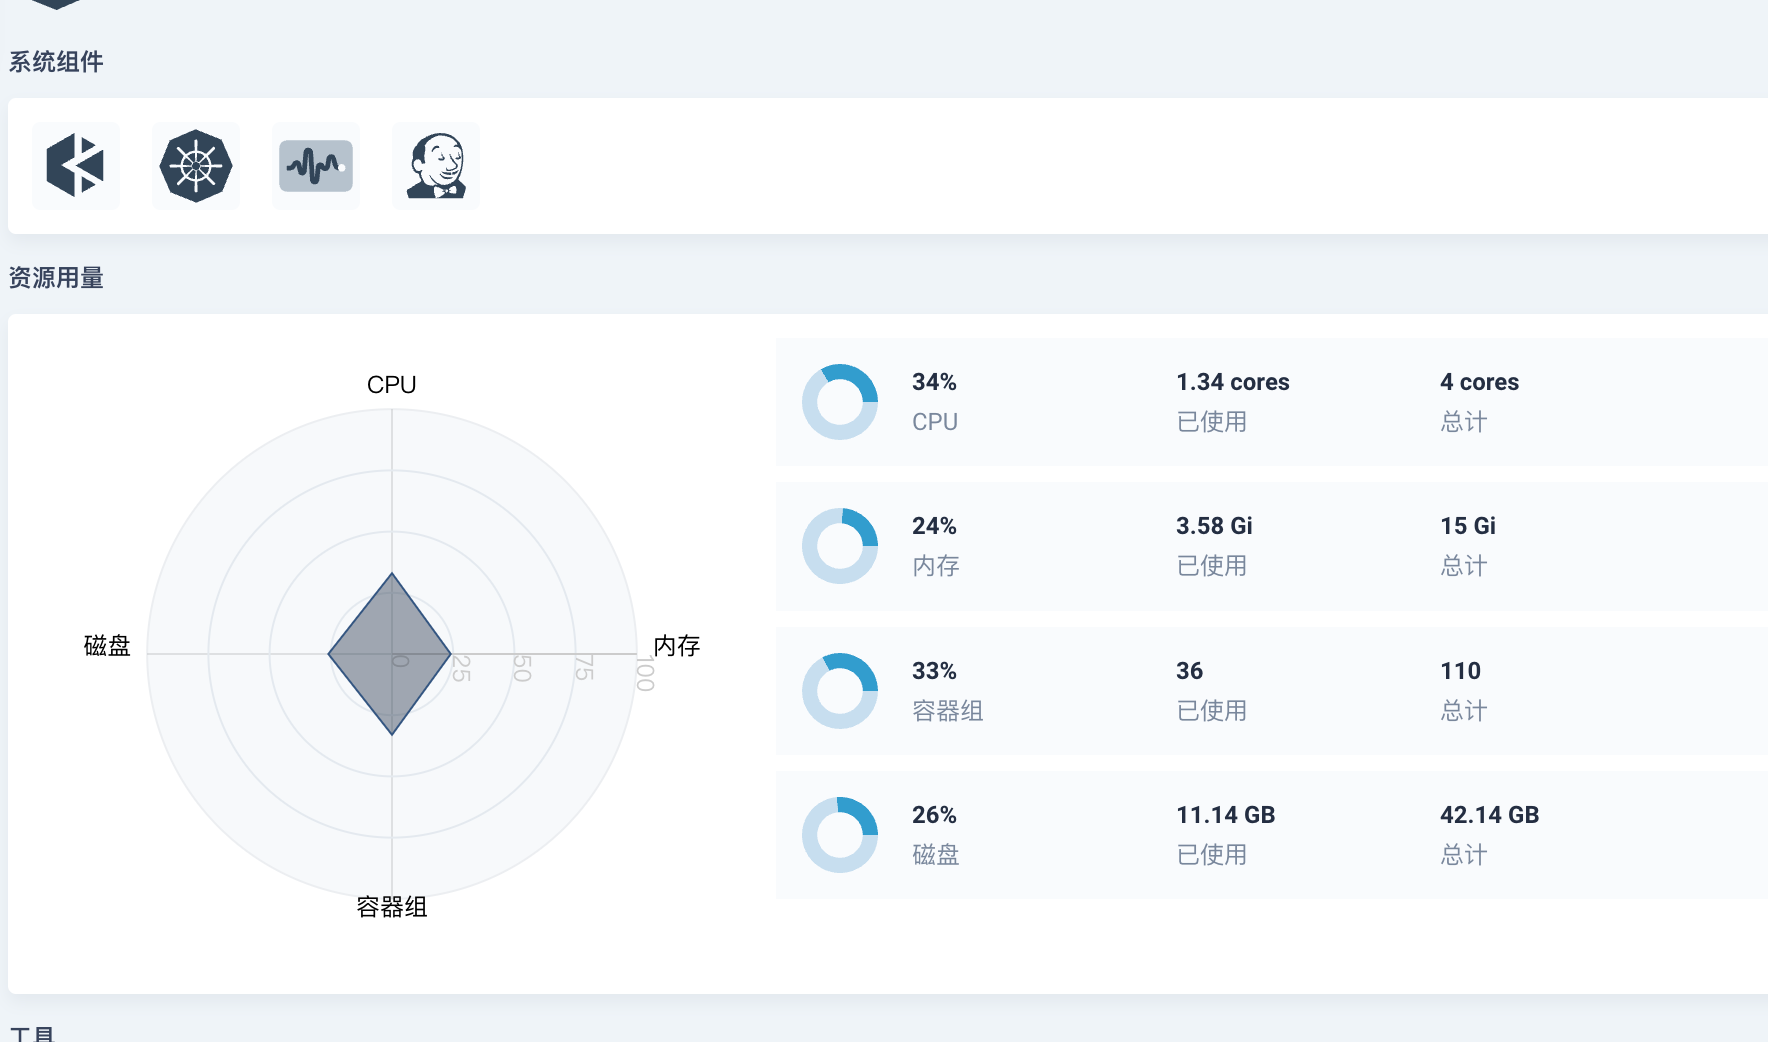
4.安装Devops后资源占用情况
内存占用:3.58G/15G
磁盘占用:11.14G/42.14G (Centos系统+Kubesphere系统)
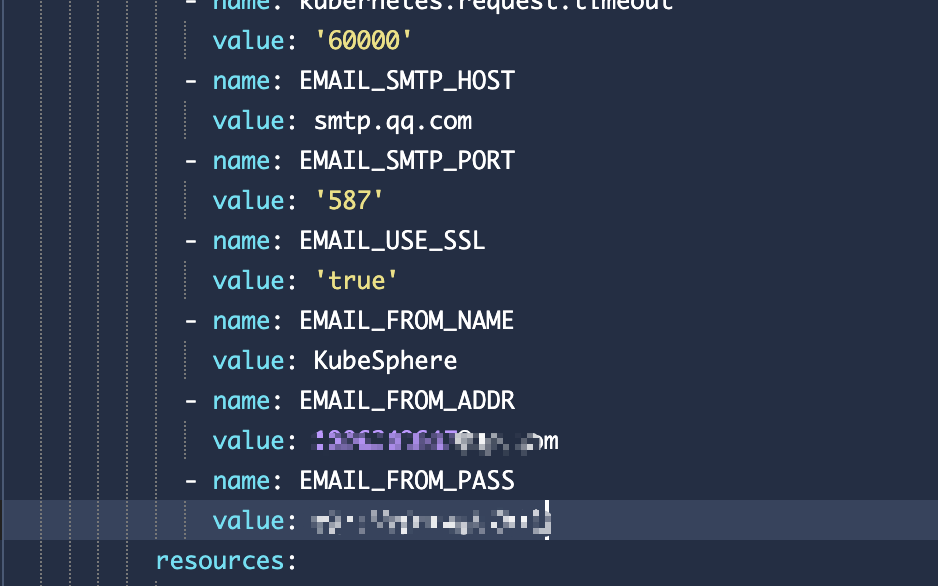
5.为 KubeSphere 流水线设置电子邮件服务器(后续邮件通知需要用到)
内置 Jenkins 无法与平台通知系统共享相同的电子邮件配置。因此,您需要单独为 KubeSphere DevOps 流水线配置电子邮件服务器设置。
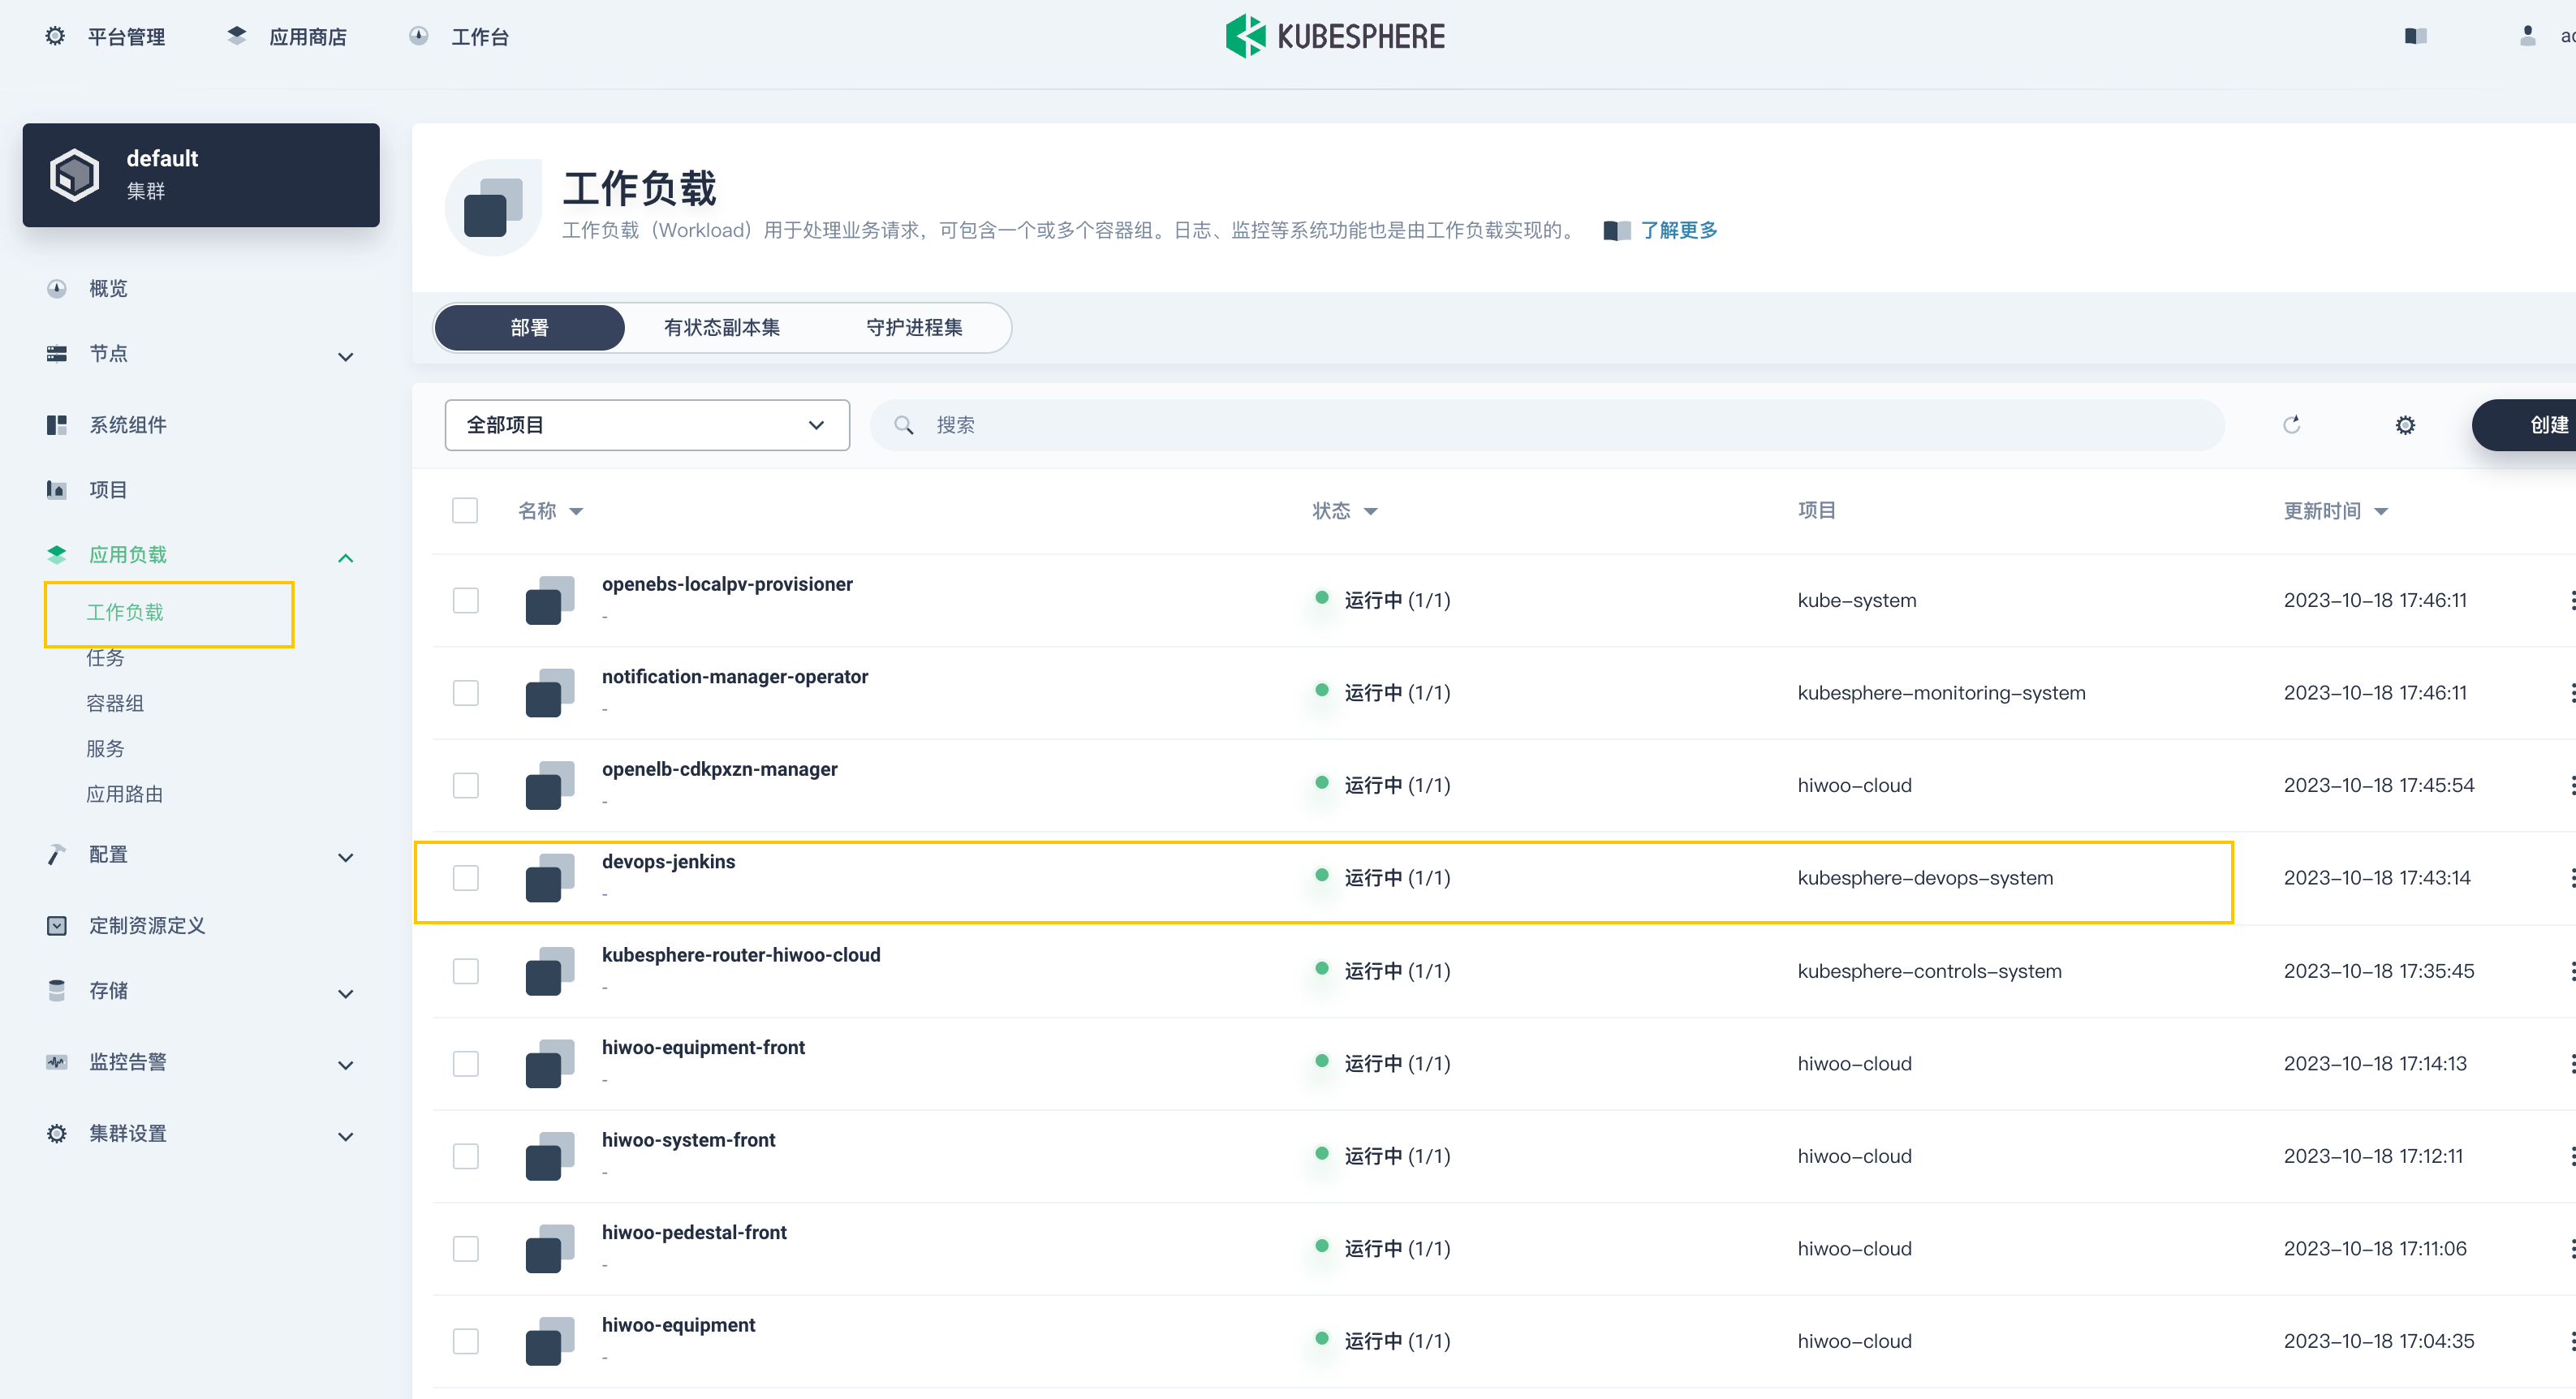
- 点击左上角的平台管理,然后选择集群管理。
- 如果您已经启用多集群功能并已导入成员集群,那么您可以选择一个特定集群以查看其节点。如果尚未启用该功能,请直接参考下一步。
- 转到应用负载下的工作负载,然后从下拉列表中选择 kubesphere-devops-system 项目。点击
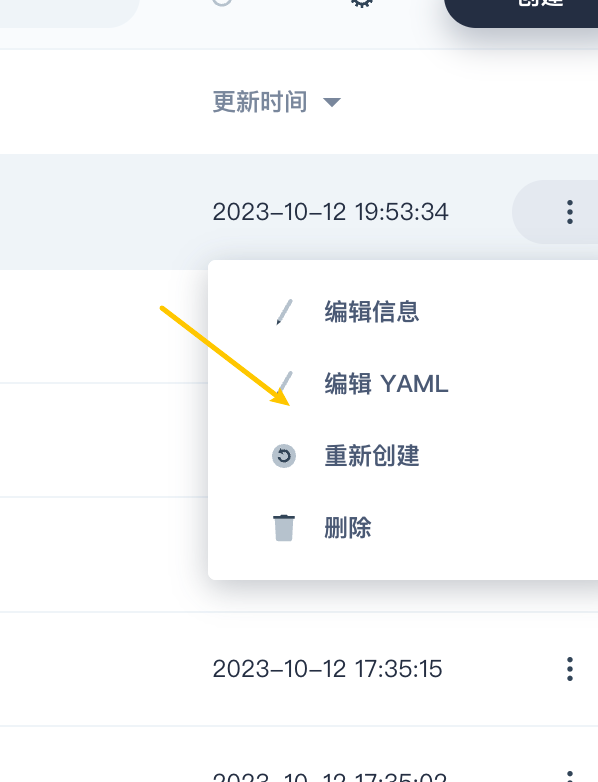
devops-jenkins右侧的 并选择编辑 YAML 以编辑其 YAML 配置文件。
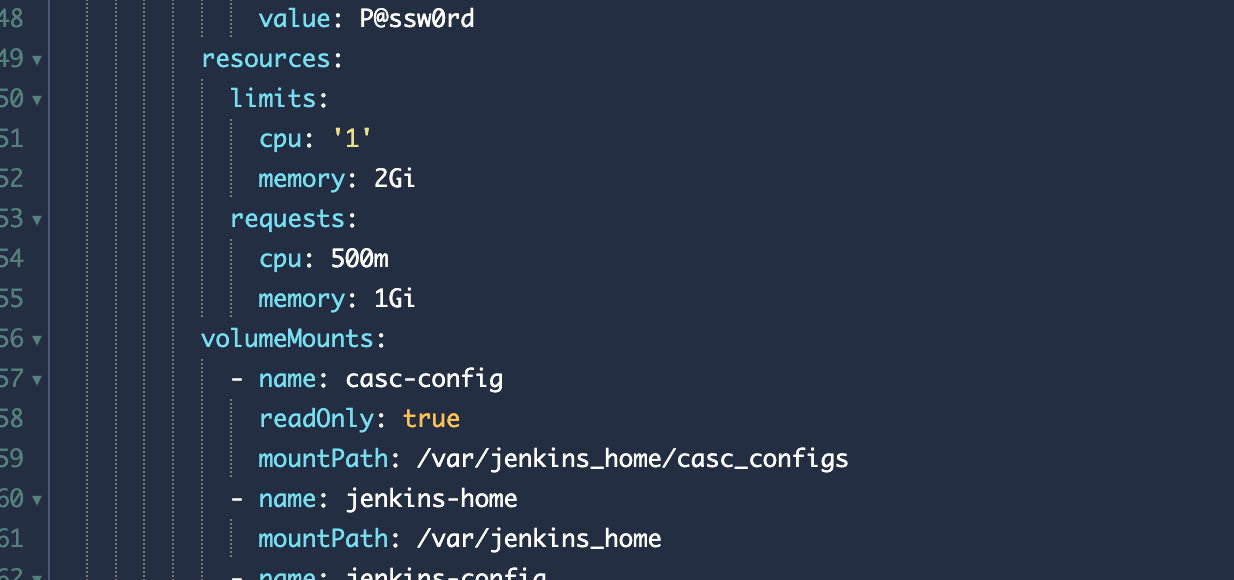
 - 向下滚动到下图所示的需要指定的字段。完成修改后,点击确定以保存。
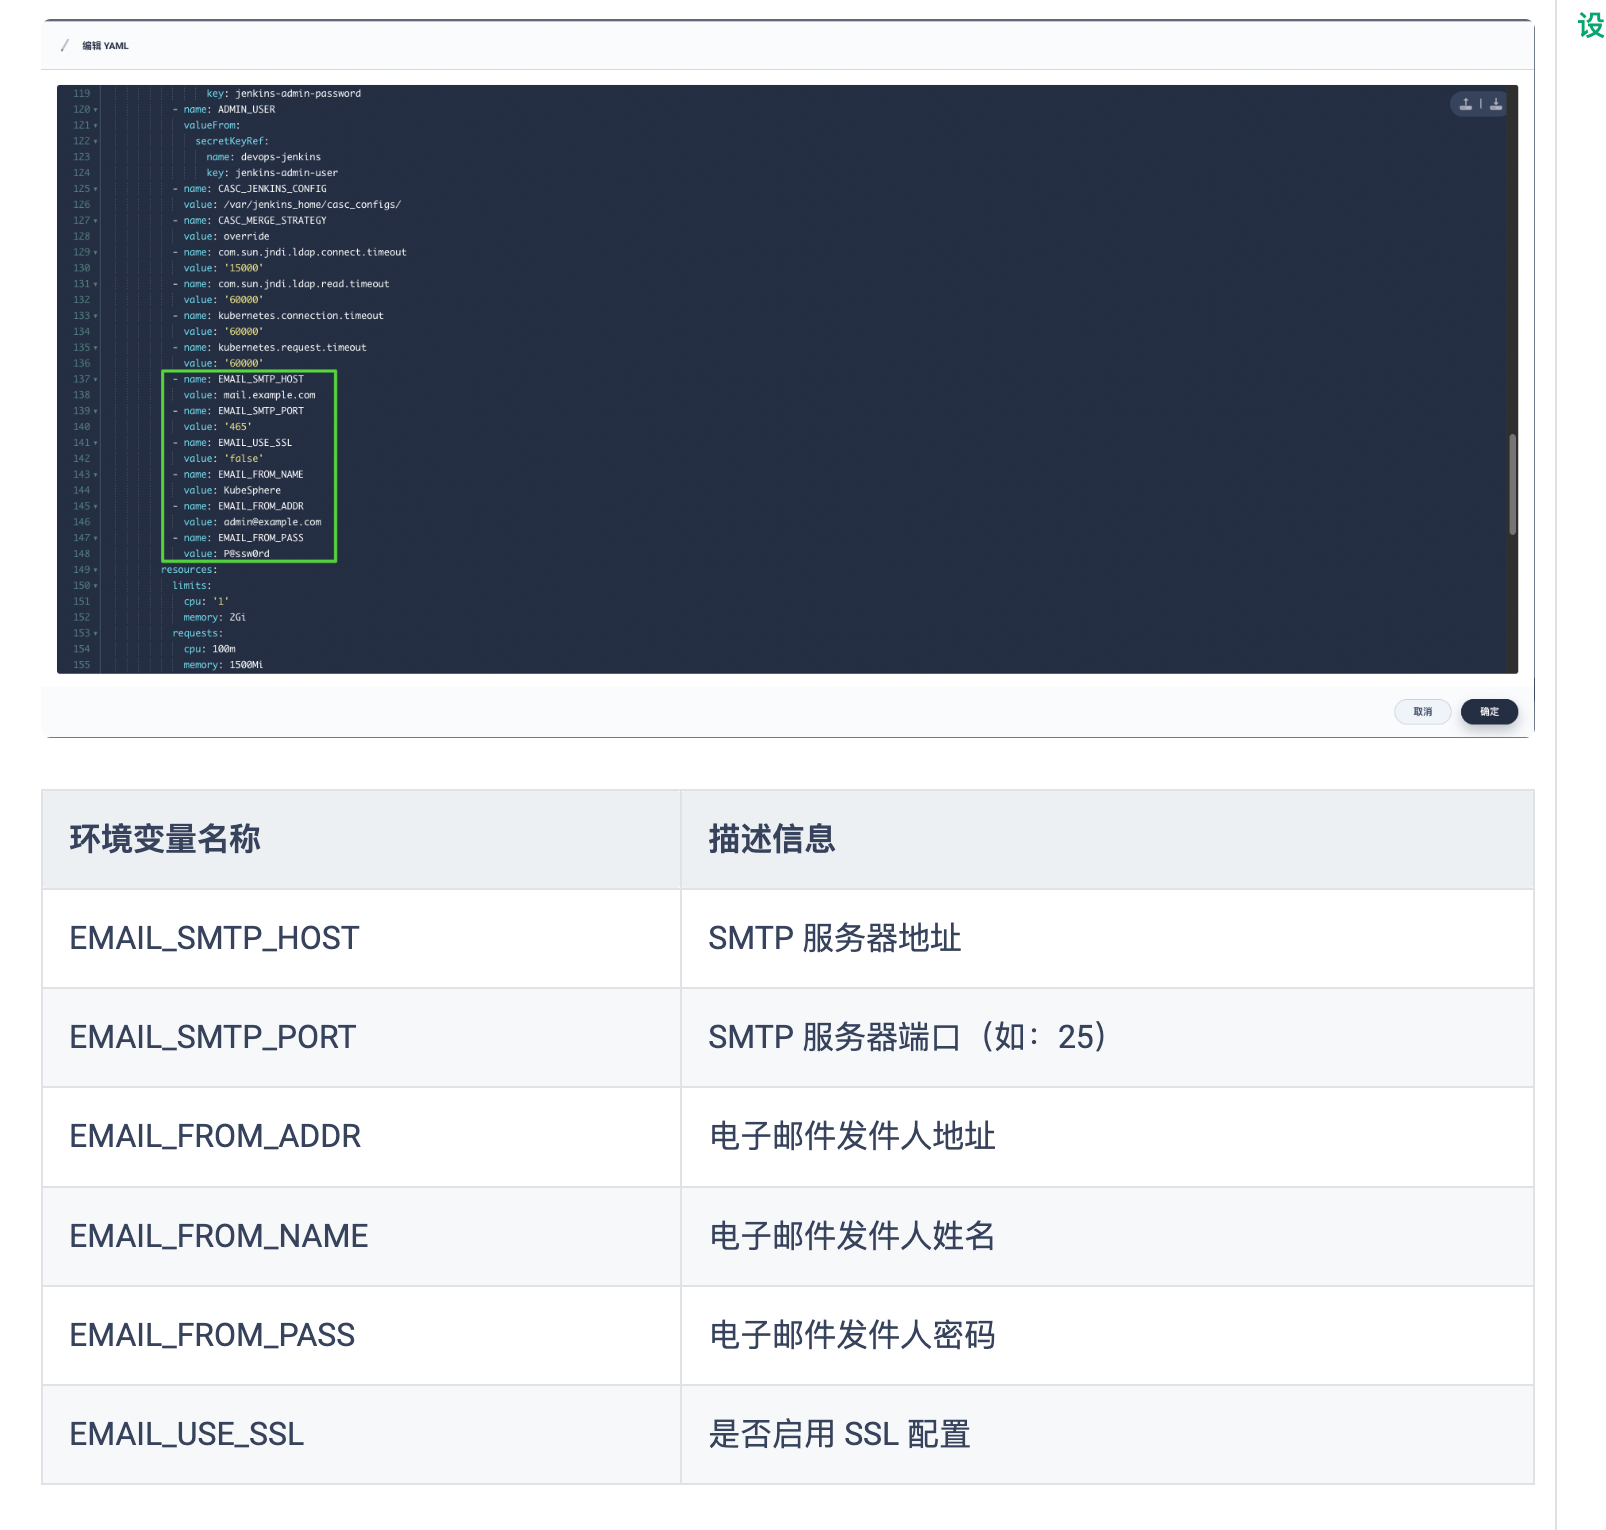
参考:
https://www.kubesphere.io/zh/docs/v3.4/devops-user-guide/how-to-use/pipelines/jenkins-email/#%E8%AE%BE%E7%BD%AE%E7%94%B5%E5%AD%90%E9%82%AE%E4%BB%B6%E6%9C%8D%E5%8A%A1%E5%99%A8
修改内容如下(如果没有ssl证书,下面改为false)
6.可能遇到的问题以及解决方案
1. 可以正常看到Jenkins 的管家图标,但是无法正常创建Devops 流水线如下所示:
执行以下命令:
kubectl get pod -n kubesphere-devops-system # 查看devops系统中调度情况

可以看到我这里 Jenkins服务处于Pending等待状态,接下来对这个pod的详细信息进行分析。这通常可以提供关于pod状态的详细信息和可能的错误消息。
执行以下命令:
kubectl describe pod devops-jenkins-6f665b6758-b58zd -n kubesphere-devops-system # 查看该Pod的详细信息
出现以下报错:

上面的事件指示pod因为没有足够的CPU资源而不能被调度。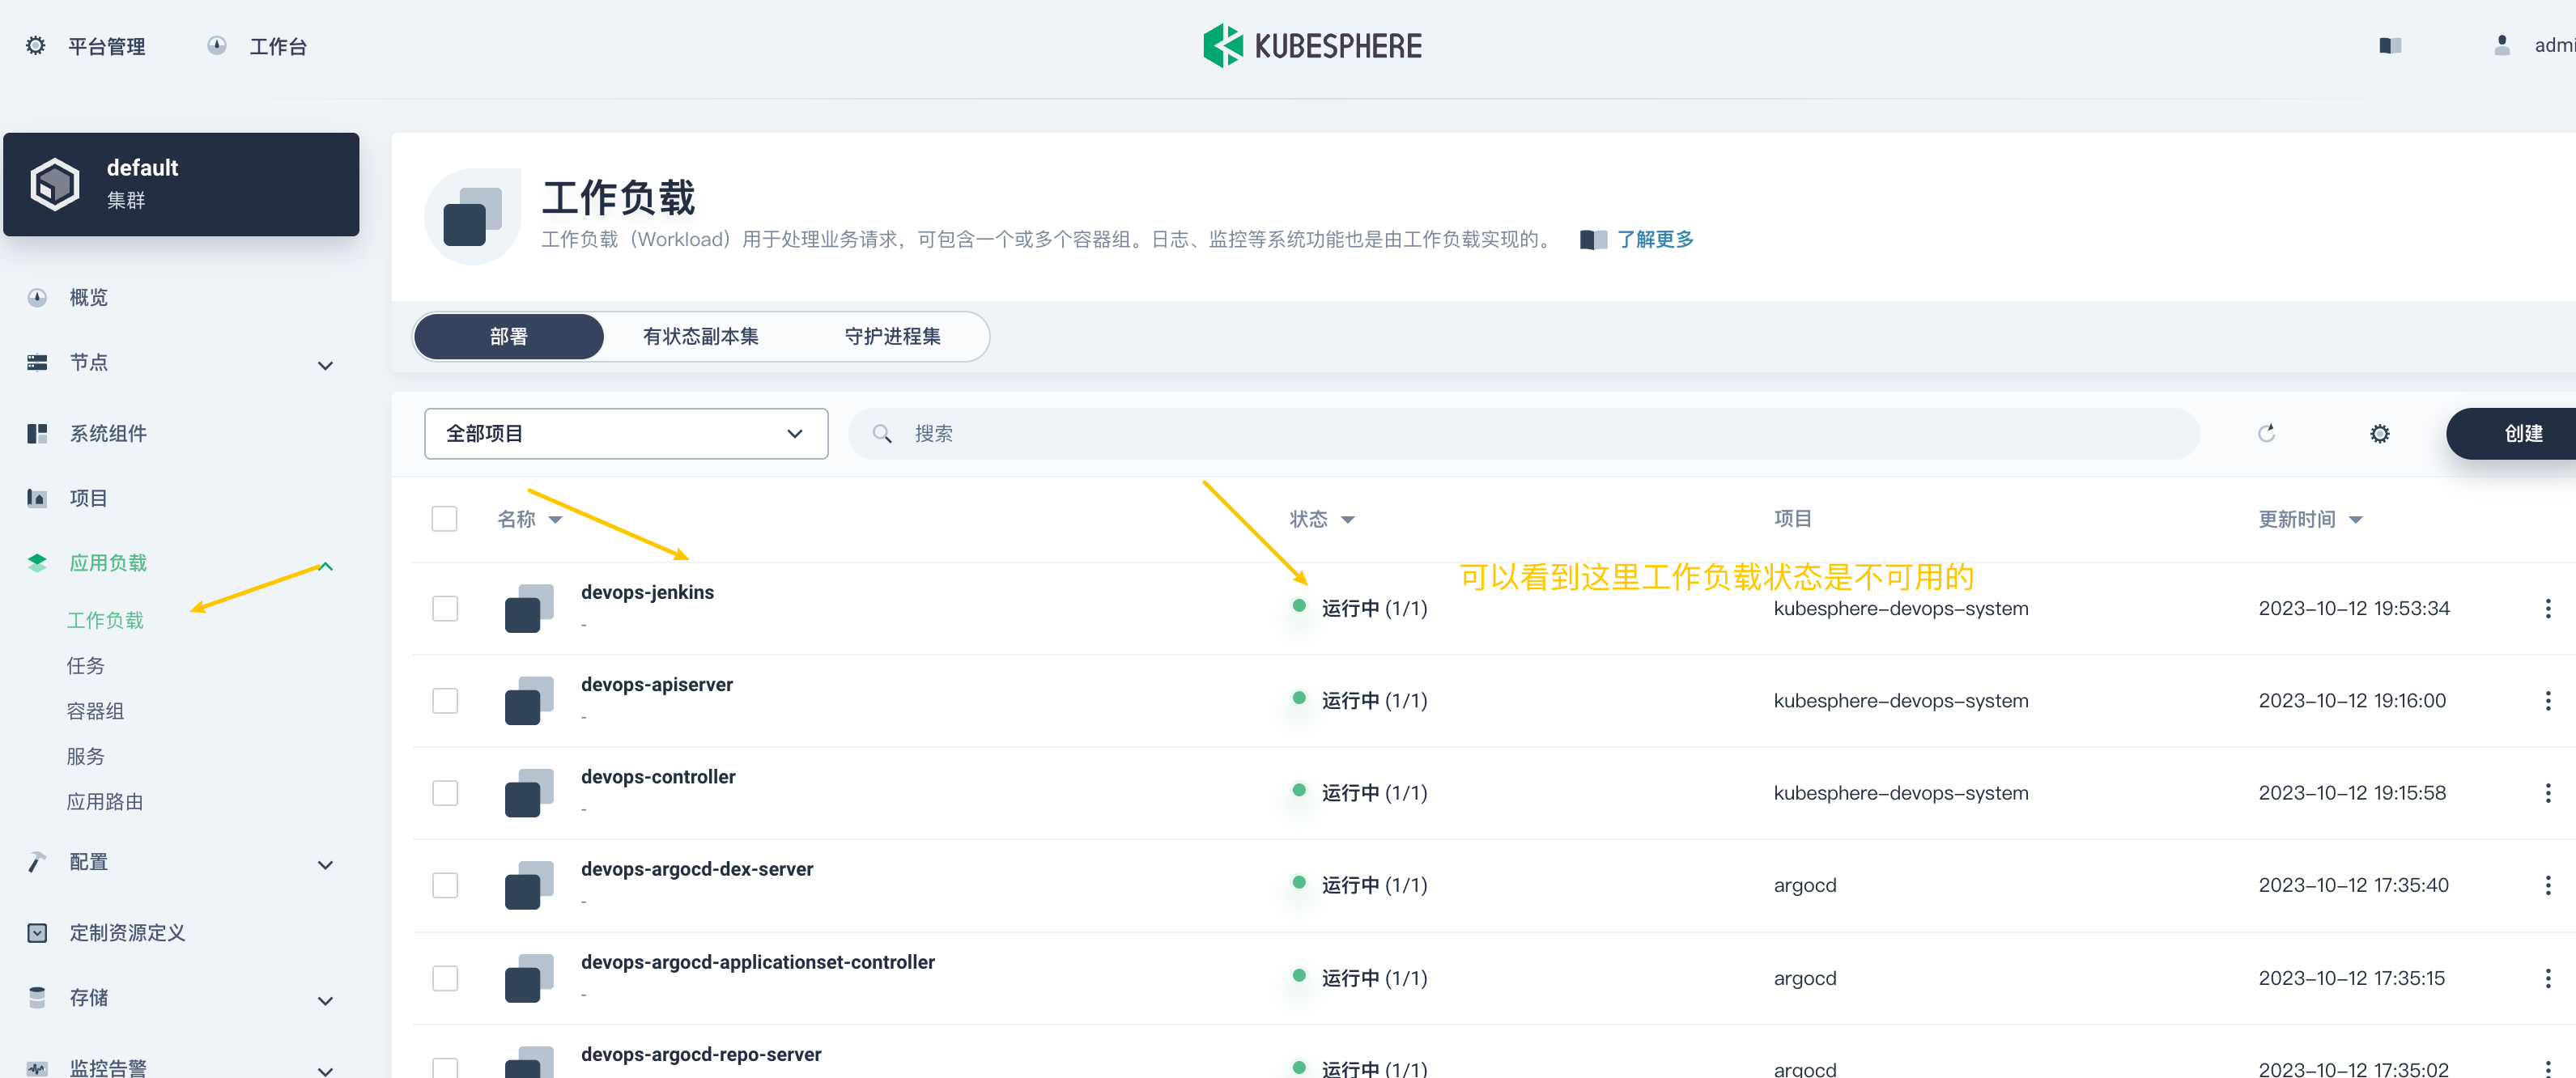
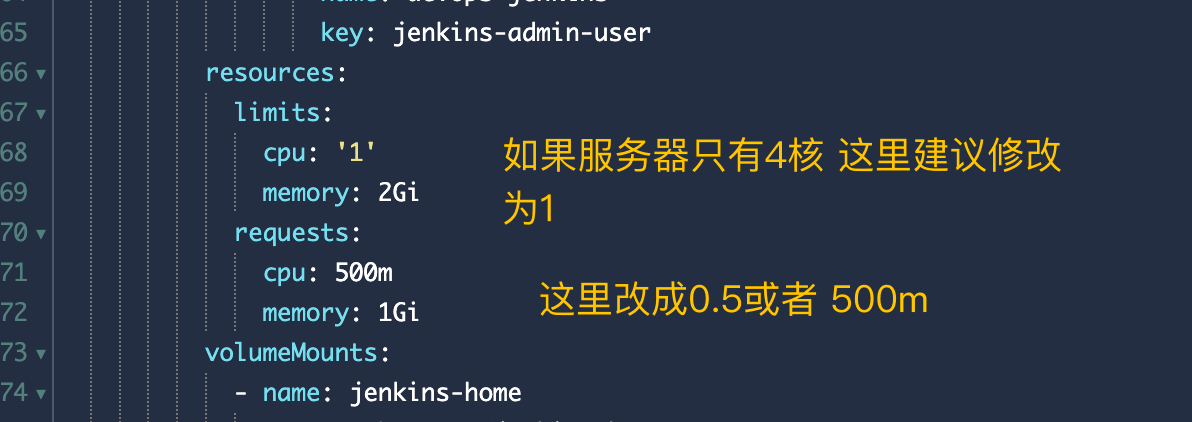
下面还有一处,记得修改
选择重新构建
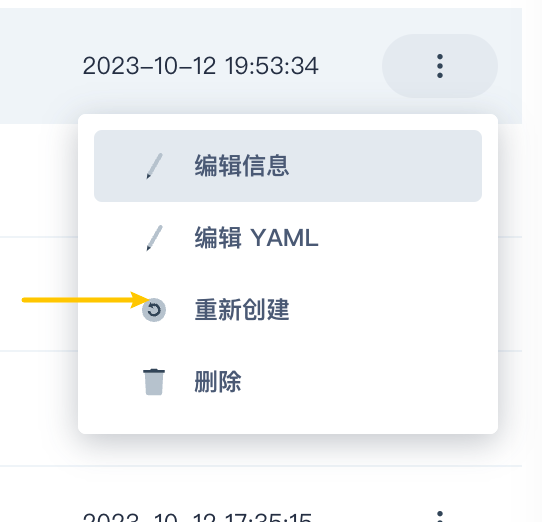
等待5分钟即可恢复
三、企业空间、角色管理与项目工程
1.创建企业空间

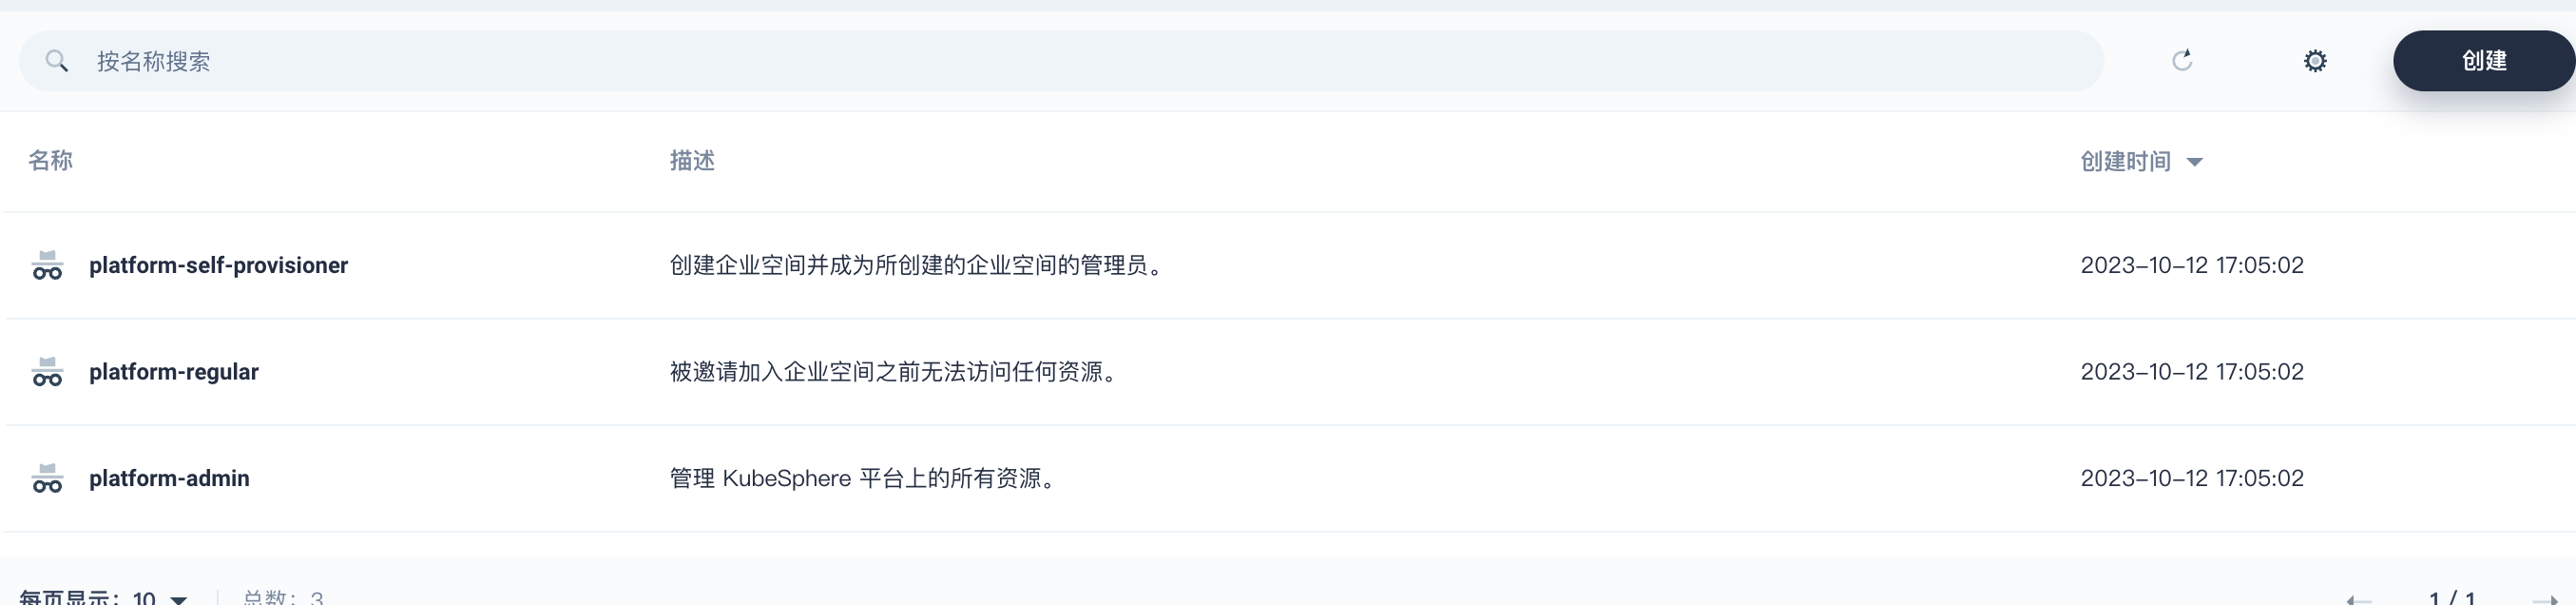
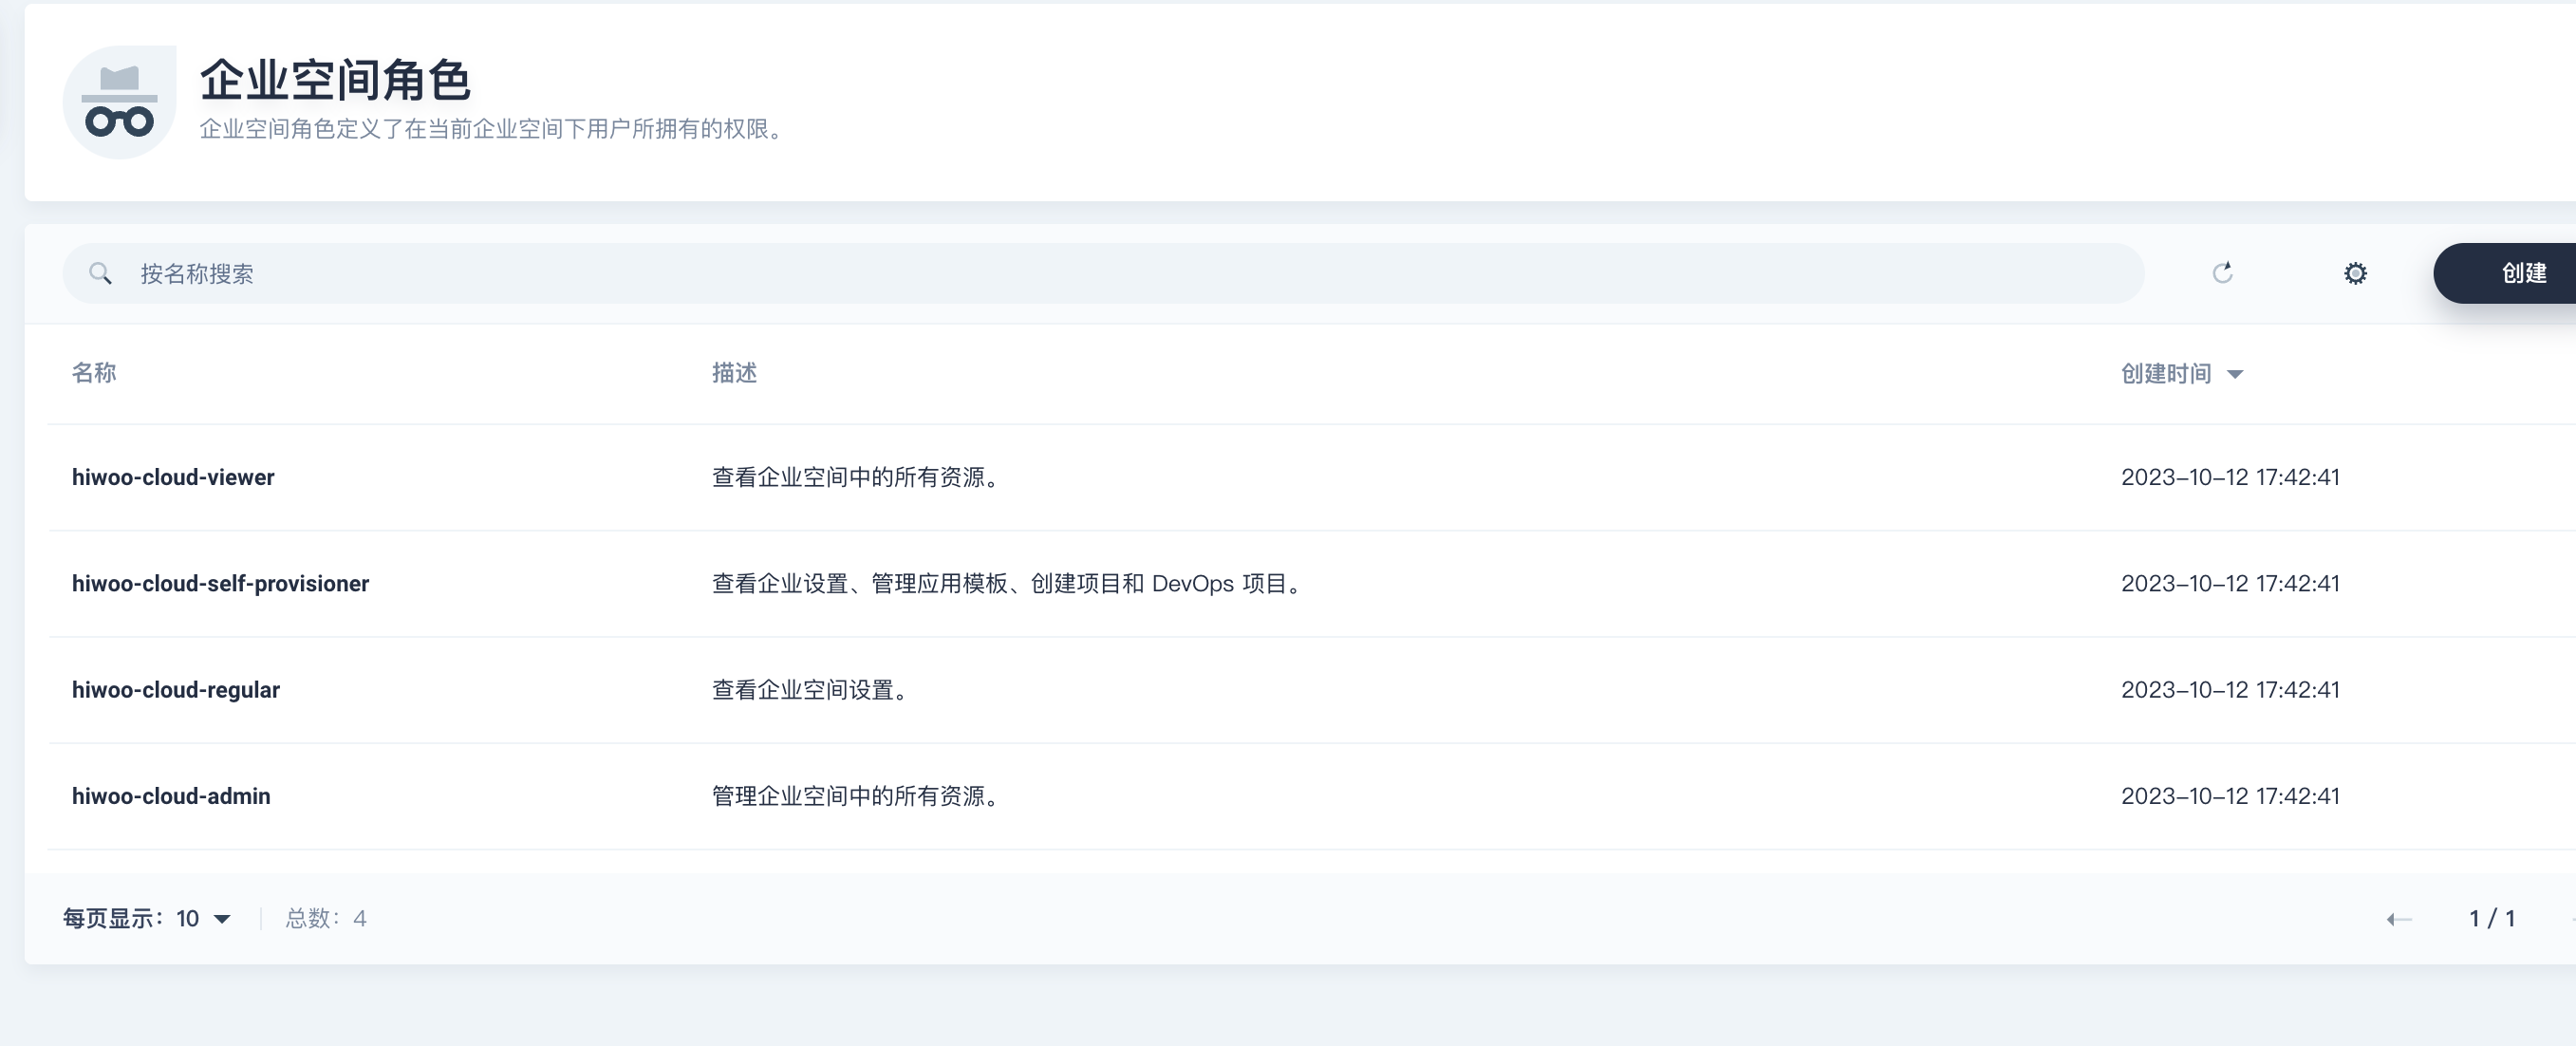
2.角色管理
可自定义角色与其对应的权限
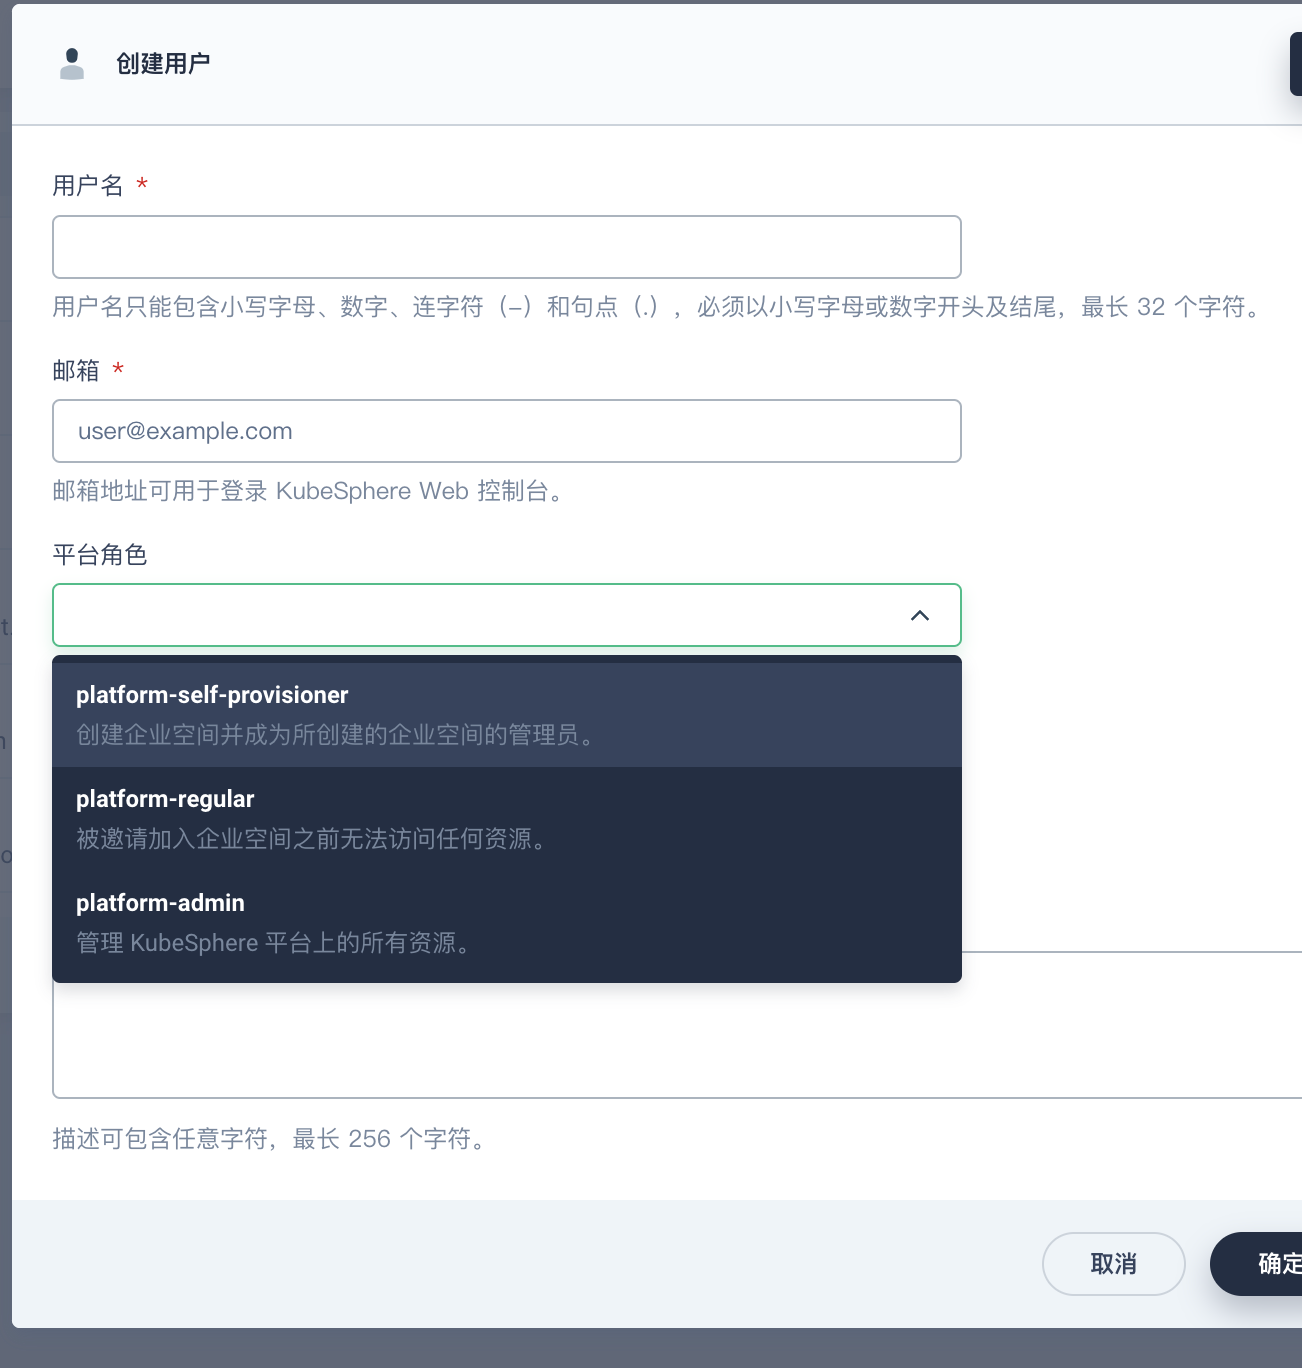
3.创建用户
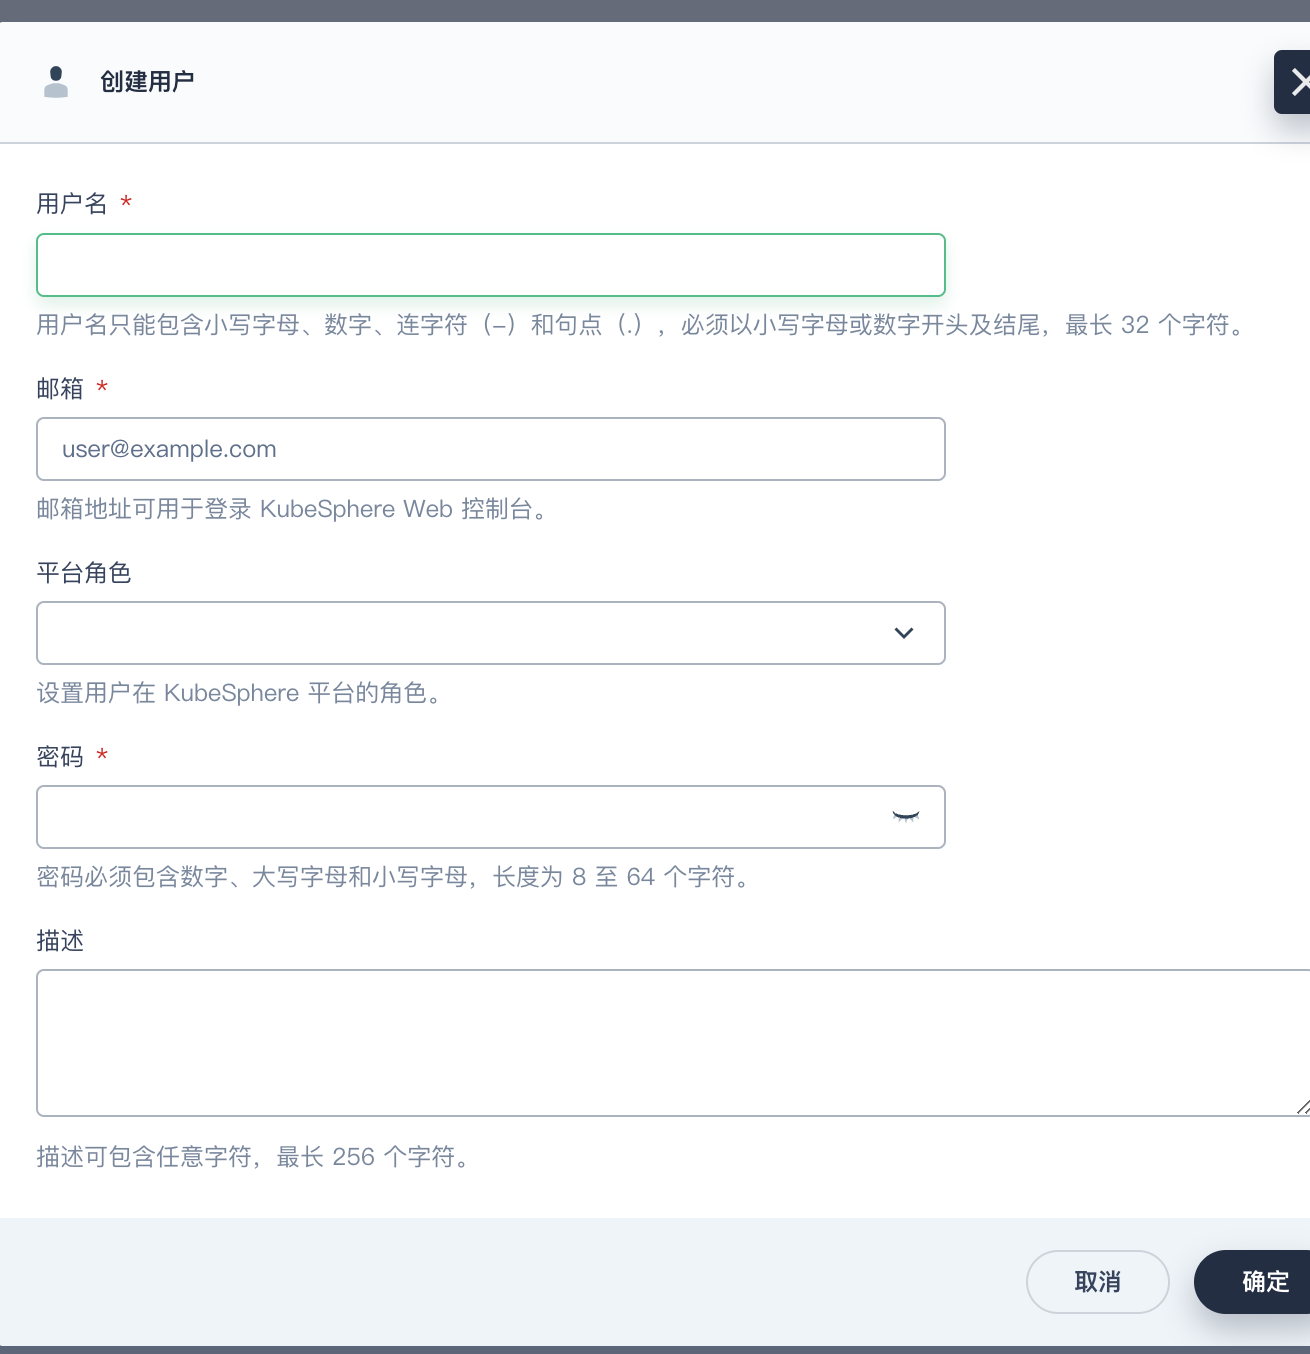
创建用户根据所对应的角色 分配权限
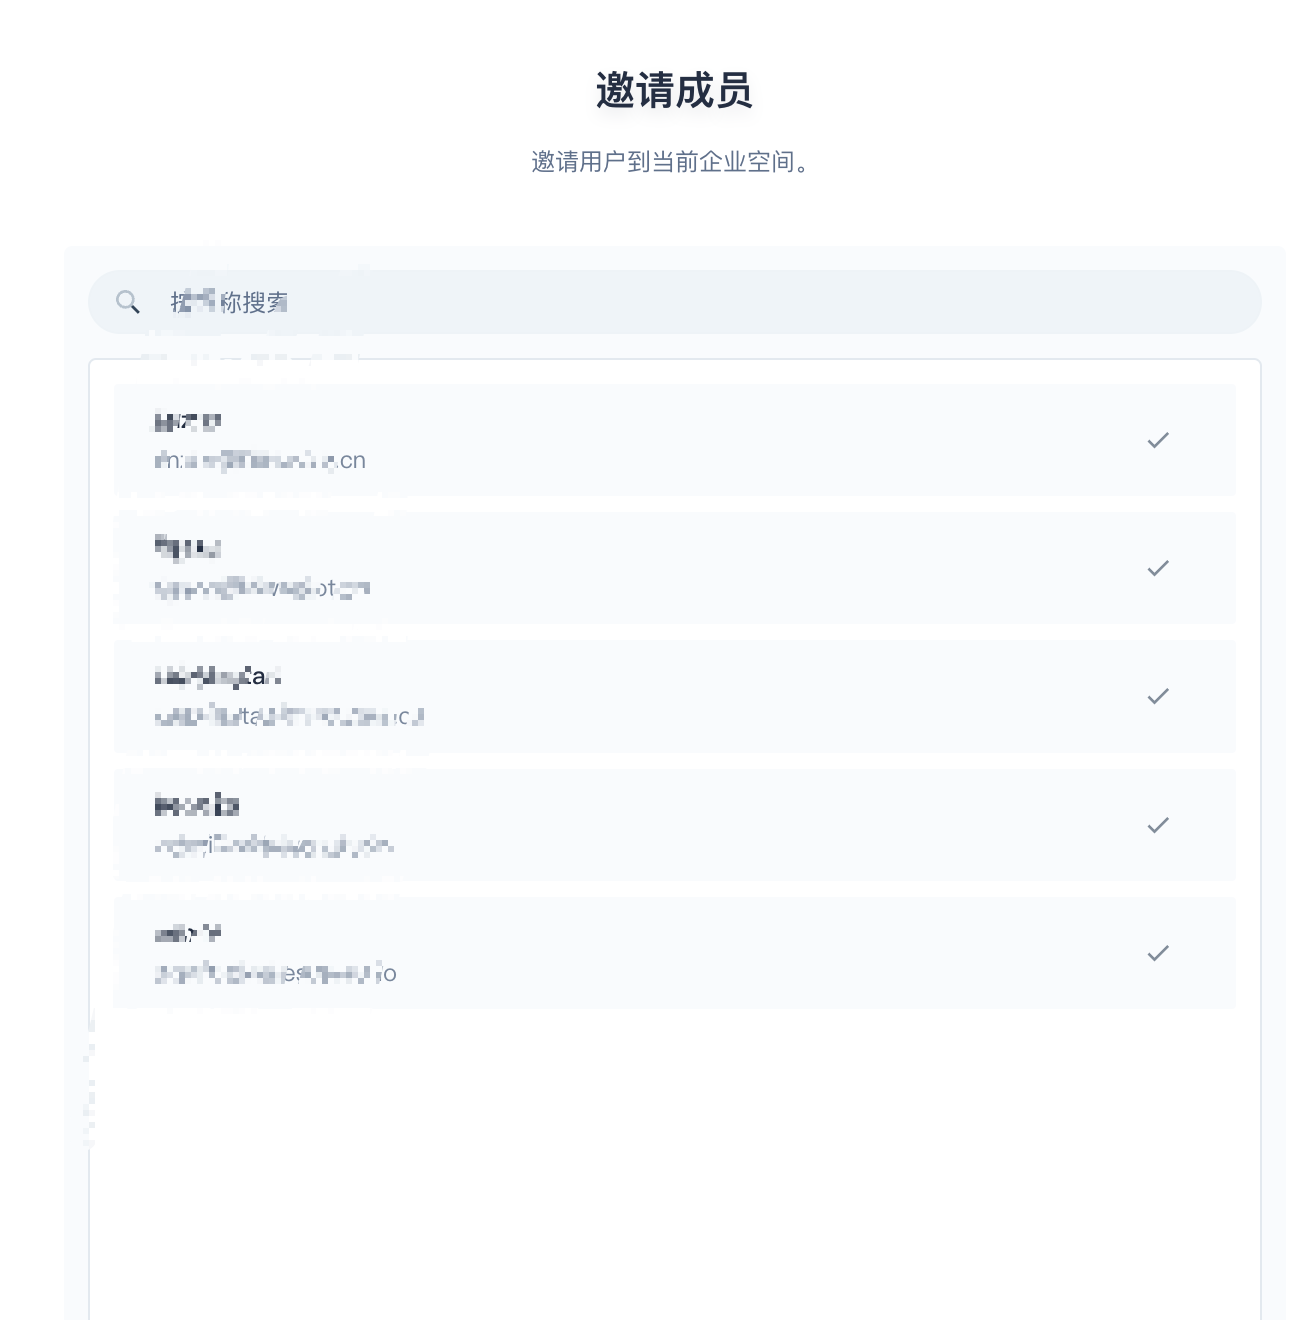
4.企业空间角色与人员加入
可以邀请上一步添加的用户进企业空间
四、项目工程与项目Devops流水线
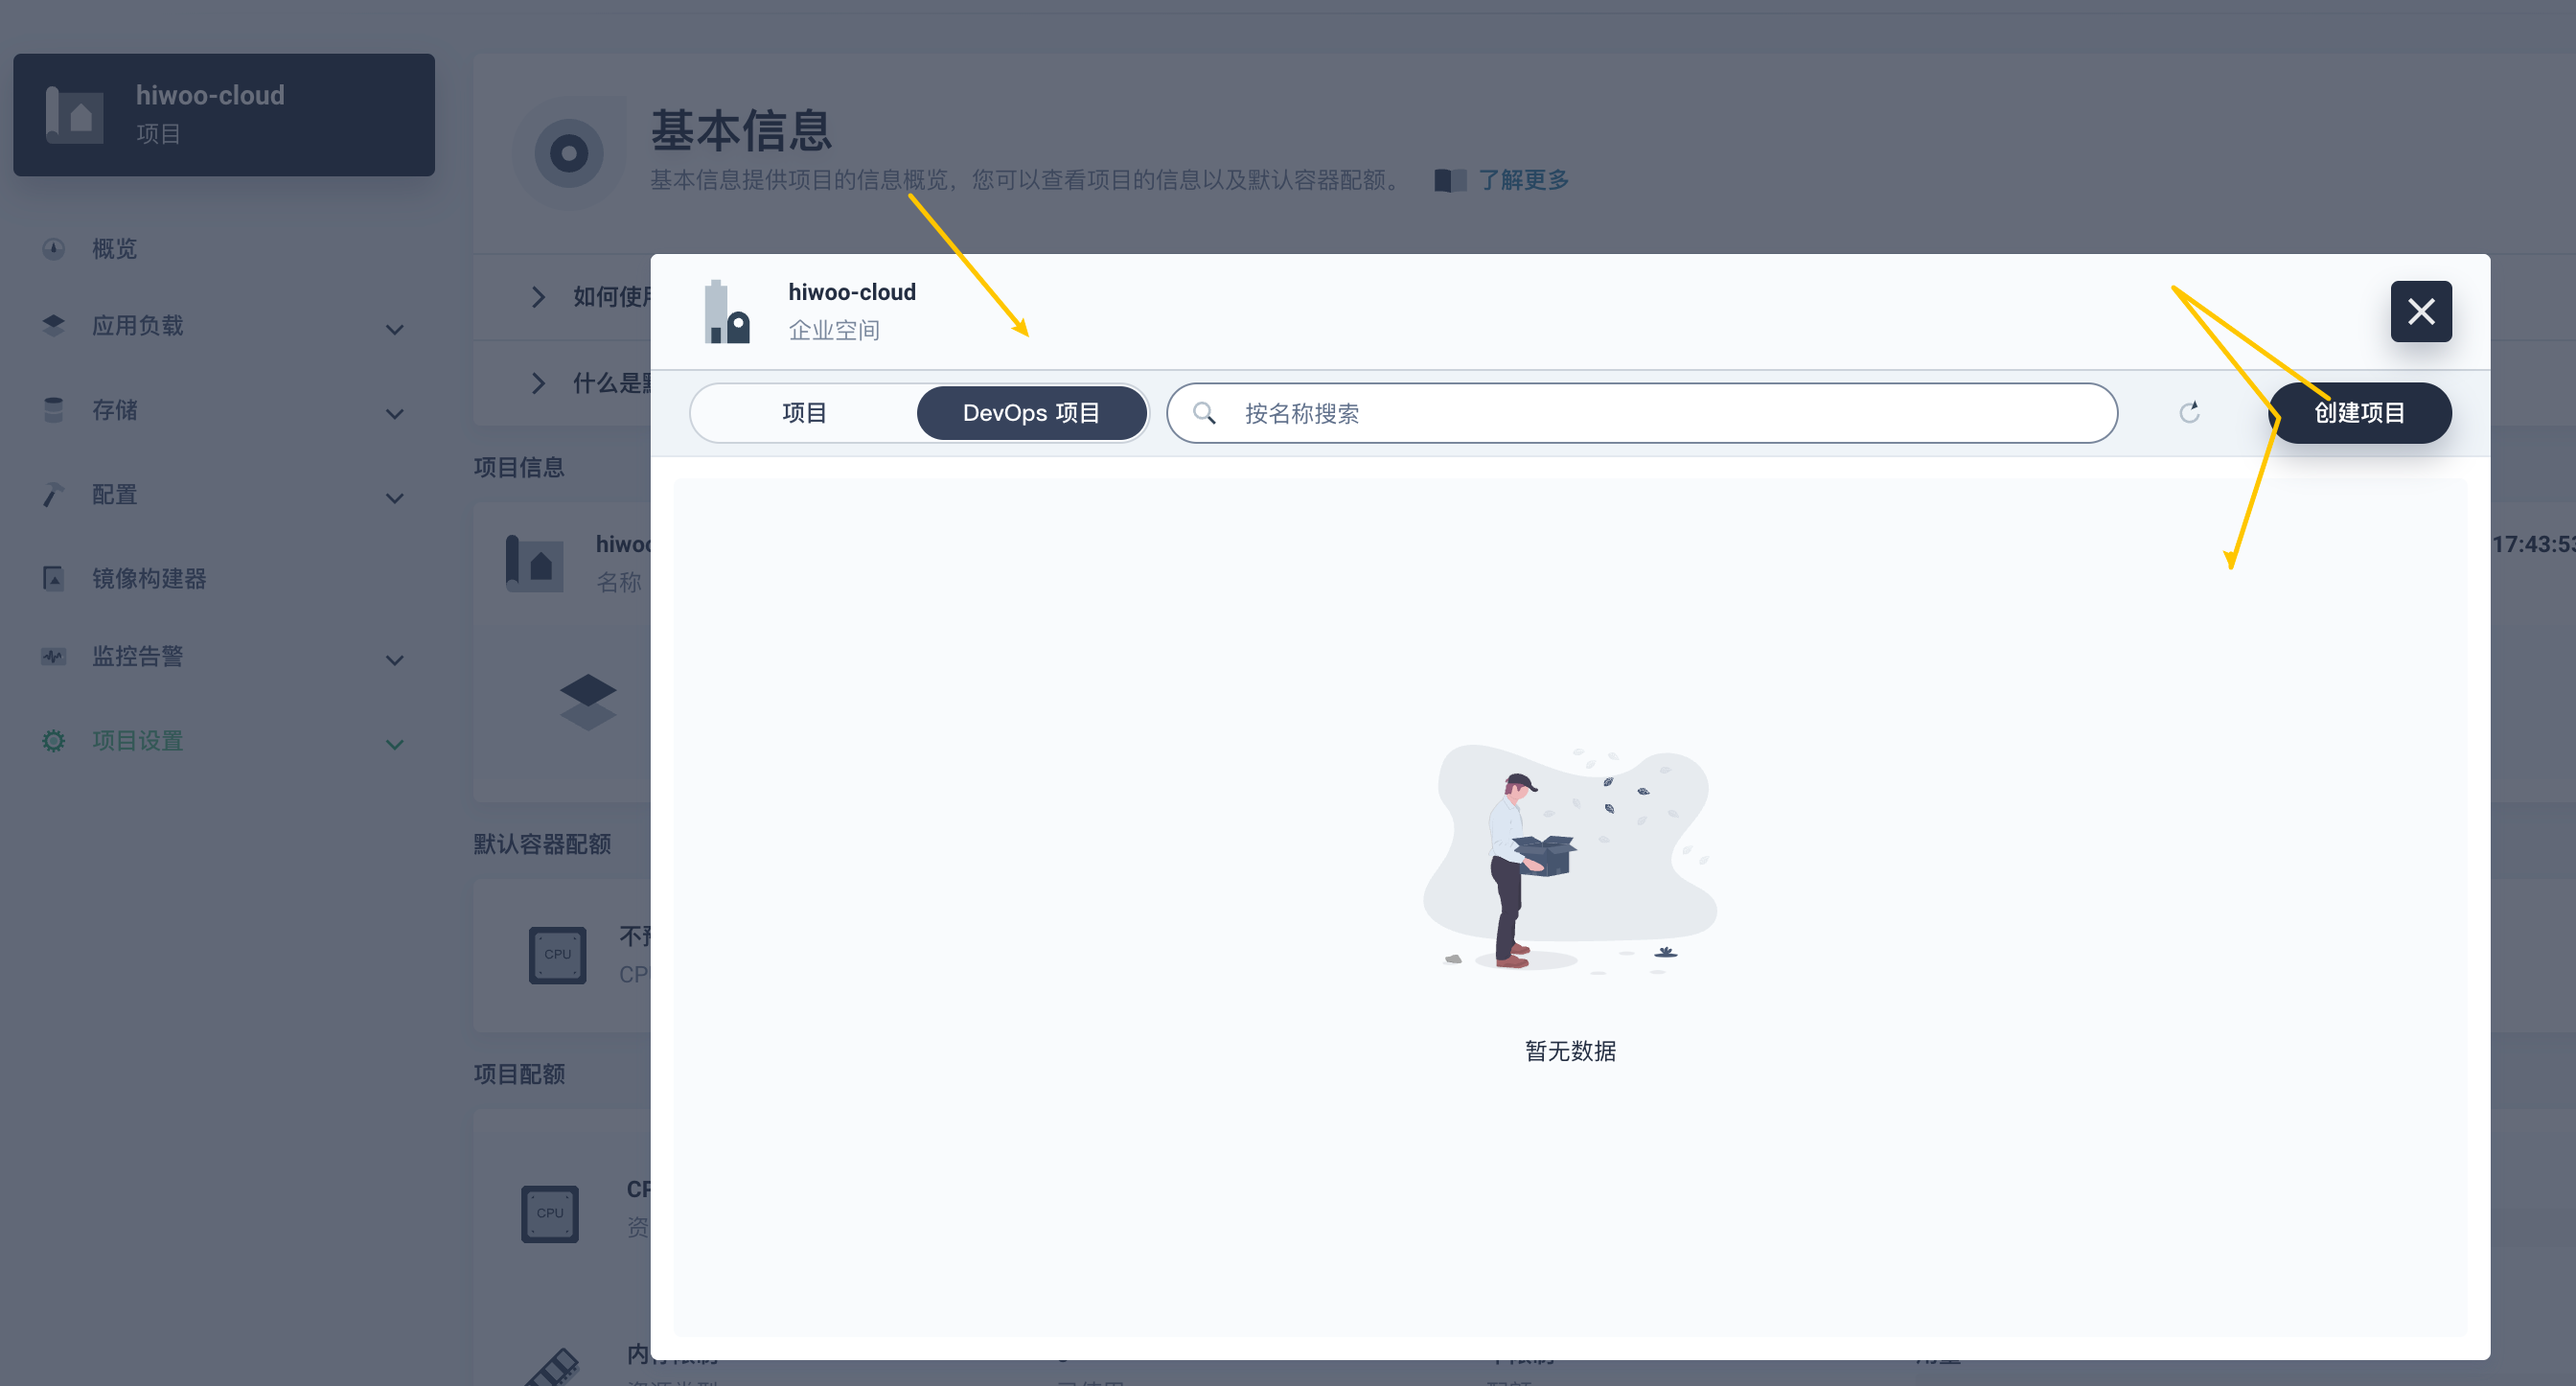
1.创建项目
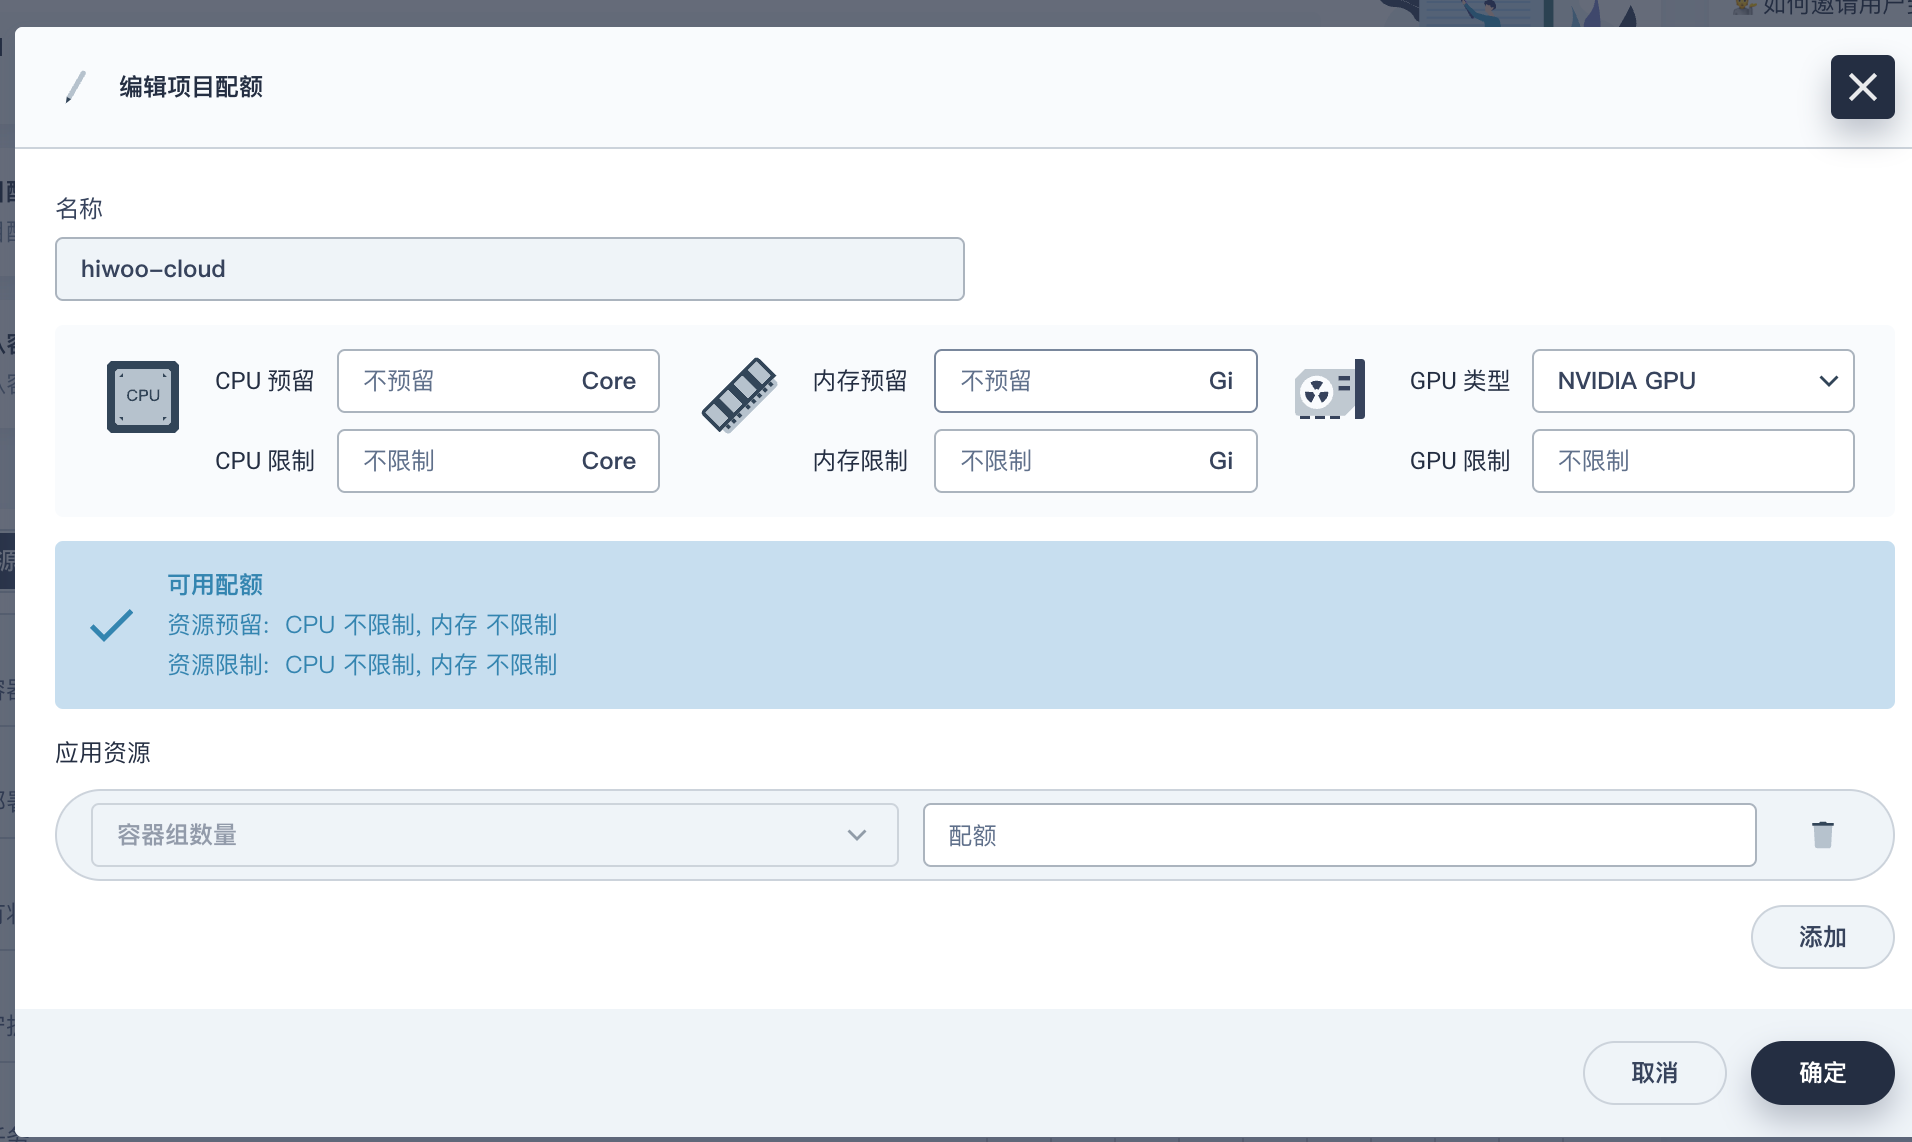
进入企业空间,点击创建项目
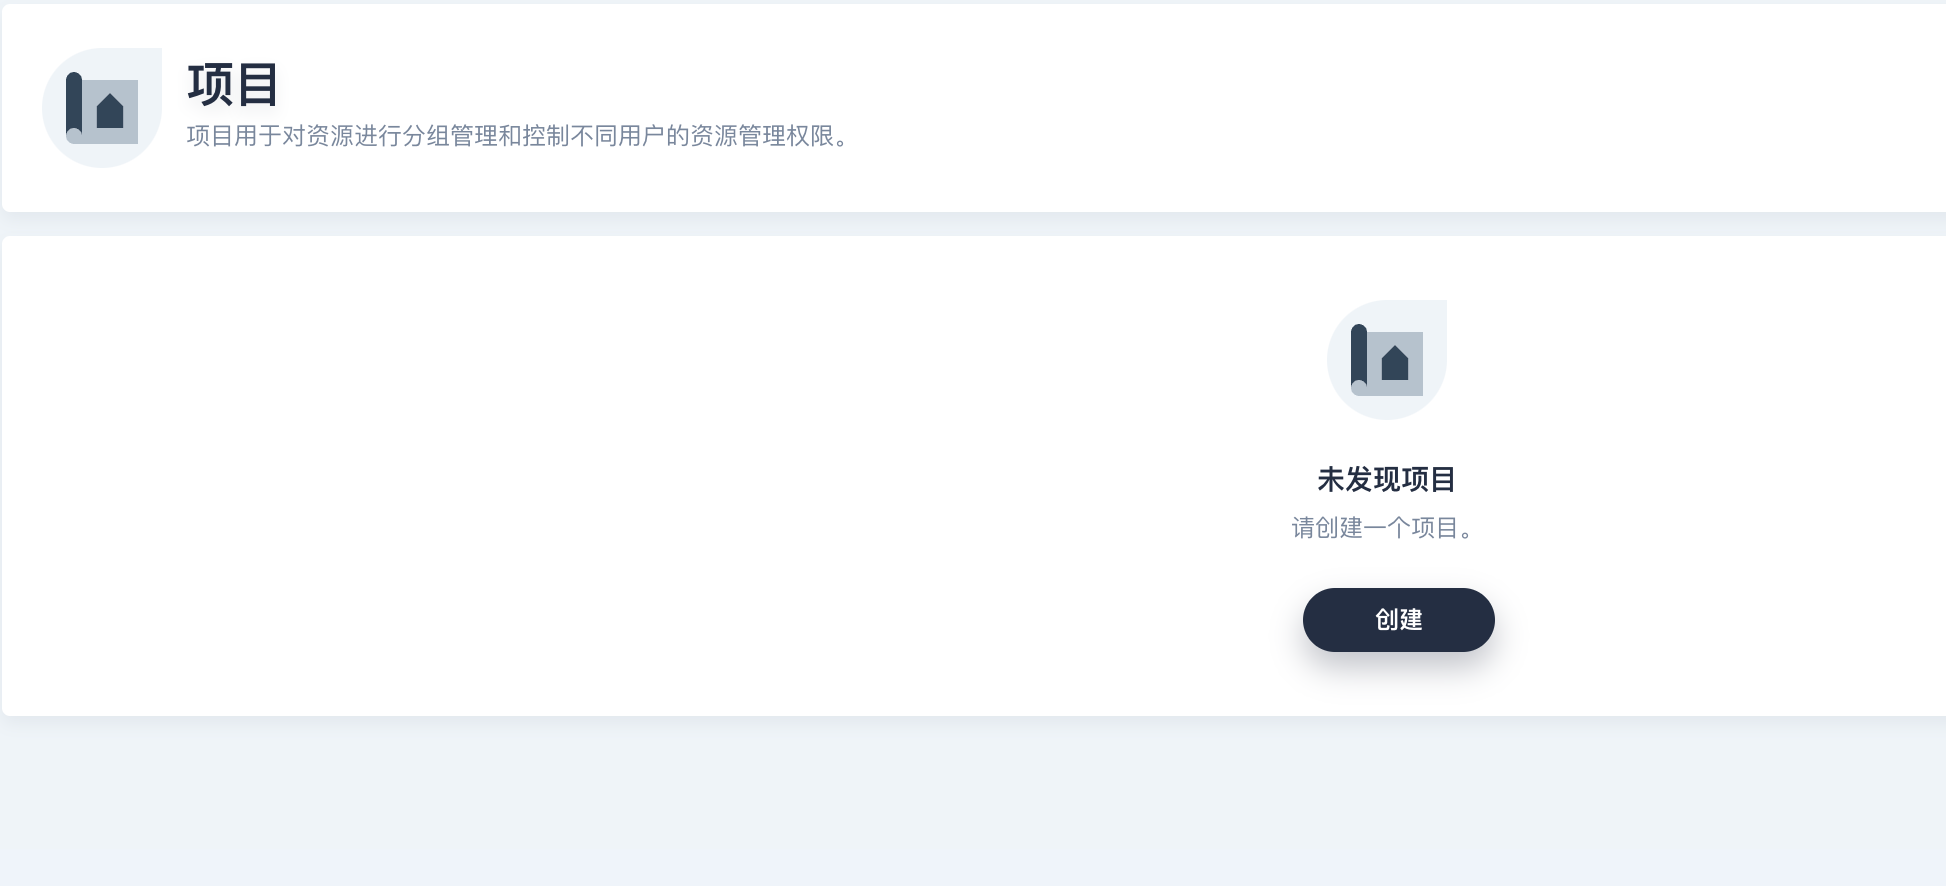
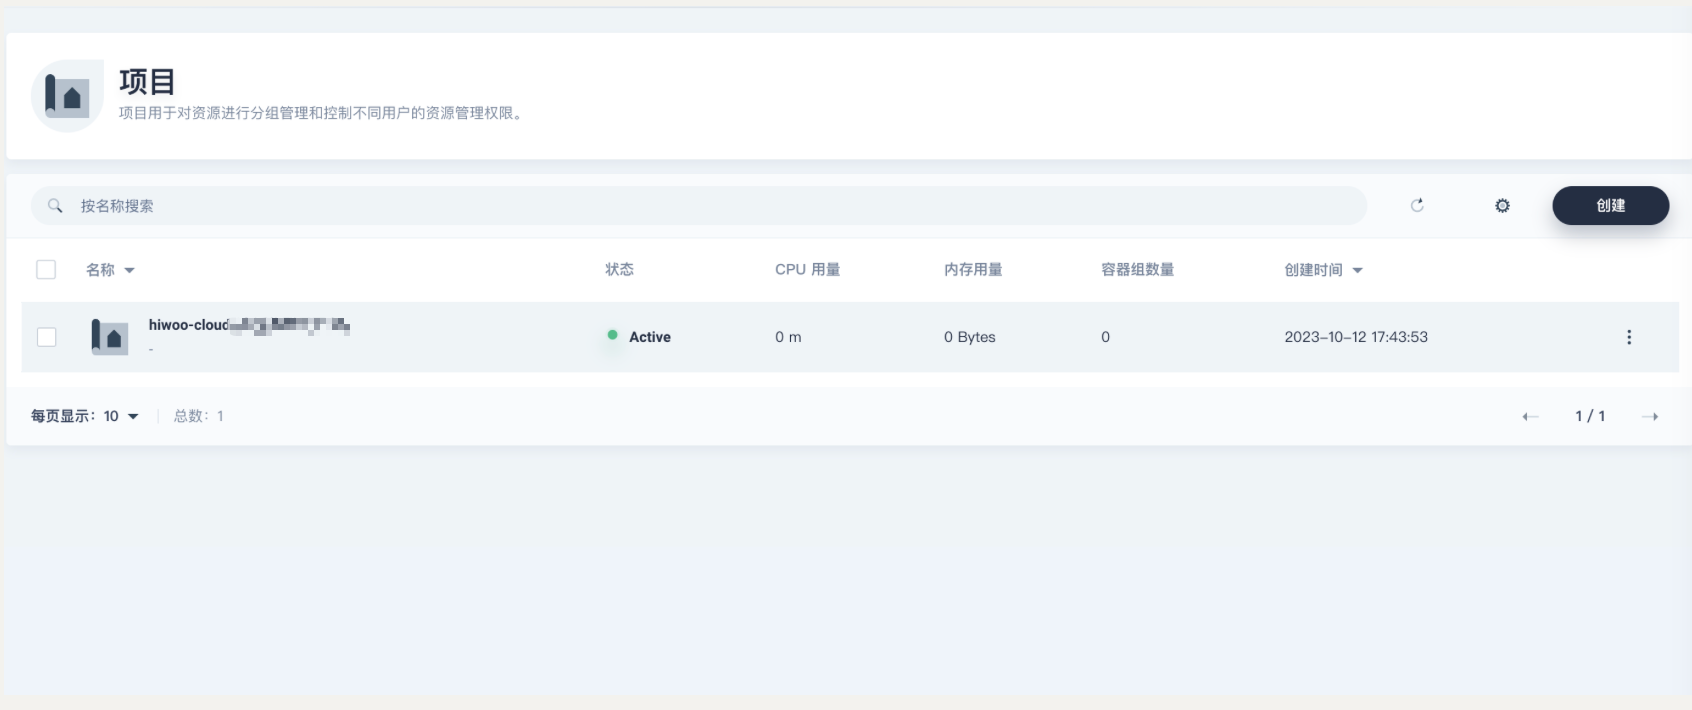
配置项目默认信息,根据实际情况选择配置,我这里默认不限制
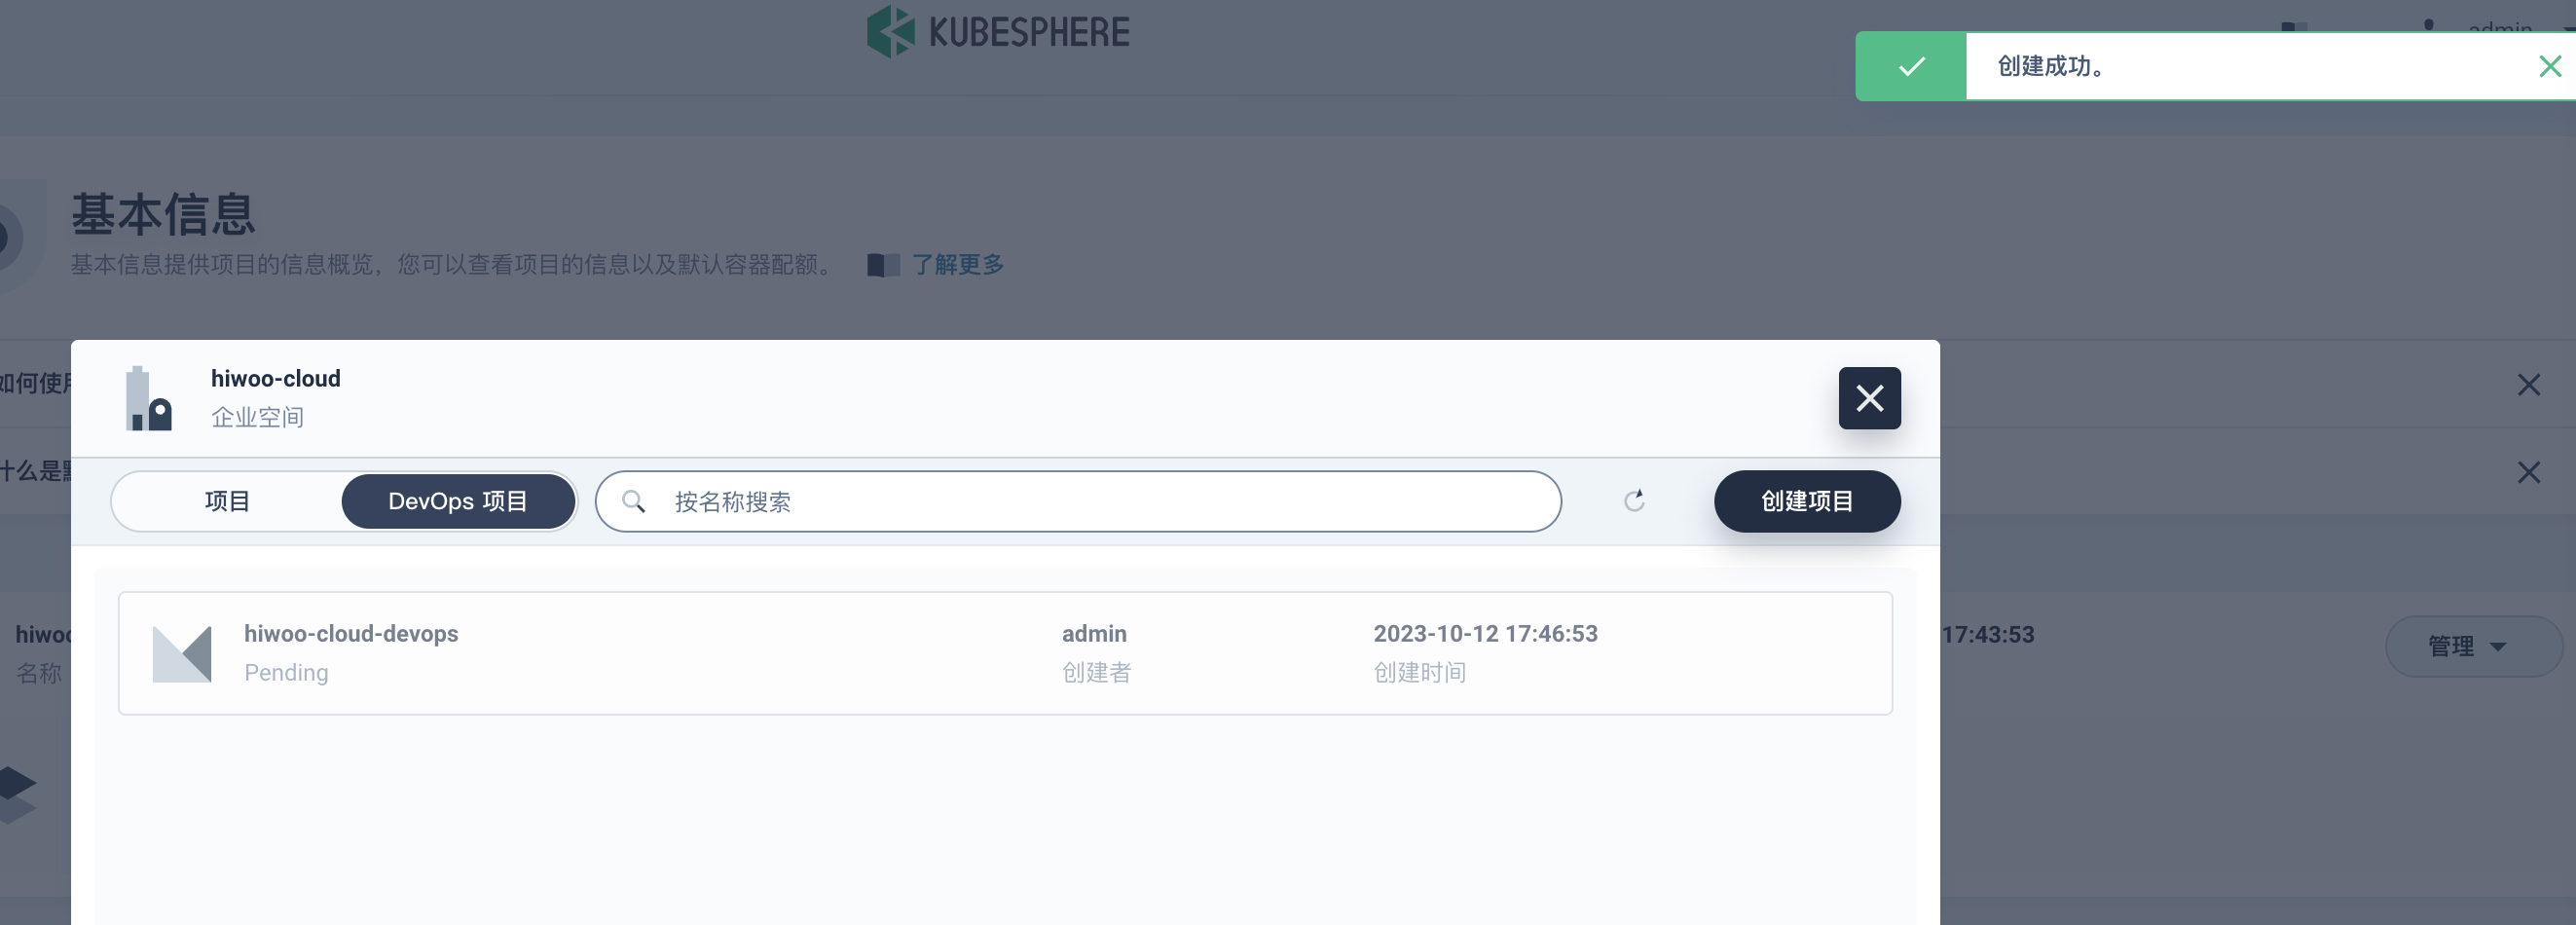
2.创建Devops项目
(需要执行第二步,安装Devops)
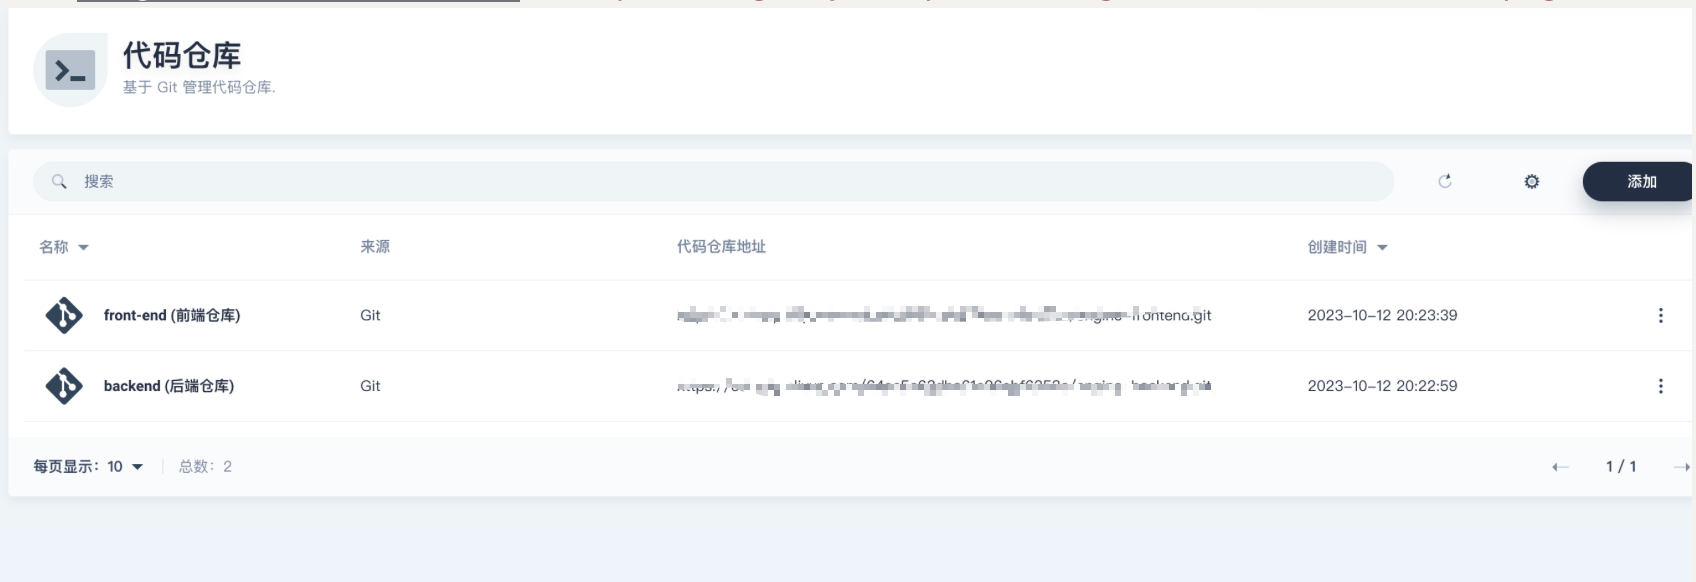
3.配置Devops基础配置
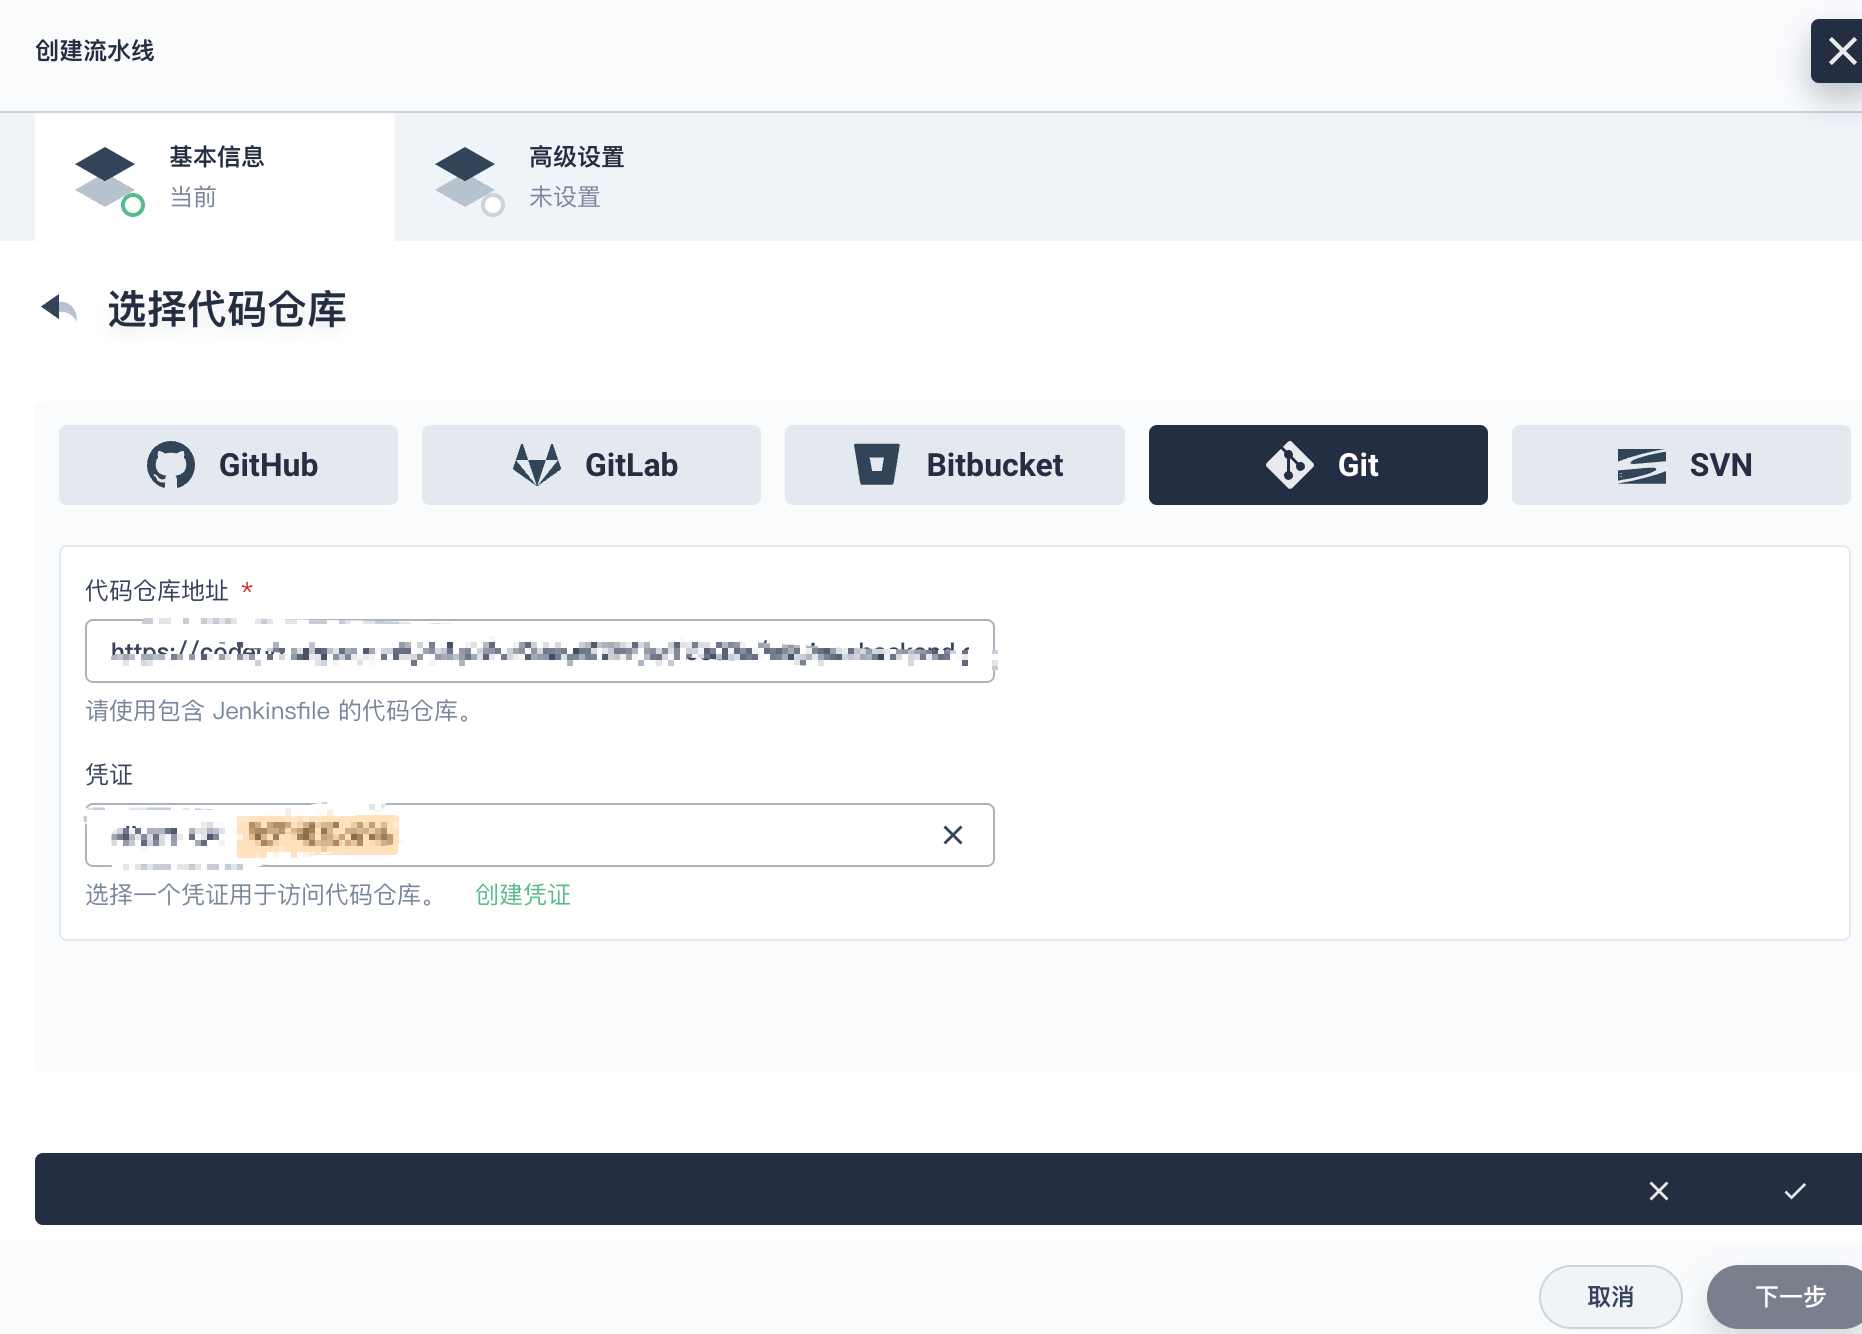
凭证配置 (代码仓库拉取账密)

代码仓库
镜像仓库账密(aliyun-docker-image)
这个镜像仓库的配置在后面会提到

五、项目流水线基础设置
1.创建基础服务流水线
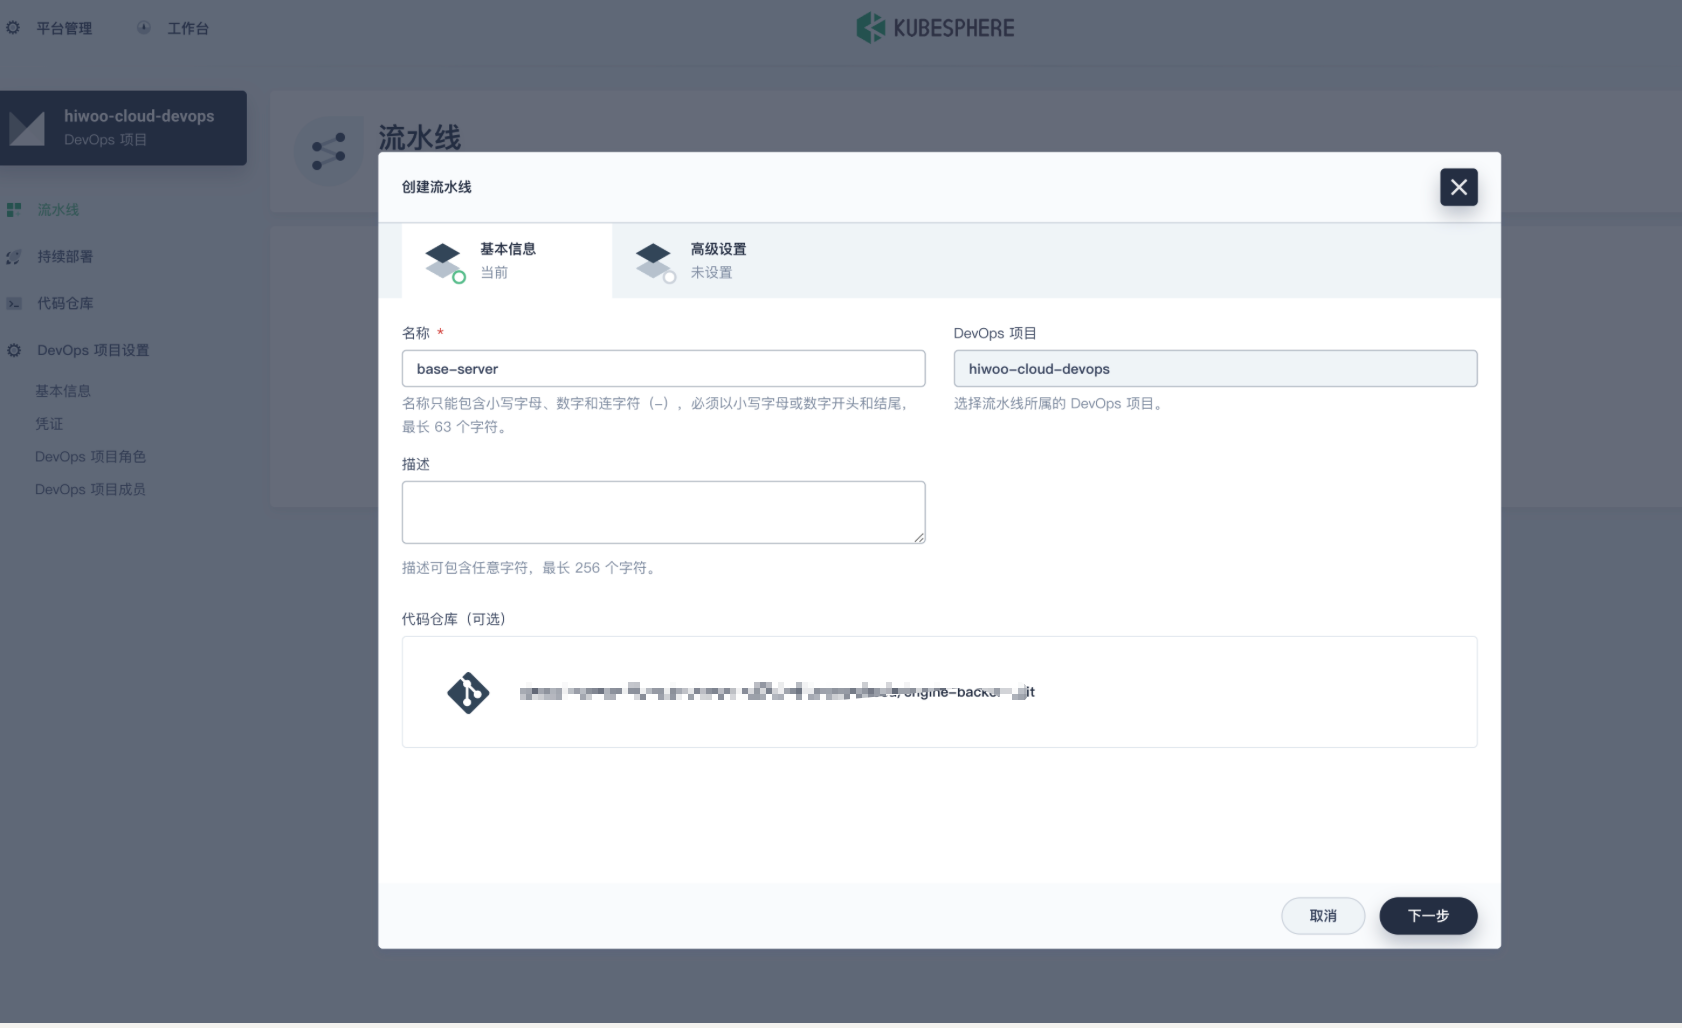
这里选择仓库的分支进行构建
正则表达式格式为:
.*分支名称.*
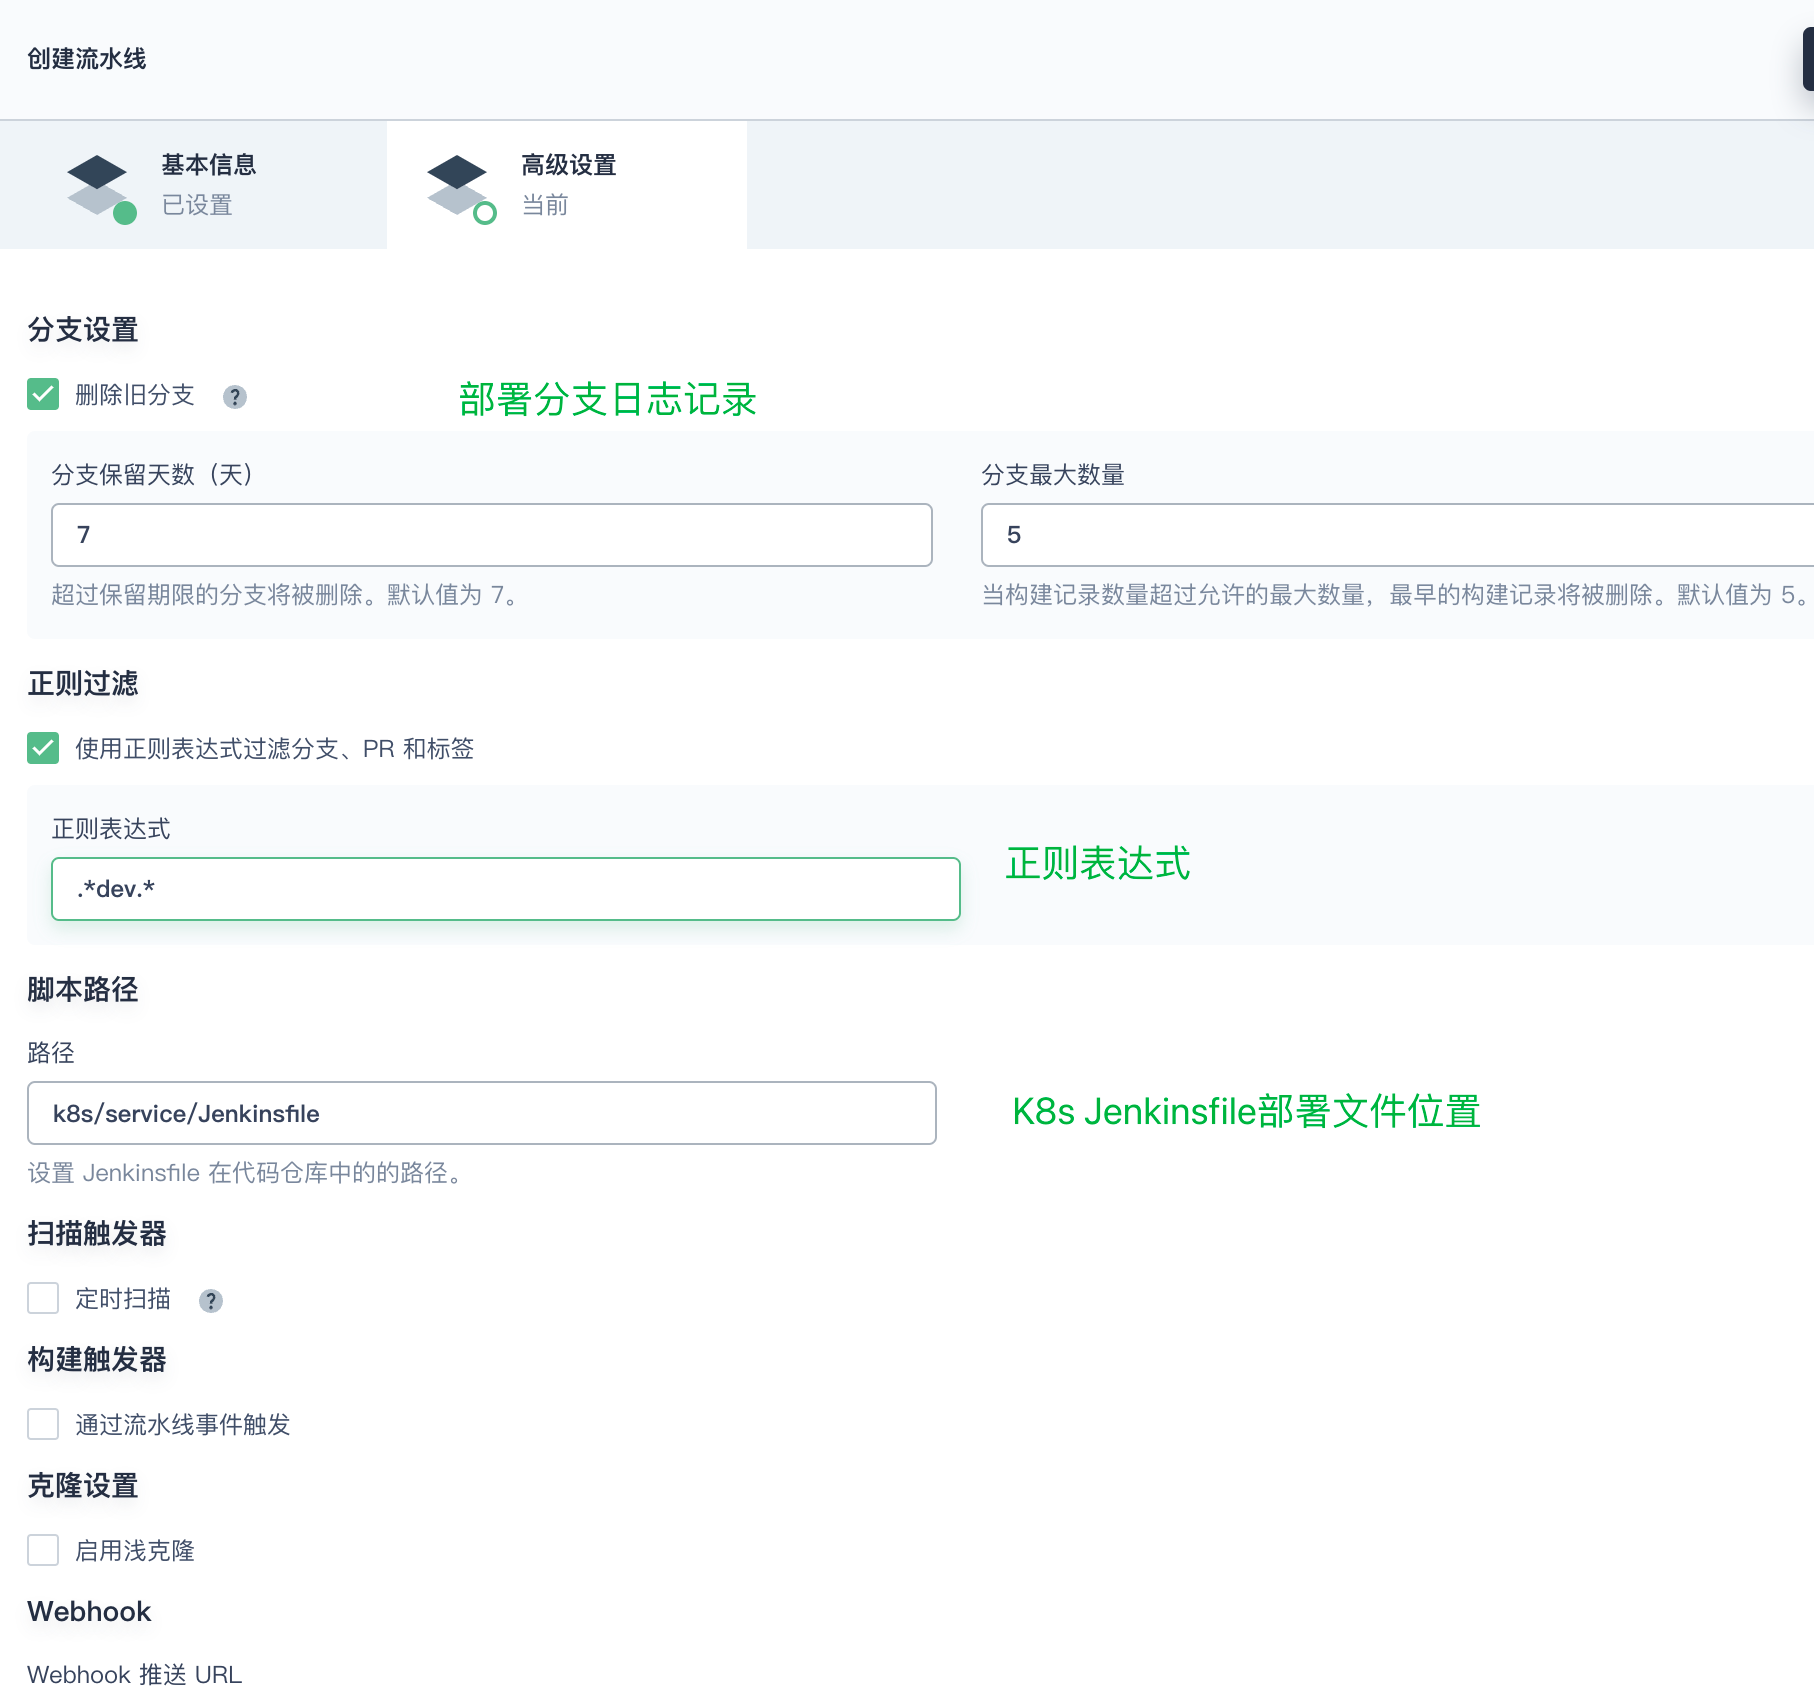
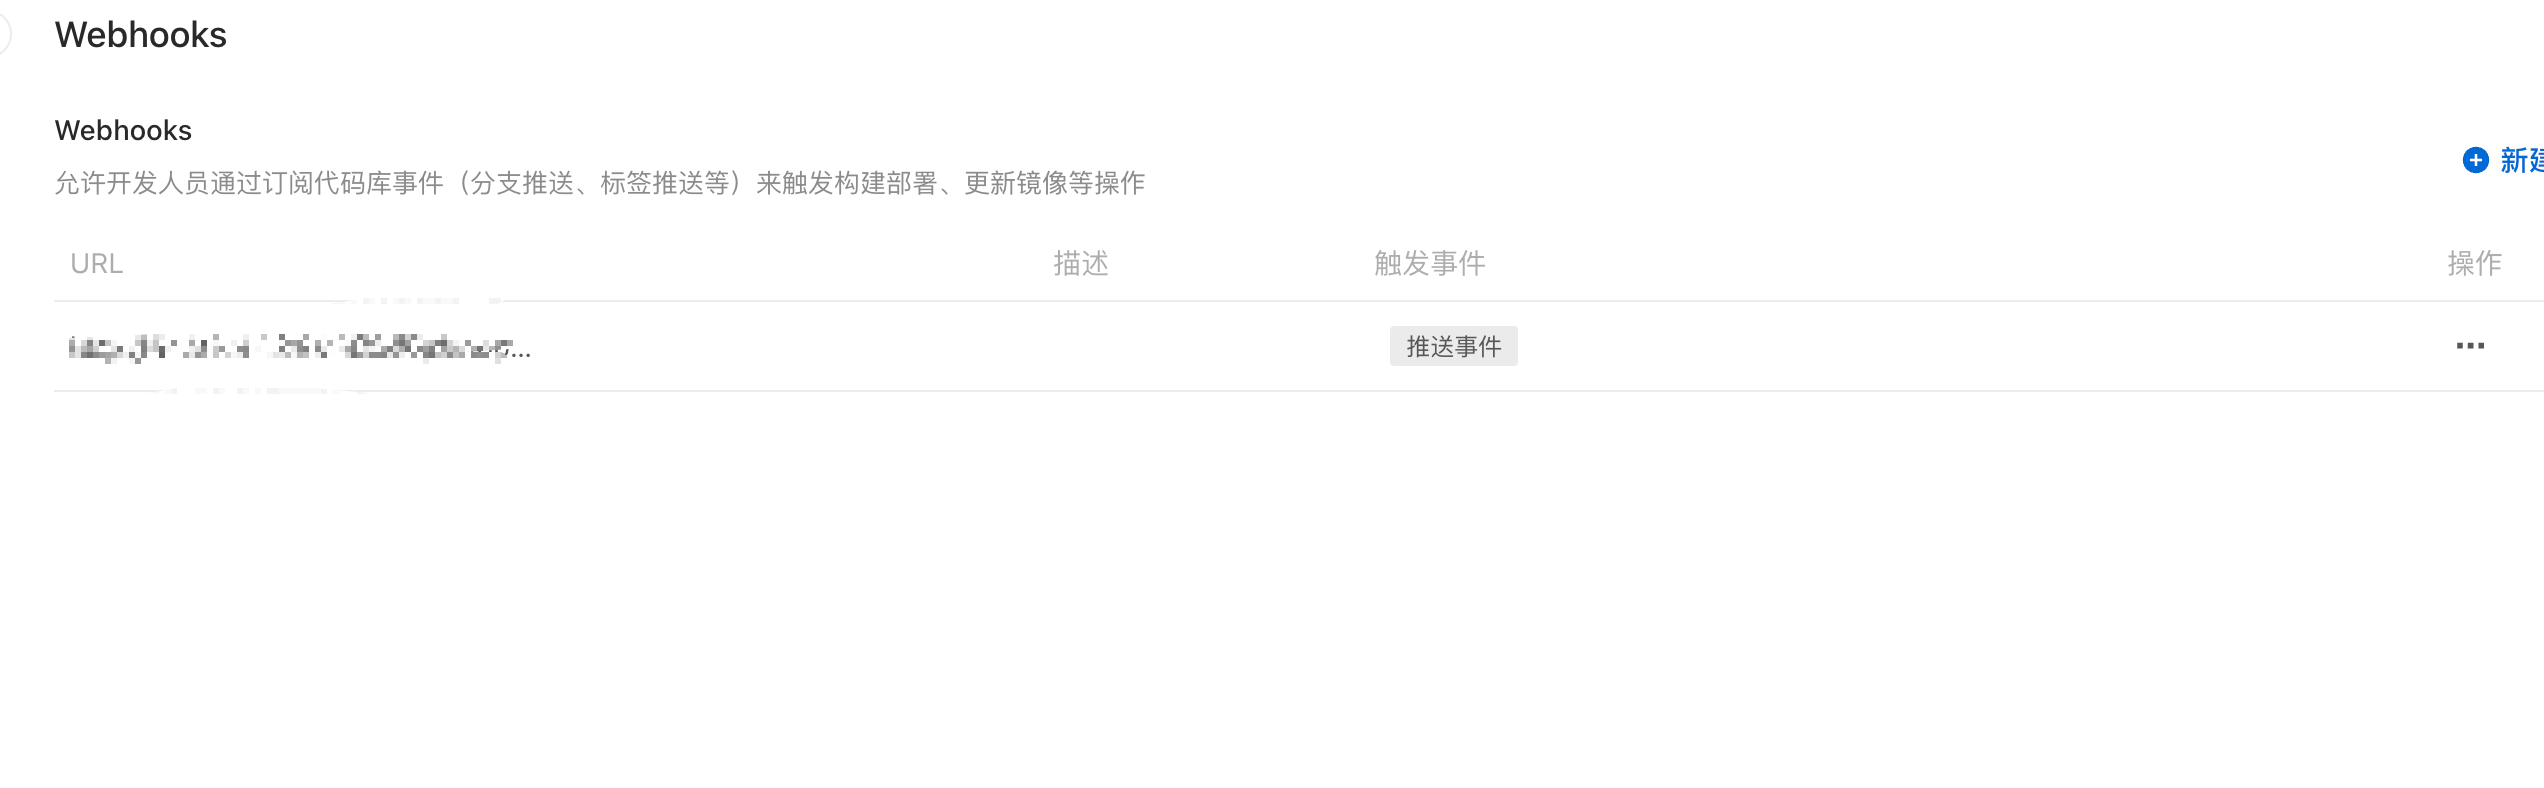
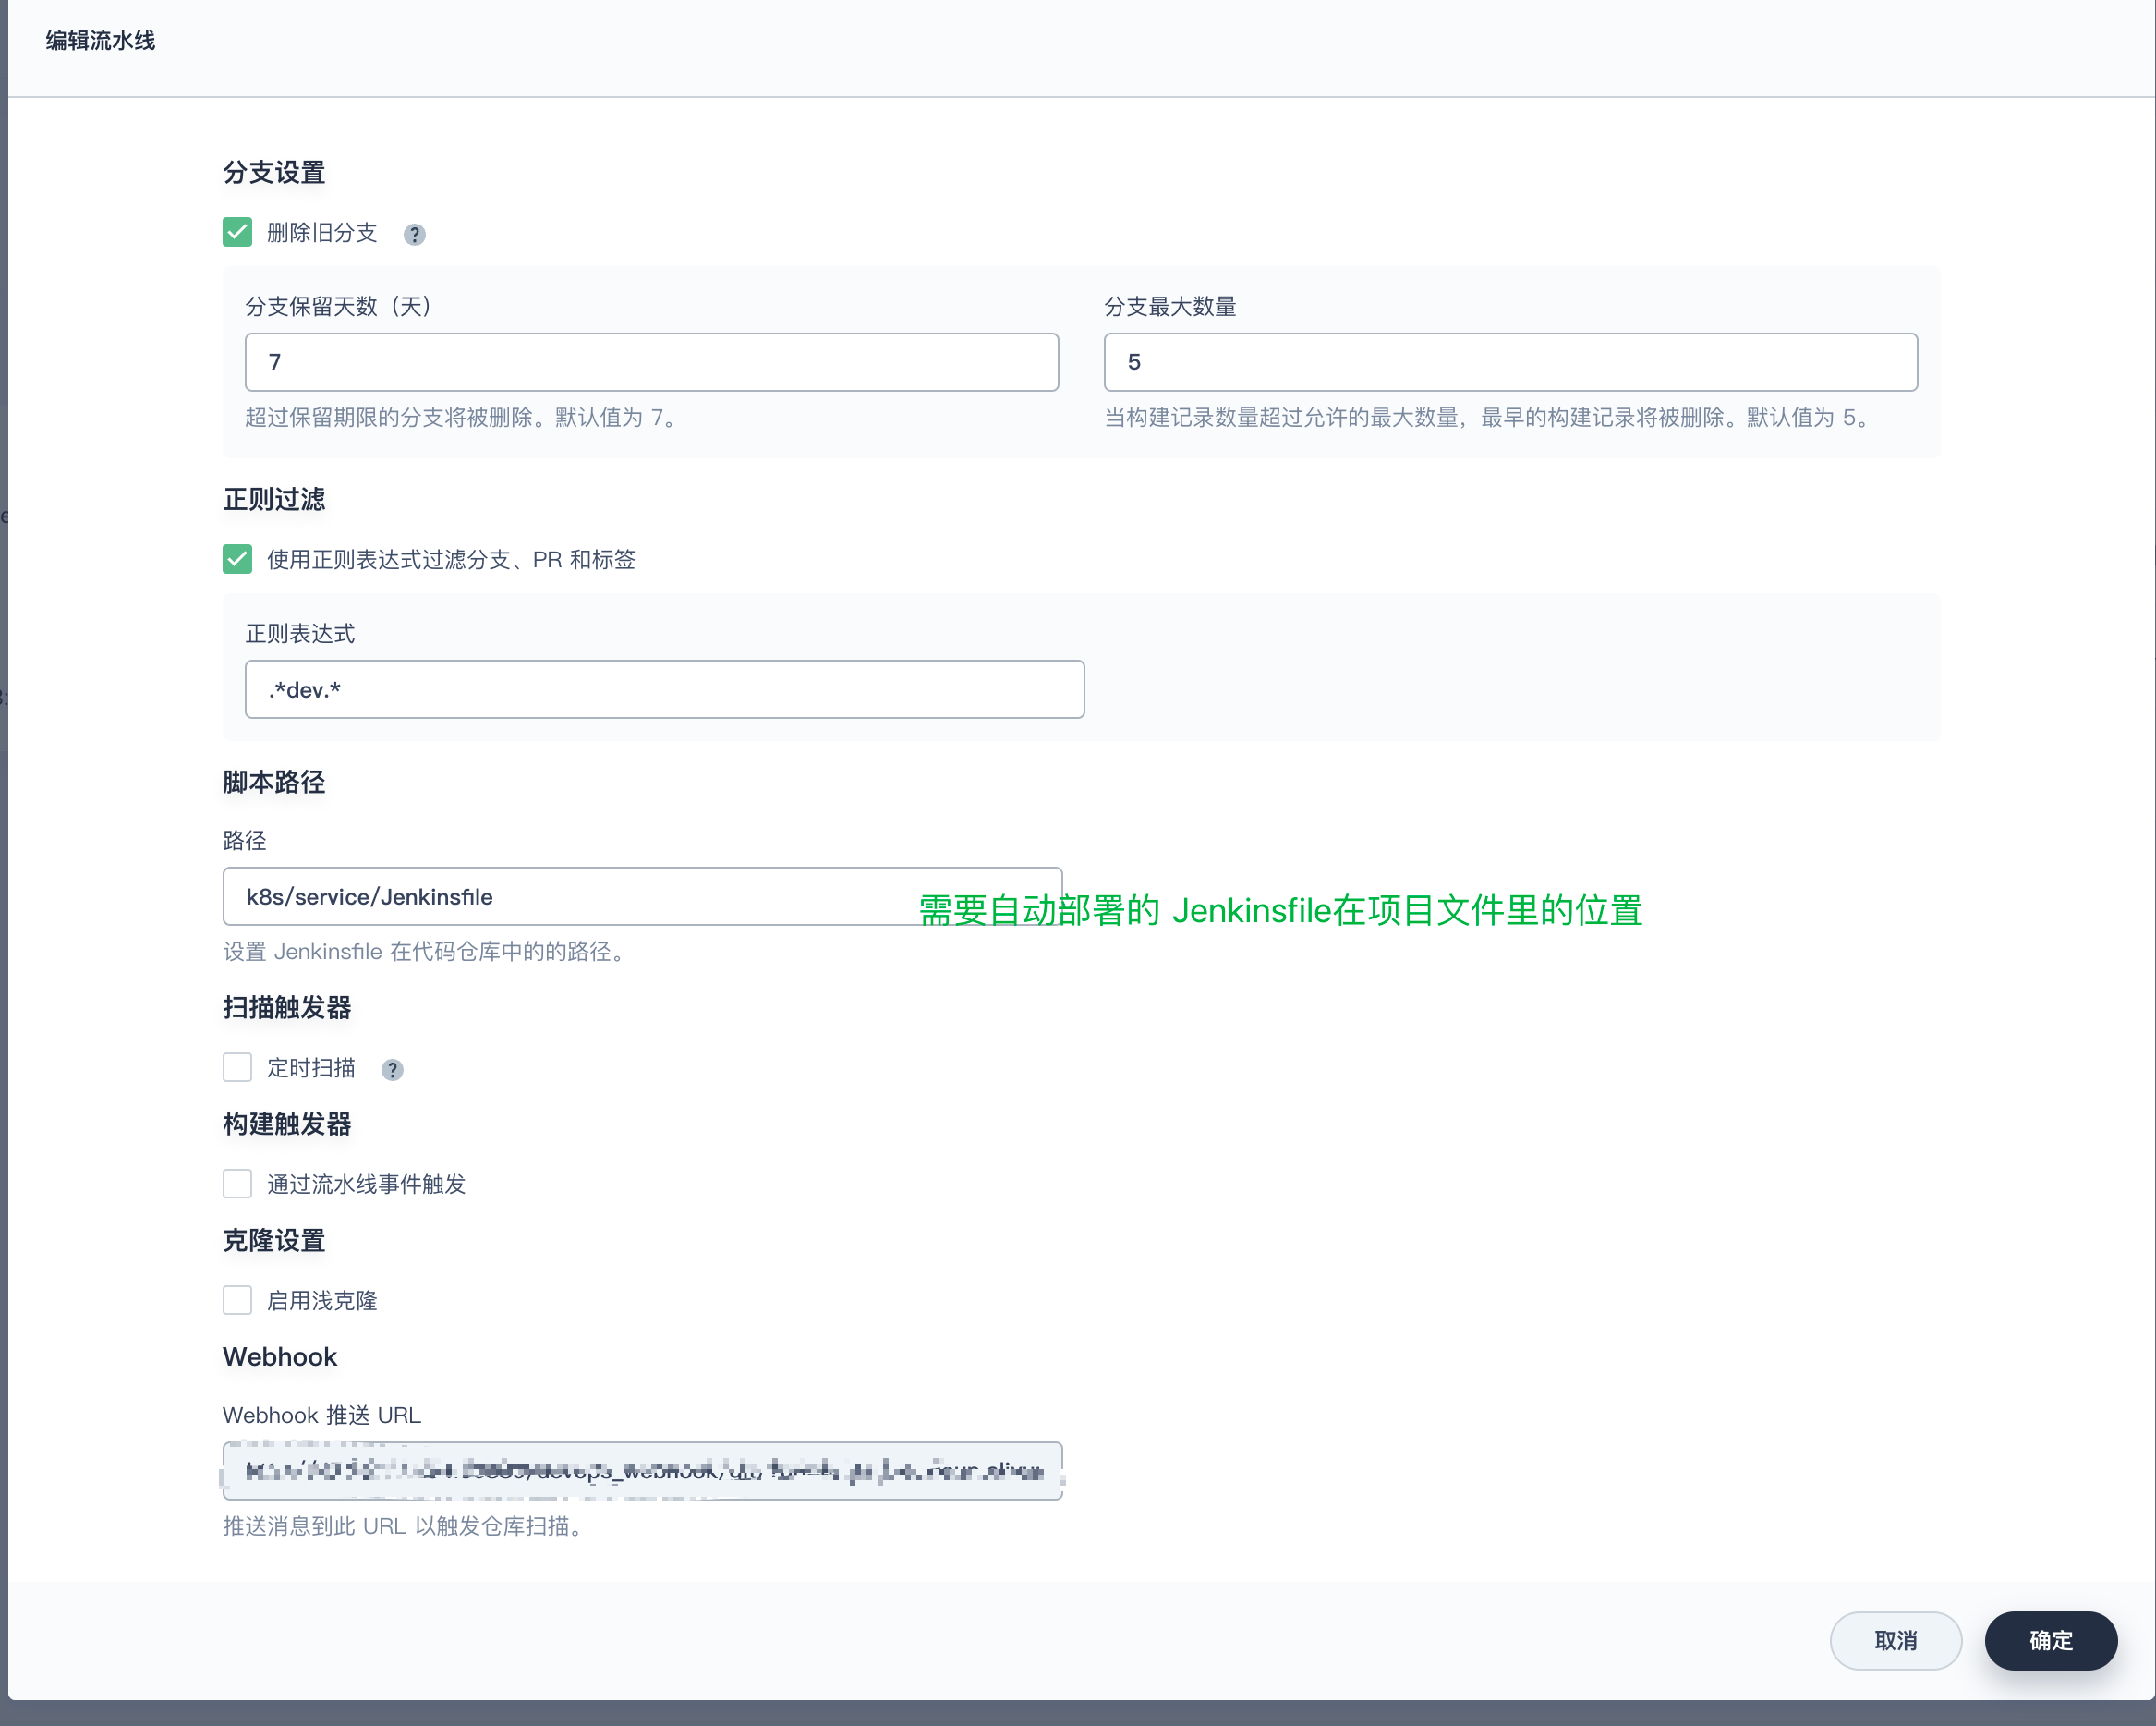
2.Webhook 配置
作用:提交代码到仓库触发流水线自动构建
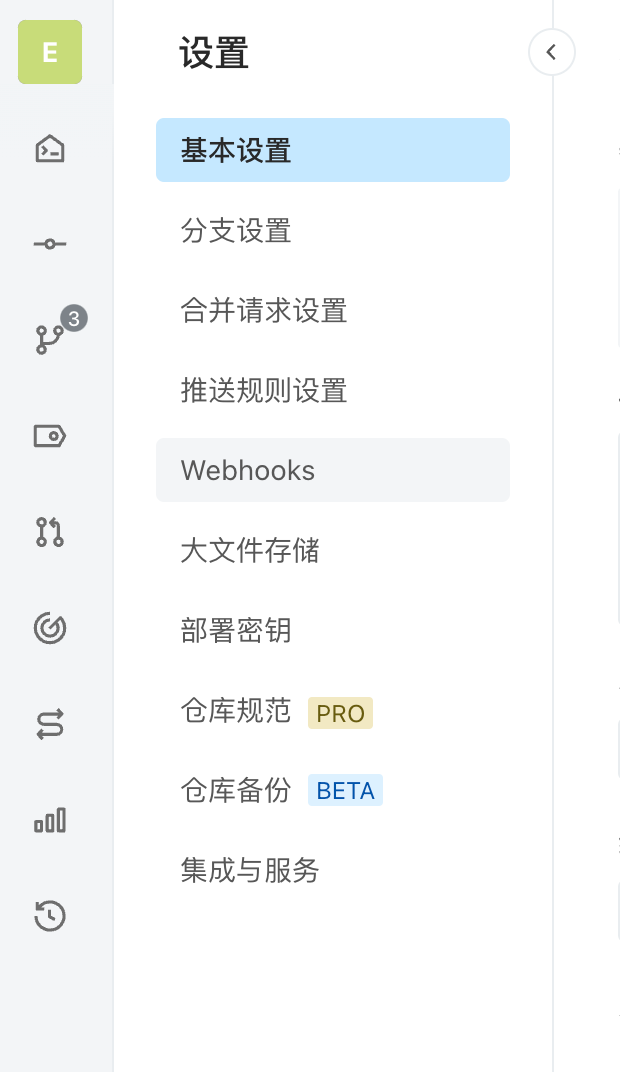
进入远程代码仓库,找到设置
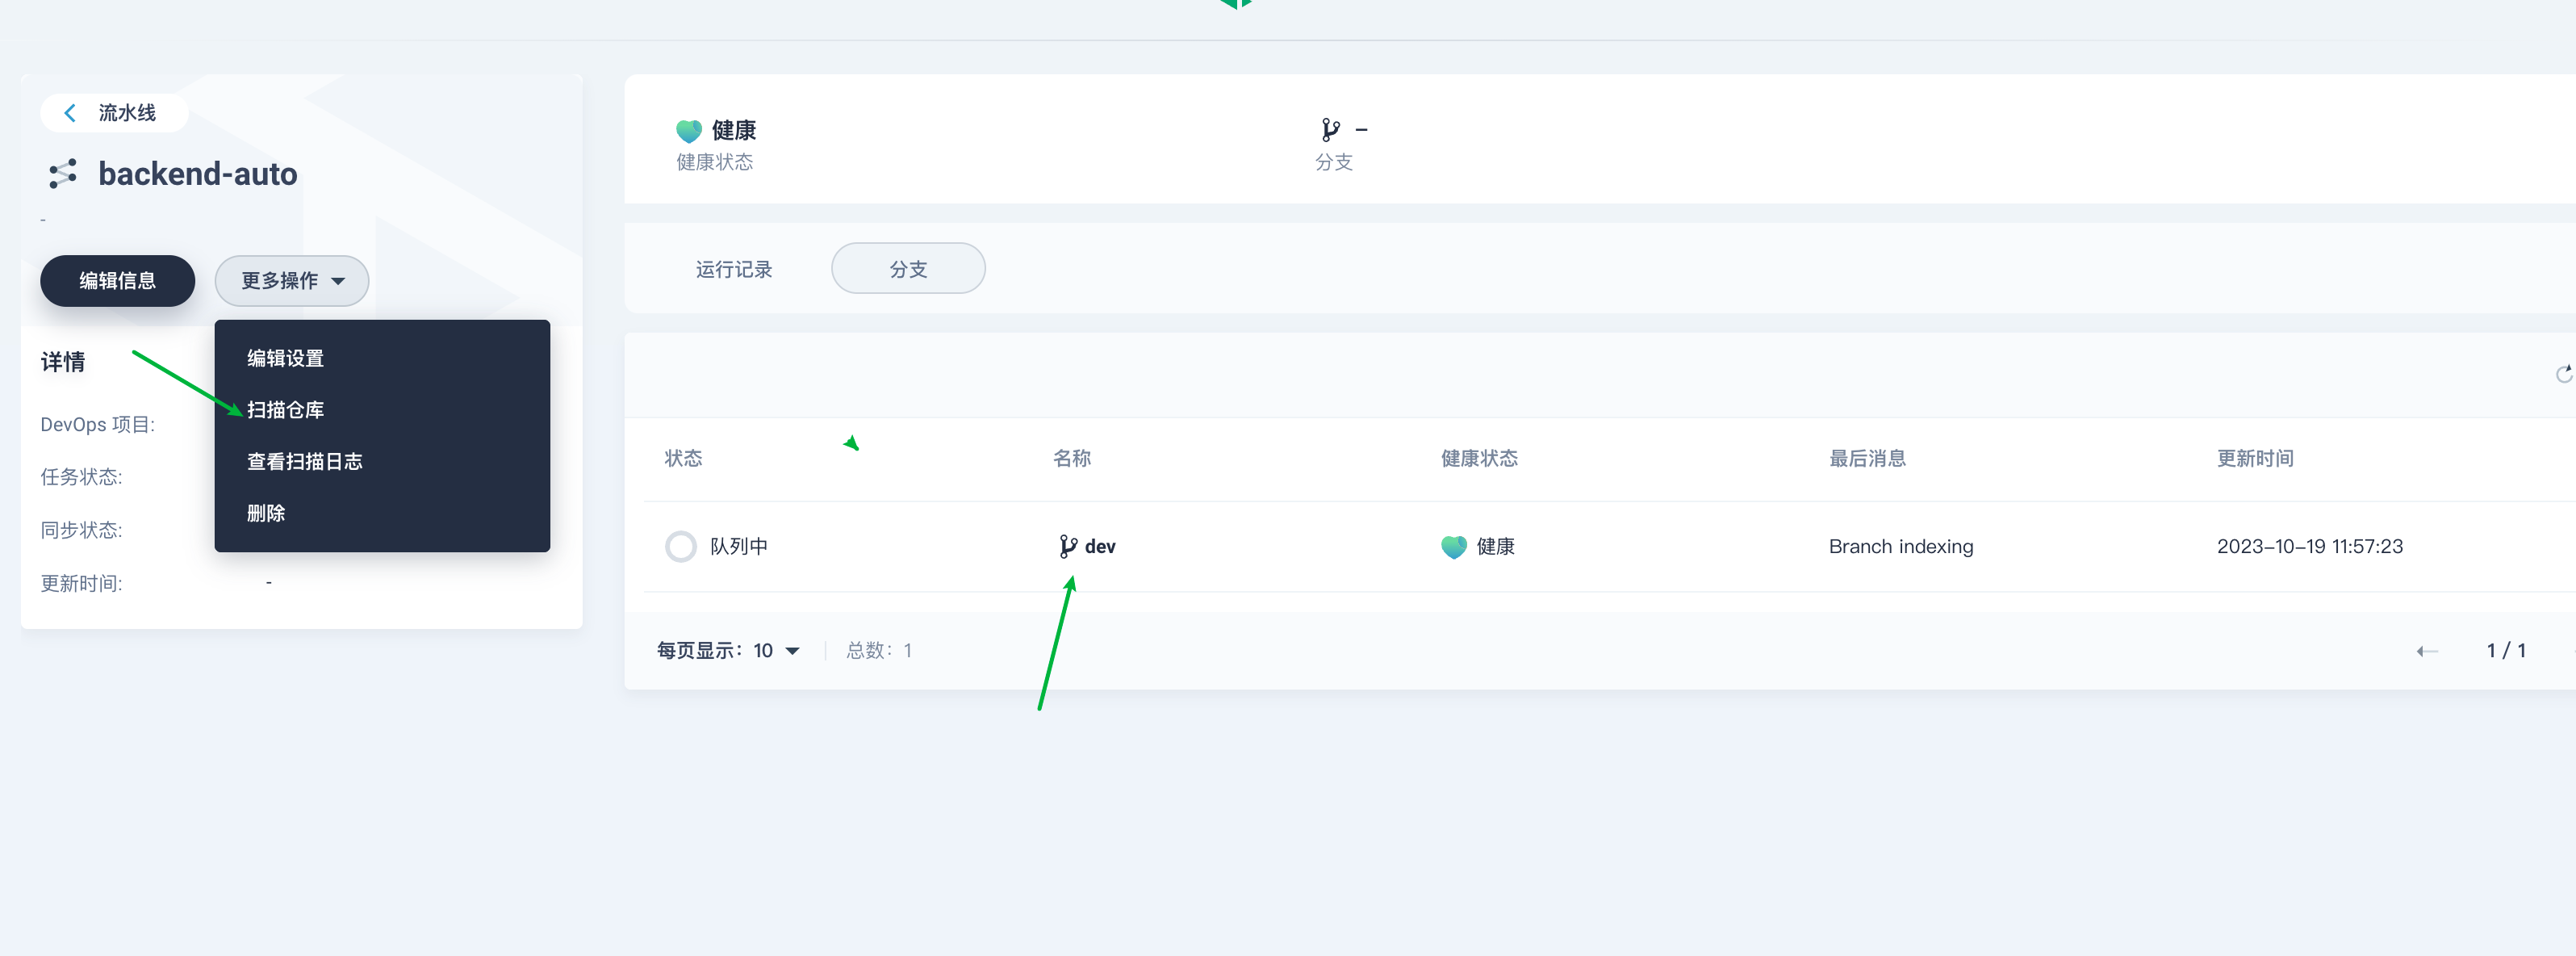
3.项目代码仓库扫码触发
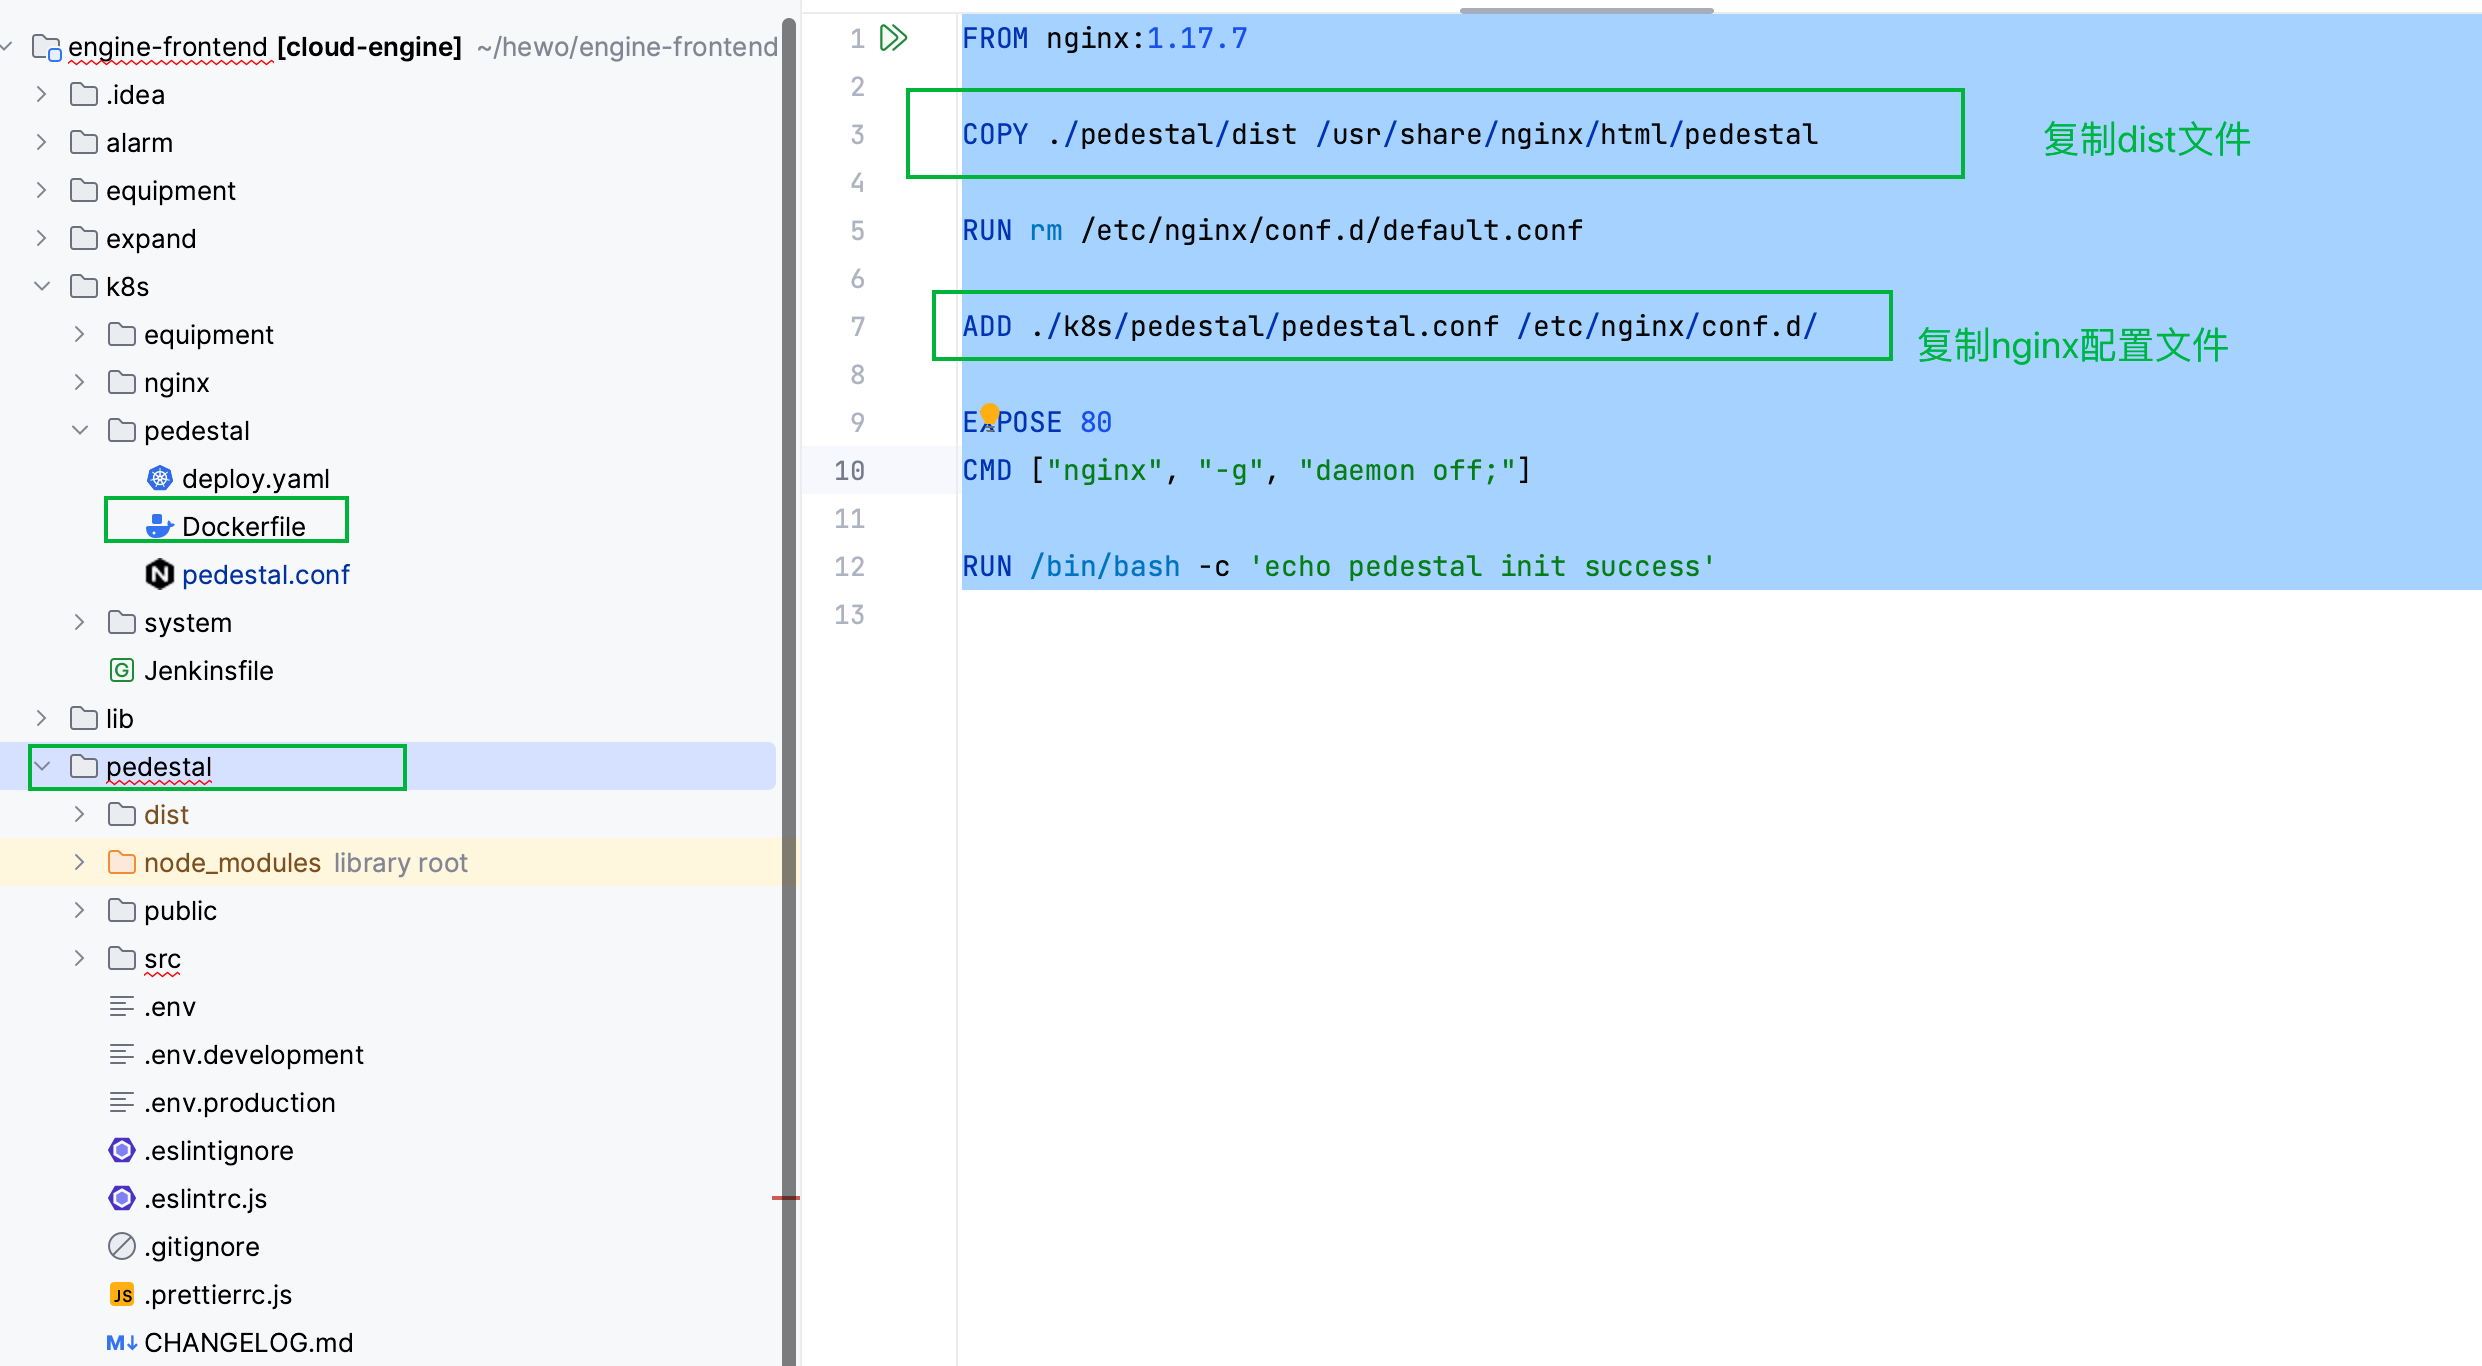
4. 配置项目Dockerfile文件与Deploy.yaml部署配置文件
这里分别以一个前端、后端微服务项目和基础服务项目做举例:
前端
前端项目分层如下:
前端 nginx.conf
server {
    listen 80;                          # 监听端口 80,处理 HTTP 请求
    server_name localhost;               # 服务器名称为 localhost

    gzip on;                             # 启用 Gzip 压缩
    gzip_static on;                      # 启用 Gzip 静态文件压缩,需要http_gzip_static_module模块
    gzip_min_length 1k;                  # 最小文件大小 1KB 才进行 Gzip 压缩
    gzip_comp_level 4;                   # Gzip 压缩级别
    gzip_proxied any;                    # 压缩代理请求
    gzip_types text/plain text/xml text/css; # 压缩的文件类型
    gzip_vary on;                        # 启用根据 Accept-Encoding 头设置 Vary 头
    gzip_disable "MSIE [1-6]\.(?!.*SV1)";  # 禁用某些旧版 IE 的 Gzip

    # 前端打包好的dist目录文件
    location / {
        add_header Access-Control-Allow-Origin  *;
        add_header Access-Control-Allow-Headers X-Requested-With;
        add_header Access-Control-Allow-Methods GET,POST,PUT,DELETE,PATCH,OPTIONS;

        try_files $uri $uri/ /index.html;
        root /usr/share/nginx/html/pedestal/;  # 指定根目录
        index index.html index.htm;           # 默认的索引文件
    }

    location /cloud-basic/ {
        add_header Access-Control-Allow-Origin  *;
        add_header Access-Control-Allow-Headers X-Requested-With;
        add_header Access-Control-Allow-Methods GET,POST,PUT,DELETE,PATCH,OPTIONS;

        try_files $uri $uri/ /index.html;
        root /usr/share/nginx/html/;
        index index.html index.htm;
    }

    location /systemServer/ {
        rewrite ^/systemServer(.*)$ $1 break;
        proxy_set_header X-Forwarded-For $proxy_add_x_forwarded_for;
        proxy_set_header Host $http_host;
        proxy_set_header X-Forwarded-Proto https;
        proxy_set_header Upgrade $http_upgrade;
        proxy_set_header Connection "upgrade";
        proxy_redirect off;
        proxy_connect_timeout 240;
        proxy_send_timeout 240;
        proxy_read_timeout 240;
        proxy_pass http://hiwoo-system-service.hiwoo-cloud:20002; # 映射K8s 中后端对应服务的DNS和端口
    }

    location /equipmentServer {
        rewrite ^/equipmentServer(.*)$ $1 break;
        proxy_set_header X-Forwarded-For $proxy_add_x_forwarded_for;
        proxy_set_header Host $http_host;
        proxy_set_header X-Forwarded-Proto https;
        proxy_http_version 1.1;
        proxy_set_header Upgrade $http_upgrade;
        proxy_set_header Connection "upgrade";
        proxy_redirect off;
        proxy_connect_timeout 240;
        proxy_send_timeout 240;
        proxy_read_timeout 240;
        proxy_pass http://hiwoo-equipment-service.hiwoo-cloud:20004/;
    }

    location /timeServies {
        rewrite ^/timeServies/(.*)$ $1 break;
        proxy_connect_timeout 15s;
        proxy_send_timeout 15s;
        proxy_read_timeout 15s;
        proxy_set_header X-Real-IP $remote_addr;
        proxy_set_header X-Forwarded-For $proxy_add_x_forwarded_for;
        proxy_set_header X-Forwarded-Proto http;
        proxy_pass http://hiwoo-equipment-service.hiwoo-cloud:20008;
    }
}
Dockerfile
FROM nginx:1.17.7

COPY ./pedestal/dist /usr/share/nginx/html/pedestal

RUN rm /etc/nginx/conf.d/default.conf

ADD ./k8s/pedestal/pedestal.conf /etc/nginx/conf.d/

EXPOSE 80
CMD ["nginx", "-g", "daemon off;"]

RUN /bin/bash -c 'echo pedestal init success'
Deploy.yaml
# Deployment 资源定义,用于管理 Pod 的生命周期,确保在集群中有指定数量的Pod副本运行
apiVersion: apps/v1
kind: Deployment
metadata:
  labels:
    app: hiwoo-pedestal-front  # 标签,用于标识这个 Deployment 和它管理的 Pod
  name: hiwoo-pedestal-front  # Deployment 的名字
  namespace: hiwoo-cloud  # 这个 Deployment 在哪个命名空间里
spec:
  progressDeadlineSeconds: 600  # 更新进度的超时时间
  replicas: 1  # 指定 Pod 的副本数量
  selector:
    matchLabels:
      app: hiwoo-pedestal-front  # 选择器,用于选择哪些 Pod 应该被这个 Deployment 管理
  strategy:
    rollingUpdate:
      maxSurge: 1  # 更新时允许超过所需副本数的最大 Pod 数量
      maxUnavailable: 0  # 在更新过程中,不可用的最大 Pod 数量
    type: RollingUpdate  # 更新策略类型
  template:
    metadata:
      labels:
        app: hiwoo-pedestal-front  # Pod 的标签
    spec:
      containers:
        - image: "hiwoo-pedestal-front:${VERSION}"  # 容器的镜像,其中 ${VERSION} 是一个占位符
          imagePullPolicy: IfNotPresent  # 如果镜像在节点上不存在,才从仓库拉取
          name: hiwoo-pedestal-front  # 容器的名字
          ports:
            - name: http-admin  # 端口的名字
              containerPort: 80  # 容器的端口号
              protocol: TCP  # 通信协议

          resources:  # 容器的资源限制和请求
            limits:
              cpu: 400m
              memory: 800Mi
            requests:
              cpu: 200m
              memory: 500Mi
          terminationMessagePath: /dev/termination-log  # 容器终止时的消息路径
          terminationMessagePolicy: File  # 容器终止时的消息策略
      dnsPolicy: ClusterFirst  # DNS 策略
      restartPolicy: Always  # 重启策略
      terminationGracePeriodSeconds: 30  # 终止时的宽限期

---

# Service 资源定义,用于为一组 Pod 提供访问入口
apiVersion: v1
kind: Service
metadata:
  labels:
    app: hiwoo-pedestal-front-service  # 标签,用于标识这个 Service
  name: hiwoo-pedestal-front-service  # Service 的名字
  namespace: hiwoo-cloud  # 这个 Service 在哪个命名空间里
spec:
  ports:
    - name: http  # 端口的名字
      port: 80  # Service 的端口号
      protocol: TCP  # 通信协议
      targetPort: 80  # 转发到 Pod 的哪个端口
      nodePort: 31080  # Node 上的端口号

  selector:
    app: hiwoo-pedestal-front  # 选择器,用于选择哪些 Pod 应该被这个 Service 访问
  sessionAffinity: None  # 会话亲和性
  type: NodePort  # Service 的类型
后端
代码层级如下:
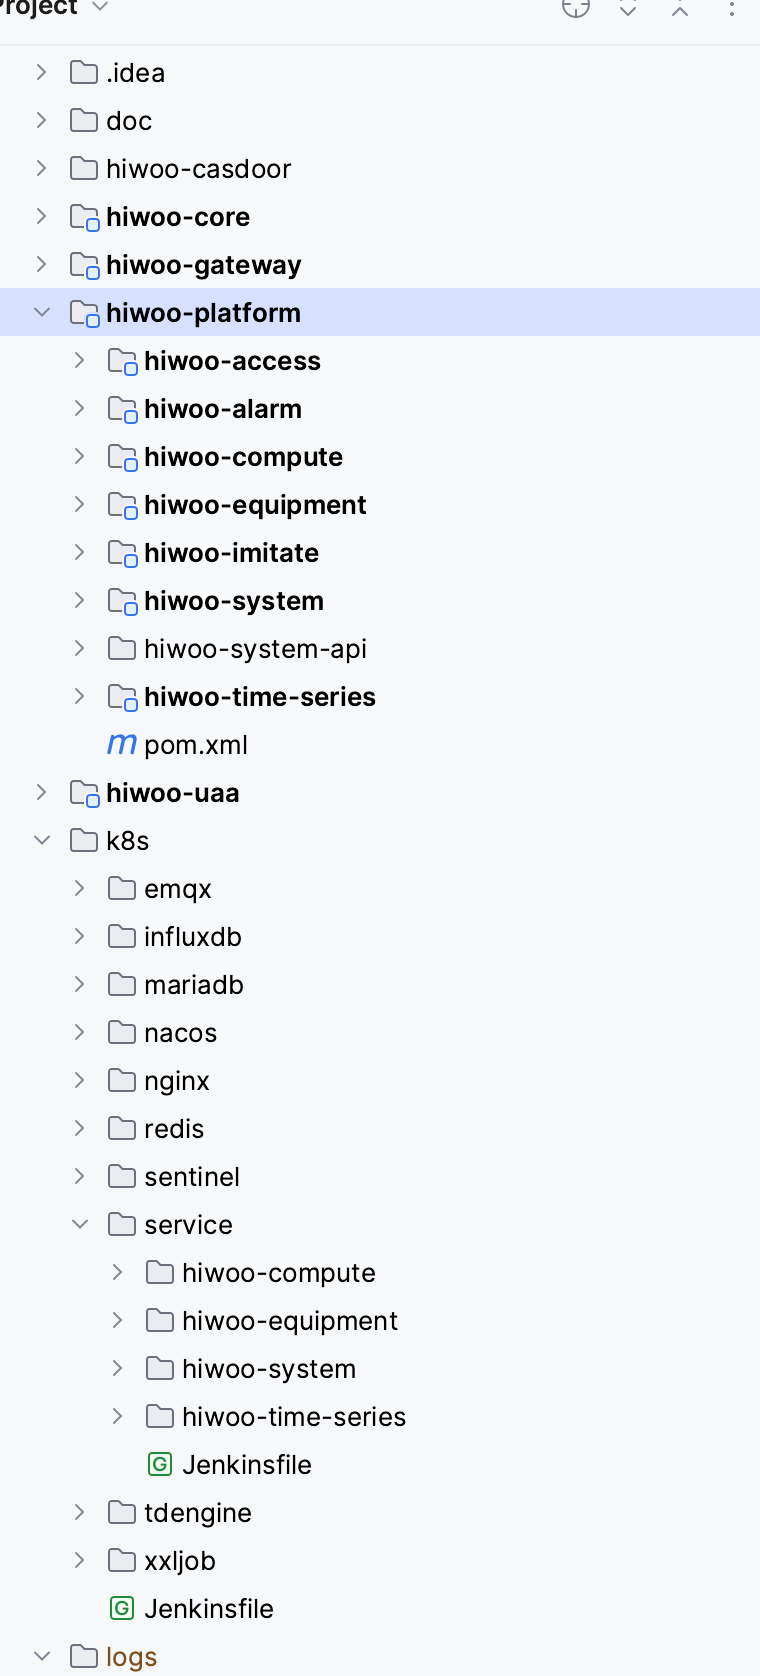
以 hiwoo-equipment 微服务举例:
Dockerfile
FROM openjdk:11-jre
##VOLUME /tmp

RUN /bin/cp /usr/share/zoneinfo/Asia/Shanghai /etc/localtime && echo 'Asia/Shanghai' >/etc/timezone

COPY ./hiwoo-platform/hiwoo-equipment/target/hiwoo-equipment.jar  /app.jar
EXPOSE 20004
EXPOSE 9394
ENTRYPOINT ["/bin/sh","-c","java -Dfile.encoding=utf8  -Djava.security.egd=file:/dev/./urandom -jar /app.jar "]
Deploy.yaml
apiVersion: apps/v1
kind: Deployment
metadata:
  labels:
    app: hiwoo-equipment
  name: hiwoo-equipment
  namespace: hiwoo-cloud
spec:
  progressDeadlineSeconds: 600
  replicas: 1
  selector:
    matchLabels:
      app: hiwoo-equipment
  strategy:
    rollingUpdate:
      maxSurge: 1        # 允许超出所需副本数的最大 Pod 数量
      maxUnavailable: 0  # 在更新过程中,允许不可用的最大 Pod 数量
    type: RollingUpdate
  template:
    metadata:
      labels:
        app: hiwoo-equipment
    spec:
      imagePullSecrets: # 后面如果要用到镜像私仓 需要配置这个
        - name: aliyun-docker-image
      containers:
        - image: "hiwoo-equipment:${VERSION}"
          imagePullPolicy: IfNotPresent  # 这里不需要每次都拉取镜像 直接使用本地的镜像即可 本地没有的情况 另说
          name: hiwoo-equipment
          ports:
            - name: http-admin
              containerPort: 20004
              protocol: TCP

            - name: http-admin2
              containerPort: 9394
              protocol: TCP
          resources:
            limits:
              cpu: 400m
              memory: 800Mi
            requests:
              cpu: 200m
              memory: 500Mi
          terminationMessagePath: /dev/termination-log
          terminationMessagePolicy: File
      dnsPolicy: ClusterFirst
      restartPolicy: Always
      terminationGracePeriodSeconds: 30


---

apiVersion: v1
kind: Service
metadata:
  labels:
    app: hiwoo-equipment-service
  name: hiwoo-equipment-service
  namespace: hiwoo-cloud
spec:
  ports:
    - name: http
      port: 20004
      protocol: TCP
      targetPort: 20004


    - name: http2
      port: 9394
      protocol: TCP
      targetPort: 9394

  selector:
    app: hiwoo-equipment
  sessionAffinity: None
  type: ClusterIP

---
基础服务MariaDB(增强版Mysql)
Dockerfile
# 使用官方MariaDB基础镜像
FROM mariadb:10.4.22

# 设置环境变量来配置时区为上海
ENV TZ=Asia/Shanghai

# 配置MySQL的root密码
ENV MYSQL_ROOT_PASSWORD=123456

# 暴露MySQL的默认端口
EXPOSE 3306
Pvc.yaml
# PersistentVolumeClaim 资源定义。PVC 是对存储的请求和消费,它指定了所需要的存储特性和大小
apiVersion: v1
kind: PersistentVolumeClaim
metadata:
  name: hiwoo-mariadb-pvc  # PVC 的名字
  namespace: hiwoo-cloud  # PVC 在哪个命名空间里
spec:
  accessModes:
    - ReadWriteOnce  # 访问模式,这里是 ReadWriteOnce,意味着存储可以被一个节点进行读写
  resources:
    requests:
      storage: 10Gi  # 请求的存储大小,这里是 10G
这个 PVC 资源描述了一个存储的请求,它希望得到一个支持读写(但一次只能被一个节点挂载)的存储,大小为 10Gi。在 Kubernetes 集群中,PVC 会试图找到一个满足其要求的 PersistentVolume (PV) 来绑定。如果找到了,PVC 就会被绑定到那个 PV 上,然后可以被 Pod 使用。如果没有找到满足条件的 PV,这个 PVC 就会一直处于待绑定的状态,除非集群管理员手动创建一个满足要求的 PV,或者存储类(StorageClass)动态地为这个 PVC 创建 PV。
# Deployment 定义,用于部署和管理 MariaDB 的实例
apiVersion: apps/v1
kind: Deployment
metadata:
  labels:
    app: hiwoo-mariadb  # 标签,用于识别这个 Deployment 和其管理的 Pod
  name: hiwoo-mariadb  # Deployment 的名称
  namespace: hiwoo-cloud  # 命名空间
spec:
  progressDeadlineSeconds: 600  # 更新进度的超时时间
  replicas: 1  # 期望的 Pod 副本数量
  selector:
    matchLabels:
      app: hiwoo-mariadb  # 选择器,确定哪些 Pod 被此 Deployment 管理
  strategy:
    rollingUpdate:
      maxSurge: 1  # 更新过程中允许超出副本数的最大 Pod 数量
      maxUnavailable: 0  # 更新过程中不可用的最大 Pod 数量
    type: RollingUpdate  # 更新策略类型
  template:  # Pod 模板
    metadata:
      labels:
        app: hiwoo-mariadb  # Pod 的标签
    spec:  # Pod 的规格
      imagePullSecrets:  # 用于从私有仓库拉取镜像的凭据
        - name: aliyun-docker-image
      containers:
        - image: hiwoo-mariadb:latest  # 使用的容器镜像
          imagePullPolicy: IfNotPresent  # 如果节点上已有此镜像,则不拉取
          name: hiwoo-mariadb  # 容器名称
          env:  # 环境变量
            - name: MYSQL_ROOT_PASSWORD  # MariaDB 的 root 密码
              value: "123456"
          ports:  # 容器开放的端口
            - name: http-admin
              containerPort: 3306  # MariaDB 的默认端口
              protocol: TCP
          resources:  # 容器资源限制和请求
            limits:
              cpu: '3'
              memory: 3000Mi
            requests:
              cpu: 60m
              memory: 50Mi
          terminationMessagePath: /dev/termination-log  # 终止消息路径
          terminationMessagePolicy: File  # 终止消息策略
          volumeMounts:  # 容器中的存储卷挂载点
            - name: mariadb-storage  # 存储卷名称
              mountPath: /var/lib/mysql  # MariaDB 数据存储路径
      dnsPolicy: ClusterFirst  # DNS策略
      restartPolicy: Always  # 重启策略
      terminationGracePeriodSeconds: 30  # 终止宽限期
      volumes:  # Pod 使用的存储卷
        - name: mariadb-storage  # 存储卷名称
          persistentVolumeClaim:  # 使用先前定义的 PVC
            claimName: hiwoo-mariadb-pvc

---

# Service 定义,为 MariaDB 提供一个访问入口
apiVersion: v1
kind: Service
metadata:
  labels:
    app: hiwoo-mariadb-service  # 标签
  name: hiwoo-mariadb-service  # Service 名称
  namespace: hiwoo-cloud  # 命名空间
spec:
  ports:
    - name: http  # 端口名称
      port: 3306  # Service 端口
      protocol: TCP  # 通信协议
      targetPort: 3306  # Pod 的端口
      nodePort: 31000  # 节点上的端口,当 Service 类型为 NodePort 时使用
  selector:
    app: hiwoo-mariadb  # 选择哪些 Pod 应该由这个 Service 访问
  sessionAffinity: None  # 会话亲和性
  type: NodePort  # Service 的类型
这个配置首先定义了一个 Deployment 来部署 MariaDB 数据库实例,为其分配了资源,并指定了存储路径。然后,它定义了一个 Service,以 NodePort 类型暴露该数据库的服务,允许外部访问。
5. 前端Jenkinsfile文件详解与优化方案
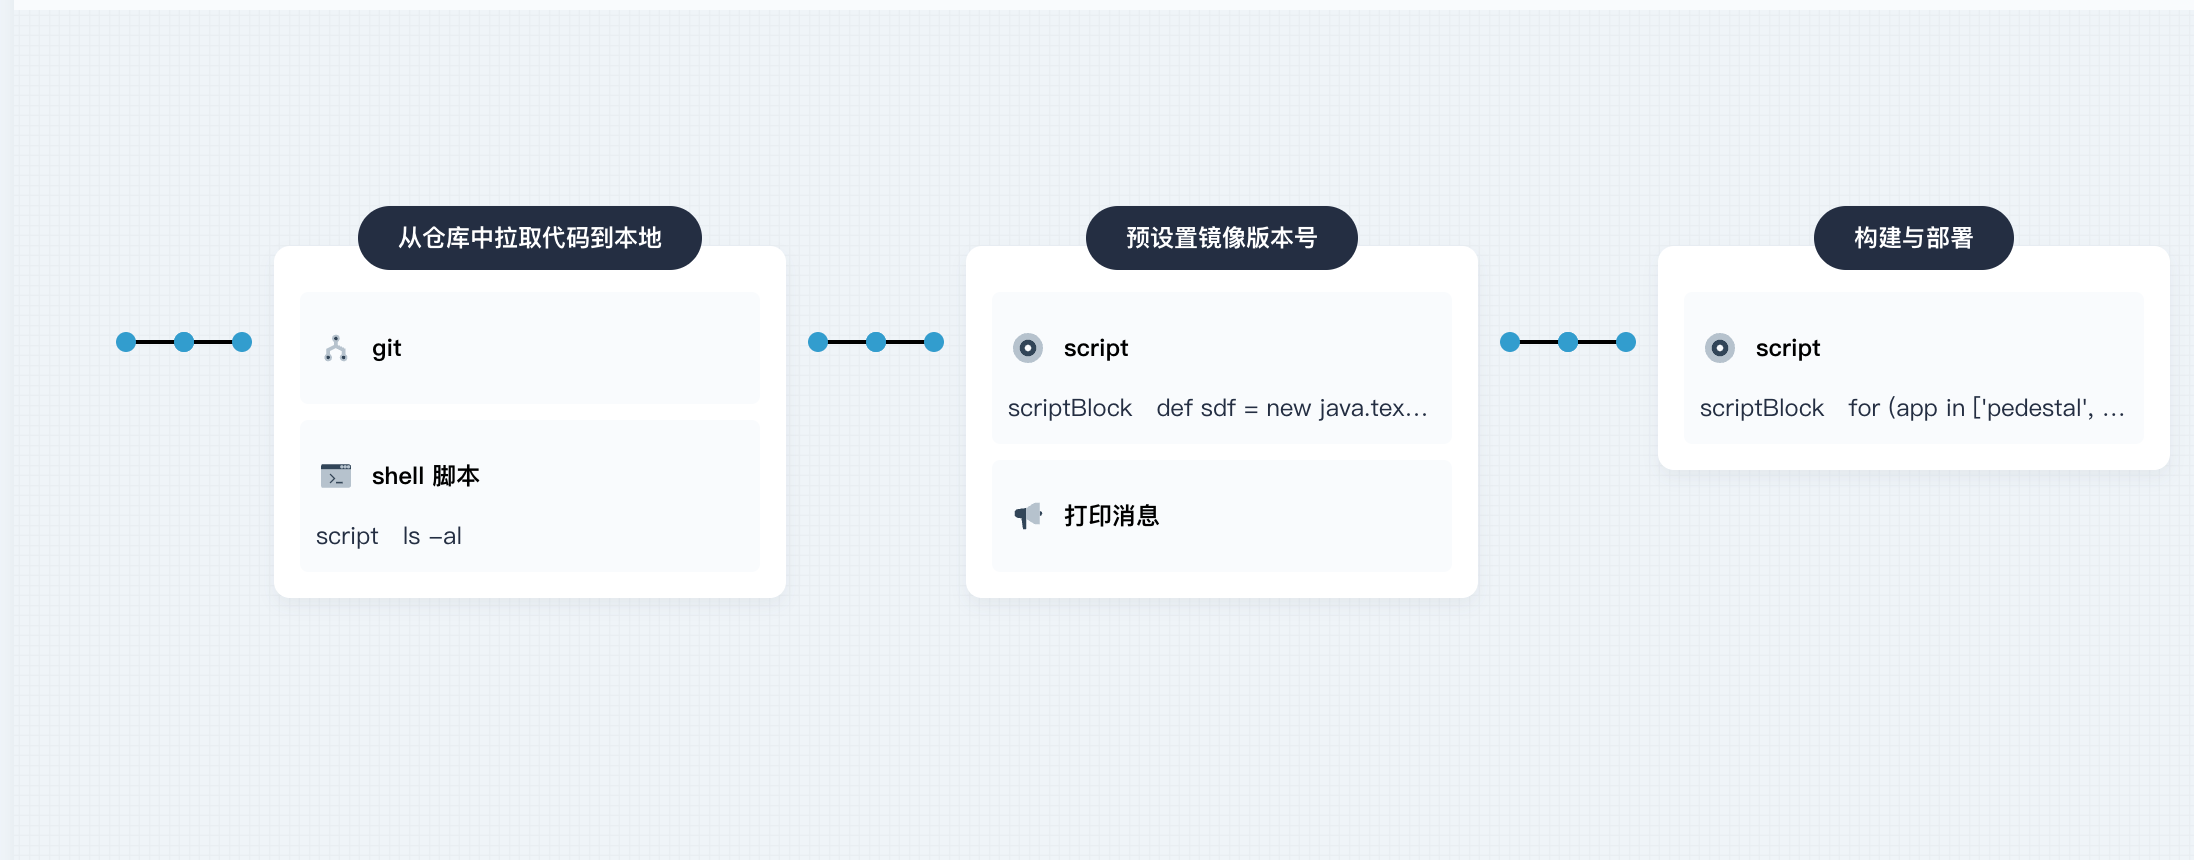
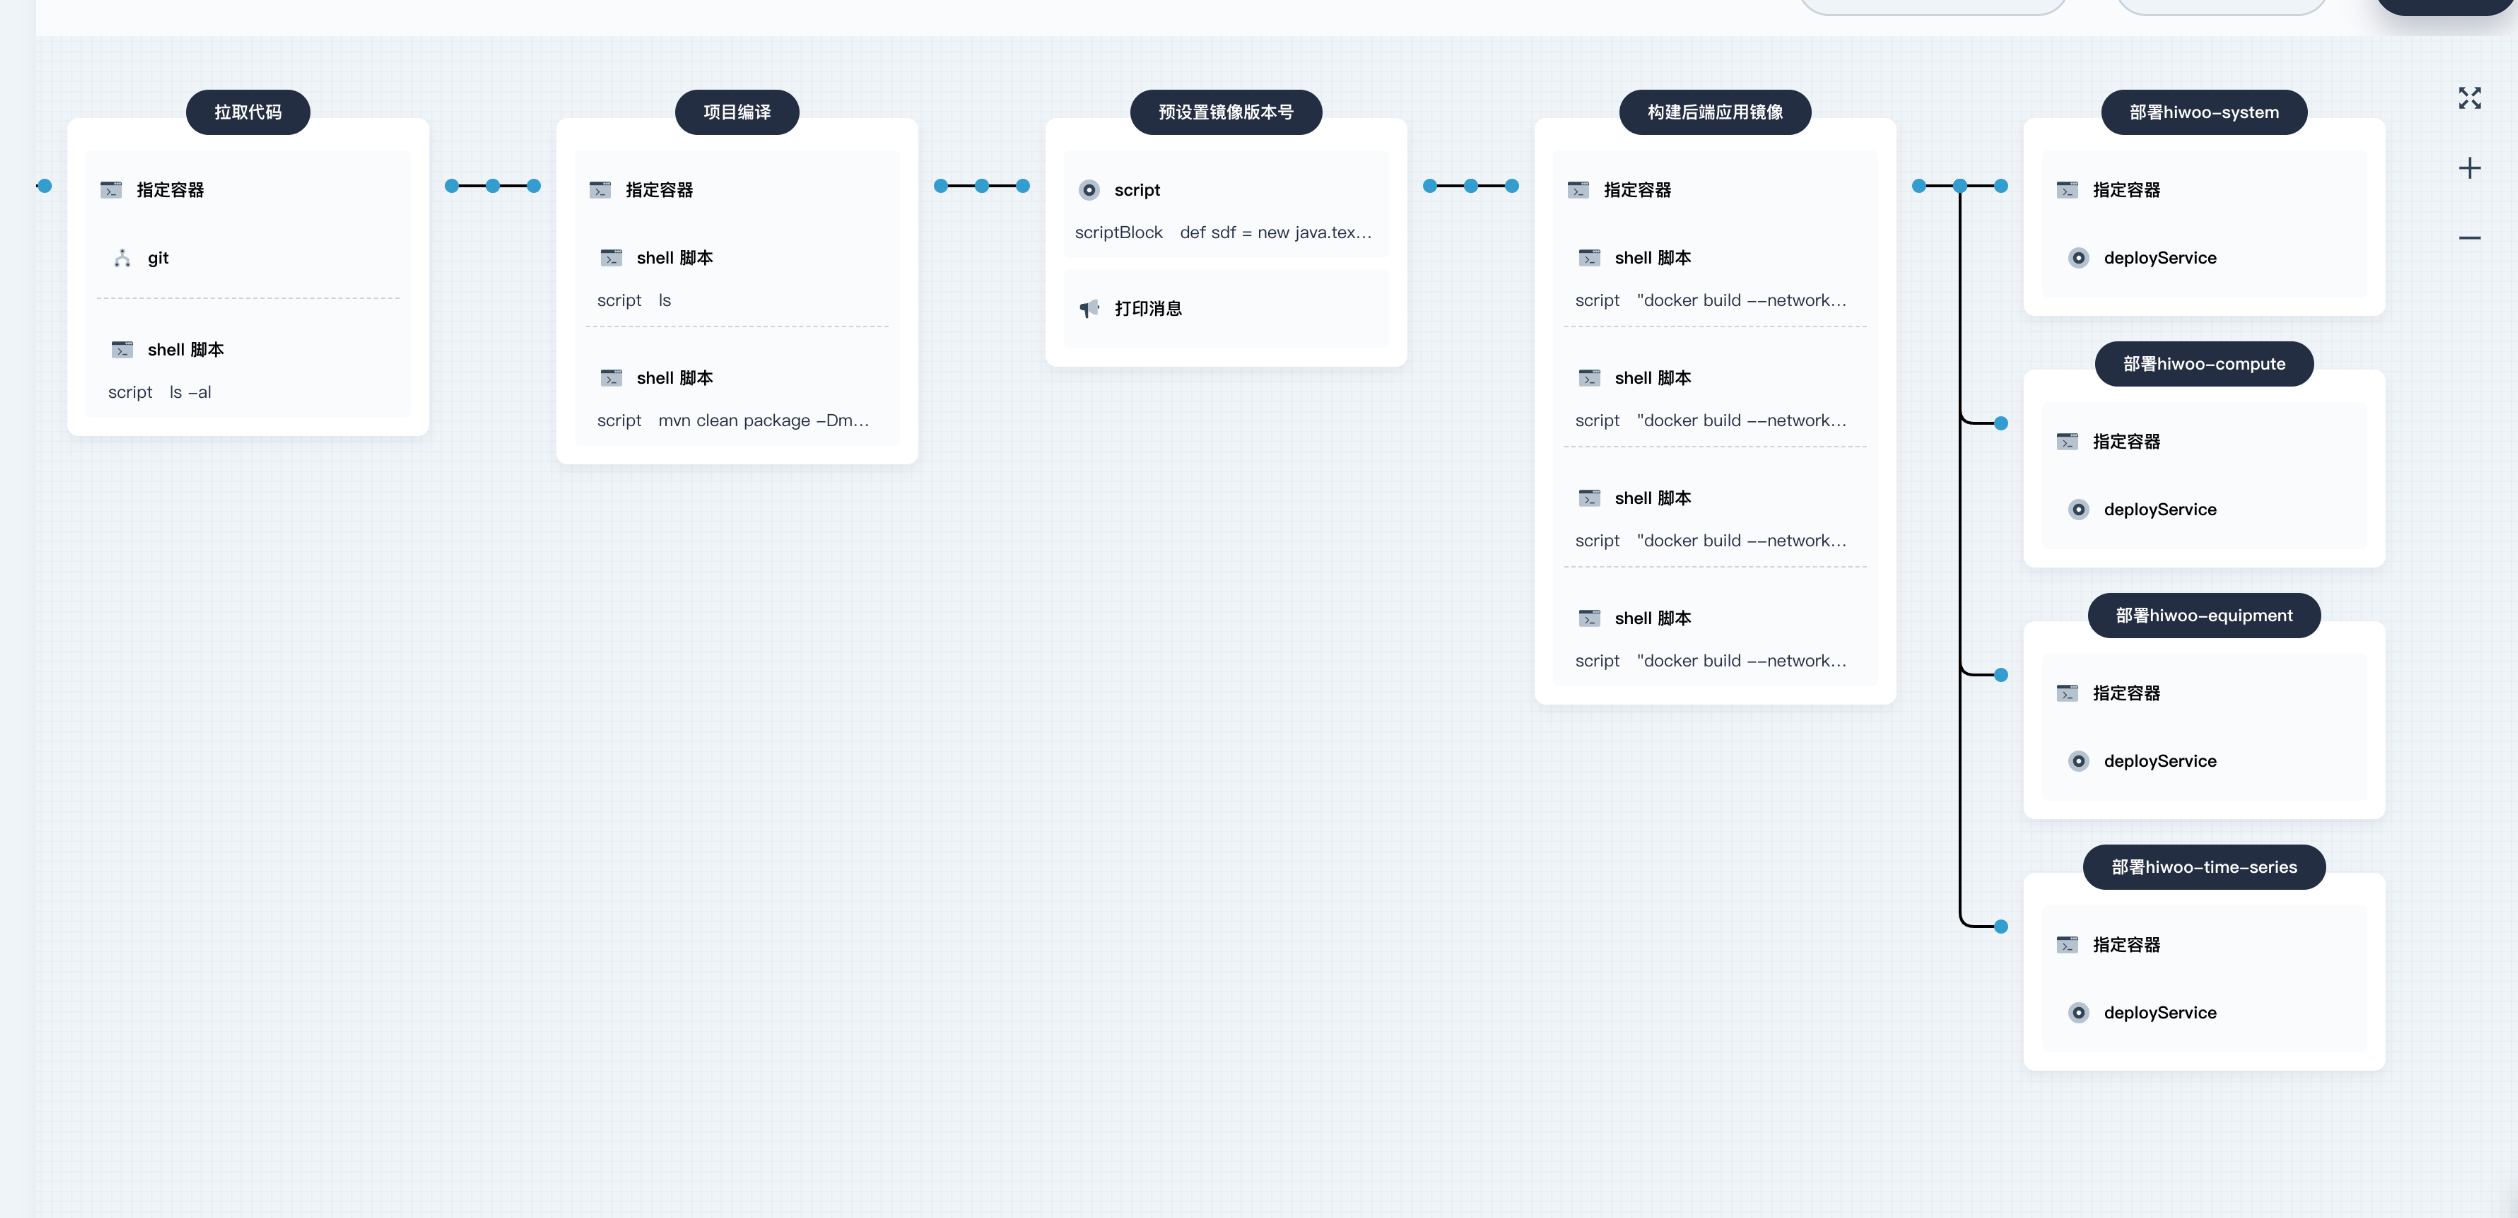
一个 Jenkins Declarative Pipeline 脚本,用于在 Kubernetes 上自动化构建和部署应用程序。这个脚本的工作流程大致可以归纳为以下几个步骤:
- 环境设置:使用指定的 Node.js 基础镜像在 Kubernetes 集群上创建 Jenkins 代理。
- 从仓库中拉取代码:从指定的 Git 仓库中拉取代码。
- 预设置镜像版本号:基于当前日期和时间生成镜像的版本号。
- 编译和打包:在 Node.js 容器中,对三个前端应用——
pedestal、system和equipment进行编译和打包。 - 构建 Docker 镜像并部署:为这三个应用构建 Docker 镜像,并使用 Kubernetes 命令行工具
kubectl将它们部署到 Kubernetes 集群中。
每个应用的编译和部署都被分为两个独立的阶段:一个用于编译和打包,另一个用于构建 Docker 镜像并部署。
以下是此 Jenkinsfile 的一些关键点:
agent:定义了 Jenkins 任务应该在哪里运行。这里,它运行在一个 Kubernetes Pod 中,该 Pod 包含一个从名为 ‘nodejs base’ 的模板继承的容器,以及一个使用 Node.js 镜像的容器。stages:定义了应该执行的一系列阶段。steps:定义了每个阶段中应该执行的一系列步骤。例如,使用git步骤从 Git 仓库中检出代码,使用sh步骤执行 shell 命令等。container:指定某些步骤应在 Kubernetes Pod 中的哪个容器中执行。environment:定义了一系列环境变量。parameters:允许用户提供输入,例如要构建的 Git 分支名称。
此 Jenkinsfile 的一个显著特点是其重复的结构:为三个不同的前端应用编译、打包、构建和部署的步骤基本相同,但它们的目录和名称不同。如果你在未来需要为更多的应用执行类似的步骤,你可能会考虑将这些重复的步骤提取为共享的库或函数,以简化脚本并提高可维护性。
简化前的Jenkinsfile
pipeline {
    agent {
        kubernetes {
            inheritFrom 'nodejs base'
            containerTemplate {
                name 'nodejs'
                image 'node:16.13.0-alpine'
            }
        }
    }


    stages {
        stage('从仓库中拉取代码到本地') {
            agent none
            steps {
                git(credentialsId: 'aliyun-git', url: 'git仓库地址', branch: 'dev', changelog: true, poll: false)
                sh 'ls -al'
            }
        }

        stage('预设置镜像版本号') {
            steps {
                script {
                    // 创建一个 SimpleDateFormat 对象,指定你想要的格式
                    def sdf = new java.text.SimpleDateFormat("yyyyMMddHHmm")
                    //设置时区为北京时间
                    sdf.setTimeZone(TimeZone.getTimeZone("Asia/Shanghai"))
                    // 获取当前日期和时间
                    def now = new Date()
                    // 格式化当前日期和时间,生成你想要的版本号
                    // 保存版本号为一个环境变量,以便后续步骤使用 不能重写 但是可以新增
                    env.VERSION = "v${sdf.format(now)}"
                }
                echo "生成镜像版本号: ${env.VERSION}"
            }
        }
        stage('编译pedestal && 打包pedestal') {
            agent none
            steps {
                container('nodejs') {
                    echo '编译pedestal 开始'
                    sh 'node -v'
                    sh 'cd ./pedestal && npm install && npm run build'

                }
            }
        }

        stage('打包+部署pedestal') {
            steps {
                container('base') {
                    echo '构建pedestal 开始'
                    sh 'ls '
                    sh 'source /etc/profile '
                    sh 'docker build -t hiwoo-pedestal-front:${VERSION} -f ./k8s/pedestal/Dockerfile  ./'

                    echo '部署pedestal 开始'
                    withCredentials([
                            kubeconfigFile(
                                    credentialsId: env.KUBECONFIG_CREDENTIAL_ID,
                                    variable: 'KUBECONFIG')
                    ]) {
                        sh 'envsubst < k8s/pedestal/deploy.yaml | kubectl apply -f - --force --grace-period=0'
                        sh 'kubectl rollout status Deployment/hiwoo-pedestal-front -n hiwoo-cloud'
                    }

                }
            }
        }

        stage('编译system && 打包system') {
            agent none
            steps {
                container('nodejs') {
                    echo '编译system 开始'
                    sh 'cd ./system && npm install && npm run build'
                }
            }
        }

        stage('打包+部署system') {
            steps {
                container('base') {
                    echo '构建system 开始'
                    sh 'ls '
                    sh 'docker build -t hiwoo-system-front:${VERSION} -f ./k8s/system/Dockerfile  ./'
                    echo '部署system 开始'
                    withCredentials([
                            kubeconfigFile(
                                    credentialsId: env.KUBECONFIG_CREDENTIAL_ID,
                                    variable: 'KUBECONFIG')
                    ]) {
                        sh 'envsubst < k8s/system/deploy.yaml | kubectl apply -f - --force --grace-period=0'
                        sh 'kubectl rollout status Deployment/hiwoo-system-front -n hiwoo-cloud'
                    }

                }
            }
        }


        stage('编译equipment && 打包equipment ') {
            agent none
            steps {
                container('nodejs') {
                    echo '编译equipment 开始'
                    sh 'cd ./equipment && npm install && npm run build'
                }
            }
        }

        stage('打包+部署equipment') {
            steps {
                container('base') {
                    echo '构建equipment 开始'
                    sh 'ls '
                    sh 'docker build -t hiwoo-equipment-front:${VERSION} -f ./k8s/equipment/Dockerfile  ./'
                    echo '部署equipment 开始'
                    withCredentials([
                            kubeconfigFile(
                                    credentialsId: env.KUBECONFIG_CREDENTIAL_ID,
                                    variable: 'KUBECONFIG')
                    ]) {
                        sh 'envsubst < k8s/equipment/deploy.yaml | kubectl apply -f - --force --grace-period=0'
                        sh 'kubectl rollout status Deployment/hiwoo-equipment-front -n hiwoo-cloud'
                    }

                }
            }
        }


    }


    environment {
        DOCKER_CREDENTIAL_ID = 'dockerhub'
        KUBECONFIG_CREDENTIAL_ID = 'demo-kubeconfig'
        REGISTRY = 'docker.io'
        DOCKERHUB_NAMESPACE = 'shaowenchen'
        APP_NAME = 'devops-python-sample'
        SONAR_CREDENTIAL_ID = 'sonar-token'
    }
    parameters {
        string(name: 'BRANCH_NAME', defaultValue: 'dev', description: '')
    }


}
简化后的Jenkinsfile
pipeline {
    agent {
        kubernetes {
            inheritFrom 'nodejs base'
            containerTemplate {
                name 'nodejs'
                image 'node:16.13.0-alpine'
            }
        }
    }

    environment {
        KUBECONFIG_CREDENTIAL_ID = 'demo-kubeconfig'
    }

    parameters {
        string(name: 'BRANCH_NAME', defaultValue: 'dev', description: '')
    }

    stages {
        stage('从仓库中拉取代码到本地') {
            steps {
                git(credentialsId: 'aliyun-git', url: 'xxx', branch: 'dev', changelog: true, poll: false)
                sh 'ls -al'
            }
        }

        stage('预设置镜像版本号') {
            steps {
                script {
                    def sdf = new java.text.SimpleDateFormat("yyyyMMddHHmm")
                    sdf.setTimeZone(TimeZone.getTimeZone("Asia/Shanghai"))
                    def now = new Date()
                    env.VERSION = "v${sdf.format(now)}"
                }
                echo "生成镜像版本号: ${env.VERSION}"
            }
        }

        // 同样的步骤为多个应用进行
        stage('构建与部署') {
            steps {
                // 这是一个循环,对于每个应用,它都会重复相同的步骤
                for (app in ['pedestal', 'system', 'equipment']) {
                    echo "编译 ${app} 开始"
                    container('nodejs') {
                        sh "cd ./${app} && npm install && npm run build"
                    }

                    container('base') {
                        echo "构建 ${app} 开始"
                        sh "docker build -t hiwoo-${app}-front:${env.VERSION} -f ./k8s/${app}/Dockerfile  ./"

                        echo "部署 ${app} 开始"
                        withCredentials([kubeconfigFile(credentialsId: env.KUBECONFIG_CREDENTIAL_ID, variable: 'KUBECONFIG')]) {
                            sh "envsubst < k8s/${app}/deploy.yaml | kubectl apply -f - --force --grace-period=0"
                            sh "kubectl rollout status Deployment/hiwoo-${app}-front -n hiwoo-cloud"
                        }
                    }
                }
            }
        }
    }
}
改进说明:
- 通过创建一个循环,我们现在可以为
['pedestal', 'system', 'equipment']中的每个应用执行相同的构建和部署步骤,而不是为每个应用重复代码。 - 使用模板字符串和循环变量来动态生成需要的路径和命令,例如
hiwoo-${app}-front:${env.VERSION}和cd ./${app}。 - 由于所有应用的构建和部署步骤都是相同的,因此我们可以将它们组合在一个统一的 “构建与部署” 阶段中。这不仅简化了 Jenkinsfile,而且使得构建和部署过程在 Jenkins UI 中更加整洁和一致。
这样的简化提高了 Jenkinsfile 的可读性,同时减少了需要维护的代码量。如果你决定添加更多的应用,只需简单地将它们添加到列表 ['pedestal', 'system', 'equipment'] 中即可。
优化方案 的优缺点
请注意,这种优化方案Jenkinsfile是基于Jenkins的“脚本式语法” 对于可视化界面不友好,两种方案 可视化界面对比如下
优化后:
优化前:
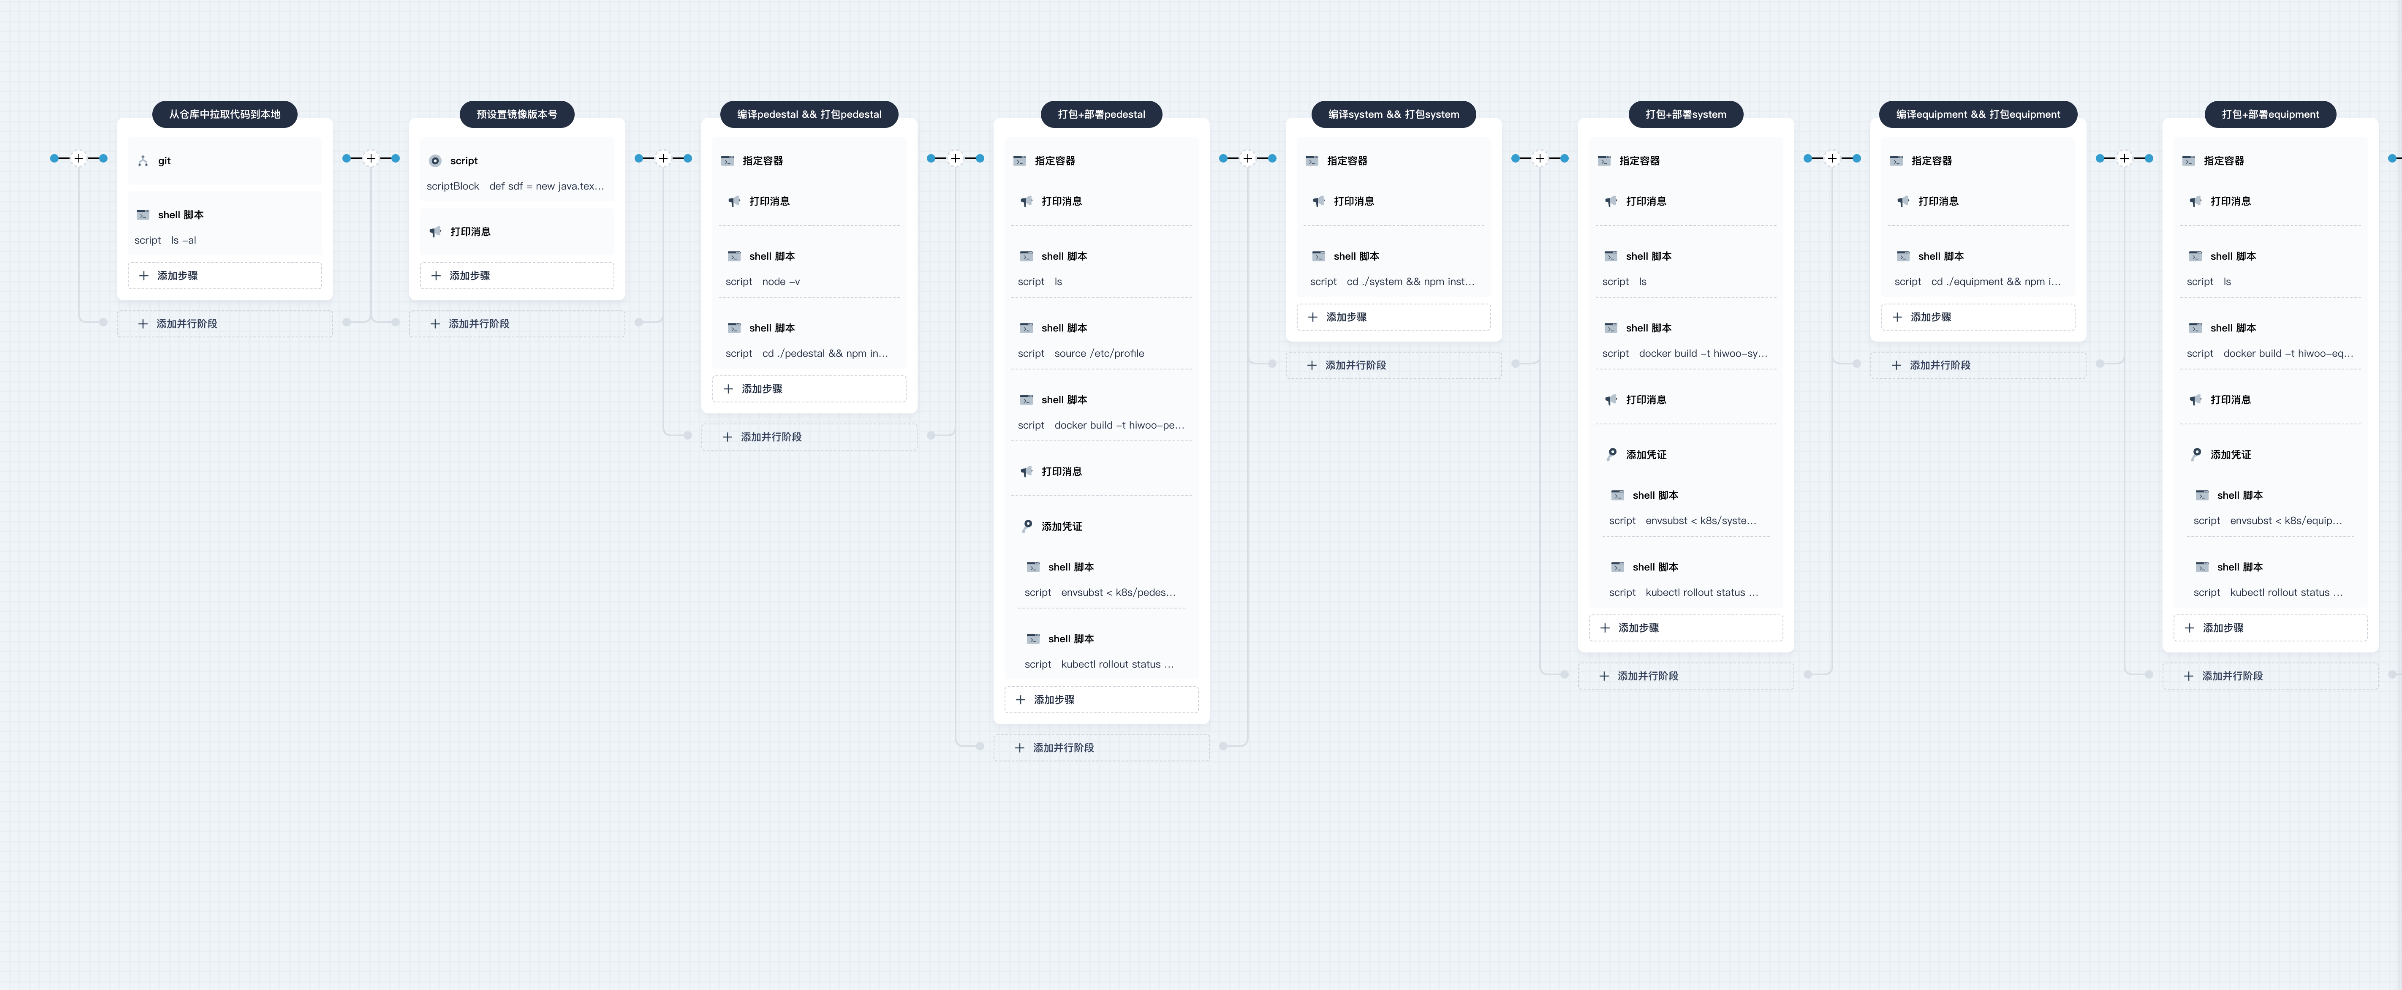
可以看到 后一种更为清晰直观,前一种则更方便修改与复用,选择那种方案需要根据实际情况自行判断~
关于自定义node版本
由于Kubesphere自带的node版本不能满足项目需求(项目中需要node16),需要自行去修改使用到的node版本
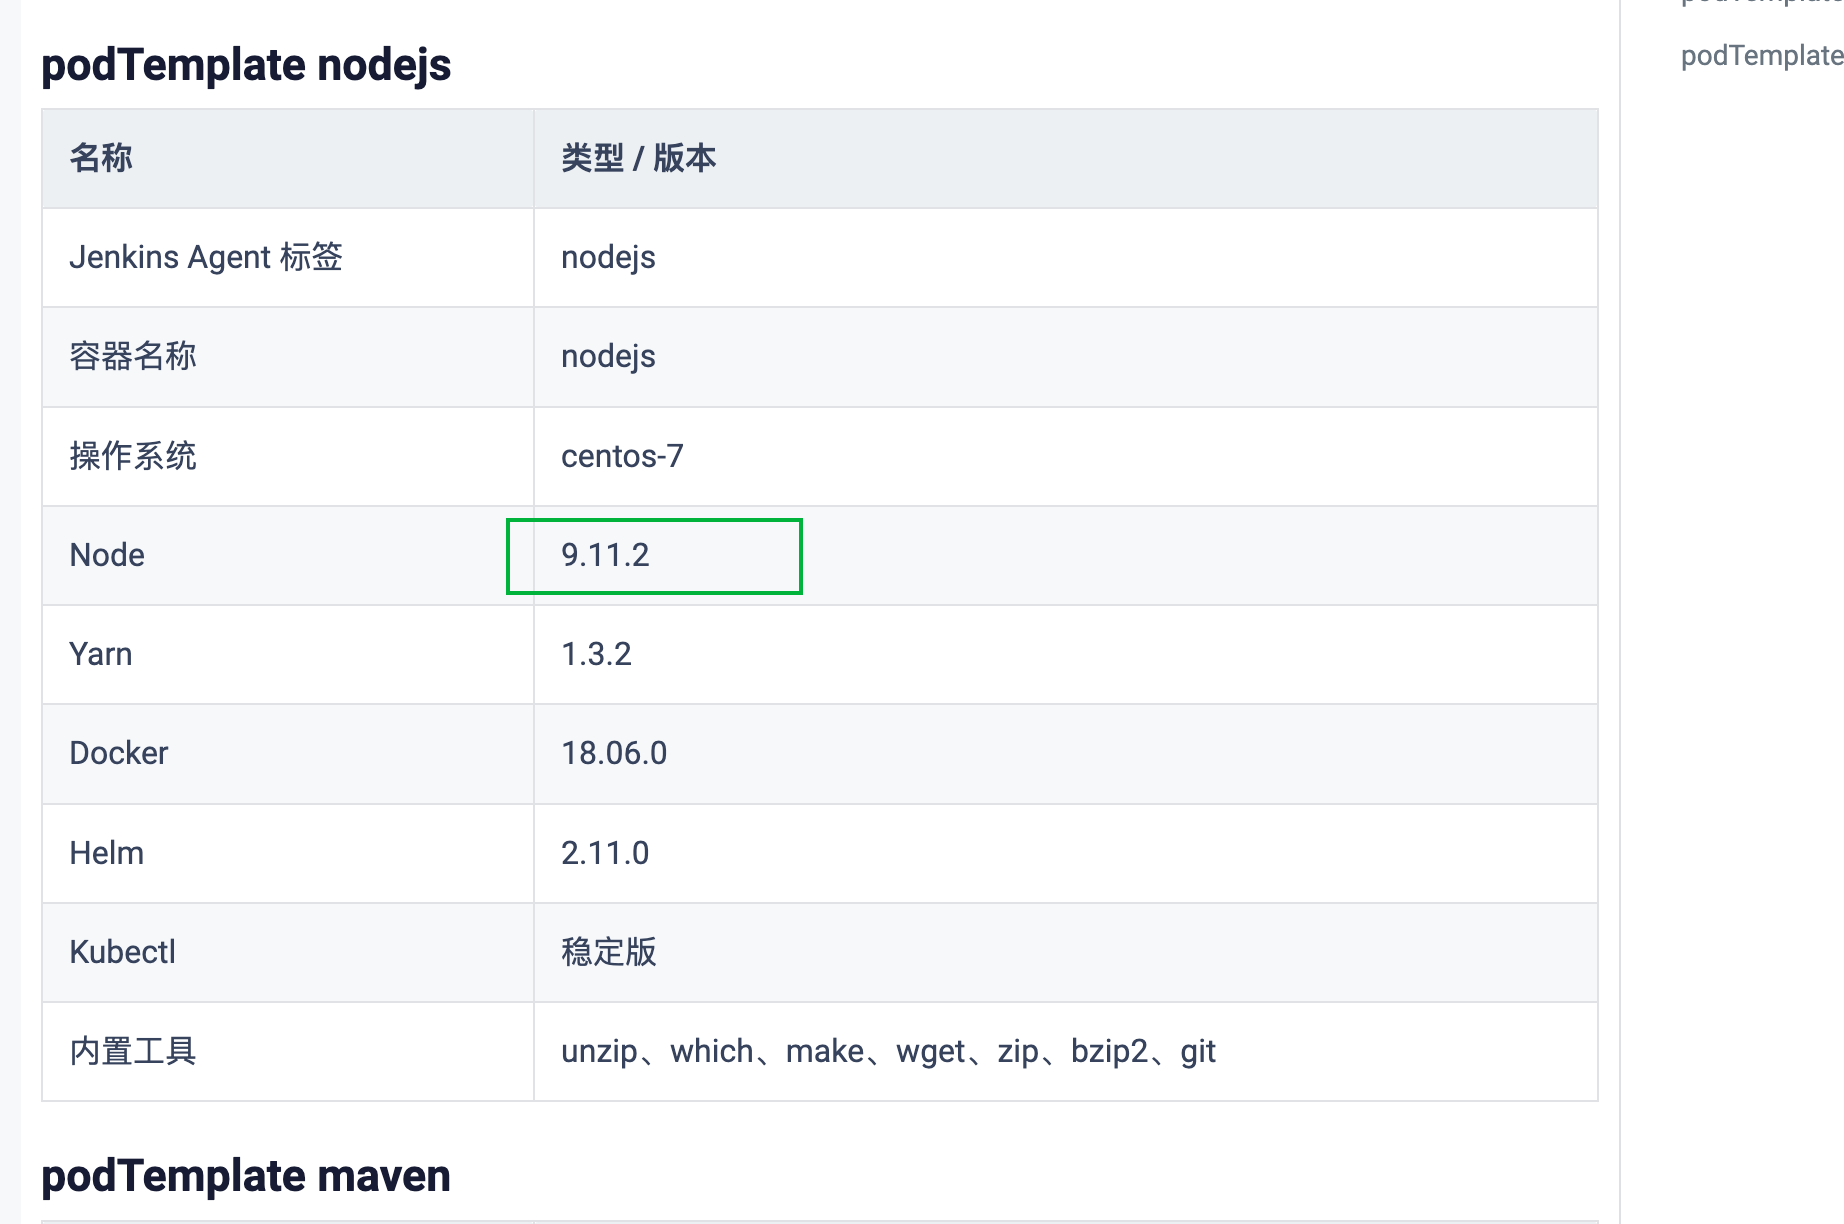
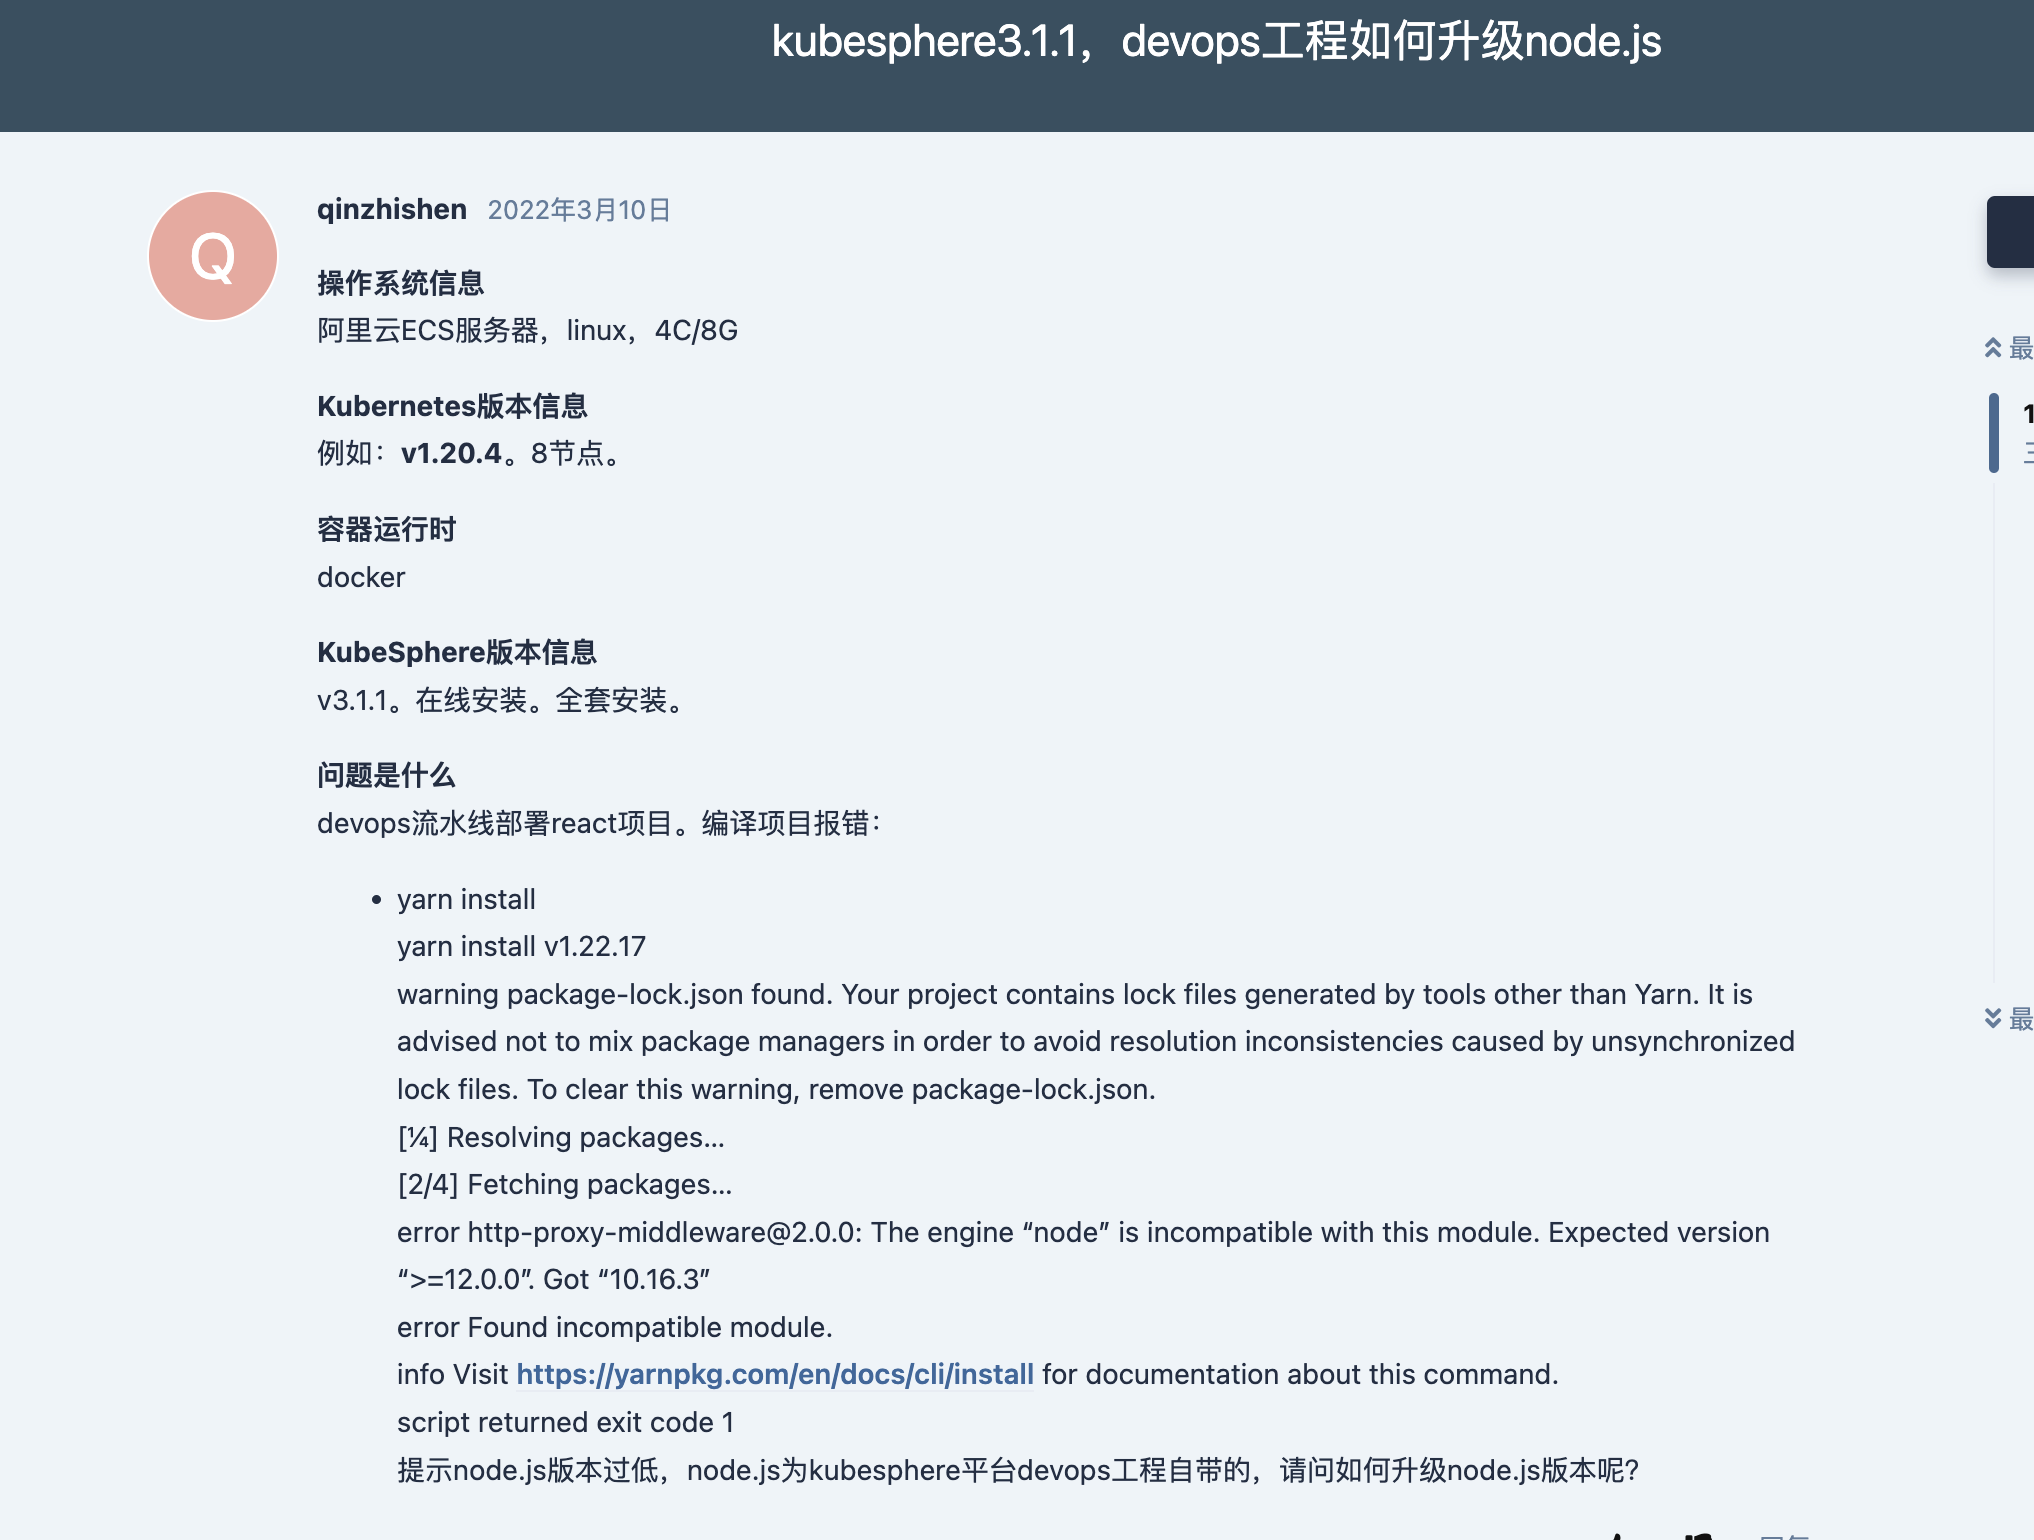
具体可以参考社区的这个issue
https://ask.kubesphere.io/forum/d/6859-kubesphere311devopsnodejs
6. 后端Jenkinsfile 文件详解
pipeline {
    // 设置agent为Kubernetes,并定义容器模板
    agent {
        kubernetes {
            // 从'maven base' 继承配置
            inheritFrom 'maven base'
            containerTemplates([ // 定义容器模板列表
                                 containerTemplate(
                                         name: 'maven',
                                         image: 'kubespheredev/builder-maven:v3.2.0jdk11'
                                 )
            ])
        }
    }

    stages {
        stage('拉取代码') {
            agent none // 不使用全局agent
            steps {
                container('maven') { // 在'maven'容器中执行以下命令
                    // 使用Git插件从Aliyun的Git仓库中拉取代码
                    git(url: 'xxx', credentialsId: 'aliyun-git', branch: 'dev', changelog: true, poll: false)
                    // 列出工作目录的文件和目录
                    sh 'ls -al'
                }
            }
        }

        stage('项目编译') {
            agent none
            steps {
                container('maven') {
                    sh 'ls'
                    // 使用Maven命令进行项目编译,跳过测试和JavaDoc生成
                    sh 'mvn clean package -Dmaven.test.skip=true -Dmaven.javadoc.skip=true'
                }
            }
        }

        stage('预设置镜像版本号') {
            steps {
                script {
                    // 使用SimpleDateFormat定义一个日期格式
                    def sdf = new java.text.SimpleDateFormat("yyyyMMddHHmm")
                    // 设置时区为北京时间
                    sdf.setTimeZone(TimeZone.getTimeZone("Asia/Shanghai"))
                    def now = new Date()
                    // 格式化当前时间,并存储为环境变量VERSION
                    env.VERSION = "v${sdf.format(now)}"
                }
                echo "生成镜像版本号: ${env.VERSION}"
            }
        }

        stage('构建镜像') {
            parallel { // 并行执行以下的子阶段
                stage('构建后端应用镜像') {
                    agent none
                    steps {
                        container('maven') {
                            // 使用Docker命令构建各种服务的Docker镜像
                            sh "docker build  --network=host -t hiwoo-compute:${env.VERSION}         -f  ./k8s/service/hiwoo-compute/Dockerfile       ./"
                            sh "docker build  --network=host -t hiwoo-equipment:${env.VERSION}       -f  ./k8s/service/hiwoo-equipment/Dockerfile     ./"
                            sh "docker build  --network=host -t hiwoo-system:${env.VERSION}          -f  ./k8s/service/hiwoo-system/Dockerfile        ./"
                            sh "docker build  --network=host -t hiwoo-time-series:${env.VERSION}     -f  ./k8s/service/hiwoo-time-series/Dockerfile   ./"
                        }
                    }
                }
            }
        }

        stage('并行部署服务') {
            parallel {
                // 使用Kubernetes插件并行部署各种服务
                // 对于每个服务,都将使用kubectl命令部署并检查部署状态
                stage('部署hiwoo-system') {
                    agent none
                    steps {
                        container('maven') {
                            deployService('hiwoo-system')
                        }
                    }
                }

                stage('部署hiwoo-compute') {
                    agent none
                    steps {
                        container('maven') {
                            deployService('hiwoo-compute')
                        }
                    }
                }

                stage('部署hiwoo-equipment') {
                    agent none
                    steps {
                        container('maven') {
                            deployService('hiwoo-equipment')
                        }
                    }
                }

                stage('部署hiwoo-time-series') {
                    agent none
                    steps {
                        container('maven') {
                            deployService('hiwoo-time-series')
                        }
                    }
                }
            }
        }
    }

    // 定义一些环境变量
    environment {
        DOCKER_CREDENTIAL_ID = 'dockerhub'
        KUBECONFIG_CREDENTIAL_ID = 'demo-kubeconfig'
        REGISTRY = 'docker.io'
        DOCKERHUB_NAMESPACE = 'shaowenchen'
        APP_NAME = 'devops-python-sample'
        SONAR_CREDENTIAL_ID = 'sonar-token'
    }

    // 定义一些参数,如分支名称
    parameters {
        string(name: 'BRANCH_NAME', defaultValue: 'dev', description: '')
    }

}

// 一个辅助函数,用于部署服务
def deployService(serviceName) {
    withCredentials([
            kubeconfigFile(
                    credentialsId: env.KUBECONFIG_CREDENTIAL_ID,
                    variable: 'KUBECONFIG')
    ]) {
        echo "部署${serviceName}开始"
        sh "envsubst < k8s/service/${serviceName}/deploy.yaml | kubectl apply -f - --force --grace-period=0"
        echo "检查 ${serviceName} 部署状态"
        sh "kubectl rollout status Deployment/${serviceName} -n hiwoo-cloud"
    }
}
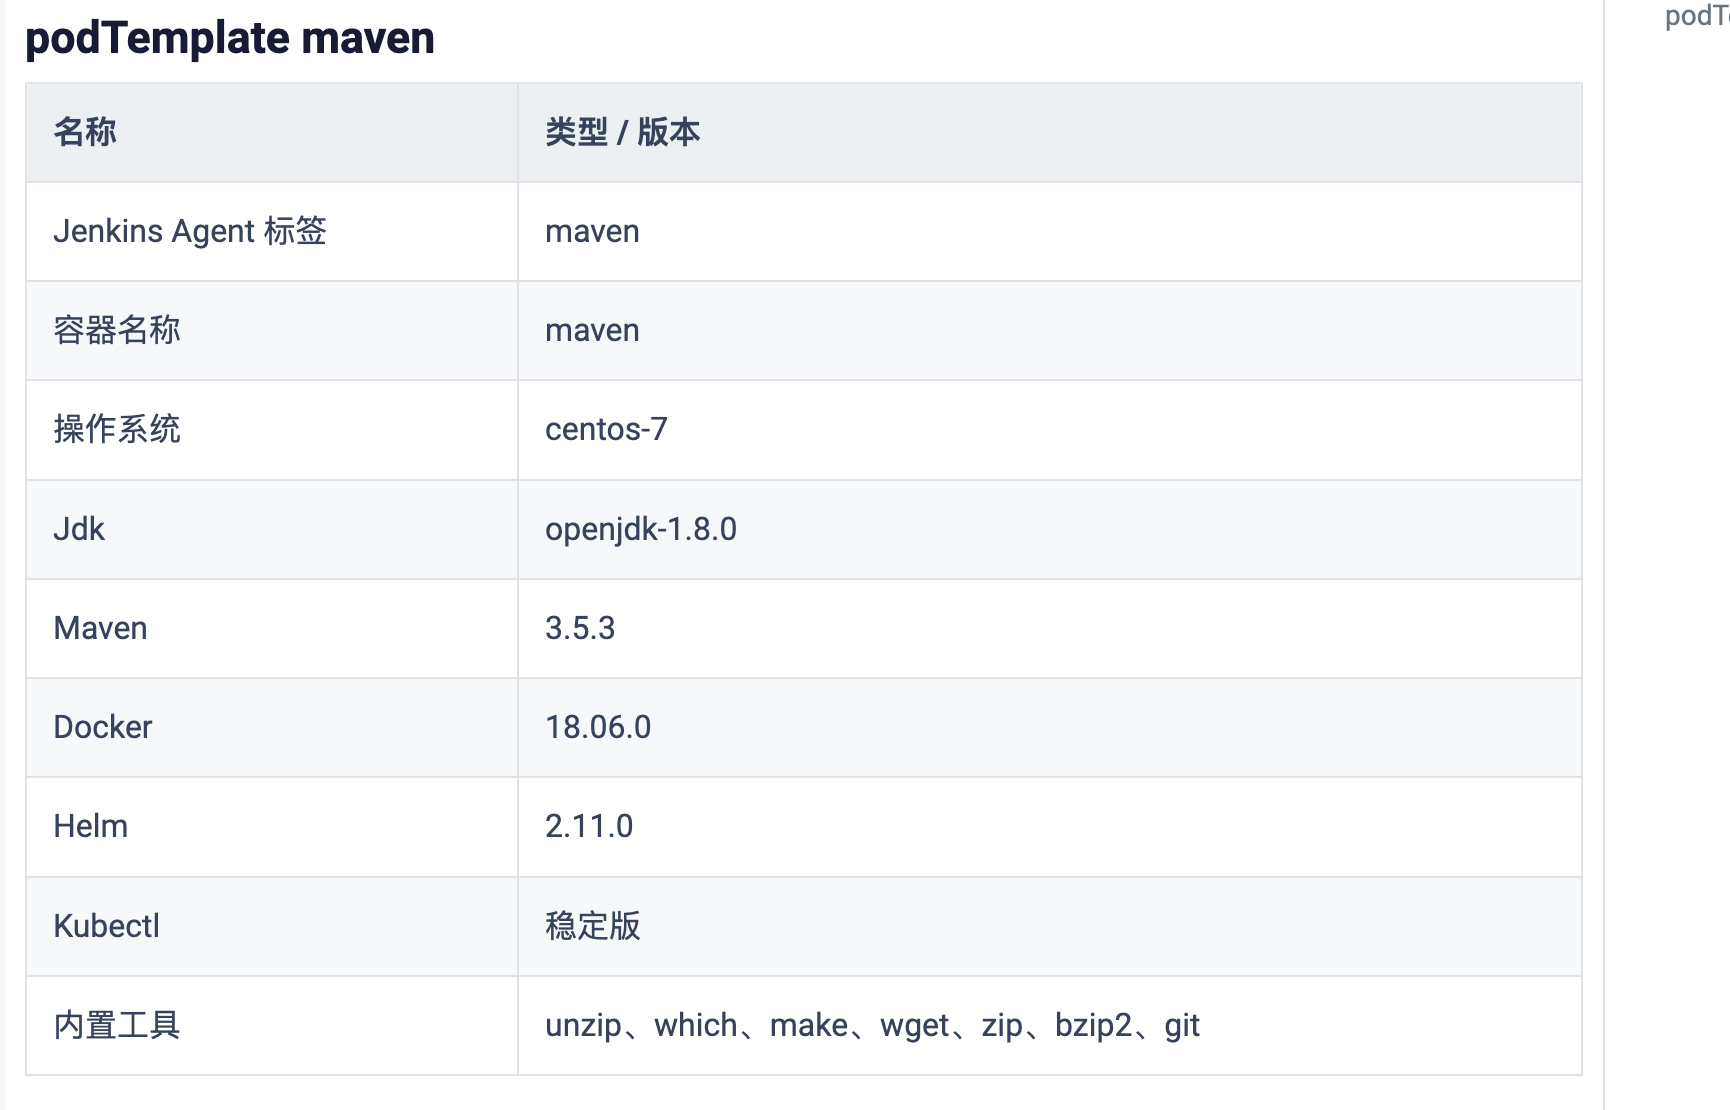
关于自定义Maven版本
内置的Maven版本为jdk1.8需要改为 11
7. 基础服务Jenkinsfile服务详解
pipeline {
agent {
node {
label 'maven'
}
}
stages {
stage('从仓库中拉取代码到本地') {
agent none
steps {
git(credentialsId: env.ALIYUN_GIT, url: 'xxxx', branch: 'dev', changelog: true, poll: false)
sh 'ls -al'
}
}
stage('default-3') {
parallel {
stage('构建&&推送XxlJob镜像') {
agent none
steps {
container('maven') { //这里取自配置好的远程Docker镜像仓库账密
withCredentials([usernamePassword(credentialsId : env.ALIYUN_DOCKER_IMAGE ,usernameVariable : 'DOCKER_USER_VAR' ,passwordVariable : 'DOCKER_PWD_VAR' ,)]) {
sh 'echo "$DOCKER_PWD_VAR" | docker login $ALIYUN_REGISTRY -u "$DOCKER_USER_VAR" --password-stdin'
echo '开始构建&&推送XxlJob项目'
sh 'ls -al ./k8s/xxljob/'
sh 'docker build --network=host -t hiwoo-xxljob:latest -f ./k8s/xxljob/Dockerfile ./k8s/xxljob/' //构建镜像
sh 'docker tag hiwoo-xxljob:latest $ALIYUN_REGISTRY/$ALIYUN_DOCKER_NAMESPACE/hiwoo-xxljob:latest ' //打标签
sh 'docker push $ALIYUN_REGISTRY/$ALIYUN_DOCKER_NAMESPACE/hiwoo-xxljob:latest ' //推送镜像
}
}
}
}
stage('构建&&推送MariaDB镜像') {
agent none
steps {
container('maven') {
withCredentials([usernamePassword(credentialsId : env.ALIYUN_DOCKER_IMAGE ,usernameVariable : 'DOCKER_USER_VAR' ,passwordVariable : 'DOCKER_PWD_VAR' ,)]) {
sh 'echo "$DOCKER_PWD_VAR" | docker login $ALIYUN_REGISTRY -u "$DOCKER_USER_VAR" --password-stdin'
echo '开始构建&&推送MariaDB项目'
sh 'docker build --network=host -t hiwoo-mariadb:latest -f ./k8s/mariadb/Dockerfile ./'
sh 'docker tag hiwoo-mariadb:latest $ALIYUN_REGISTRY/$ALIYUN_DOCKER_NAMESPACE/hiwoo-mariadb:latest '
sh 'docker push $ALIYUN_REGISTRY/$ALIYUN_DOCKER_NAMESPACE/hiwoo-mariadb:latest '
}
}
}
}
stage('构建&&推送Emqx镜像') {
agent none
steps {
container('maven') {
withCredentials([usernamePassword(credentialsId : env.ALIYUN_DOCKER_IMAGE ,usernameVariable : 'DOCKER_USER_VAR' ,passwordVariable : 'DOCKER_PWD_VAR' ,)]) {
sh 'echo "$DOCKER_PWD_VAR" | docker login $ALIYUN_REGISTRY -u "$DOCKER_USER_VAR" --password-stdin'
echo '开始构建&&推送Emqx项目'
sh 'docker build --network=host -t hiwoo-emqx:latest -f ./k8s/emqx/Dockerfile ./'
sh 'docker tag hiwoo-emqx:latest $ALIYUN_REGISTRY/$ALIYUN_DOCKER_NAMESPACE/hiwoo-emqx:latest '
sh 'docker push $ALIYUN_REGISTRY/$ALIYUN_DOCKER_NAMESPACE/hiwoo-emqx:latest '
}
}
}
}
stage('构建&&推送Influxdb镜像') {
agent none
steps {
container('maven') {
withCredentials([usernamePassword(credentialsId : env.ALIYUN_DOCKER_IMAGE ,usernameVariable : 'DOCKER_USER_VAR' ,passwordVariable : 'DOCKER_PWD_VAR' ,)]) {
sh 'echo "$DOCKER_PWD_VAR" | docker login $ALIYUN_REGISTRY -u "$DOCKER_USER_VAR" --password-stdin'
echo '开始构建&&推送Influxdb项目'
sh 'docker build --network=host -t hiwoo-influxdb:latest -f ./k8s/influxdb/Dockerfile ./'
sh 'docker tag hiwoo-influxdb:latest $ALIYUN_REGISTRY/$ALIYUN_DOCKER_NAMESPACE/hiwoo-influxdb:latest '
sh 'docker push $ALIYUN_REGISTRY/$ALIYUN_DOCKER_NAMESPACE/hiwoo-influxdb:latest '
}
}
}
}
stage('构建&&推送Nacos镜像') {
agent none
steps {
container('maven') {
withCredentials([usernamePassword(credentialsId : env.ALIYUN_DOCKER_IMAGE ,usernameVariable : 'DOCKER_USER_VAR' ,passwordVariable : 'DOCKER_PWD_VAR' ,)]) {
sh 'echo "$DOCKER_PWD_VAR" | docker login $ALIYUN_REGISTRY -u "$DOCKER_USER_VAR" --password-stdin'
echo '开始构建&&推送Nacos项目'
sh 'docker build --network=host -t hiwoo-nacos:latest -f ./k8s/nacos/Dockerfile ./'
sh 'docker tag hiwoo-nacos:latest $ALIYUN_REGISTRY/$ALIYUN_DOCKER_NAMESPACE/hiwoo-nacos:latest '
sh 'docker push $ALIYUN_REGISTRY/$ALIYUN_DOCKER_NAMESPACE/hiwoo-nacos:latest '
}
}
}
}
stage('构建&&推送Redis镜像') {
agent none
steps {
container('maven') {
withCredentials([usernamePassword(credentialsId : env.ALIYUN_DOCKER_IMAGE ,usernameVariable : 'DOCKER_USER_VAR' ,passwordVariable : 'DOCKER_PWD_VAR' ,)]) {
sh 'echo "$DOCKER_PWD_VAR" | docker login $ALIYUN_REGISTRY -u "$DOCKER_USER_VAR" --password-stdin'
echo '开始构建&&推送Redis项目'
sh 'docker build --network=host -t hiwoo-redis:latest -f ./k8s/redis/Dockerfile ./'
sh 'docker tag hiwoo-redis:latest $ALIYUN_REGISTRY/$ALIYUN_DOCKER_NAMESPACE/hiwoo-redis:latest '
sh 'docker push $ALIYUN_REGISTRY/$ALIYUN_DOCKER_NAMESPACE/hiwoo-redis:latest '
}
}
}
}
stage('构建&&推送Sentinel镜像') {
agent none
steps {
container('maven') {
withCredentials([usernamePassword(credentialsId : env.ALIYUN_DOCKER_IMAGE ,usernameVariable : 'DOCKER_USER_VAR' ,passwordVariable : 'DOCKER_PWD_VAR' ,)]) {
sh 'echo "$DOCKER_PWD_VAR" | docker login $ALIYUN_REGISTRY -u "$DOCKER_USER_VAR" --password-stdin '
echo '开始构建&&推送Sentinel项目'
sh 'docker build --network=host -t hiwoo-sentinel:latest -f ./k8s/sentinel/Dockerfile ./'
sh 'docker tag hiwoo-sentinel:latest $ALIYUN_REGISTRY/$ALIYUN_DOCKER_NAMESPACE/hiwoo-sentinel:latest '
sh 'docker push $ALIYUN_REGISTRY/$ALIYUN_DOCKER_NAMESPACE/hiwoo-sentinel:latest '
}
}
}
}
stage('构建&&推送Tdengine镜像') {
agent none
steps {
container('maven') {
withCredentials([usernamePassword(credentialsId : env.ALIYUN_DOCKER_IMAGE ,usernameVariable : 'DOCKER_USER_VAR' ,passwordVariable : 'DOCKER_PWD_VAR' ,)]) {
sh 'echo "$DOCKER_PWD_VAR" | docker login $ALIYUN_REGISTRY -u "$DOCKER_USER_VAR" --password-stdin'
echo '开始构建&&推送Tdengine项目'
sh 'docker build --network=host -t hiwoo-tdengine:latest -f ./k8s/tdengine/Dockerfile ./'
sh 'docker tag hiwoo-tdengine:latest $ALIYUN_REGISTRY/$ALIYUN_DOCKER_NAMESPACE/hiwoo-tdengine:latest '
sh 'docker push $ALIYUN_REGISTRY/$ALIYUN_DOCKER_NAMESPACE/hiwoo-tdengine:latest '
}
}
}
}
}
}
stage('清理未标记的Docker镜像与已推送的镜像') {
agent none
steps {
container('maven') {
echo '清理未标记的 Docker 镜像'
sh 'docker rmi $(docker images -a -f "dangling=true" -q) || echo "没有None的镜像可以清除"'
// sh 'docker rmi $(docker images -a -q --filter "reference=hiwoo-*:latest") || echo "没有匹配的镜像可以清除"' //目前来讲 latest镜像没有清除的必要
}
}
}
stage('查看当前构建&&推送的所有镜像文件') {
agent none
steps {
container('maven') {
sh 'docker images '
}
}
}
stage('部署MariaDB') {
agent none
steps {
container('maven') {
withCredentials([
kubeconfigFile(
credentialsId: env.KUBECONFIG_CREDENTIAL_ID,
variable: 'KUBECONFIG')
]) {
echo '部署MariaDB Start~'
script {
def pvcExists = sh(script: "kubectl get pvc hiwoo-mariadb-pvc -n hiwoo-cloud --no-headers=true || true", returnStdout: true).trim()
// 如果不存在,则创建 PVC 持久化数据库文件
if (!pvcExists) {
sh 'envsubst < k8s/mariadb/pvc.yaml | kubectl apply -f - '
} else {
echo "PVC hiwoo-mariadb-pvc already exists. Skipping creation."
}
}
sh 'envsubst < k8s/mariadb/deploy.yaml | kubectl apply -f - --force --grace-period=0'
echo '检查 MariaDB 部署状态'
sh 'kubectl rollout status Deployment/hiwoo-mariadb -n hiwoo-cloud'
}
}
}
}
stage('等待项目初始化完成') {
agent none
steps {
script {
echo "开始等待..."
sleep 20 // 等待 20 秒
echo "等待完成!"
}
}
}
stage('导入SQL文件(仅当master第一次部署需要,后续则根据情况是否需要导入)') {
agent none
when {
allOf {
expression { env.BRANCH_NAME == 'dev' } // 只有在 dev 分支
expression { env.INPUT_SQL == 'true' } // 用户指定要导入 SQL
}
}
steps {
container('maven') {
withCredentials([
kubeconfigFile(
credentialsId: env.KUBECONFIG_CREDENTIAL_ID,
variable: 'KUBECONFIG')
]) {
echo '导入SQL文件 Start~ 支持大文件sql导入'
sh 'cd k8s && ls -al'
sh 'kubectl exec -it -n hiwoo-cloud deploy/hiwoo-mariadb -- mysql -h localhost -u root -p123456 < k8s/mariadb/nacos.sql'
sh 'kubectl exec -it -n hiwoo-cloud deploy/hiwoo-mariadb -- mysql -h localhost -u root -p123456 < k8s/mariadb/xxljob_config.sql'
echo '导入iot_engine_db.sql start'
sh 'kubectl exec -it -n hiwoo-cloud deploy/hiwoo-mariadb -- mysql -h localhost -u root -p123456 < k8s/mariadb/iot_engine_db.sql'
}
}
}
}
stage('并行执行部署其他基础服务') {
parallel {
stage('部署Xxl-Job') {
agent none
steps {
container('maven') {
withCredentials([
kubeconfigFile(
credentialsId: env.KUBECONFIG_CREDENTIAL_ID,
variable: 'KUBECONFIG')
]) {
echo '部署Xxl-Job开始'
sh 'envsubst < k8s/xxljob/deploy.yaml | kubectl apply -f - --force --grace-period=0'
echo '检查 Xxl-job 部署状态'
sh 'kubectl rollout status Deployment/hiwoo-xxljob -n hiwoo-cloud'
}
}
}
}
stage('部署Nacos') {
agent none
steps {
container('maven') {
withCredentials([
kubeconfigFile(
credentialsId: env.KUBECONFIG_CREDENTIAL_ID,
variable: 'KUBECONFIG')
]) {
echo '部署Nacos开始,开始部署 nacos配置文件' //以ConfigMap的形式导入application.properties 配置文件 以便后续修改
sh '''#!/bin/bash
NAMESPACE="hiwoo-cloud"
CONFIGMAP_NAME="nacos-configmap"
CONFIGMAP_PATH="k8s/nacos/application.properties"
# 检查ConfigMap是否已经存在
kubectl get configmap -n $NAMESPACE $CONFIGMAP_NAME &> /dev/null
# 根据ConfigMap是否存在来创建或更新
if [ $? -eq 0 ]; then
echo "ConfigMap $CONFIGMAP_NAME 已经存在,将更新配置"
kubectl create configmap $CONFIGMAP_NAME --from-file=$CONFIGMAP_PATH -n $NAMESPACE --dry-run=client -o yaml | kubectl apply -f -
else
echo "ConfigMap $CONFIGMAP_NAME 不存在,将创建新的配置"
kubectl create configmap $CONFIGMAP_NAME --from-file=$CONFIGMAP_PATH -n $NAMESPACE
fi
echo "部署Nacos开始,配置文件已创建/更新"
'''
sh 'envsubst < k8s/nacos/deploy.yaml | kubectl apply -f - --force --grace-period=0'
echo '检查 Nacos 部署状态'
sh 'kubectl rollout status Deployment/hiwoo-nacos -n hiwoo-cloud'
}
}
}
}
stage('部署Tdengine') {
agent none
steps {
container('maven') {
withCredentials([
kubeconfigFile(
credentialsId: env.KUBECONFIG_CREDENTIAL_ID,
variable: 'KUBECONFIG')
]) {
echo '部署Tdengine开始'
sh 'envsubst < k8s/tdengine/deploy.yaml | kubectl apply -f - --force --grace-period=0'
echo '检查 Tdengine 部署状态'
sh 'kubectl rollout status Deployment/hiwoo-tdengine -n hiwoo-cloud'
}
}
}
}
stage('部署Redis') {
agent none
steps {
container('maven') {
withCredentials([
kubeconfigFile(
credentialsId: env.KUBECONFIG_CREDENTIAL_ID,
variable: 'KUBECONFIG')
]) {
echo '构建&&推送最新的Redis配置文件'
sh '''#!/bin/bash
NAMESPACE="hiwoo-cloud"
CONFIGMAP_NAME="redis-configmap"
CONFIGMAP_PATH="k8s/redis/redis.conf"
# 检查ConfigMap是否已经存在
kubectl get configmap -n $NAMESPACE $CONFIGMAP_NAME &> /dev/null
# 根据ConfigMap是否存在来创建或更新
if [ $? -eq 0 ]; then
echo "ConfigMap $CONFIGMAP_NAME 已经存在,将更新配置"
kubectl create configmap $CONFIGMAP_NAME --from-file=$CONFIGMAP_PATH -n $NAMESPACE --dry-run=client -o yaml | kubectl apply -f -
else
echo "ConfigMap $CONFIGMAP_NAME 不存在,将创建新的配置"
kubectl create configmap $CONFIGMAP_NAME --from-file=$CONFIGMAP_PATH -n $NAMESPACE
fi
echo "构建&&推送Redis开始,配置文件已创建/更新"
'''
sh 'envsubst < k8s/redis/deploy.yaml | kubectl apply -f - --force --grace-period=0'
echo '检查 Redis 部署状态'
sh 'kubectl rollout status Deployment/hiwoo-redis -n hiwoo-cloud'
}
}
}
}
stage('部署Emqx') {
agent none
steps {
container('maven') {
withCredentials([
kubeconfigFile(
credentialsId: env.KUBECONFIG_CREDENTIAL_ID,
variable: 'KUBECONFIG')
]) {
echo '部署Emqx开始'
sh 'envsubst < k8s/emqx/deploy.yaml | kubectl apply -f - --force --grace-period=0'
echo '检查 Emqx 部署状态'
sh 'kubectl rollout status Deployment/hiwoo-emqx -n hiwoo-cloud'
}
}
}
}
stage('部署Influxdb') {
agent none
steps {
container('maven') {
withCredentials([
kubeconfigFile(
credentialsId: env.KUBECONFIG_CREDENTIAL_ID,
variable: 'KUBECONFIG')
]) {
echo '部署Influxdb开始'
sh 'envsubst < k8s/influxdb/deploy.yaml | kubectl apply -f - --force --grace-period=0'
echo '检查 Influxdb 部署状态'
sh 'kubectl rollout status Deployment/hiwoo-influxdb -n hiwoo-cloud'
}
}
}
}
stage('部署Sentinel') {
agent none
steps {
container('maven') {
withCredentials([
kubeconfigFile(
credentialsId: env.KUBECONFIG_CREDENTIAL_ID,
variable: 'KUBECONFIG')
]) {
echo '部署Sentinel开始'
sh 'envsubst < k8s/sentinel/deploy.yaml | kubectl apply -f - --force --grace-period=0'
echo '检查 Sentinel 部署状态'
sh 'kubectl rollout status Deployment/hiwoo-sentinel -n hiwoo-cloud'
}
}
}
}
}
}
}
environment {
KUBECONFIG_CREDENTIAL_ID = 'demo-kubeconfig'
SONAR_CREDENTIAL_ID = 'sonar-token'
ALIYUN_DOCKER_IMAGE = 'aliyun-docker-image'
ALIYUN_REGISTRY = 'registry.cn-hangzhou.aliyuncs.com'
ALIYUN_DOCKER_NAMESPACE = 'hiwoo'
ALIYUN_GIT = 'aliyun-git'
}
parameters {
string(name: 'INPUT_SQL', defaultValue: 'false', description: '是否导入SQL文件,true/false (默认不需要重新导入)')
string(name: 'BRANCH_NAME', defaultValue: 'dev', description: '')
}
}
六、流水线自动触发构建模式
前提: 配置好所有项目里Jenkinsfile 与Dockerfile与Deploy.yaml文件
然后观察项目流水线运行情况即可
部署完成之后在 项目命名空间里查看对应项目部署即可
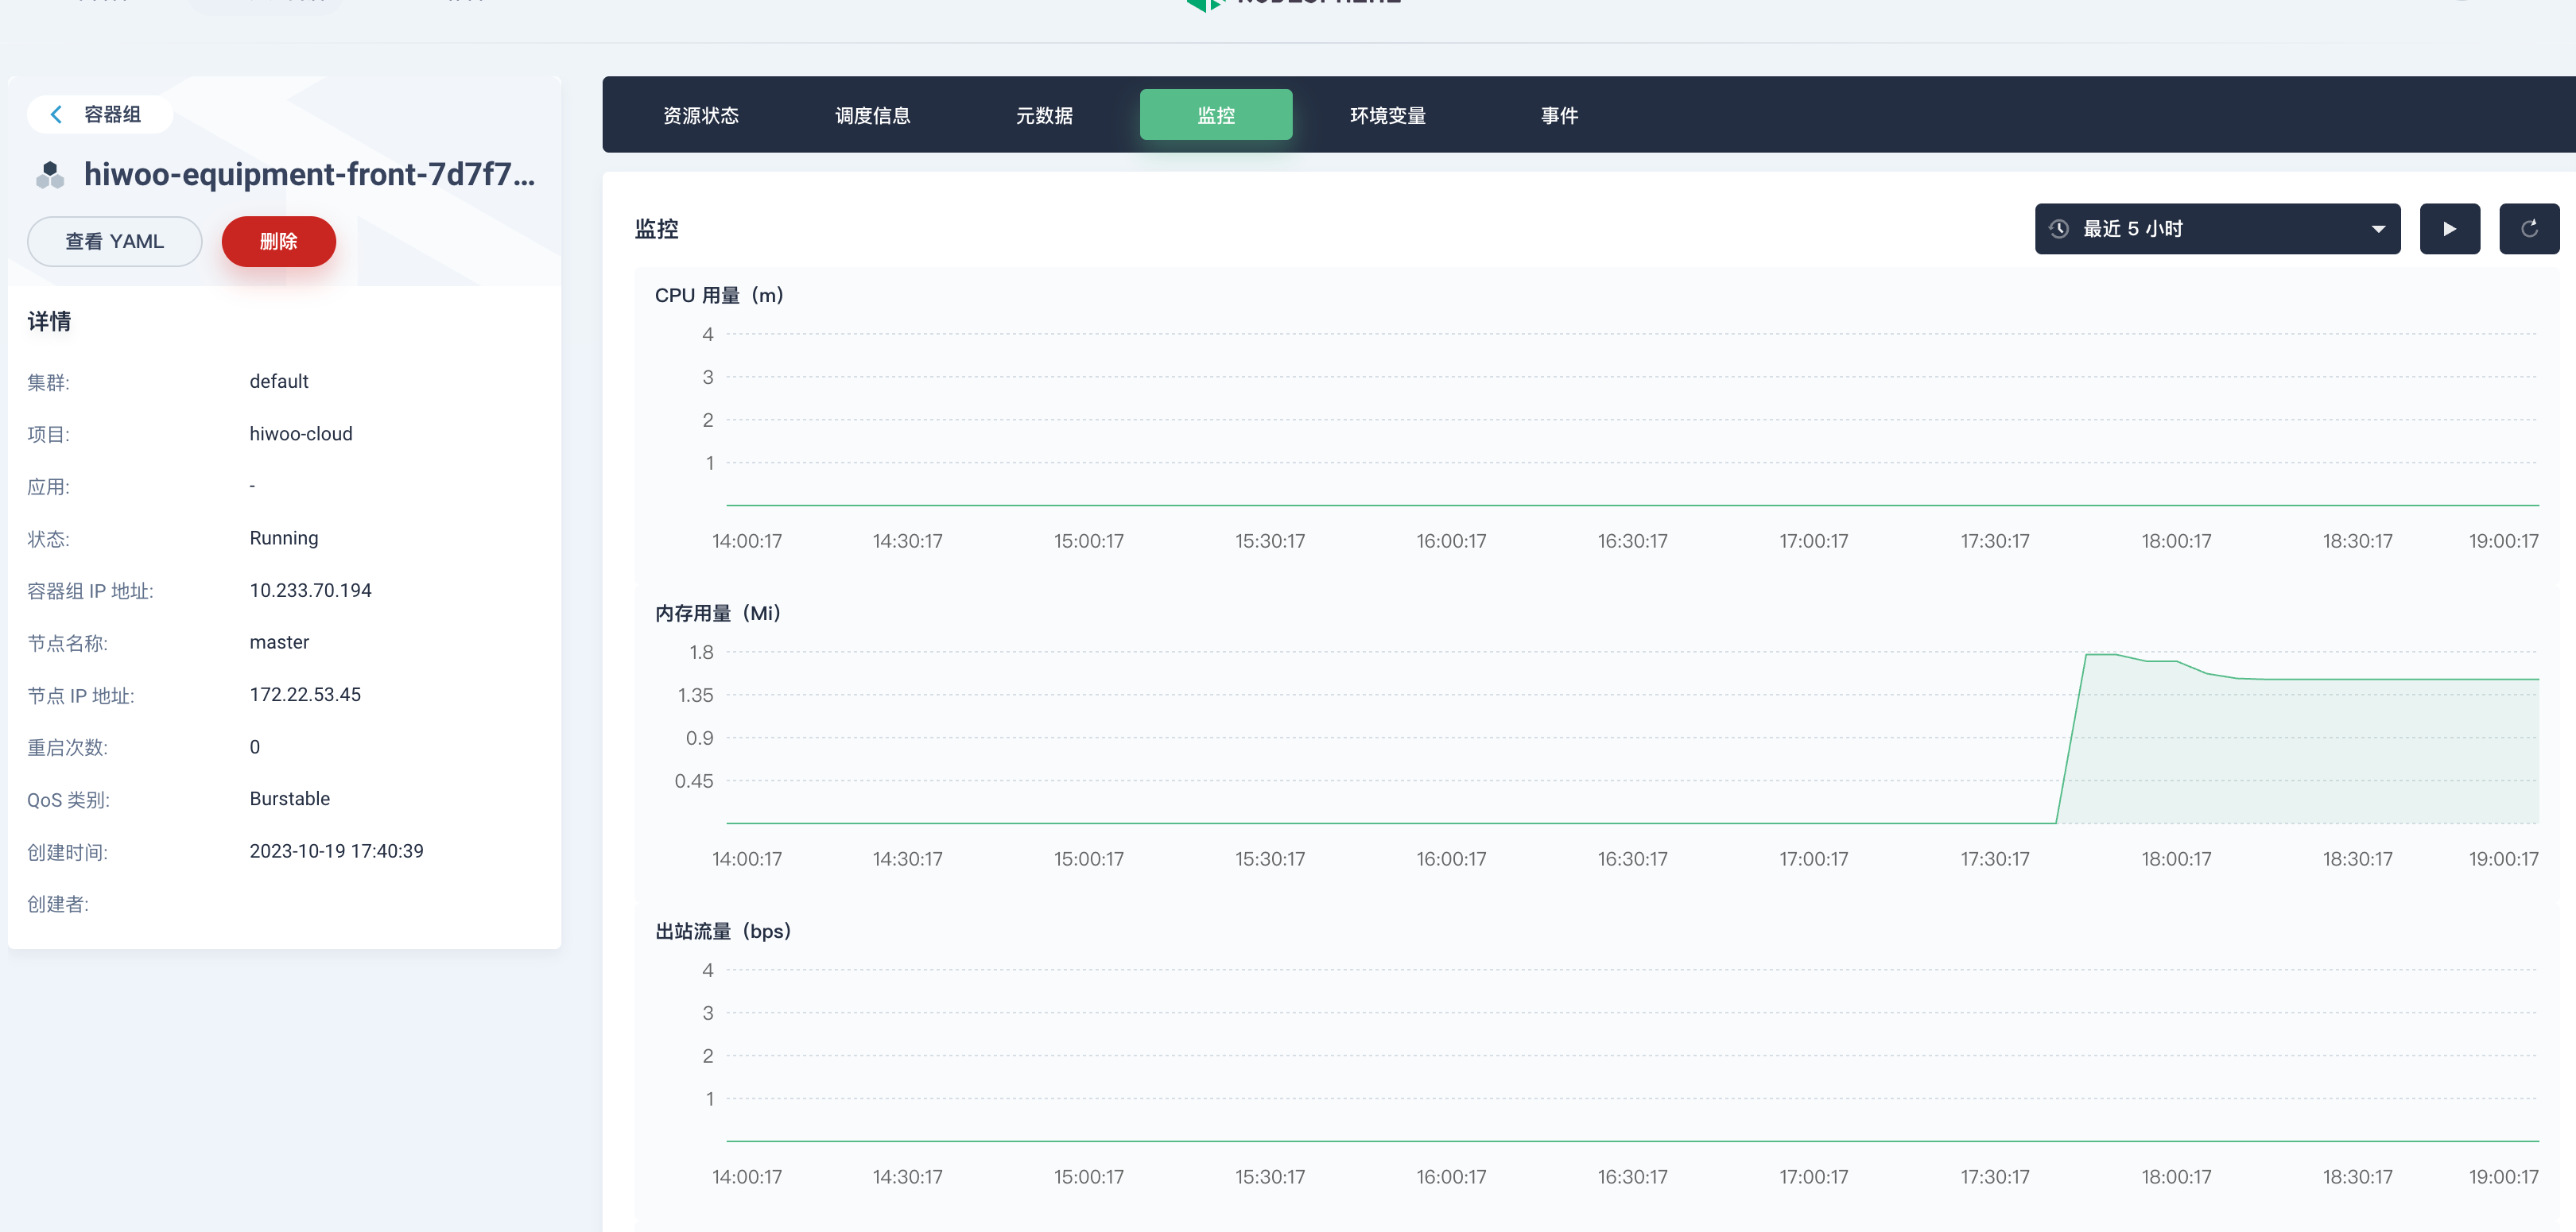
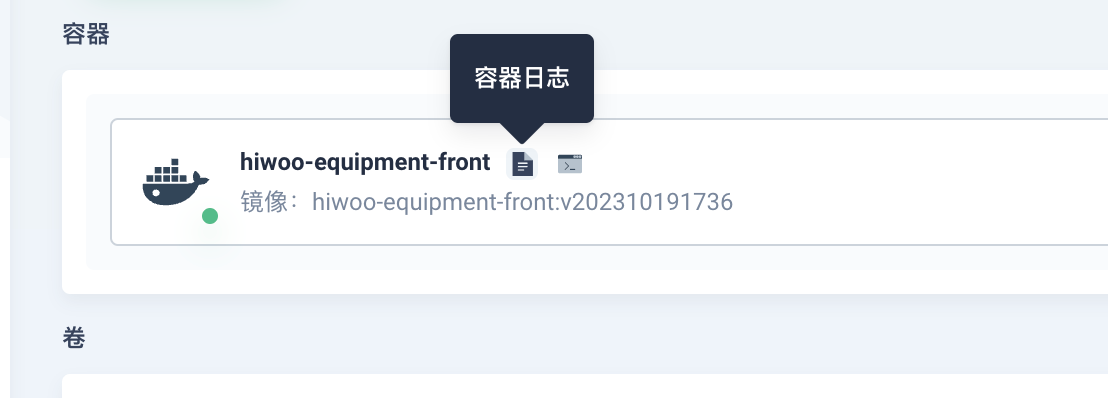
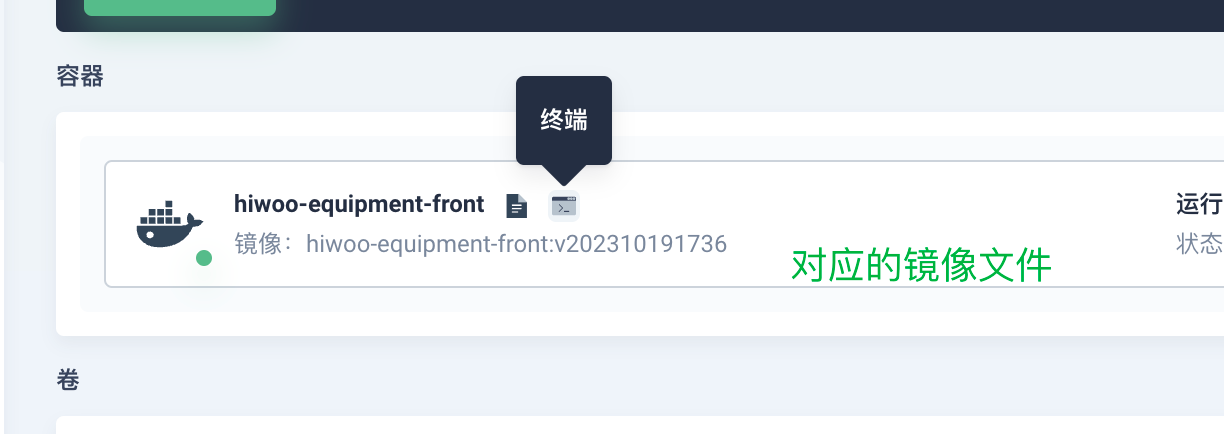
七、项目运维
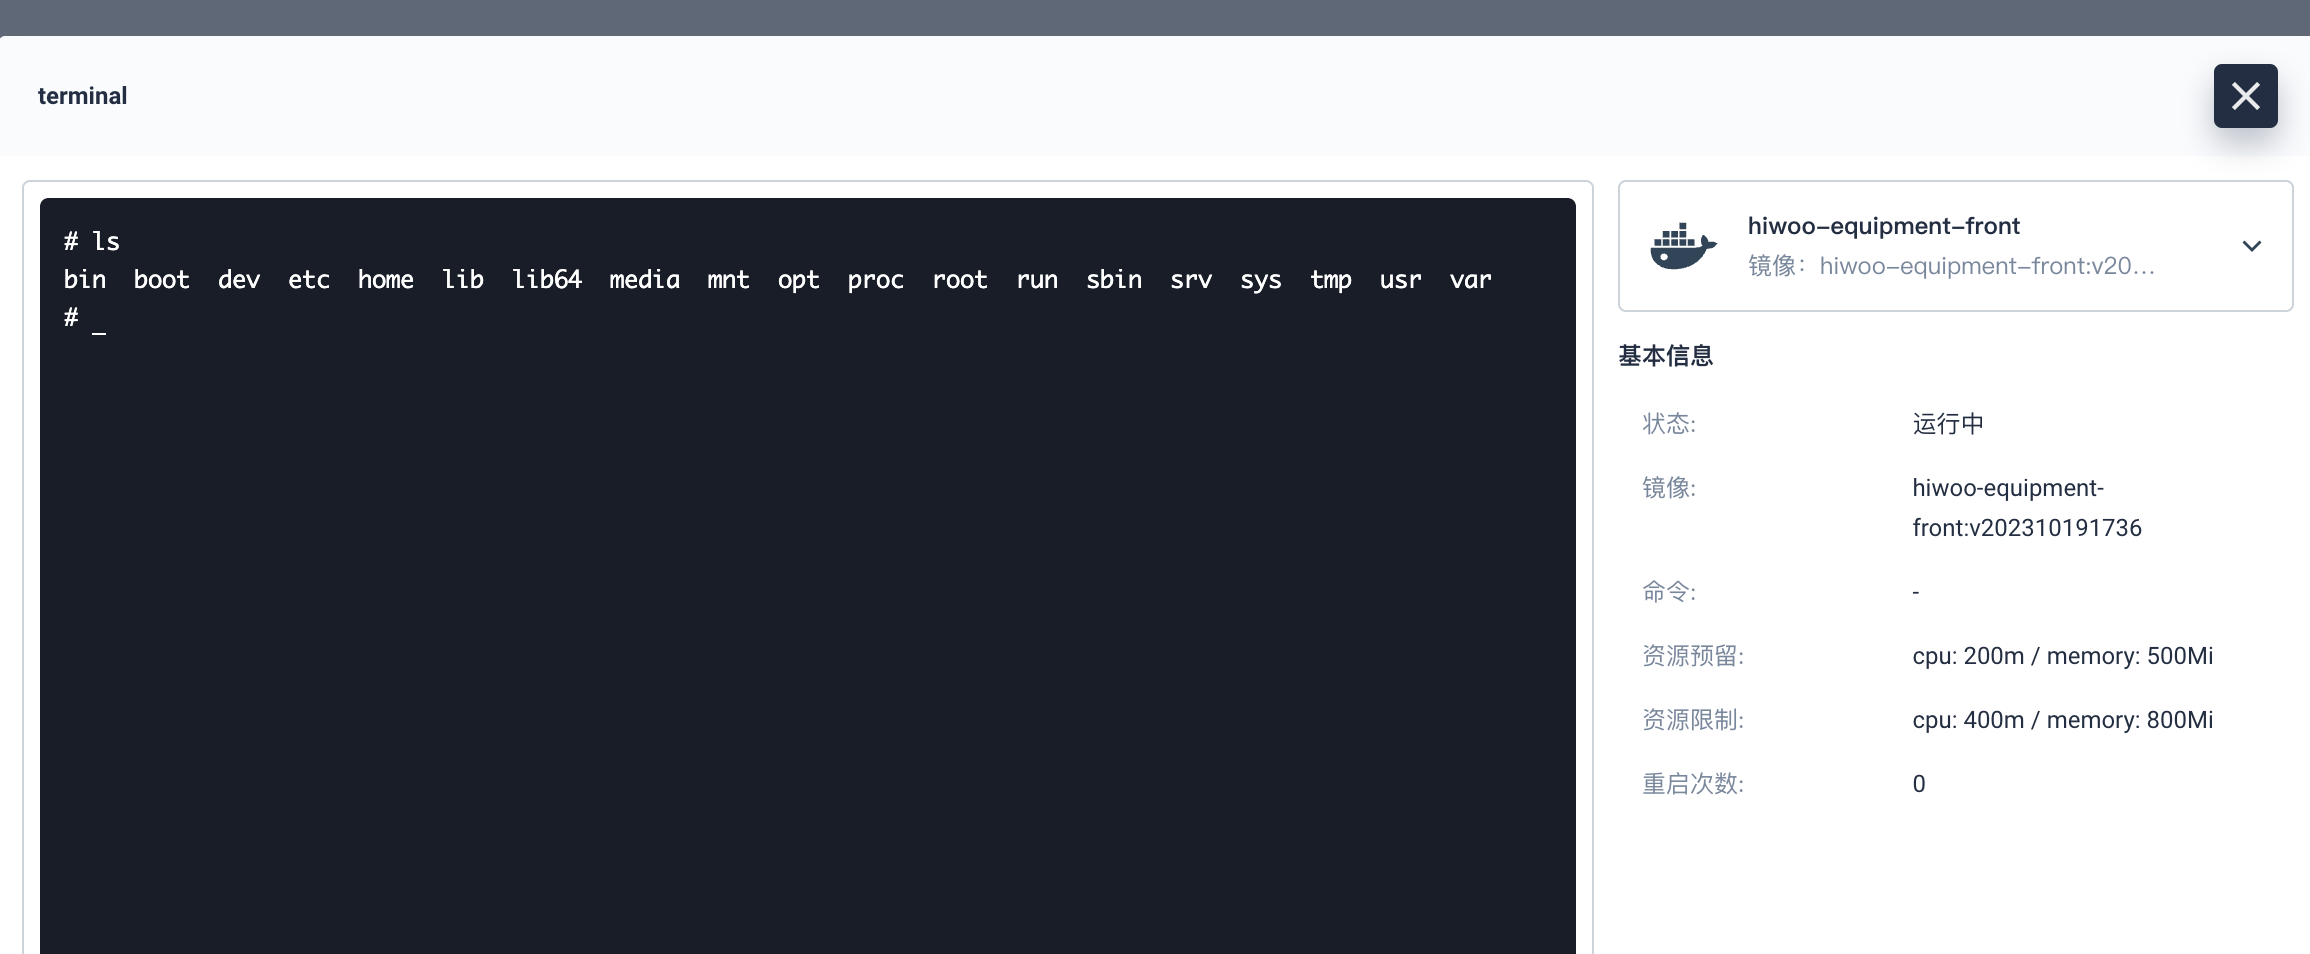
查看其中一个服务

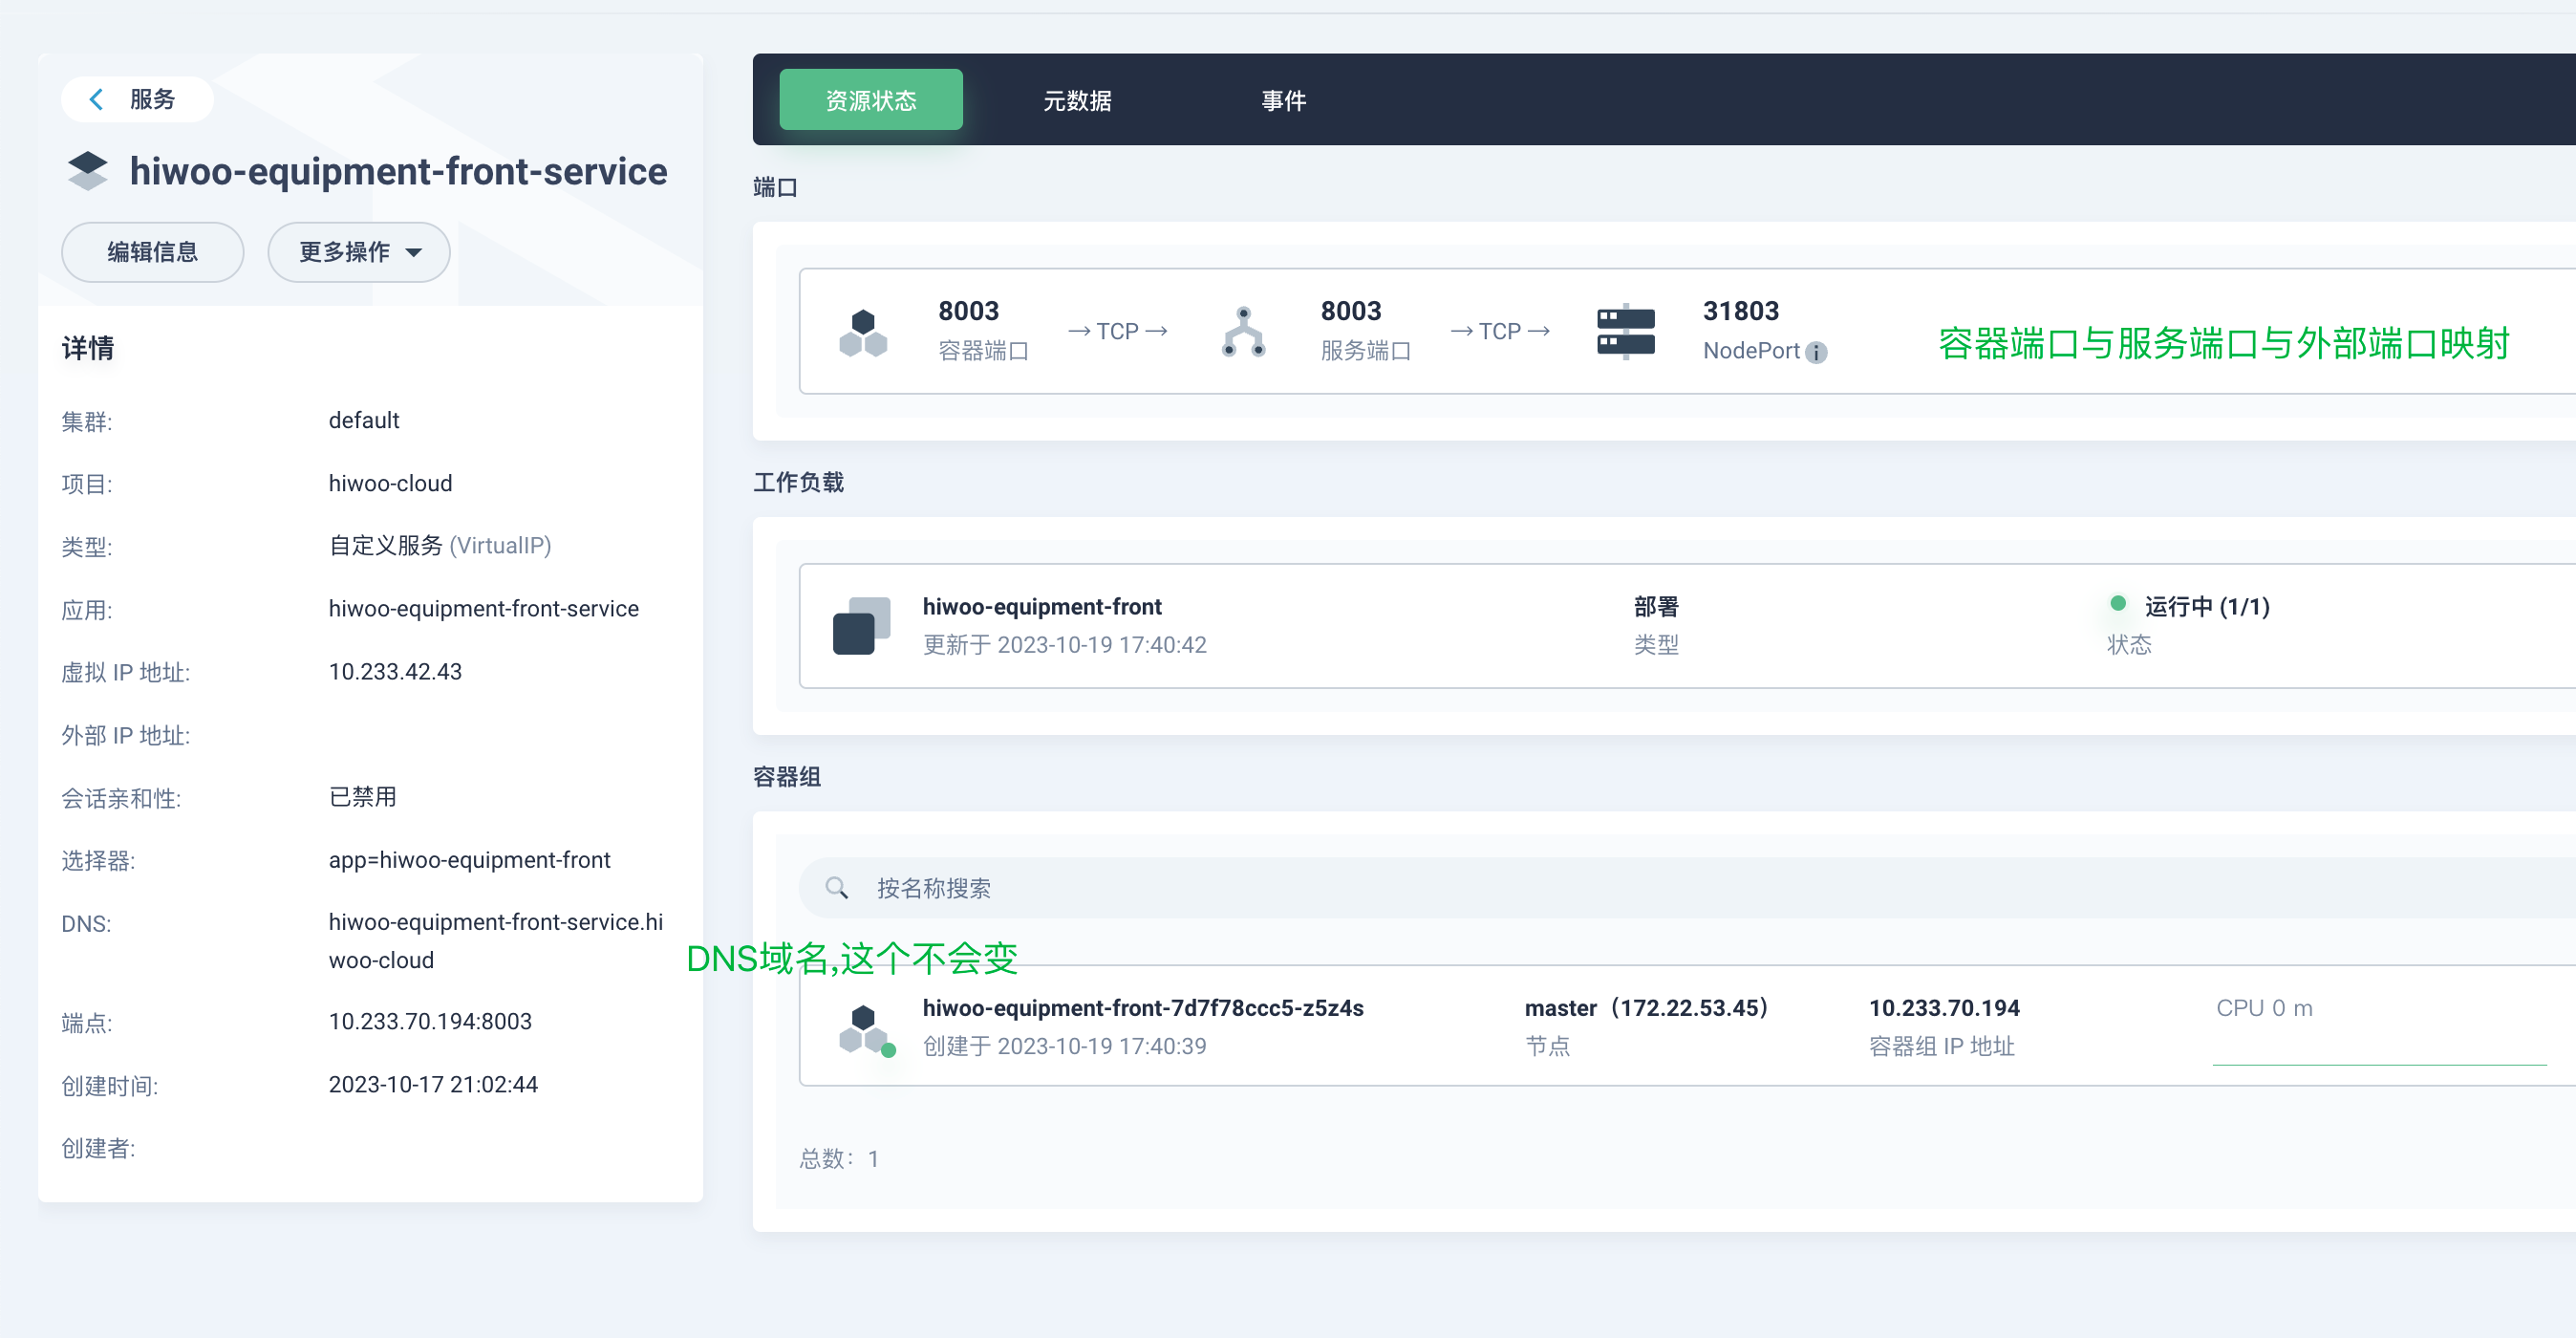
1.监控页面
2.查看容器日志
3.查看项目内容器文件
3.链路追踪
待后续补充
4.镜像仓库管理
待后续补充
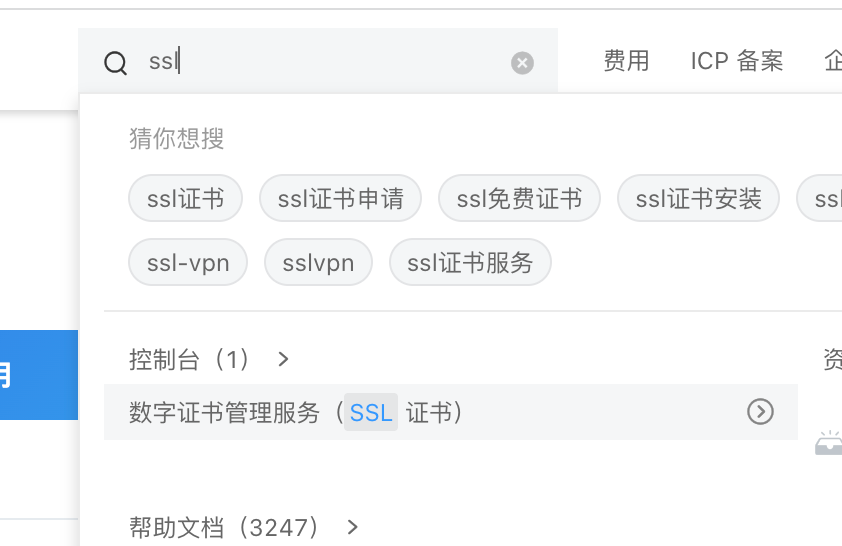
5. 域名TLS配置
这里需要去域名服务商那边获取域名的公钥私钥,然后填入本平台
以阿里云举例:

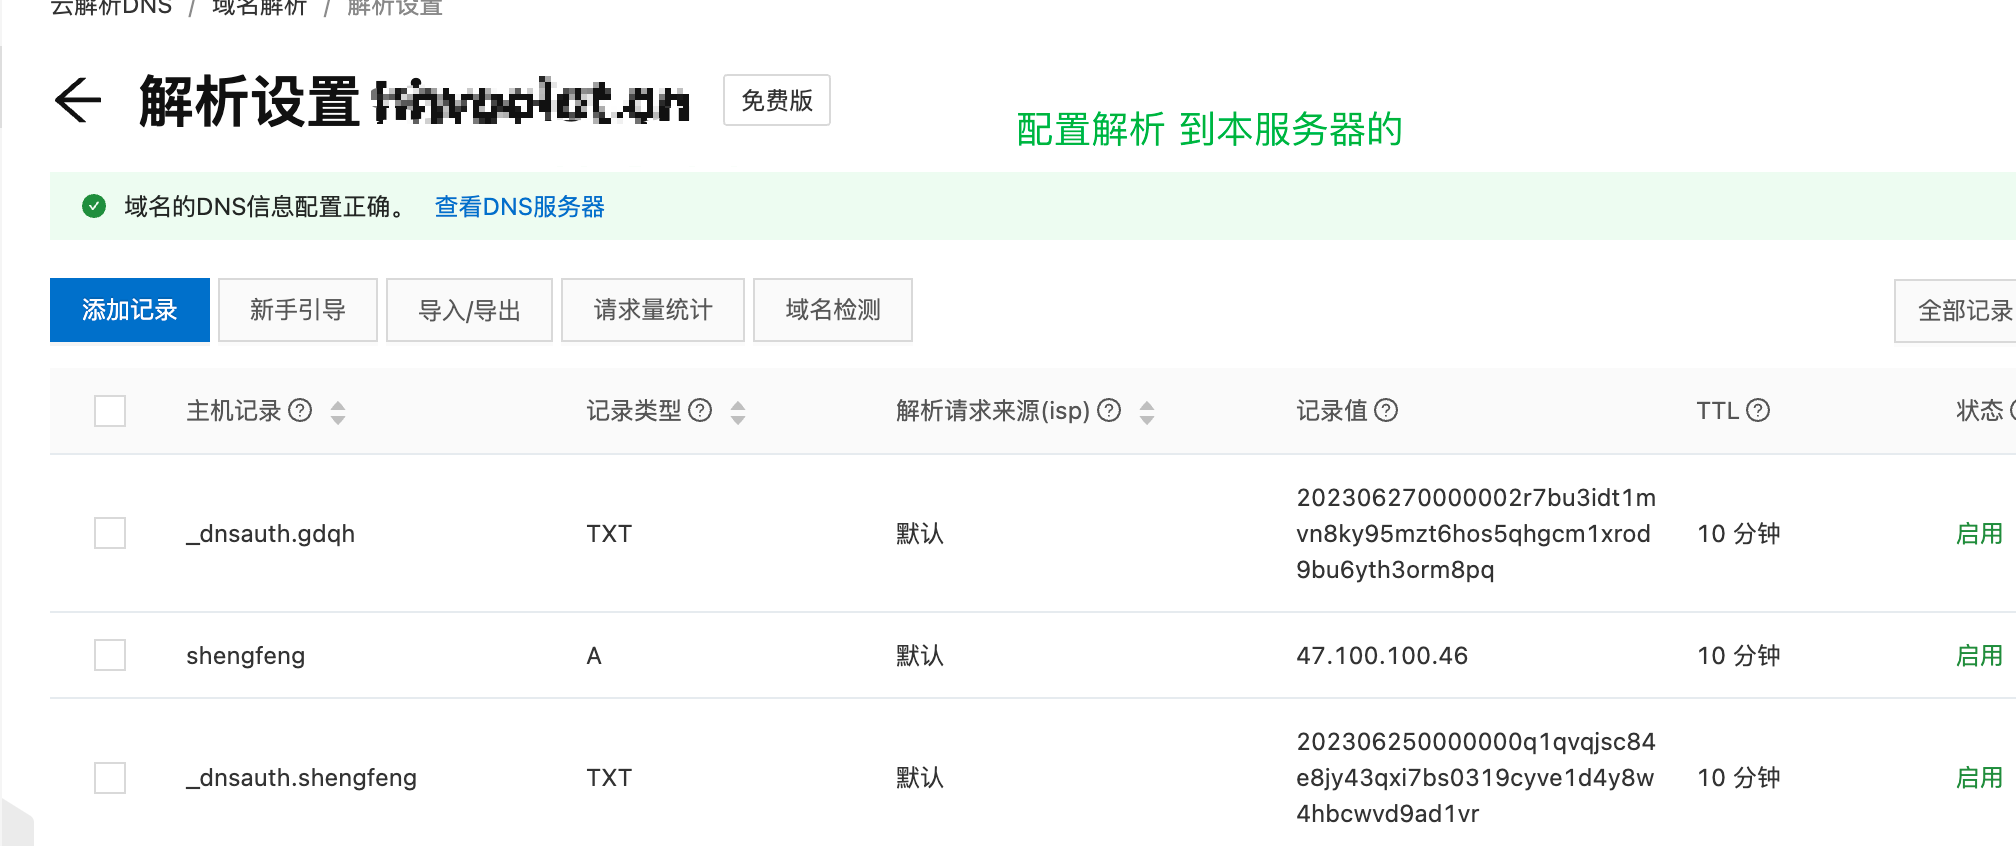
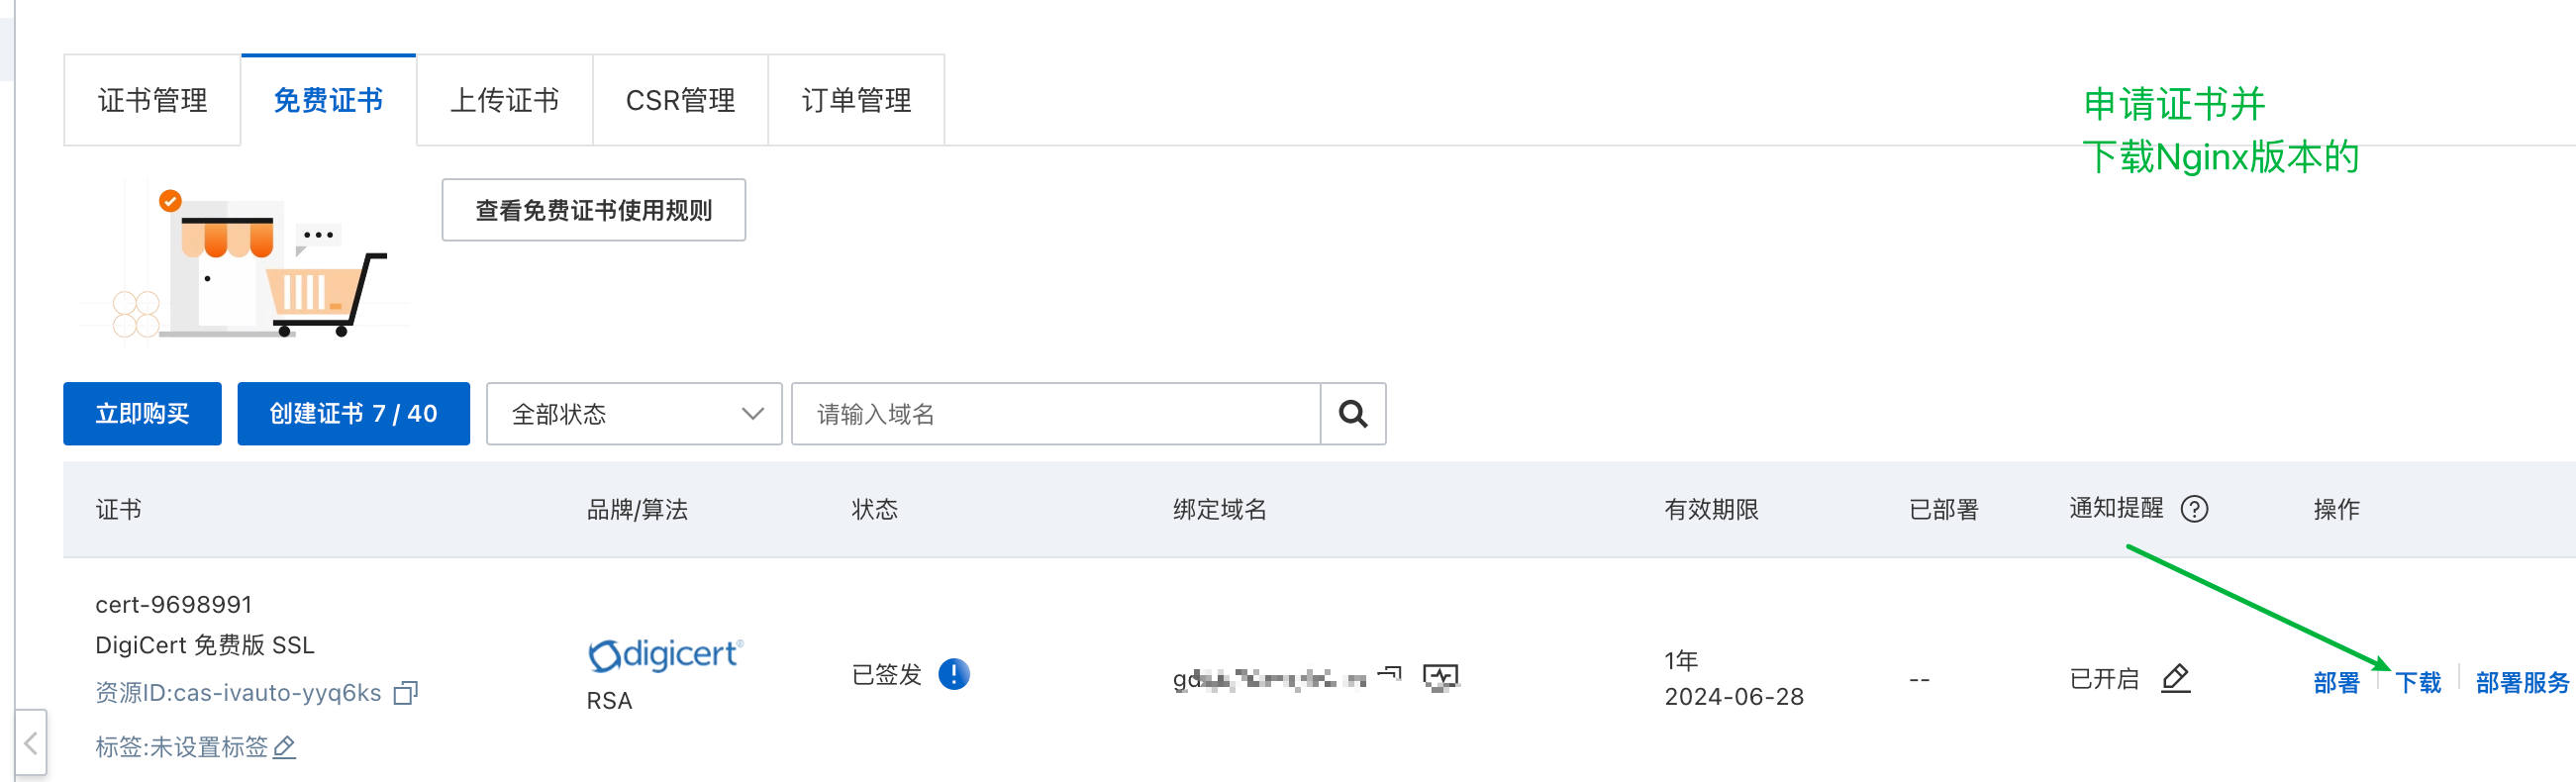
配置域名映射待补充…参考文档如下
https://kubesphere.io/zh/docs/v3.3/project-user-guide/application-workloads/routes/
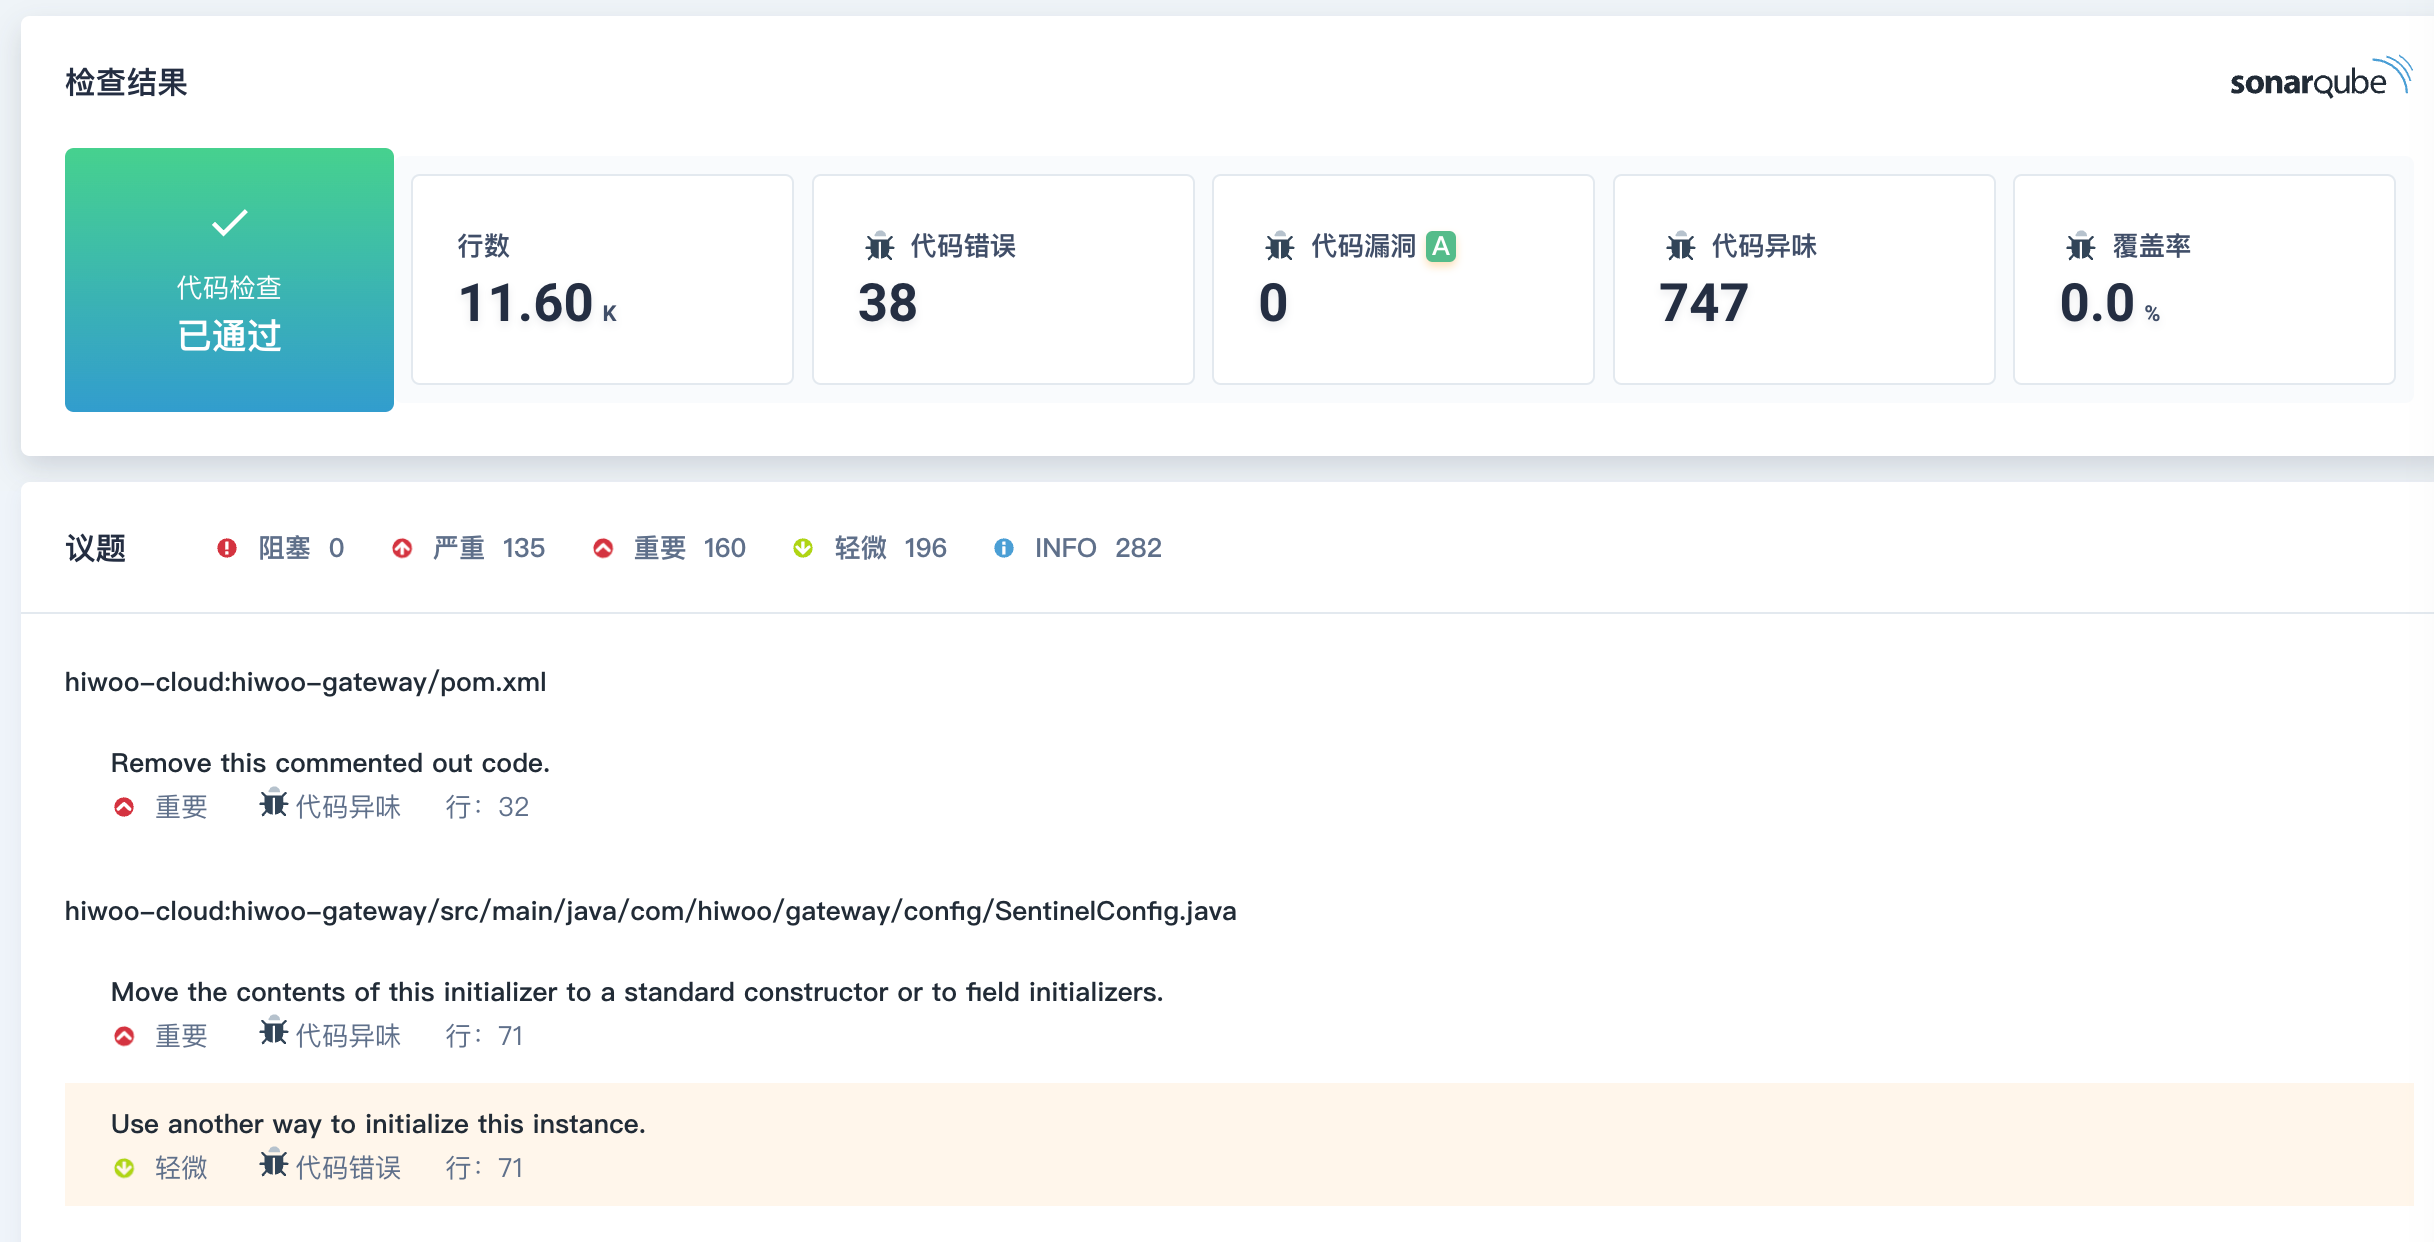
6.代码质量检测
参考文档 https://kubesphere.io/zh/docs/v3.3/devops-user-guide/how-to-integrate/sonarqube/
查看helm版本 : helm version
helm version
version.BuildInfo{Version:"v3.9.0", GitCommit:"7ceeda6c585217a19a1131663d8cd1f7d641b2a7", GitTreeState:"clean", GoVersion:"go1.17.5"}
若这一步显示没有安装 Helm,则执行以下命令去安装Helm
curl https://raw.githubusercontent.com/helm/helm/master/scripts/get-helm-3 | bash
安装 SonarQube 服务器
helm upgrade --install sonarqube sonarqube --repo https://charts.kubesphere.io/main -n kubesphere-devops-system --create-namespace --set service.type=NodePort
获取 SonarQube 控制台地址
export NODE_PORT=$(kubectl get --namespace kubesphere-devops-system -o jsonpath="{.spec.ports[0].nodePort}" services sonarqube-sonarqube)

export NODE_IP=$(kubectl get nodes --namespace kubesphere-devops-system -o jsonpath="{.items[0].status.addresses[0].address}")

echo http://$NODE_IP:$NODE_PORT

请注意这里输出的IP为内网地址,后续需要替换为 外网IP
步骤 1:访问 SonarQube 控制台
-
执行以下命令查看 SonarQube 的状态。请注意,只有在 SonarQube 启动并运行后才能访问 SonarQube 控制台。
$ kubectl get pod -n kubesphere-devops-system NAME READY STATUS RESTARTS AGE devops-jenkins-68b8949bb-7zwg4 1/1 Running 0 84m s2ioperator-0 1/1 Running 1 84m sonarqube-postgresql-0 1/1 Running 0 5m31s sonarqube-sonarqube-bb595d88b-97594 1/1 Running 2 5m31s -
在浏览器中访问 SonarQube 控制台
http://<Node IP>:<NodePort>。 -
点击右上角的 Log in,然后使用默认帐户
admin/admin登录。…
具体安装步骤参照官网文档(一致)
添加访问Token

步骤 2:配置SonarQube Jenkinfile
        stage('代码质量检测') {
            agent none
            steps {
                container('maven') {
                    withCredentials([string(credentialsId : 'sonarqube' ,variable : 'SONAR_TOKEN' ,)]) {
                        withSonarQubeEnv('sonar') {
                            sh '''mvn compile sonar:sonar -Dsonar.projectKey=hiwoo-cloud -Dsonar.host.url=xxx(Sonarqube外部Ip地址) -Dsonar.login=$SONAR_TOKEN'''
                        }

                    }

                    timeout(unit: 'MINUTES', activity: true, time: 10) {
                        waitForQualityGate 'false'
                    }

                }

            }
        }
使用效果
八、日常运维命令附录
1、Docker基础命令
- 基本命令:
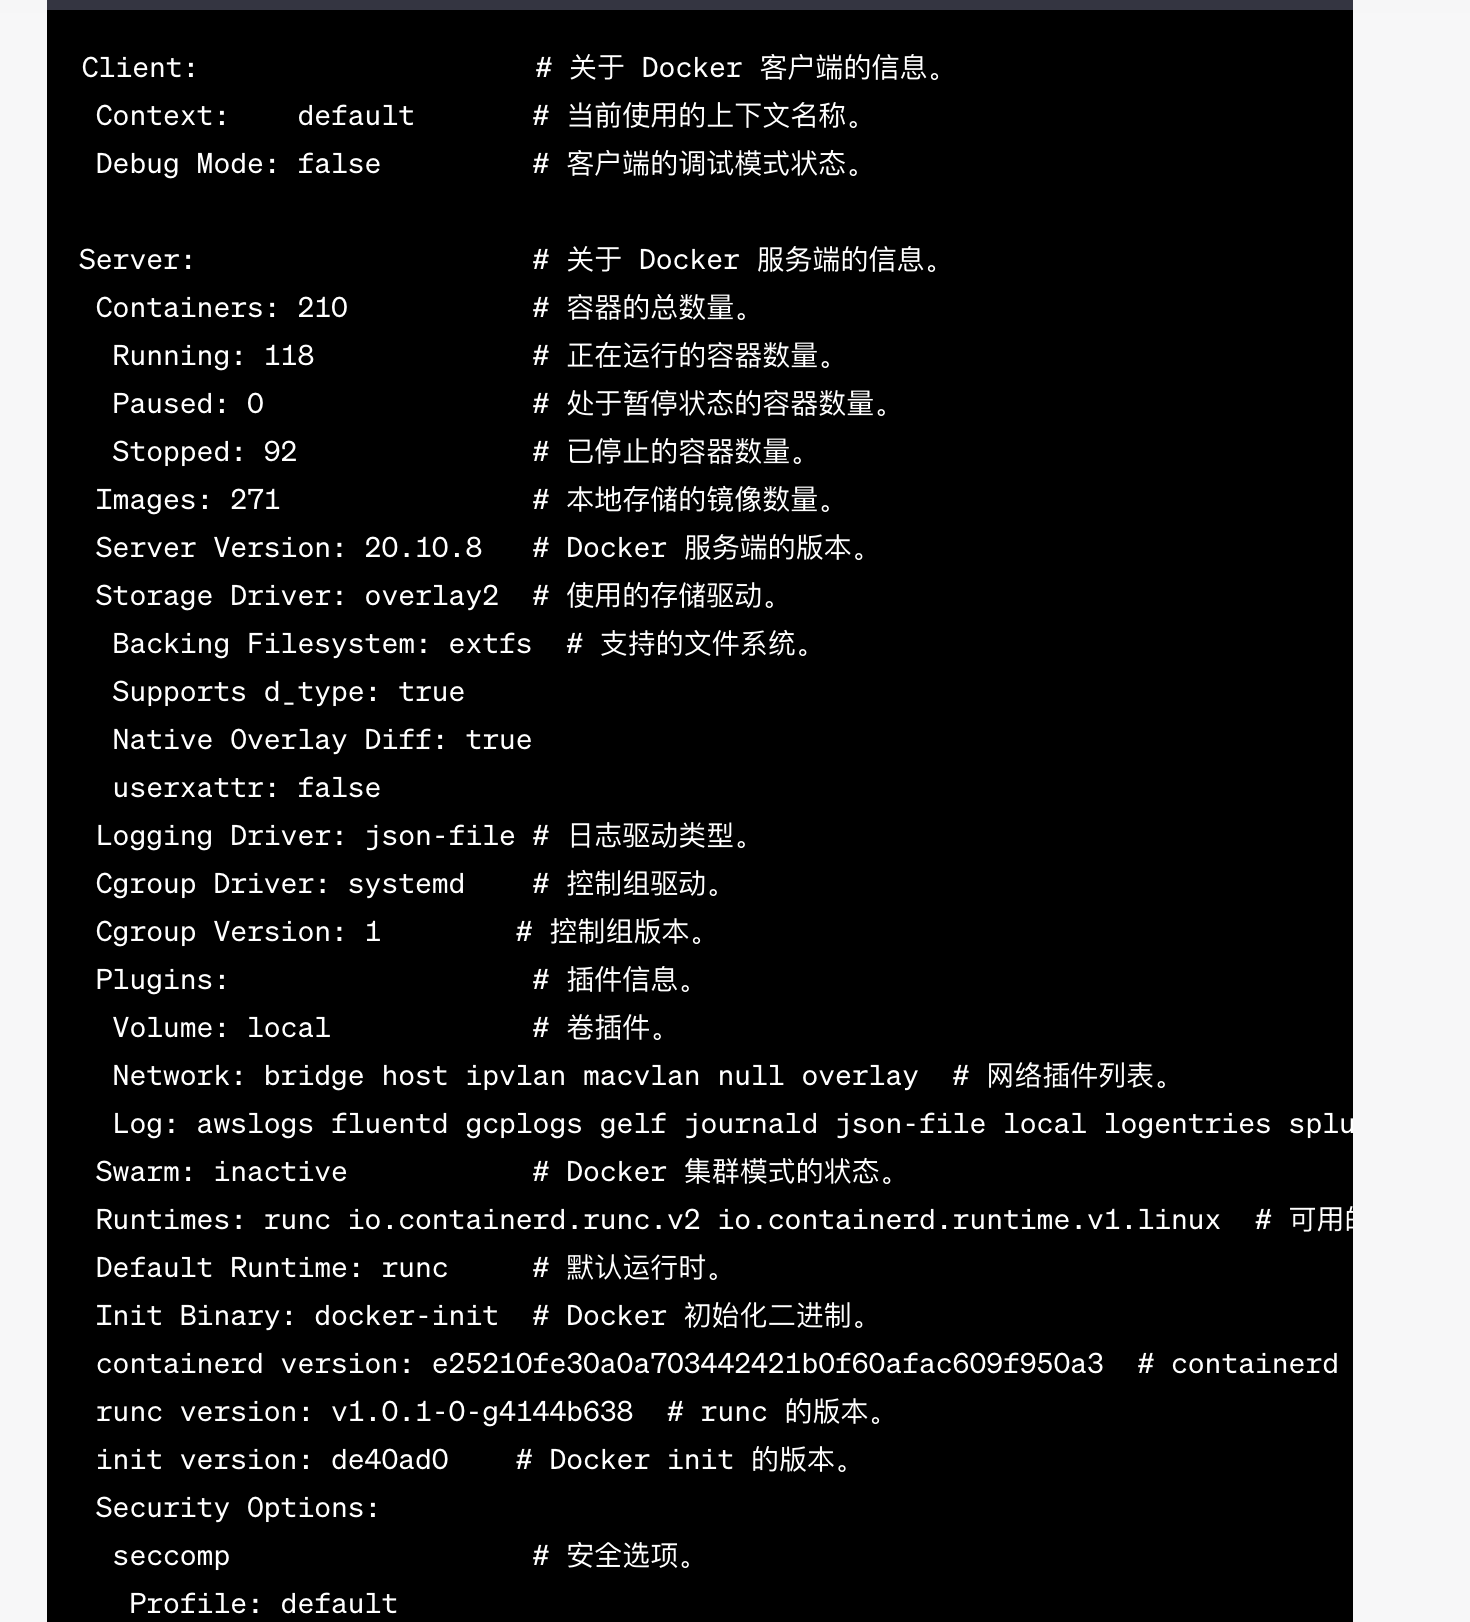
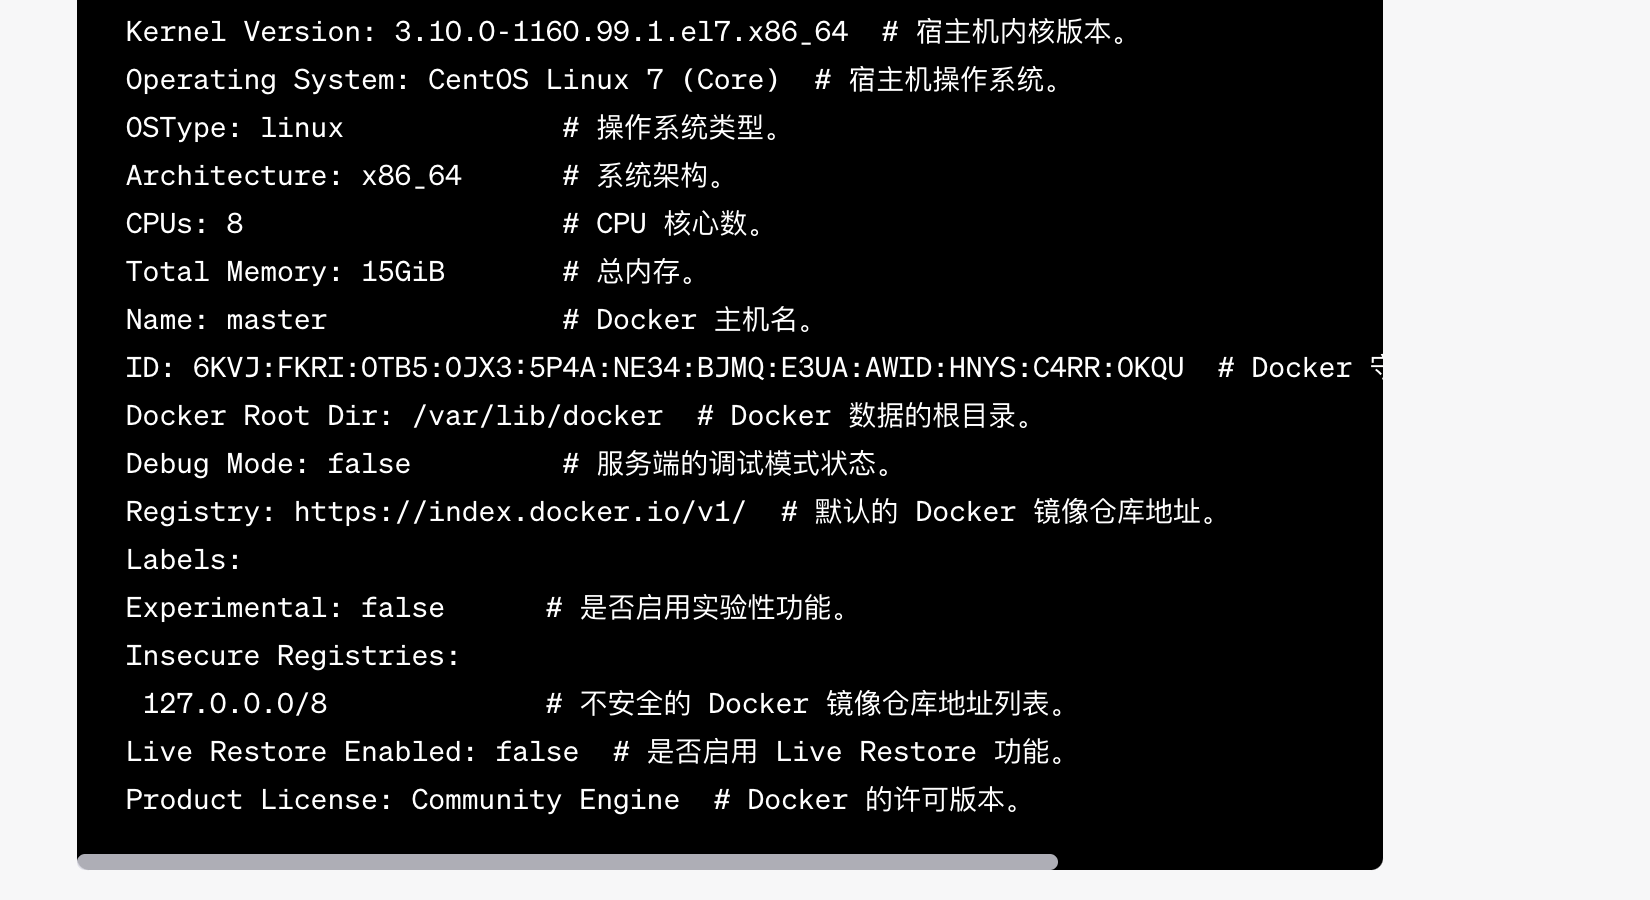
docker --version:查看 Docker 版本。docker info:显示 Docker 系统信息,包括镜像和容器的数量。
- 镜像命令:
docker images:列出本地的所有镜像。docker pull <image_name>:下载一个镜像。docker rmi <image_name>:删除一个或多个镜像。docker build -t <image_name>:<tag> <path>:从 Dockerfile 构建一个镜像。
- 容器命令:
docker ps:列出正在运行的容器。docker ps -a:列出所有的容器,包括停止的。docker run <options> <image_name>:从镜像运行一个容器。docker start <container_id>:启动一个或多个已停止的容器。docker stop <container_id>:停止一个或多个正在运行的容器。docker restart <container_id>:重启一个或多个容器。docker rm <container_id>:删除一个或多个容器。docker logs <container_id>:查看容器的日志输出。docker exec -it <container_id> <command>:在正在运行的容器内执行命令。
- 网络命令:
docker network ls:列出所有的网络。docker network create <network_name>:创建一个新的网络。docker network rm <network_name>:删除网络。
- 数据卷命令:
docker volume ls:列出所有的数据卷。docker volume create <volume_name>:创建一个新的数据卷。docker volume rm <volume_name>:删除数据卷。
- Docker Compose 命令 (需要单独安装 Docker Compose):
docker-compose up:根据docker-compose.yml文件启动服务。docker-compose down:停止并删除服务。docker-compose ps:列出docker-compose运行的服务。docker-compose logs:查看服务的日志。
docker info:显示 Docker 系统信息,包括镜像和容器的数量。
2、Docker 组合命令(适用与本项目)
找到所有前端一天前的、没有挂载容器的镜像,清除并释放空间
# 获取所有正在使用的镜像名称
used_images=$(docker ps -a --format "{{.Image}}" | sort | uniq)

# 筛选出创建时间超过1天的,名称为 hiwoo-**-front 格式的镜像
docker images --format "table {{.Repository}}:{{.Tag}}\t{{.CreatedAt}}\t{{.ID}}" | \
grep "hiwoo-.*-front" | \
while read repo date id; do
    if [[ ! "$used_images" =~ "$repo" ]] && [[ $(date -d "$date" +%s) -lt $(date -d "1 day ago" +%s) ]]; then
        echo "Deleting $repo with ID: $id";
        docker rmi -f $repo
    fi;
done
找到所有一天前的、没有挂载容器的镜像,清除并释放空间
# 获取所有正在使用的镜像名称
used_images=$(docker ps -a --format "{{.Image}}" | sort | uniq)

# 筛选出创建时间超过1天的,名称为 hiwoo-**-front 格式的镜像
docker images --format "table {{.Repository}}:{{.Tag}}\t{{.CreatedAt}}\t{{.ID}}" | \
grep "hiwoo-.*" | \
while read repo date id; do
    if [[ ! "$used_images" =~ "$repo" ]] && [[ $(date -d "$date" +%s) -lt $(date -d "1 day ago" +%s) ]]; then
        echo "Deleting $repo with ID: $id";
        docker rmi -f $repo
    fi;
done
对整个项目Docker日志,Jenkins日志,无用镜像文件进行清理
#!/bin/bash
echo "=========删除jenkins的构建记录===================="
echo "是否删除jenkins的构件记录"
read removeJenkinsBuild
case  "$removeJenkinsBuild"  in
  yes|y|YES|Y)
  #删除jenkins的build开始
  cd /data/mtl/jenkins/jobs/
  localPwd=pwd
  echo "当前目录$localPwd"
  for file in ./*
  do
  if [ -d "$file" ]
  then
    cd $file
    echo "删除的目录$file"
    rm -rf builds modules
    cd -
  fi
  done
  echo "删除build完成"
esac
echo "=========删除docker的log===================="
echo "是否删除docker的日志"
read clearDockerLog
case "$clearDockerLog" in
  yes|y|Y|YES)
  #删除log
  logs=$(find /var/lib/docker/containers/ -name *-json.log)
  for log in $logs
      do
              echo "删除log日志地址 : $log"
              cat /dev/null > $log
      done
esac
echo "=========删除docker的空镜像(images)===================="
echo "是否删除空的none镜像"
read deleteNone
case  "$deleteNone"  in
  yes|y|YES|Y)
    #查询none的镜像
    noneImages=$(docker images | grep "none" | awk '{print $3}')
    for tempImage in $noneImages
        do
            echo "删除的当前镜像:$tempImage"
            docker rmi $tempImage
        done
esac
echo "执行完成..................end"
3. K8s 运维基础命令
- kubectl get nodes
- 解释:列出集群中的所有节点。
- kubectl get pods
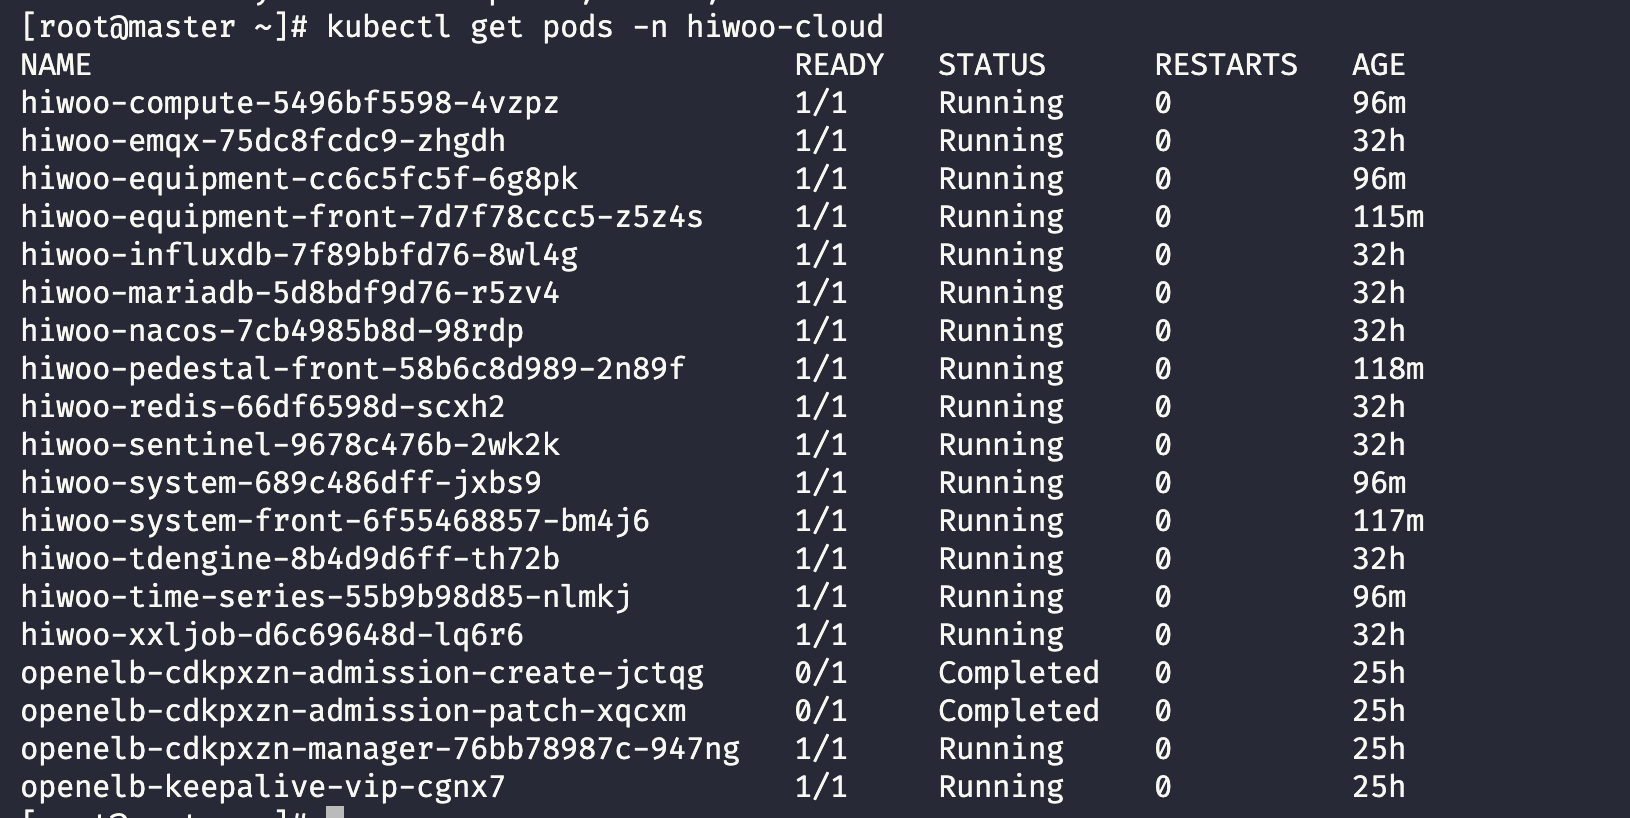
- 解释:列出指定命名空间下的所有 Pod。如果没有指定命名空间,它会列出默认命名空间中的 Pod。 -n + namespace 为 项目命名空间下的所有pod
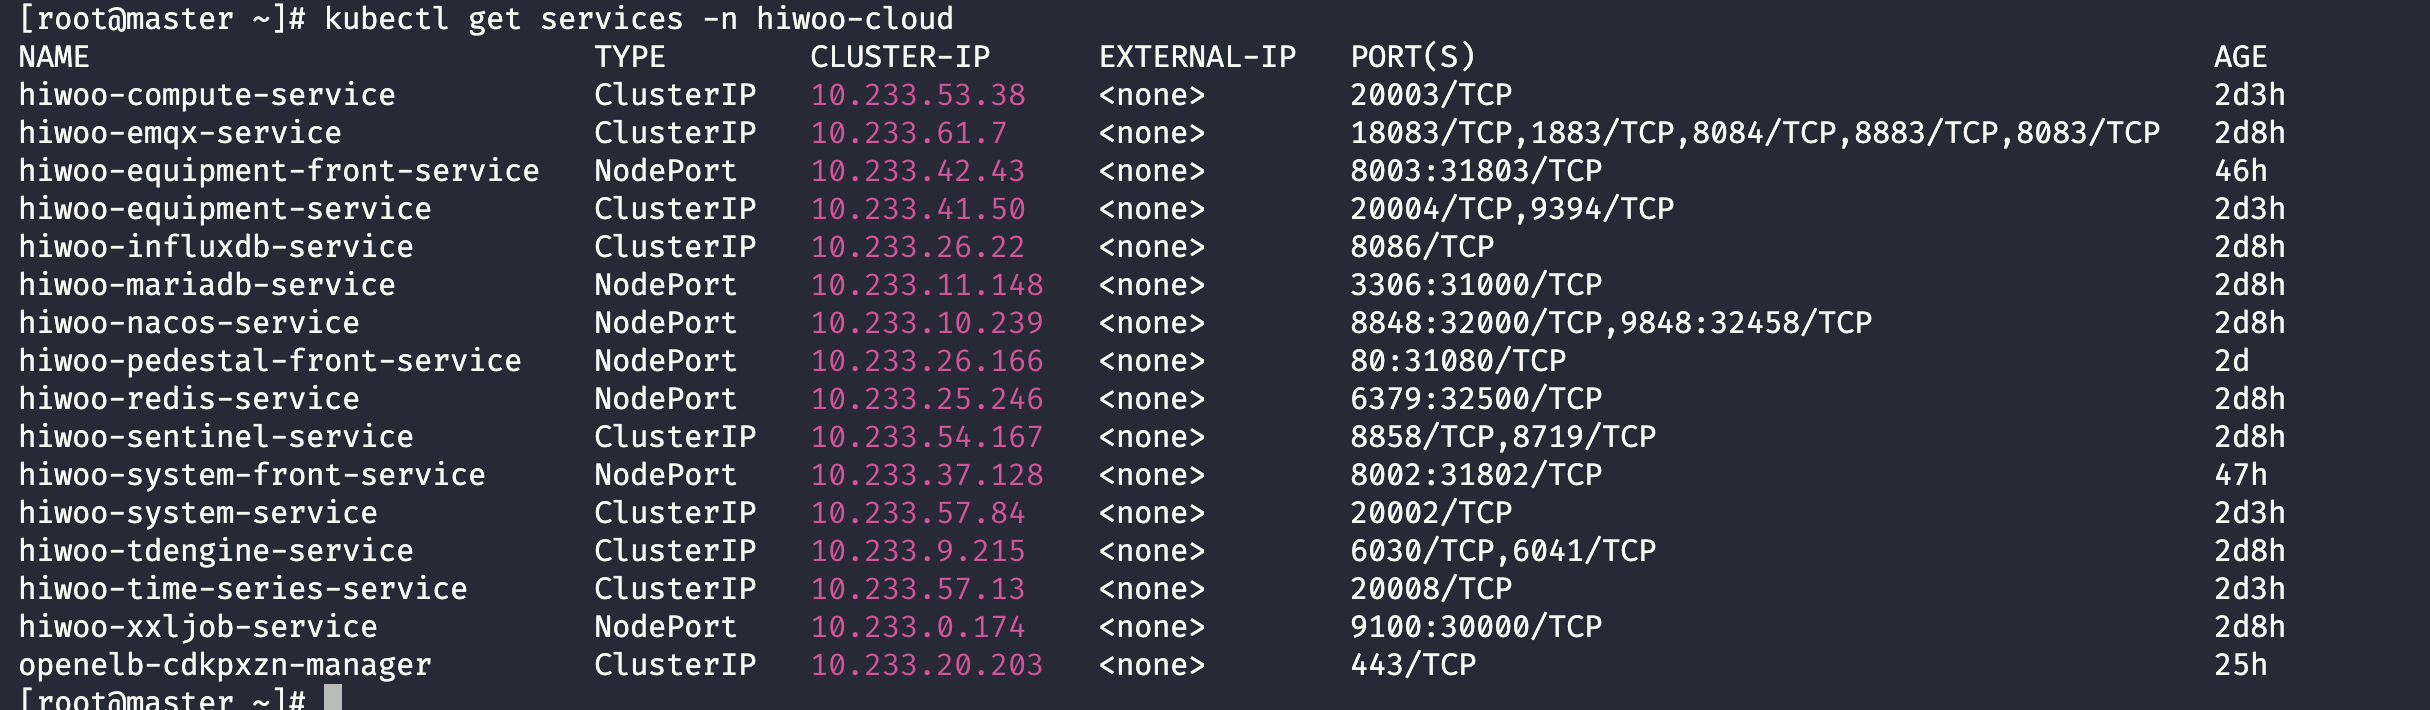
- kubectl get services
- 解释:列出指定命名空间下的所有服务。
- kubectl create -f [filename.yaml]
- 解释:根据指定的 YAML 文件创建资源,如 Pod、Service、Deployment 等。
- kubectl delete -f [filename.yaml]
- 解释:根据指定的 YAML 文件删除资源。
- kubectl describe pod [pod-name]
- 解释:显示特定 Pod 的详细信息,如事件、容器状态等。
- kubectl logs [pod-name]
- 解释:获取指定 Pod 的日志。
- kubectl exec -it [pod-name] – /bin/sh
- 解释:进入指定 Pod 的 shell。这使得您可以在 Pod 内部执行命令。
- kubectl scale deployment [deployment-name] --replicas=[num]
- 解释:调整指定 Deployment 的副本数量。
- kubectl get namespaces
- 解释:列出集群中的所有命名空间。
- kubectl config set-context --current --namespace=[namespace-name]
- 解释:将当前上下文的默认命名空间更改为指定的命名空间,这样 subsequent
kubectl命令默认都会在这个命名空间中执行。- kubectl apply -f [filename.yaml]
- 解释:应用更改。与
create命令不同,apply命令可以用来创建或更新资源。- kubectl rollout undo deployment/[deployment-name]
- 解释:撤销指定 Deployment 的最近一次更新。
- kubectl get configmap
- 解释:列出指定命名空间下的所有 ConfigMap。
- kubectl get secret
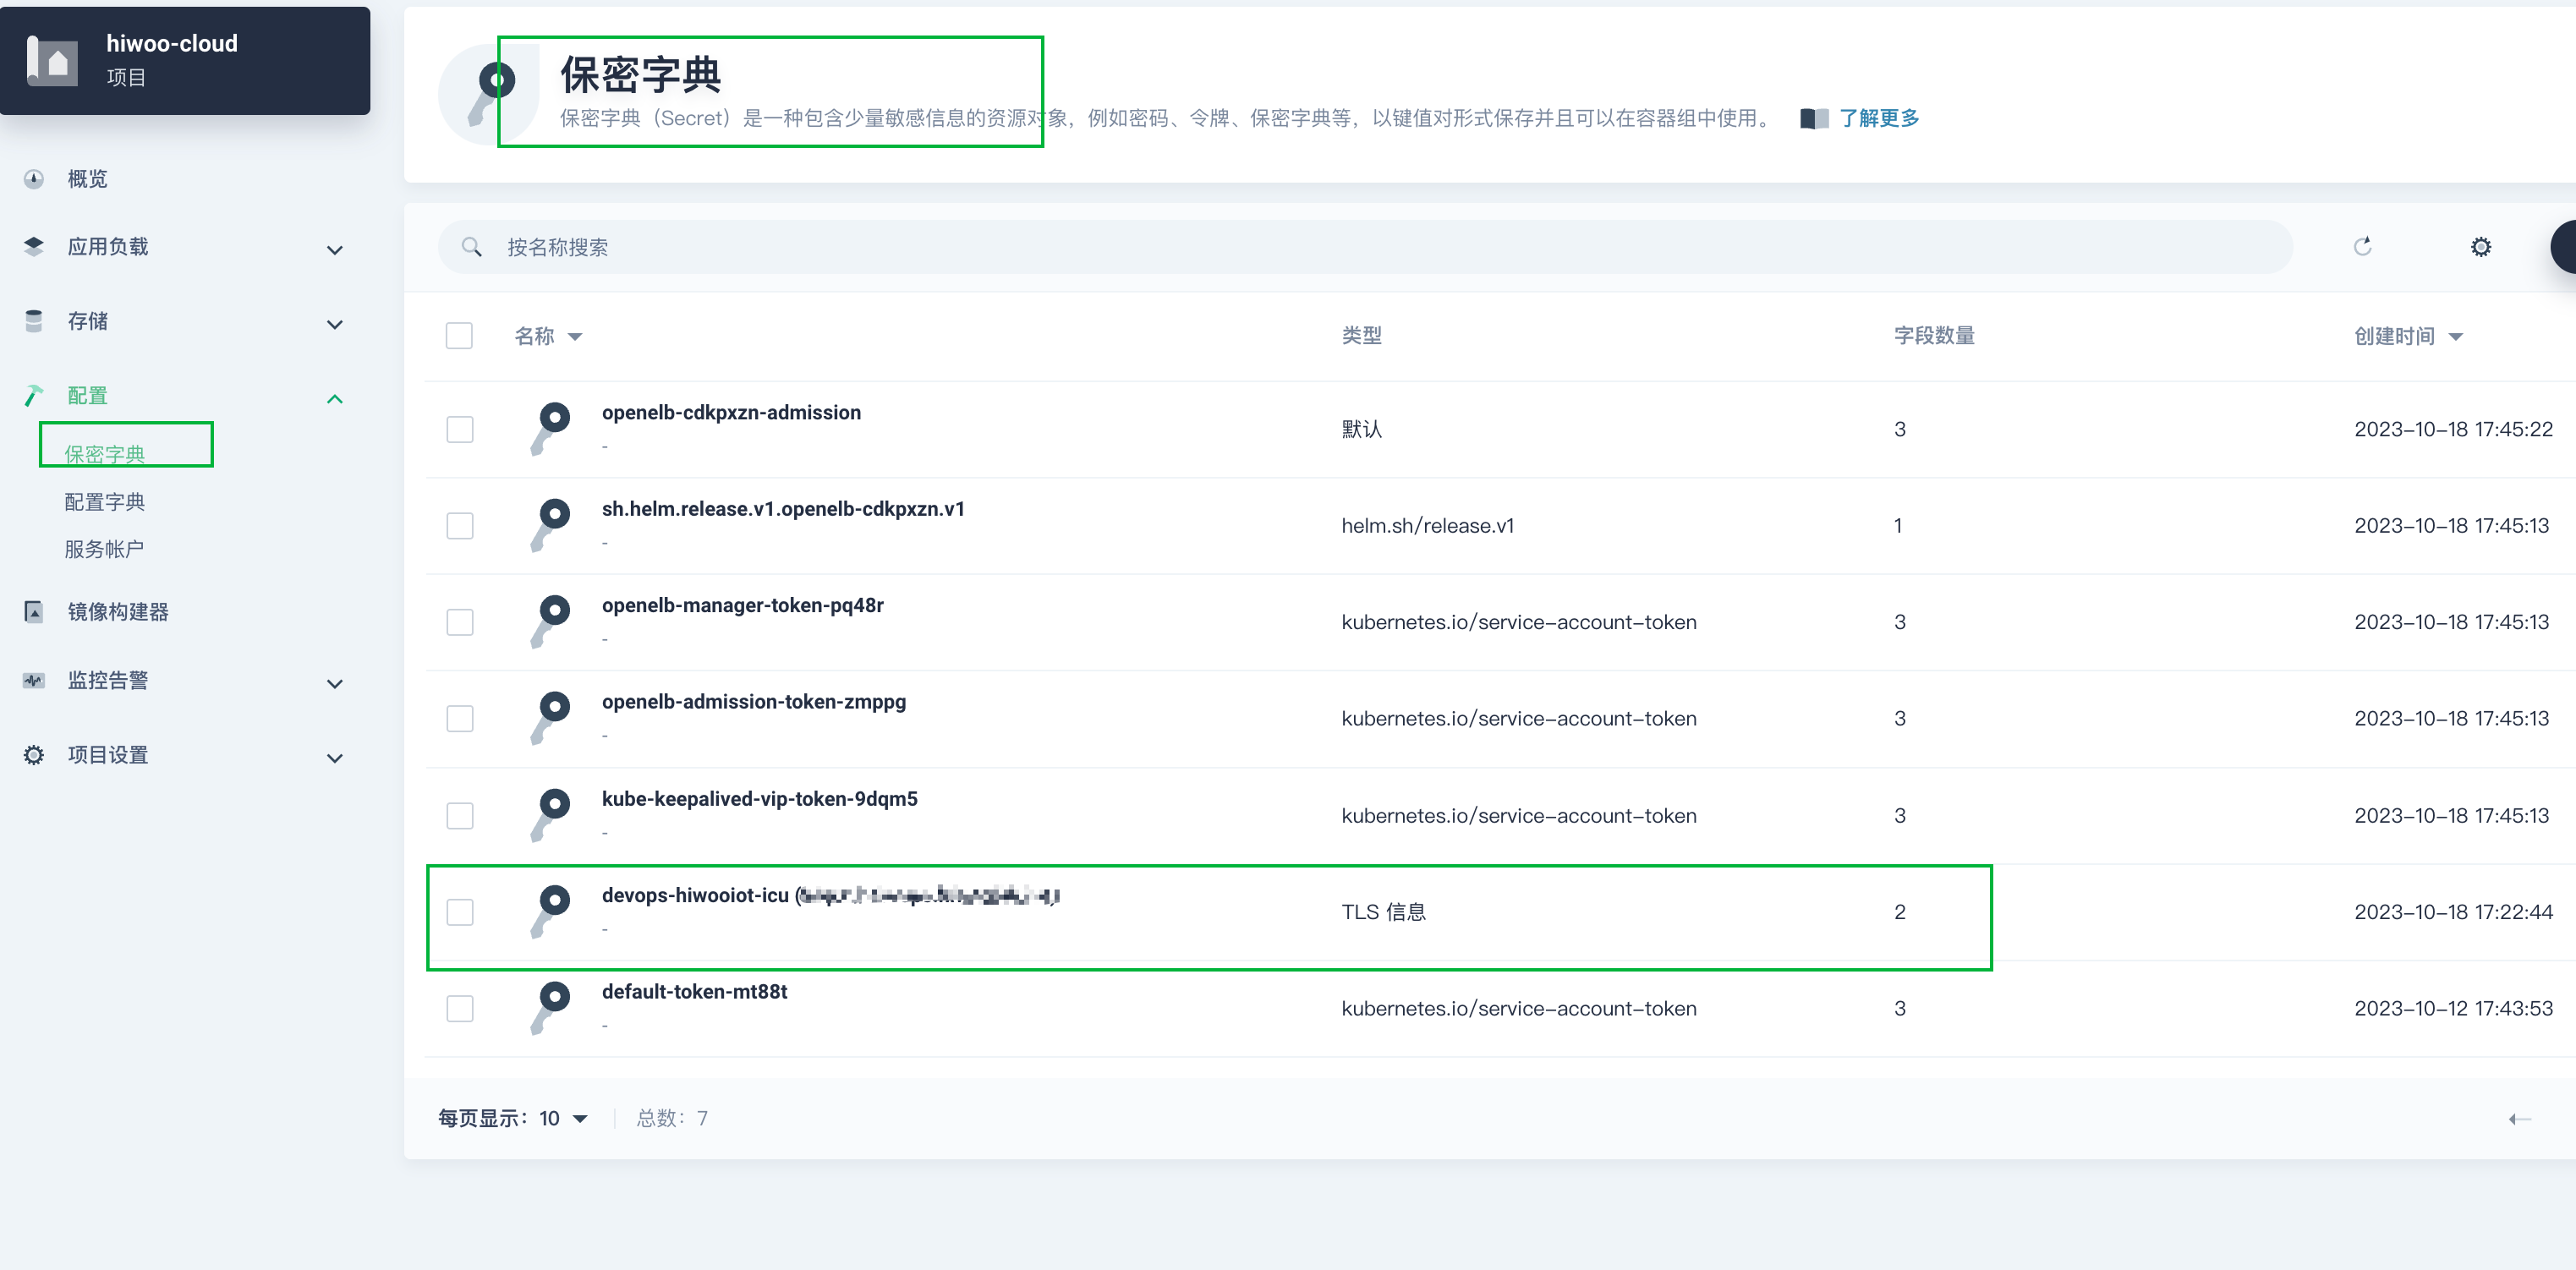
- 解释:列出指定命名空间下的所有 Secret。


![JWT的封装、[Authorize]的使用](https://img-blog.csdnimg.cn/85870169bd3e43c0909cf35764f5cdb6.png)