SpringBoot 嵌入了 Web 容器如 Tomcat/Jetty/Undertow,——这是怎么做到的?我们以 Tomcat 为例子,尝试调用嵌入式 Tomcat。
为了说明如何打造轻量级的 SpringBoot,本文分为“嵌入式 Tomcat”、“增强 SpringMVC”和“打包/部署”三个小节来介绍。
嵌入式 Tomcat
调用嵌入式 Tomcat,如果按照默认去启动,一个 main 函数就可以了。
简单的例子
下面是启动 Tomcat 的一个例子。
Tomcat tomcat = new Tomcat();
tomcat.enableNaming();
tomcat.getHost().setAutoDeploy(false);
tomcat.getHost().setAppBase("webapp");
// 在对应的 host 下面创建一个 context 并制定他的工作路径,会加载该目录下的所有 class 文件,或者静态文件
//        tomcat.setBaseDir(Thread.currentThread().getContextClassLoader().getResource("").getPath()); // 设置 tomcat 启动后的工作目录
//        System.out.println(Thread.currentThread().getContextClassLoader().getResource("").getPath());

// 读取项目路径
System.out.println(System.getProperty("user.dir"));
String jspDir = System.getProperty("user.dir");
StandardContext ctx = (StandardContext) tomcat.addWebapp("/", new File(jspDir).getAbsolutePath());
ctx.setReloadable(false);// 禁止重新载入
WebResourceRoot resources = new StandardRoot(ctx);// 创建WebRoot
resources.addPreResources(new DirResourceSet(resources, "/WEB-INF/classes", new File("target/classes").getAbsolutePath(), "/"));// tomcat 内部读取 Class 执行

// 创建连接器,并且添加对应的连接器,同时连接器指定端口 设置 IO 协议
Connector connector = new Connector("org.apache.coyote.http11.Http11NioProtocol");
connector.setPort(port);
connector.setThrowOnFailure(true);

tomcat.getService().addConnector(connector);// 只能设置一个 service,直接拿默认的
tomcat.setConnector(connector); // 设置执行器

try {
	tomcat.start(); // tomcat 启动
} catch (LifecycleException e) {
	throw new RuntimeException(e);
}

tomcat.getServer().await(); // 保持主线程不退出,让其阻塞,不让当前线程结束,等待处理请求
增强 SpringMVC
把应用原来的 src/main/webapp/WEB-INF,移动到 src/main/resources/WEB-INF下,把在src/main/webapp下面的所有文件,移动到 src/main/META-INF/resources 目录下。
打包与部署
Maven 打包
我们希望打出哪个环境的包,就只需要包含这个环境的配置文件即可,不想包含其他环境的配置文件,这时候可以直接在 maven 中使用 profiles 和 resources 来配置,打包时使用mvn package -P dev即可。
<profiles>
    <!--开发环境-->
    <profile>
        <id>dev</id>
        <properties>
            <spring.profiles.active>dev</spring.profiles.active>
        </properties>
        <activation>
            <activeByDefault>true</activeByDefault>
        </activation>
    </profile>
    <!--测试环境-->
    <profile>
        <id>test</id>
        <properties>
            <spring.profiles.active>test</spring.profiles.active>
        </properties>
    </profile>
    <!--生产环境-->
    <profile>
        <id>prod</id>
        <properties>
            <spring.profiles.active>prod</spring.profiles.active>
        </properties>
    </profile>
</profiles>
<build>
    <resources>
        <resource>
            <directory>src/main/resources</directory>
            <filtering>false</filtering>
        </resource>
        <resource>
            <directory>src/main/resources.${spring.profiles.active}</directory>
            <filtering>false</filtering>
        </resource>
    </resources>
</build>
原理如下:
maven 在构建项目时,默认是把
main/resoures目录作为资源文件所在目录的,现在我们在main/conf目录下也存放了资源文件(即application.properites文件),因此需要告诉 maven 资源文件所在的目录有哪些,通过 build 元素中增加 resources 元素就可以达到这一目的。这里告诉 maven 有两个地方存在资源文件,一个是默认的 resources 目录,另一个是在src/main/conf/${env}目录下,而${env}引用的是上面 properties 元素中定义的 env 的值,而它的值引用的又是spring.profiles.active的值(其值为 dev、test 和 online 中的一个),因此,目录要么是src/main/conf/dev,要么是src/main/conf/test,要么是main/conf/online,这最终取决于参数spring.profiles.active的值。因此,根据参数spring.profiles.active的值的不同,在构建打包时最终会选择 dev、test 和 online 这三个目录中的一个中的application.properties打包到项目中来。
将应用打成一个 fat jar 的方式,可以用 Spring 的:
<plugin>
  <groupId>org.springframework.boot</groupId>
  <artifactId>spring-boot-maven-plugin</artifactId>
  <version>1.3.3.RELEASE</version>
  <configuration>
    <mainClass>com.demo.proj.Main</mainClass>
  </configuration>
  <executions>
    <execution>
      <phase>package</phase>
      <goals>
        <goal>repackage</goal>
      </goals>
    </execution>
  </executions>
</plugin>
Profiles
在实际使用环境中,我们同一个应用环境可能需要在不同环境运行(开发、测试、生产等),每个环境的参数都有可能不同(连接参数、日志级别等),使用 Profiles 可以将不同环境下的参数进行拆分,并指定加载。
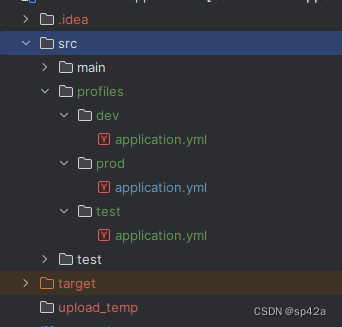
IDEA 配置,在 src 目录下创建 profiles 目录,安排如下图的配置文件。
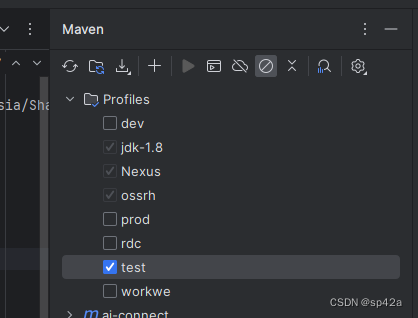
然后 Maven Profile 打勾即可。
启动参数
开始以为要 run 配置中加入--spring.profiles.active=dev参数,其实不用,还是在 IDEA 里面选 profile 打勾即可。
小结
啥?Spring Boot 不用?——对。就只是使用 Spring MVC,而不用 Boot。为啥?——Boot 太重了:)
这是反智吗?Spring Boot 好好的就只是因为太重就不用?——请允许我跟你说,MVC 几乎能做到 Boot 的事情,而且它更轻量级,何乐不为呢?Yes,让我们试试:Spring Framework without Spring Boot!
参考
- SpringMVC 纯注解配置
- 仿SpringBoot的启动方式


