一、什么是后台交互?
在小程序中,与后台交互指的是小程序前端与后台服务器之间的数据通信和请求处理过程。通过与后台交互,小程序能够获取服务器端的数据、上传用户数据、发送请求等。
小程序与后台交互可以实现数据的传输、用户认证、实时消息推送等功能,为用户提供更丰富的体验和功能。
与后台交互可以通过以下方式实现:
- 发起网络请求:小程序可以使用网络请求 API(如wx.request)向后台发送 HTTP 请求,来获取后台服务器返回的数据。可以使用 GET、POST、PUT、DELETE 等不同的请求类型来实现不同的操作。
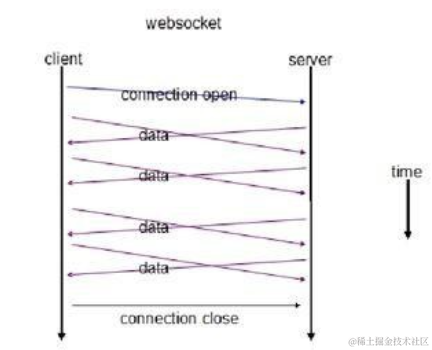
- WebSocket:小程序可以使用 WebSocket 技术与服务器建立长连接,实现实时的双向通信。通过 WebSocket,小程序能够及时接收服务器端推送的消息,实现实时更新和交互。
- 云函数:小程序提供了云开发平台,其中的云函数可以在后台服务器上执行,用于处理复杂的业务逻辑和数据处理。小程序可以通过调用云函数来与后台进行交互,并获取处理结果。
二、后台数据交互与request封装
1、准备工作
- 在使用数据交互的时候我们要事先准备好后台的数据方便我们进行调用。
- 我在这里就不准备后台的数据在这里了
2、后台数据交互
1、在前面的博客里面编写了一个专门用来调用数据后台的一个api.js文件,我们要确保这些数据可以调用到后台,记得把你的后台启动哦!
// 以下是业务服务器API地址 // 本机开发API地址 var WxApiRoot = 'http://localhost:8080/wx/'; module.exports = { IndexUrl: WxApiRoot + 'home/index' //首页数据接口 };2、在你要调用的页面的js里面编写调用的方法,注意记得打印一下你的数据是在那个属性里面,记得在Page的外面调用实用例。
// 获取应用实例 const app = getApp() const api = require("../../config/api") //首页会议信息的ajax loadMeetingInfos() { let that = this; wx.request({ url: api.IndexUrl, dataType: 'json', success(res) { console.log(res) that.setData({ lists: res.data.data.infoList }) } }) }然后再定义好的onLoad方法里面调用
    onLoad() {
        if (wx.getUserProfile) {
            this.setData({
                canIUseGetUserProfile: true
            })
        }
        this.loadMeetingInfos();
    }

3、request封装
- 在我们项目的里面有个utils/util,js文件,在里面进行一个方法编写。
/**
 * 封装微信的request请求
 */
function request(url, data = {}, method = "GET") {
    return new Promise(function (resolve, reject) {
        wx.request({
            url: url,
            data: data,
            method: method,
            header: {
                'Content-Type': 'application/json',
            },
            success: function (res) {
                if (res.statusCode == 200) {
                    resolve(res.data);//会把进行中改变成已成功
                } else {
                    reject(res.errMsg);//会把进行中改变成已失败
                }
            },
            fail: function (err) {
                reject(err)
            }
        })
    });
}
module.exports = {
    formatTime,request
}
在你的需要调用的页面进行一个方法的调用进行代码的优化;就以上为例:
// 获取应用实例
const app = getApp()
const api = require("../../config/api")
const util = require("../../utils/util.js")
 //首页会议信息的ajax
    loadMeetingInfos() {
        let that = this;

        util.request(api.IndexUrl).then(res => {
            console.log(res)
            this.setData({
                lists: res.data.infoList
            })
        }).catch(res => {
            console.log('服器没有开启,使用模拟数据!')
        })
    }
效果也是一样的,只是进行了一个代码的优化。


这里提供完整的代码
util.js
const formatTime = date => {
    const year = date.getFullYear()
    const month = date.getMonth() + 1
    const day = date.getDate()
    const hour = date.getHours()
    const minute = date.getMinutes()
    const second = date.getSeconds()

    return `${[year, month, day].map(formatNumber).join('/')} ${[hour, minute, second].map(formatNumber).join(':')}`
}

const formatNumber = n => {
    n = n.toString()
    return n[1] ? n : `0${n}`
}

/**
 * 封装微信的request请求
 */
function request(url, data = {}, method = "GET") {
    return new Promise(function (resolve, reject) {
        wx.request({
            url: url,
            data: data,
            method: method,
            header: {
                'Content-Type': 'application/json',
            },
            success: function (res) {
                if (res.statusCode == 200) {
                    resolve(res.data);//会把进行中改变成已成功
                } else {
                    reject(res.errMsg);//会把进行中改变成已失败
                }
            },
            fail: function (err) {
                reject(err)
            }
        })
    });
}
module.exports = {
    formatTime,request
}
index.js
// index.js
// 获取应用实例
const app = getApp()
const api = require("../../config/api")
const util = require("../../utils/util.js")
Page({
    data: {
        imgSrcs: [{
            "img": "https://cdn-we-retail.ym.tencent.com/tsr/home/v2/banner1.png",
            "text": "1"
        },
        "lists": []
    },
    //首页会议信息的ajax
    loadMeetingInfos() {
        let that = this;
        util.request(api.IndexUrl).then(res => {
            console.log(res)
            this.setData({
                lists: res.data.infoList
            })
            console.log(res.data.infoList)
        }).catch(res => {
            console.log('服器没有开启,使用模拟数据!')
        })
    },
    onLoad() {
        if (wx.getUserProfile) {
            this.setData({
                canIUseGetUserProfile: true
            })
        }
        this.loadMeetingInfos();
    }
})
三、wxs的使用
我们可以在微信的开发文档里面可以查看到微信开放文档,wxs的使用。

1、使用wxs步骤
- 我们首先新建一个wxs文件在一个位置
- 然后在里面定义方法
function getState(state){} module.exports = { getState: getState };- 在wxml里面调用,src:是你的wxs的路径;module:你后面需要调用的名字,可以随便取。
<wxs src="/utils/comm.wxs" module="tools" />调用
<text class="list-num">{{tools.getState(item.state)}}</text>
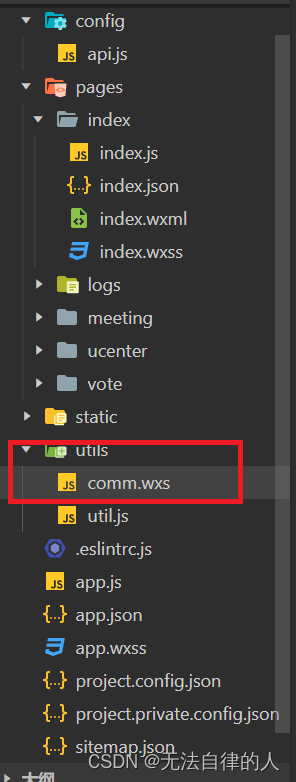
2、完整方法
wxs
function getState(state) {
    // 状态:0取消会议1待审核2驳回3待开4进行中5开启投票6结束会议,默认值为1
    if (state == 0) {
        return '取消会议';
    } else if (state == 1) {
        return '待审核';
    } else if (state == 2) {
        return '驳回';
    } else if (state == 3) {
        return '待开';
    } else if (state == 4) {
        return '进行中';
    } else if (state == 5) {
        return '开启投票';
    } else if (state == 6) {
        return '结束会议';
    }

    return '其它';

}
function getNumber(canyuze, liexize, zhuchiren) {
    var person = canyuze + ',' + liexize + ',' + zhuchiren;
    return person.split(',').length;
}
function formatDate(ts, option) {
    var date = getDate(ts)
    var year = date.getFullYear()
    var month = date.getMonth() + 1
    var day = date.getDate()
    var week = date.getDay()
    var hour = date.getHours()
    var minute = date.getMinutes()
    var second = date.getSeconds()

    //获取 年月日
    if (option == 'YY-MM-DD') return [year, month, day].map(formatNumber).join('-')

    //获取 年月
    if (option == 'YY-MM') return [year, month].map(formatNumber).join('-')

    //获取 年
    if (option == 'YY') return [year].map(formatNumber).toString()

    //获取 月
    if (option == 'MM') return [mont].map(formatNumber).toString()

    //获取 日
    if (option == 'DD') return [day].map(formatNumber).toString()

    //获取 年月日 周一 至 周日
    if (option == 'YY-MM-DD Week') return [year, month, day].map(formatNumber).join('-') + ' ' + getWeek(week)

    //获取 月日 周一 至 周日
    if (option == 'MM-DD Week') return [month, day].map(formatNumber).join('-') + ' ' + getWeek(week)

    //获取 周一 至 周日
    if (option == 'Week') return getWeek(week)

    //获取 时分秒
    if (option == 'hh-mm-ss') return [hour, minute, second].map(formatNumber).join(':')

    //获取 时分
    if (option == 'hh-mm') return [hour, minute].map(formatNumber).join(':')

    //获取 分秒
    if (option == 'mm-dd') return [minute, second].map(formatNumber).join(':')

    //获取 时
    if (option == 'hh') return [hour].map(formatNumber).toString()

    //获取 分
    if (option == 'mm') return [minute].map(formatNumber).toString()

    //获取 秒
    if (option == 'ss') return [second].map(formatNumber).toString()

    //默认 时分秒 年月日
    return [year, month, day].map(formatNumber).join('-') + ' ' + [hour, minute, second].map(formatNumber).join(':')
}
function formatNumber(n) {
    n = n.toString()
    return n[1] ? n : '0' + n
}

function getWeek(n) {
    switch (n) {
        case 1:
            return '星期一'
        case 2:
            return '星期二'
        case 3:
            return '星期三'
        case 4:
            return '星期四'
        case 5:
            return '星期五'
        case 6:
            return '星期六'
        case 7:
            return '星期日'
    }
}
module.exports = {
    getState: getState,
    getNumber: getNumber,
    formatDate:formatDate
};
index.wxml
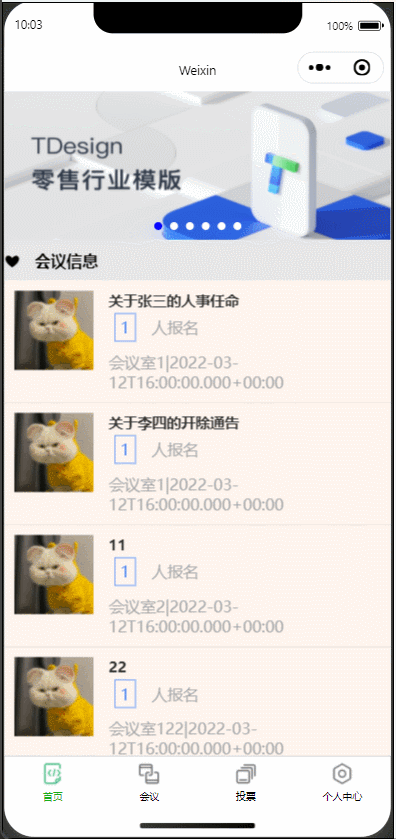
<view class="indexbg">
<swiper autoplay="true" indicator-dots="true" indicator-color="#fff" indicator-active-color="#00f">
<block wx:for="{{imgSrcs}}" wx:key="text">
<swiper-item>
<view>
<image src="{{item.img}}" class="swiper-item" />
</view>
</swiper-item>
</block>
</swiper>
<wxs src="/utils/comm.wxs" module="tools" />
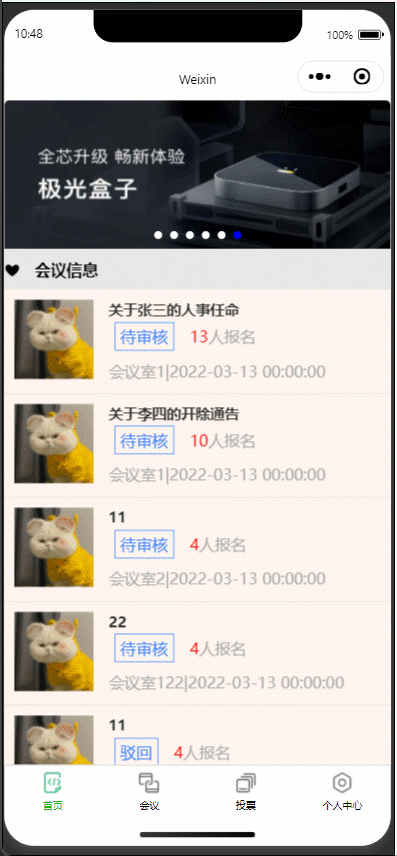
<view class="mobi-title">
<text class="mobi-icon">❤</text>
<text class="mobi-text">会议信息</text>
</view>
<block wx:for-items="{{lists}}" wx:for-item="item" wx:key="item.id" class="bg">
<view class="list" data-id="{{item.id}}">
<view class="list-img">
<image class="video-img" mode="scaleToFill" src="{{item.image != null ? item.image:'/static/persons/8.jpg'}}"></image>
</view>
<view class="list-detail">
<view class="list-title"><text>{{item.title}}</text></view>
<view class="list-tag">
<view class="state">{{tools.getState(item.state)}}</view>
<view class="join"><text class="list-num">{{tools.getNumber(item.canyuze,item.liexize,item.zhuzhiren)}}</text>人报名</view>
</view>
<view class="list-info"><text>{{item.location}}</text>|<text>{{tools.formatDate(item.starttime,'YY-MM-DD hh-mm-ss')}}</text></view>
</view>
</view>
</block>
<view class="section">
<text>到底啦</text>
</view>
</view>