目录
一、开始时间与结束时间之差
二、弹出层的大小以及位置设置
2.1、高度设置body-style
2.2、位置设置dialogStyle
三、vue2安装引入Ant Design Vue
四、按钮控制盒子的显示与隐藏
五、表单生成器思想
5.1、点击左侧控件库生成中间的控件元素
5.2、点击中间的控件,值会显示在右侧
5.3、修改右侧的值,引起中间元素的值变化
六、前后端图像处理
6.1、当后端返回的图片只是数字时
6.2、后端在线图片地址拼接
一、开始时间与结束时间之差
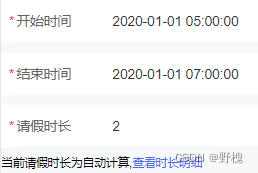
时间格式化方法:format
// 工具函数的抽取----时间格式化
export const formatDate=d=> {
  var date = new Date(d);
  var YY = date.getFullYear() + "-";
  var MM =
    (date.getMonth() + 1 < 10
      ? "0" + (date.getMonth() + 1)
      : date.getMonth() + 1) + "-";
  var DD = date.getDate() < 10 ? "0" + date.getDate() : date.getDate();
  var hh =
    (date.getHours() < 10 ? "0" + date.getHours() : date.getHours()) + ":";
  var mm =
    (date.getMinutes() < 10 ? "0" + date.getMinutes() : date.getMinutes()) +
    ":";
  var ss =
    date.getSeconds() < 10 ? "0" + date.getSeconds() : date.getSeconds();
  return YY + MM + DD + " " + hh + mm + ss;
}
// 调用工具函数--时间格式化
import { formatDate } from "@/uitls/index.js";
 // 自动计算时长
    diffTime() {
this.startTime = formatDate(date);// 开始时间
  this.endTime = formatDate(date);// 结束时间
      const date1 = new Date(this.startTime) //开始时间
      const date2 = new Date(this.endTime) //结束时间
      const date3 = date2.getTime() - date1.getTime() //时间差的毫秒数
      // const days =date3 / (24 * 3600 * 1000); //计算出相差天数
      const hours = Math.floor(date3 / 1000 / 60 / 60) // 计算出小时数
      var num = hours / 24
      num = num.toFixed(2)
      this.durations = num
二、弹出层的大小以及位置设置
这里指的是Ant Design Vue的用法:https://1x.antdv.com/components/modal-cn/
2.1、高度设置body-style
官网里有个属性是body-style,这里可以设置modal的高度
<a-modal :body-style="bodystyle"></a-modal>
//在data里面设置的话,去掉const "="改为":"
const bodystyle = {
  height: '480px',
  overflow: 'hidden',
  overflowY: 'scroll',
}
宽度设置直接在<a-modal width="100%"></a-modal>即可
2.2、位置设置dialogStyle
 <a-modal title="新增" :visible="visible" width="70%" :dialogStyle="dialogStyle">11111</a-modal>
//在data中
dialogStyle:{
top:"50px",
left:"100px"
},
三、vue2安装引入Ant Design Vue
指定版本号
npm install --save ant-design-vue@1.7.8
在main.js文件中
import Antd from 'ant-design-vue';
import 'ant-design-vue/dist/antd.css';
Vue.use(Antd);
如果是vue3引入,直接
npm install --save ant-design-vue
若出错需要卸载 npm uninstall ant-design-vue,在重新安装
四、按钮控制盒子的显示与隐藏
<template>
  <div class="edit">
    <button @click="come" v-show="!visible">添加控件</button>
    <HomeBar v-show="visible"></HomeBar>
  </div>
</template>
<script>
import HomeBar from "../components/HomeBar.vue";
export default {
  components: {
    HomeBar,
  },
  data() {
    return {
      // 引入组件(盒子)的显示与隐藏(一开始处于隐藏状态)
      visible:false,
    }
  },
  methods:{
       come(){     //点击按钮:自己消失,并且盒子出现
          this.visible=!this.visible;
      },
  },
};
</script>
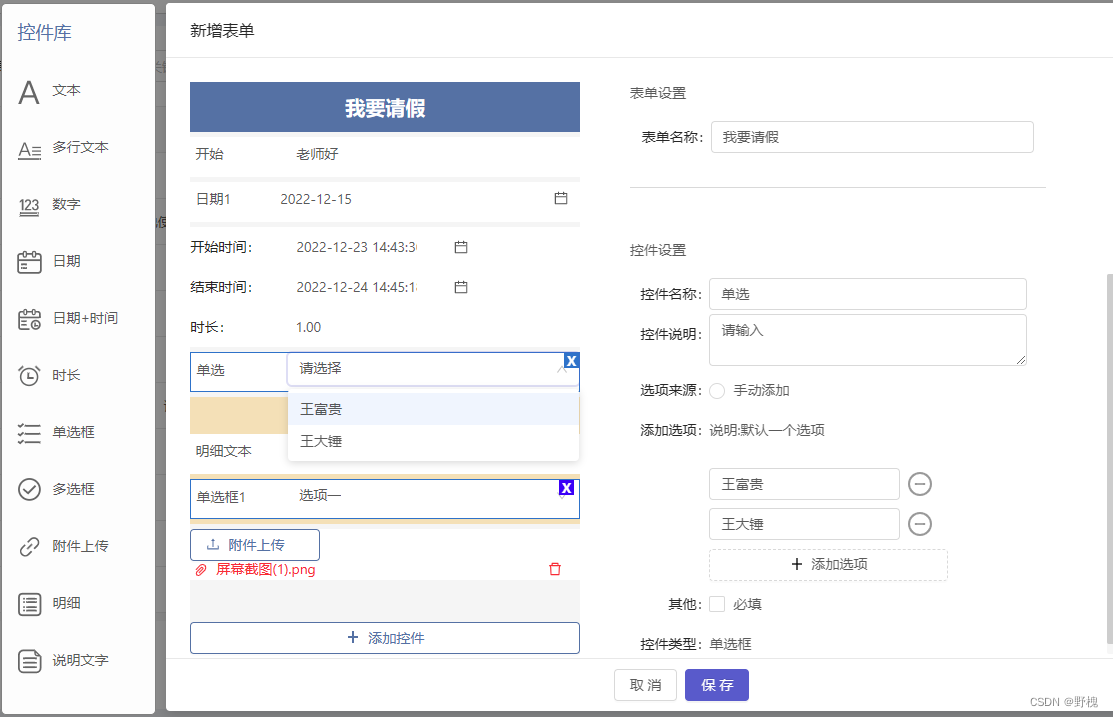
五、表单生成器思想
5.1、点击左侧控件库生成中间的控件元素
(1)左侧的每个控件都有一个唯一的id,点击时将对应的id逆向传值,返给父组件,父组件根据获取的id进行判断?则根据左侧的id会生成中间的模板元素。
<template>
  <div>
    <!-- 控件库 -->
    <div class="kj-box">
      <h1>控件库</h1>
      <div class="big-box">
        <div class="kj-every" @click="clickEvery(v.id)" v-for="(v, id) in ArrayList" :key="id">
          <img :src="v.mbicon" />
          <span>{{ v.kjtype }}</span>
        </div>
      </div>
    </div>
  </div>
</template>
    // 点击每一个控件库
    clickEvery(e) {
      // console.log("e是谁",e);
      this.emptyVisible = false
      this.Newid = e
      let goodID
      // 借助“深拷贝”完成新数据影响旧数据的问题
      this.skbList = JSON.parse(JSON.stringify(this.ArrayList))
      this.skbList.map((item) => {
        if (item.id == this.Newid) {
          goodID = item
        }
      })
      this.goods = goodID
      this.$emit('ArrayRef', this.goods)
      console.log('子组件', this.goods)
    },
父组件那边接收到点击的元素id后
    // 点击每一个控件库
    clickEvery(e) {
      // console.log('e是谁', e)
      this.changeData(e)
    },
    changeData(e) {
      // console.log('点id', this.allIndex, this.Bigform.ArrayListShow[this.allIndex])
      if (
        this.allIndex != -1 &&
        this.Bigform.ArrayListShow[this.allIndex] &&
        this.Bigform.ArrayListShow[this.allIndex].id == 10
      ) {
        if (e.id == 10) {
          return
        }
        this.Bigform.ArrayListShow[this.allIndex].detailList.push(e)
        this.ThreeList=this.Bigform.ArrayListShow[this.allIndex].detailList
      } else {
        this.Bigform.ArrayListShow.push(e)
      }
    },
中间模板生成的思想:
按照对应的下标,这样可以避免统一控件多次生成时,值同时变化的问题;
而明细控件则是在添加时,除了自身不能添加外,其余控件依旧可以添加,相当于在一个空间中再次加入左侧的控件,在中间模板下标==-1(比如点击明细空间之外的父盒子@click.self="detailLost")时,证明明细内容添加完毕!
5.2、点击中间的控件,值会显示在右侧
    // 编辑按钮==》blueX出现
    RightEdit(e, index) {
      // console.log('明细要的e', e.detailList)
      // 点击每一个之前,将必填的状态设置为跟随每一个的状态,提高用户体验感
      this.Bigform.form.other = e.other
      this.kjEdit = true
      if (this.Newid == 7) {
        this.singelShow = true //单选框和多选框对应的盒子
        this.doubleShow = false
        // this.Bigform.form.domains = this.Bigform.ArrayListShow[this.allIndex].domains || []
      } else if (this.Newid == 8) {
        this.doubleShow = true
        this.singelShow = false
        //  this.Bigform.form.domains2 = this.Bigform.ArrayListShow[this.allIndex].domains || []
      } else {
        this.singelShow = false
        this.doubleShow = false
      }
      this.isActive = index //点击对应下标,盒子的蓝色边框出现
      this.allIndex = index //拿到ArrayListShow对应的下标,赋给data中的(全局变量)allIndex
      this.Bigform.ArrayListShow.forEach((item) => {
        item.BoxShow = false
      })
      this.$set(e, 'BoxShow', true) //点击对应下标,蓝色X出现。【等同于e.BoxShow=true/e['BoxShow']=true】
      let count = this.count++
      this.$set(e, 'index', count)
      // console.log("deomain",this.Bigform.ArrayListShow[this.allIndex].domains,this.allIndex);
      this.Newid = e.id
      this.Bigform.form.kjname = e.kjname
      this.Bigform.form.kjtype = e.kjtype
      this.Bigform.form.kjdesc = e.kjdesc
      this.Bigform.form.domains = this.Bigform.ArrayListShow[this.allIndex].domains || []
      this.Bigform.form.domains2 = this.Bigform.ArrayListShow[this.allIndex].domains || []
},点击中间的每一个元素,右上方出现蓝色X,点击删除指定元素
   // 删除指定的表单控件元素
    DelEvery(index) {
      this.Bigform.ArrayListShow.splice(index, 1)
    },
5.3、修改右侧的值,引起中间元素的值变化
    // 右侧的控件编辑
    kjnameShow1(e, f) {
      // 将右侧表单的kjname直接赋给左侧渲染过的kjname
      e[this.allIndex].kjname = this.Bigform.form.kjname
      e[this.allIndex].kjdesc = this.Bigform.form.kjdesc
      if (e[this.allIndex].id == 10) {
        // console.log(f,"右到左");
        f[this.DelIndex].kjname = this.Bigform.form.kjname
        f[this.DelIndex].kjdesc = this.Bigform.form.kjdesc
      }
    },
六、前后端图像处理
6.1、当后端返回的图片只是数字时
前端图片库需要提前命名好,根据返回的数字进行拼接,就会前后端图片显示一致
      <div class="eightBox">
        <div
          class="aFBox"
          v-for="(item, index) in FeatureProps"
          :key="item.id"
          v-show="index < maxLength"
        >
          <img :src="getImgUrl(item.icon)" />
          <p>{{ item.name }}</p>
        </div>
      </div>
<script>
    getImgUrl(img) {//拼接图片地址
      // console.log("图片icon",img);
      // console.log("url",`@/assets/img/list0`+img+`.png`);
      return require(`@/assets/img/list0` + img + `.png`);
    },
</script>
6.2、后端在线图片地址拼接
接到的avatar地址如下,则需要拼接在线地址

这种一般有两个接口,下面这就是所有图片前边部分的在线地址

<template>
<img :src="`${ImgUrl}${item.avatar}`" @error="defaultBackImg" />
</template>
<script>
import { CopyUser, GetIMg} from "@/request/api";
  async created() {
    let res = await CopyUser();
    this.UserList = res.data.result;
    console.log("列", res);
    let Img = await GetIMg();
    this.ImgUrl = Img.data.message;
    console.log("在线地址", this.ImgUrl);
  },
//如果后台返回的数据为空,则使用默认图片
  defaultBackImg(event) {
      if (event.type == "error") {
        event.target.src = require("@/assets/img/yiji00.png");
      }
    },
</script>