在本文中,我们将介绍如何构建一个 Web 应用程序,该应用程序使用 ChatGPT 和 Stable Diffusion 为你提供的任何网站描述生成徽标和合适的域名。

推荐:用 NSDT编辑器 快速搭建可编程3D场景
1、介绍
人工智能正在接管世界。 这些技术每天都在震撼我们的世界:ChatGPT 和 Stable Diffusion。
ChatGPT 可以使用其 GPT3.5 模型回答世界上的任何问题。稳定扩散是一种文本到图像的模型,可以将任何文本转换为图片。结合这两种技术是人工智能的未来。我将在本文中向拟展示如何将两者结合起来创建整个网站品牌。
我对这个真的很兴奋🤩

2、什么是稳定扩散?
稳定扩散是一种文本到图像的潜在扩散模型,使用户能够根据给定的文本输入在几秒钟内生成图像。 它还用于诸如内绘画、外绘画和生成图像到图像转换等过程。
ChatGPT 也是经过 OpenAI 训练的 AI 语言模型,用于生成文本并以类人对话方式与用户交互。 用户可以提交请求并在短短几秒钟内获得历史、科学、数学和时事等广泛主题的信息或问题的答案。
在本文末尾,拟将了解如何使用 Stable Diffusion WebUI 从文本创建图像,以及如何从 Node.js 应用程序向 ChatGPT 发送消息。
3、安装并运行稳定的 Diffusion Web UI
可以在 Windows、Linux 和 Apple Silicon 上安装 Stable Diffusion Web UI。 在这里,我将指导拟完成 Apple Silicon 上的安装。
先决条件:确保拟的计算机上安装了 Homebrew。 它是一个软件包,可让拟安装 Apple 未提供的各种应用程序。
打开一个新的终端窗口并运行以下命令来安装 WebUI 依赖项。
MAC:
brew install cmake protobuf rust python@3.10 git wget
Debian系Linux:
sudo apt install wget git python3 python3-venv
红帽系Linux:
sudo dnf install wget git python3
Arch系Linux:
sudo pacman -S wget git python3
通过运行以下命令克隆 Web UI 存储库:
git clone https://github.com/AUTOMATIC1111/stable-diffusion-webui
我们需要下载稳定扩散模型(大文件)。 进入目录 stable-diffusion-webui/models/Stable-diffusion :
cd stable-diffusion-webui/models/Stable-diffusion
下载模型 - 对于我们的用例,我们将使用 Stable Diffusion 1.5,但请随意下载拟想要的任何其他版本:
wget https://huggingface.co/runwayml/stable-diffusion-v1-5/resolve/main/v1-5-pruned-emaonly.ckpt
下载后将模型从 v1-5-pruned-emaonly.ckpt 重命名为 `odel.ckpt
mv v1-5-pruned-emaonly.ckpt model.ckpt 。
进入 stable-diffusion-webui 文件夹并运行 Web UI 项目以创建虚拟环境并安装其依赖项:
cd stable-diffusion-webui
./webui.sh
访问本地 URL - http://127.0.0.1:7860,通过其用户界面与 Web UI 进行交互:
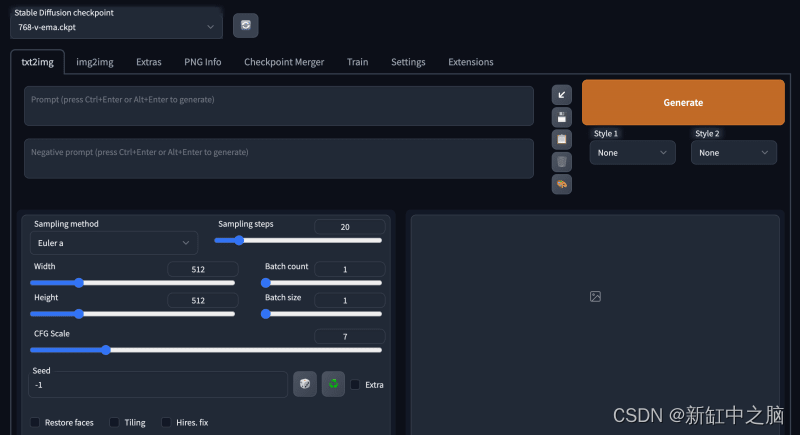
要稍后重新启动 Web UI 进程,请导航到终端上的 stable-diffusion-webui 文件夹并运行命令 ./webui.sh。 如果要使用Web UI API,请在命令 ./webui.sh --api中添加flag api标志。
4、构建Web应用程序
在本节中,我将指导拟创建 Web 应用程序的项目环境。 我们将使用 React.js 作为前端,使用 Node.js 作为后端服务器。
通过运行以下代码为 Web 应用程序创建项目文件夹:
mkdir stable-diffusion-app
cd stable-diffusion-app
mkdir client server
通过终端导航到客户端文件夹并创建一个新的 React.js 项目:
cd client
npx create-react-app ./
删除React应用程序中的冗余文件,例如徽标和测试文件,并更新App.js文件以显示“Hello World”,如下所示。
function App() {
    return (
        <div>
            <p>Hello World!</p>
        </div>
    );
}
export default App;
导航到 src/index.css 文件并复制以下代码。 它包含该项目样式所需的所有 CSS。
@import url("https://fonts.googleapis.com/css2?family=Space+Grotesk:wght@300;400;500;600;700&display=swap");
* {
    box-sizing: border-box;
    margin: 0;
    padding: 0;
    font-family: "Space Grotesk", sans-serif;
}
.app,
.loading,
.result__container > div {
    display: flex;
    align-items: center;
    justify-content: center;
}
.app {
    width: 100%;
    margin: 50px auto;
    flex-direction: column;
}
.app > h1 {
    margin-bottom: 30px;
    color: #2b3467;
}
form {
    display: flex;
    flex-direction: column;
    width: 80%;
}
textarea {
    padding: 20px;
    border: 1px solid #ddd;
    outline: none;
    border-radius: 5px;
    margin: 5px 0px;
    box-shadow: 0 2px 8px 0 rgba(99, 99, 99, 0.2);
}
button {
    margin-top: 15px;
    display: inline-block;
    width: 200px;
    padding: 20px;
    cursor: pointer;
    font-weight: bold;
    border: none;
    border-radius: 5px;
    outline: none;
    font-size: 18px;
    background-color: #f0dbdb;
}
.loading {
    width: 100%;
    height: 100vh;
    background-color: #fefcf3;
}
.result__container {
    display: flex;
    align-items: center;
    flex-wrap: wrap;
    margin-top: 30px;
}
.result__container > div {
    margin: 5px;
    flex-direction: column;
}
.image {
    width: 400px;
    height: 300px;
    margin-bottom: 15px;
}
更新 App.js 文件以显示一个输入字段,允许拟输入建议的网站描述:
import React, { useState } from "react";

const App = () => {
    const [description, setDescription] = useState("");

    const handleSubmit = (e) => {
        e.preventDefault();
        console.log({ description });
        setDescription("");
    };

    return (
        <div className='app'>
            <h1>Website Idea Generator</h1>
            <form method='POST' onSubmit={handleSubmit}>
                <label htmlFor='description'>Enter the description</label>
                <textarea
                    name='description'
                    rows={6}
                    value={description}
                    onChange={(e) => setDescription(e.target.value)}
                />
                <button>GENERATE</button>
            </form>
        </div>
    );
};

export default App;
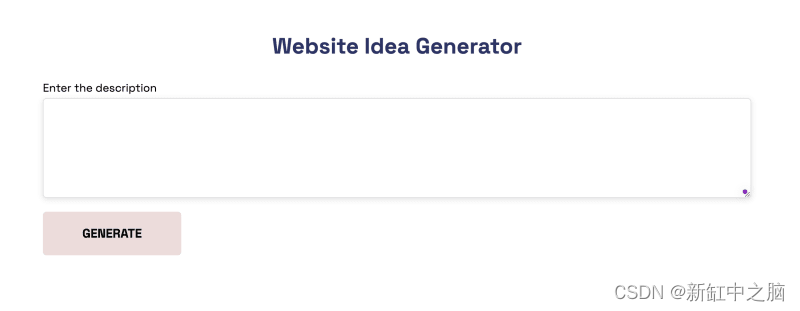
5、设置 Node.js 服务器
导航到终端内的服务器文件夹并创建一个 package.json 文件。
cd server & npm init -y
安装 Express、Nodemon 和 CORS 库。
npm install express cors nodemon
ExpressJS 是一个快速、简约的框架,提供了在 Node.js 中构建 Web 应用程序的多种功能,CORS 是一个 Node.js 包,允许在不同域之间进行通信,Nodemon 是一个 Node.js 工具,可以在检测到文件后自动重新启动服务器 变化。
创建一个 index.js 文件 - Web 服务器的入口点。
touch index.js
使用 ExpressJS 设置 Node.js 服务器。 当你在浏览器中访问 http://localhost:4000/api 时,下面的代码片段会返回一个 JSON 对象。
//👇🏻index.js
const express = require("express");
const cors = require("cors");
const app = express();
const PORT = 4000;

app.use(express.urlencoded({ extended: true }));
app.use(express.json());
app.use(cors());

app.get("/api", (req, res) => {
    res.json({
        message: "Hello world",
    });
});

app.listen(PORT, () => {
    console.log(`Server listening on ${PORT}`);
});
安装 Axios、非官方 ChatGPT API 库和 Puppeteer。 ChatGPT API 使用 Puppeteer 作为可选对等依赖项来自动绕过 Cloudflare 保护。
npm install chatgpt puppeteer axios
要在 server/index.js 文件中使用 ChatGPT API,你需要配置该文件以使用 require 和 import 关键字来导入库。
因此,更新 server/package.json 文件以包含 type 关键字。
{ "type": "module" }
在 server/index.js 文件顶部添加以下代码片段:
import { createRequire } from "module";
const require = createRequire(import.meta.url);
//...other code statements
完成最后两个步骤后,你现在可以在 index.js 文件中使用 ChatGPT。
通过将启动命令添加到 package.json 文件中的脚本列表来配置 Nodemon。 下面的代码片段使用 Nodemon 启动服务器。
//In server/package.json

"scripts": {
    "test": "echo \\"Error: no test specified\\" && exit 1",
    "start": "nodemon index.js"
  },
恭喜! 你现在可以使用以下命令启动服务器:
npm start
6、如何在 Node.js 中与 ChatGPT 通信
在本部分中,你将了解如何通过非官方 ChatGPT 库从 Node.js 服务器与 ChatGPT 进行通信。
该库使用基于浏览器的全自动解决方案,使我们能够顺利进入 - 这意味着它执行完整的浏览器自动化,使我们能够登录 OpenAI 网站、解决验证码并通过 OpenAI cookie 发送消息。
你已经在上一节中安装了该库; 接下来,将 ChatGPT API 库导入到 index.js 文件中,如下所示。 ChatGPT API 使用 Puppeteer 作为可选对等依赖项来自动绕过 Cloudflare 保护。
import { ChatGPTAPIBrowser } from "chatgpt";
我们需要 ChatGPT 为用户指定的任何描述生成域名,并为 Stable Diffusion API 创建提示。因此,在服务器上创建一条接受来自 React 应用程序描述的路由。
app.post("/api", async (req, res) => {
    const { prompt } = req.body;
    console.log(prompt);
});
在 React 应用程序中创建一个函数,一旦用户提交表单,该函数就会将描述发送到服务器上的 /api 端点。
async function sendDescription() {
    try {
        const request = await fetch("http://localhost:4000/api", {
            method: "POST",
            body: JSON.stringify({
                prompt: description,
            }),
            headers: {
                Accept: "application/json",
                "Content-Type": "application/json",
            },
        });
        const res = await request.json();
        console.log(res);
    } catch (err) {
        console.error(err);
    }
}
在 React 应用程序中添加一个加载状态来保存请求状态,并在提交表单后调用异步函数。
const [description, setDescription] = useState("");
const [loading, setLoading] = useState(false);

const handleSubmit = (e) => {
    e.preventDefault();
    //👇🏻 calls the async function
    sendDescription();
    setDescription("");
    setLoading(true);
};
更新 /api 端点以将描述发送到 ChatGPT 并生成域名和稳定扩散提示。
async function chatgptFunction(content) {
    try {
        const api = new ChatGPTAPIBrowser({
            email: "YOUR_CHATGPT_EMAIL_ADDRESS",
            password: "YOUR_CHATGPT_PASSWORD",
        });
        await api.initSession();

        //👇🏻 sends the instruction for the domain name to ChatGPT
        const getDomainName = await api.sendMessage(
            `Can you generate a domain name for a website about: ${content}`
        );
        let domainName = getDomainName.response;

        //👇🏻 sends the instruction for the prompt to ChatGPT
        const generatePrompt = await api.sendMessage(
            `I have a website for ${content}, and I want to generate a logo for it, can you generate a prompt for dall-e for me? make it long like 50 words, you don't need to tell me why you generated the prompt`
        );
        const diffusionPrompt = generatePrompt.response;

        console.log({ domainName, diffusionPrompt });
    } catch (err) {
        console.error(err);
    }
}

app.post("/api", async (req, res) => {
    const { prompt } = req.body;
    const result = await chatgptFunction(prompt);
    res.json({ message: "Retrieved successfully!" });
});
上面的代码片段使用 Puppeteer 启动浏览器并使你能够自动登录 ChatGPT 帐户。 身份验证后,ChatGPT 处理请求并返回响应。
在接下来的部分中,我将指导你如何将生成的提示发送到 Stable Diffusion API。
7、如何与稳定扩散 API 交互
要与 Stable Diffusion API 交互,请运行以下命令重新启动 Web UI 进程:
cd stable-diffusion-webui
./webui.sh --api
可以在 http://127.0.0.1:7860/docs 上查看可用的 API 端点。我们将使用 /sdapi/v1/txt2img 端点进行文本到图像的转换。

使用生成的提示作为负载向 sdapi/v1/txt2img 端点发出 POST 请求。
async function chatgptFunction(content) {
    try {
        const api = new ChatGPTAPIBrowser({
            email: "asaoludavid234@yahoo.com",
            password: "davidasaolu",
        });
        await api.initSession();

        const getDomainName = await api.sendMessage(
            `Can you generate a domain name for a website about: ${content}`
        );
        let domainName = getDomainName.response;

        const generatePrompt = await api.sendMessage(
            `I have a website for ${content}, and I want to generate a logo for it, can you generate a prompt for dall-e for me? make it long like 50 words, you don't need to tell me why you generated the prompt`
        );
        const diffusionPrompt = generatePrompt.response;

        //👇🏻 Makes a POST request via Axios with the prompt as the payload
        const request = await axios.post("http://127.0.0.1:7860/sdapi/v1/txt2img", {
            prompt: diffusionPrompt,
        });
        //👇🏻 returns the generated logo and the domain name
        let logoImage = await request.data.images;
        return { logoImage, domainName };
    } catch (err) {
        console.error(err);
    }
}
从上面的代码片段中, /sdapi/v1/txt2img 端点接受一个名为提示的必需参数 - 要生成的图像的文本描述。
更新 Node.js 服务器上的 /api 端点以保存结果并将其发送到 React.js 应用程序。
//👇🏻 holds the results
const database = [];

app.post("/api", async (req, res) => {
    const { prompt } = req.body;
    const result = await chatgptFunction(prompt);
    //👇🏻 saves the result to the database array
    database.push(result);
    //👇🏻 return the result as a response
    res.json({ message: "Retrieved successfully!", result: database });
});
8、使用 React 应用程序显示结果
更新 sendDescription 函数以接收来自服务器的响应。
//👇🏻 React state that holds the result
const [result, setResult] = useState([]);

async function sendDescription() {
    try {
        const request = await fetch("http://localhost:4000/api", {
            method: "POST",
            body: JSON.stringify({
                prompt: description,
            }),
            headers: {
                Accept: "application/json",
                "Content-Type": "application/json",
            },
        });
        const res = await request.json();
        if (res.message) {
            //👇🏻 update the loading and result states
            setLoading(false);
            setResult(res.result);
        }
    } catch (err) {
        console.error(err);
    }
}
创建一个加载组件,每当请求待处理时都会向用户显示该组件。
import React from "react";

const Loading = () => {
    return (
        <div className='loading'>
            <h1>Loading, please wait...</h1>
        </div>
    );
};

export default Loading;
添加下面的代码片段以在请求待处理时显示该组件。
if (loading) return <Loading />;
更新组件以呈现生成的结果,如下所示。
return (
    <div className='app'>
        <h1>Website Idea Generator</h1>
        <form method='POST' onSubmit={handleSubmit}>
            <label htmlFor='description'>Enter the description</label>
            <textarea
                name='description'
                rows={6}
                value={description}
                onChange={(e) => setDescription(e.target.value)}
            />
            <button>GENERATE</button>
        </form>

        <div className='result__container'>
            {result.length > 0 &&
                result.map((item, index) => (
                    <div key={index}>
                        <img
                            src={`data:image/png;base64,${item.logoImage}`}
                            alt={item.domainName}
                            className='image'
                        />
                        <p>Domain: {item.domainName}</p>
                    </div>
                ))}
        </div>
    </div>
);
上面的代码片段显示了为各种请求生成的徽标和域名。 恭喜!🎉 你已经完成了本教程的项目。
以下是鸡尾酒网站获得的结果示例:

9、结束语
到目前为止,你已经学会了:
- 什么是稳定扩散,
- 如何在计算机上安装和设置 Stable Diffusion
- 如何从 Node.js 应用程序向 ChatGPT 发送消息,以及
- 如何通过稳定扩散 API 从文本生成图像。
本教程的源代码可在 github 获取。
原文链接:Node.js开发稳定扩散应用 — BimAnt

