天行健,君子以自强不息;地势坤,君子以厚德载物。
每个人都有惰性,但不断学习是好好生活的根本,共勉!
文章均为学习整理笔记,分享记录为主,如有错误请指正,共同学习进步。
文章目录
- 一、服务安装参考
- 二、Java实现新增数据到ES
- 1. 环境
- 2. 包结构
- 3. 依赖引入
- 4. http请求工具
- 5. 测试代码
- 6. 访问kibana服务
一、服务安装参考
首先需要准备好elasticsearch和kibana
elasticsearch的下载、安装、使用可参考:Elasticsearch安装
kibana的下载、安装、使用可参考:Kibana安装、配置
服务的启动使用和数据增删改查可参考:kibana操作elasticsearch(增删改查)
在进行一下Java实现之前,先将es服务和kibana服务启动
二、Java实现新增数据到ES
Elasticsearch的服务开启后,可以使用http请求进行调用接口来操作Elasticsearch数据
请求的url格式如下:
http://localhost:9200/index/type/id
对于Java来说,可以使用http请求工具进行实现,同时传参,参数为json类型数据
具体实现如下
1. 环境
并非要求,只是我这里使用的这个环境
JDK 1.8
Maven 3.9.4
IDEA 2023.2.1
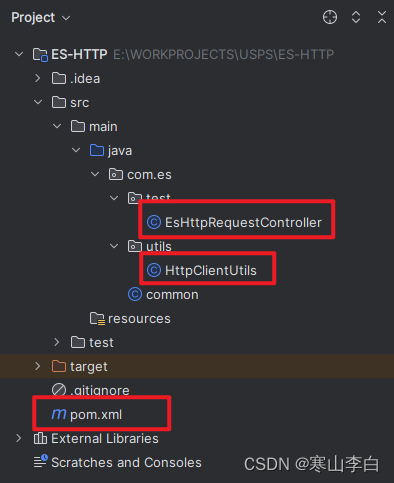
2. 包结构
这里主要用到三个文件:pom引入依赖,HttpClientUtils是请求工具,EsHttpRequestController是请求调用测试
3. 依赖引入
引入http工具所需要的依赖,也就是实现请求的依赖
传入的参数为json类型所以也需要json工具的依赖
pom.xml完整内容
<?xml version="1.0" encoding="UTF-8"?>
<project xmlns="http://maven.apache.org/POM/4.0.0"
         xmlns:xsi="http://www.w3.org/2001/XMLSchema-instance"
         xsi:schemaLocation="http://maven.apache.org/POM/4.0.0 http://maven.apache.org/xsd/maven-4.0.0.xsd">
    <modelVersion>4.0.0</modelVersion>

    <groupId>com.es</groupId>
    <artifactId>ES-HTTP</artifactId>
    <version>1.0-SNAPSHOT</version>

    <properties>
        <maven.compiler.source>8</maven.compiler.source>
        <maven.compiler.target>8</maven.compiler.target>
        <project.build.sourceEncoding>UTF-8</project.build.sourceEncoding>
    </properties>

    <dependencies>
        <!-- https://mvnrepository.com/artifact/org.apache.httpcomponents/httpcore -->
        <dependency>
            <groupId>org.apache.httpcomponents</groupId>
            <artifactId>httpcore</artifactId>
            <version>4.4.14</version>
        </dependency>
        <dependency>
            <groupId>org.apache.httpcomponents</groupId>
            <artifactId>httpclient</artifactId>
            <version>4.5.13</version>
        </dependency>
        <!--json工具-->
        <dependency>
            <groupId>com.alibaba.fastjson2</groupId>
            <artifactId>fastjson2</artifactId>
            <version>2.0.33</version>
        </dependency>

    </dependencies>


</project>
4. http请求工具
HttpClientUtils.java
package com.es.utils;

import org.apache.http.HttpEntity;
import org.apache.http.client.methods.CloseableHttpResponse;
import org.apache.http.client.methods.HttpPost;
import org.apache.http.entity.StringEntity;
import org.apache.http.impl.client.CloseableHttpClient;
import org.apache.http.impl.client.HttpClients;
import org.apache.http.util.EntityUtils;

/**
 * @ClassDescription:
 * @JdkVersion: 1.8
 * @Author: 李白
 * @Created: 2023/10/16 16:12
 */
public class HttpClientUtils {

    public static void post(){

    }
    public static String doPost(String url, String str, String encoding) {
        String body = "";
        try {
            // 创建httpclient对象
            CloseableHttpClient client = HttpClients.createDefault();
            // 创建post方式请求对象
            HttpPost httpPost = new HttpPost(url);
            // 设置参数到请求对象中
            httpPost.setEntity(new StringEntity(str, encoding));
            // 设置header信息
            // 指定报文头【Content-type】、【User-Agent】
            httpPost.setHeader("Content-type", "application/json;charset=UTF-8");
            // 执行请求操作,并拿到结果(同步阻塞)
            CloseableHttpResponse response = client.execute(httpPost);
            // 获取结果实体
            HttpEntity entity = response.getEntity();
            if (entity != null) {
                // 按指定编码转换结果实体为String类型
                body = EntityUtils.toString(entity, encoding);
            }
            EntityUtils.consume(entity);
            // 释放链接
            response.close();
            return body;
        } catch (Exception e1) {
            e1.printStackTrace();
            return "";

        }
    }

}
5. 测试代码
编写mian方法执行请求存数据到es
EsHttoRequestController.java
package com.es.test;

import com.alibaba.fastjson2.JSONObject;
import com.es.utils.HttpClientUtils;

/**
 * @ClassDescription:
 * @JdkVersion: 1.8
 * @Author: 李白
 * @Created: 2023/10/16 16:12
 */
public class EsHttpRequestController {

    public static void main(String[] args) {
        JSONObject js = new JSONObject();
        js.put("name","杜甫");
        js.put("age","6800");
        js.put("gender","男");
        String jsonStr = js.toJSONString();
        HttpClientUtils.doPost("http://127.0.0.1:9200/deviceinfo/users/1002",jsonStr,"UTF-8");
    }

}
6. 访问kibana服务
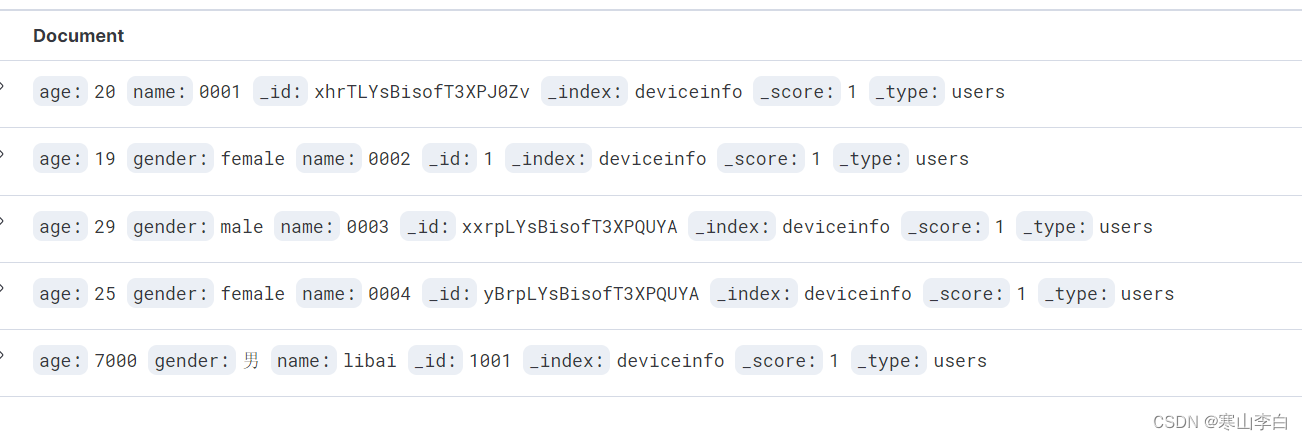
先看kibana服务查看数据
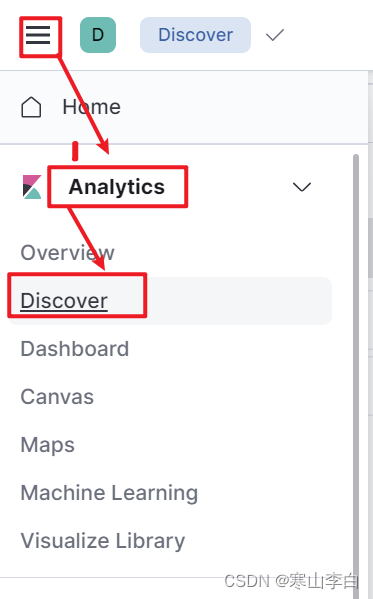
打开侧边栏,Analytics–Discover
查看现有数据
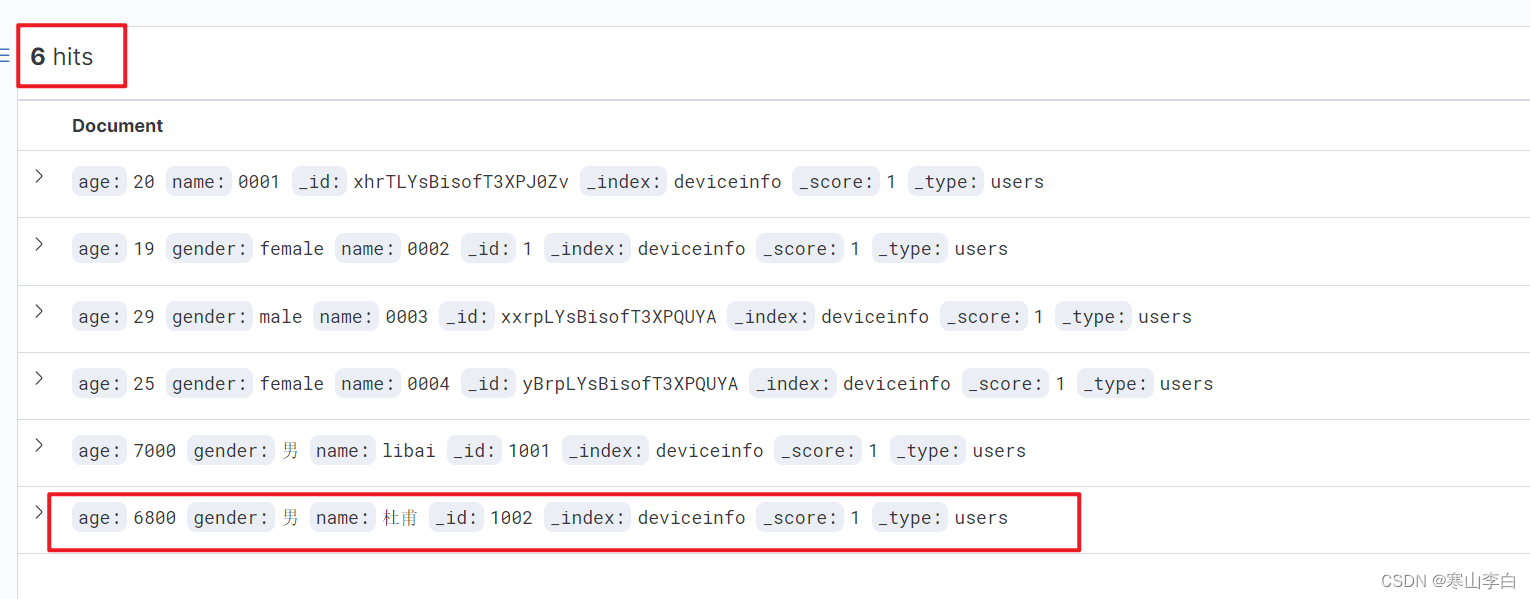
执行5. 测试代码的代码,然后刷新界面查看新增数据
如下,新增成功
感谢阅读,祝君暴富!






![[ Windows-Nginx ]Windows服务器,Tomcat容器部署项目,整合Nginx](https://img-blog.csdnimg.cn/020f81b891474ad586561cd46602b2a5.png)