Linux1024一篇通俗易懂的liunx命令操作总结(第十课)
一 liunx 介绍
Linux是一种免费开源的操作系统,它的设计基于Unix。它最早是由芬兰的一位大学生Linus Torvalds在1991年开始编写的,取名为Linux。Linux具有高度的灵活性和可定制性,可以在不同的硬件平台上运行,并支持多个用户同时使用。Linux系统是GNU计划的一部分,GNU是一个旨在开发自由软件的计划。
Linux分为内核和发行版。内核是操作系统的核心部分,它控制着计算机硬件和资源的管理。发行版则是由内核和其他软件组成的完整操作系统。常见的Linux发行版有Ubuntu、Debian、Fedora、CentOS、Red Hat等。
Linux的特点包括:
-
开源:Linux的源代码可以免费获取,用户可以根据自己的需要自由修改和分发。
-
多用户:Linux支持多个用户同时使用,每个用户都可以有自己的个人账户和权限。
-
高度定制化:Linux可以根据用户的需求进行高度的定制,用户可以选择自己需要的桌面环境、软件等。
-
安全性高:由于Linux的源代码公开,使得许多开发人员对其进行审查,也使Linux系统更加安全,而且不容易受到病毒攻击。
-
良好的兼容性:Linux可以运行在不同的硬件平台上,并且支持许多不同的文件格式和协议。
-
可靠性高:Linux系统的稳定性和可靠性非常高,可以长时间运行而不会出现问题。
总之,Linux是一种非常强大和可定制的操作系统,它的开源和多样性吸引了很多程序员和用户使用和开发。
1 认识Linux操作系统的结构目录
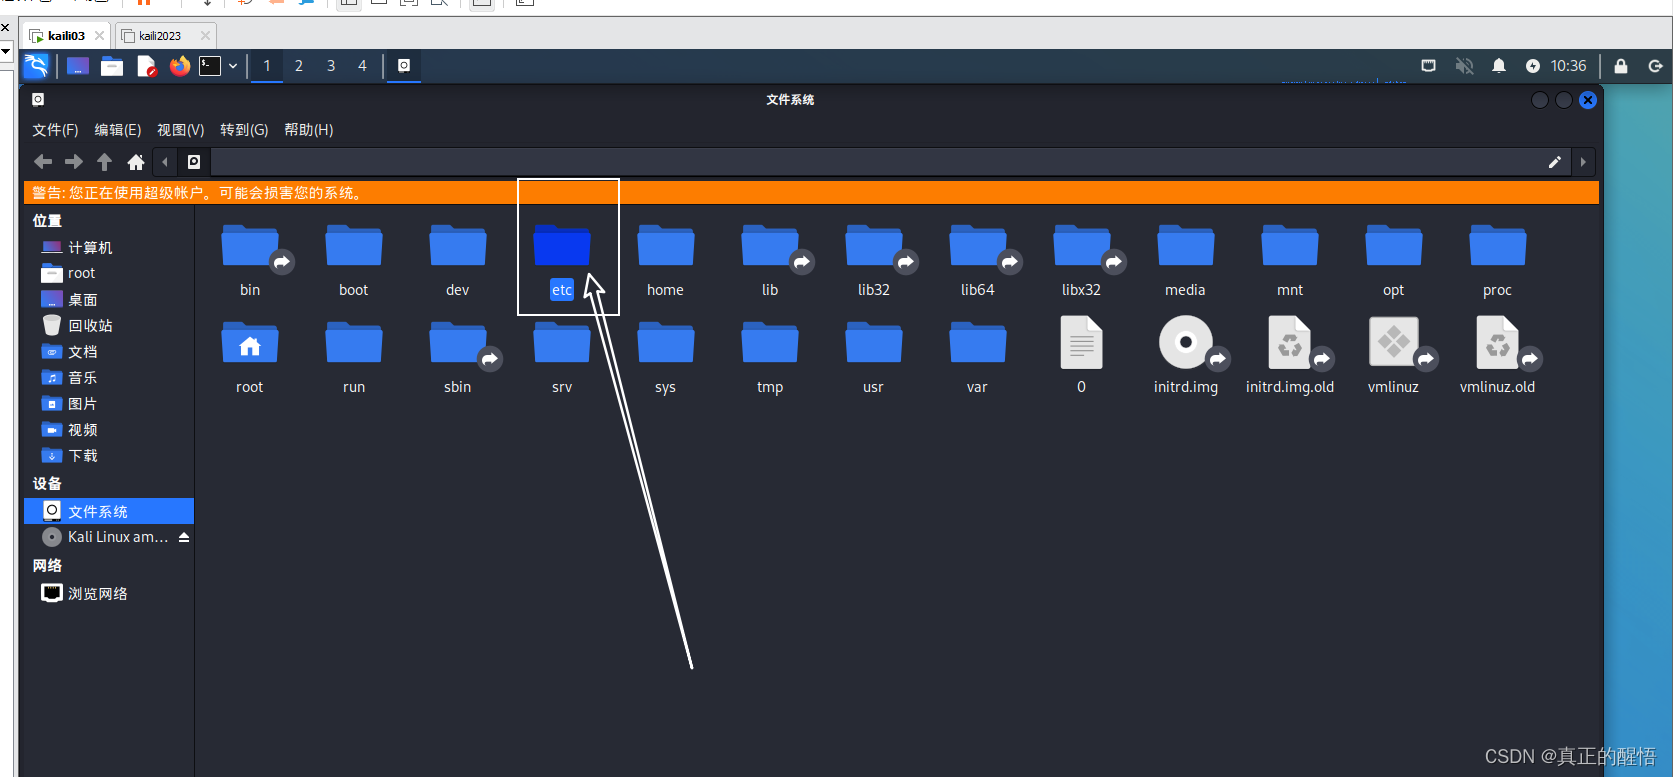
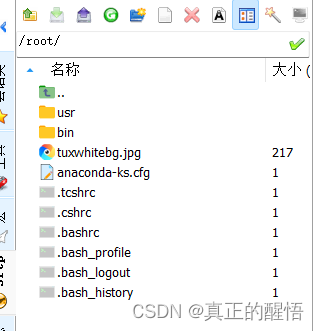


2 ls less cat 查询命令
[root@localhost ~]# ls
anaconda-ks.cfg  bin  tuxwhitebg.jpg  usr
[root@localhost ~]# ls /
afs  boot  etc   lib    lost+found  mnt  proc  run   srv  tmp  var
bin  dev   home  lib64  media       opt  root  sbin  sys  usr
[root@localhost ~]#
3 less 查看文件的内容分页查看内容
[root@localhost ~]# less anaconda-ks.cfg
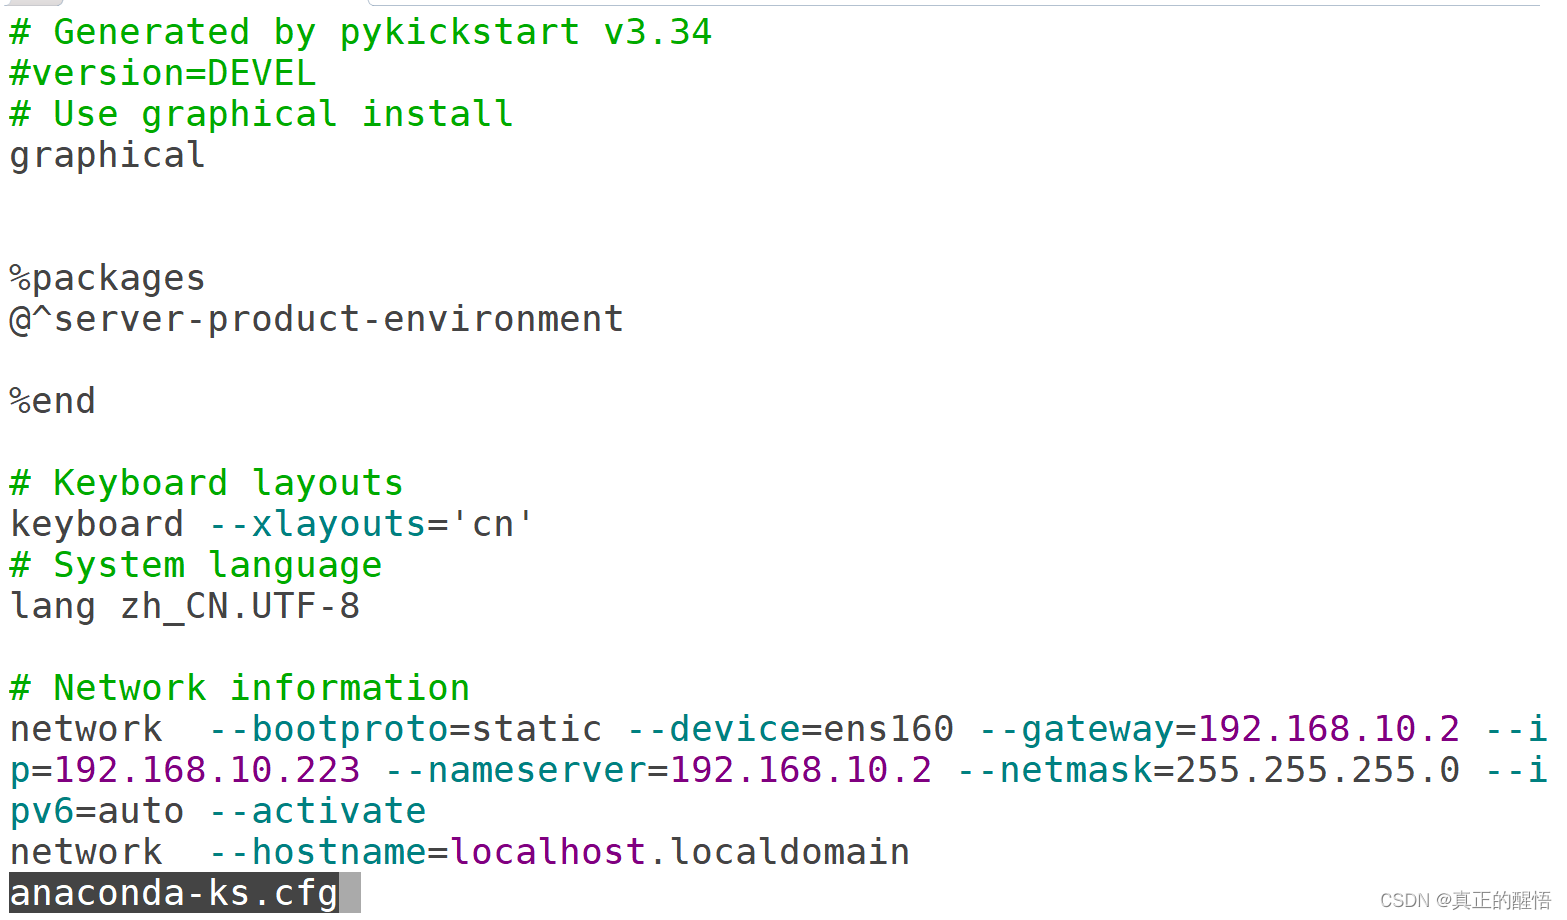
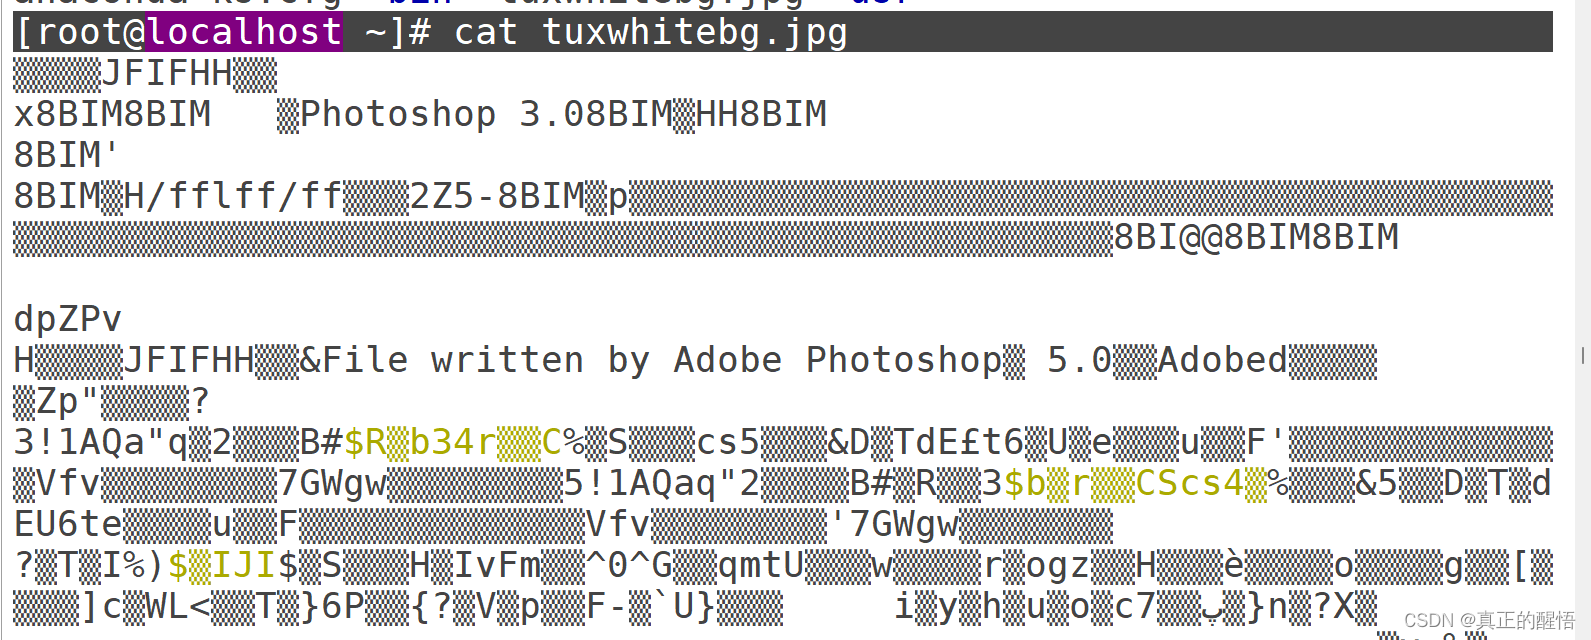
4 cat 查看文件的详细内容
[root@localhost ~]# cat tuxwhitebg.jpg
5 查看当前位置 Pwd
[root@localhost ~]# pwd
/root
[root@localhost ~]# cd /home/
[root@localhost home]# pwd
/home
[root@localhost home]#
6 ls -- help 寻求帮助的命令操作
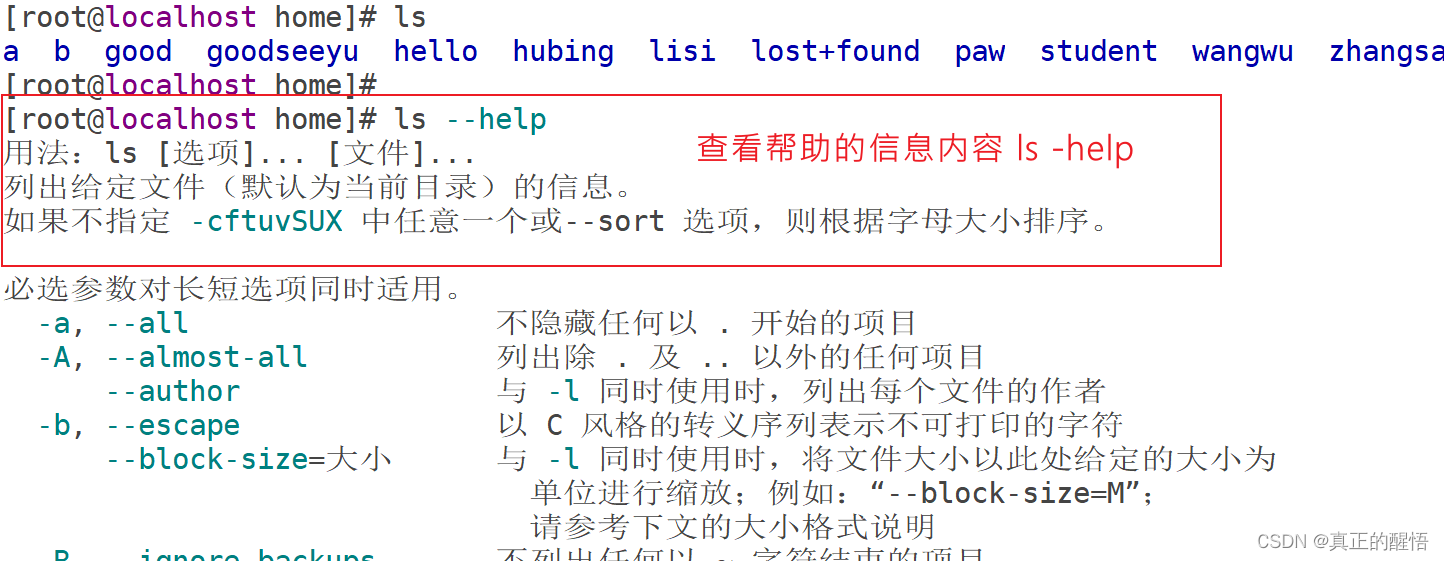
7 查看目录下或者本身的信息或者内容 ls ls /
[root@localhost home]# ls
goodseeyu  hubing  lost+found  student  zhangsan
hello      lisi    paw         wangwu
[root@localhost home]# ls /
afs  boot  etc   lib    lost+found  mnt  proc  run   srv  tmp  var
bin  dev   home  lib64  media       opt  root  sbin  sys  usr
[root@localhost home]#
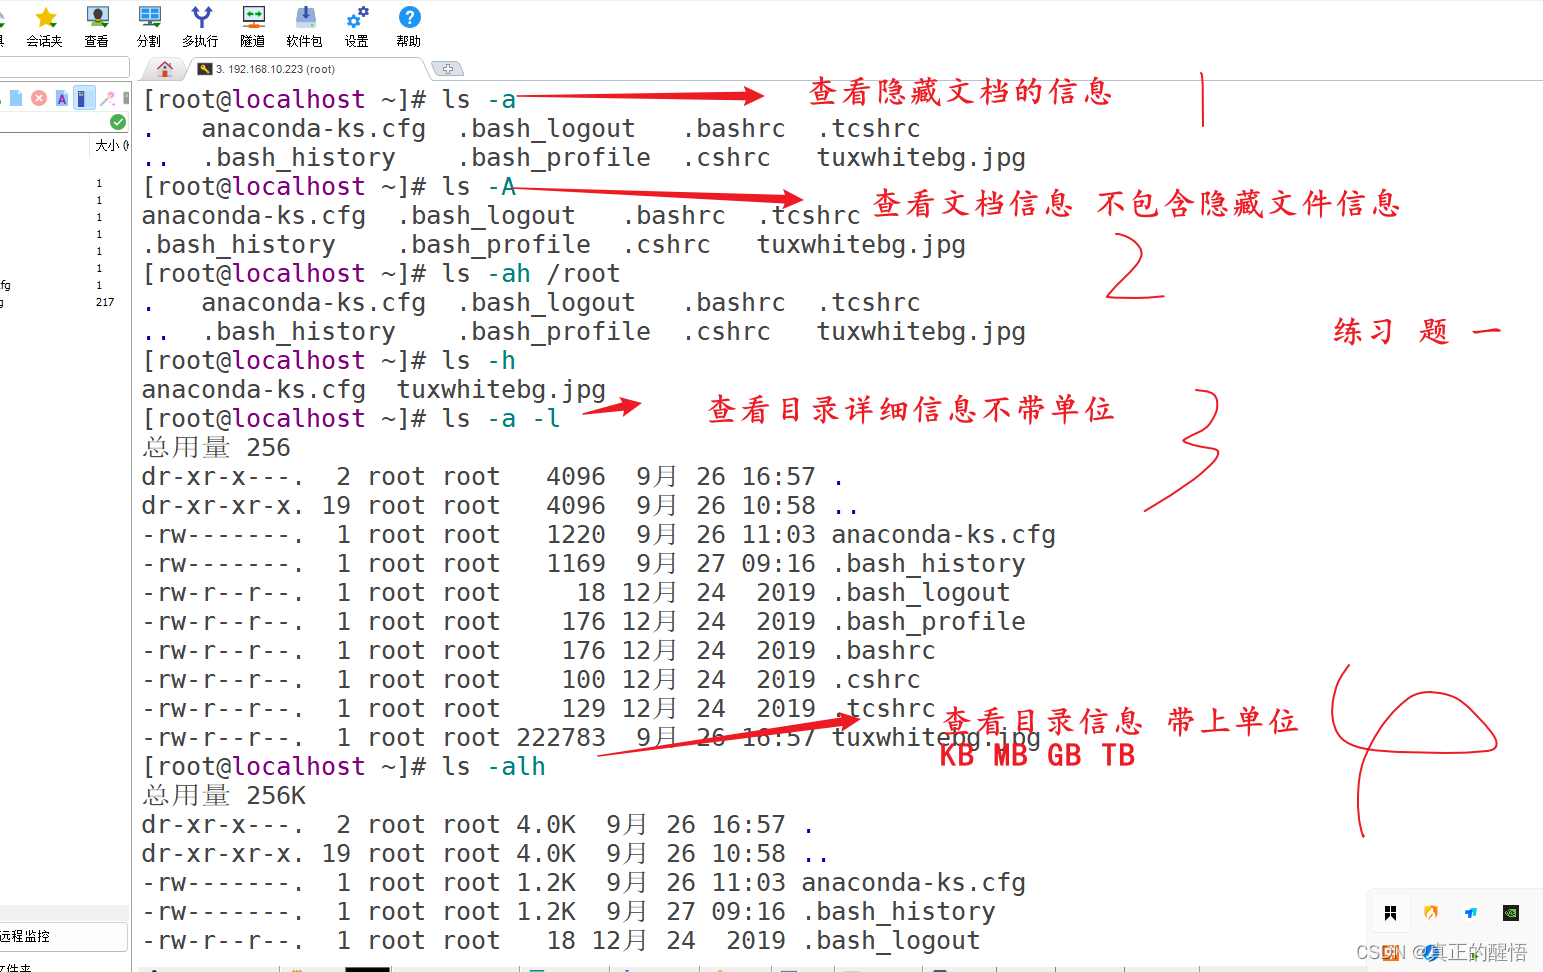
8 查看目录下所有内容(包含隐藏文档) ls -a

9 查看目录下所有内容(不包含隐藏文档) ls -A 目录

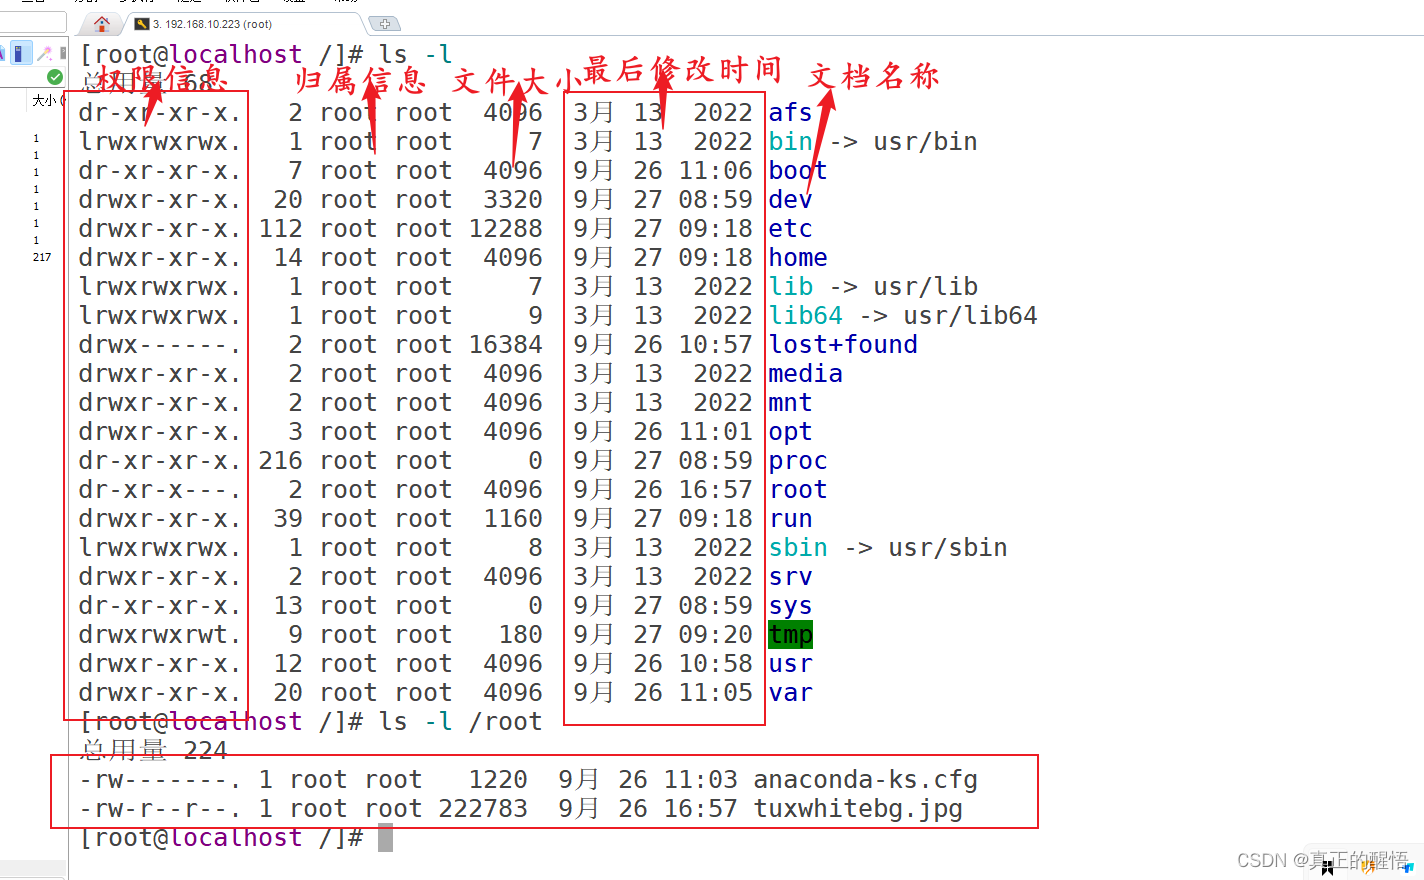
10 查看文档目录下的文档详细信息 ls -l 目录
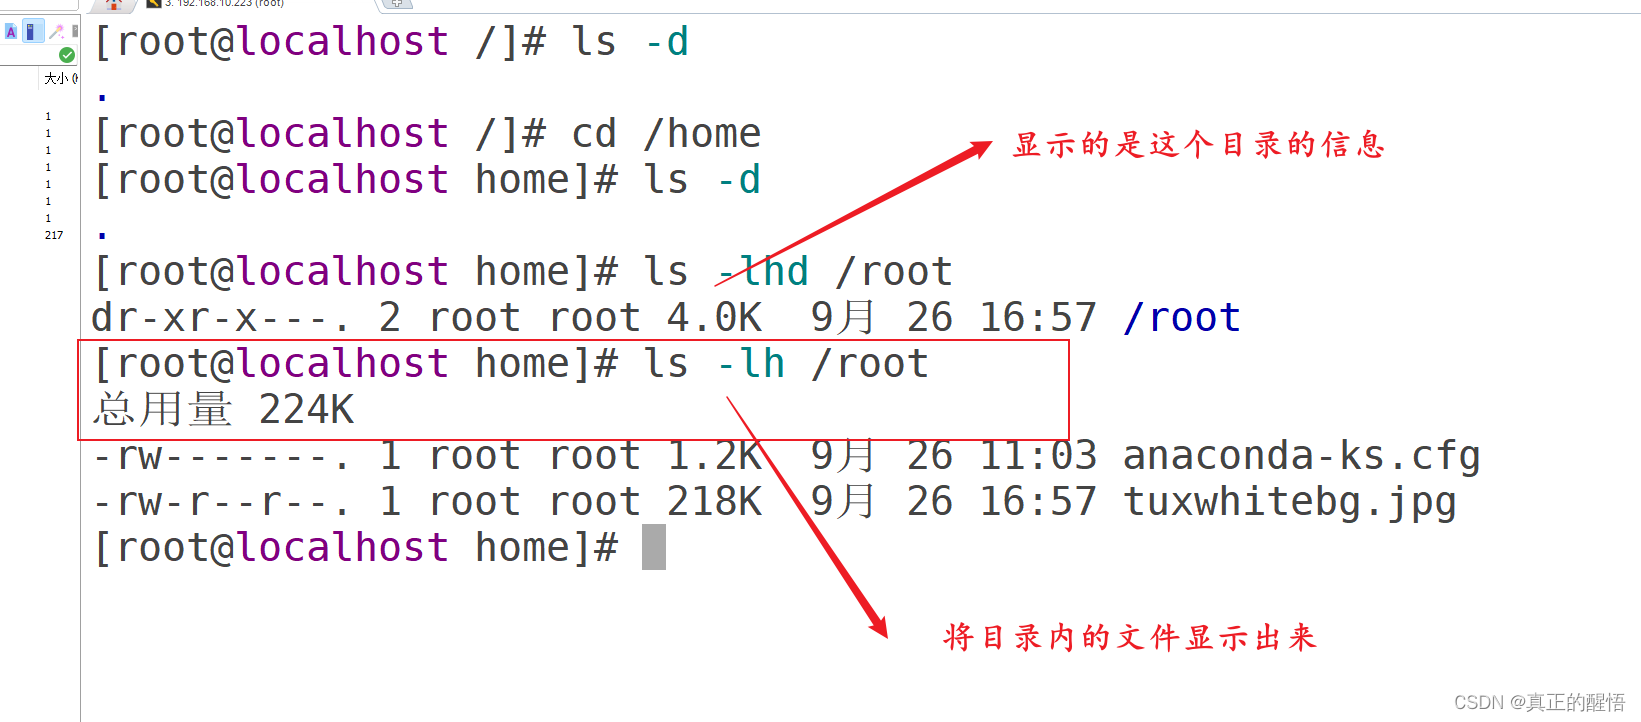
11 查看目录本身而不是目录下的内容 ls -ld
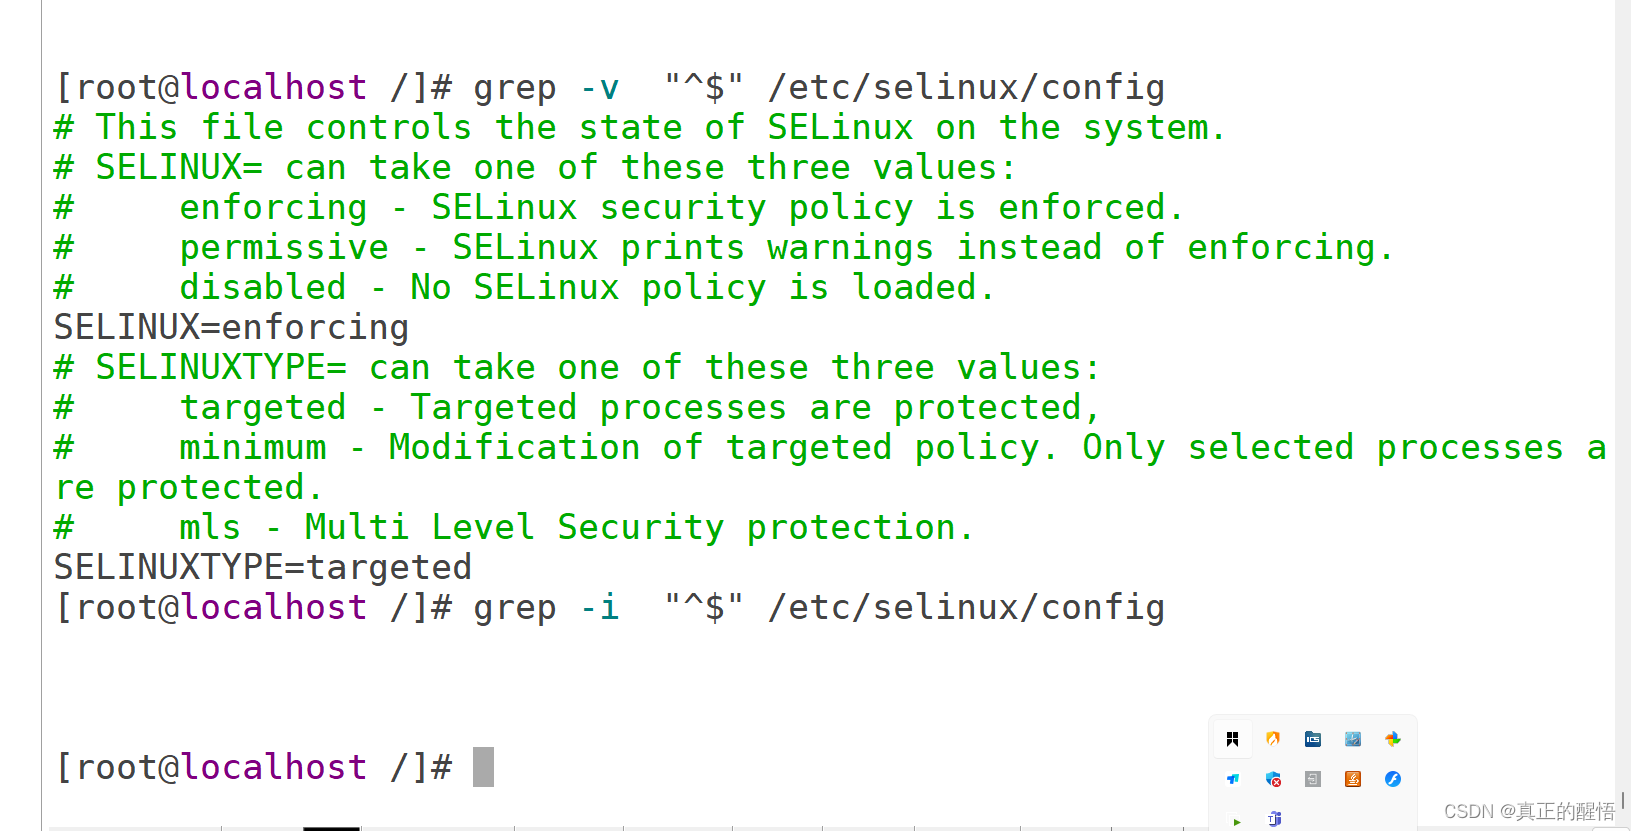
12 查看文档带上单位显示大小 ls -h
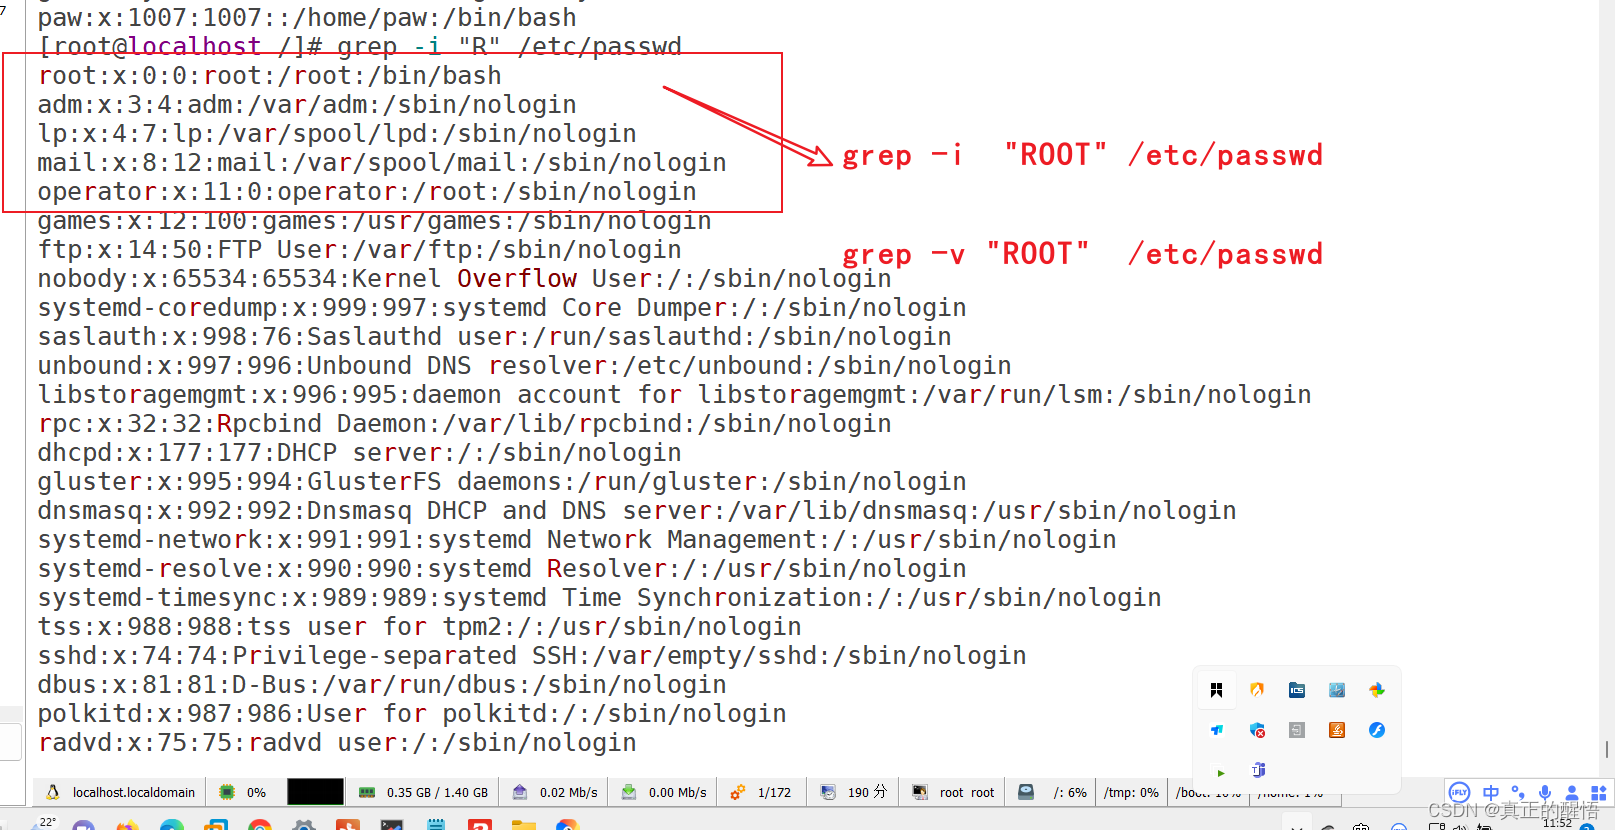
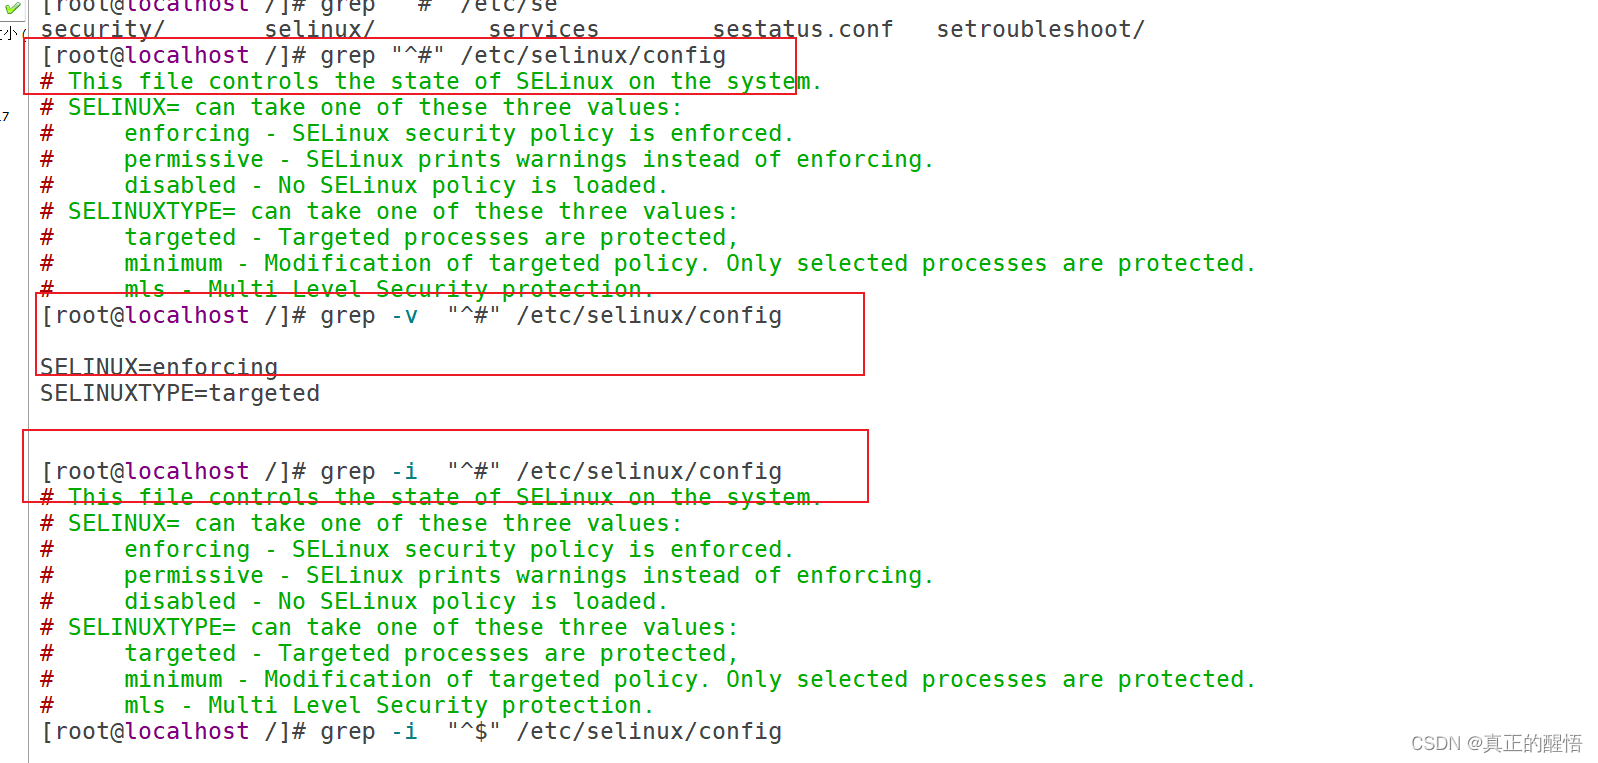
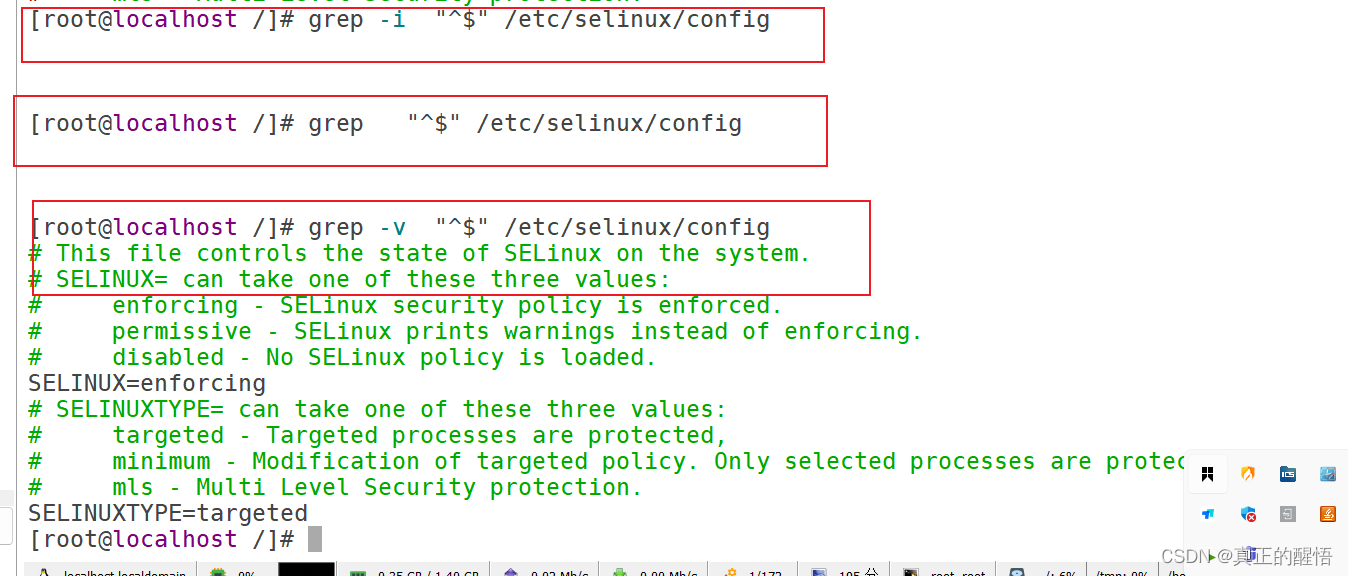
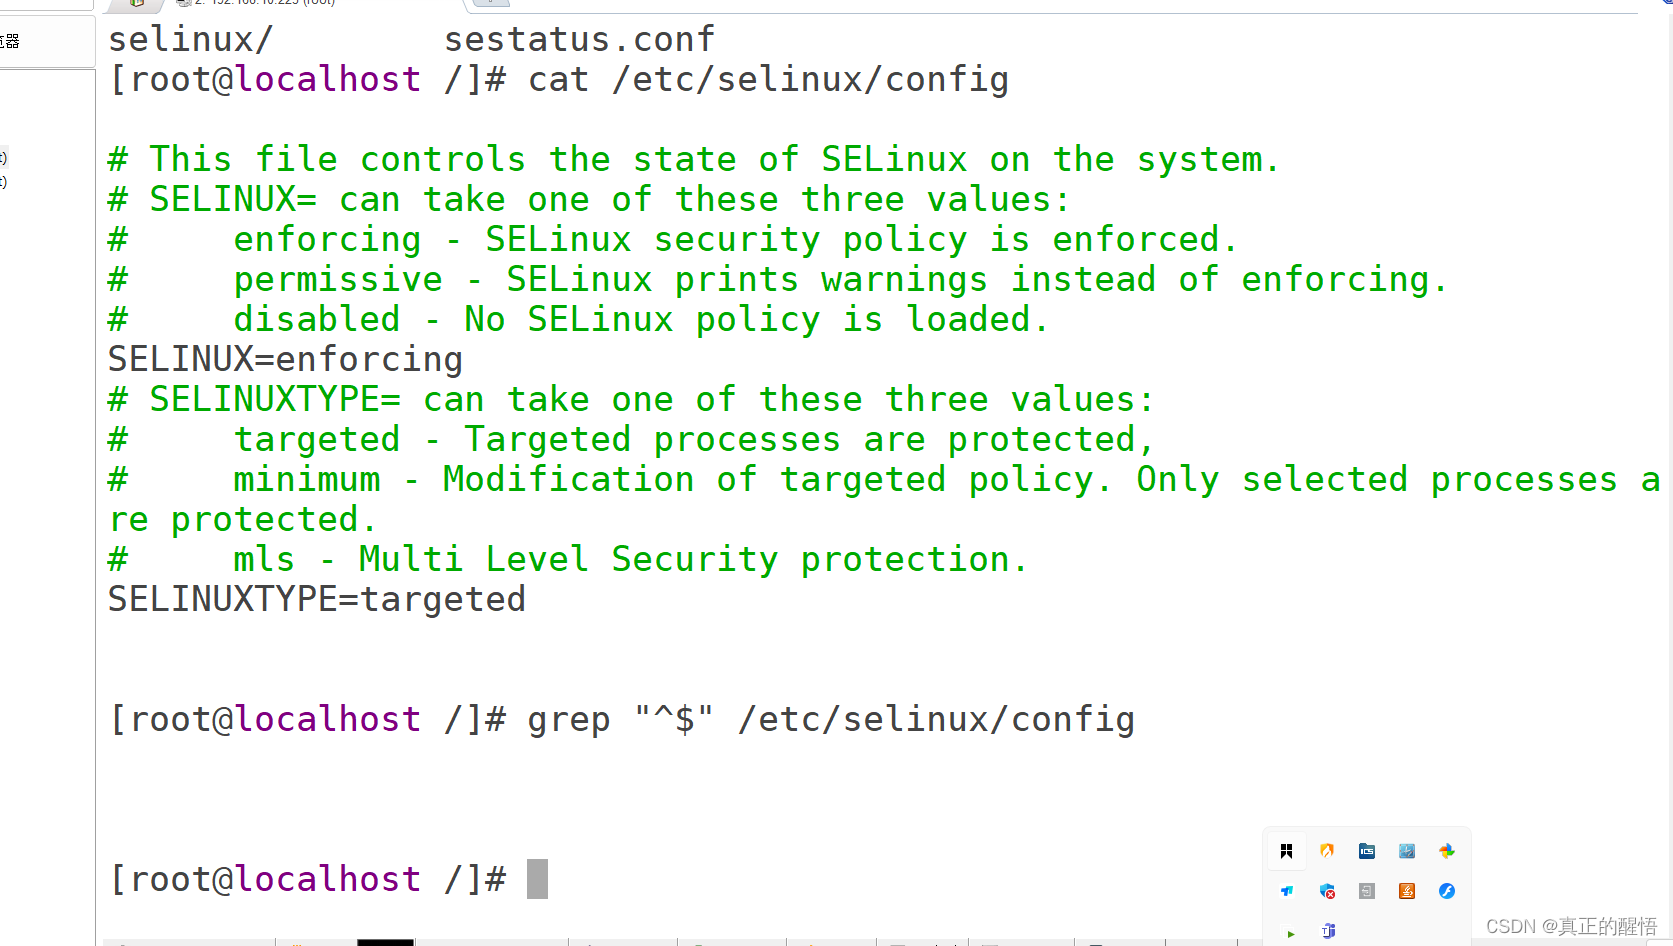
13 切换盘符的命令 cd / . ..
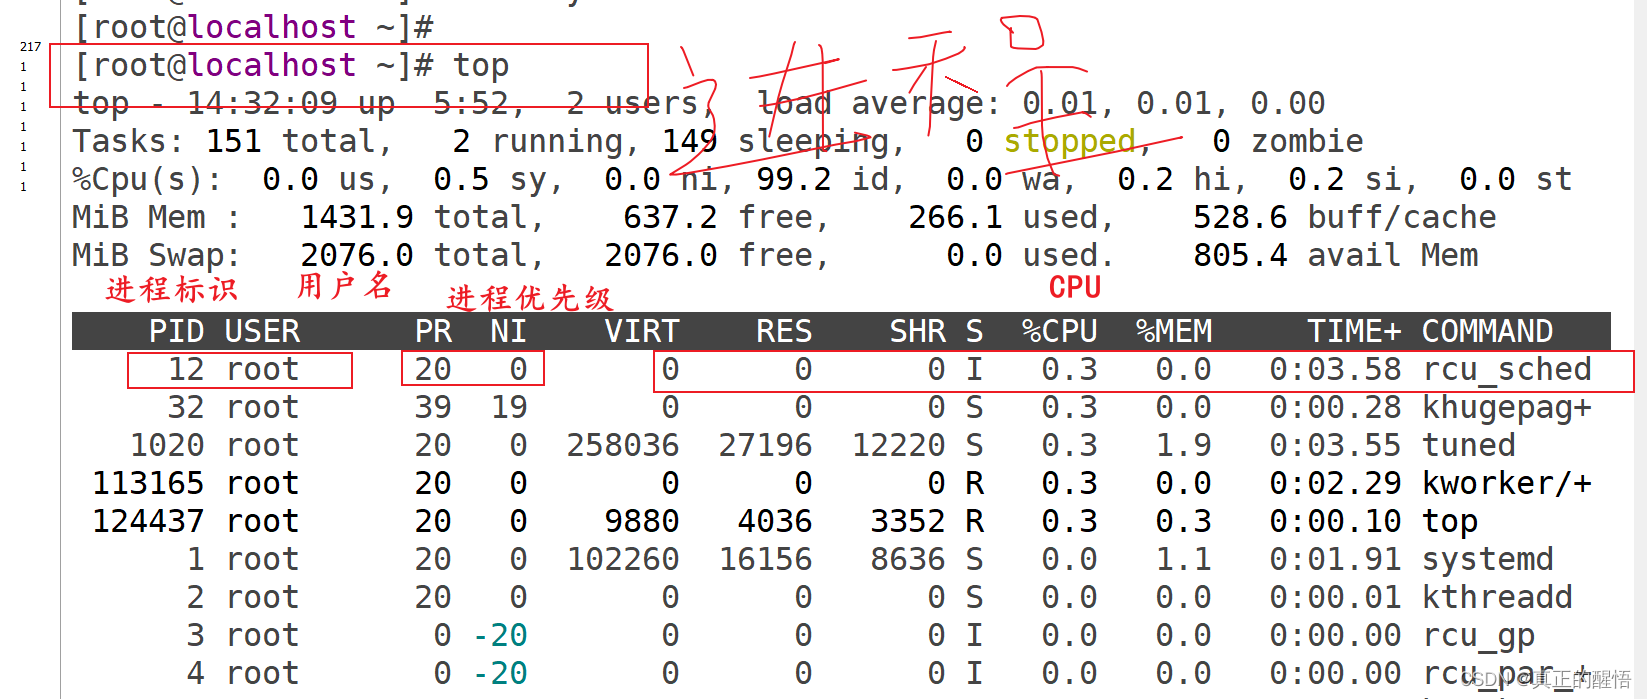
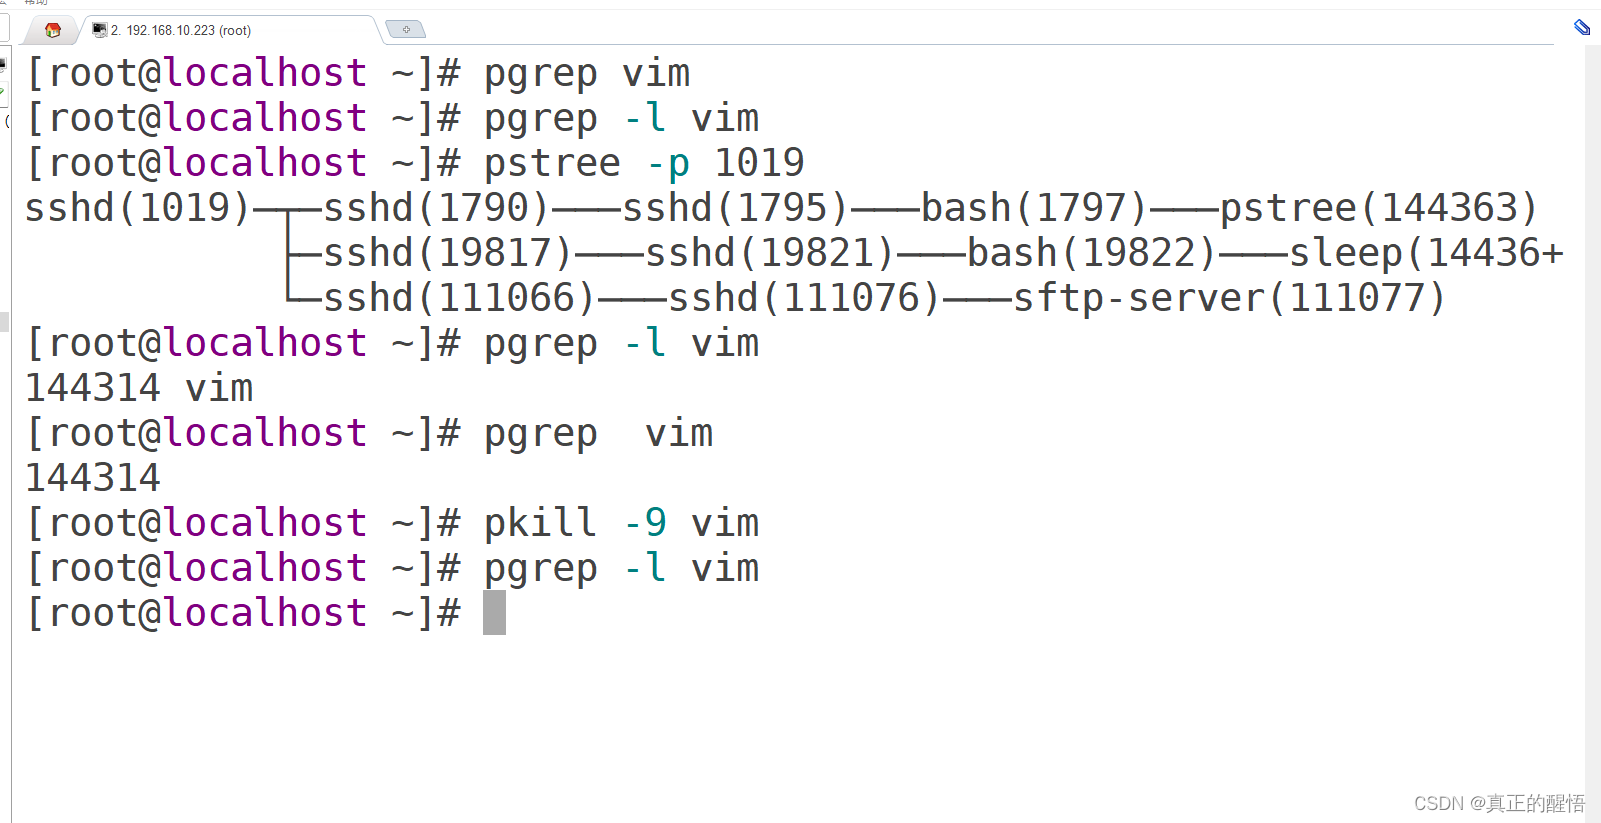
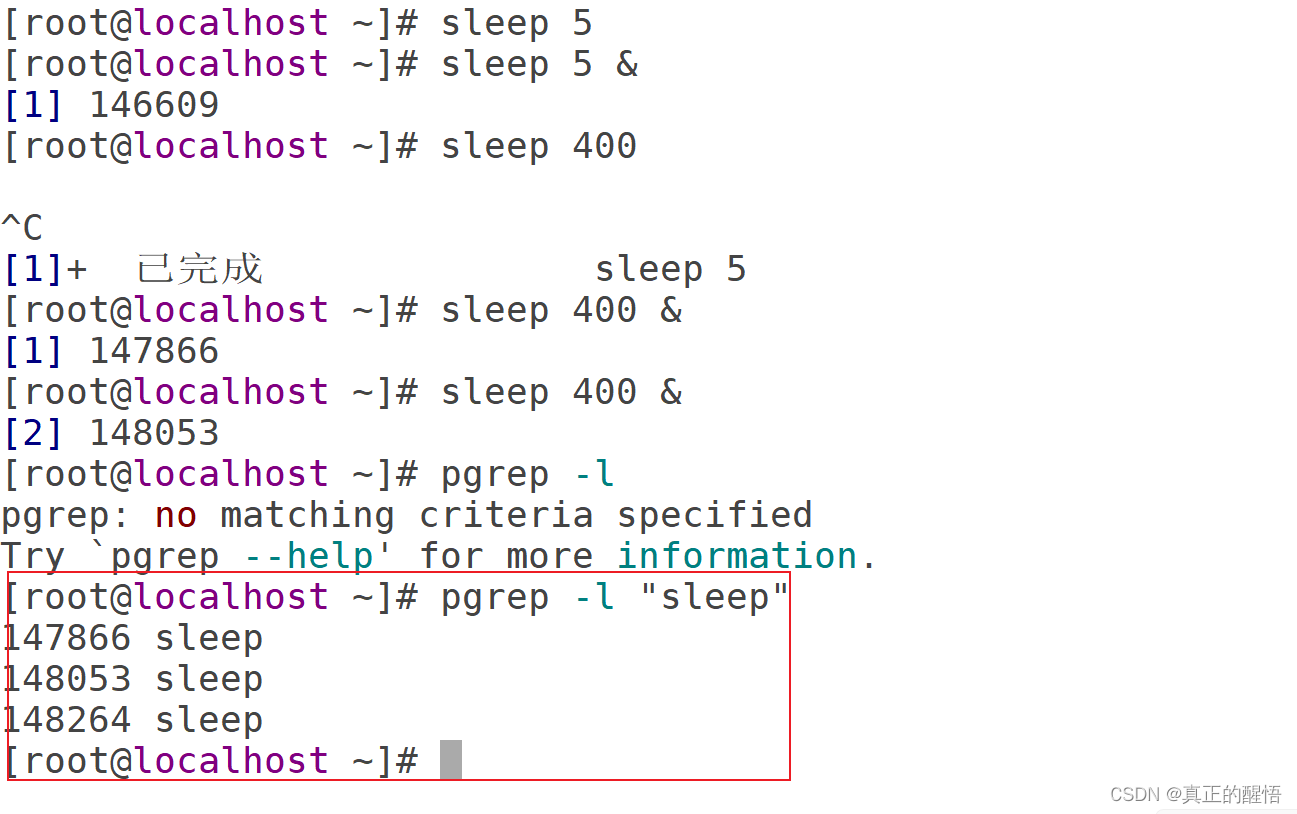
[root@localhost ~]# cd /lib
[root@localhost lib]# cd /srv
[root@localhost srv]# cd /etc
[root@localhost etc]# ls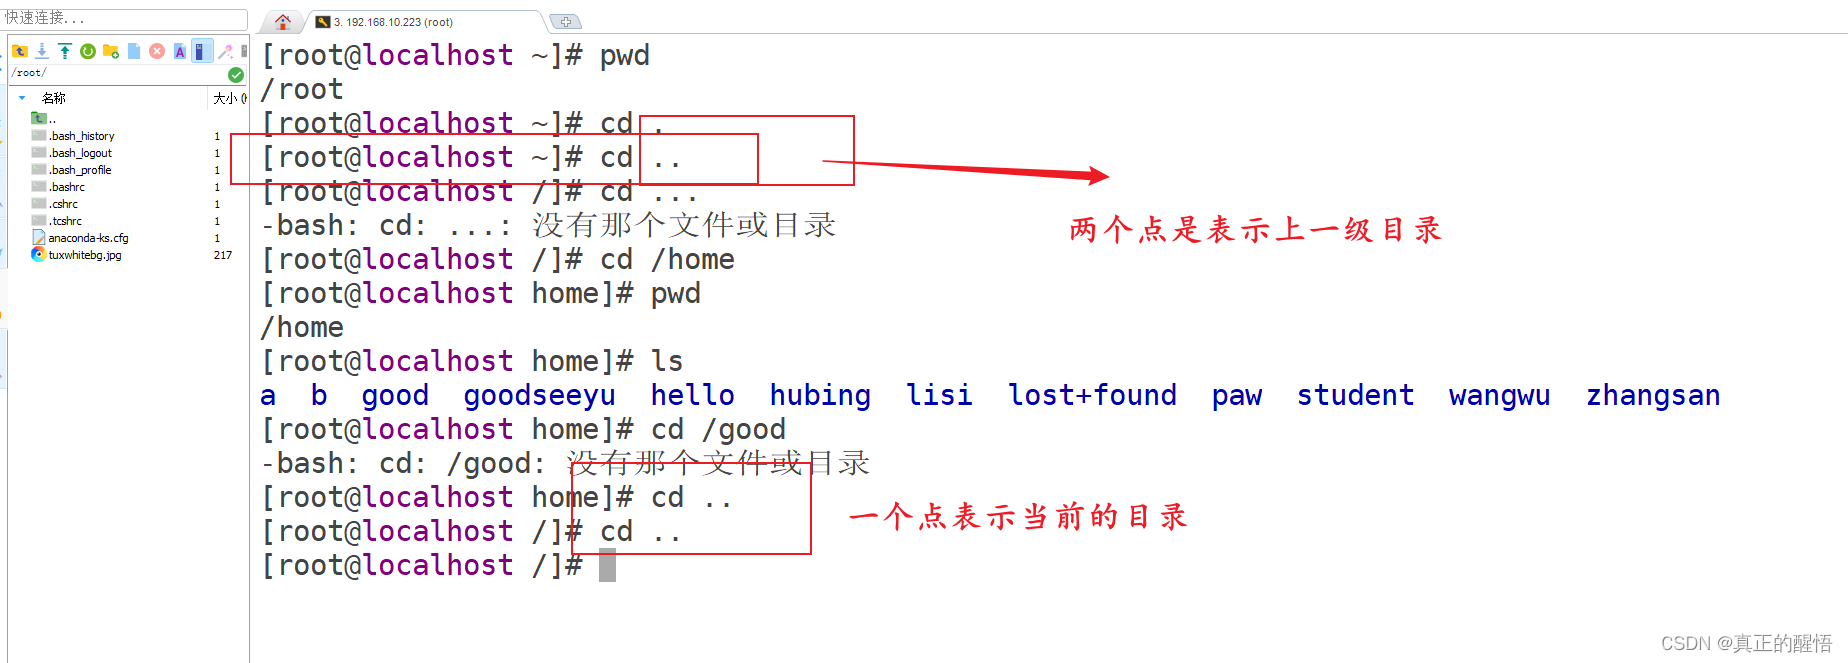
14 绝对路径 相对路径
在 Linux 中,路径是指向文件或目录的位置。路径可以使用绝对路径或相对路径来表示。
绝对路径
绝对路径是指从根目录开始的完整路径。根目录是 Linux 文件系统的顶层目录,通常用 “/” 表示。在绝对路径中,路径名中的每一个目录都用斜杠 “/” 分隔开来。
例如,要访问 /home/user1/testfile 这个文件,其绝对路径就是 /home/user1/testfile。
相对路径
相对路径是相对于当前工作目录的路径。当前工作目录是命令行 shell 所在的目录。在相对路径中,路径名中的每一个目录都用斜杠 “/” 分隔开来。
例如,如果当前工作目录是 /home/user1,且要访问 testfile,可以使用相对路径 ./testfile 或者 testfile。
15 文件文档的管理
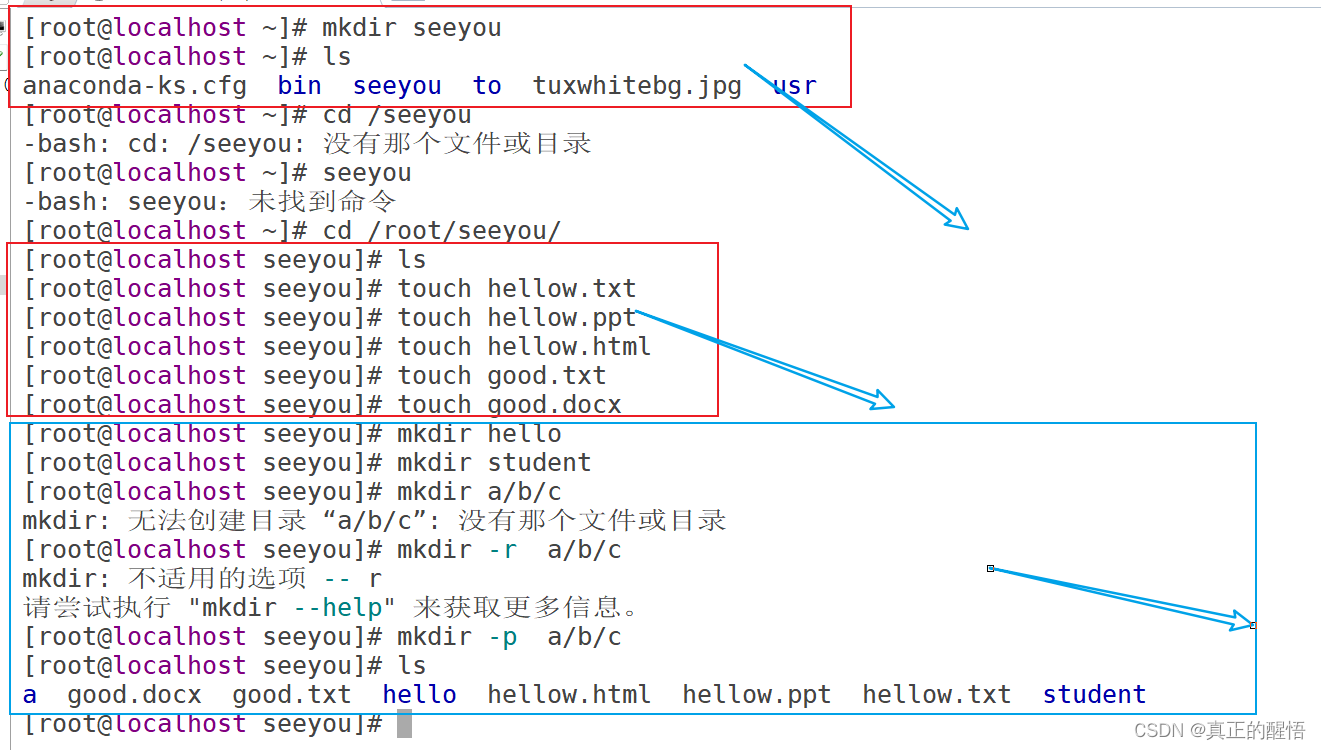
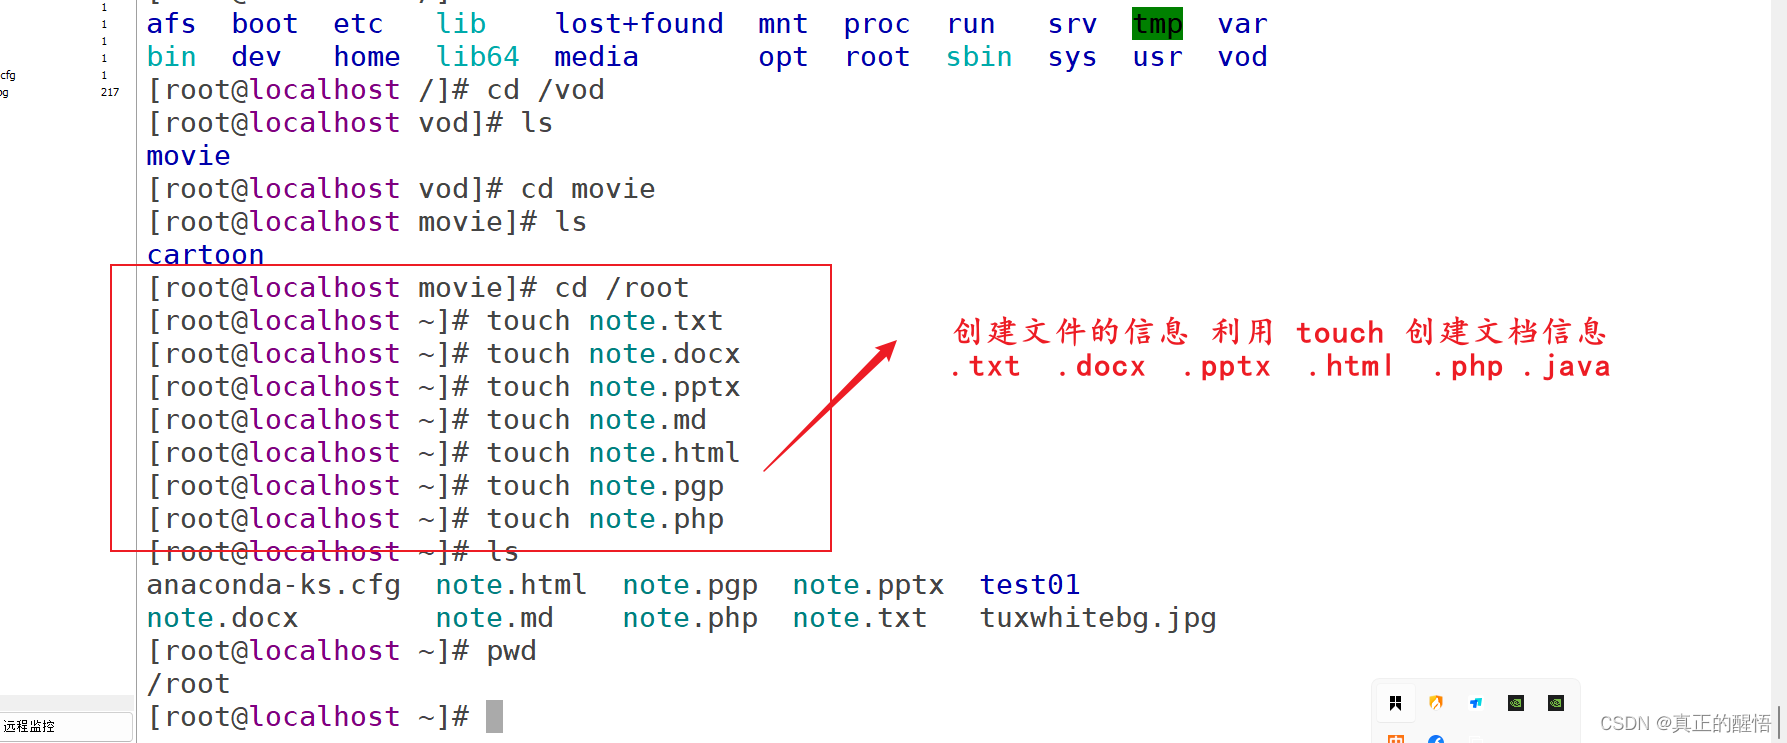
16 touch:创建文件名
[root@localhost ~]# cd /root/seeyou/
[root@localhost seeyou]# ls
[root@localhost seeyou]# touch hellow.txt
[root@localhost seeyou]# touch hellow.ppt
[root@localhost seeyou]# touch hellow.html
[root@localhost seeyou]# touch good.txt
[root@localhost seeyou]# touch good.docx
17 mkdir:创建文件目录
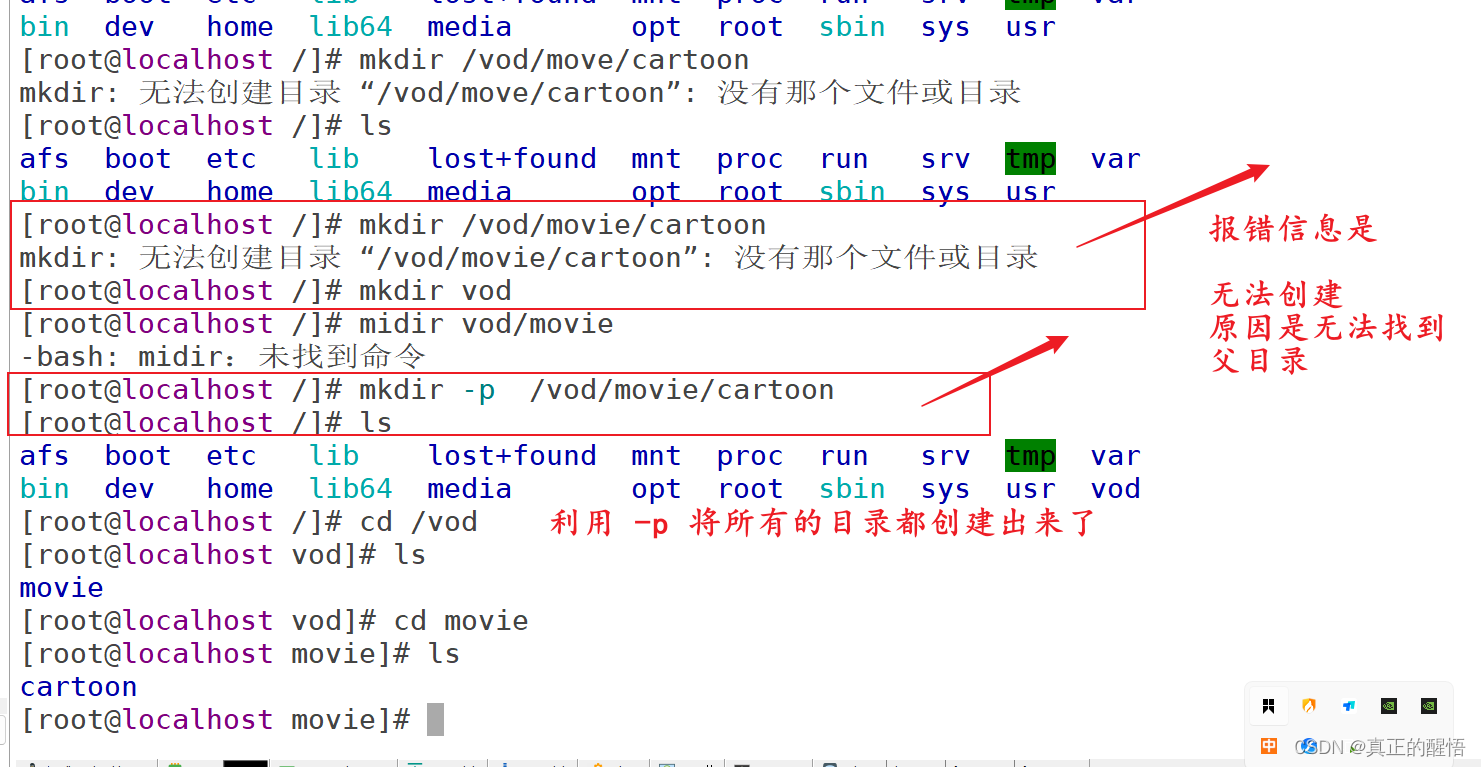
[root@localhost seeyou]# mkdir hello
[root@localhost seeyou]# mkdir student
[root@localhost seeyou]# mkdir a/b/c
mkdir: 无法创建目录 “a/b/c”: 没有那个文件或目录
[root@localhost seeyou]# mkdir -r  a/b/c
mkdir: 不适用的选项 -- r
请尝试执行 "mkdir --help" 来获取更多信息。
[root@localhost seeyou]# mkdir -p  a/b/c
[root@localhost seeyou]# ls
a  good.docx  good.txt  hello  hellow.html  hellow.ppt  hellow.txt  student
[root@localhost seeyou]#
18 多级目录创建 mkdir -p 目录

19 复制目录 cp 原文件 目标 文件
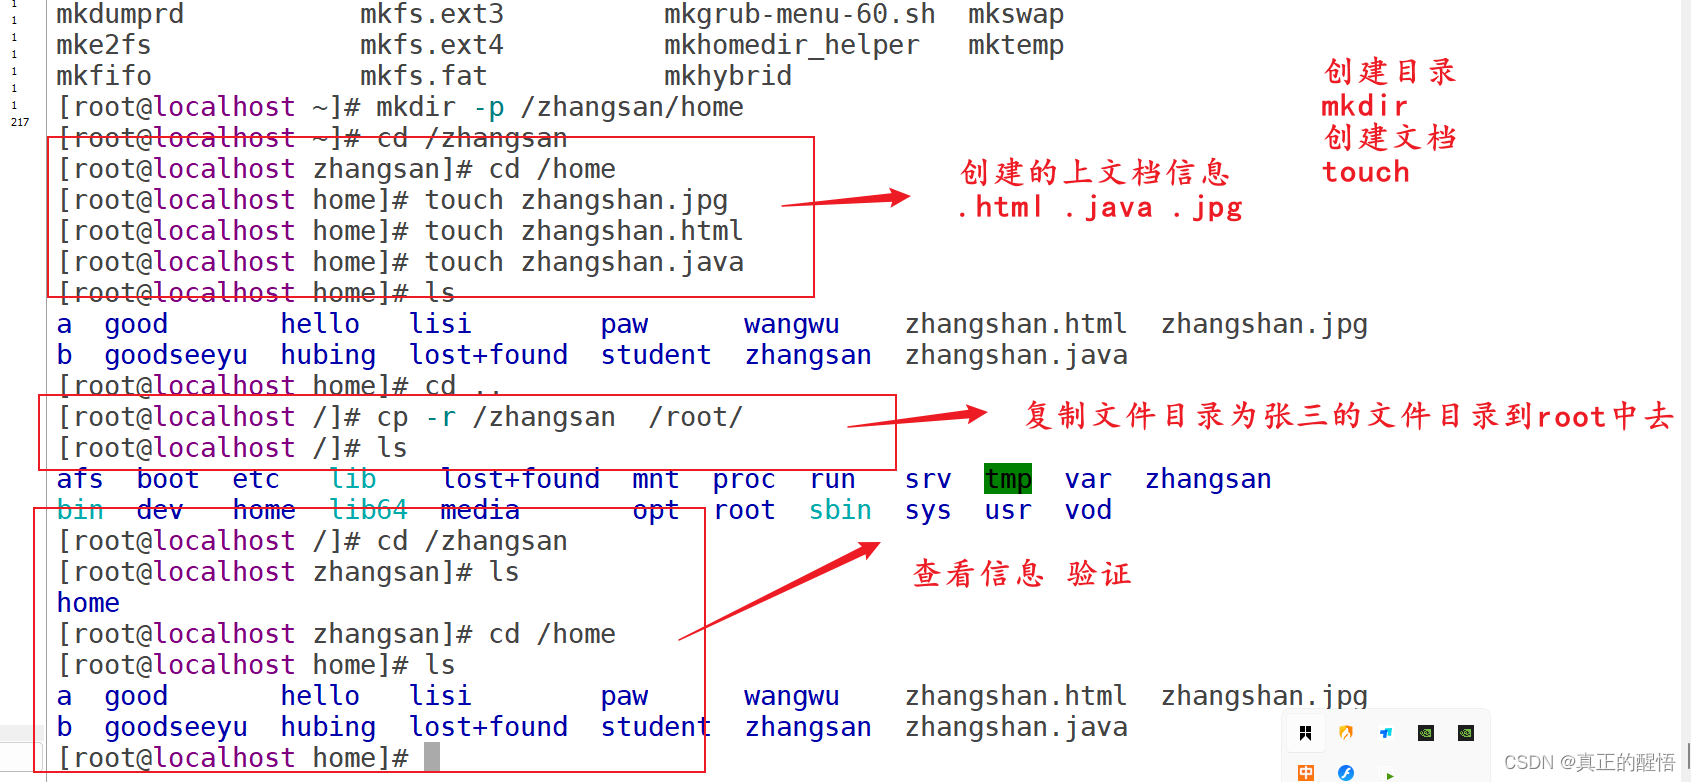
20 复制目录 cp -r 原目录 目标目录
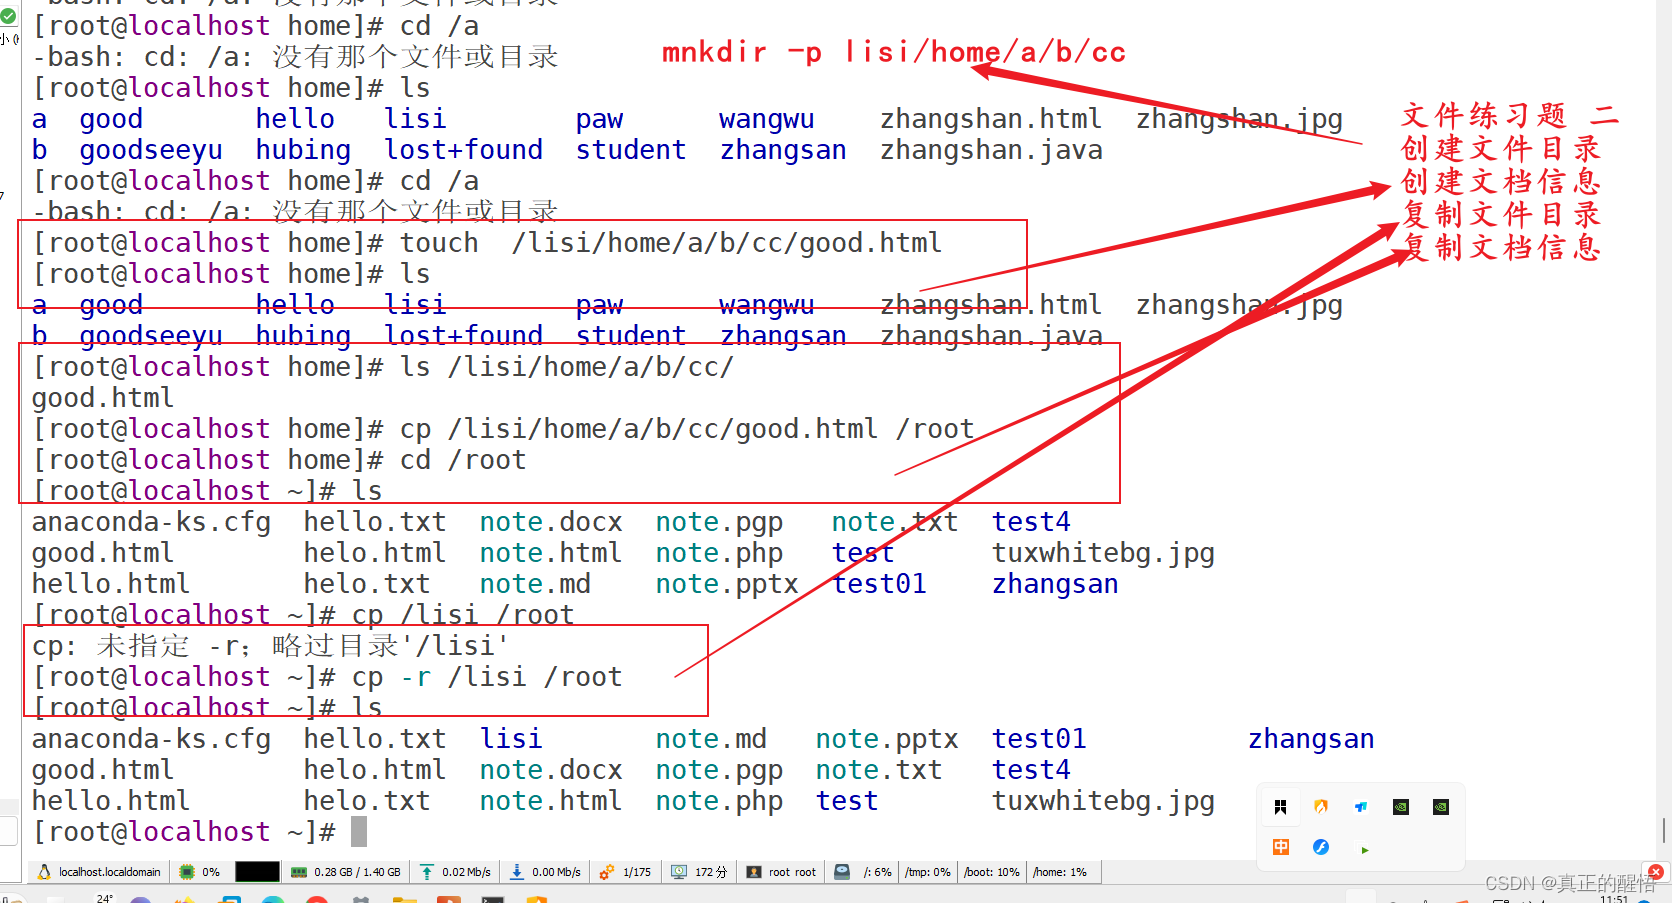
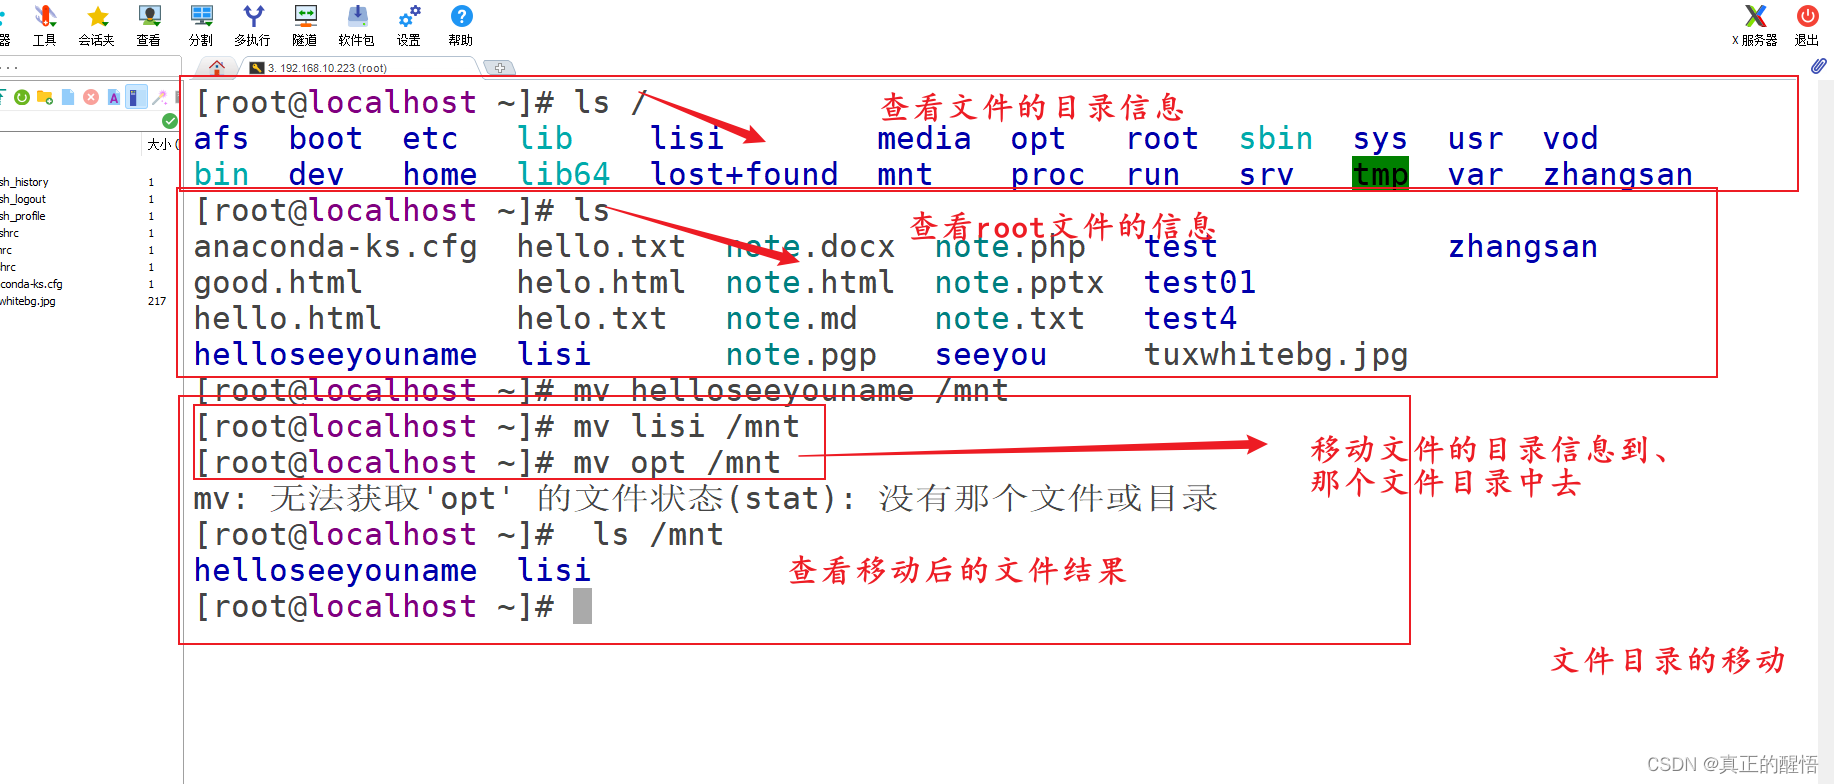
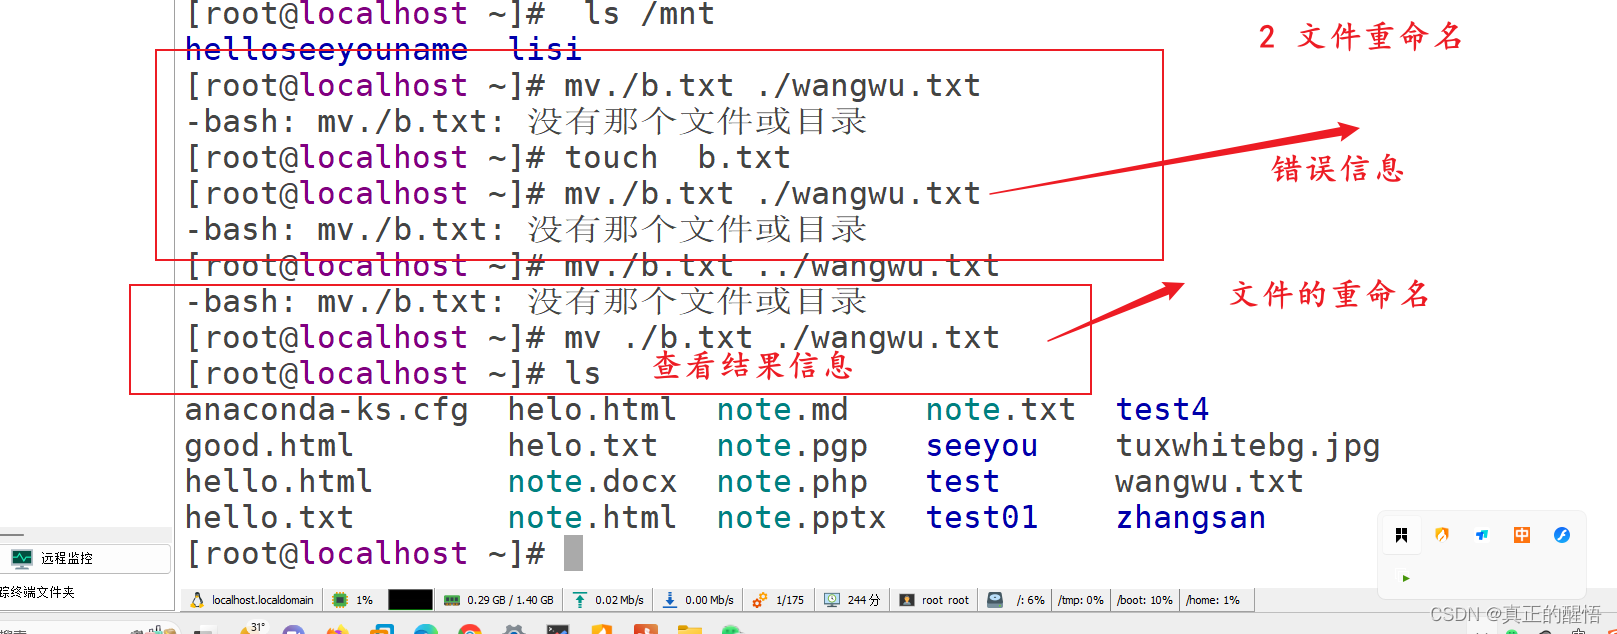
21 移动文档 mv 原文档 目标文档
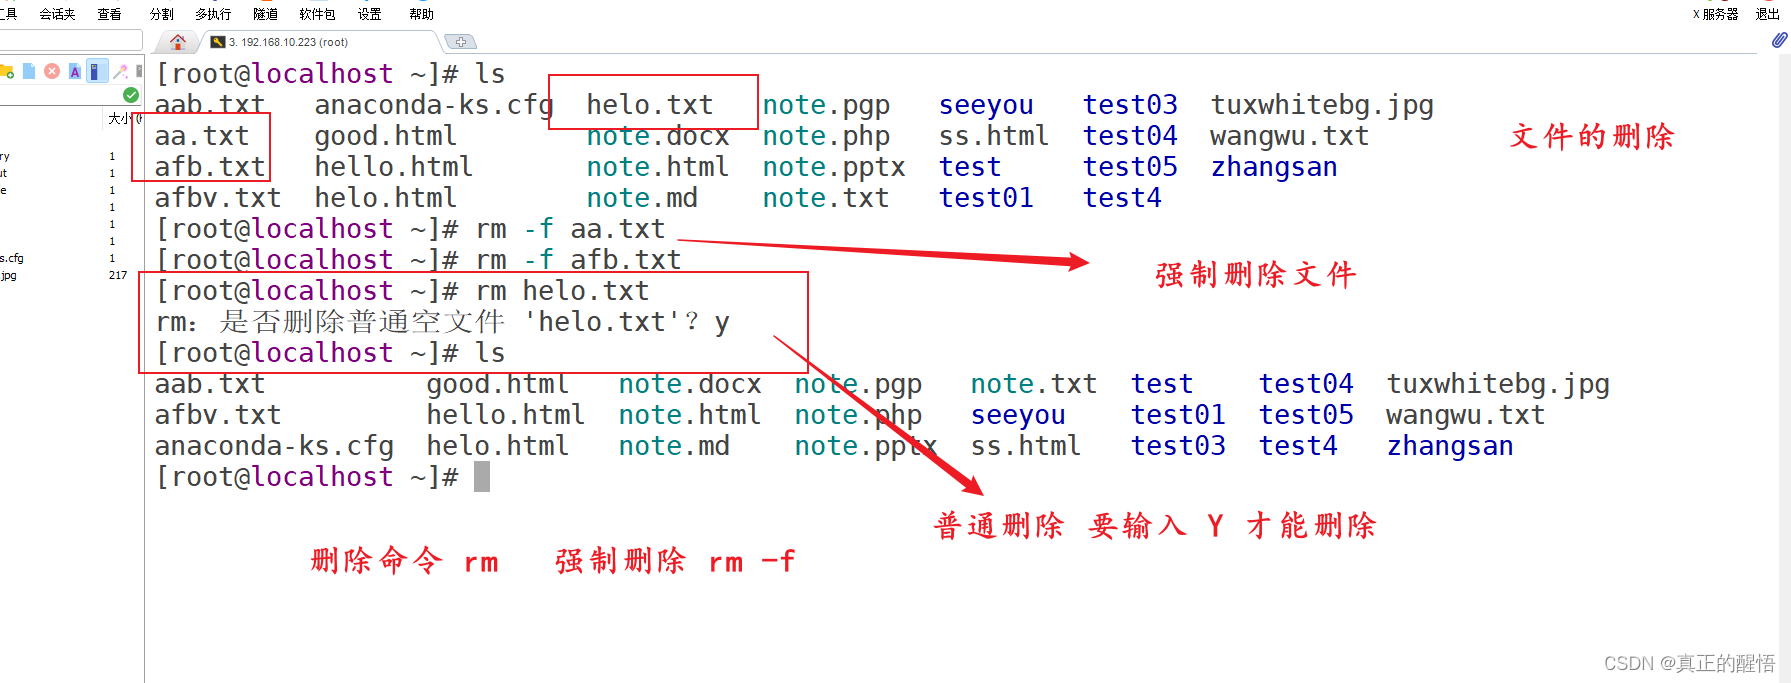
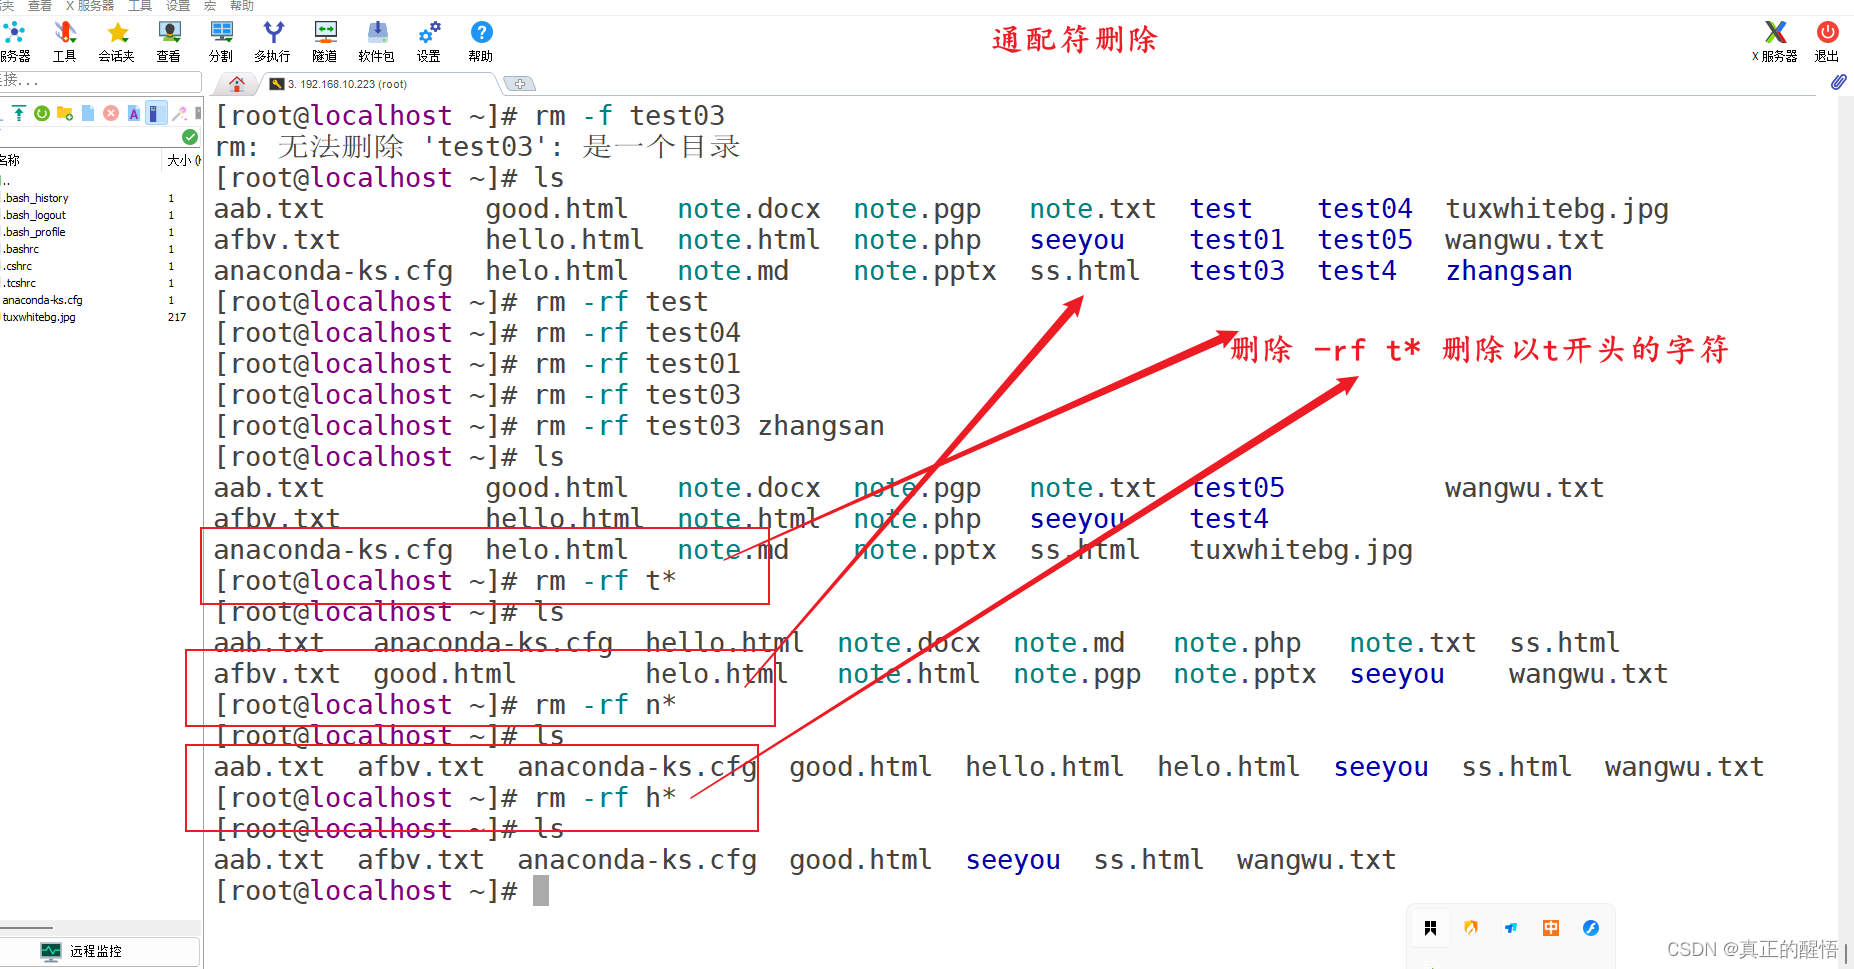
22 删除文档命令 rm -f 目标文档
23 删除文件目录命令 rm -rf 目标目录
24 综合练习

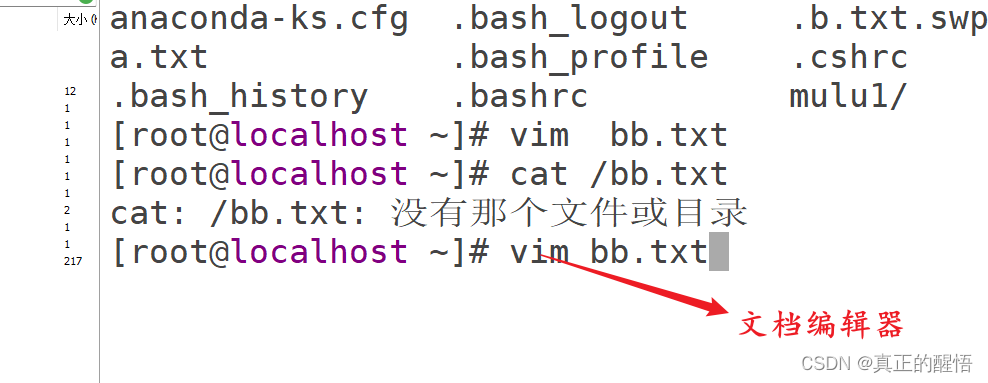
25 文档编辑器 Vim 基础操作
Vim:一个高度可定制的文本编辑器,可以通过命令模式和插入模式进行编辑。
Emacs:一个类Unix操作系统上非常强大的文本编辑器,它使用LISP编程语言作为扩展语言。
Nano:一个简单易用的文本编辑器,适用于新手。
Gedit:一个GNOME桌面环境下的文本编辑器,提供基本的编辑功能。
Atom:一个由GitHub开发的跨平台文本编辑器,支持多种编程语言。
Sublime Text:一个流行的跨平台文本编辑器,具有快速、轻便和高度可定制的特点。
Visual Studio Code:一个由微软开发的跨平台文本编辑器,支持多种编程语言和集成开发环境。
26 认识Vim编辑器的操作
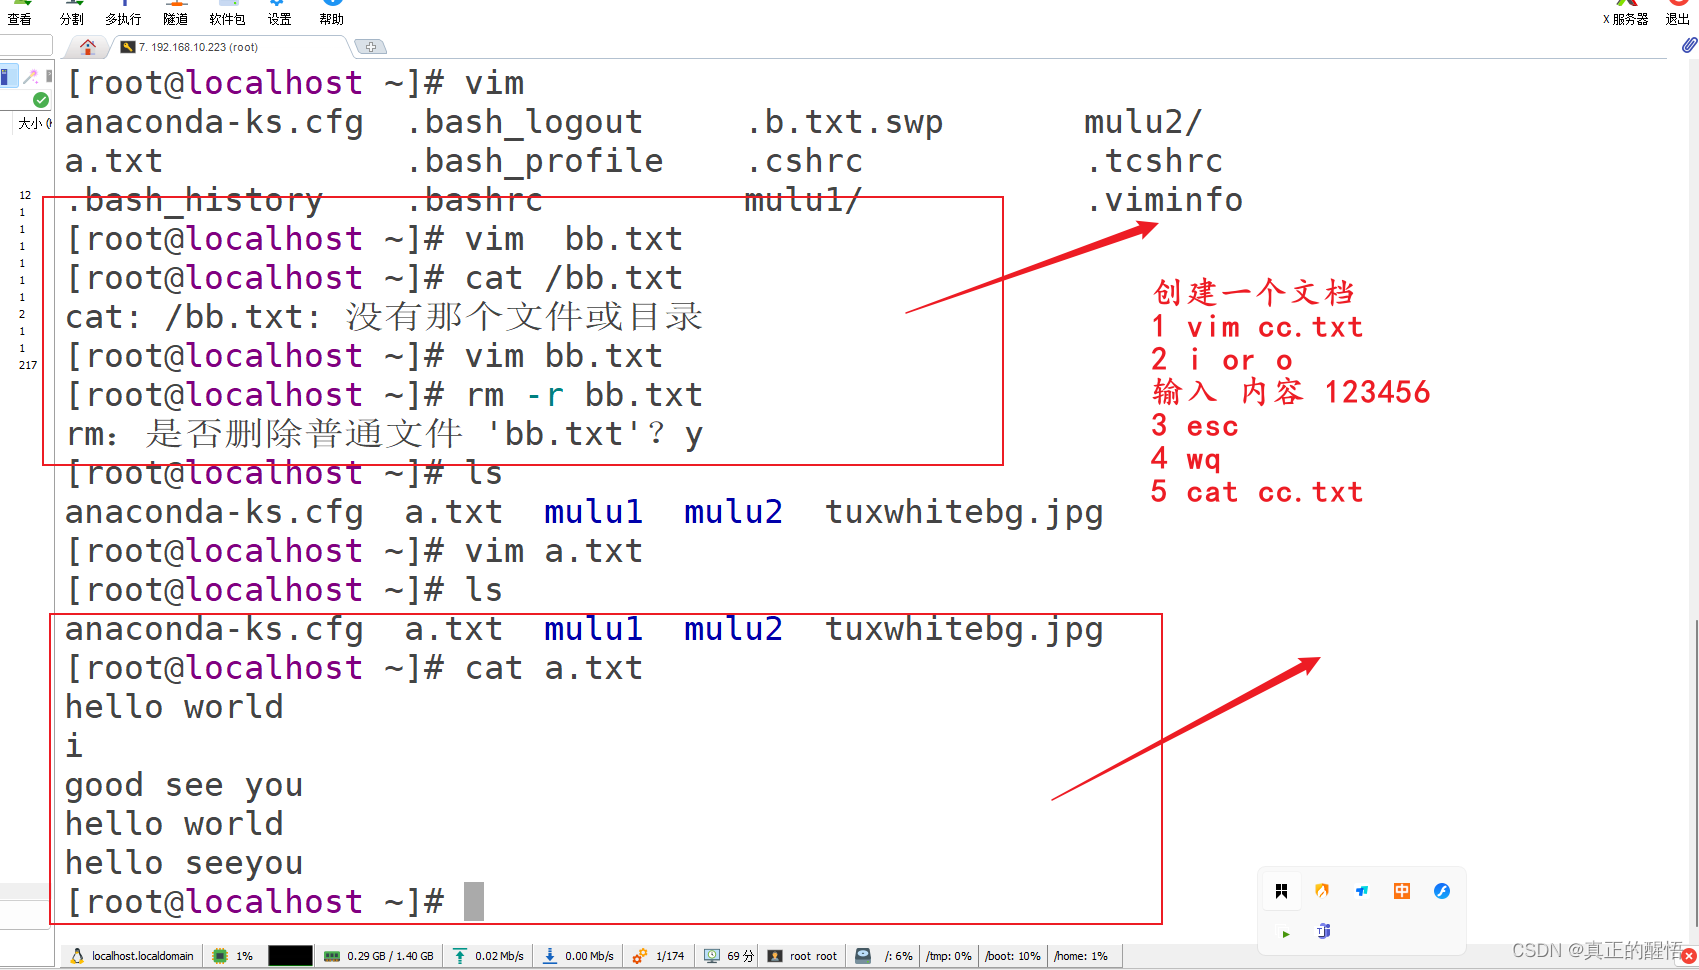
启动vim编辑器
在终端中输入
vim命令即可启动vim编辑器。创建或打开文件
可以在vim命令后面直接跟上文件名,如
vim file.txt,如果文件存在则会打开,如果文件不存在则会创建该文件并打开。命令模式和插入模式
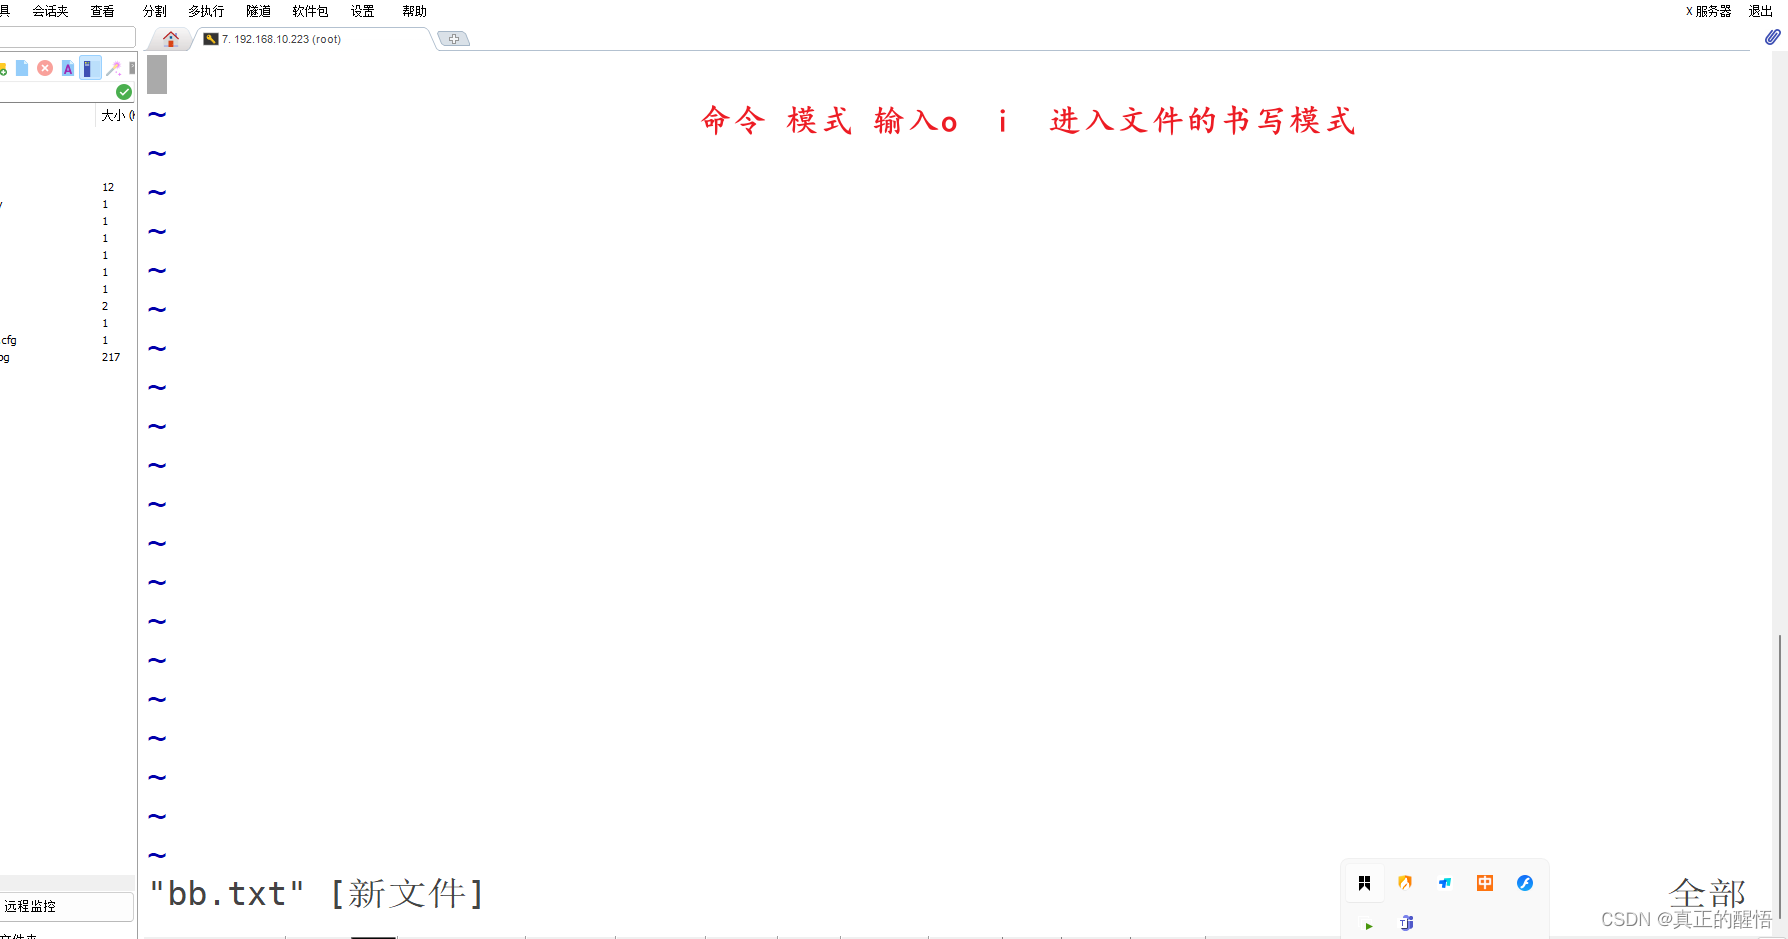
vim编辑器有两种模式:命令模式和插入模式。
命令模式用于移动光标、复制、粘贴等操作。在命令模式下按下
i键即可进入插入模式,此时可以开始编辑文件。要返回到命令模式,可以按下ESC键。保存和退出
在命令模式下,按下
:w可以保存文件,:q可以退出编辑器。如果文件已被修改,需要先保存后退出,则可以使用:wq命令。光标移动
在命令模式下,可以使用以下键盘控制光标移动:
h:光标左移一格
j:光标下移一格
k:光标上移一格
l:光标右移一格
0:光标移到行首
$:光标移到行末
G:光标移到文件末尾
gg:光标移到文件开头复制和粘贴
在命令模式下,使用以下命令进行复制和粘贴:
yy:复制当前行
p:粘贴复制的内容
撤销和重做
在命令模式下,可以使用以下命令进行撤销和重做操作:
u:撤销上一次操作
CTRL + r:重做上一次操作
27 vim实操
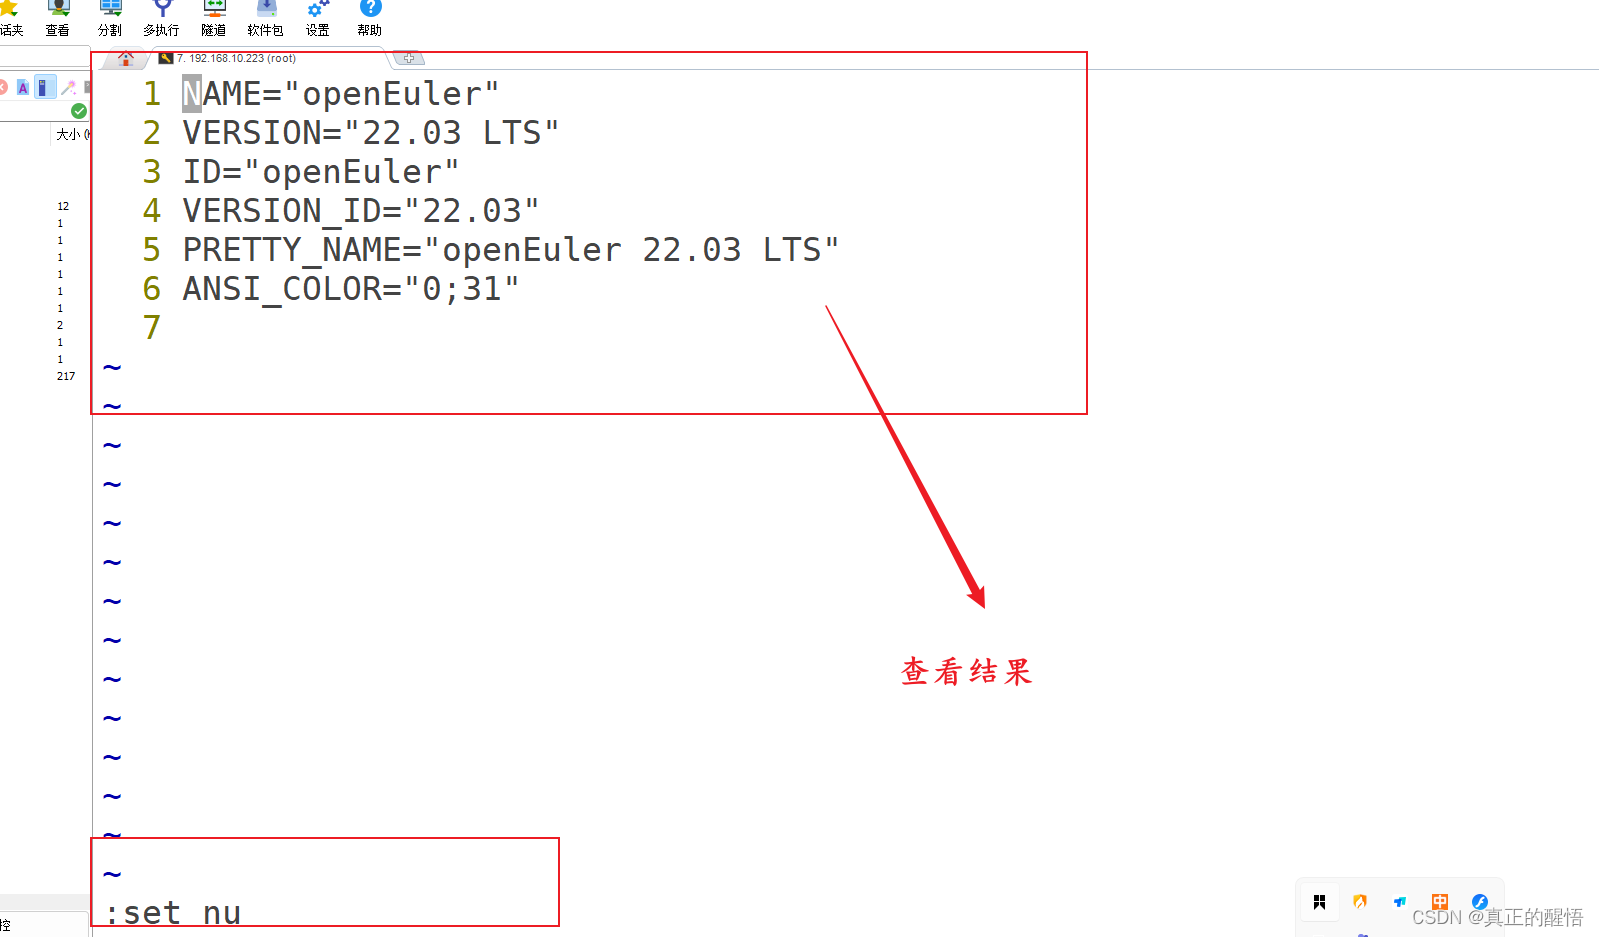
28 用户的管理 增删改查
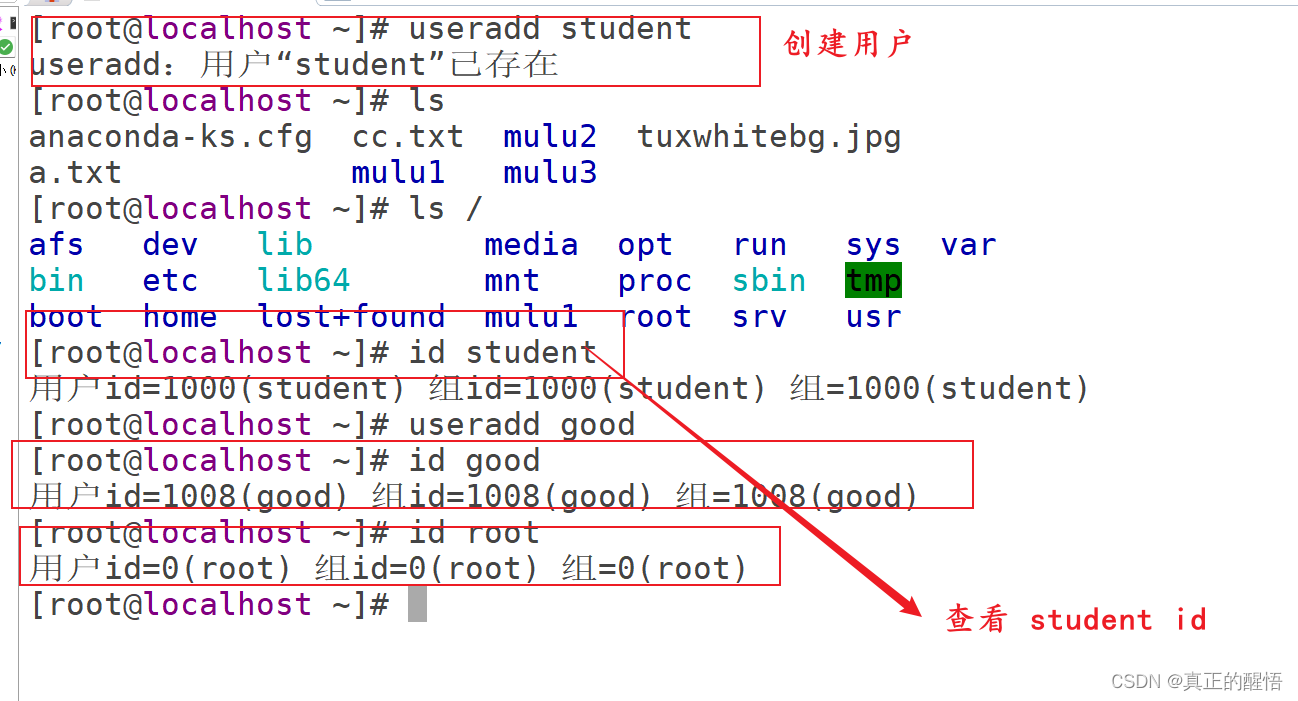
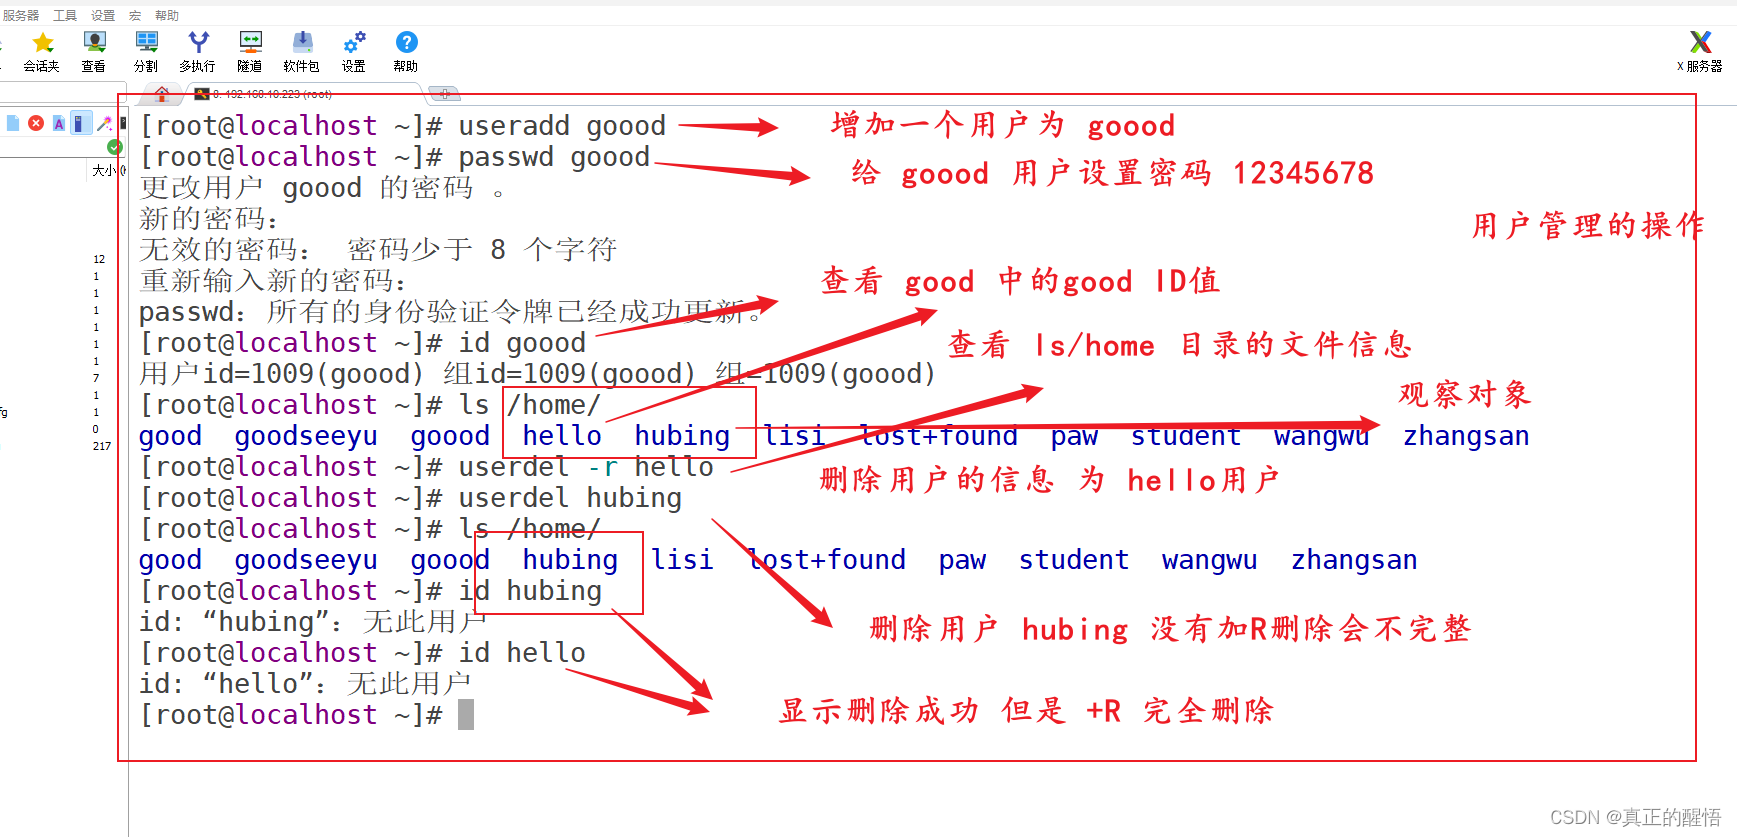


[root@localhost ~]# vim /var/www/html/t1.php
[root@localhost ~]# useradd hellow
[root@localhost ~]# passwd hellow
更改用户 hellow 的密码 。
新的密码:
无效的密码: 密码少于 8 个字符
重新输入新的密码:
passwd:所有的身份验证令牌已经成功更新。
[root@localhost ~]# id hellow
用户id=1008(hellow) 组id=1008(hellow) 组=1008(hellow)
[root@localhost ~]# passwd hellow
更改用户 hellow 的密码 。
新的密码:
无效的密码: 密码少于 8 个字符
重新输入新的密码:
passwd:所有的身份验证令牌已经成功更新。
[root@localhost ~]# id hellow
用户id=1008(hellow) 组id=1008(hellow) 组=1008(hellow)
[root@localhost ~]# ls /home/
goodseeyu hello hellow hubing lisi lost+found paw student wangwu zhangsan
[root@localhost ~]# userdel -r lisi
[root@localhost ~]# ls /home/
goodseeyu hello hellow hubing lost+found paw student wangwu zhangsan
29 用户组的管理 增删改查

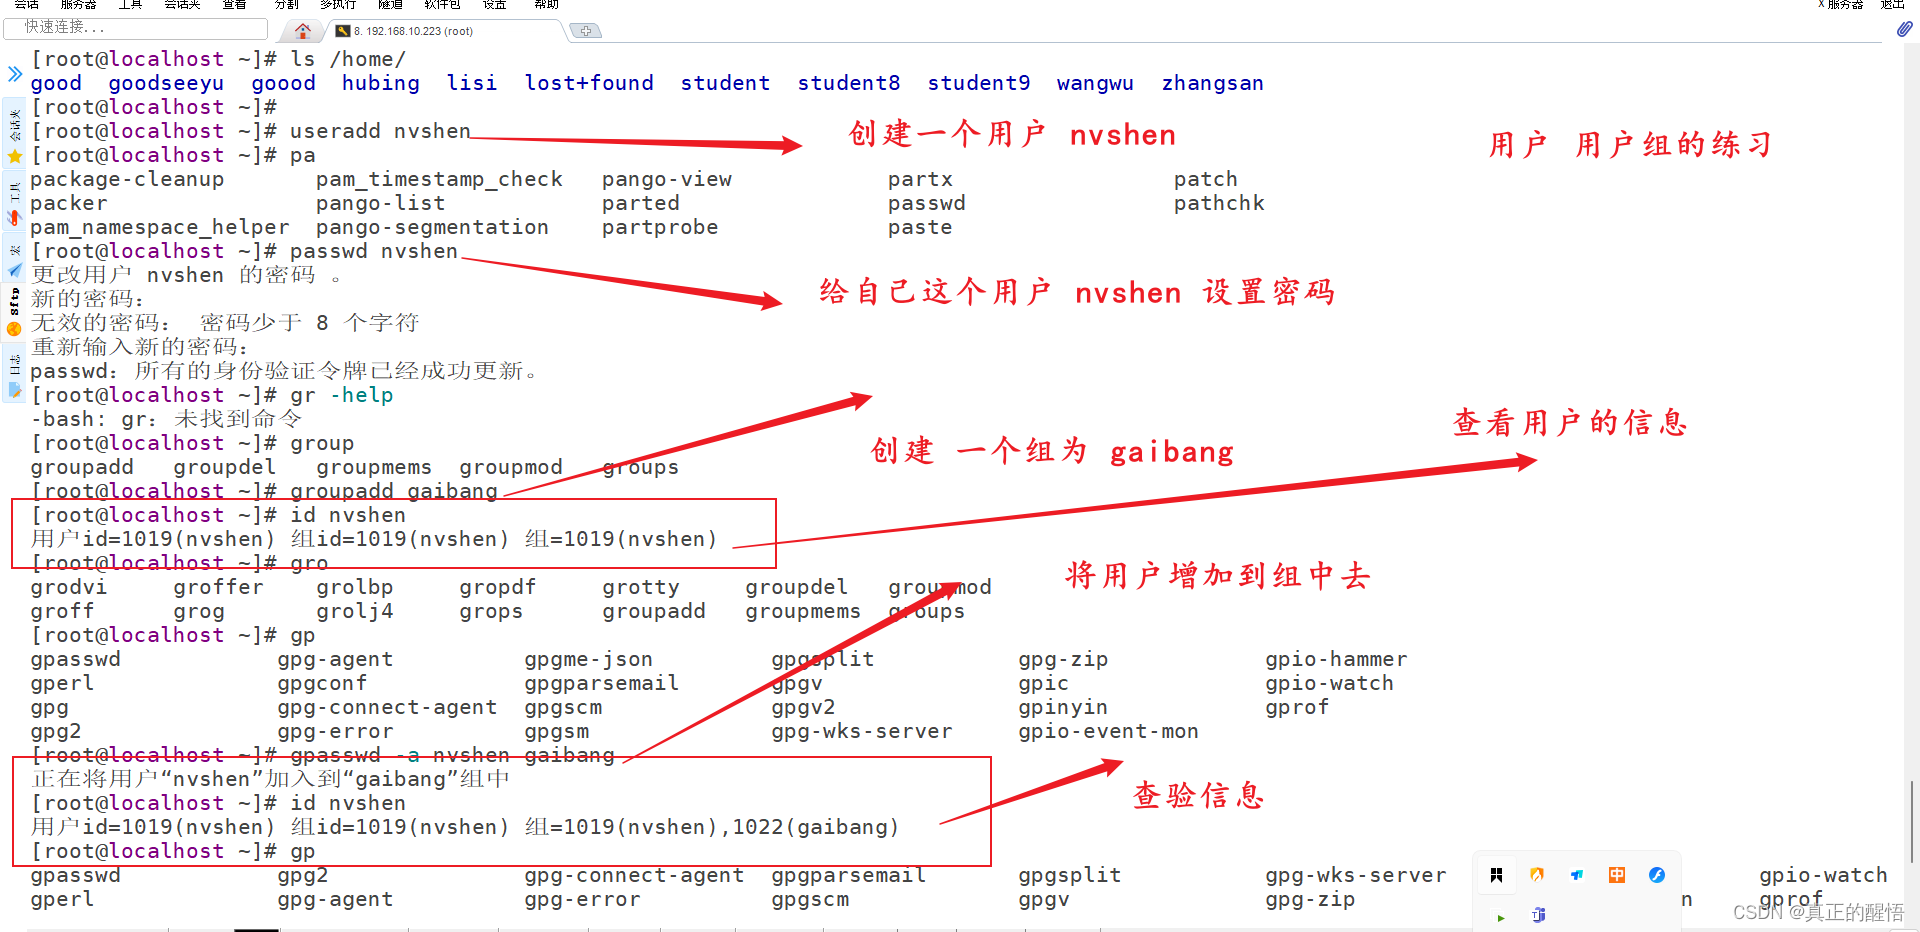
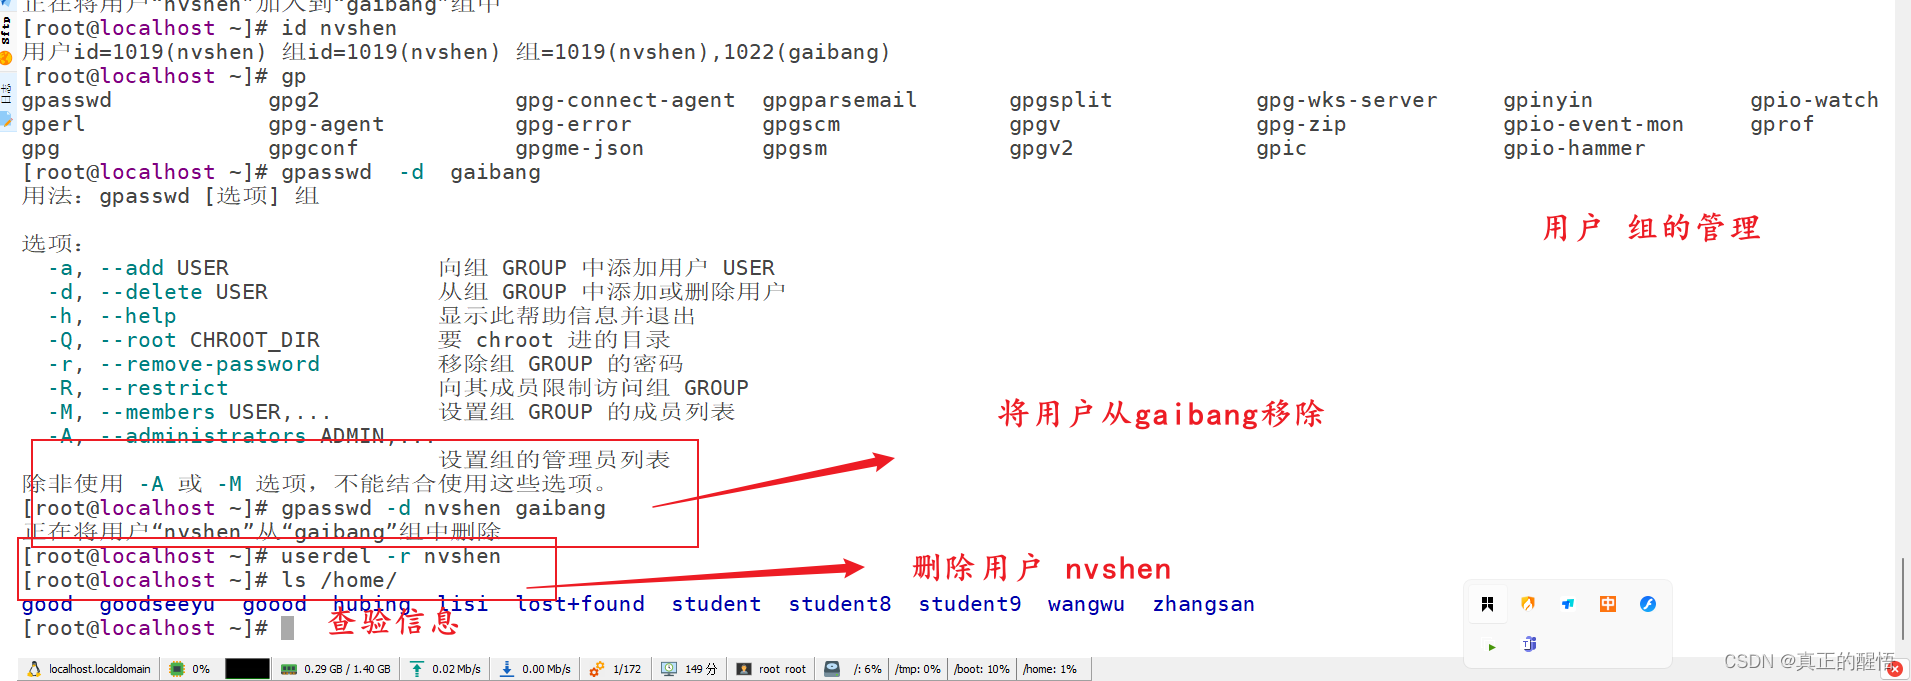

[root@localhost ~]# id hellow
用户id=1008(hellow) 组id=1008(hellow) 组=1008(hellow)
[root@localhost ~]# ls /home/
goodseeyu hello hellow hubing lisi lost+found paw student wangwu zhangsan
[root@localhost ~]# userdel -r lisi
[root@localhost ~]# ls /home/
goodseeyu hello hellow hubing lost+found paw student wangwu zhangsan
[root@localhost ~]# gro
grodvi groffer grolbp gropdf grotty groupdel groupmod
groff grog grolj4 grops groupadd groupmems groups
[root@localhost ~]# group hello
-bash: group:未找到命令
[root@localhost ~]# grou
[root@localhost ~]# gro
grodvi groffer grolbp gropdf grotty groupdel groupmod
groff grog grolj4 grops groupadd groupmems groups
[root@localhost ~]# groupadd hello
groupadd:“hello”组已存在
[root@localhost ~]# groupadd good
[root@localhost ~]# groupadd see
[root@localhost ~]# ls /
afs boot etc lib lost+found mnt proc root sbin sys usr
bin dev home lib64 media opt repos run srv tmp var
[root@localhost ~]# ls /home/
goodseeyu hello hellow hubing lost+found paw student wangwu zhangsan
[root@localhost ~]# id hello
用户id=1001(hello) 组id=1001(hello) 组=1001(hello)
[root@localhost ~]# gpasswd -a hubing see
正在将用户“hubing”加入到“see”组中
[root@localhost ~]# id hubing
用户id=1002(hubing) 组id=1002(hubing) 组=1002(hubing),1010(see)
30 切换用户
[root@localhost ~]# su - hubing


Welcome to 5.10.0-60.18.0.50.oe2203.x86_64

System information as of time:  2023年 10月 14日 星期六 11:45:39 CST

System load:    0.16
Processes:      169
Memory used:    24.4%
Swap used:      0%
Usage On:       6%
IP address:     192.168.10.223
IP address:     192.168.122.1
Users online:   1
To run a command as administrator(user "root"),use "sudo <command>".
[hubing@localhost ~]$
31 退出 exit
[hubing@localhost ~]$ exit
注销
[root@localhost ~]#
文档的属主 属组 其他权限的操作 读 写 可控制权限操作
32 认识文档权限
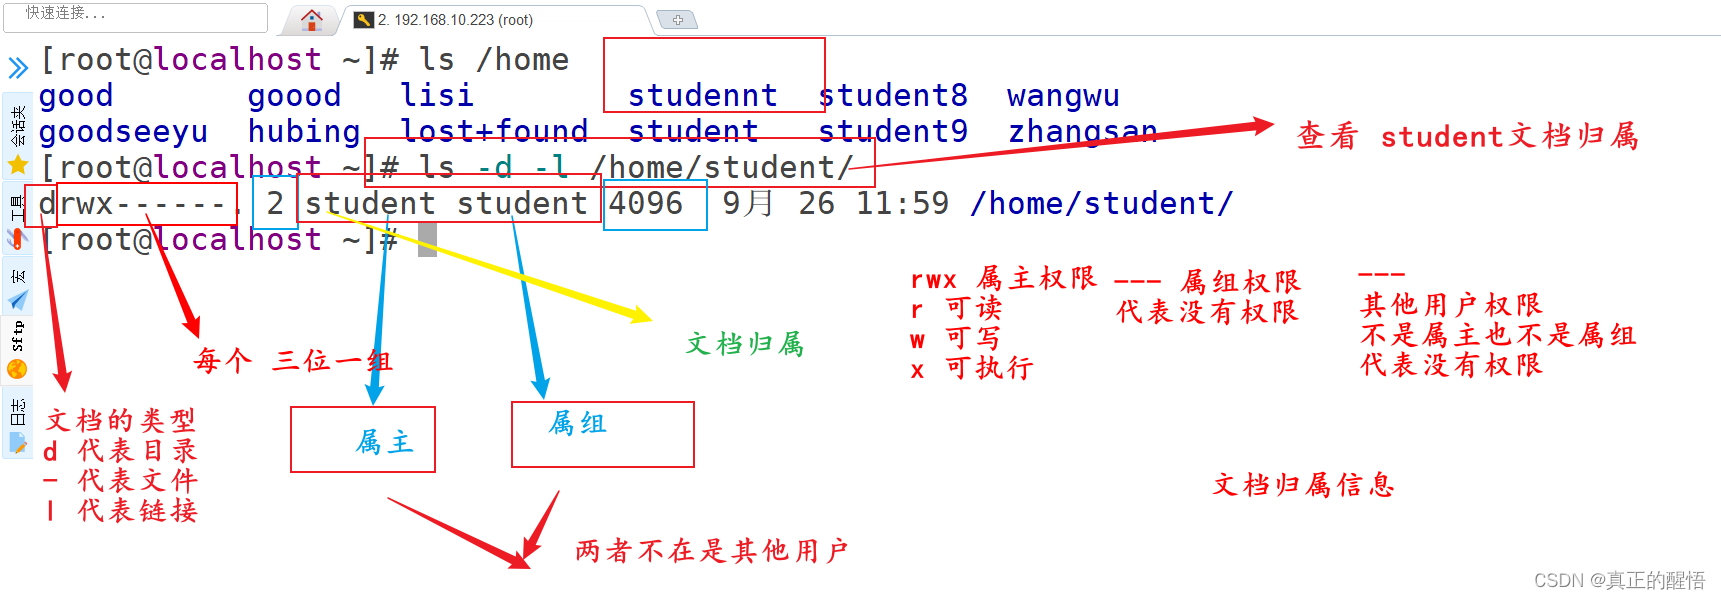


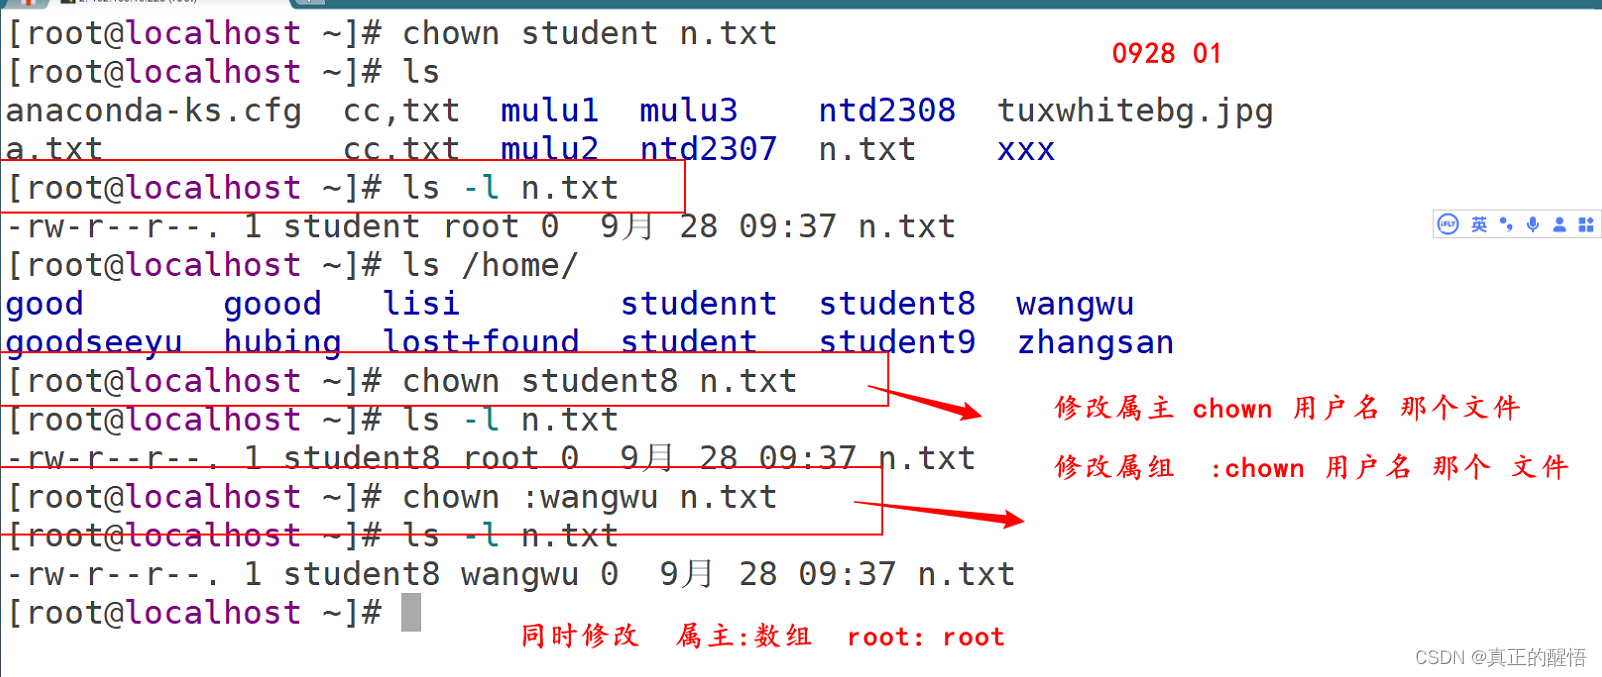
33 对文档的属主 属组 其他权限操作 chown
33.1 chown 用户
33.2 chown :用户名
33.3 chown 用户名:用户组名 文档名
34 文档 可读 可写 可控制
U:user O:other G:grounp R:read W:writer X:exictue
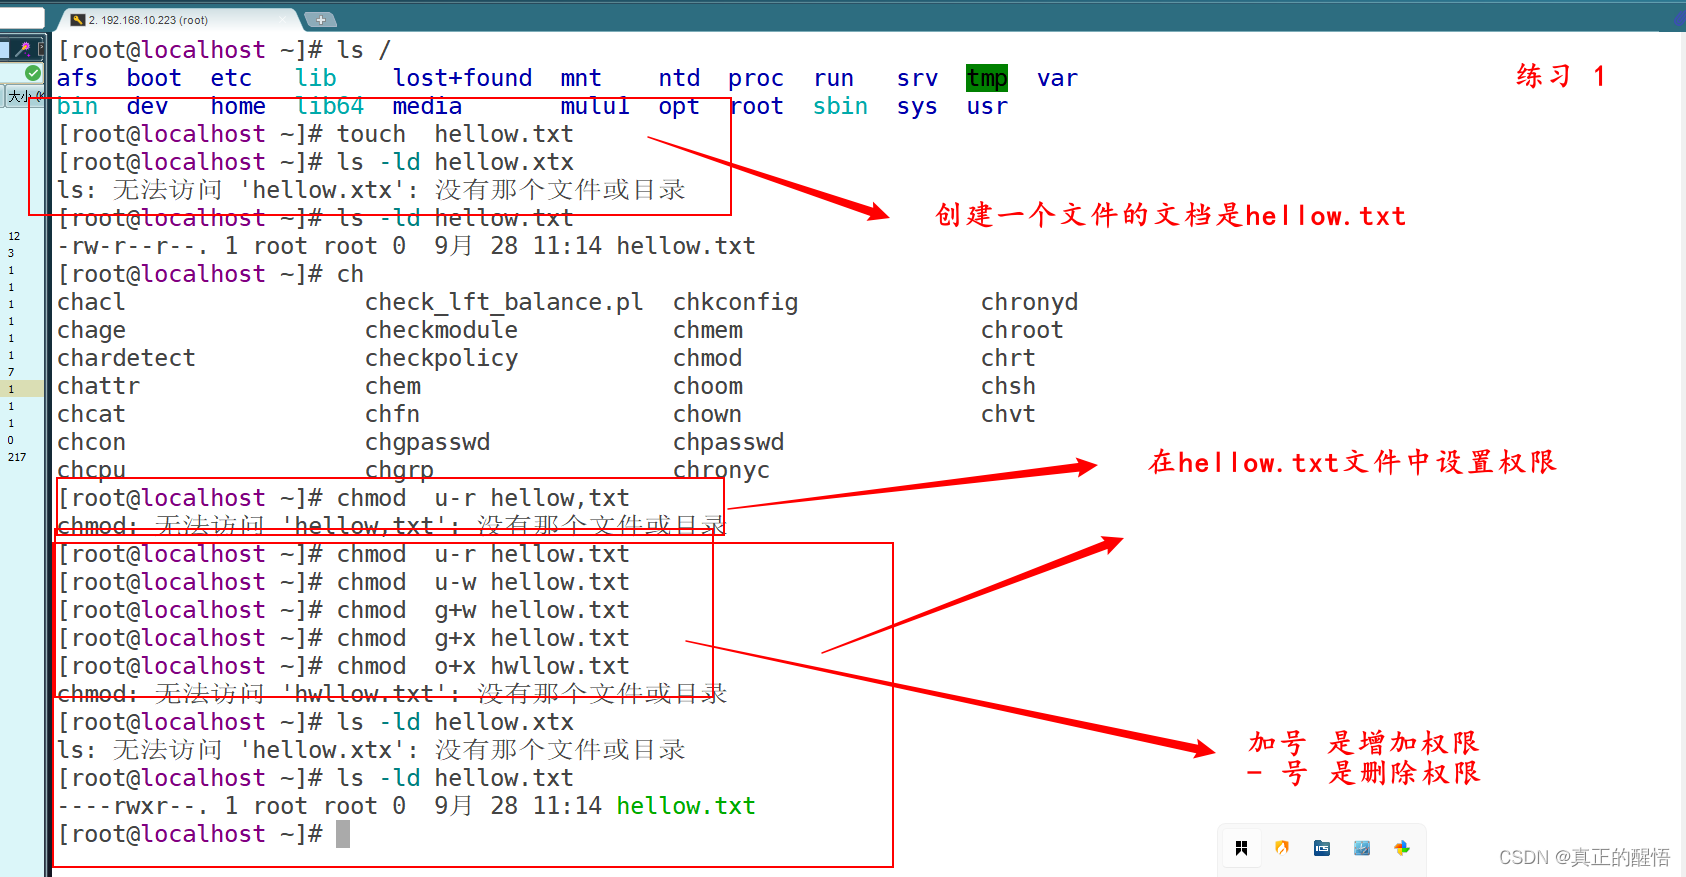
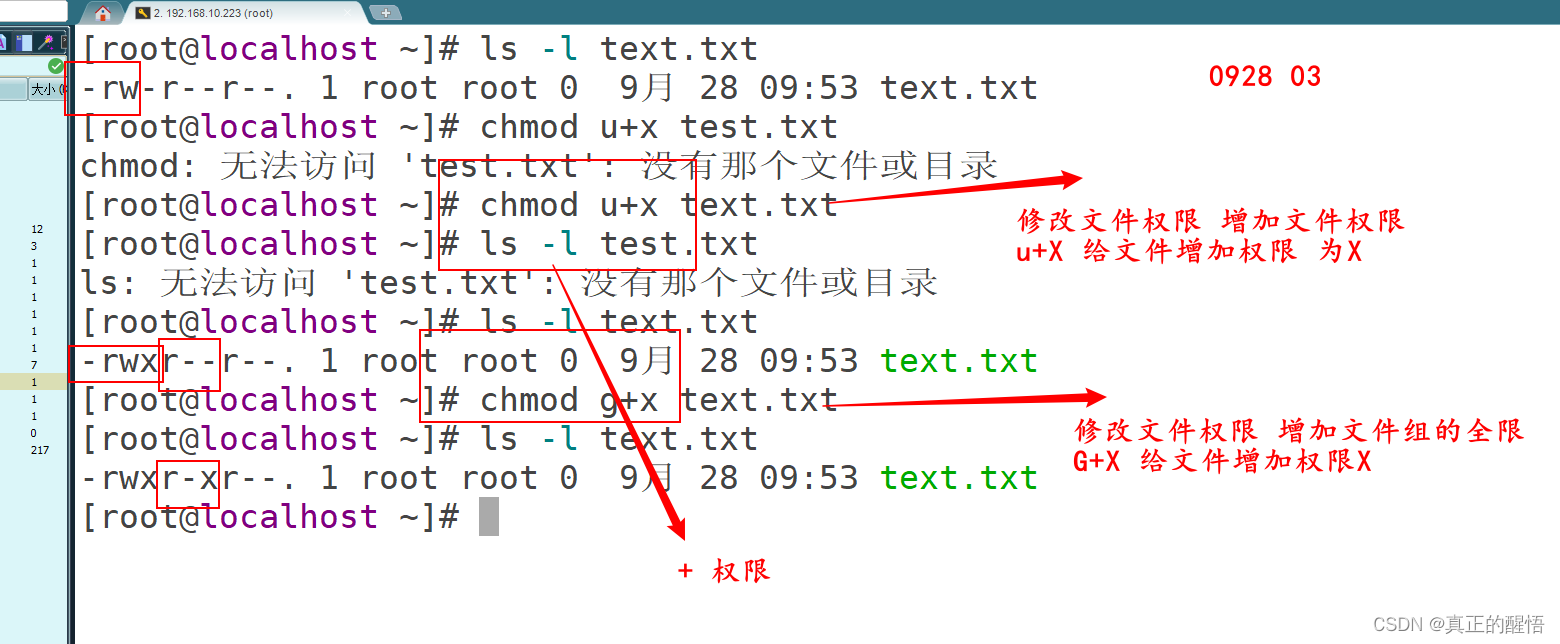
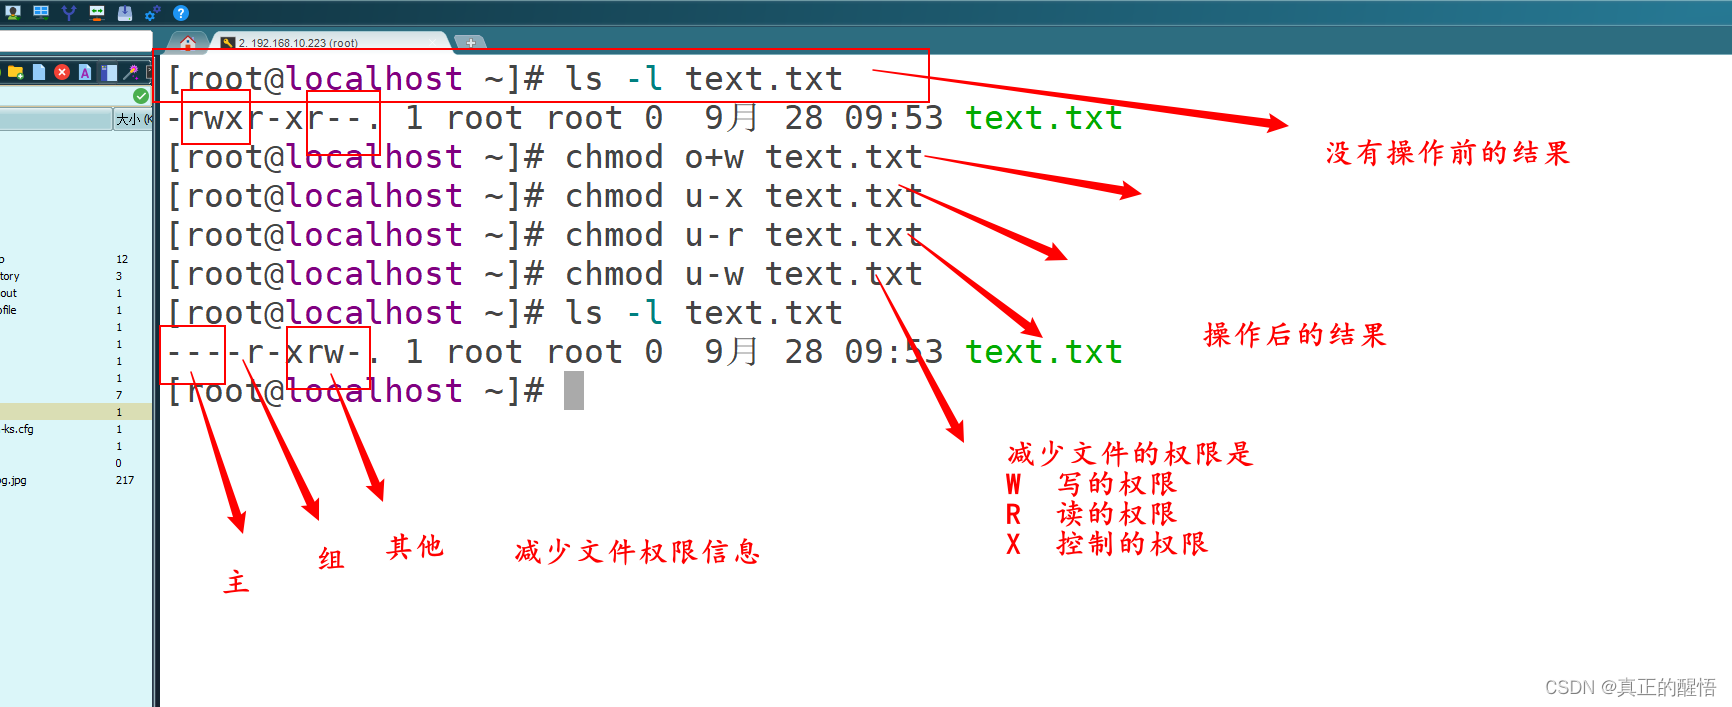
chmod[ugo][+-=][rwx] 文档名
[root@localhost ~]# ls -l a.txt
-rw-r--r--. 1 root root 0 10月 14 11:47 a.txt
[root@localhost ~]# ch
chacl                 check_lft_balance.pl  chkconfig             chronyd
chage                 checkmodule           chmem                 chroot
chardetect            checkpolicy           chmod                 chrt
chattr                chem                  choom                 chsh
chcat                 chfn                  chown                 chvt
chcon                 chgpasswd             chpasswd
chcpu                 chgrp                 chronyc
[root@localhost ~]# chmod u+x a.txt
[root@localhost ~]# ls -l a.txt
-rwxr--r--. 1 root root 0 10月 14 11:47 a.txt
[root@localhost ~]# chomod o+xwy a.txt
-bash: chomod:未找到命令
[root@localhost ~]# chomod o+x a.txt
-bash: chomod:未找到命令
[root@localhost ~]# chomod O+w a.txt
-bash: chomod:未找到命令
[root@localhost ~]# chomod g+w a.txt
-bash: chomod:未找到命令
[root@localhost ~]# chmod o+x a.txt
[root@localhost ~]# ls -l a.txt
-rwxr--r-x. 1 root root 0 10月 14 11:47 a.txt
[root@localhost ~]#
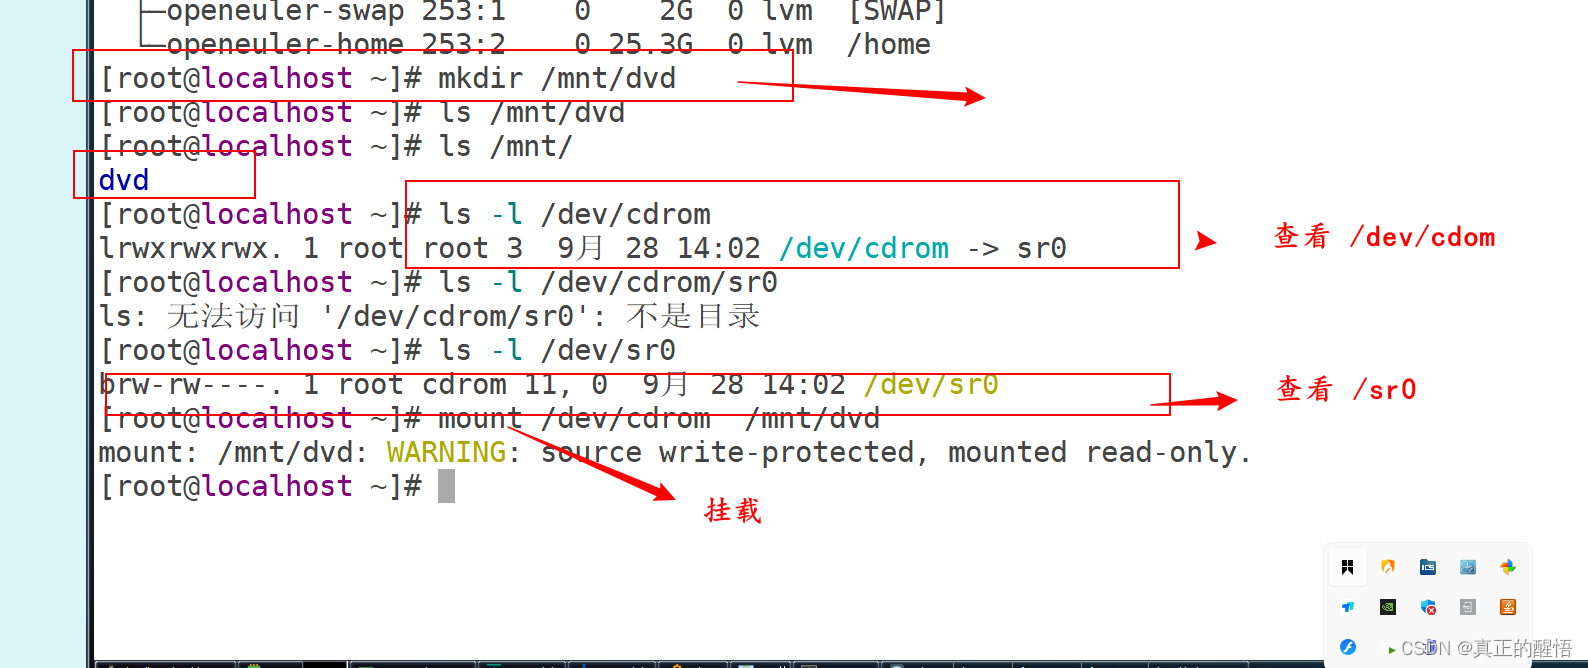
35 linux 挂载的基础操作

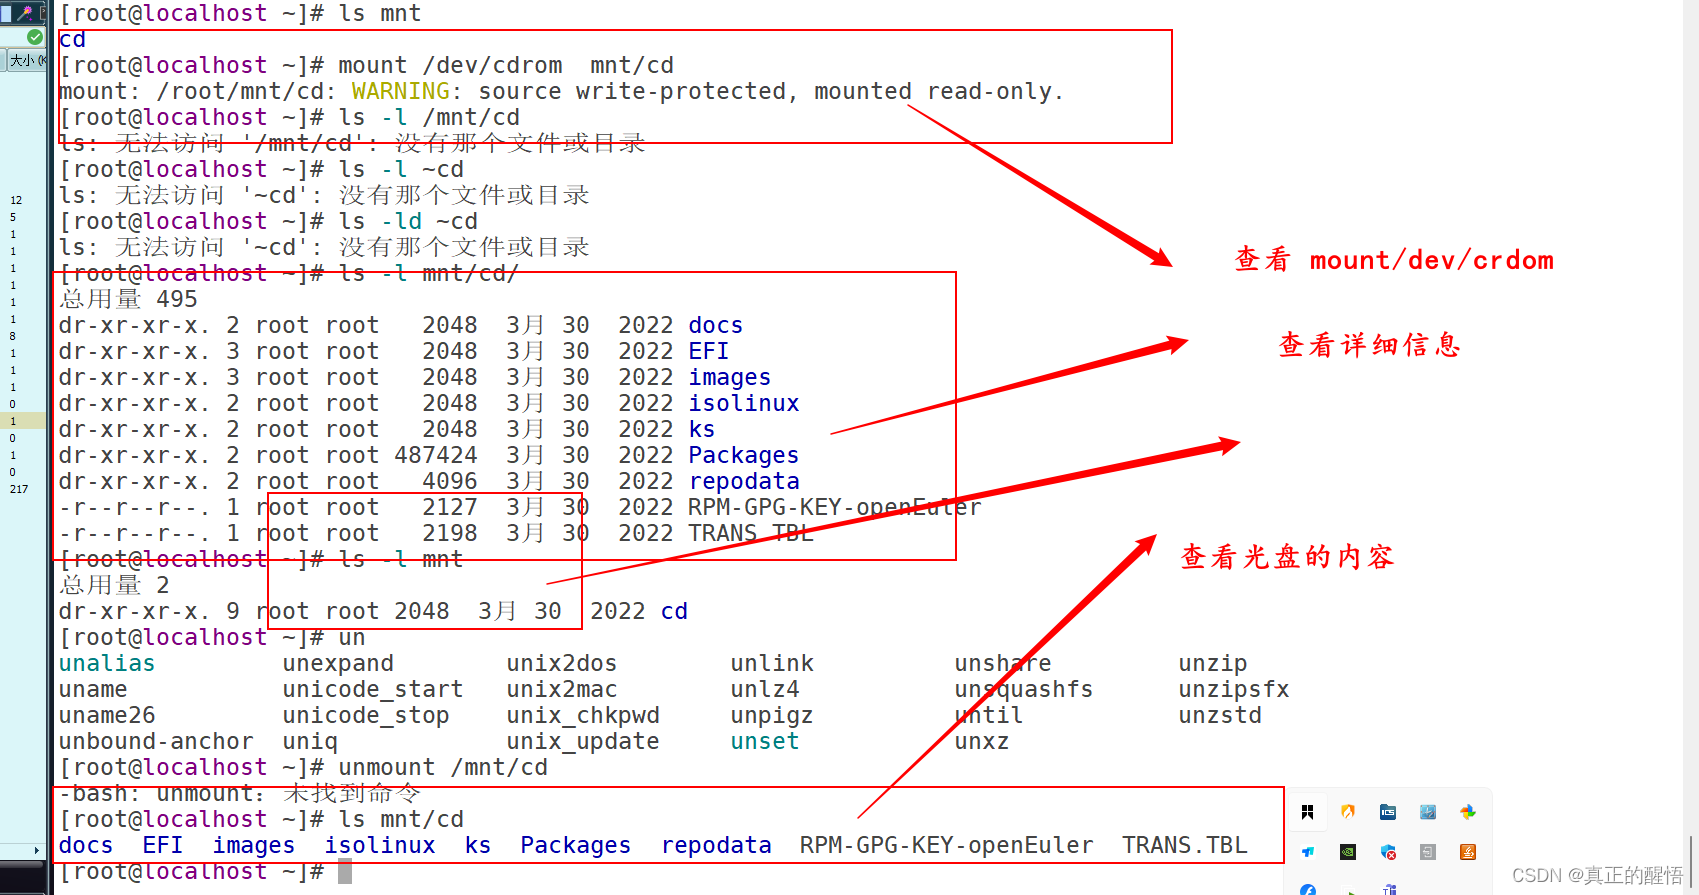
36 手动挂载 mount


37 手动挂载综合题
38 配置开机自动挂载
1、创建挂载点
[root@svr223 ~]# mkdir -p /repos/openEuler
2、修改配置/etc/fstab
[root@svr223 ~]# vim /etc/fstab
// 设备文件         挂载点          文件系统类型   挂载选项   检查 备份
/dev/cdrom      /repos/openEuler  iso9660      ro        0   0

[root@svr223 ~]# reboot
3、检查配置
[root@svr223 ~]# mount  -a

没有报错代表配置正确
如果有报错代表配置有问题
4、验证
重启之后,查看
reboot:重启

[root@svr223 ~]# reboot
[root@svr223 ~]#
docs  images    ks        repodata               TRANS.TBL
EFI   isolinux  Packages  RPM-GPG-KEY-openEuler
常见错误:
[root@svr223 ~]# mount -a
mount: /repos/openEuler: 特殊设备 /dev/cdom 不存在.
mount: /repos/openEuer: 挂载点不存在.
mount: /repos/openEuler: 未知的文件系统类型“iso9960”.
mount: /repos/openEuler: 文件系统类型错误、选项错误、/dev/sr0 上有坏超级块、缺少代码页或帮助程序或其他错误.
39 YUM 源的基础操作
- 查看系统中已有的YUM源列表:yum repolist
- 启用某个YUM源:yum-config-manager --enable repo_name
- 禁用某个YUM源:yum-config-manager --disable repo_name
- 列出某个YUM源的详细信息:yum info repo_name
- 搜索某个软件包:yum search package_name
- 安装某个软件包:yum install package_name
- 更新某个软件包:yum update package_name
- 删除某个软件包:yum remove package_name
- 清除YUM缓存:yum clean all
- 下载某个软件包但不安装:yum download package_name
- 检查某个软件包是否有更新:yum check-update package_name
- 列出已安装的软件包:yum list installed
- 展示某个软件包的安装信息:yum list package_name
- 列出已安装的但是没有被其它软件包所依赖的软件包:yum list extras
- 列出某个软件包的依赖关系:yum deplist package_name
40 yum info 软件 显示软件的详细信息
[root@localhost ~]# yum info httpd
Last metadata expiration check: 2:14:26 ago on 2023年10月14日 星期六 09时37分52秒.
Installed Packages
Name         : httpd
Version      : 2.4.51
Release      : 9.oe2203
Architecture : x86_64
Size         : 4.6 M
Source       : httpd-2.4.51-9.oe2203.src.rpm
Repository   : @System
From repo    : @commandline
Summary      : Apache HTTP Server
URL          : https://httpd.apache.org/
License      : ASL 2.0
Description  : Apache HTTP Server is a powerful and flexible HTTP/1.1 compliant web server.
41 yum provides 文件名 查看某个我嗯嗯那就是由那个软件包提供的
[root@localhost ~]# yum provides httpd
Last metadata expiration check: 2:14:16 ago on 2023年10月14日 星期六 09时37分52秒.
httpd-2.4.51-5.oe2203.x86_64 : Apache HTTP Server
Repo : repos_openEuler_
Matched from:
Provide : httpd = 2.4.51-5.oe2203
httpd-2.4.51-9.oe2203.x86_64 : Apache HTTP Server
Repo : @System
Matched from:
Provide : httpd = 2.4.51-9.oe2203
42 yum -y install 软件名 :安装软件
[root@localhost ~]# yum -y install httpd
Last metadata expiration check: 2:16:10 ago on 2023年10月14日 星期六 09时37分52秒.
Dependencies resolved.
===============================================================================================================
Package Architecture Version Repository Size
===============================================================================================================
Installing:
httpd x86_64 2.4.51-5.oe2203 repos_openEuler_ 1.3 M
Installing dependencies:
mod_http2 x86_64 1.15.25-1.oe2203 repos_openEuler_ 126 k
Downgrading:
httpd-filesystem noarch 2.4.51-5.oe2203 repos_openEuler_ 11 k
httpd-tools x86_64 2.4.51-5.oe2203 repos_openEuler_ 71 k
Transaction Summary
===============================================================================================================
Install 2 Packages
Downgrade 2 Packages
Total size: 1.5 M
Downloading Packages:
Running transaction check
Transaction check succeeded.
Running transaction test
Transaction test succeeded.43 yum -y remove 软件名 :卸载软件
[root@localhost ~]# yum -y remove httpd
Dependencies resolved.
===============================================================================================================
Package Architecture Version Repository Size
===============================================================================================================
Removing:
httpd x86_64 2.4.51-9.oe2203 @@commandline 4.6 M
Removing dependent packages:
mod_http2 x86_64 1.15.25-1.oe2203 @@commandline 329 k
Transaction Summary
===============================================================================================================
Remove 2 Packages
Freed space: 4.9 M
Running transaction check
Transaction check succeeded.
Running transaction test
Transaction test succeeded.
Running transaction
Preparing : 1/1
Running scriptlet: httpd-2.4.51-9.oe2203.x86_64 1/1
Running scriptlet: httpd-2.4.51-9.oe2203.x86_64 1/2
Removed /etc/systemd/system/multi-user.target.wants/httpd.service.44 yum -y reinstall 软件名:重装软件
[root@localhost ~]# yum -y reinstall httpd
Last metadata expiration check: 2:18:09 ago on 2023年10月14日 星期六 09时37分52秒.
Dependencies resolved.
===============================================================================================================
Package Architecture Version Repository Size
===============================================================================================================
Reinstalling:
httpd x86_64 2.4.51-5.oe2203 repos_openEuler_ 1.3 M
Transaction Summary
===============================================================================================================
Total size: 1.3 M
Installed size: 4.6 M
Downloading Packages:
Running transaction check
Transaction check succeeded.
Running transaction test
Transaction test succeeded.
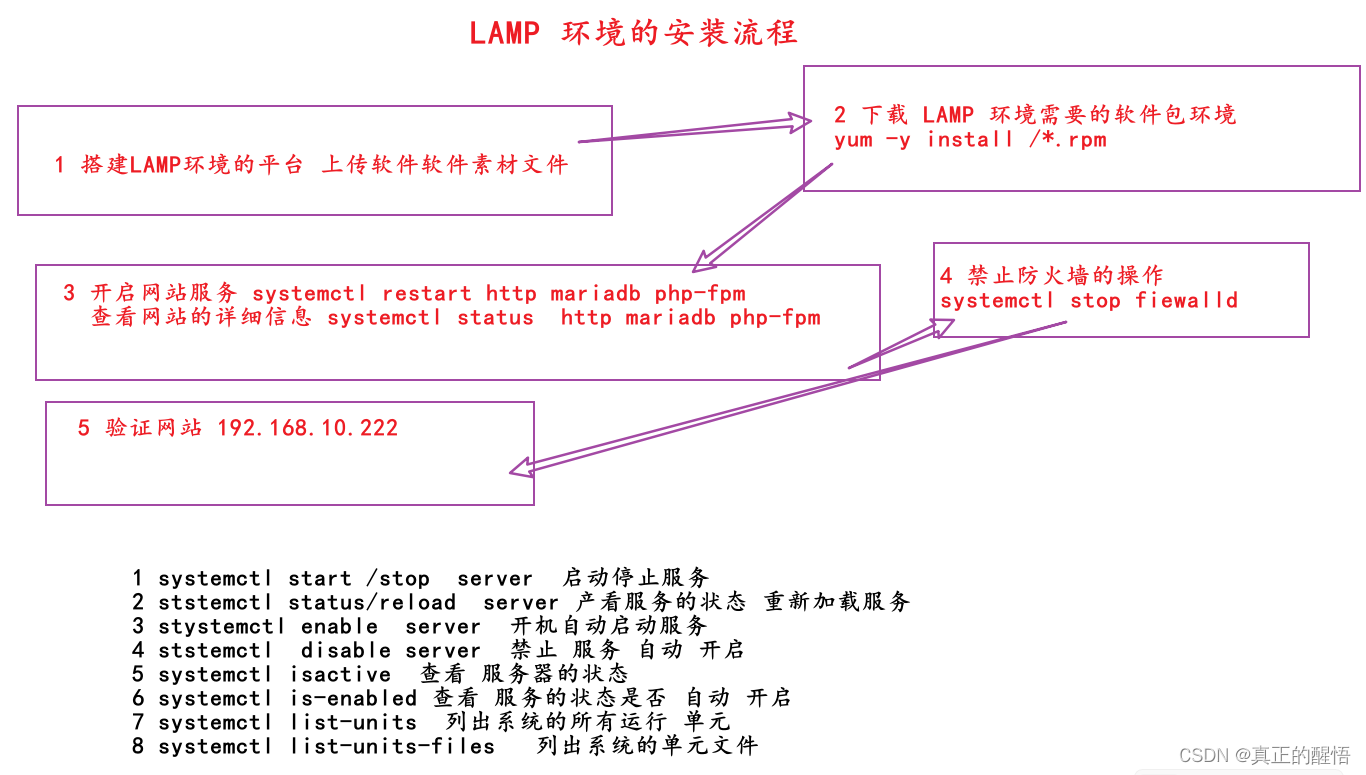
Running transaction45 LAMP 环境的安装
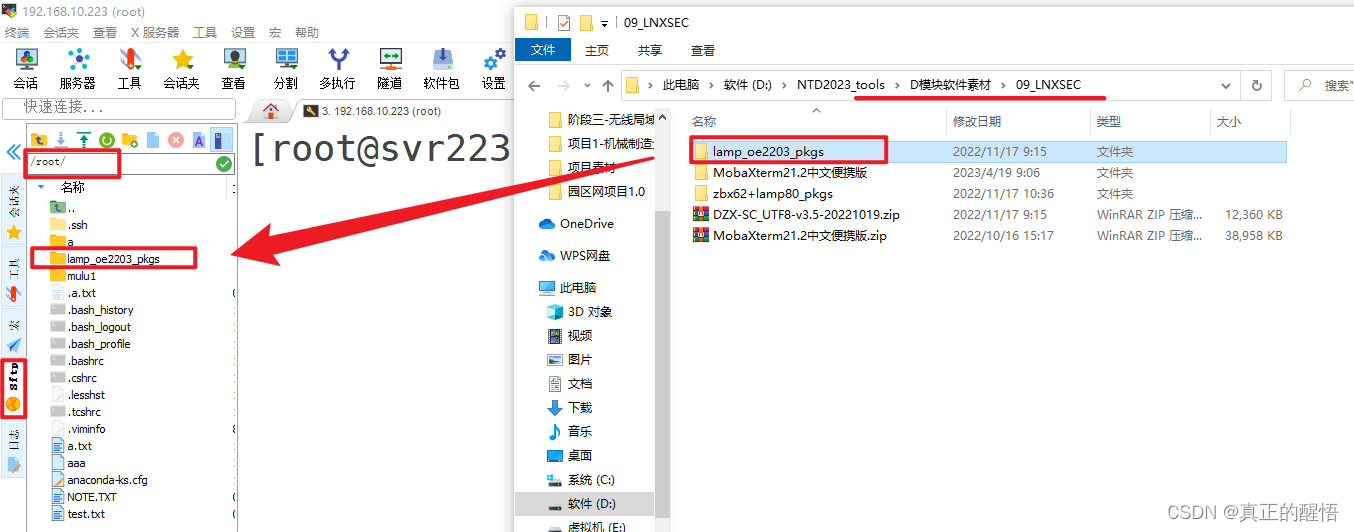
// 卸载之前的Apache web服务器httpd,防止与之后的LAMP环境冲突
[root@svr223 ~]# yum -y remove httpd

[root@svr223 ~]# pwd
/root
[root@svr223 ~]# ls
anaconda-ks.cfg  lamp_oe2203_pkgs
[root@svr223 ~]# ls lamp_oe2203_pkgs/
apr-1.7.0-4.oe2203.x86_64.rpm
apr-util-1.6.1-12.oe2203.x86_64.rpm
git-2.33.0-3.oe2203.x86_64.rpm
httpd-2.4.51-9.oe2203.x86_64.rpm
...
安装软件包
[root@svr223 ~]# yum -y install httpd mariadb-server php-fpm php-mysqlnd
使用如下方式安装:
[root@svr223 ~]# yum -y install ./lamp_oe2203_pkgs/*.rpm
检查安装的软件包:

httpd:Apahce web应用服务器
mariadb-server:数据库服务器
php-fpm:php解析器
php-mysqlnd:php操作数据库程序

[root@svr223 ~]# yum  list  httpd  mariadb-server  php-fpm  php-mysqlnd
Last metadata expiration check: 2:14:09 ago on 2023年04月19日 星期三 15时24分30秒.
Installed Packages
httpd.x86_64                    2.4.51-9.oe2203               @@commandline
mariadb-server.x86_64           4:10.5.16-1.oe2203            @@commandline
php-fpm.x86_64                  8.0.0-10.oe2203               @@commandline
php-mysqlnd.x86_64              8.0.0-10.oe2203               @@commandline
[root@svr223 ~]#
systemctl:系统控制器  控制服务的开启/关闭/设置成开机自启/禁止开机自启
system:系统
ctl:controller 控制器
start:开始/开启 stop:停止 is-active:是否活跃/是否开启 active:活跃/开启 inactive:不活跃/关闭 restart:重新启动 type:类型/列出 service:服务
status:状态  enable:开启/开机自启 /now:现在/立即/disable:禁止

systemctl start <service>	启动服务
systemctl stop <service>	停止服务
systemctl restart <service>	重新启动服务
systemctl reload <service>	重新加载服务配置文件
systemctl status <service>	查看服务状态
systemctl enable <service>	设置服务开机自启动
systemctl disable <service>	禁用服务开机自启动
systemctl is-active <service>	检查服务是否正在运行
systemctl is-enabled <service>	检查服务是否开机自启动
systemctl list-units	        列出所有运行中的系统单元
systemctl list-unit-files	列出所有可用的系统单元文件
systemctl mask <service>	禁止启动和停止服务
systemctl unmask <service>	允许启动和停止服务

[root@svr223 ~]# systemctl enable --now  httpd  mariadb  php-fpm
[root@svr223 ~]# systemctl status httpd mariadb php-fpm //查看状态
http://服务器IP地址
如:
http://192.168.10.223/
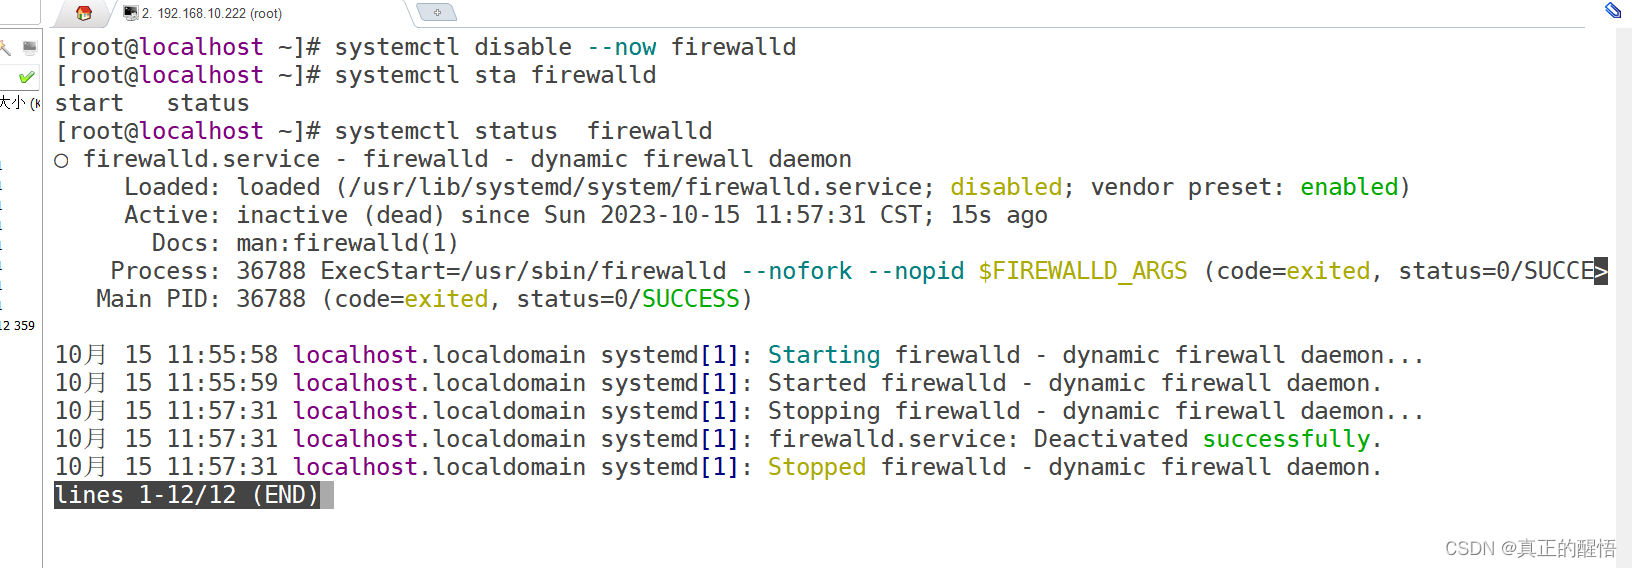
firewalld:Linux中防火墙服务
// 禁止防护墙开机自启,并且立即禁止
[root@svr223 ~]# systemctl disable --now firewalld
[root@svr223 ~]# systemctl status firewalld //查看状态


验证php-fpm是否正常
/var/www/html 目录:网站根目录
当用户访问服务器http服务的时候,默认输入的IP地址(192.168.10.223)默认对应的目录就是网站的根目录
[root@svr223 ~]# vim /var/www/html/t1.php
<?php
phpinfo();
?>
浏览器输入http://192.168.10.223/t1.php测试,出现以下页面,说明正常

46 systemctl 总结
46.1 systemctl系统服务管理
[root@svr223 ~]# systemctl  --type  service  // 查看所有的服务
[root@svr223 ~]# systemctl  is-active  httpd  // 查看服务是否激活
active  // 激活状态
[root@svr223 ~]# systemctl stop httpd
[root@svr223 ~]# systemctl  is-active  httpd
inactive  // 非激活状态,即关闭
[root@svr223 ~]# systemctl  **start**  httpd  // 启动
[root@svr223 ~]# systemctl  **restart**  httpd  // 重启
[root@svr223 ~]# systemctl  **stop**  httpd   // 停止
[root@svr223 ~]# systemctl  **status**  httpd  // 查看状态(详细)
[root@svr223 ~]# systemctl  **is-active**  httpd  // 查看状态(简洁)
46.2 设置服务开机自启
[root@svr223 ~]# systemctl **enable** httpd  //设置开机自启
Created symlink /etc/systemd/system/multi-user.target.wants/httpd.service → /usr/lib/systemd/system/httpd.service.
[root@svr223 ~]# systemctl enable httpd **--now**
                                  // 设置开机自启,并开启服务
46.3 设置禁止服务开机自启
[root@svr223 ~]# systemctl **disable** httpd  // 设置开机不自启
Removed /etc/systemd/system/multi-user.target.wants/httpd.service.
[root@svr223 ~]# systemctl disable httpd **--now**
                              // 设置开机不自启,并关闭服务
[root@svr223 ~]# systemctl **is-enabled** httpd//查看服务是否是开机自启状态
disabled   // 开机不自启
[root@svr223 ~]# systemctl enable httpd
[root@svr223 ~]# systemctl is-enabled httpd
enabled   // 开机自启
[root@svr223 ~]# systemctl stop httpd
[root@svr223 ~]# systemctl enable httpd
[root@svr223 ~]# systemctl is-active httpd
inactive
[root@svr223 ~]# systemctl enable httpd --now
                                  // 设置开机自启,并开启服务
[root@svr223 ~]# systemctl is-active httpd
active
[root@svr223 ~]# systemctl disable httpd
Removed /etc/systemd/system/multi-user.target.wants/httpd.service.
[root@svr223 ~]# systemctl is-active httpd
active
[root@svr223 ~]# systemctl disable httpd --now
                  // 设置为开机不自启,并关闭服务
[root@svr223 ~]# systemctl is-active httpd
inactive
[root@svr223 ~]# systemctl disable httpd --now
[root@svr223 ~]# systemctl is-active httpd
[root@svr223 ~]# systemctl stop httpd
[root@svr223 ~]# systemctl is-active httpd
[root@svr223 ~]# systemctl status httpd
[root@svr223 ~]# systemctl restart  firewalld
[root@svr223 ~]# systemctl is-active  firewalld
active
[root@svr223 ~]# systemctl enable httpd
[root@svr223 ~]# systemctl disable firewalld
[root@svr223 ~]# systemctl enable mariadb php-fpm
47 SELinux 学习
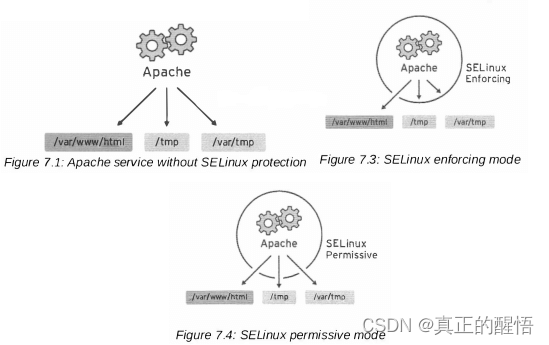
[root@svr223 ~]# getenforce  // 获取当前SELinux状态
Permissive
[root@svr223 ~]# setenforce 1   // 修改为Enforcing 强制
[root@svr223 ~]# getenforce
Enforcing
[root@svr223 ~]# setenforce 0   // 修改为Permissive 宽松
[root@svr223 ~]# getenforce
Permissive
[root@svr223 ~]#
[root@svr223 ~]# vim /etc/selinux/config
SELINUX=permissive // 修改为宽松模式(利用快捷键Ctrl+p)48 which基本操作
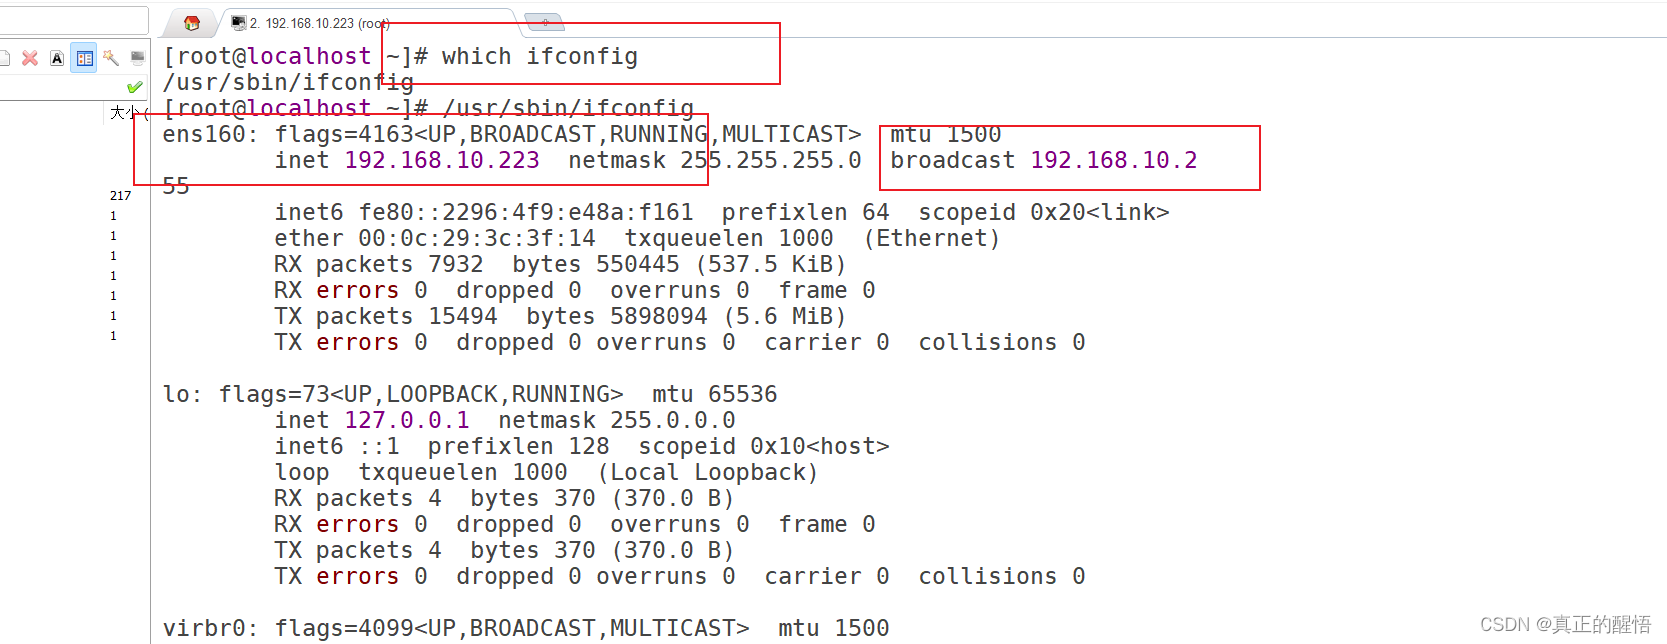
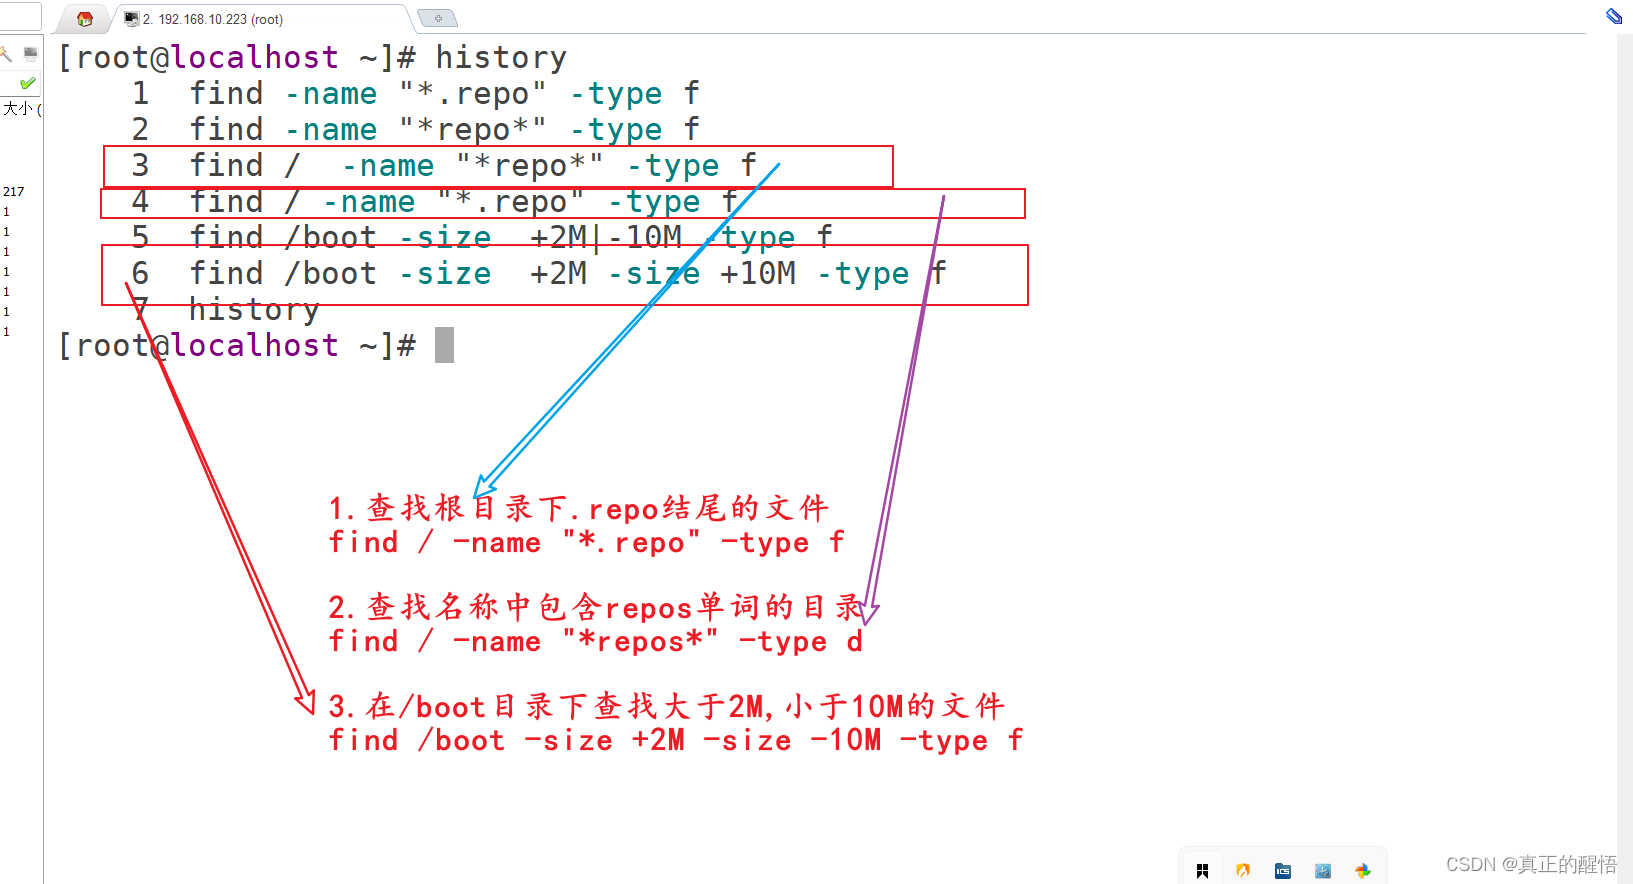
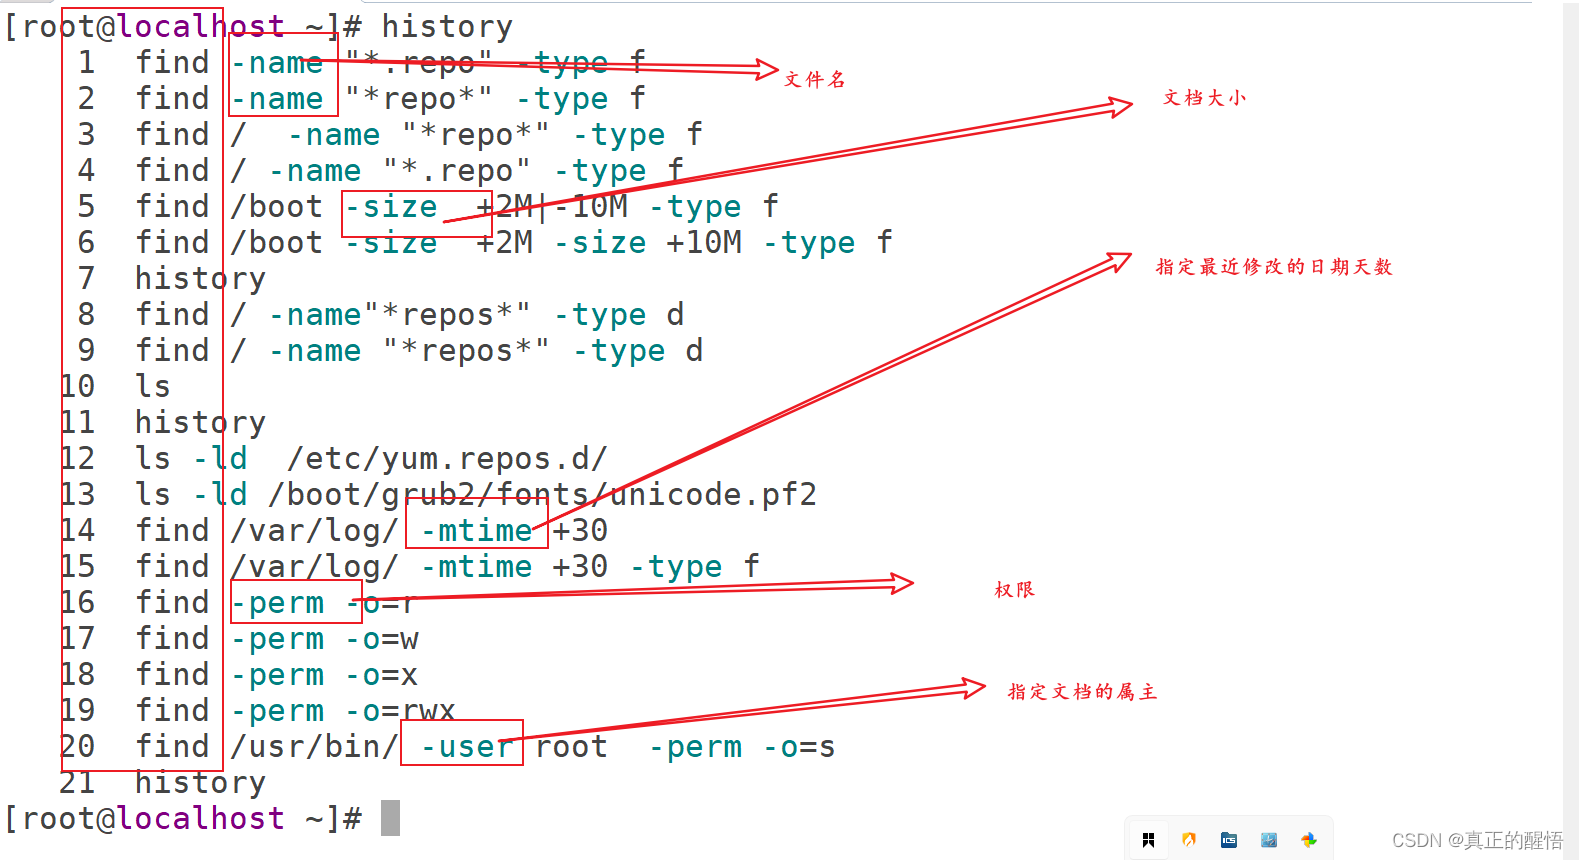
49 find 基本操作

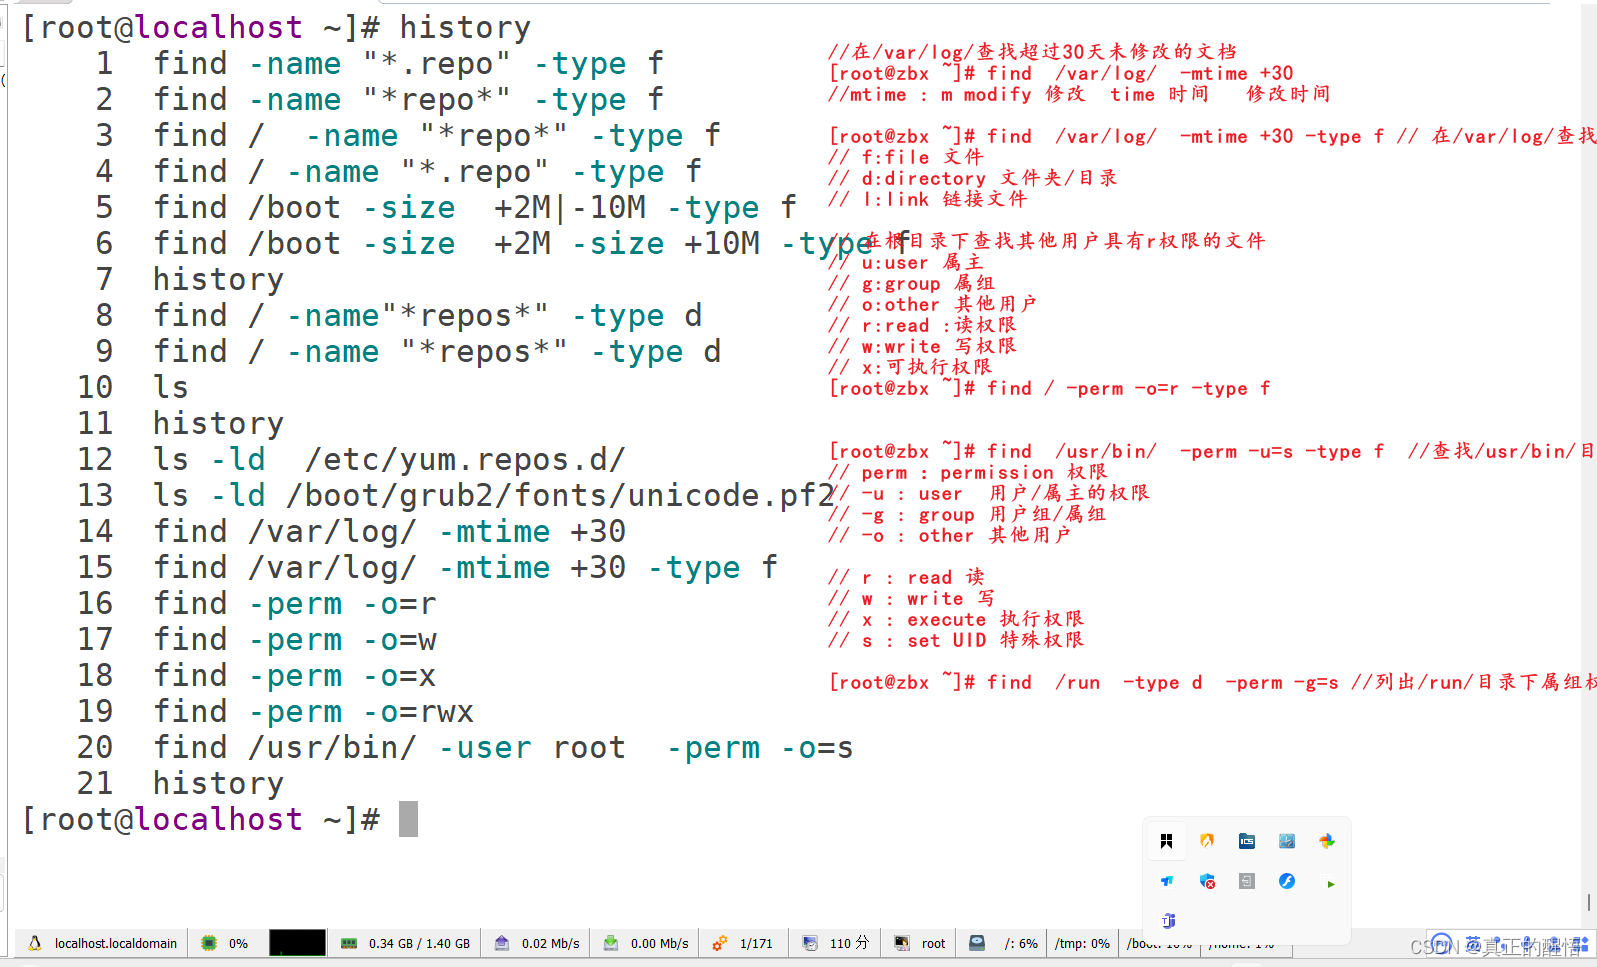
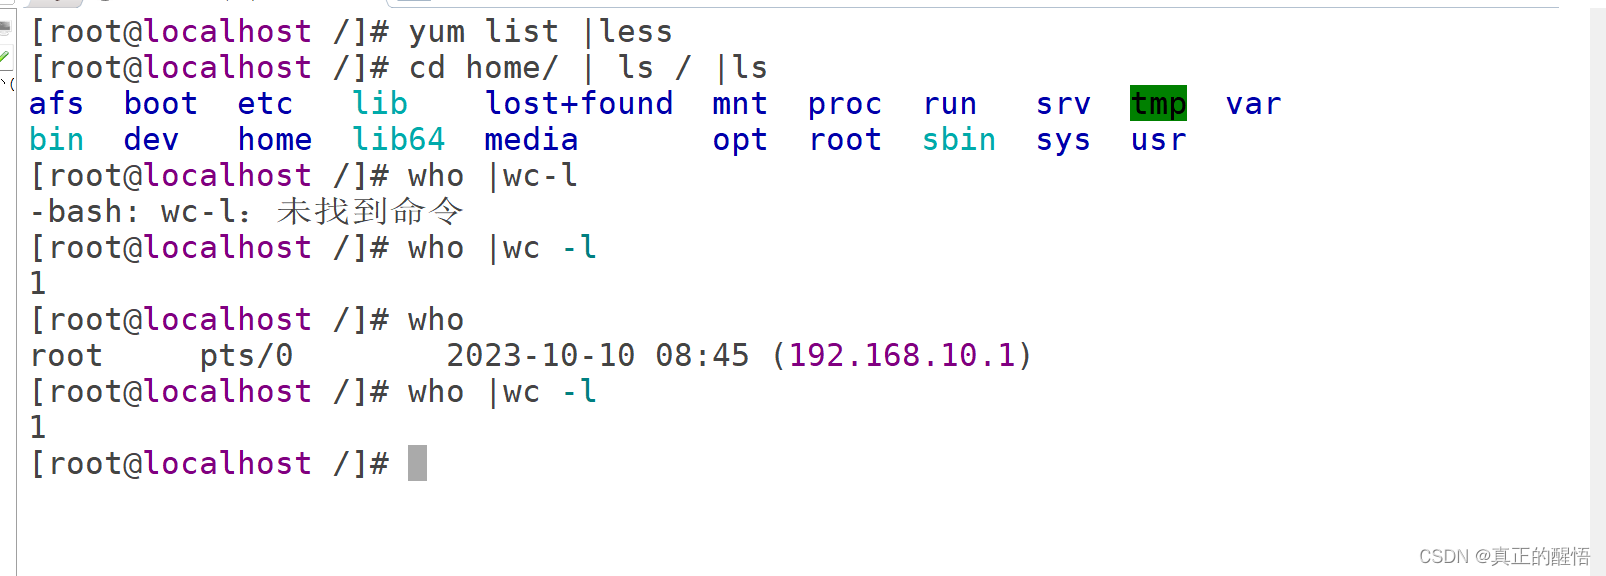
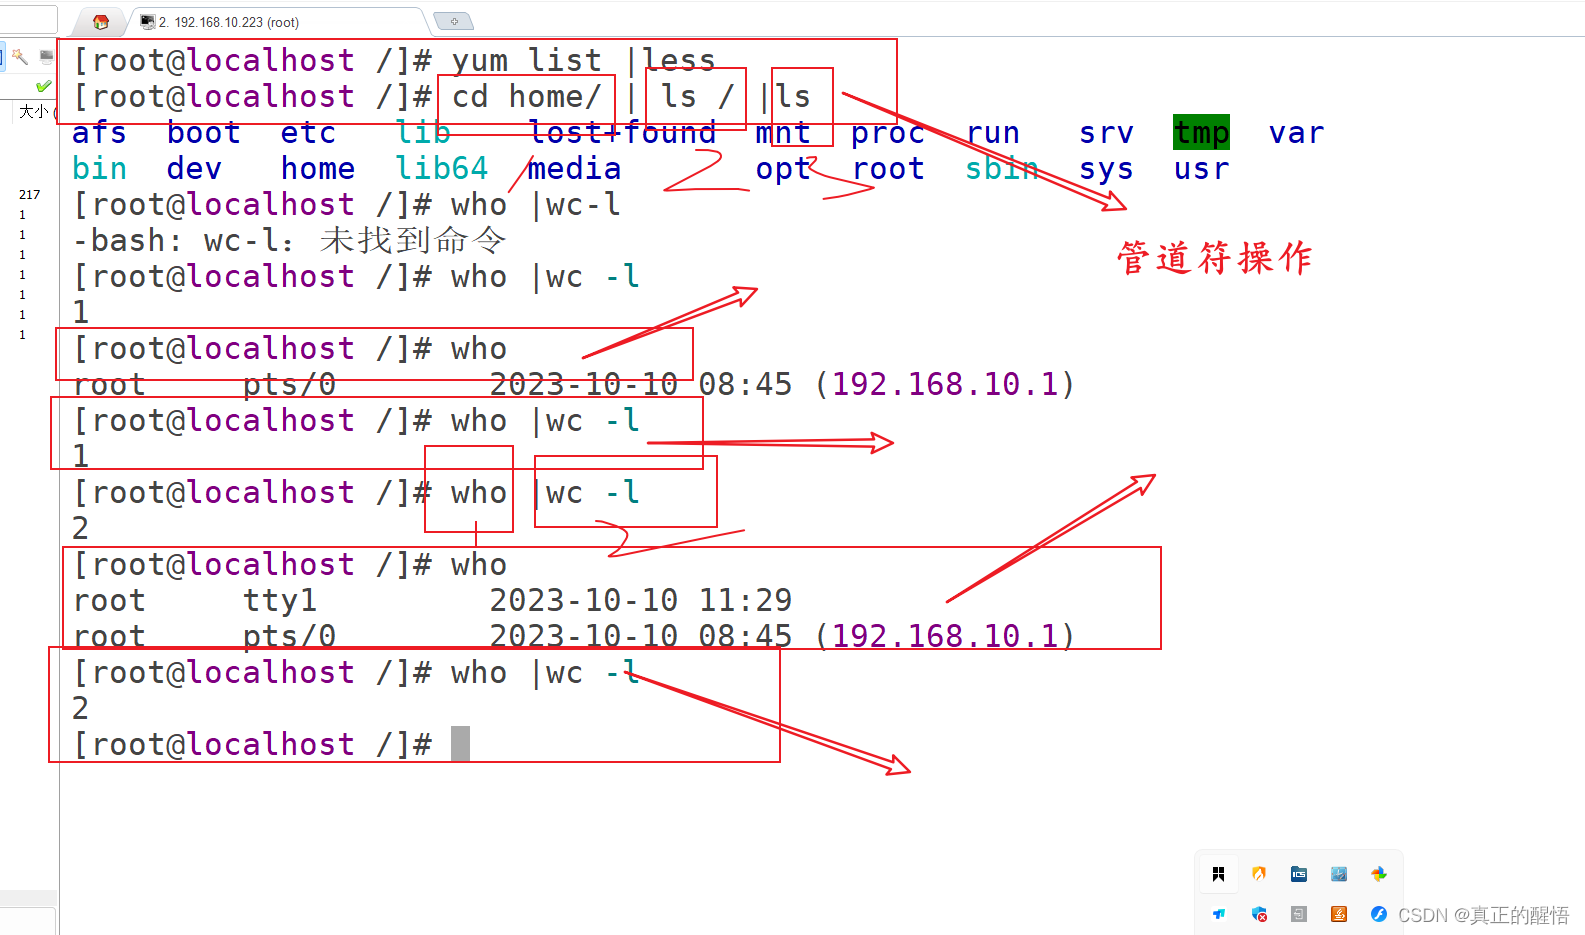
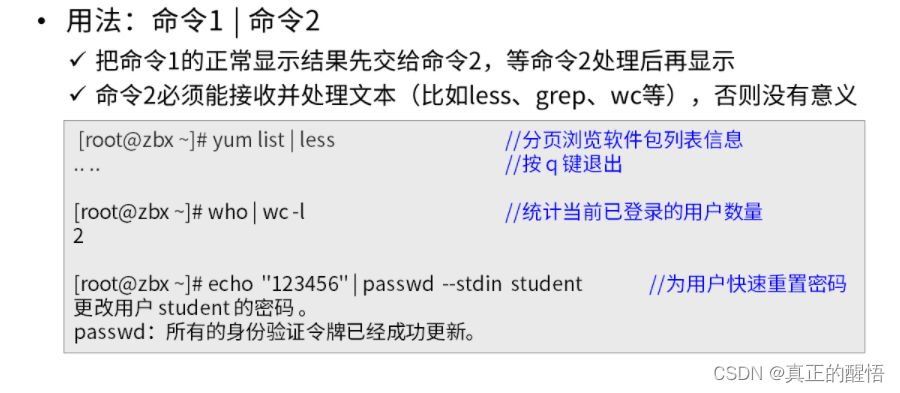
50 管道符号: 命令1 | 命令2 将命令1执行的结果传递给命令2

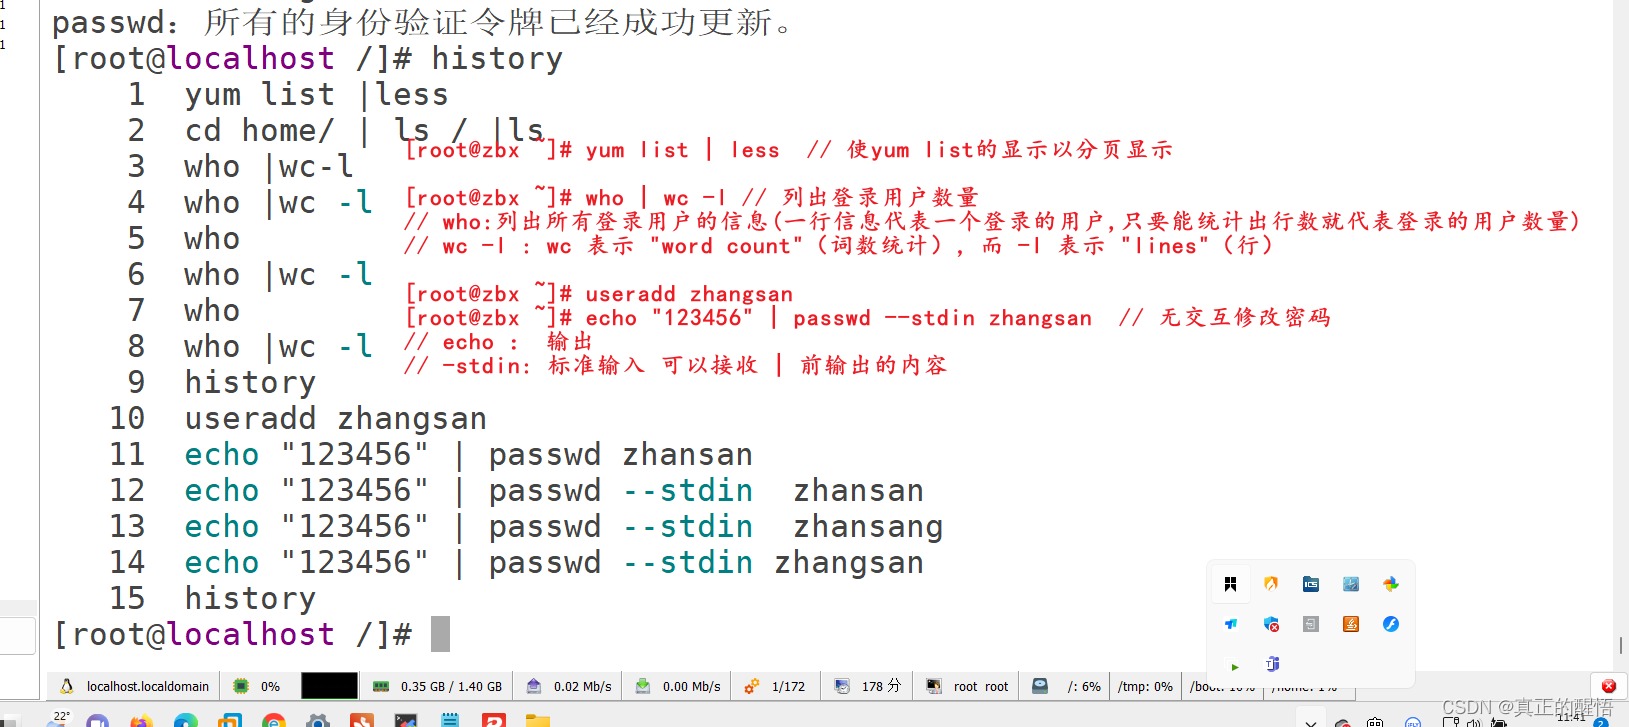
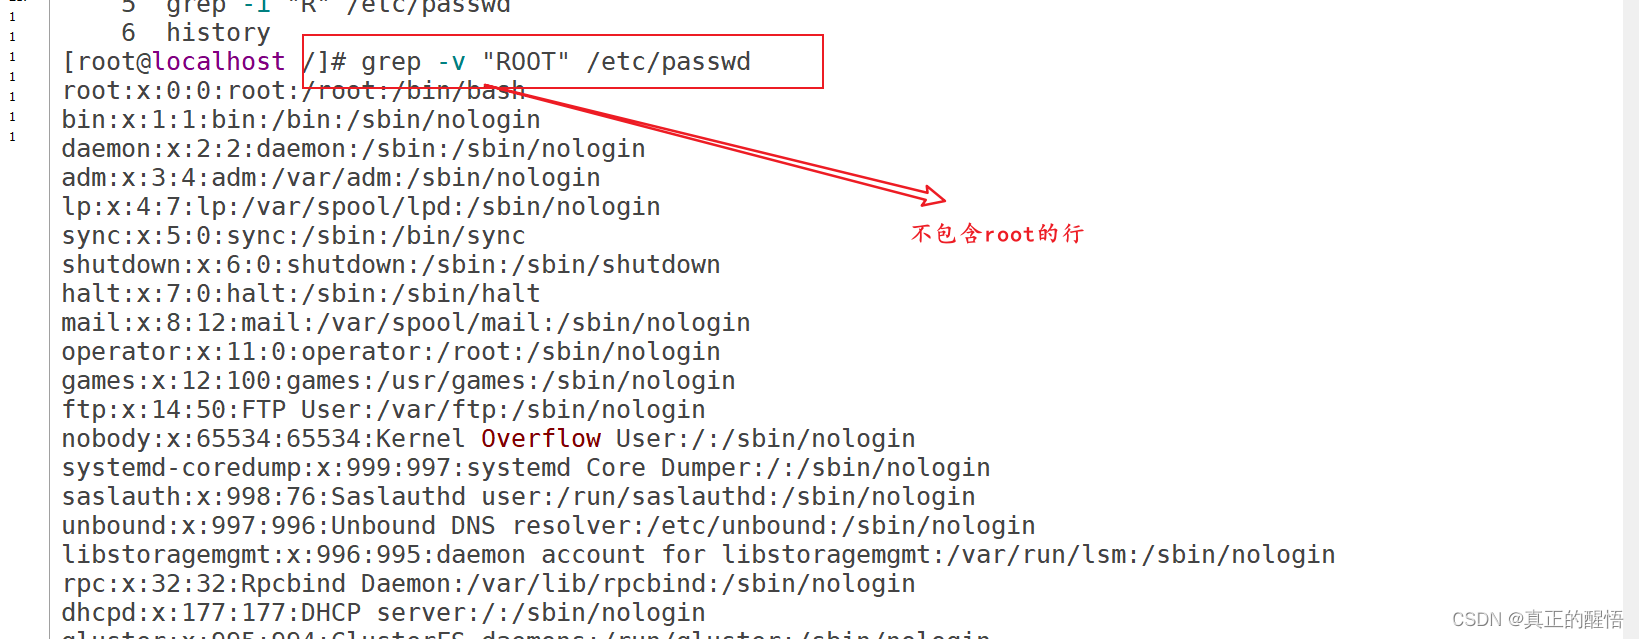
51 grep 查找文件中满足条件的内容

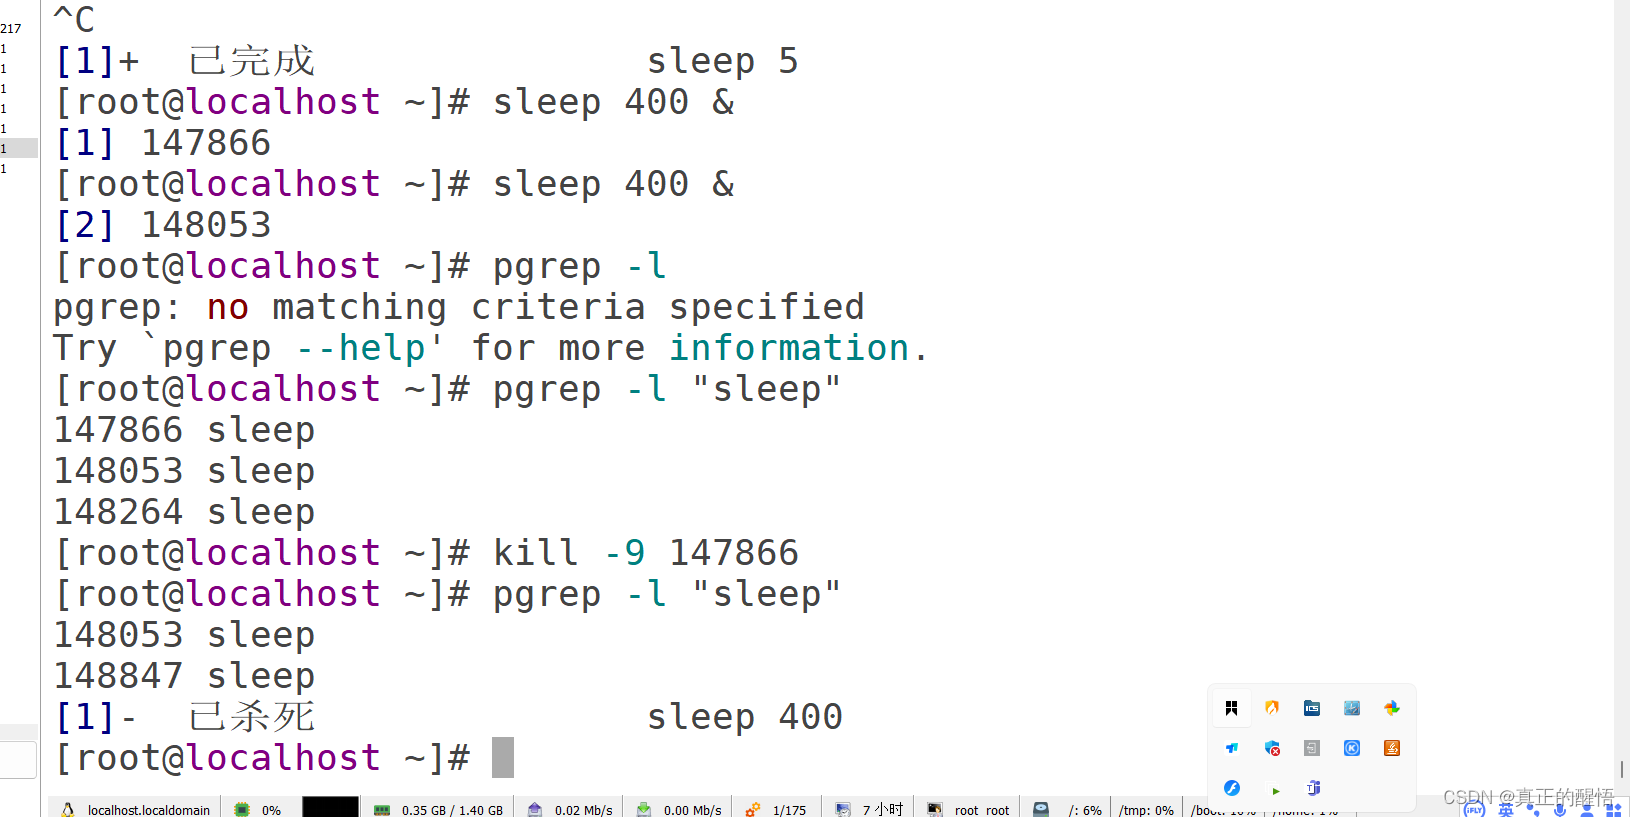
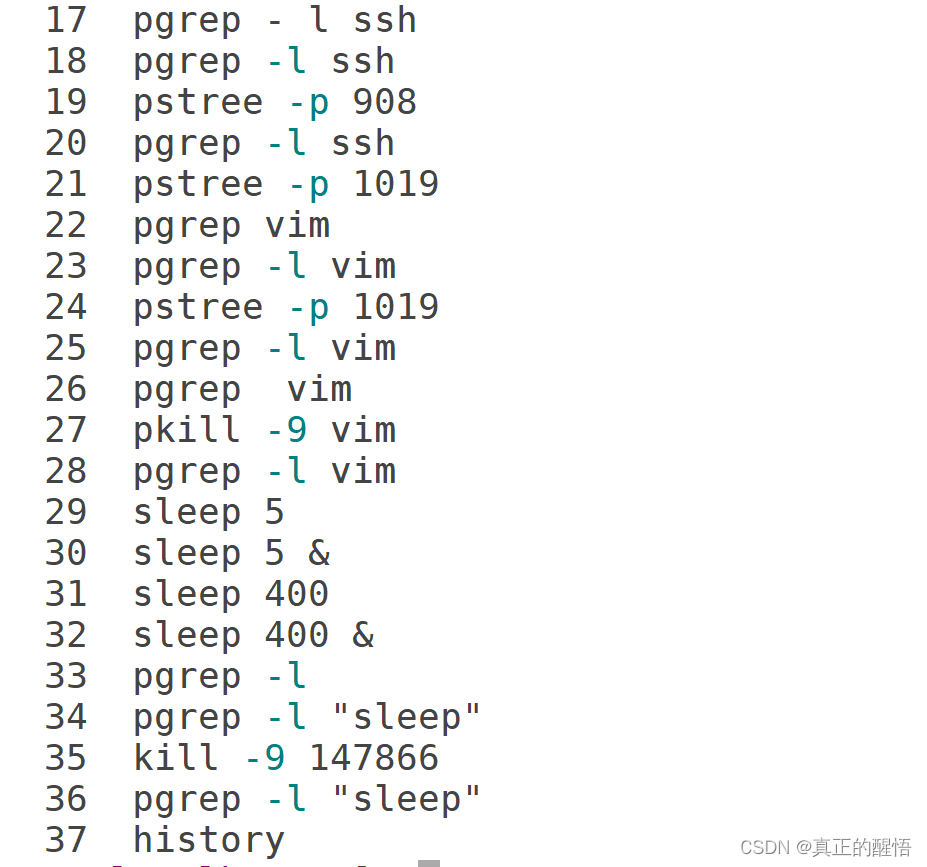
52 进程相关的操作 pstree:查看进程树

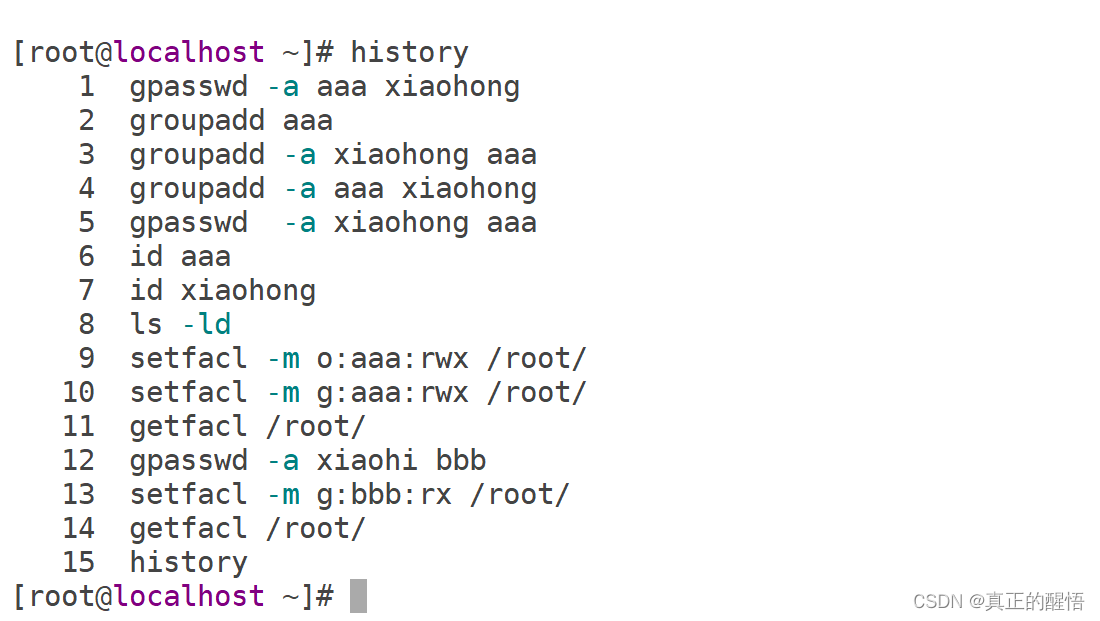
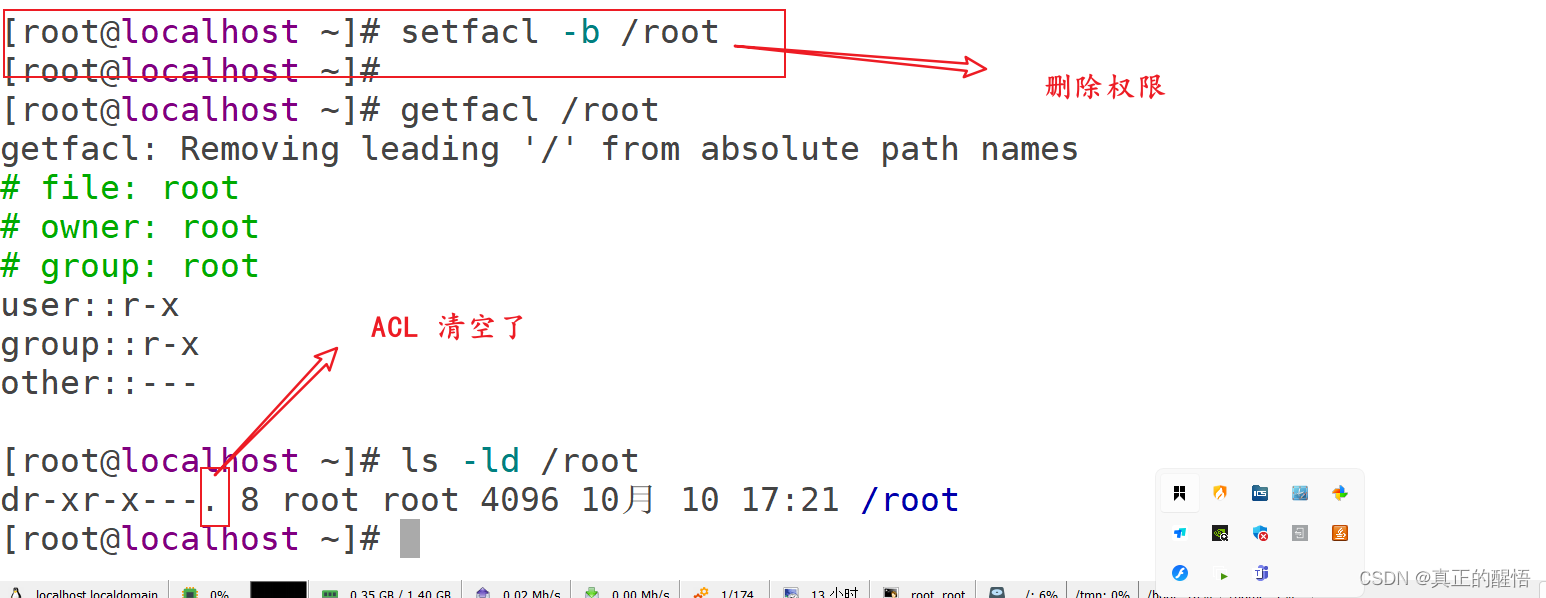
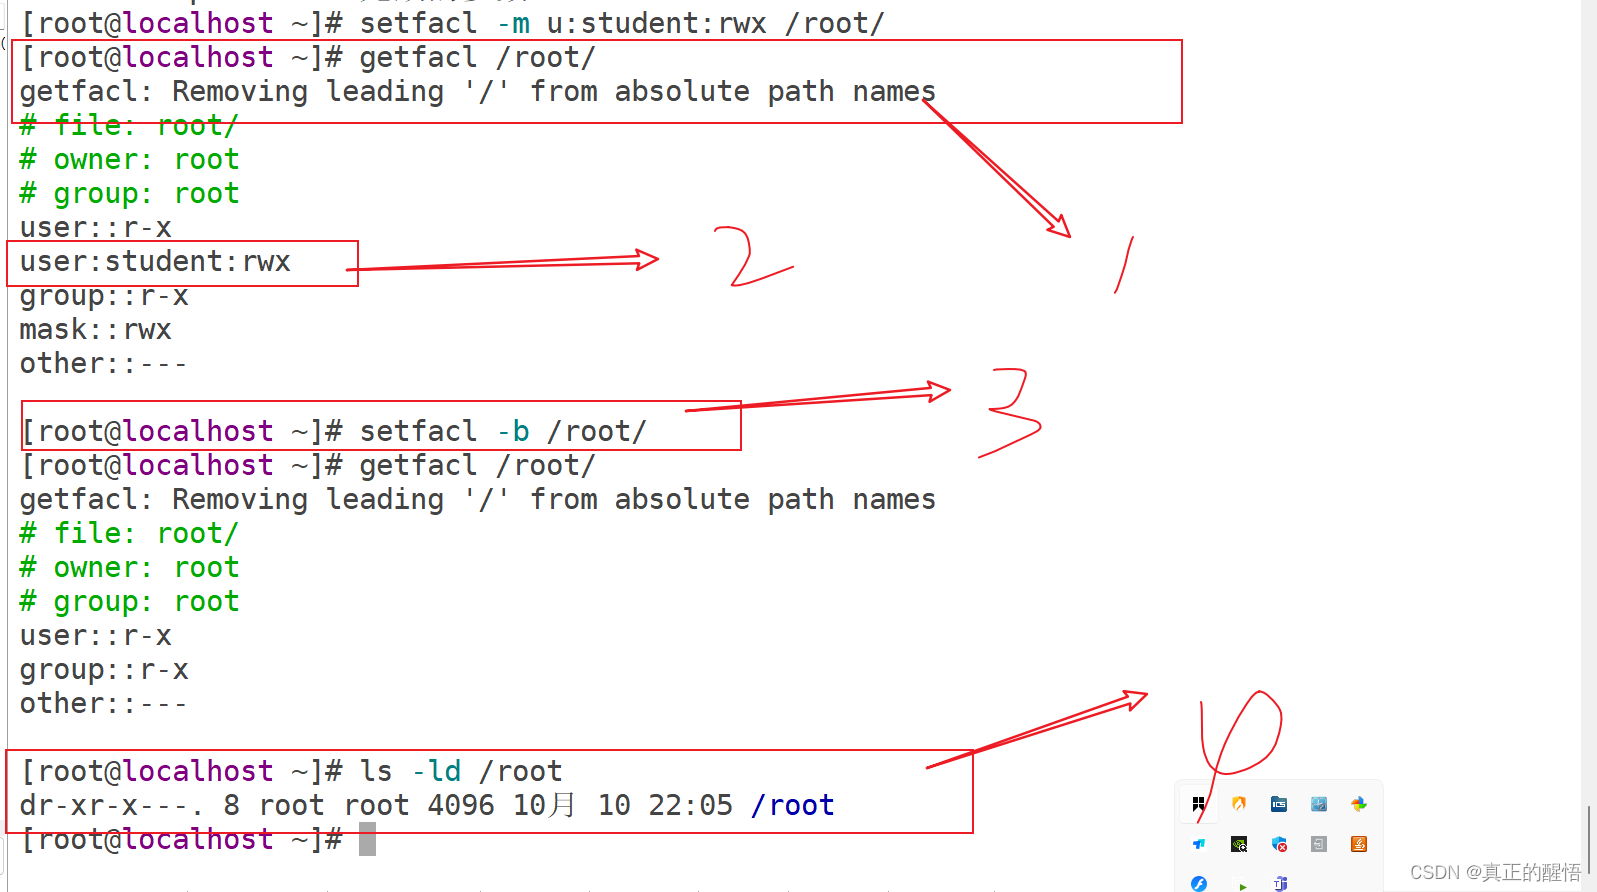
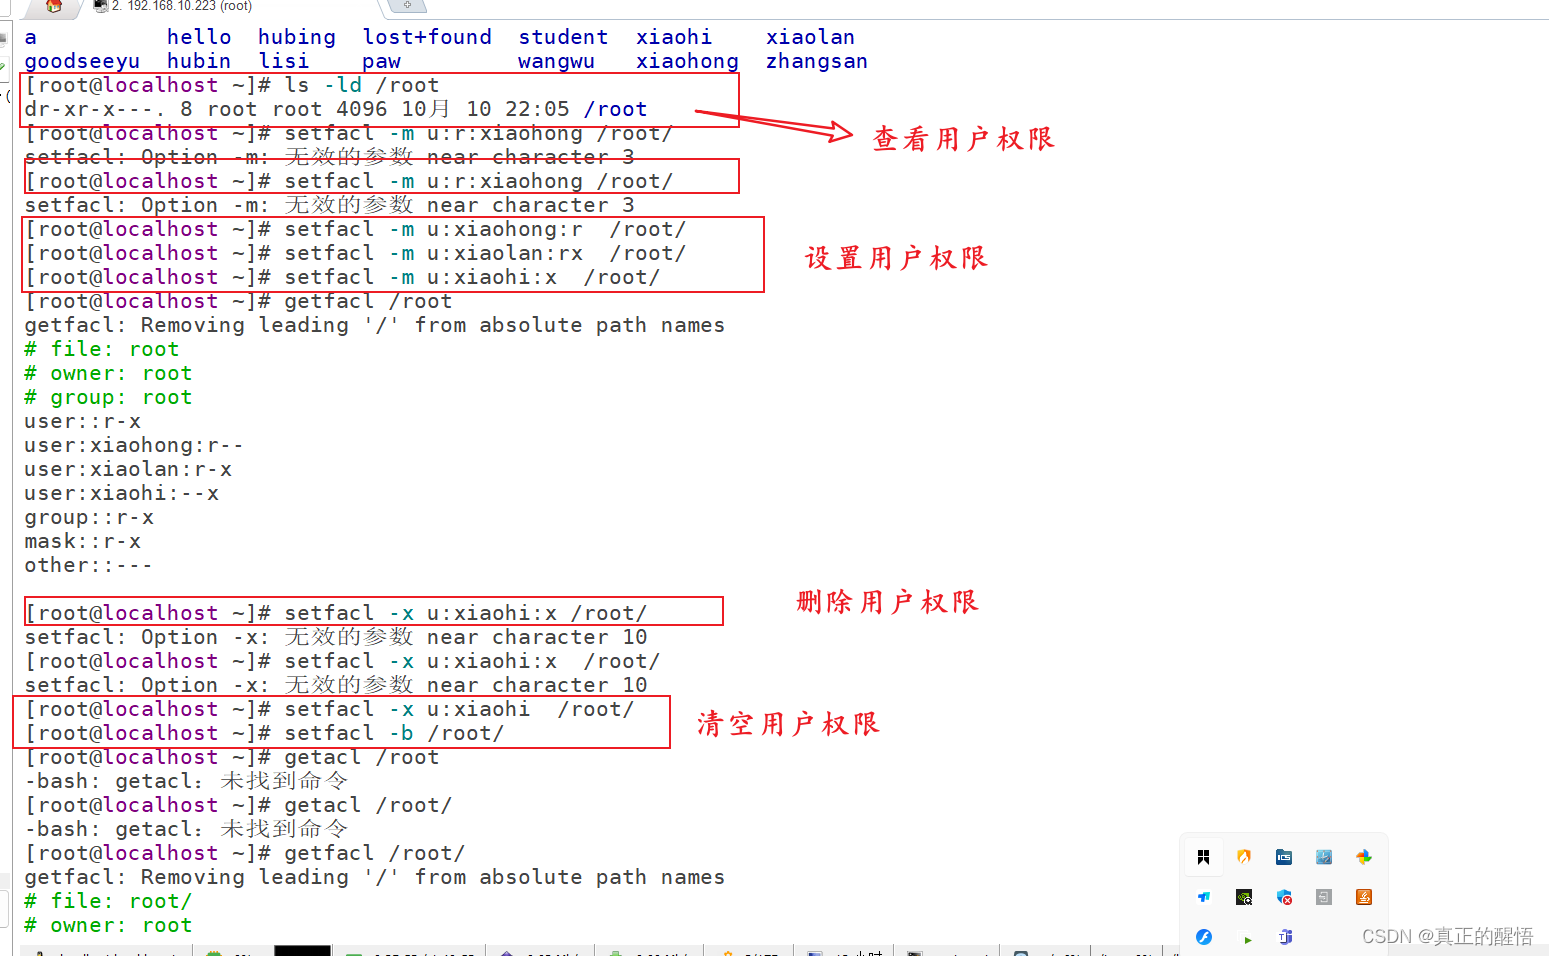
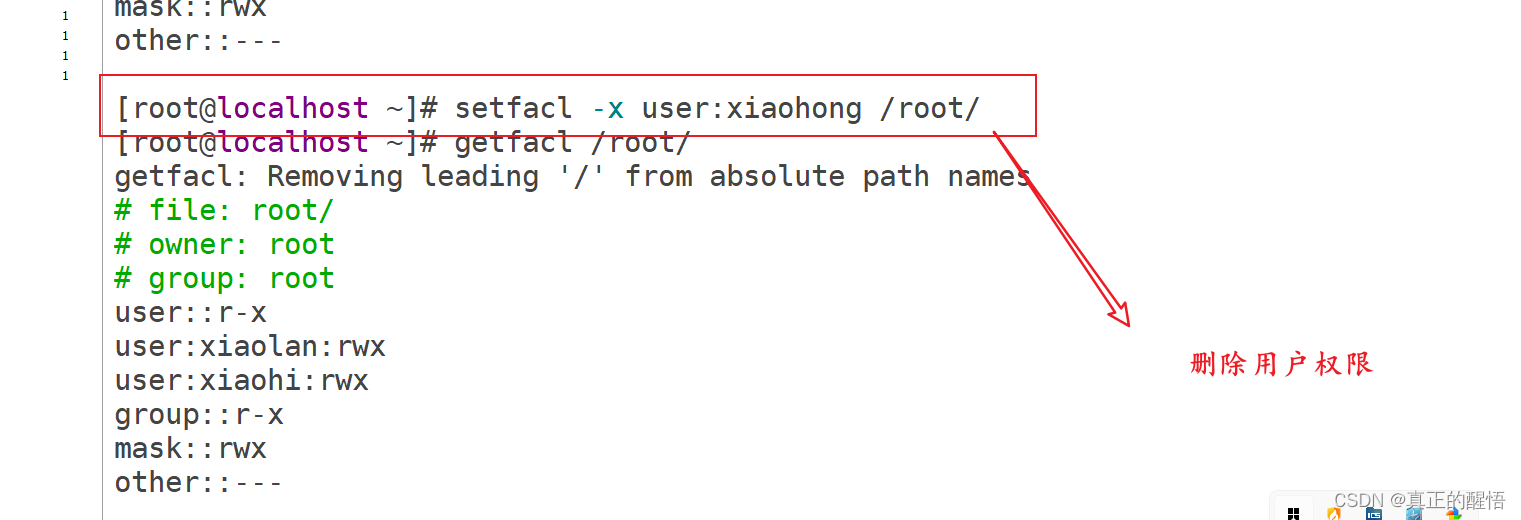
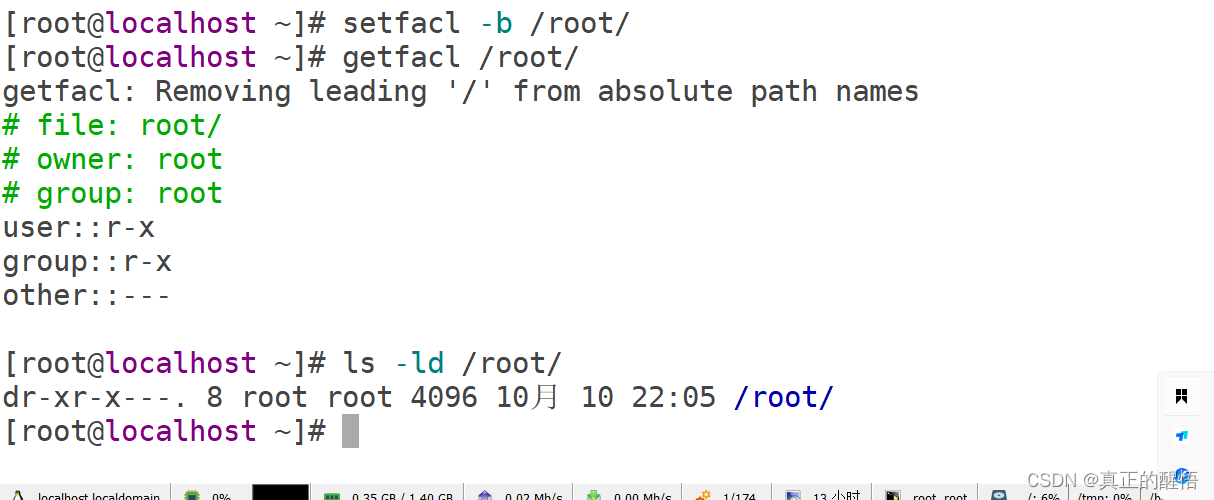
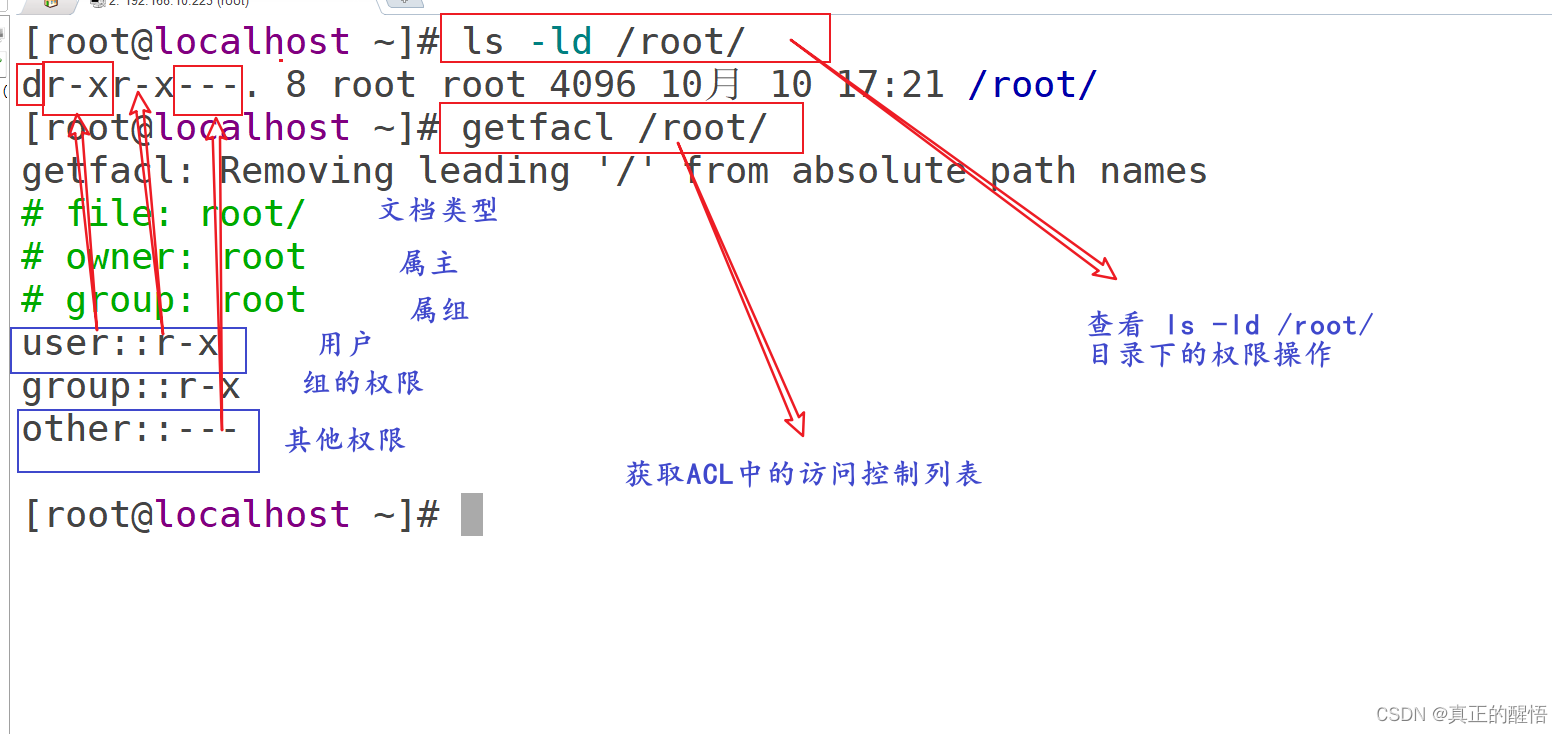
53 ACL 基础操作 getfacl:获取acl
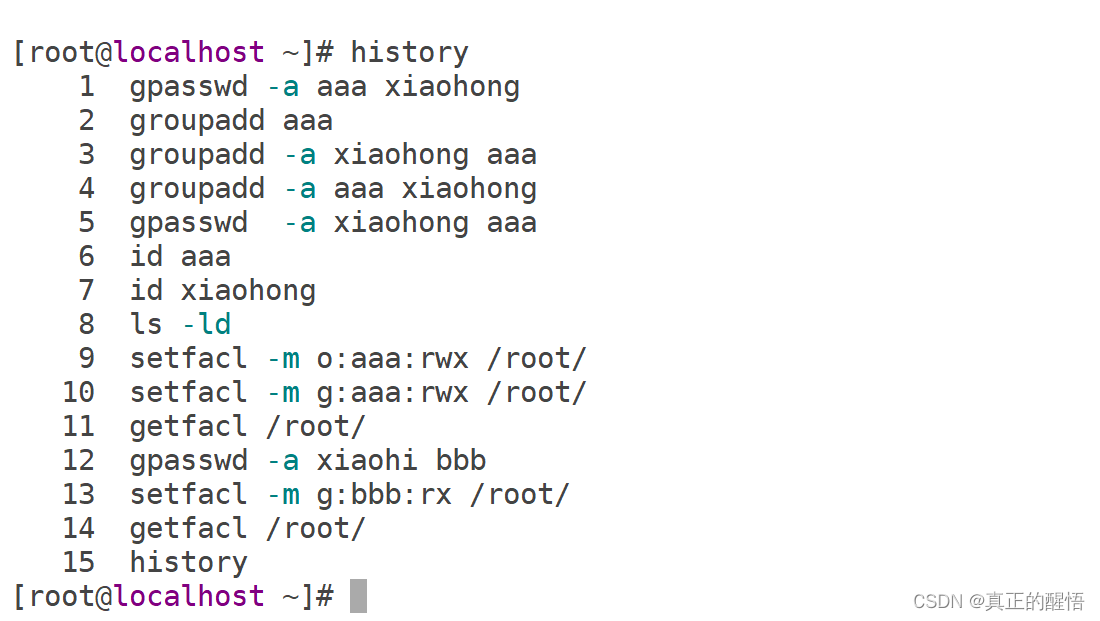
54 SUID/SGID/STICK 基础操作
-
SUID(Set User ID):SUID是一种特殊权限位,当应用程序被设置为SUID时,用户将以文件所有者(通常是管理员)的身份运行该程序。这允许普通用户以超级用户身份执行某些命令或操作。例如,passwd命令必须具有SUID位才能让用户更改自己的密码。
-
SGID(Set Group ID):SGID是类似于SUID的特殊权限位,但它是为组而设计的。当应用程序被设置为SGID时,用户将以文件所属组的身份运行该程序。这可以确保多个用户可以访问同一组共享的文件时,可以在相同的组权限下访问该文件。例如,一个共享文件夹的SGID位可以确保所有成员都可以访问并编辑该文件夹中的文件。
-
STICKY(Sticky Bit):STICKY是一种权限标记,它可以应用于目录。当一个目录被设置为sticky bit时,只有该目录的所有者和超级用户才能删除或移动该目录中的文件。其他用户不能删除或移动其他用户的文件,因此这是一种用于保护共享目录的有用机制。
54.1 SUID测试
// 测试普通用户在执行具有suid权限的程序后,能否具有此程序的属主权限
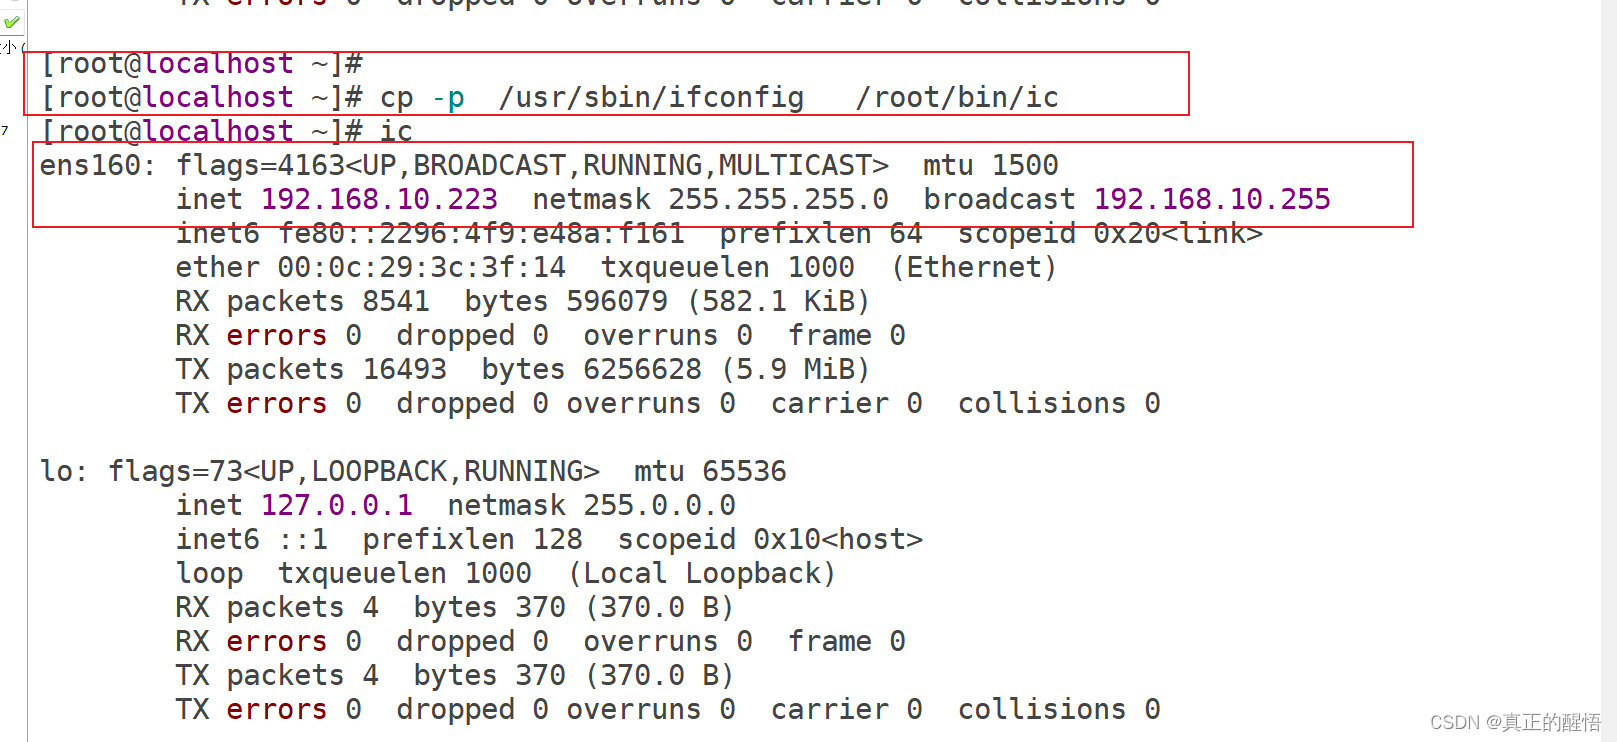
[root@zbx ~]# cp -p /usr/bin/vim /usr/bin/.vim // -p 复制权限
[root@zbx ~]# ls -l /usr/bin/vim /usr/bin/.vim
-rwxr-xr-x. 1 root root 3222024  3月 21  2022 /usr/bin/.vim
-rwxr-xr-x. 1 root root 3222024  3月 21  2022 /usr/bin/vim
[root@zbx ~]#
[root@zbx ~]# chmod u+s /usr/bin/.vim  // 给.vim 程序添加SUID权限
[root@zbx ~]#
[root@zbx ~]# ls -l /usr/bin/vim /usr/bin/.vim
-rwsr-xr-x. 1 root root 3222024  3月 21  2022 /usr/bin/.vim
-rwxr-xr-x. 1 root root 3222024  3月 21  2022 /usr/bin/vim
[root@zbx ~]# useradd student
[root@zbx ~]# su - student
[student@zbx ~]$ ls -l /usr/bin/vim /usr/bin/.vim
-rwsr-xr-x. 1 root root 3222024  3月 21  2022 /usr/bin/.vim
-rwxr-xr-x. 1 root root 3222024  3月 21  2022 /usr/bin/vim

[student@zbx ~]$ vim /home/student/stu1.txt
[student@zbx ~]$ .vim /home/student/stu2.txt

[student@zbx ~]$ ls -l /home/student/stu1.txt /home/student/stu2.txt


// 查看发现,虽然使用的是用户student进行的文档创建,但是stu2.txt属主变成了root


[root@zbx ~]# find /usr/bin/ -perm -u=s -type f // 查找/usr/bin目录下所有具有SUID的程序文件

// 查找/run目录下属组具有s特权(SGID)的目录
[root@zbx ~]# find /run -perm -g=s -type d
54.2 SGID测试
// 测试在不具有SGID的目录下创建文档时,与具有SGID的目录下创建文档时,所创建文档属组的区别

[root@zbx ~]# mkdir -m ug=rwx,o=rx /public  // -m : 在创建目录的同时设置权限
[root@zbx ~]# ls -ld /public/
drwxrwxr-x. 2 root root 4096  4月 23 16:00 /public/
[root@zbx ~]# useradd zhangsan
[root@zbx ~]# chown :zhangsan /public/
[root@zbx ~]# ls -ld /public/
drwxrwxr-x. 2 root zhangsan 4096  4月 23 16:00 /public/
[root@zbx ~]#
[root@zbx ~]# touch /public/root1.txt
[root@zbx ~]#
[root@zbx ~]# chmod g+s /public/
[root@zbx ~]#
[root@zbx ~]# ls -ld /public/
drwxrwsr-x. 2 root users 4096  4月 23 16:03 /public/
[root@zbx ~]#
[root@zbx ~]# touch /public/root2.txt
[root@zbx ~]#
[root@zbx ~]# ls -l /public/*.txt
-rw-------. 1 root root  0  4月 23 16:03 /public/root1.txt
-rw-------. 1 root zhangsan 0  4月 23 16:05 /public/root2.txt
54.3 粘滞位测试
在一个其他人有w权限的目录中,如果该目录有粘滞位的特殊权限,自己只能删自己创建的,不能删除其他人的文件。
// 测试添加了t权限的目录,用户是否还可以操作其他用户的文档
[root@zbx ~]# useradd student

// /home/student : student的家目录
// ~ :家目录,如果~后面什么都不跟,代表的是当前用户的家目录
// ~用户名 : 用户对应的家目录
[root@zbx ~]# touch ~student/root.txt
[root@zbx ~]# su - student
[student@zbx ~]$ ls -ld ~student
drwx------ 2 student student 4096  6月  1 22:44 /home/student/

[student@zbx ~]$ rm -rf ~student/root.txt
[student@zbx ~]
// 可以删除,因为student用户对/home/student目录具有w权限,所以可以对目录下的文件进行删除

[student@zbx ~] exit
[root@zbx ~]# ls -ld /tmp/
drwxrwxrwt. 12 root root 240  4月 23 15:50 /tmp/

[root@zbx ~]# touch /tmp/root.txt

[root@zbx ~]# su - student

[student@zbx ~]$
[student@zbx ~]$ rm -rf /tmp/root.txt
// rm: 无法删除 '/tmp/root.txt': 不允许的操作
55 linunx操作命令汇总
1. pwd:显示当前目录的路径
2. cd:切换到指定目录
3. ls:列出指定目录下的所有文件和文件夹
4. touch:创建一个新文件
5. mkdir:创建一个新目录
6. rmdir:删除一个空的目录
7. rm:删除文件或目录
8. mv:移动或重命名文件或目录
9. cp:复制文件或目录
10. cat:显示文件内容
11. grep:在文件中查找指定内容
12. find:在指定目录下查找文件
13. chmod:改变文件或目录的访问权限
14. chown:改变文件或目录的所有者
15. chgrp:改变文件或目录的所属组
16. ping:测试网络连接
17. ifconfig:显示网络接口配置
18. netstat:显示网络状态
19. route:显示或修改网络路由表
20. iptables:管理网络防火墙规则
21. top:显示系统进程的实时信息
22. ps:显示系统进程的信息
23. kill:终止一个进程
24. free:显示系统内存使用情况
25. df:显示文件系统使用情况
26. du:显示指定目录的磁盘使用情况
27. tar:打包或解压文件
28. gzip:压缩文件
29. gunzip:解压缩文件
30. ssh:通过 SSH 安全连接到远程服务器
31. scp:通过 SSH 安全复制文件
32. rsync:通过 SSH 安全同步文件
33. curl:传输数据
34. wget:下载文件
35. yum:在 CentOS 或 RHEL 系统中安装、升级和删除软件包
36. apt-get:在 Debian 或 Ubuntu 系统中安装、升级和删除软件包
37. service:管理系统服务
38. systemctl:管理 systemd 系统服务
39. crontab:管理定时任务
40. useradd:创建新用户
41. userdel:删除用户
42. passwd:更改用户密码
43. groupadd:创建新用户组
44. groupdel:删除用户组
45. su:切换到另一个用户
46. sudo:以超级用户权限执行命令
47. ping6:测试 IPv6 网络连接
48. ifconfig6:显示 IPv6 网络接口配置
49. netstat6:显示 IPv6 网络状态
50. route6:显示或修改 IPv6 网络路由表
51. ip6tables:管理 IPv6 网络防火墙规则
52. screen:在终端中创建多个会话
53. tmux:在终端中管理多个会话
54. who:显示当前登录用户
55. whoami:显示当前用户名称
56. uname:显示系统信息
57. uptime:显示系统运行时间和负载
58. hostname:显示或设置系统主机名
59. date:显示或设置系统日期和时间
60. clear:清除终端上的内容
61. echo:输出文本
62. tee:将输出同时发送到终端和文件
63. cut:从文本中剪切数据
64. sed:编辑文本
65. awk:处理和分析文本
66. sort:对文本数据进行排序
67. uniq:从文本中删除重复行
68. diff:比较两个文本文件的差异
69. patch:将补丁文件应用到源代码中
70. make:构建源代码
71. gcc:编译 C 语言源代码
72. g++:编译 C++ 源代码
73. gdb:调试 C 或 C++ 程序
74. python:启动 Python 解释器
75. pip:管理 Python 模块
76. virtualenv:创建 Python 虚拟环境
77. git:管理源代码版本控制
78. svn:管理源代码版本控制
79. hg:管理源代码版本控制
80. ssh-keygen:创建 SSH 私钥和公钥对
81. ssh-copy-id:将 SSH 公钥复制到远程服务器
82. openssl:创建和管理 SSL/TLS 证书和密钥
83. nc:在网络上传输数据
84. tcpdump:在网络上捕获数据包
85. ngrep:在网络上查找指定内容的数据包
86. nmap:扫描网络和主机
87. arp:显示和修改网络地址映射表
88. dig:DNS 查询工具
89. nslookup:DNS 查询工具
90. host:DNS 查询工具
91. traceroute:显示数据包到目标主机的路径
92. mtr:显示数据包到目标主机的路径和网络延迟
93. telnet:与远程服务器进行交互式通信
94. ftp:使用 FTP 协议进行文件传输
95. sftp:使用 SSH 安全文件传输协议进行文件传输
96. scp:使用 SSH 安全文件传输协议进行文件传输
97. curlftpfs:使用 FTP 文件系统连接到远程文件夹
98. nfs:使用 NFS 文件系统连接到远程文件夹
99. smbclient:使用 SMB/CIFS 协议连接到远程文件夹
100. mount:挂载文件系统
101. umount:卸载文件系统
102. lsblk:显示所有块设备
103. fdisk:管理磁盘分区
104. mkfs:格式化磁盘分区
105. fsck:检查和修复文件系统
106. mountpoint:检查目录是否为挂载点
107. blkid:显示块设备的 UUID 和文件系统类型
108. lspci:显示系统中所有 PCI 设备的信息
109. lsusb:显示系统中所有 USB 设备的信息
110. lshw:显示系统硬件信息