在网上看到一个开源的分库分表组件,并且通过SPI机制做成了springboot的starter,觉得挺有意思的,给大家介绍一下。**
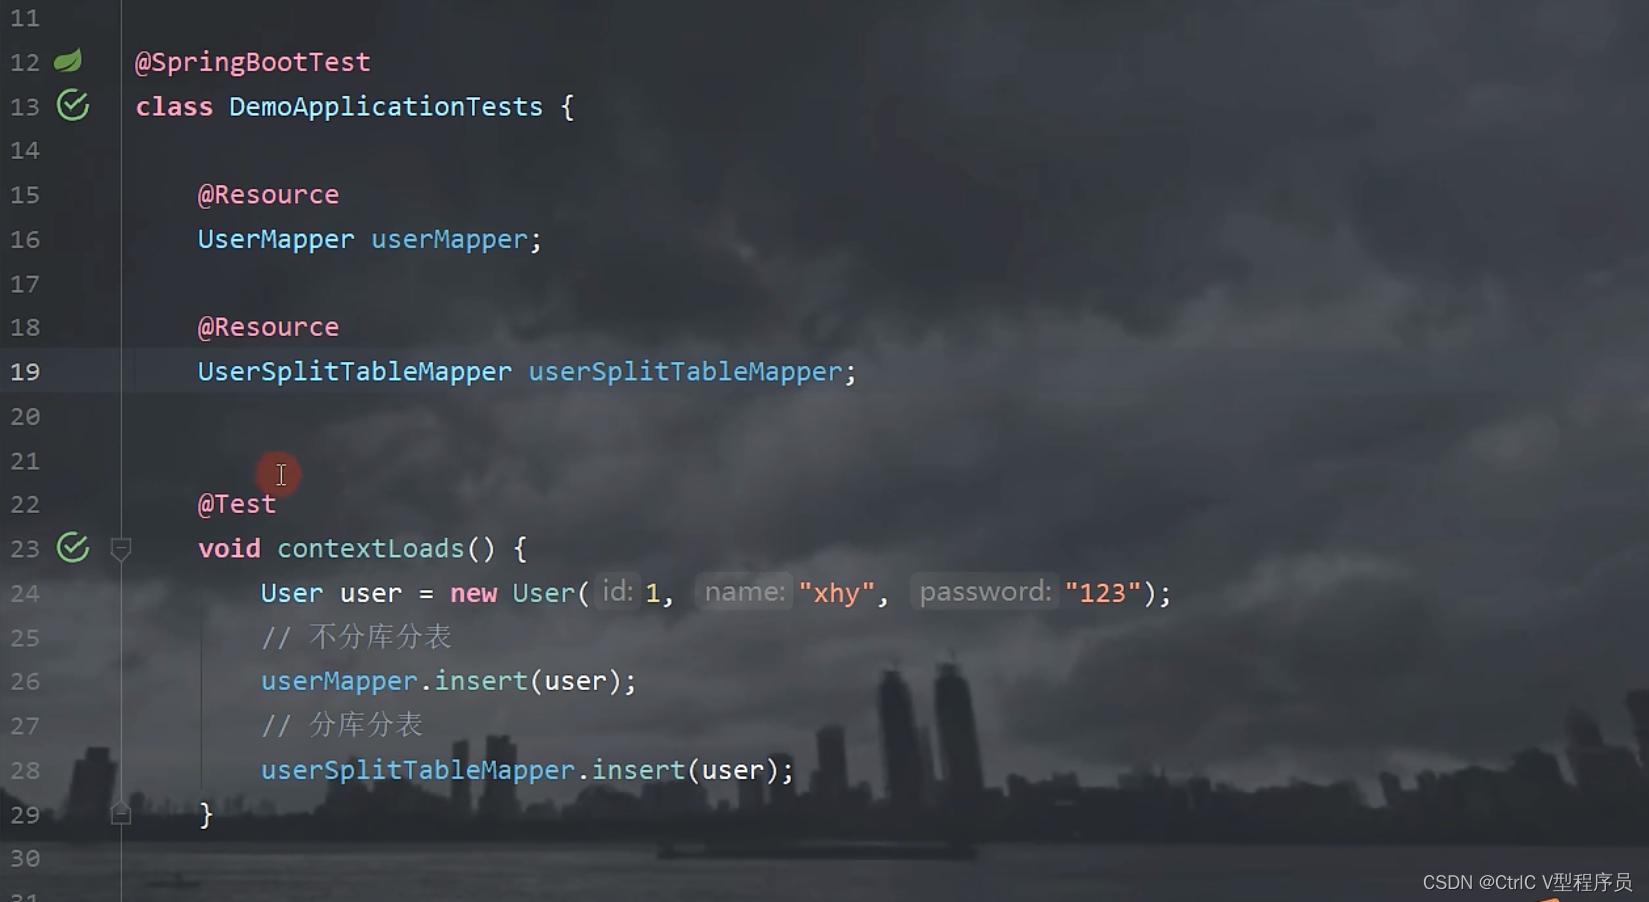
首先有两个mapper对象,一个是普通的mapper,一个是分库分表的mapper,分别往数据库插入数据。

可以看到分为了三个数据库,分别是test test_01 test_02,然后test库有一张user表,test_01 test_02各有user_000-003个四张表,然后我们运行测试用例:
我们可以看到在test库的user表和test01的user_001表分别插入了一条记录,分库分表成功。
使用起来非常简单,只需要在Mapper接口上加入两个注解:
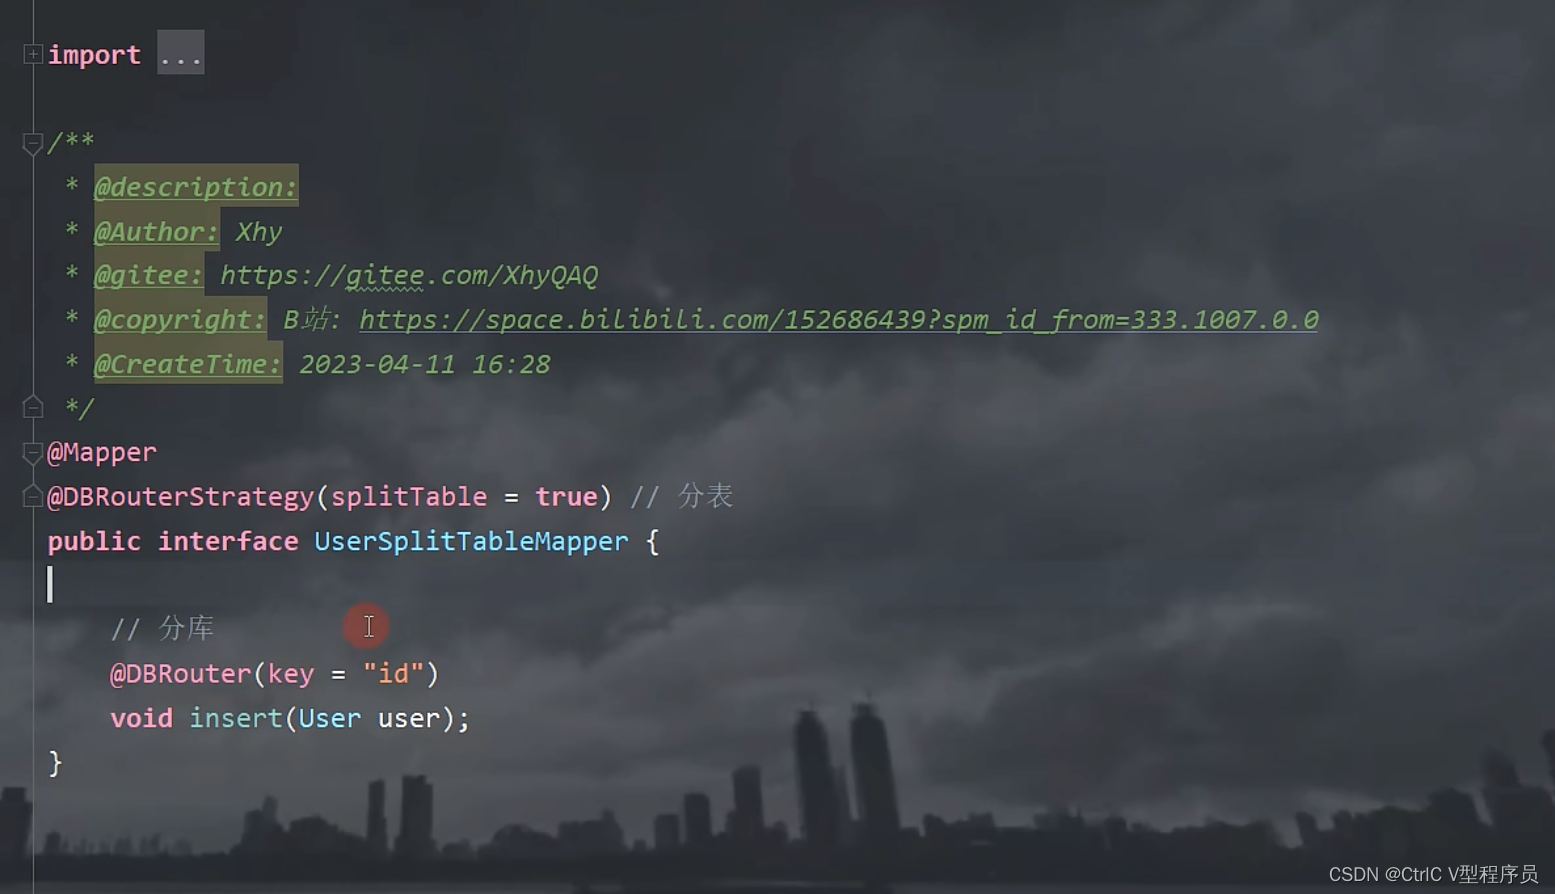
第一个注解DBRouterStrategy表示是否需要分表,第二个注解DBRouterStrategy表示分库分表的字段。
下面我们来讲解分库分表的原理
宏观流程
1.在调用dao层接口时换数据源 -> 更换库
2.在执行sql之前替换原有sql ->更换表
3.执行sql
核心类
AbstractRoutingDataSource类是用于动态切换数据源
AbstractRoutingDataSource#determineCurrentLookupKey用于获取数据源的抽象方法
DynamicMybatisPlugin实现Interceptor接口可用于拦截sql操作
DBRouterStrategyHashCode路由计算:由HashMap扰动函数的散列方式
微观流程
1.使用SPI机制扫描注入DataSourceAutoConfig
2.获取并存储配置文件中配置的数据源信息
3.创建DynamicDataSource代替mybatis中数据源bean,重写**determineCurrentLookupKey()**方法,设置数据源策略
4.创建TransactionTemplate ,供后续声明式事务
5.创建DBRouterConfig ,用于存储DB的信息(库表数量,路由字段)
6.创建IDBRouterStrategy路由策略,供后续可以手动设置路由(一个事务中需要切换多个数据源会导致数据源失效,因此需要先设置路由)
7.创建DynamicMybatisPlugin拦截器,用于动态修改sql操作哪张表
8.创建DBRouterJoinPointaop,用于在不手动设置路由情况下,aop设置路由策略
首先是DataSourceAutoConfig
@Configuration
public class DataSourceAutoConfig implements EnvironmentAware {

    /**
     * 数据源配置组
     * value:数  据源详细信息
     */
    private Map<String, Map<String, Object>> dataSourceMap = new HashMap<>();

    /**
     * 默认数据源配置
     */
    private Map<String, Object> defaultDataSourceConfig;

    /**
     * 分库数量
     */
    private int dbCount;

    /**
     * 分表数量
     */
    private int tbCount;

    /**
     * 路由字段
     */
    private String routerKey;

    /**
     * AOP,用于分库
     * @param dbRouterConfig
     * @param dbRouterStrategy
     * @return
     */
    @Bean(name = "db-router-point")
    @ConditionalOnMissingBean
    public DBRouterJoinPoint point(DBRouterConfig dbRouterConfig, IDBRouterStrategy dbRouterStrategy) {
        return new DBRouterJoinPoint(dbRouterConfig, dbRouterStrategy);
    }

    /**
     * 将DB的信息注入到spring中,供后续获取
     * @return
     */
    @Bean
    public DBRouterConfig dbRouterConfig() {
        return new DBRouterConfig(dbCount, tbCount, routerKey);
    }

    /**
     * 配置插件bean,用于动态的决定表信息
     * @return
     */
    @Bean
    public Interceptor plugin() {
        return new DynamicMybatisPlugin();
    }

    /**
     * 用于配置 TargetDataSources 以及 DefaultTargetDataSource
     * TargetDataSources: 额外的数据源
     * 可以用指定的key获取其他的数据源来达到动态切换数据源
     * DefaultTargetDataSource: 默认的数据源
     * 如果没有要用的数据源就会使用默认的数据源
     * @return
     */
    @Bean
    public DataSource dataSource() {
        Map<Object, Object> targetDataSources = new HashMap<>();
        for (String dbInfo : dataSourceMap.keySet()) {
            Map<String, Object> objMap = dataSourceMap.get(dbInfo);
            targetDataSources.put(dbInfo, new DriverManagerDataSource(objMap.get("url").toString(), objMap.get("username").toString(), objMap.get("password").toString()));
        }

        // 设置数据源
        DynamicDataSource dynamicDataSource = new DynamicDataSource();
        dynamicDataSource.setTargetDataSources(targetDataSources);
        dynamicDataSource.setDefaultTargetDataSource(new DriverManagerDataSource(defaultDataSourceConfig.get("url").toString(), defaultDataSourceConfig.get("username").toString(), defaultDataSourceConfig.get("password").toString()));

        return dynamicDataSource;
    }


    /**
     * 依赖注入
     * @param dbRouterConfig
     * @return
     */
    @Bean
    public IDBRouterStrategy dbRouterStrategy(DBRouterConfig dbRouterConfig) {
        return new DBRouterStrategyHashCode(dbRouterConfig);
    }


    /**
     * 配置事务
     * @param dataSource
     * @return
     */
    @Bean
    public TransactionTemplate transactionTemplate(DataSource dataSource) {
        DataSourceTransactionManager dataSourceTransactionManager = new DataSourceTransactionManager();
        dataSourceTransactionManager.setDataSource(dataSource);

        TransactionTemplate transactionTemplate = new TransactionTemplate();
        transactionTemplate.setTransactionManager(dataSourceTransactionManager);
        transactionTemplate.setPropagationBehaviorName("PROPAGATION_REQUIRED");
        return transactionTemplate;
    }

    /**
     * 读取yml中的数据源信息
     * @param environment
     */
    @Override
    public void setEnvironment(Environment environment) {
        String prefix = "xhy-db-router.jdbc.datasource.";

        dbCount = Integer.valueOf(environment.getProperty(prefix + "dbCount"));
        tbCount = Integer.valueOf(environment.getProperty(prefix + "tbCount"));
        routerKey = environment.getProperty(prefix + "routerKey");

        // 分库分表数据源
        String dataSources = environment.getProperty(prefix + "list");
        assert dataSources != null;
        for (String dbInfo : dataSources.split(",")) {
            Map<String, Object> dataSourceProps = PropertyUtil.handle(environment, prefix + dbInfo, Map.class);
            dataSourceMap.put(dbInfo, dataSourceProps);
        }

        // 默认数据源
        String defaultData = environment.getProperty(prefix + "default");
        defaultDataSourceConfig = PropertyUtil.handle(environment, prefix + defaultData, Map.class);

    }
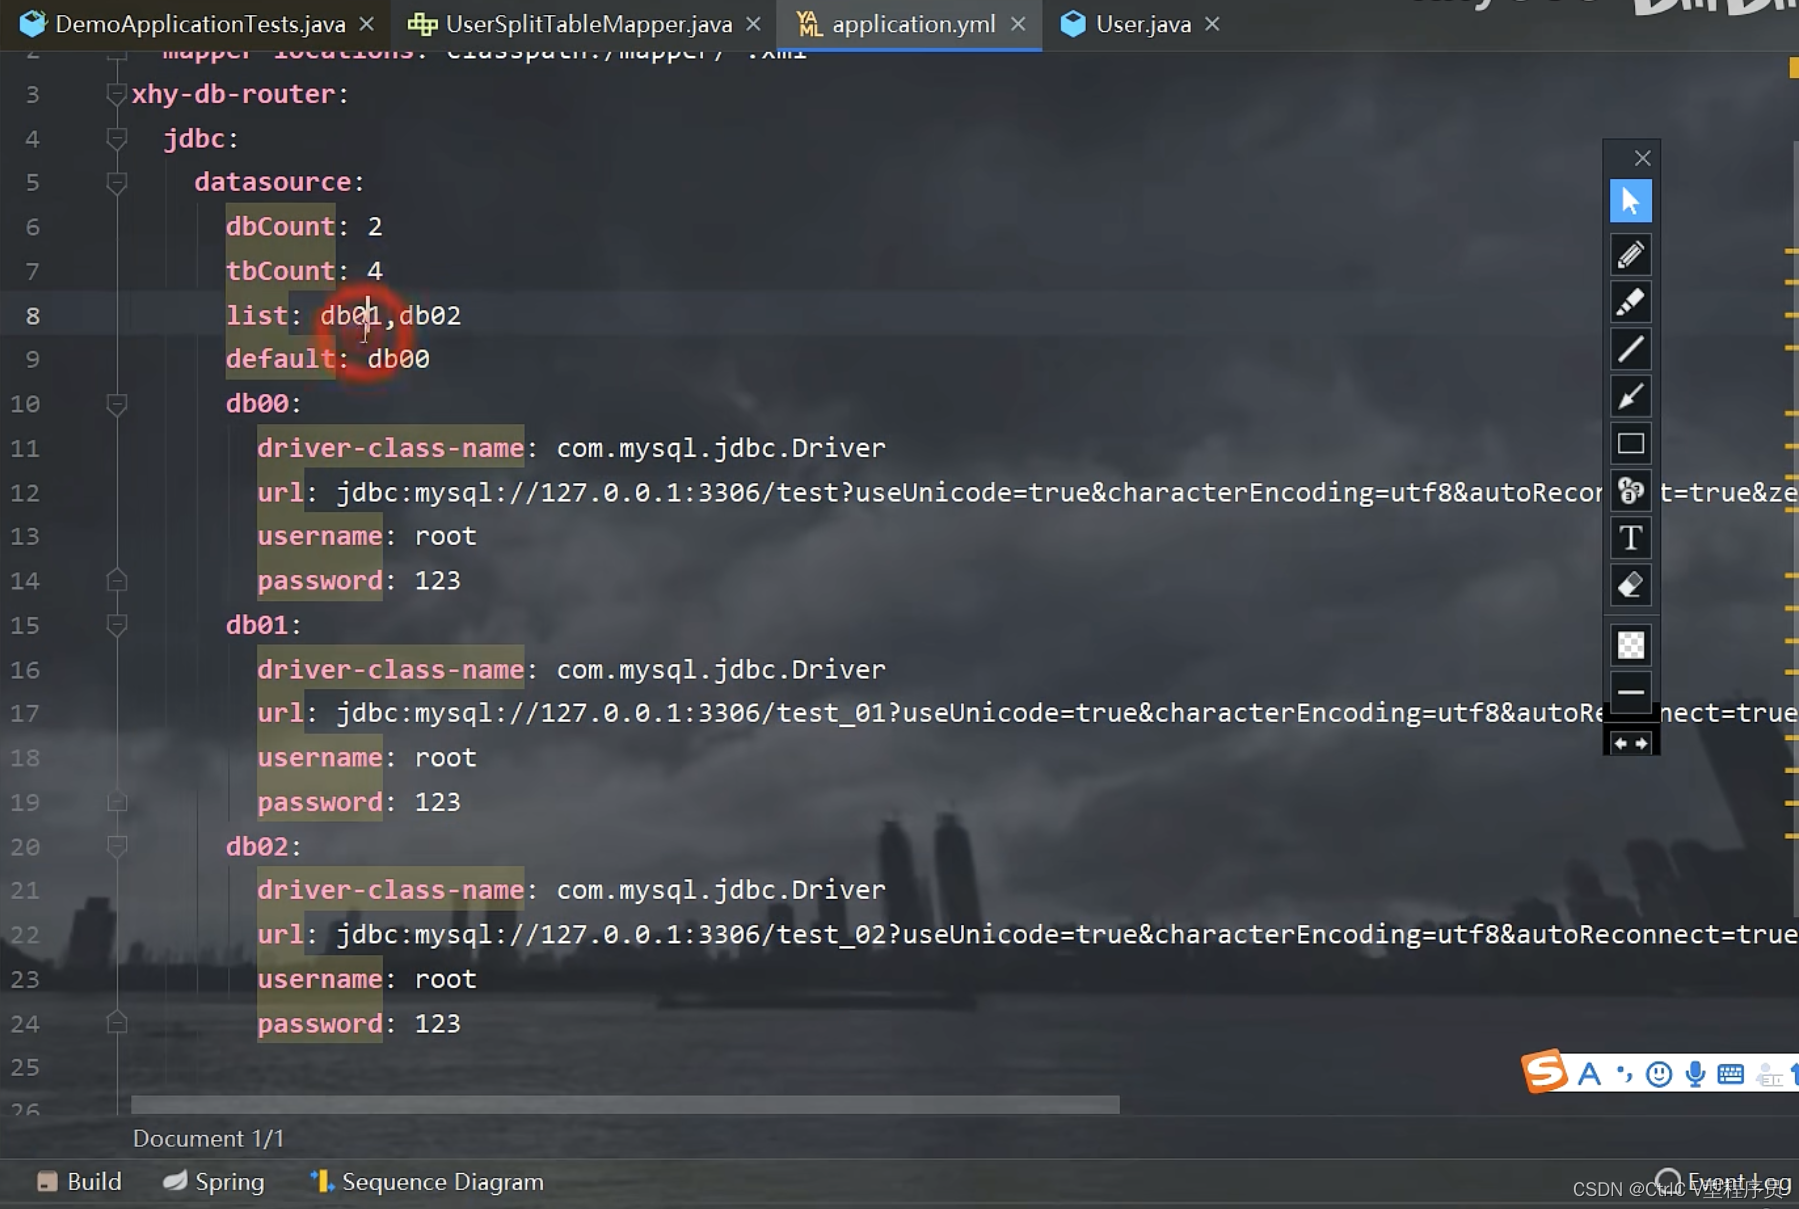
首先这个类实现了 EnvironmentAware接口,通过setEnvironment方法从配置文件中加载数据源,放入dataSourceMap中,配置文件的内容如下图所示:
    /**
     * 读取yml中的数据源信息
     * @param environment
     */
    @Override
    public void setEnvironment(Environment environment) {
        String prefix = "xhy-db-router.jdbc.datasource.";

        dbCount = Integer.valueOf(environment.getProperty(prefix + "dbCount"));
        tbCount = Integer.valueOf(environment.getProperty(prefix + "tbCount"));
        routerKey = environment.getProperty(prefix + "routerKey");

        // 分库分表数据源
        String dataSources = environment.getProperty(prefix + "list");
        assert dataSources != null;
        for (String dbInfo : dataSources.split(",")) {
            Map<String, Object> dataSourceProps = PropertyUtil.handle(environment, prefix + dbInfo, Map.class);
            dataSourceMap.put(dbInfo, dataSourceProps);
        }

        // 默认数据源
        String defaultData = environment.getProperty(prefix + "default");
        defaultDataSourceConfig = PropertyUtil.handle(environment, prefix + defaultData, Map.class);
然后在DataSource这个bean中设置了默认数据源和额外数据源,默认数据源就是配置文件中default指定的不分库分表的库,而其他的库都作为额外的数据源。
    /**
     * 用于配置 TargetDataSources 以及 DefaultTargetDataSource
     * TargetDataSources: 额外的数据源
     * 可以用指定的key获取其他的数据源来达到动态切换数据源
     * DefaultTargetDataSource: 默认的数据源
     * 如果没有要用的数据源就会使用默认的数据源
     * @return
     */
    @Bean
    public DataSource dataSource() {
        Map<Object, Object> targetDataSources = new HashMap<>();
        for (String dbInfo : dataSourceMap.keySet()) {
            Map<String, Object> objMap = dataSourceMap.get(dbInfo);
            targetDataSources.put(dbInfo, new DriverManagerDataSource(objMap.get("url").toString(), objMap.get("username").toString(), objMap.get("password").toString()));
        }

        // 设置数据源
        DynamicDataSource dynamicDataSource = new DynamicDataSource();
        dynamicDataSource.setTargetDataSources(targetDataSources);
        dynamicDataSource.setDefaultTargetDataSource(new DriverManagerDataSource(defaultDataSourceConfig.get("url").toString(), defaultDataSourceConfig.get("username").toString(), defaultDataSourceConfig.get("password").toString()));

        return dynamicDataSource;
    }
然后是DynamicDataSource继承了AbstractRoutingDataSource用于动态切换数据源。
public class DynamicDataSource extends AbstractRoutingDataSource {

    @Override
    protected Object determineCurrentLookupKey() {
        return "db" + DBContextHolder.getDBKey();
    }
}
然后我们进入集成的抽象类AbstractRoutingDataSource发现determineTargetDataSource这个方法决定了使用哪个数据源
	protected DataSource determineTargetDataSource() {
		Assert.notNull(this.resolvedDataSources, "DataSource router not initialized");
		Object lookupKey = determineCurrentLookupKey();
		DataSource dataSource = this.resolvedDataSources.get(lookupKey);
		if (dataSource == null && (this.lenientFallback || lookupKey == null)) {
			dataSource = this.resolvedDefaultDataSource;
		}
		if (dataSource == null) {
			throw new IllegalStateException("Cannot determine target DataSource for lookup key [" + lookupKey + "]");
		}
		return dataSource;
determineCurrentLookupKey方法是个抽象方法由我们自己实现,便是我们在DynamicDataSource中重写的方法,而DBContextHolder这个类是个ThreadLocal线程本地缓存变量,随着线程的创建而创建,销毁而销毁
public class DBContextHolder {

    private static final ThreadLocal<String> dbKey = new ThreadLocal<String>();
    private static final ThreadLocal<String> tbKey = new ThreadLocal<String>();

    public static void setDBKey(String dbKeyIdx){
        dbKey.set(dbKeyIdx);
    }

    public static String getDBKey(){
        return dbKey.get();
    }

    public static void setTBKey(String tbKeyIdx){
        tbKey.set(tbKeyIdx);
    }

    public static String getTBKey(){
        return tbKey.get();
    }

    public static void clearDBKey(){
        dbKey.remove();
    }

    public static void clearTBKey(){
        tbKey.remove();
    }

}
这个类分别有两个ThreadLocal,分别存放数据库和表的路由键。
接下来是DynamicMybatisPlugin拦截器类
@Intercepts({@Signature(type = StatementHandler.class, method = "prepare", args = {Connection.class, Integer.class})})
public class DynamicMybatisPlugin implements Interceptor {

    private Pattern pattern = Pattern.compile("(from|into|update)[\\s]{1,}(\\w{1,})", Pattern.CASE_INSENSITIVE);

    @Override
    public Object intercept(Invocation invocation) throws Throwable {
        // 获取StatementHandler
        StatementHandler statementHandler = (StatementHandler) invocation.getTarget();
        MetaObject metaObject = MetaObject.forObject(statementHandler, SystemMetaObject.DEFAULT_OBJECT_FACTORY, SystemMetaObject.DEFAULT_OBJECT_WRAPPER_FACTORY, new DefaultReflectorFactory());
        // MappedStatement 包含sql语句的元信息
        MappedStatement mappedStatement = (MappedStatement) metaObject.getValue("delegate.mappedStatement");

        // 获取自定义注解判断是否进行分表操作
        String id = mappedStatement.getId();
        String className = id.substring(0, id.lastIndexOf("."));
        Class<?> clazz = Class.forName(className);
        DBRouterStrategy dbRouterStrategy = clazz.getAnnotation(DBRouterStrategy.class);
        if (null == dbRouterStrategy || !dbRouterStrategy.splitTable()){
            return invocation.proceed();
        }

        // 获取SQL
        BoundSql boundSql = statementHandler.getBoundSql();
        String sql = boundSql.getSql();

        // 替换SQL表名 USER 为 USER_001
        Matcher matcher = pattern.matcher(sql);
        String tableName = null;
        if (matcher.find()) {
            tableName = matcher.group().trim();
        }
        assert null != tableName;
        String replaceSql = matcher.replaceAll(tableName + "_" + DBContextHolder.getTBKey());

        // 通过反射修改SQL语句
        Field field = boundSql.getClass().getDeclaredField("sql");
        field.setAccessible(true);
        field.set(boundSql, replaceSql);
        field.setAccessible(false);

        return invocation.proceed();
    }

}
拦截的类是StatementHandler,这个类是一个接口,有以下几个实现类
BaseStatementHandler:用于实现StatementHandler中子类公用的方法
RoutingStatementHandler:处理具体的组件
PreparedStatementHandler:用于处理带有参数的sql
CallableStatementHandler:用于处理带有存储过程的sql
SimpleStatementHandler:用于处理不带参数的sql
我们只拦截prepare这个预处理方法
@Override
  public Statement prepare(Connection connection, Integer transactionTimeout) throws SQLException {
    ErrorContext.instance().sql(boundSql.getSql());
    Statement statement = null;
    try {
      statement = instantiateStatement(connection);
      setStatementTimeout(statement, transactionTimeout);
      setFetchSize(statement);
      return statement;
    } catch (SQLException e) {
      closeStatement(statement);
      throw e;
    } catch (Exception e) {
      closeStatement(statement);
      throw new ExecutorException("Error preparing statement.  Cause: " + e, e);
    }
  }
这个方法主要是在执行sql之前做一些预处理,可以获取到需要执行的sql语句和参数。
DynamicMybatisPlugin的处理逻辑如下
1.拦截StatementHandler的prepare方法
2.通过StatementHandler获取到MappedStatement,通过反射从MappedStatement中获取到对应的Mapper类对象
3.通过Mapper类对象判断存不存在dbRouterStrategy注解
4.通过正则表达式从sql中截取表名,从ThreadLocal中获取表路由键,替换sql中的表名
接下来是DBRouterJoinPoint,这个类是一个动态代理切面类
@Aspect
public class DBRouterJoinPoint {

   private Logger logger = LoggerFactory.getLogger(DBRouterJoinPoint.class);

   private DBRouterConfig dbRouterConfig;

   private IDBRouterStrategy dbRouterStrategy;

   public DBRouterJoinPoint(DBRouterConfig dbRouterConfig, IDBRouterStrategy dbRouterStrategy) {
       this.dbRouterConfig = dbRouterConfig;
       this.dbRouterStrategy = dbRouterStrategy;
   }

   @Pointcut("@annotation(com.xhystudy.dbrouter.annotation.DBRouter)")
   public void aopPoint() {
   }

   /**
    * 所有需要分库分表的操作,都需要使用自定义注解进行拦截,拦截后读取方法中的入参字段,根据字段进行路由操作。
    * 1. dbRouter.key() 确定根据哪个字段进行路由
    * 2. getAttrValue 根据数据库路由字段,从入参中读取出对应的值。比如路由 key 是 uId,那么就从入参对象 Obj 中获取到 uId 的值。
    * 3. dbRouterStrategy.doRouter(dbKeyAttr) 路由策略根据具体的路由值进行处理
    * 4. 路由处理完成后放行。 jp.proceed();
    * 5. 最后 dbRouterStrategy 需要执行 clear 因为这里用到了 ThreadLocal 需要手动清空。关于 ThreadLocal 内存泄漏介绍 https://t.zsxq.com/027QF2fae
    */
   @Around("aopPoint() && @annotation(dbRouter)")
   public Object doRouter(ProceedingJoinPoint jp, DBRouter dbRouter) throws Throwable {
       String dbKey = dbRouter.key();

       if (StringUtils.isBlank(dbKey) && StringUtils.isBlank(dbRouterConfig.getRouterKey())) {
           throw new RuntimeException("annotation DBRouter key is null!");
       }
       dbKey = StringUtils.isNotBlank(dbKey) ? dbKey : dbRouterConfig.getRouterKey();
       // 路由属性
       String dbKeyAttr = getAttrValue(dbKey, jp.getArgs());
       // 路由策略
       dbRouterStrategy.doRouter(dbKeyAttr);
       // 返回结果
       try {
           return jp.proceed();
       } finally {
           dbRouterStrategy.clear();
       }
   }

   private Method getMethod(JoinPoint jp) throws NoSuchMethodException {
       Signature sig = jp.getSignature();
       MethodSignature methodSignature = (MethodSignature) sig;
       return jp.getTarget().getClass().getMethod(methodSignature.getName(), methodSignature.getParameterTypes());
   }

   public String getAttrValue(String attr, Object[] args) {
       if (1 == args.length) {
           Object arg = args[0];
           if (arg instanceof String) {
               return arg.toString();
           }
       }

       String filedValue = null;
       for (Object arg : args) {
           try {
               if (StringUtils.isNotBlank(filedValue)) {
                   break;
               }
               filedValue = BeanUtils.getProperty(arg, attr);
           } catch (Exception e) {
               logger.error("获取路由属性值失败 attr:{}", attr, e);
           }
       }
       return filedValue;
   }

}
这个类拦截了带有DBRouter注解的方法,也就是mapper中的增删改查方法
DBRouterConfig是一个从配置文件里读数据的配置类,没啥好说的,然后是IDBRouterStrategy便是真正执行路由策略的核心类
这个切面的工作流程如下
1.拦截带有DBRouter注解的方法
2.通过三元运算从DBRouter注解和配置文件里routeKey配置项中获取路由字段,如果获取不到则报错
3.从参数中遍历获取路由字段的值
4.进行路由
接下来我们来到真正进行路由的IDBRouterStrategy,这是一个接口
public interface IDBRouterStrategy {

   /**
    * 路由计算
    *
    * @param dbKeyAttr 路由字段
    */
   void doRouter(String dbKeyAttr);

   /**
    * 手动设置分库路由
    *
    * @param dbIdx 路由库,需要在配置范围内
    */
   void setDBKey(int dbIdx);

   /**
    * 手动设置分表路由
    *
    * @param tbIdx 路由表,需要在配置范围内
    */
   void setTBKey(int tbIdx);

   /**
    * 获取分库数
    *
    * @return 数量
    */
   int dbCount();

   /**
    * 获取分表数
    *
    * @return 数量
    */
   int tbCount();

   /**
    * 清除路由
    */
   void clear();

}
我们找到实现类DBRouterStrategyHashCode
public class DBRouterStrategyHashCode implements IDBRouterStrategy {

   private Logger logger = LoggerFactory.getLogger(DBRouterStrategyHashCode.class);

   private DBRouterConfig dbRouterConfig;

   public DBRouterStrategyHashCode(DBRouterConfig dbRouterConfig) {
       this.dbRouterConfig = dbRouterConfig;
   }

   /**
    * 计算方式:
    * size = 库*表的数量
    * idx : 散列到的哪张表
    * dbIdx = idx / dbRouterConfig.getTbCount() + 1;
    * dbIdx : 用于计算哪个库,idx为0-size的值,除以表的数量 = 当前是几号库,又因库是从一号库开始算的,因此需要+1
    * tbIdx : idx - dbRouterConfig.getTbCount() * (dbIdx - 1);用于计算哪个表,
    * idx 可以理解为是第X张表,但是需要落地到是第几个库的第几个表
    * 例子:假设2库8表,idx为14,因此是第二个库的第6个表才是第14张表
    * (dbIdx - 1) 因为库是从1开始算的,因此这里需要-1
    * dbRouterConfig.getTbCount() * (dbIdx - 1) 是为了算出当前库前面的多少张表,也就是要跳过前面的这些表,
    * 然后来计算当前库中的表
    * @param dbKeyAttr 路由字段
    */
   @Override
   public void doRouter(String dbKeyAttr) {

       // 获取所有表
       int size = dbRouterConfig.getDbCount() * dbRouterConfig.getTbCount();

       // 扰动函数;在 JDK 的 HashMap 中,对于一个元素的存放,需要进行哈希散列。而为了让散列更加均匀,所以添加了扰动函数。
       // 因此在这里借鉴 HashMap 源码
       int idx = (size - 1) & (dbKeyAttr.hashCode() ^ (dbKeyAttr.hashCode() >>> 16));

       // 库表索引;相当于是把一个长条的桶,切割成段,对应分库分表中的库编号和表编号
       // 获取对应的库,库是从1开始算的,因此要在此基础上+1
       int dbIdx = idx / dbRouterConfig.getTbCount() + 1;

       int tbIdx = idx - dbRouterConfig.getTbCount() * (dbIdx - 1);

       // 设置库表信息到上下文,String.format("%02d", dbIdx),数据不为两位的话则在前面补0,这里的策略主要和设置的库表名称有关
       // 例如: 库名称为test_01 那就写%02d。表名称user_001 对应%03d
       DBContextHolder.setDBKey(String.format("%02d", dbIdx));
       DBContextHolder.setTBKey(String.format("%03d", tbIdx));
       logger.debug("数据库路由 dbIdx:{} tbIdx:{}",  dbIdx, tbIdx);
   }


   @Override
   public void setDBKey(int dbIdx) {
       DBContextHolder.setDBKey(String.format("%02d", dbIdx));
   }

   @Override
   public void setTBKey(int tbIdx) {
       DBContextHolder.setTBKey(String.format("%03d", tbIdx));
   }

   @Override
   public int dbCount() {
       return dbRouterConfig.getDbCount();
   }

   @Override
   public int tbCount() {
       return dbRouterConfig.getTbCount();
   }

   @Override
   public void clear(){
       DBContextHolder.clearDBKey();
       DBContextHolder.clearTBKey();
   }
这个类借鉴了HashMap的hash扰动算法,下面我简单介绍下哈希扰动
这个Hashmap的Hash值计算方法
 static final int hash(Object key) {
     int h;
     return (key == null) ? 0 : (h = key.hashCode()) ^ (h >>> 16);
 }
这里的代码很简单,就是让key对象的哈希值自身和右移16位后的自己,进行异或运算。我们来讨论一下为什么要这样做。
其只要目的有两个,一是通过逻辑运算是哈希值落在数组的下标区间内,第二点也是主要的一点,尽可能的降低哈希碰撞发生的概率。
哈希碰撞会对hashMap的性能带来灾难性的影响。如果多个hashCode()的值落到同一个桶内的时候,这些值是存储到一个链表中的。最坏的情况下,所有的key都映射到同一个桶中,这样hashmap就退化成了一个链表——查找时间从O(1)到O(n)。
原始的哈希值计算出来以后就是32位了,而我们的容量明显不会有这么大,所以需要把原始的哈希值进行运算,使得其在某个固定的区间。比如我们的容量只有16,那么下标就是0-15,这样的话,就必须保证哈希值在此区间。首先最直白的方式肯定是取余,比如对16取余,就可以得到0-15这16种结果,刚好可以放入数组中,但是取余操作的效率很低,所以采用了位运算的方式,其本质上就是一种效率更高的取余。
当进行put操作的时候,底层通过(n-1)&hash这样一个运算,巧妙的对原始哈希值进行了取余运算。n为数组的长度,n-1就会得到一个低位全为1的二进制数,如15(00001111),31(00011111),某个数对这种数进行与操作,很明显高位全为0,低位全保留了原样,从而把范围固定在了0到(n-1)之间。(按位运算方法取余只对2的n次幂-1才适用,所以容量为2的n次幂也是十分关键的)。
但这时候问题就来了,这样就算我的散列值分布再松散,要是只取最后几位的话,碰撞也会很严重。更要命的是如果散列本身做得不好,分布上成等差数列的漏洞,恰好使最后几个低位呈现规律性重复,就无比蛋疼。
右位移16位,正好是32bit的一半,自己的高半区和低半区做异或,就是为了混合原始哈希码的高位和低位,以此来加大低位的随机性。而且混合后的低位掺杂了高位的部分特征,这样高位的信息也被变相保留下来。


