本文分享SMOKE的模型推理,和可视化结果。以kitti数据集为例子,对训练完的模型进行推理,并可视化3D框的结果,画到图像中。
关于模型原理、搭建开发环境、模型训练,可以参考之前的博客:
【论文解读】SMOKE 单目相机 3D目标检测(CVPR2020)_一颗小树x的博客-CSDN博客_smoke 论文
CVPR2020 SMOKE 单目相机 3D目标检测【环境搭建篇】_一颗小树x的博客-CSDN博客
单目3D目标检测——SMOKE 环境搭建|模型训练_一颗小树x的博客-CSDN博客

一、模型训练
模型训练的轮数,建议参考官方的25000轮,然后获得模型训练产出:
last_checkpoint 指定模型权重路径
log.txt 记录训练过程的日志信息
model_0010000.pth 模型训练10000轮保持的权重
model_0018000.pth 模型训练18000轮保持的权重
model_final.pth 模型训练结束 保持的权重(25000轮)
当然可以调整训练的配置文件 configs/smoke_gn_vector.yaml
MAX_ITERATION,这里官网的训练轮数是25000次,训练完模型效果还行。
IMS_PER_BATCH,批量大小是32,显存没这么大,可以改小一些。
STEPS,是训练过程中,在多少轮时,保存模型的权重;默认是10000轮、18000轮,自行修改。
其它的根据任务情况,修改即可。
二、模型推理
在last_checkpoint 文件会指定模型推理权重路径,默认是:
./tools/logs/model_final.pth
可以根据权重的名称和路径,自行修改。
使用以下命令进行模型推理
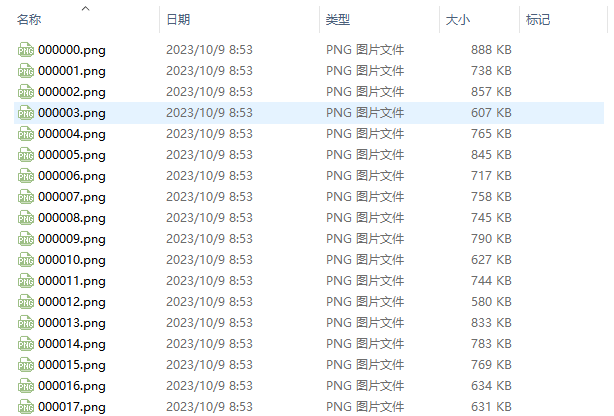
python tools/plain_train_net.py --eval-only --config-file "configs/smoke_gn_vector.yaml"成功执行后,会在 tools/logs 目录中,生成一个inference目录,存放kitti testing的推理结果
000000.txt
000001.txt
......
007517.txt
三、可视化结果
首先观察inference目录的txt文件,以为000001.txt例
Car 0 0 0.47040000557899475 142.83970642089844 181.67050170898438 348.4837951660156 249.11219787597656 1.5202000141143799 1.6481000185012817 4.1107001304626465 -8.623299598693848 1.7422000169754028 17.326099395751953 0.00860000029206276 0.4050000011920929
Car 0 0 -1.8617000579833984 9.46560001373291 176.27439880371094 213.91610717773438 291.6900939941406 1.4990999698638916 1.6033999919891357 3.7634999752044678 -7.857800006866455 1.5611000061035156 11.27649974822998 -2.4702999591827393 0.40119999647140503
其实生成的结果,和kitii标签格式是一致的。
然后准备kitii testing的相机标定参数,实现可视化3D框的结果,画到图像中。代码的目录结构

其中dataset目录的结构如下:

我们需要存放calib 相机标定文件、imges_2 testing的图像、label_2 复制inference下的txt到里面。
主代码 kitti_3d_vis.py
# kitti_3d_vis.py


from __future__ import print_function

import os
import sys
import cv2
import random
import os.path
import shutil
from PIL import Image
BASE_DIR = os.path.dirname(os.path.abspath(__file__))
ROOT_DIR = os.path.dirname(BASE_DIR)
sys.path.append(BASE_DIR)
sys.path.append(os.path.join(ROOT_DIR, 'mayavi'))
from kitti_util import *

def visualization():
    import mayavi.mlab as mlab
    dataset = kitti_object(r'./dataset/')

    path = r'./dataset/testing/label_2/'
    Save_Path = r'./save_3d_output/'
    files = os.listdir(path)
    for file in files:
        name = file.split('.')[0]
        save_path = Save_Path + name + '.png'
        data_idx = int(name)

        # Load data from dataset
        objects = dataset.get_label_objects(data_idx)
        img = dataset.get_image(data_idx)
        img = cv2.cvtColor(img, cv2.COLOR_BGR2RGB)
        calib = dataset.get_calibration(data_idx)
        print(' ------------ save image with 3D bounding box ------- ')
        print('name:', name)
        show_image_with_boxes(img, objects, calib, save_path, True)


if __name__=='__main__':
    visualization()
依赖代码 kitti_util.py
# kitti_util.py


from __future__ import print_function

import os
import sys
import cv2
import numpy as np
from PIL import Image
import matplotlib.pyplot as plt
BASE_DIR = os.path.dirname(os.path.abspath(__file__))
ROOT_DIR = os.path.dirname(BASE_DIR)
sys.path.append(os.path.join(ROOT_DIR, 'mayavi'))

class kitti_object(object):
    def __init__(self, root_dir, split='testing'):
        self.root_dir = root_dir
        self.split = split
        self.split_dir = os.path.join(root_dir, split)

        if split == 'training':
            self.num_samples = 7481
        elif split == 'testing':
            self.num_samples = 7518
        else:
            print('Unknown split: %s' % (split))
            exit(-1)

        self.image_dir = os.path.join(self.split_dir, 'image_2')
        self.calib_dir = os.path.join(self.split_dir, 'calib')
        self.label_dir = os.path.join(self.split_dir, 'label_2')

    def __len__(self):
        return self.num_samples

    def get_image(self, idx):
        assert(idx<self.num_samples)
        img_filename = os.path.join(self.image_dir, '%06d.png'%(idx))
        return load_image(img_filename)

    def get_calibration(self, idx):
        assert(idx<self.num_samples)
        calib_filename = os.path.join(self.calib_dir, '%06d.txt'%(idx))
        return Calibration(calib_filename)

    def get_label_objects(self, idx):
        # assert(idx<self.num_samples and self.split=='training')
        label_filename = os.path.join(self.label_dir, '%06d.txt'%(idx))
        return read_label(label_filename)

def show_image_with_boxes(img, objects, calib, save_path, show3d=True):
    ''' Show image with 2D bounding boxes '''
    img1 = np.copy(img) # for 2d bbox
    img2 = np.copy(img) # for 3d bbox
    for obj in objects:
        if obj.type=='DontCare':continue
        cv2.rectangle(img1, (int(obj.xmin),int(obj.ymin)), (int(obj.xmax),int(obj.ymax)), (0,255,0), 2) # 画2D框
        box3d_pts_2d, box3d_pts_3d = compute_box_3d(obj, calib.P) # 获取3D框-图像(8*2)、3D框-相机坐标系(8*3)
        img2 = draw_projected_box3d(img2, box3d_pts_2d) # 在图像上画3D框
    if show3d:
        Image.fromarray(img2).save(save_path) # 保存带有3D框的图像
        # Image.fromarray(img2).show()
    else:
        Image.fromarray(img1).save(save_path) # 保存带有2D框的图像
        # Image.fromarray(img1).show()


class Object3d(object):
    ''' 3d object label '''
    def __init__(self, label_file_line):
        data = label_file_line.split(' ')
        data[1:] = [float(x) for x in data[1:]]

        # extract label, truncation, occlusion
        self.type = data[0] # 'Car', 'Pedestrian', ...
        self.truncation = data[1] # truncated pixel ratio [0..1]
        self.occlusion = int(data[2]) # 0=visible, 1=partly occluded, 2=fully occluded, 3=unknown
        self.alpha = data[3] # object observation angle [-pi..pi]

        # extract 2d bounding box in 0-based coordinates
        self.xmin = data[4] # left
        self.ymin = data[5] # top
        self.xmax = data[6] # right
        self.ymax = data[7] # bottom
        self.box2d = np.array([self.xmin,self.ymin,self.xmax,self.ymax])

        # extract 3d bounding box information
        self.h = data[8] # box height
        self.w = data[9] # box width
        self.l = data[10] # box length (in meters)
        self.t = (data[11],data[12],data[13]) # location (x,y,z) in camera coord.
        self.ry = data[14] # yaw angle (around Y-axis in camera coordinates) [-pi..pi]

    def print_object(self):
        print('Type, truncation, occlusion, alpha: %s, %d, %d, %f' % \
            (self.type, self.truncation, self.occlusion, self.alpha))
        print('2d bbox (x0,y0,x1,y1): %f, %f, %f, %f' % \
            (self.xmin, self.ymin, self.xmax, self.ymax))
        print('3d bbox h,w,l: %f, %f, %f' % \
            (self.h, self.w, self.l))
        print('3d bbox location, ry: (%f, %f, %f), %f' % \
            (self.t[0],self.t[1],self.t[2],self.ry))


class Calibration(object):
    ''' Calibration matrices and utils
        3d XYZ in <label>.txt are in rect camera coord.
        2d box xy are in image2 coord
        Points in <lidar>.bin are in Velodyne coord.

        y_image2 = P^2_rect * x_rect
        y_image2 = P^2_rect * R0_rect * Tr_velo_to_cam * x_velo
        x_ref = Tr_velo_to_cam * x_velo
        x_rect = R0_rect * x_ref

        P^2_rect = [f^2_u,  0,      c^2_u,  -f^2_u b^2_x;
                    0,      f^2_v,  c^2_v,  -f^2_v b^2_y;
                    0,      0,      1,      0]
                 = K * [1|t]

        image2 coord:
         ----> x-axis (u)
        |
        |
        v y-axis (v)

        velodyne coord:
        front x, left y, up z

        rect/ref camera coord:
        right x, down y, front z

        Ref (KITTI paper): http://www.cvlibs.net/publications/Geiger2013IJRR.pdf

        TODO(rqi): do matrix multiplication only once for each projection.
    '''
    def __init__(self, calib_filepath, from_video=False):
        if from_video:
            calibs = self.read_calib_from_video(calib_filepath)
        else:
            calibs = self.read_calib_file(calib_filepath)
        # Projection matrix from rect camera coord to image2 coord
        self.P = calibs['P2']
        self.P = np.reshape(self.P, [3,4])
        # Rigid transform from Velodyne coord to reference camera coord
        self.V2C = calibs['Tr_velo_to_cam']
        self.V2C = np.reshape(self.V2C, [3,4])
        self.C2V = inverse_rigid_trans(self.V2C)
        # Rotation from reference camera coord to rect camera coord
        self.R0 = calibs['R0_rect']
        self.R0 = np.reshape(self.R0,[3,3])

        # Camera intrinsics and extrinsics
        self.c_u = self.P[0,2]
        self.c_v = self.P[1,2]
        self.f_u = self.P[0,0]
        self.f_v = self.P[1,1]
        self.b_x = self.P[0,3]/(-self.f_u) # relative
        self.b_y = self.P[1,3]/(-self.f_v)

    def read_calib_file(self, filepath):
        ''' Read in a calibration file and parse into a dictionary.'''
        data = {}
        with open(filepath, 'r') as f:
            for line in f.readlines():
                line = line.rstrip()
                if len(line)==0: continue
                key, value = line.split(':', 1)
                # The only non-float values in these files are dates, which
                # we don't care about anyway
                try:
                    data[key] = np.array([float(x) for x in value.split()])
                except ValueError:
                    pass

        return data

    def read_calib_from_video(self, calib_root_dir):
        ''' Read calibration for camera 2 from video calib files.
            there are calib_cam_to_cam and calib_velo_to_cam under the calib_root_dir
        '''
        data = {}
        cam2cam = self.read_calib_file(os.path.join(calib_root_dir, 'calib_cam_to_cam.txt'))
        velo2cam = self.read_calib_file(os.path.join(calib_root_dir, 'calib_velo_to_cam.txt'))
        Tr_velo_to_cam = np.zeros((3,4))
        Tr_velo_to_cam[0:3,0:3] = np.reshape(velo2cam['R'], [3,3])
        Tr_velo_to_cam[:,3] = velo2cam['T']
        data['Tr_velo_to_cam'] = np.reshape(Tr_velo_to_cam, [12])
        data['R0_rect'] = cam2cam['R_rect_00']
        data['P2'] = cam2cam['P_rect_02']
        return data

    def cart2hom(self, pts_3d):
        ''' Input: nx3 points in Cartesian
            Oupput: nx4 points in Homogeneous by pending 1
        '''
        n = pts_3d.shape[0]
        pts_3d_hom = np.hstack((pts_3d, np.ones((n,1))))
        return pts_3d_hom

    # ===========================
    # ------- 3d to 3d ----------
    # ===========================
    def project_velo_to_ref(self, pts_3d_velo):
        pts_3d_velo = self.cart2hom(pts_3d_velo) # nx4
        return np.dot(pts_3d_velo, np.transpose(self.V2C))

    def project_ref_to_velo(self, pts_3d_ref):
        pts_3d_ref = self.cart2hom(pts_3d_ref) # nx4
        return np.dot(pts_3d_ref, np.transpose(self.C2V))

    def project_rect_to_ref(self, pts_3d_rect):
        ''' Input and Output are nx3 points '''
        return np.transpose(np.dot(np.linalg.inv(self.R0), np.transpose(pts_3d_rect)))

    def project_ref_to_rect(self, pts_3d_ref):
        ''' Input and Output are nx3 points '''
        return np.transpose(np.dot(self.R0, np.transpose(pts_3d_ref)))

    def project_rect_to_velo(self, pts_3d_rect):
        ''' Input: nx3 points in rect camera coord.
            Output: nx3 points in velodyne coord.
        '''
        pts_3d_ref = self.project_rect_to_ref(pts_3d_rect)
        return self.project_ref_to_velo(pts_3d_ref)

    def project_velo_to_rect(self, pts_3d_velo):
        pts_3d_ref = self.project_velo_to_ref(pts_3d_velo)
        return self.project_ref_to_rect(pts_3d_ref)

    def corners3d_to_img_boxes(self, corners3d):
        """
        :param corners3d: (N, 8, 3) corners in rect coordinate
        :return: boxes: (None, 4) [x1, y1, x2, y2] in rgb coordinate
        :return: boxes_corner: (None, 8) [xi, yi] in rgb coordinate
        """
        sample_num = corners3d.shape[0]
        corners3d_hom = np.concatenate((corners3d, np.ones((sample_num, 8, 1))), axis=2)  # (N, 8, 4)

        img_pts = np.matmul(corners3d_hom, self.P.T)  # (N, 8, 3)

        x, y = img_pts[:, :, 0] / img_pts[:, :, 2], img_pts[:, :, 1] / img_pts[:, :, 2]
        x1, y1 = np.min(x, axis=1), np.min(y, axis=1)
        x2, y2 = np.max(x, axis=1), np.max(y, axis=1)

        boxes = np.concatenate((x1.reshape(-1, 1), y1.reshape(-1, 1), x2.reshape(-1, 1), y2.reshape(-1, 1)), axis=1)
        boxes_corner = np.concatenate((x.reshape(-1, 8, 1), y.reshape(-1, 8, 1)), axis=2)

        return boxes, boxes_corner


    # ===========================
    # ------- 3d to 2d ----------
    # ===========================
    def project_rect_to_image(self, pts_3d_rect):
        ''' Input: nx3 points in rect camera coord.
            Output: nx2 points in image2 coord.
        '''
        pts_3d_rect = self.cart2hom(pts_3d_rect)
        pts_2d = np.dot(pts_3d_rect, np.transpose(self.P)) # nx3
        pts_2d[:,0] /= pts_2d[:,2]
        pts_2d[:,1] /= pts_2d[:,2]
        return pts_2d[:,0:2]

    def project_velo_to_image(self, pts_3d_velo):
        ''' Input: nx3 points in velodyne coord.
            Output: nx2 points in image2 coord.
        '''
        pts_3d_rect = self.project_velo_to_rect(pts_3d_velo)
        return self.project_rect_to_image(pts_3d_rect)

    # ===========================
    # ------- 2d to 3d ----------
    # ===========================
    def project_image_to_rect(self, uv_depth):
        ''' Input: nx3 first two channels are uv, 3rd channel
                   is depth in rect camera coord.
            Output: nx3 points in rect camera coord.
        '''
        n = uv_depth.shape[0]
        x = ((uv_depth[:,0]-self.c_u)*uv_depth[:,2])/self.f_u + self.b_x
        y = ((uv_depth[:,1]-self.c_v)*uv_depth[:,2])/self.f_v + self.b_y
        pts_3d_rect = np.zeros((n,3))
        pts_3d_rect[:,0] = x
        pts_3d_rect[:,1] = y
        pts_3d_rect[:,2] = uv_depth[:,2]
        return pts_3d_rect

    def project_image_to_velo(self, uv_depth):
        pts_3d_rect = self.project_image_to_rect(uv_depth)
        return self.project_rect_to_velo(pts_3d_rect)


def rotx(t):
    ''' 3D Rotation about the x-axis. '''
    c = np.cos(t)
    s = np.sin(t)
    return np.array([[1,  0,  0],
                     [0,  c, -s],
                     [0,  s,  c]])


def roty(t):
    ''' Rotation about the y-axis. '''
    c = np.cos(t)
    s = np.sin(t)
    return np.array([[c,  0,  s],
                     [0,  1,  0],
                     [-s, 0,  c]])


def rotz(t):
    ''' Rotation about the z-axis. '''
    c = np.cos(t)
    s = np.sin(t)
    return np.array([[c, -s,  0],
                     [s,  c,  0],
                     [0,  0,  1]])


def transform_from_rot_trans(R, t):
    ''' Transforation matrix from rotation matrix and translation vector. '''
    R = R.reshape(3, 3)
    t = t.reshape(3, 1)
    return np.vstack((np.hstack([R, t]), [0, 0, 0, 1]))


def inverse_rigid_trans(Tr):
    ''' Inverse a rigid body transform matrix (3x4 as [R|t])
        [R'|-R't; 0|1]
    '''
    inv_Tr = np.zeros_like(Tr) # 3x4
    inv_Tr[0:3,0:3] = np.transpose(Tr[0:3,0:3])
    inv_Tr[0:3,3] = np.dot(-np.transpose(Tr[0:3,0:3]), Tr[0:3,3])
    return inv_Tr

def read_label(label_filename):
    lines = [line.rstrip() for line in open(label_filename)]
    objects = [Object3d(line) for line in lines]
    return objects

def load_image(img_filename):
    return cv2.imread(img_filename)

def load_velo_scan(velo_filename):
    scan = np.fromfile(velo_filename, dtype=np.float32)
    scan = scan.reshape((-1, 4))
    return scan

def project_to_image(pts_3d, P):
    '''
    将3D坐标点投影到图像平面上,生成2D坐
    pts_3d是一个nx3的矩阵,包含了待投影的3D坐标点(每行一个点),P是相机的投影矩阵,通常是一个3x4的矩阵。
    函数返回一个nx2的矩阵,包含了投影到图像平面上的2D坐标点。
    '''

    ''' Project 3d points to image plane.

    Usage: pts_2d = projectToImage(pts_3d, P)
      input: pts_3d: nx3 matrix
             P:      3x4 projection matrix
      output: pts_2d: nx2 matrix

      P(3x4) dot pts_3d_extended(4xn) = projected_pts_2d(3xn)
      => normalize projected_pts_2d(2xn)

      <=> pts_3d_extended(nx4) dot P'(4x3) = projected_pts_2d(nx3)
          => normalize projected_pts_2d(nx2)
    '''
    n = pts_3d.shape[0] # 获取3D点的数量
    pts_3d_extend = np.hstack((pts_3d, np.ones((n,1)))) # 将每个3D点的坐标扩展为齐次坐标形式(4D),通过在每个点的末尾添加1,创建了一个nx4的矩阵。
    # print(('pts_3d_extend shape: ', pts_3d_extend.shape))

    pts_2d = np.dot(pts_3d_extend, np.transpose(P)) # 将扩展的3D坐标点矩阵与投影矩阵P相乘,得到一个nx3的矩阵,其中每一行包含了3D点在图像平面上的投影坐标。每个点的坐标表示为[x, y, z]。
    pts_2d[:,0] /= pts_2d[:,2] # 将投影坐标中的x坐标除以z坐标,从而获得2D图像上的x坐标。
    pts_2d[:,1] /= pts_2d[:,2] # 将投影坐标中的y坐标除以z坐标,从而获得2D图像上的y坐标。
    return pts_2d[:,0:2] # 返回一个nx2的矩阵,其中包含了每个3D点在2D图像上的坐标。


def compute_box_3d(obj, P):
    '''
    计算对象的3D边界框在图像平面上的投影
    输入: obj代表一个物体标签信息,  P代表相机的投影矩阵-内参。
    输出: 返回两个值, corners_3d表示3D边界框在 相机坐标系 的8个角点的坐标-3D坐标。
                                     corners_2d表示3D边界框在 图像上 的8个角点的坐标-2D坐标。
    '''
    # compute rotational matrix around yaw axis
    # 计算一个绕Y轴旋转的旋转矩阵R,用于将3D坐标从世界坐标系转换到相机坐标系。obj.ry是对象的偏航角
    R = roty(obj.ry)

    # 3d bounding box dimensions
    # 物体实际的长、宽、高
    l = obj.l;
    w = obj.w;
    h = obj.h;

    # 3d bounding box corners
    # 存储了3D边界框的8个角点相对于对象中心的坐标。这些坐标定义了3D边界框的形状。
    x_corners = [l/2,l/2,-l/2,-l/2,l/2,l/2,-l/2,-l/2];
    y_corners = [0,0,0,0,-h,-h,-h,-h];
    z_corners = [w/2,-w/2,-w/2,w/2,w/2,-w/2,-w/2,w/2];

    # rotate and translate 3d bounding box
    # 1、将3D边界框的角点坐标从对象坐标系转换到相机坐标系。它使用了旋转矩阵R
    corners_3d = np.dot(R, np.vstack([x_corners,y_corners,z_corners]))
    # 3D边界框的坐标进行平移
    corners_3d[0,:] = corners_3d[0,:] + obj.t[0];
    corners_3d[1,:] = corners_3d[1,:] + obj.t[1];
    corners_3d[2,:] = corners_3d[2,:] + obj.t[2];

    # 2、检查对象是否在相机前方,因为只有在相机前方的对象才会被绘制。
    # 如果对象的Z坐标(深度)小于0.1,就意味着对象在相机后方,那么corners_2d将被设置为None,函数将返回None。
    if np.any(corners_3d[2,:]<0.1):
        corners_2d = None
        return corners_2d, np.transpose(corners_3d)

    # project the 3d bounding box into the image plane
    # 3、将相机坐标系下的3D边界框的角点,投影到图像平面上,得到它们在图像上的2D坐标。
    corners_2d = project_to_image(np.transpose(corners_3d), P);
    return corners_2d, np.transpose(corners_3d)


def compute_orientation_3d(obj, P):
    ''' Takes an object and a projection matrix (P) and projects the 3d
        object orientation vector into the image plane.
        Returns:
            orientation_2d: (2,2) array in left image coord.
            orientation_3d: (2,3) array in in rect camera coord.
    '''

    # compute rotational matrix around yaw axis
    R = roty(obj.ry)

    # orientation in object coordinate system
    orientation_3d = np.array([[0.0, obj.l],[0,0],[0,0]])

    # rotate and translate in camera coordinate system, project in image
    orientation_3d = np.dot(R, orientation_3d)
    orientation_3d[0,:] = orientation_3d[0,:] + obj.t[0]
    orientation_3d[1,:] = orientation_3d[1,:] + obj.t[1]
    orientation_3d[2,:] = orientation_3d[2,:] + obj.t[2]

    # vector behind image plane?
    if np.any(orientation_3d[2,:]<0.1):
      orientation_2d = None
      return orientation_2d, np.transpose(orientation_3d)

    # project orientation into the image plane
    orientation_2d = project_to_image(np.transpose(orientation_3d), P);
    return orientation_2d, np.transpose(orientation_3d)

def draw_projected_box3d(image, qs, color=(0,60,255), thickness=2):
    '''
    qs: 包含8个3D边界框角点坐标的数组, 形状为(8, 2)。图像坐标下的3D框, 8个顶点坐标。
    '''
    ''' Draw 3d bounding box in image
        qs: (8,2) array of vertices for the 3d box in following order:
            1 -------- 0
           /|         /|
          2 -------- 3 .
          | |        | |
          . 5 -------- 4
          |/         |/
          6 -------- 7
    '''
    qs = qs.astype(np.int32) # 将输入的顶点坐标转换为整数类型,以便在图像上绘制。

    # 这个循环迭代4次,每次处理一个边界框的一条边。
    for k in range(0,4):
       # Ref: http://docs.enthought.com/mayavi/mayavi/auto/mlab_helper_functions.html

       # 定义了要绘制的边的起始点和结束点的索引。在这个循环中,它用于绘制边界框的前四条边。
       i,j=k,(k+1)%4
       cv2.line(image, (qs[i,0],qs[i,1]), (qs[j,0],qs[j,1]), color, thickness)

        # 定义了要绘制的边的起始点和结束点的索引。在这个循环中,它用于绘制边界框的后四条边,与前四条边平行
       i,j=k+4,(k+1)%4 + 4
       cv2.line(image, (qs[i,0],qs[i,1]), (qs[j,0],qs[j,1]), color, thickness)

        # 定义了要绘制的边的起始点和结束点的索引。在这个循环中,它用于绘制连接前四条边和后四条边的边界框的边。
       i,j=k,k+4
       cv2.line(image, (qs[i,0],qs[i,1]), (qs[j,0],qs[j,1]), color, thickness)
    return image
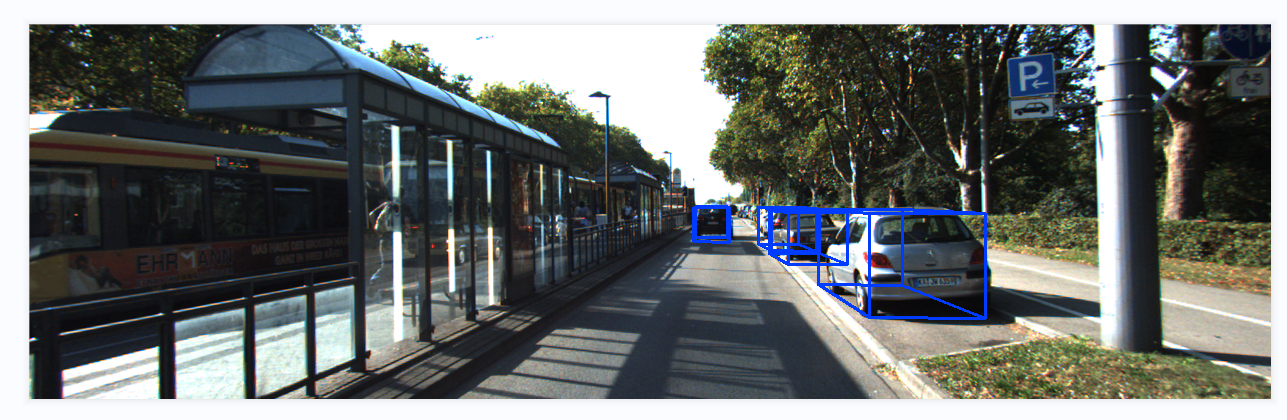
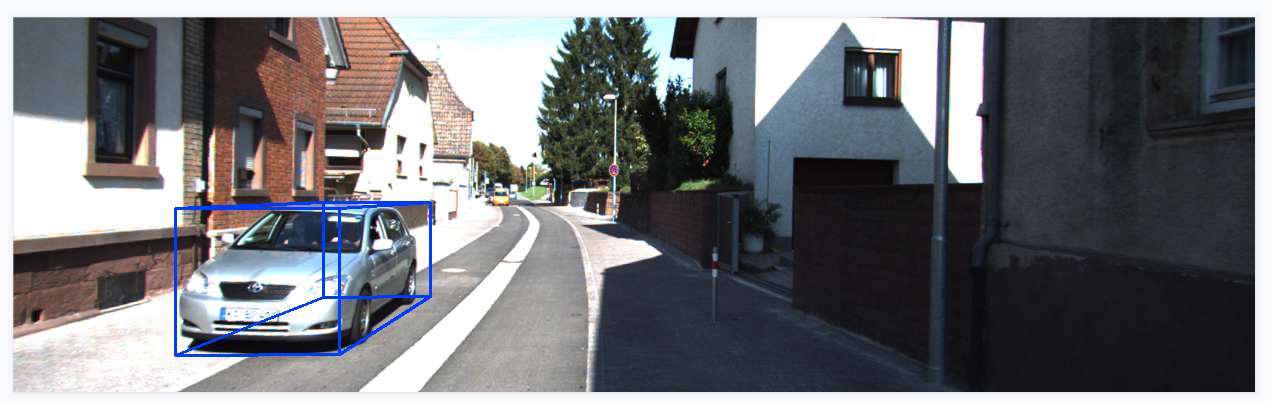
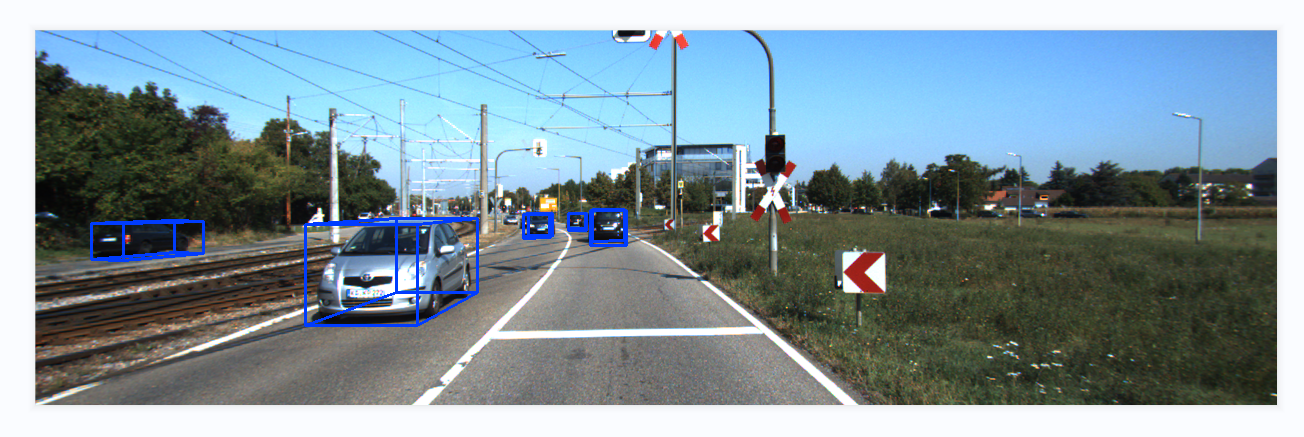
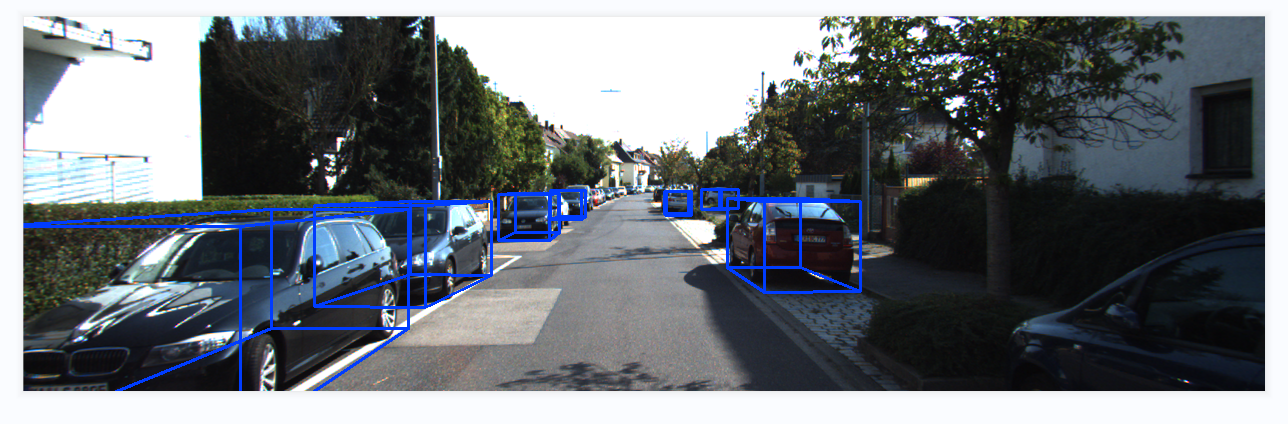
运行后会在save_3d_output中保存可视化的图像。
模型推理结果可视化效果:
分析完成~