目录
- 一、生命周期的钩子函数
- 二、创建阶段
- 三、挂载阶段
- 四、父子组件创建和挂载阶段钩子函数的执行次序
- 五、更新阶段
- 六、销毁阶段
- 七、复习和补充
- 1、MVVM
- 2、v-for中的key值
- 3、$nextTick
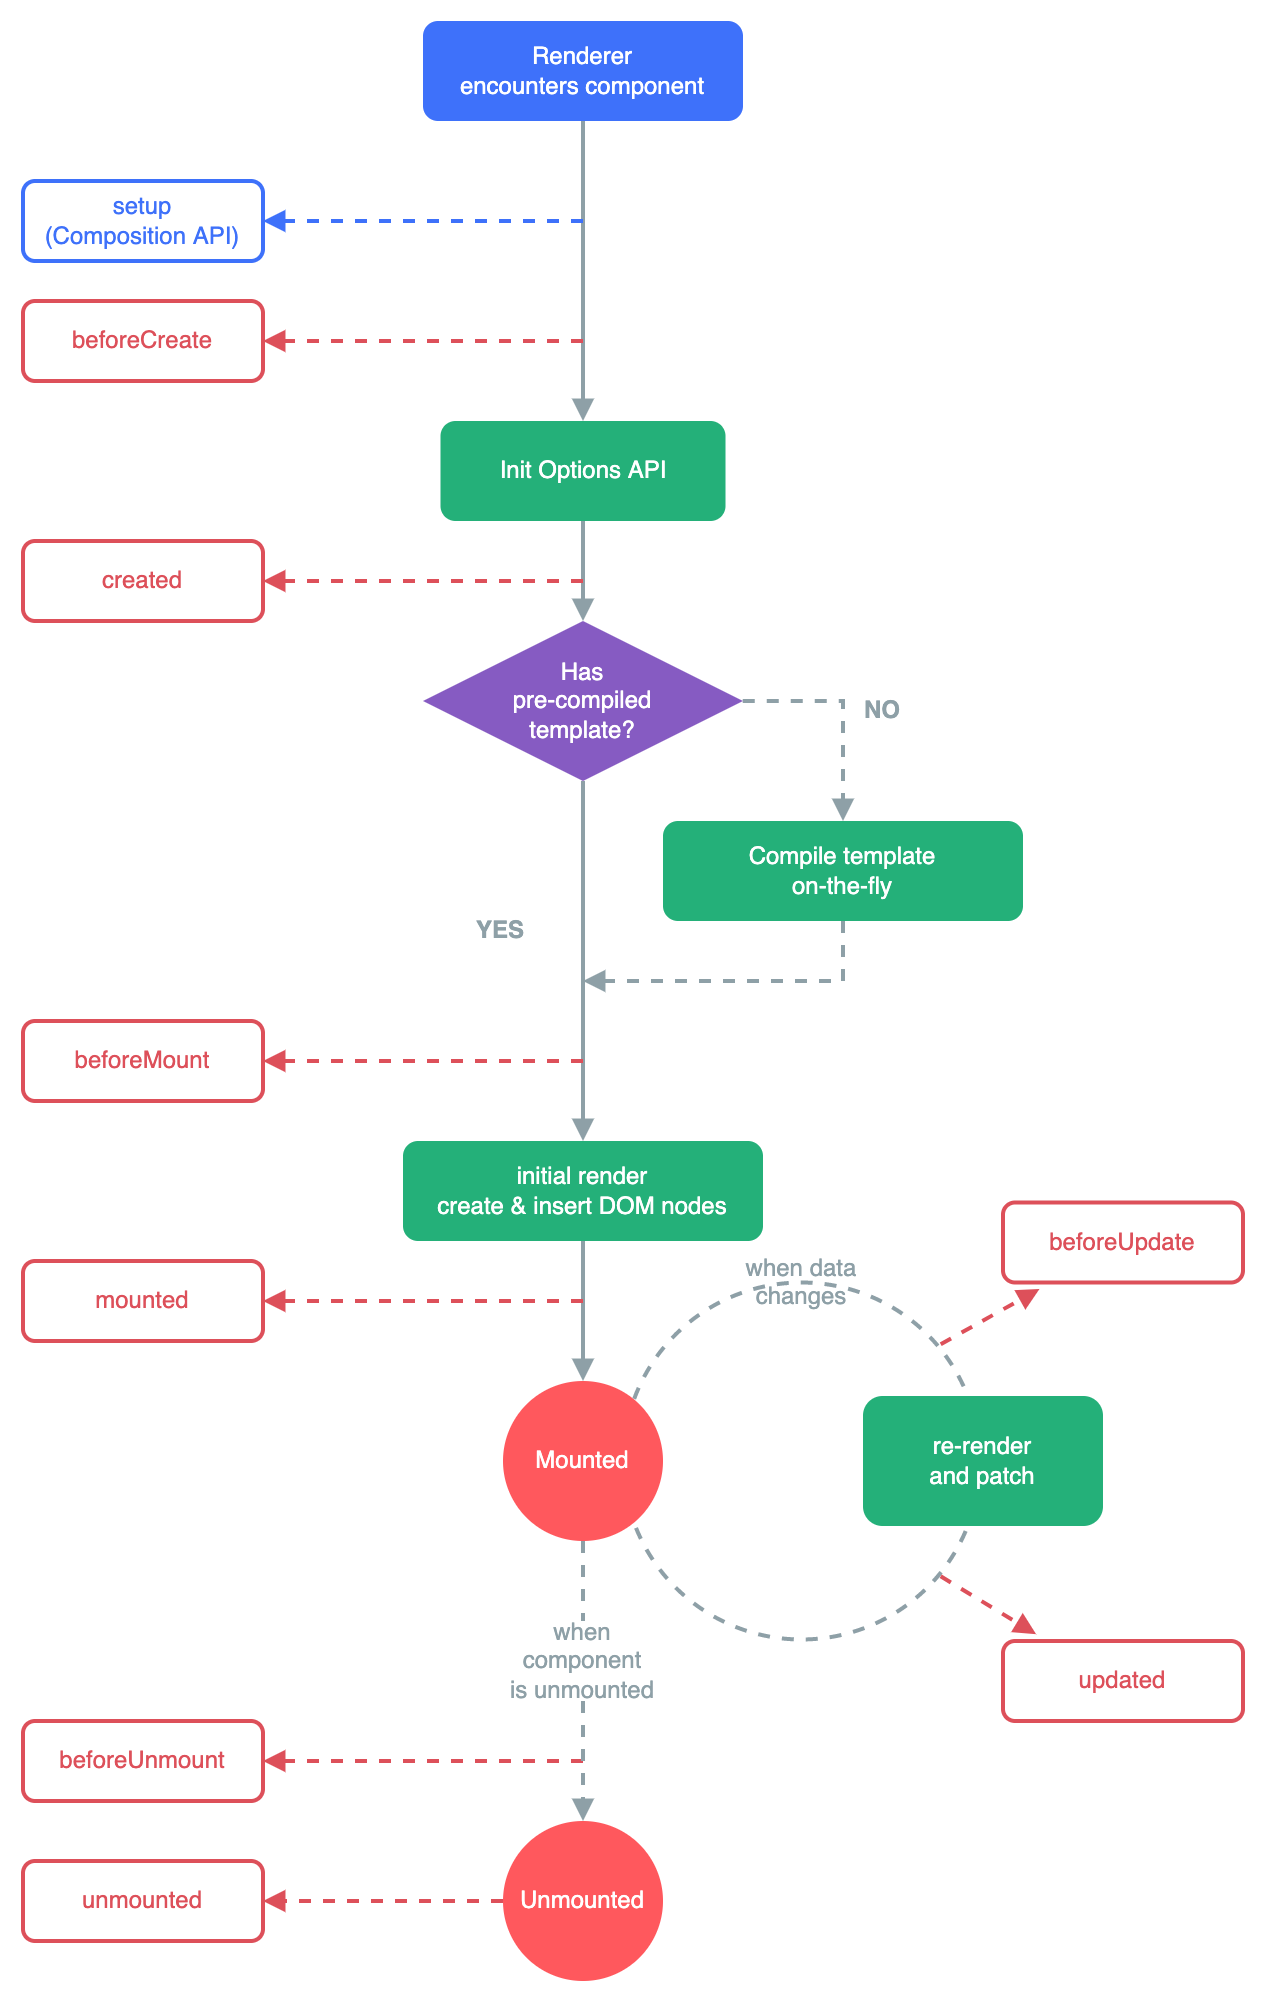
一、生命周期的钩子函数
- 在组件的生命周期的过程中自动的调用的函数,叫做生命周期的钩子函数
二、创建阶段
beforeCreate :组件实例初始化之后,自动调用created :组件实例完成所有状态相关的处理之后会自动调用 ,可以拿到数据
<div id="box">
{{a}}
<input type="text" id="abc" ref="txt">
<Child ref="child"></Child>
</div>
<script>
let Child = {
template: `
<div>
child<input type='text' v-model="str" />
</div>`,
data() {
return {
str: "init"
}
},
}
Vue.createApp({
components: {
Child
},
data() {
return {
a: 123
}
},
beforeCreate() {
console.log("beforeCreate:", this.a);
},
created() {
console.log("created:", this.a)
},
}).mount("#box")
</script>

三、挂载阶段
boforeMount:组件挂载前自动调用mounted:组件挂载后自动调用 ,不但可以拿到数据,还可以拿到真实的dom节点
<div id="box">
{{a}}
<input type="text" id="abc" ref="txt">
<Child ref="child"></Child>
</div>
<script>
let Child = {
template: `<div>child
<input type='text' v-model="str" />
</div>`,
data() {
return {
str: "init"
}
},
methods: {
fun() {
console.log("Fun")
}
}
}
Vue.createApp({
components: {
Child
},
data() {
return {
a: 123
}
},
beforeMount() {
console.log("app beforeMount:", this.a, this)
},
mounted() {
console.log("app mounted:", this.a, this)
let txt = this.$refs.txt;
console.log(txt);
txt.focus();
console.log(this.$refs.child.str)
this.$refs.child.str = this.a
this.$refs.child.fun()
}
}).mount("#box")
</script>
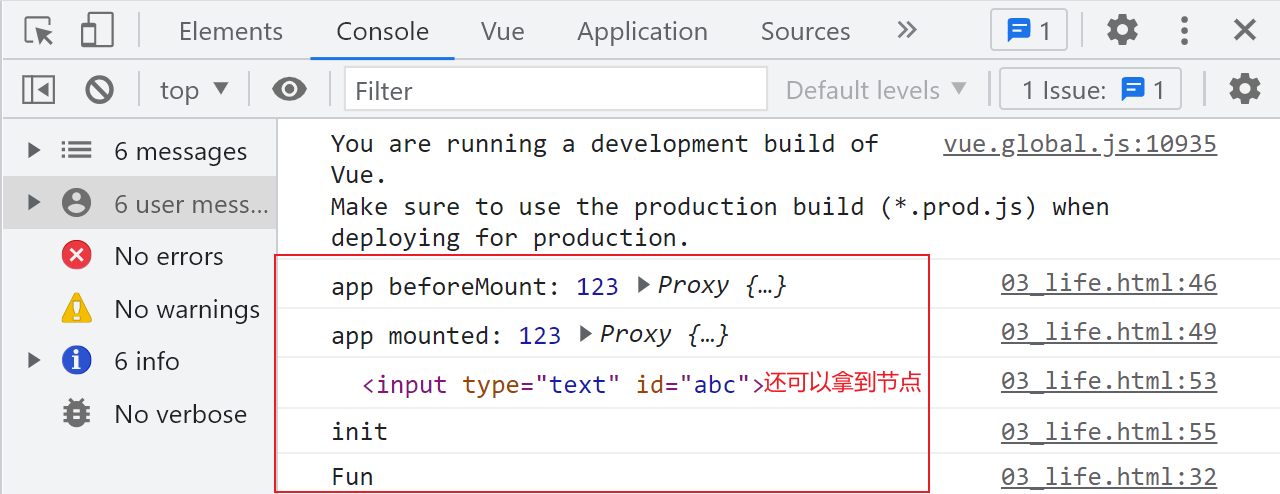
ref可以标识组件 ,父组件可以读写子组件里的数据,也可以访问子组件里的方法
<input type="text"  ref="txt">
this.$refs.ref的标识  就可以拿到节点了
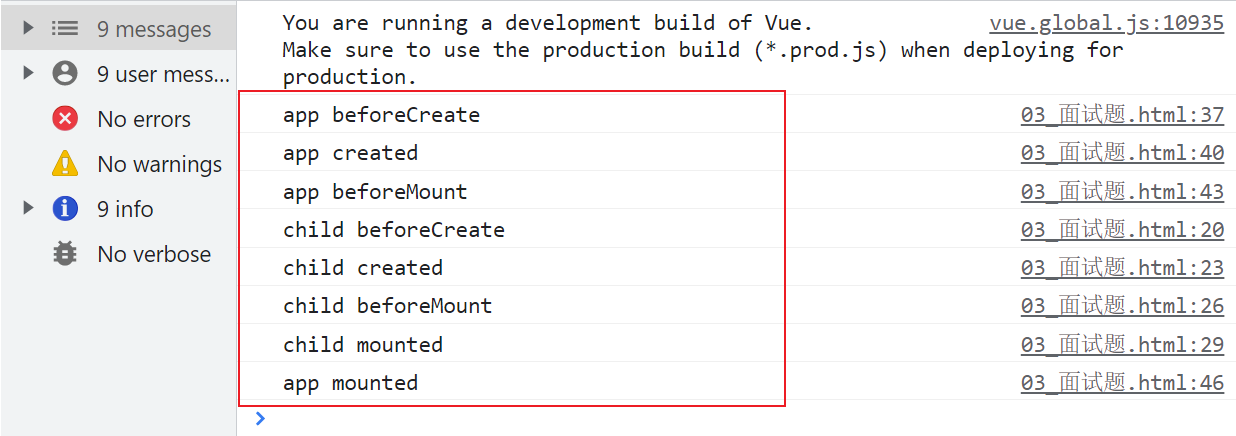
四、父子组件创建和挂载阶段钩子函数的执行次序
- app beforeCreate
- app created
- app beforeMount
- child beforeCreate
- child created
- child beforeMount
- child mounted
app mounted
    <div id="box">
        <Child></Child>
    </div>
    <script>
        let Child = {
            template: `<div>child</div>`,
            beforeCreate() {
                console.log("child beforeCreate")
            },
            created() {
                console.log("child created")
            },
            beforeMount() {
                console.log("child beforeMount");
            },
            mounted() {
                console.log("child mounted");
            },
        }
        Vue.createApp({
            components: {
                Child
            },
            beforeCreate() {
                console.log("app beforeCreate")
            },
            created() {
                console.log("app created")
            },
            beforeMount() {
                console.log("app beforeMount");
            },
            mounted() {
                console.log("app mounted");
            },
            data() {
                return {
                }
            },
        }).mount("#box")
    </script>
五、更新阶段
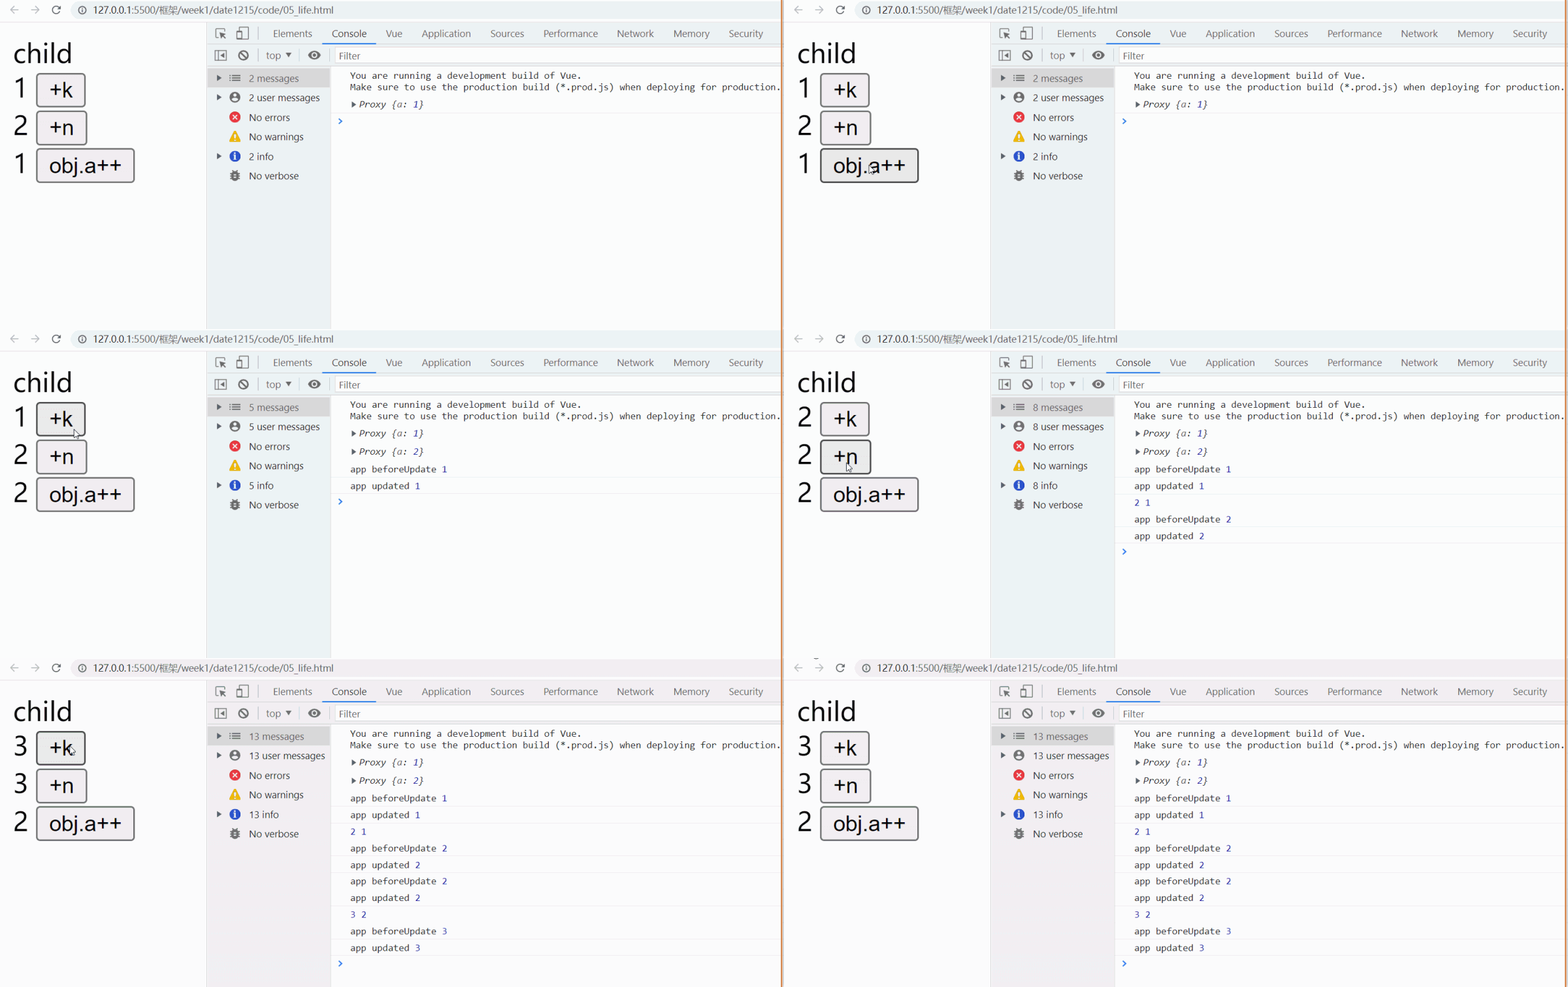
beforeUpdate:组件因为一个响应式状态改变后,更新dom树之前自动调用updated:组件因为一个响应式状态改变后,更新 dom树之后自动调用
    <div id="box">
        <Child v-if="flag"></Child>
        {{k}} <button @click="k++">+k</button> <br>
        {{n}} <button @click="n++">+n</button> <br>
        {{obj.a}} <button @click="obj.a++">obj.a++</button> <br>
    </div>
<script>
let Child = {
template: `<div>child</div>`,
}
let app = Vue.createApp({
components: {
Child
},
beforeUpdate() {
console.log("app beforeUpdate", this.k)
},
updated() {
console.log("app updated", this.k)
},
beforeUnmount() {
console.log("app beforeUnmount")
},
unmounted() {
console.log("app unmounted")
},
watch: {
k(n, o) {
console.log(n, o)
},
obj: {
handler(n) {
console.log(n)
},
deep: true,
immediate: true
}
},
data() {
return {
k: 1,
n: 2,
obj: {
a: 1
},
flag: true
}
},
})
app.mount("#box")
</script>
六、销毁阶段
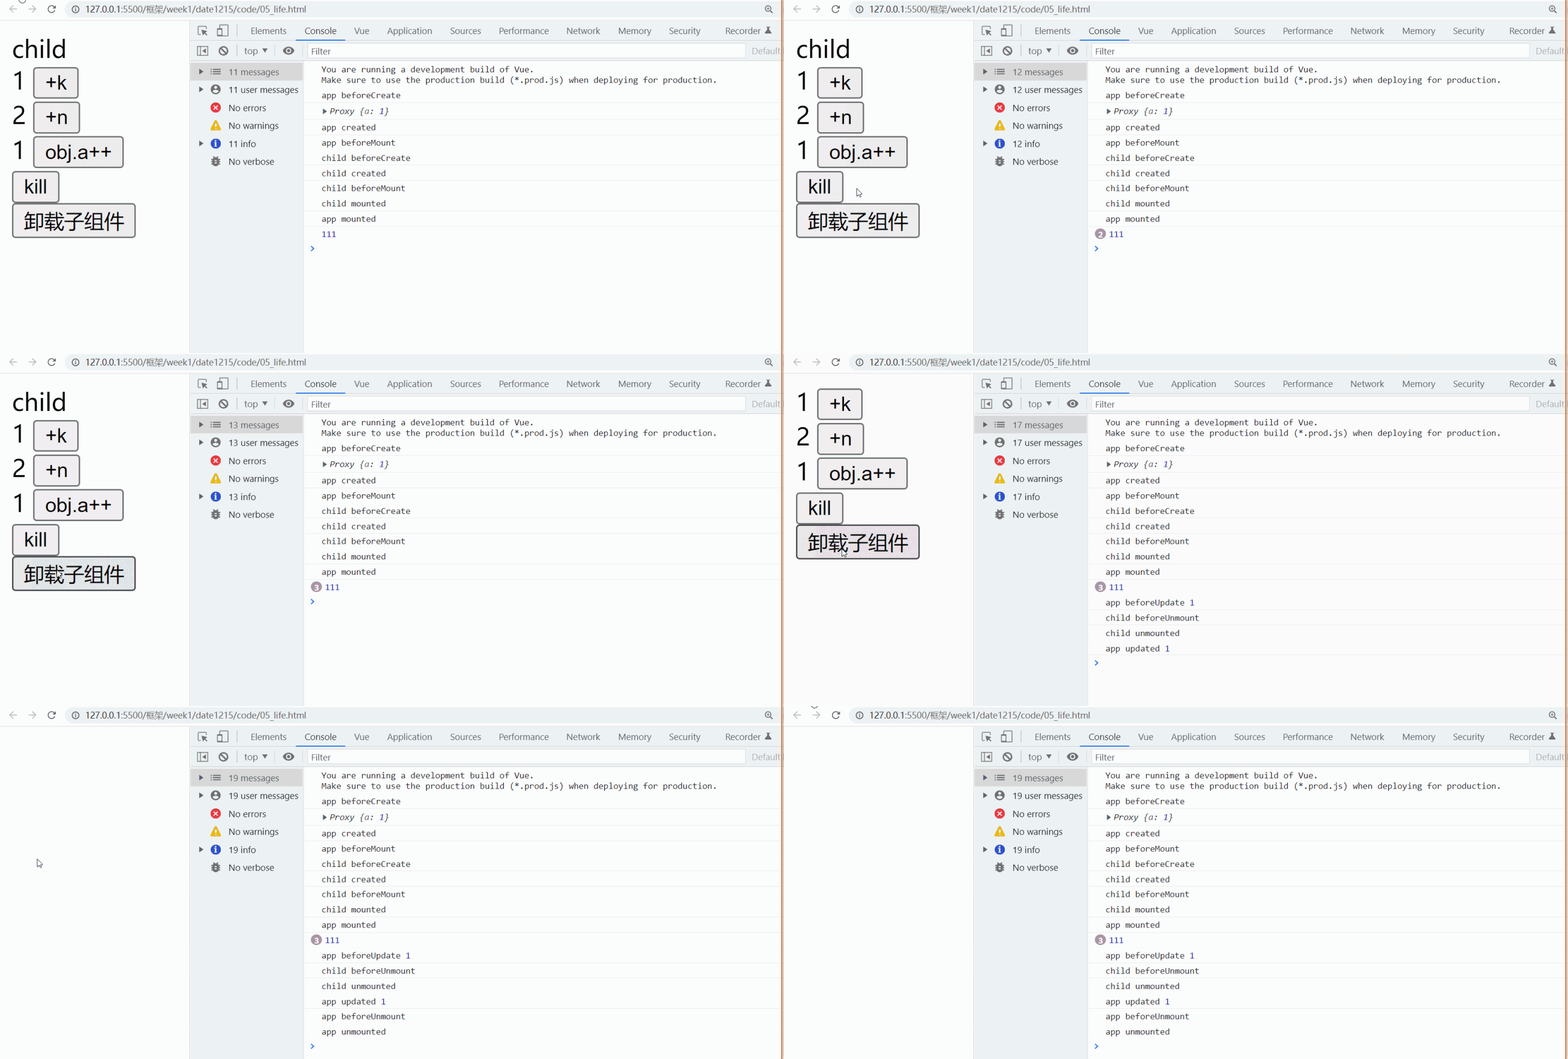
beforeUnmount:组件卸载前调用,清理资源,防止内存泄露unmounted:组件卸载后调用
    <div id="box">
        <Child v-if="flag"></Child>
        {{k}} <button @click="k++">+k</button> <br>
        {{n}} <button @click="n++">+n</button> <br>
        {{obj.a}} <button @click="obj.a++">obj.a++</button> <br>
        <button @click="kill">kill</button> <br>
        <button @click="flag=false">卸载子组件</button> <br>
    </div>
<script>
let Child = {
template: `<div>child</div>`,
beforeCreate() {
console.log("child beforeCreate")
},
created() {
console.log("child created")
},
beforeMount() {
console.log("child beforeMount");
},
mounted() {
console.log("child mounted");
this.timer = setInterval(() => {
console.log(111)
}, 1000)
},
beforeUnmount() {
console.log("child beforeUnmount")
clearInterval(this.timer)
},
unmounted() {
console.log("child unmounted");
}
}
let app = Vue.createApp({
components: {
Child
},
methods: {
kill() {
app.unmount();
}
},
beforeCreate() {
console.log("app beforeCreate")
},
created() {
console.log("app created")
},
beforeMount() {
console.log("app beforeMount");
},
mounted() {
console.log("app mounted");
},
beforeUpdate() {
console.log("app beforeUpdate", this.k)
},
updated() {
console.log("app updated", this.k)
},
beforeUnmount() {
console.log("app beforeUnmount")
},
unmounted() {
console.log("app unmounted")
},
watch: {
k(n, o) {
console.log(n, o)
},
obj: {
handler(n) {
console.log(n)
},
deep: true,
immediate: true
}
},
data() {
return {
k: 1,
n: 2,
obj: {
a: 1
},
flag: true
}
},
})
app.mount("#box")
</script>
七、复习和补充
1、MVVM
- M(model):模型层 数据
- V(view):视图,渲染数据展示数据
- m (viewModel):视图模型 ,视图和模型沟通的桥梁,模型数据变化了,视图也会变化
2、v-for中的key值
- vfor 中的key值得作用 ,为了找到修改数据的那个对应的虚拟dom节点的条件之一,能提高比对效率
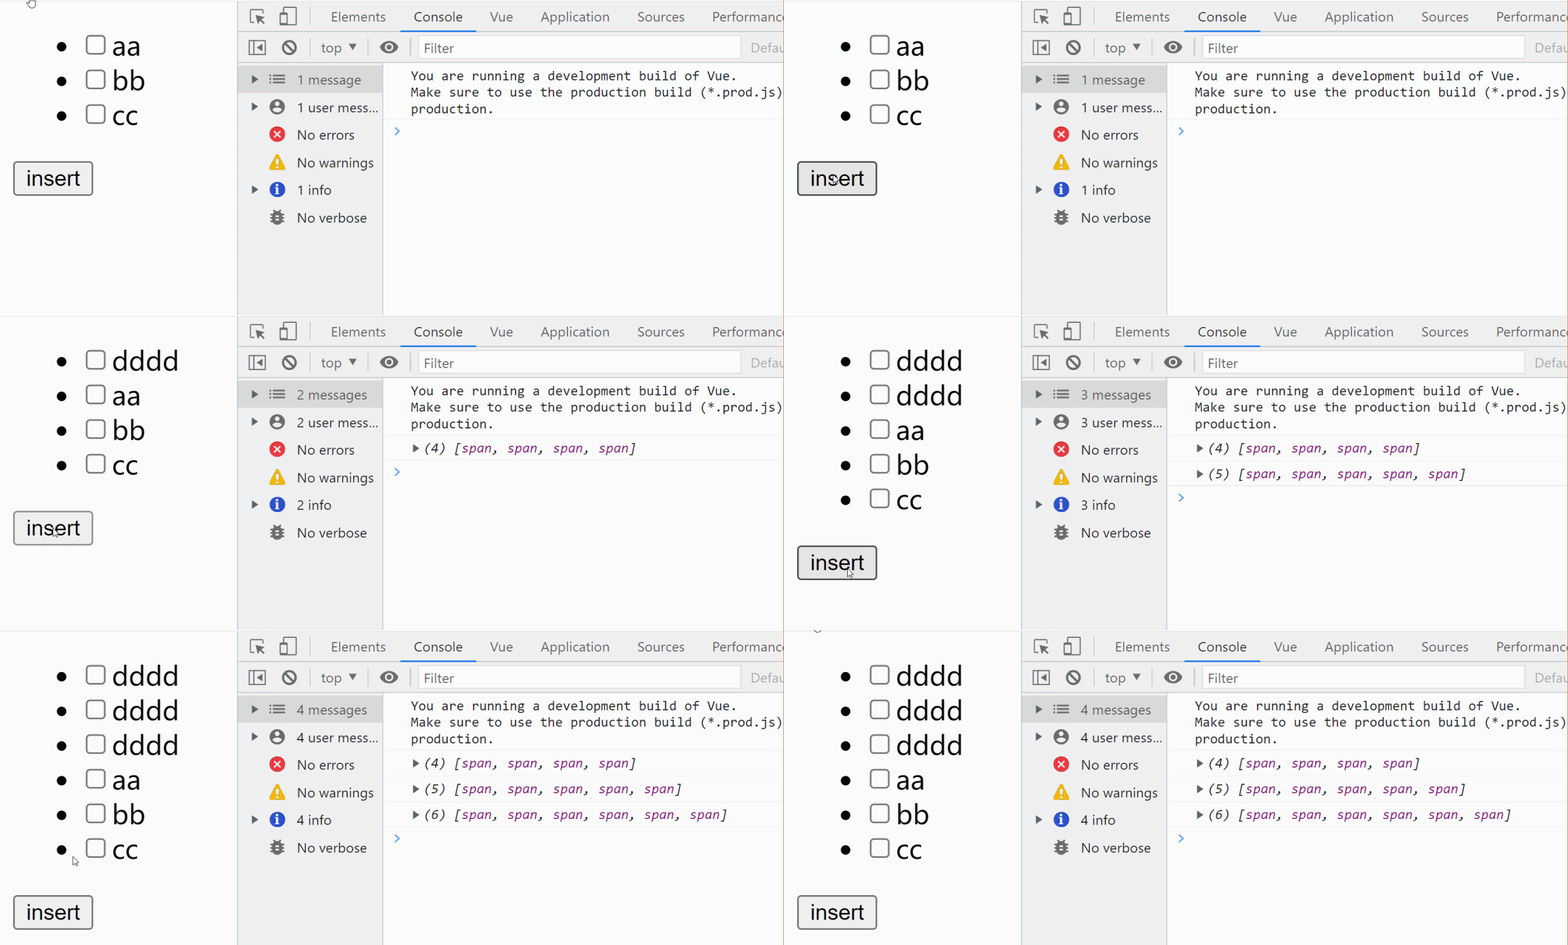
3、$nextTick
<div id="box">
<ul>
<li v-for="item in list" :key="item">
<input type="checkbox" />
<span ref="liitem">{{item}}</span>
</li>
</ul>
<button @click="add">insert</button>
</div>
<script>
Vue.createApp({
data() {
return {
list: ["aa", "bb", 'cc']
}
},
methods: {
add() {
this.list.unshift("dddd")
this.$nextTick(() => {
console.log(this.$refs.liitem);
})
}
}
}).mount("#box")
</script>




![[N1CTF 2018]eating_cms parse_url绕过](https://img-blog.csdnimg.cn/0d49f17c376c4762818dd8bc11c30ed9.png)
