Vue3项目使用Stimulsoft.Reports.js【项目实战】
相关阅读:vue-cli使用stimulsoft.reports.js(保姆级教程)_stimulsoft vue-CSDN博客
前言
在BS的项目中我们时常会用到报表打印、标签打印、单据打印,可是BS的通用打印解决方案又很少,小型公司只能依赖第三方打印组件,这无疑是很令人头疼的,这款Stimulsoft.Reports.js是目前我用过比较方便的打印工具,正版价格对于小公司来说也比较合适。
同款的有ActiveReportsJS比这个可能更好用,但是价格也相对高一点。
1.stimulsoft.reports.js下载
官方设计器下载地址:模板设计器
官方项目下载地址:stimulsoft.reports.js测试项目下载 。点击页面底部【Download】下载项目源码里面有我们要的所有文件
注:本插件为付费插件,非付费状态会有水印
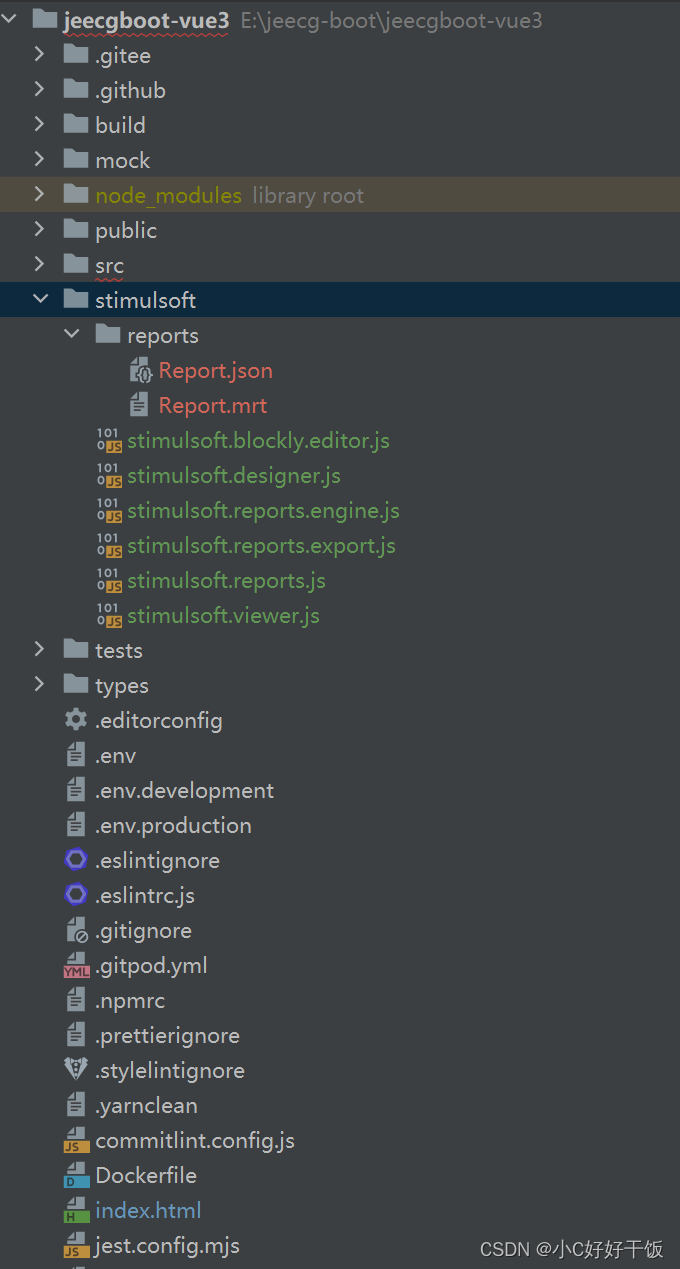
2.文件存放
我们把下载的项目存放到项目顶层路径,当然你可以使用自定义名字
工具路径:stimulsoft/*
模板路径:stimulsoft/reports/*
3.项目引入
引入文件 index.html
里的<%= BASE_URL %> 是由于我使用的项目需要加 <%= BASE_URL %>前缀才能访问到具体文件
以这种全局引入的方式会给window下面加一个Stimulsoft的属性后面我们会用到它
<!DOCTYPE html>
<html lang="zh_CN" id="htmlRoot">
  <head>
    <!-- 其他代码 -->
  </head>
  <body>
    <!-- 其他代码 -->
    <script src="<%= BASE_URL %>stimulsoft/stimulsoft.reports.js"></script>
    <script src="<%= BASE_URL %>stimulsoft/stimulsoft.viewer.js"></script>
    <script src="<%= BASE_URL %>stimulsoft/stimulsoft.designer.js"></script>
    <script src="<%= BASE_URL %>stimulsoft/stimulsoft.blockly.editor.js"></script>
  </body>
</html>
4.创建打印组件
我的打印组件创建路径:src/components/Print/PrintStimulsoftReportV3.vue
<template>
  <span>
      <slot>
        <!-- 可以替换该默认插槽 -->
        <a-button type='primary' @click='printer'>{{ name }}</a-button>
      </slot>
  </span>
</template>

<script lang="ts" setup>
import {watch, defineExpose} from "vue";

// 暴露打印方法供父组件使用
defineExpose({
  printer
})
/**
 * 父组件传递打印需要的参数
 * file 文件名
 * name 打印按钮显示文本
 * data 打印的数据
 * isPrinter 打印更新
 */
const props = defineProps(["file", "name", "data", "isPrinter"])
const {data, file, name, isPrinter} = props
// 监听变化,使用isPrinter来更新打印
watch(props, (value, oldValue, onCleanup) => {
      if (value.isPrinter != oldValue.isPrinter) {
        printer()
      }
    }
);

function printer() {
  console.log('begin')
  // 获取Stimulsoft工具对象
  let Stimulsoft = window.Stimulsoft
  // 绑定激活码
  Stimulsoft.Base.StiLicense.key = "你的激活码";
  // 创建报表
  let report = new Stimulsoft.Report.StiReport()
  console.log(report.renderAsync)
  // 绑定报表路径,这里使用了插槽来适应不同的文件
  report.loadFile('/stimulsoft/reports/' + file + '.mrt')
  // 清空缓存
  report.dictionary.databases.clear()
  // 创建新的DataSet对象
  let dataSet = new Stimulsoft.System.Data.DataSet('JSON')
  // 打印数据绑定
  let json = {}
  json[file + ""] = data?.value
  json['data'] = data?.value
  console.log("打印数据", json)
  dataSet.readJson(JSON.stringify(json))
  report.regData('JSON', 'JSON', dataSet)
  // 调用打印数据
  report.renderAsync(function () {
    report.print()
  });

}
</script>

<style scoped>
</style>
5.调用打印组件
5.1基本调用
<template>
  <div>
    <PrintStimulsoftReportV3
        :file="'Report'"
        :name="'打印按钮1'"
        :data="printData1"
        :isPrinter="isPrinter"/>

    <PrintStimulsoftReportV3
        ref="printV3"
        :file="'Report'"
        :name="'打印按钮2'"
        :data="printData2"
        :isPrinter="isPrinter">
      <a-button type="primary" @click="print">打印V3</a-button>
    </PrintStimulsoftReportV3>
  </div>
</template>

<script lang="ts" setup>
import PrintStimulsoftReportV3 from "@/components/Print/PrintStimulsoftReportV3.vue";
import {ref, reactive,onMounted} from "vue"

const printData1: any = reactive([])
onMounted(()=>{
  printData1.value=[
    {
      "id": "1709766277226536962",
      "username": "user",
      "title": "阳光小镇的故事",
      "content": "曾经有一个小镇,名叫阳光镇。这个小镇并不大,但它却拥有着一群善良和蔼的居民。",
      "createBy": "admin",
      "createTime": "2023-10-05 11:03:41",
      "updateBy": "admin",
      "updateTime": "2023-10-05 11:06:13",
      "sysOrgCode": "A01"
    }
  ]
})

const isPrinter = ref(false)
const printData2: any = reactive([])
const printV3 =ref()
function print(){
  printData2.value=[
    {
      "id": "1709766277226536962",
      "username": "user",
      "title": "阳光小镇的故事",
      "content": "曾经有一个小镇,名叫阳光镇。这个小镇并不大,但它却拥有着一群善良和蔼的居民。",
      "createBy": "admin",
      "createTime": "2023-10-05 11:03:41",
      "updateBy": "admin",
      "updateTime": "2023-10-05 11:06:13",
      "sysOrgCode": "A01"
    },
    {
      "id": "1709766277226536962",
      "username": "user",
      "title": "阳光小镇的故事",
      "content": "曾经有一个小镇,名叫阳光镇。这个小镇并不大,但它却拥有着一群善良和蔼的居民。",
      "createBy": "admin",
      "createTime": "2023-10-05 11:03:41",
      "updateBy": "admin",
      "updateTime": "2023-10-05 11:06:13",
      "sysOrgCode": "A01"
    }
  ]
  // 通过子组件方法打印
  printV3.value.printer()
  // 通过修改参数打印
  // isPrinter.value=!isPrinter.value
}

</script>

<style scoped>

</style>
5.2实战调用
这里是我实际测试项目中用到的调用方式,操作为【选中打印项目】->【打印数据】
<template>
  <div class="p-2">
    <BasicTable
        @register="registerTable"
        :rowSelection="rowSelection"
        @edit-end="handleEditEnd"
        @edit-cancel="handleEditCancel"
        :beforeEditSubmit="beforeEditSubmit"
        @row-click="rowSelectChange"
    >
      <template #tableTitle>
        <a-button type="primary" preIcon="ant-design:plus" @click="add">新建</a-button>
        <a-button type="primary" preIcon="ant-design:export-outlined" @click="onExportXls"> 导出</a-button>
        <j-upload-button type="primary" preIcon="ant-design:import-outlined" @click="onImportXls">导入</j-upload-button>
        <PrintJmreport :template-id="'869739541898461184'" :params="printParams" :disabled="!!!selectedRowKeys.length"/>
        <PrintStimulsoftReport ref="Print" :data="printArrV2" :file="'Report'" name="打印Stimulsoft"
                               :isPrinter="isPrinter">
          <a-button type="primary" @click="printDataV2" :disabled="!selectedRowKeys.length">
            打印Vue2
          </a-button>
        </PrintStimulsoftReport>
        <PrintStimulsoftReportV3 ref="printV3" :data="printArrV3" :file="'Report'" name="打印V3"
                                 :isPrinter="isPrinter">
          <a-button type="primary" @click="printDataV3" :disabled="!selectedRowKeys.length">
            打印Vue3
          </a-button>
        </PrintStimulsoftReportV3>
      </template>
      <template #action="{ record }">
        <TableAction :actions="getActions(record)" :dropDownActions="getDropDownActions(record)"/>
      </template>
      <a-divider/>
    </BasicTable>
    <NodeBootModal @register="registerModel" @success="onSubmit"/>
  </div>
</template>

<script lang="ts" setup>
import {BasicTable, EditRecordRow, TableAction} from '/@/components/Table';
import type {ActionItem} from '/@/components/Table';
import {useListPage} from '/@/hooks/system/useListPage';
import {useTable} from '/@/components/Table';
import {list, del, getExportUrl, getImportUrl, edit as editData, getById} from './NodeBoot.api';
import {columns, searchFormSchema} from './NoteBoot.data';
import NodeBootModal from './modal/NodeBootModal.vue';
import {useModal} from '/@/components/Modal';
import JUploadButton from '/@/components/Button/src/JUploadButton.vue';
import {ref, reactive, provide} from 'vue';
import PrintJmreport from '@/components/Print/PrintJmreport.vue';
import PrintStimulsoftReport from "@/components/Print/PrintStimulsoftReport.vue";
import PrintStimulsoftReportV3 from "@/components/Print/PrintStimulsoftReportV3.vue";

const {prefixCls, tableContext, onImportXls, onExportXls} = useListPage({
  designScope: 'note-boot-list',
  tableProps: {
    size: 'small',
    api: list,
    columns: columns,
    formConfig: {
      schemas: searchFormSchema,
    },
    minHeight: 500,
    maxHeight: 1000,
    bordered: true,
    clickToRowSelect: true,
    rowSelection: {
      type: 'radio',
    },
  },
  exportConfig: {
    name: '记事本',
    url: getExportUrl,
  },
  importConfig: {
    url: getImportUrl,
  },
});

const [registerTable, {reload, updateTableDataRecord}, {rowSelection, selectedRows, selectedRowKeys}] = tableContext;

const [registerModel, {openModal}] = useModal();

function add() {
  openModal(true, {title: '新增', record: [], isUpdate: false});
}

function edit(record) {
  openModal(true, {title: '编辑', record: record, isUpdate: true});
}

function info(record) {
  openModal(true, {title: '详情', record: record, isUpdate: true, disable: true});
}

function onSubmit() {
  reload();
}

function getActions(record): ActionItem[] {
  return [
    {
      label: '编辑',
      onClick: () => edit(record),
    },
  ];
}

function getDropDownActions(record): ActionItem[] {
  return [
    {
      label: '详情',
      onClick: () => info(record),
    },
    {
      label: '删除',
      popConfirm: {
        title: '确认删除',
        confirm: () => del(record, reload),
      },
    },
  ];
}

// const [registerTable, {reload, updateTableDataRecord}] = useTable({
//   title: '可编辑单元格示例',
//   api: list,
//   columns: columns,
//   showIndexColumn: true,
//   bordered: true,
// });

async function handleEditEnd({record, index, key, value}: Recordable) {
  console.log('结束', record, index, key, value);
  const params = {};
  params['id'] = record.id;
  params['' + key] = value;
  return await editData(params);
  // return false;
}

function handleEditCancel() {
  console.log('取消提交');
}

async function beforeEditSubmit({record, index, key, value}) {
  console.log('单元格数据正在准备提交', {record, index, key, value});
  return true;
}

// 打印
const printParams: any = reactive({});
let printArrV2: any[] = reactive([])
const printArrV3: any = reactive([])
const isPrinter = ref(false)

function rowSelectChange(value) {
  printParams.value = {
    id: value.id
  }
  getById({id: value.id}).then(resp => {
    console.log("请求的数据", resp)
    printArrV2 = [resp]
    printArrV3.value = [resp]
  })
}

async function printDataV2() {
  await getById({id: selectedRowKeys.value[0]}).then(resp => {
    console.log(resp)
    printArrV2 = [resp]
    console.log(printArrV2)
  })
  isPrinter.value = !isPrinter.value
}

const printV3 = ref()

async function printDataV3() {
  await getById({id: selectedRowKeys.value[0]}).then(resp => {
    console.log(resp)
    printArrV3.value = [resp]
    console.log(printArrV3)
  })
  // isPrinter.value = !isPrinter.value
  printV3.value.printer()
}

</script>

<style scoped></style>
6.其他补充
6.1 vue2打印组件
<template>
  <span>
      <slot>
        <a-button type='primary' icon='printer' @click='printer'>{{ this.name }}</a-button>
      </slot>
  </span>
</template>

<script>
export default {
  name: 'statement',
  props: {
    data: {
      type: Array,
      default: false
    },
    file: {
      type: String,
      default: false
    },
    name: {
      type: String,
      default: '打印'
    },
    isPrinter: {
      type: Boolean,
      default: false
    }
  },
  data() {
  },
  methods: {
    printer() {
      console.log('begin')
      Stimulsoft.Base.StiLicense.key = "";
      let report = new Stimulsoft.Report.StiReport()
      console.log(report.renderAsync)
      report.loadFile('/stimulsoft/reports/' + this.file + '.mrt')

      report.dictionary.databases.clear()
      // 创建新的DataSet对象
      let dataSet = new Stimulsoft.System.Data.DataSet('JSON')
      let json = {}
      json[this.file] = this.data
      json['data'] = this.data
      console.log(json)
      dataSet.readJson(JSON.stringify(json))
      report.regData('JSON', 'JSON', dataSet)
      report.renderAsync(function () {
        setTimeout(() => {
        }, 500)
        report.print()
      });
      // setTimeout(() => {
      //   report.render()
      //   report.print()
      // }, 500)
      this.isPrinter = false
    },
    showPrinter() {
      this.isPrinter = true
    }
  },
  watch: {
    isPrinter(val) {
      console.log("监听到了数据改变")
      this.printer()
    }
  }
}
</script>

<style scoped>
</style>
6.2 模板数据源
在vue-cli使用stimulsoft.reports.js(保姆级教程)_stimulsoft vue-CSDN博客有详细介绍数据源和报表的使用基础
{
    "data":[
        {
            "id": "1709766277226536962",
            "username": "user",
            "title": "阳光小镇的故事",
            "content": "曾经有一个小镇,名叫阳光镇。",
            "createBy": "admin",
            "createTime": "2023-10-05 11:03:41",
            "updateBy": "admin",
            "updateTime": "2023-10-05 11:06:13",
            "sysOrgCode": "A01"
        }
    ]
}
6.3 效果预览