WeNet在正式发布两年的时间里,成为非常热门的ASR生产工具,其面向生产的属性更是深受工业界的好评。近期,喜马拉雅团队在WeNet中支持了Squeezeformer的相关工作。本文由喜马拉雅珠峰智能实验室撰写,介绍了Squeezeformer论文的复现细节,包括训练方案、流式推理以及实验结果。
喜马拉雅珠峰智能实验室:聚焦音视频以及智能语音技术,先后打造了语音合成(TTS)、语音识别(ASR)、智能审核、语音唤醒、智能音效、降噪、智能配乐、虚拟人讲书等产品和能力。通过行业领先的TTS技术,喜马拉雅用AIGC(AI生成内容)引领长音频行业的内容生产变革,让内容生产提效。推出的”AI开放平台“和 辅助创作者生产工具“喜韵音坊“ 为B端和C端的用户和创作者提供服务。与此同时,音视频实验室通过AI文稿、图像生成等多项音视频技术,进一步提升喜马拉雅用户的内容消费体验。“单田芳声音重现”等账号下上线的运用单田芳AI合成音所制作的专辑数量已经有100多张,总播放量超过1亿。
论文介绍
由伯克利大学和谷歌合作的Squeezeformer[1]旨在推进下一代的语音识别主干网络,并达到了同等参数量下性能优于Conformer的结果,文章已经被NeurIPS 2022收录,本文尝试对其进行复现,实现中我们参考了Code[2]。
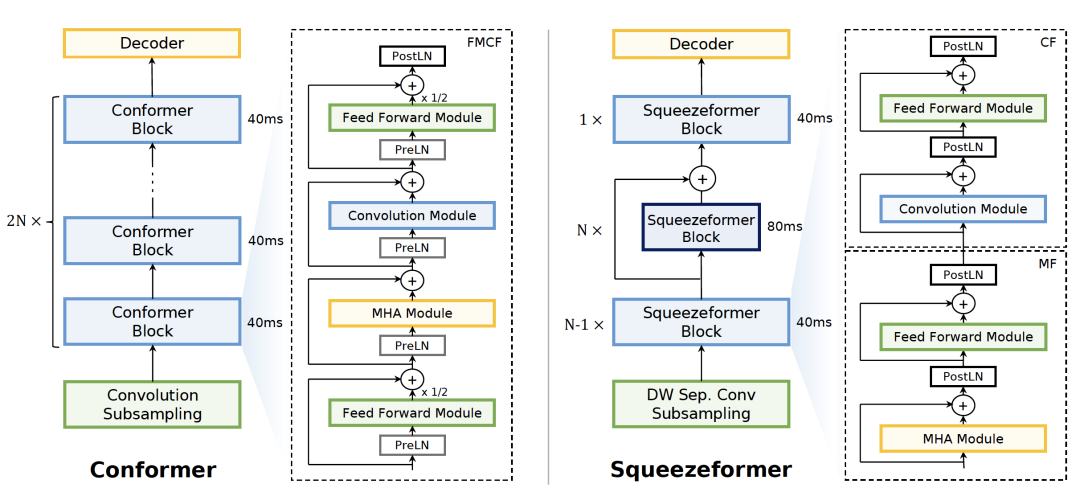
Squeezeformer相对于Conformer,主要包含4个改进点:
-
Temporal U-Net 结构: 作者通过实验发现ASR训练过程中,中间层的帧embedding相似度很高,因此提出在时间维度上对中间层的帧数进行压缩,在最后一层恢复的方式。
-
MFCF block 结构: 作者推荐采用self-attention + ffn + conv module + ffn (MFCF)的组合替代标准Conformer中ffn + self-attention + conv module + ffn(这里的1/2也被取消)。
-
微观架构改动: GLU被替换为Swish;同时作者推荐adaptive scale + PostLN的方式,代替单纯的PreLN或PostLN;subsampling中部分conv被替换为depthwise conv。
-
Scale up: 由于U-Net的结构,相同参数量的squeezeformer的FLOPs比Conformer更低,因此作者采用了scale up的方式给出了FLOPs与Conformer相同时的对比效果。
算法实现
(1) 下采样部分其中一个pointwise卷积被替换为depthwise卷积。
class DepthwiseConv2dSubsampling4(BaseSubsampling):
    """Depthwise Convolutional 2D subsampling (to 1/4 length).

        Args:
            idim (int): Input dimension.
            odim (int): Output dimension.
            pos_enc_class (nn.Module): position encoding class.
            dw_stride (int): Whether do depthwise convolution.
            input_size (int): filter bank dimension.

        """

    def __init__(
            self, idim: int, odim: int,
            pos_enc_class: torch.nn.Module,
            dw_stride: bool = False,
            input_size: int = 80,
            input_dropout_rate: float = 0.1,
            init_weights: bool = True
    ):
        super(DepthwiseConv2dSubsampling4, self).__init__()
        self.idim = idim
        self.odim = odim
        self.pw_conv = nn.Conv2d(
            in_channels=idim, out_channels=odim, kernel_size=3, stride=2)
        self.act1 = nn.ReLU()
        self.dw_conv = nn.Conv2d(
            in_channels=odim, out_channels=odim, kernel_size=3, stride=2,
            groups=odim if dw_stride else 1
        )
        self.act2 = nn.ReLU()
        self.pos_enc = pos_enc_class
        self.input_proj = nn.Sequential(
            nn.Linear(
                odim * (((input_size - 1) // 2 - 1) // 2), odim),
            nn.Dropout(p=input_dropout_rate),
        )
        if init_weights:
            linear_max = (odim * input_size / 4) ** -0.5
            torch.nn.init.uniform_(
                self.input_proj.state_dict()['0.weight'], -linear_max, linear_max)
            torch.nn.init.uniform_(
                self.input_proj.state_dict()['0.bias'], -linear_max, linear_max)
        self.subsampling_rate = 4
        # 6 = (3 - 1) * 1 + (3 - 1) * 2
        self.right_context = 6
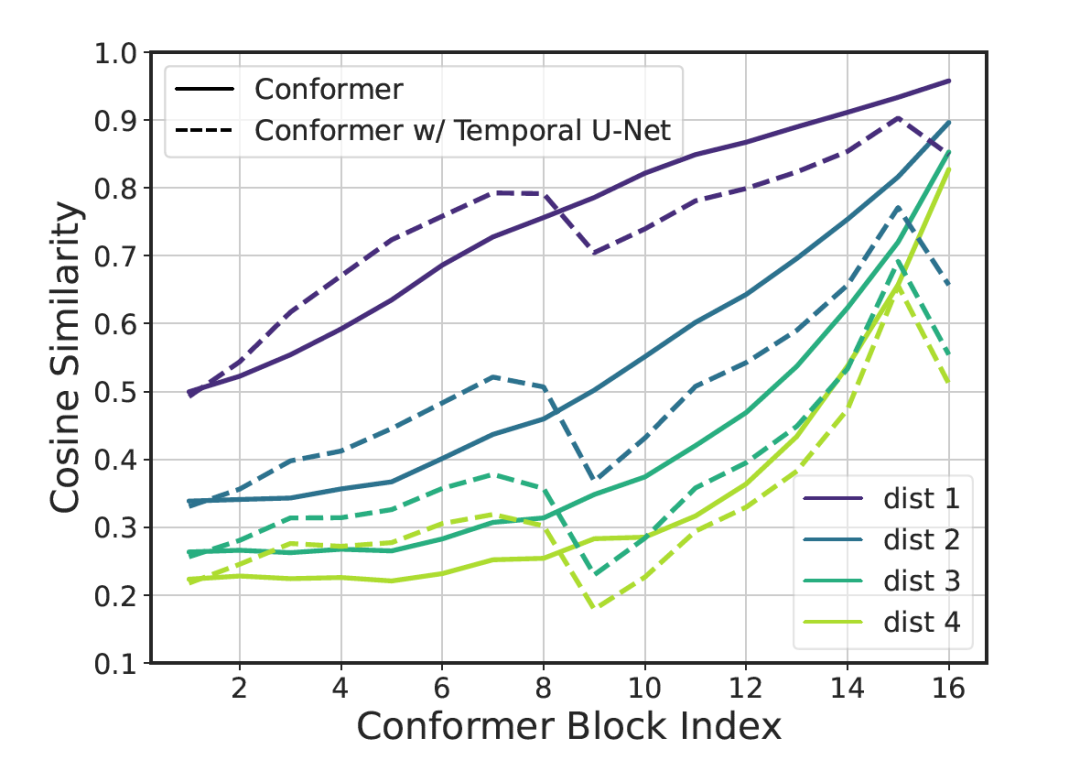
(2) 作者通过对比相邻帧之间的Cosine Similarity发现,在Conformer模型中间层有着比较大的信息冗余,尤其是在序号更大的block。
因此采用U-Net的结构替换原始的Conformer,核心部分是TimeReductionLayer。
TimeReductionLayer 将单位帧对应时长由40ms变为80ms,即在时间维度上变为1/2。我们这里提供了1D和2D版本的TimeReductionLayer。
class TimeReductionLayer1D(nn.Module):
    def __init__(self, channel: int, out_dim: int,
                 kernel_size: int = 5, stride: int = 2):
        super(TimeReductionLayer1D, self).__init__()

        self.channel = channel
        self.out_dim = out_dim
        self.kernel_size = kernel_size
        self.stride = stride
        self.padding = max(0, self.kernel_size - self.stride)

        self.dw_conv = nn.Conv1d(
            in_channels=channel,
            out_channels=channel,
            kernel_size=kernel_size,
            stride=stride,
            padding=self.padding,
            groups=channel,
        )

        self.pw_conv = nn.Conv1d(
            in_channels=channel, out_channels=out_dim,
            kernel_size=1, stride=1, padding=0, groups=1,
        )

        self.init_weights()

    def init_weights(self):
        dw_max = self.kernel_size ** -0.5
        pw_max = self.channel ** -0.5
        torch.nn.init.uniform_(self.dw_conv.weight, -dw_max, dw_max)
        torch.nn.init.uniform_(self.dw_conv.bias, -dw_max, dw_max)
        torch.nn.init.uniform_(self.pw_conv.weight, -pw_max, pw_max)
        torch.nn.init.uniform_(self.pw_conv.bias, -pw_max, pw_max)

    def forward(self, xs, xs_lens: torch.Tensor,
                mask: torch.Tensor = torch.ones((0, 0, 0), dtype=torch.bool),
                mask_pad: torch.Tensor = torch.ones((0, 0, 0), dtype=torch.bool),
                ):
        xs = xs.transpose(1, 2)  # [B, C, T]
        xs = xs.masked_fill(mask_pad.eq(0), 0.0)

        xs = self.dw_conv(xs)
        xs = self.pw_conv(xs)

        xs = xs.transpose(1, 2)  # [B, T, C]

        B, T, D = xs.size()
        mask = mask[:, ::self.stride, ::self.stride]
        mask_pad = mask_pad[:, :, ::self.stride]
        L = mask_pad.size(-1)
        # For JIT exporting, we remove F.pad operator.
        if L - T < 0:
            xs = xs[:, :L - T, :].contiguous()
        else:
            dummy_pad = torch.zeros(B, L - T, D, device=xs.device)
            xs = torch.cat([xs, dummy_pad], dim=1)

        xs_lens = torch.div(xs_lens + 1, 2, rounding_mode='trunc')
        return xs, xs_lens, mask, mask_pad
(3) Recover部分实现,在时间维度上进行复制、映射和recover_tensor叠加。
    # recover output length for ctc decode
    xs = torch.repeat_interleave(xs, repeats=2, dim=1)
    xs = self.time_recover_layer(xs)
    recoverd_t = recover_tensor.size(1)
    xs = recover_tensor + xs[:, :recoverd_t, :].contiguous()
(4) 替换FMCF为MFCF结构,这里默认采用PostLN,也兼容了PreLN。
    def forward(
            self,
            x: torch.Tensor,
            mask: torch.Tensor,
            pos_emb: torch.Tensor,
            mask_pad: torch.Tensor = torch.ones((0, 0, 0), dtype=torch.bool),
            att_cache: torch.Tensor = torch.zeros((0, 0, 0, 0)),
            cnn_cache: torch.Tensor = torch.zeros((0, 0, 0, 0)),
        ) -> Tuple[torch.Tensor, torch.Tensor, torch.Tensor, torch.Tensor]:
        # self attention module
        residual = x
        if self.normalize_before:
            x = self.layer_norm1(x)
        x_att, new_att_cache = self.self_attn(
            x, x, x, mask, pos_emb, att_cache)
        if self.concat_after:
            x_concat = torch.cat((x, x_att), dim=-1)
            x = residual + self.concat_linear(x_concat)
        else:
            x = residual + self.dropout(x_att)
        if not self.normalize_before:
            x = self.layer_norm1(x)

        # ffn module
        residual = x
        if self.normalize_before:
            x = self.layer_norm2(x)
        x = self.ffn1(x)
        x = residual + self.dropout(x)
        if not self.normalize_before:
            x = self.layer_norm2(x)

        # conv module
        new_cnn_cache = torch.zeros((0, 0, 0), dtype=x.dtype, device=x.device)
        residual = x
        if self.normalize_before:
            x = self.layer_norm3(x)
        x, new_cnn_cache = self.conv_module(x, mask_pad, cnn_cache)
        x = residual + self.dropout(x)
        if not self.normalize_before:
            x = self.layer_norm3(x)

        # ffn module
        residual = x
        if self.normalize_before:
            x = self.layer_norm4(x)
        x = self.ffn2(x)
        x = residual + self.dropout(x)
        if not self.normalize_before:
            x = self.layer_norm4(x)

        return x, mask, new_att_cache, new_cnn_cache
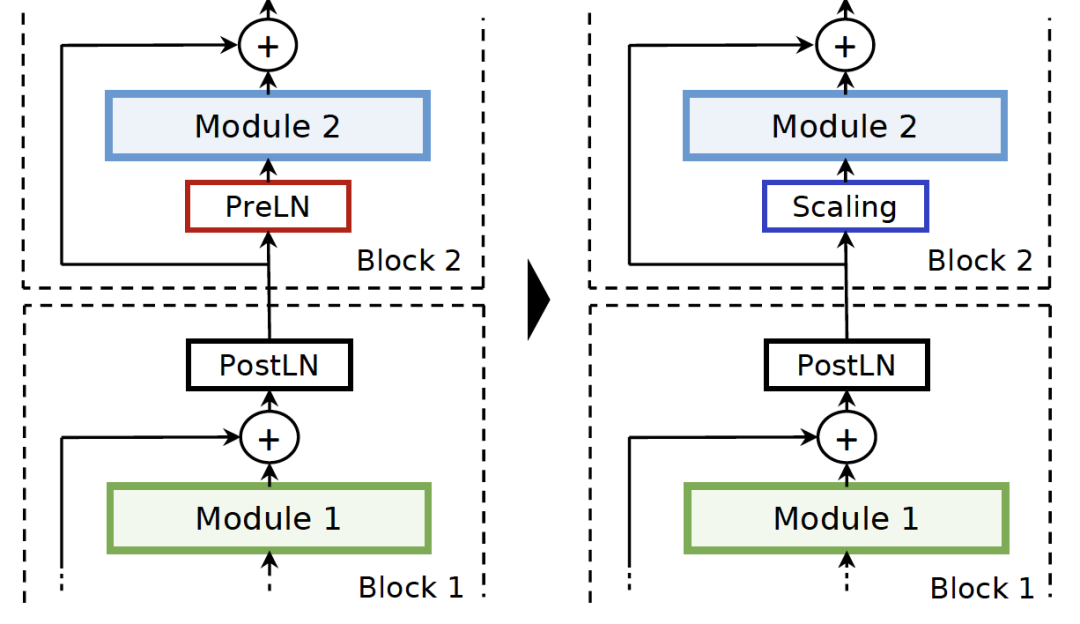
(5) 如图所示,PreLN的部分被替换为adaptive scale。这里以FeedForward layer为例,adaptive scale指的是在输入layer之前加入一组可学习参数的仿射变换,以及合理的init weights方式。许多研究工作表明,PreLN的结构更容易稳定收敛,PostLN训练的模型效果更好,因此adaptive scale+PostLN的组合被视为两者优点的结合。
class PositionwiseFeedForward(torch.nn.Module):
    """Positionwise feed forward layer.

    FeedForward are appied on each position of the sequence.
    The output dim is same with the input dim.

    Args:
        idim (int): Input dimenstion.
        hidden_units (int): The number of hidden units.
        dropout_rate (float): Dropout rate.
        activation (torch.nn.Module): Activation function
    """

    def __init__(self,
                 idim: int,
                 hidden_units: int,
                 dropout_rate: float,
                 activation: torch.nn.Module = torch.nn.ReLU(),
                 adaptive_scale: bool = False,
                 init_weights: bool = False
                 ):
        """Construct a PositionwiseFeedForward object."""
        super(PositionwiseFeedForward, self).__init__()
        self.idim = idim
        self.hidden_units = hidden_units
        self.w_1 = torch.nn.Linear(idim, hidden_units)
        self.activation = activation
        self.dropout = torch.nn.Dropout(dropout_rate)
        self.w_2 = torch.nn.Linear(hidden_units, idim)
        self.ada_scale = None
        self.ada_bias = None
        self.adaptive_scale = adaptive_scale
        self.ada_scale = torch.nn.Parameter(
            torch.ones([1, 1, idim]), requires_grad=adaptive_scale)
        self.ada_bias = torch.nn.Parameter(
            torch.zeros([1, 1, idim]), requires_grad=adaptive_scale)
        if init_weights:
            self.init_weights()

    def init_weights(self):
        ffn1_max = self.idim ** -0.5
        ffn2_max = self.hidden_units ** -0.5
        torch.nn.init.uniform_(self.w_1.weight.data, -ffn1_max, ffn1_max)
        torch.nn.init.uniform_(self.w_1.bias.data, -ffn1_max, ffn1_max)
        torch.nn.init.uniform_(self.w_2.weight.data, -ffn2_max, ffn2_max)
        torch.nn.init.uniform_(self.w_2.bias.data, -ffn2_max, ffn2_max)

    def forward(self, xs: torch.Tensor) -> torch.Tensor:
        """Forward function.

        Args:
            xs: input tensor (B, L, D)
        Returns:
            output tensor, (B, L, D)
        """
        if self.adaptive_scale:
            xs = self.ada_scale * xs + self.ada_bias
        return self.w_2(self.dropout(self.activation(self.w_1(xs))))
流式推理
如下图所示,由于Squeezeformer在squeeze的部分与Conformer不同,为了在流式推理过程中保持接口使用方式不变,我们在Squeezeformer推理中额外采用了slice + pad的形式。缓存attention cache时,在时间维度上复制下采样倍数;计算下一个chunk时,按照下采样系数取出。
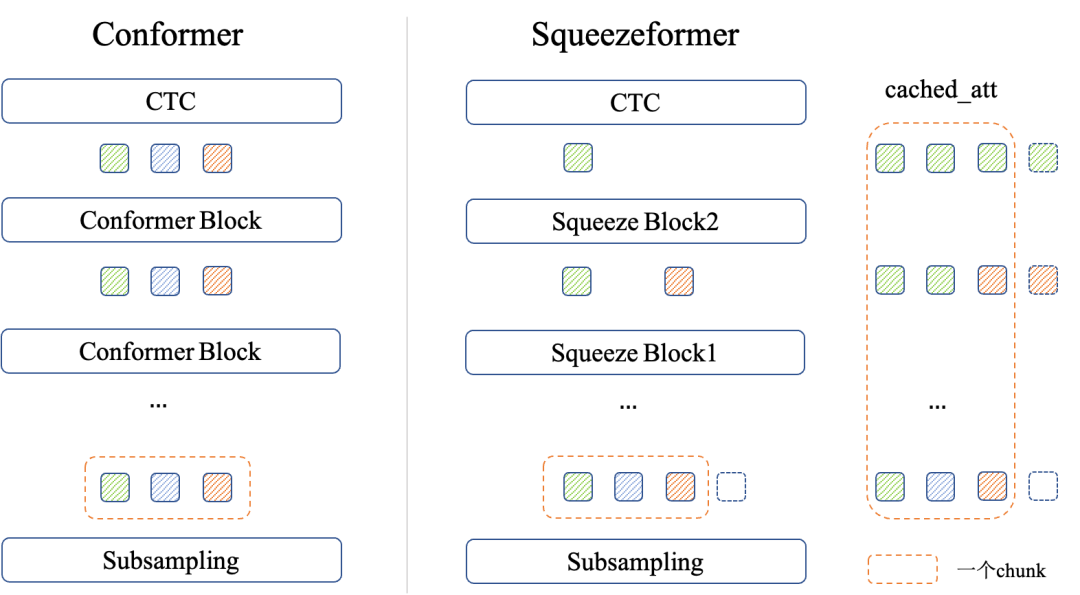
attention cache & cnn cache 的核心代码如下:
    factor = self.calculate_downsampling_factor(i)

    xs, _, new_att_cache, new_cnn_cache = layer(
        xs, att_mask, pos_emb,
        att_cache=att_cache[i:i + 1][:, :, ::factor, :]
        [:, :, :pos_emb.size(1) - xs.size(1), :] if
        elayers > 0 else att_cache[:, :, ::factor, :],
        cnn_cache=cnn_cache[i] if cnn_cache.size(0) > 0 else cnn_cache
    )
    cached_att \
        = new_att_cache[:, :, next_cache_start // factor:, :]
    cached_cnn = new_cnn_cache.unsqueeze(0)
    cached_att = cached_att.repeat_interleave(repeats=factor, dim=2)
    if i == 0:
        # record length for the first block as max length
        max_att_len = cached_att.size(2)
    r_att_cache.append(cached_att[:, :, :max_att_len, :])
    r_cnn_cache.append(cached_cnn)
另外,流式推理过程中,由于time reduce的padding导致边界处理稍有差异,使得调用forward接口效果与调用forward chunk接口稍有偏差,我们这里额外给出了一种stream reduce保持推理时的一致性。
差异1:在forward接口中卷积会对全长进行pad,卷积计算到中间位置的可见帧为数据,而forward chunk接口会在当前chunk做pad
self.padding = max(0, self.kernel_size - self.stride)
self.dw_conv = nn.Conv1d(
    in_channels=channel,
    out_channels=channel,
    kernel_size=kernel_size,
    stride=stride,
    padding=self.padding,
    groups=channel,
)
差异2:与上面类似,在L-T不为0时,forward与forward chunk会带来差异
L = mask_pad.size(-1)
if L - T < 0:
    xs = xs[:, :L - T, :].contiguous()
else:
    dummy_pad = torch.zeros(B, L - T, D, device=xs.device)
    xs = torch.cat([xs, dummy_pad], dim=1)
实验结果
我们在WeNet上贡献了完整的Squeezeformer训练方案,并给出了在计算速度相对可比的情况下,不同大小模型的实验效果。
1.在最普遍使用的Medium模型,我们给出了3种尺度的结果,
分别是V0: 接近Conformer效果的最小模型,V1: 参数量相近的模型,以及V2: FLOPs相近的模型。

2.Large模型我们给出了参数量相近情况下的对比结果。

3.同时Squeezeformer也支持流式的训练和推理,在参数量相近的情况下,对比效果如下。

Squeezeformer在Librispeech上的完整训练效果,详见LibriSpeech 实验结果[3]
补充说明:
-
SM12-V1和U2++的参数量一致,效果差异主要来自squeeze layer的实现方式、BN同步、decoder以及流式训练方式。
-
由于这个系列算法的在CNN结构的Norm方式采用了BN,我们通过实验发现syncbn可以带来提升,因此部分实验结构采用了syncbn的操作,这个部分后续也会在WeNet中更新。
参考资料
[1]Squeezeformer: https://arxiv.org/pdf/2206.00888v1.pdf
[2]Code: https://github.com/kssteven418/Squeezeformer
[3]README.md: https://github.com/wenet-e2e/wenet/tree/main/examples/librispeech/s0
机器翻译,仅供参考

