目录
一、JdbcTemplate 概述
1、什么是 JdbcTemplate
2、准备运行环境
二、添加功能
1、示例
三、修改和删除功能
1、示例
四、查询功能
1、查询记录数
2、查询返回 bean 对象
3、查询返回集合
4、测试
五、批量增删改功能
1、批量添加
2、批量修改
3、批量删除
一、JdbcTemplate 概述
1、什么是 JdbcTemplate
Spring 框架对 JDBC 进行封装,形成一个 Spring 风格的模板,使用 JdbcTemplate 方便实现对数据库操作。
2、准备运行环境
(1)添加依赖(导入 jar 包或使用 maven)
这里使用 maven:
<!-- https://mvnrepository.com/artifact/com.alibaba/druid -->
<dependency>
    <groupId>com.alibaba</groupId>
    <artifactId>druid</artifactId>
    <version>1.2.8</version>
</dependency>
<!-- https://mvnrepository.com/artifact/org.postgresql/postgresql -->
<dependency>
    <groupId>org.postgresql</groupId>
    <artifactId>postgresql</artifactId>
    <version>42.6.0</version>
</dependency>

<dependency>
    <groupId>org.springframework</groupId>
    <artifactId>spring-jdbc</artifactId>
    <version>5.3.22</version>
</dependency>

<dependency>
    <groupId>org.springframework</groupId>
    <artifactId>spring-orm</artifactId>
    <version>5.3.22</version>
</dependency>

<dependency>
    <groupId>org.springframework</groupId>
    <artifactId>spring-tx</artifactId>
    <version>5.3.22</version>
</dependency>
(2)在 spring 配置文件配置数据库连接池
依据介绍 IOC 的文章中的操作:
- 可以选择将数据库信息写死在 xml 中;
- 也可以使用 placeholder 标签引入 properties 配置文件;
(3)把前面配置好的数据库连接池注入到 JdbcTemplate 对象的 DataSource 属性
- 由于 JdbcTemplate 源码中使用的是 set 方法,因此这里需要使用 <property> 来进行注入。
<?xml version="1.0" encoding="UTF-8"?>
<beans xmlns="http://www.springframework.org/schema/beans"
       xmlns:xsi="http://www.w3.org/2001/XMLSchema-instance"
       xmlns:context="http://www.springframework.org/schema/context"
       xmlns:aop="http://www.springframework.org/schema/aop"
       xsi:schemaLocation="http://www.springframework.org/schema/beans http://www.springframework.org/schema/beans/spring-beans.xsd
                           http://www.springframework.org/schema/context http://www.springframework.org/schema/context/spring-context.xsd
                           http://www.springframework.org/schema/aop http://www.springframework.org/schema/aop/spring-aop.xsd">
    <!-- 注解扫描 -->
    <context:component-scan base-package="com.demo"></context:component-scan>

    <bean id="dataSource" class="com.alibaba.druid.pool.DruidDataSource">
        <property name="driverClassName" value="org.postgresql.Driver"></property>
        <property name="url" value="jdbc:postgresql://localhost:5432/MyDatabase"></property>
        <property name="username" value="postgres"></property>
        <property name="password" value="123456"></property>
    </bean>

    <bean id="jdbcTemplate" class="org.springframework.jdbc.core.JdbcTemplate">
        <property name="dataSource" ref="dataSource"></property>
    </bean>
</beans>
(4)创建 Service 类,创建 Dao 类,向 dao 注入 jdbcTemplate 对象
(4-1)Service 类
package com.demo.service.impl;

import com.demo.dao.UserDao;
import com.demo.service.UserService;
import org.springframework.beans.factory.annotation.*;
import org.springframework.stereotype.Service;

@Service
public class UserServiceImpl implements UserService {
    @Autowired
    @Qualifier(value = "userDaoImpl")
    private UserDao userDao;
}
(4-2)Dao 类
package com.demo.dao.impl;

import com.demo.dao.UserDao;
import org.springframework.beans.factory.annotation.*;
import org.springframework.jdbc.core.JdbcTemplate;
import org.springframework.stereotype.Repository;

@Repository
public class UserDaoImpl implements UserDao {
    @Autowired
    @Qualifier(value = "jdbcTemplate")
    private JdbcTemplate jdbcTemplate;
}
(5)测试代码
import com.demo.service.UserService;
import org.junit.Test;
import org.springframework.context.ApplicationContext;
import org.springframework.context.support.ClassPathXmlApplicationContext;

public class DruidTest {
    @Test
    public void test() {
        ApplicationContext context = new ClassPathXmlApplicationContext("Druid.xml");
        UserService userService = context.getBean("userServiceImpl", UserService.class);
        System.out.println(userService);
    }
}
二、添加功能
实际上 JdbcTemplate 与 dbutil 类似,都是第三方的数据库操作的封装类,因此使用上也是差不多的,不再做特别说明。
1、示例
创建名为 MyDatabase 的数据库,创建一个名为 MyUser 的表。
首先创建一个 bean 对象,然后编写对应的 dao 层和 service 层,在 dao 层中使用 JdbcTemplate 的 update 方法来做添加操作。
(1)代码
(1-1)User
package com.demo.pojo;

public class User {
    private Integer Id;
    private String username;
    private String Status;

    public User() {
    }

    public User(Integer id, String username, String status) {
        Id = id;
        this.username = username;
        Status = status;
    }

    @Override
    public String toString() {
        return "User{" +
                "Id=" + Id +
                ", username='" + username + '\'' +
                ", Status='" + Status + '\'' +
                '}';
    }

    public Integer getId() {
        return Id;
    }

    public void setId(Integer id) {
        Id = id;
    }

    public String getUsername() {
        return username;
    }

    public void setUsername(String username) {
        this.username = username;
    }

    public String getStatus() {
        return Status;
    }

    public void setStatus(String status) {
        Status = status;
    }
}
(1-2)UserDao 与 UserService
- 在 dao 进行数据库添加操作;
- 调用 JdbcTemplate 对象里面 update 方法实现添加操作;
package com.demo.dao.impl;

import com.demo.dao.UserDao;
import com.demo.pojo.User;
import org.springframework.beans.factory.annotation.*;
import org.springframework.jdbc.core.JdbcTemplate;
import org.springframework.stereotype.Repository;

@Repository
public class UserDaoImpl implements UserDao {
    @Autowired
    @Qualifier(value = "jdbcTemplate")
    private JdbcTemplate jdbcTemplate;

    public int addUser(User user) {
        // 这里不传 id 是因为设置了 id 自增。
        String sql = "insert into \"MyUser\"(username, status) values(?, ?);";
        return jdbcTemplate.update(sql, user.getUsername(), user.getStatus());
    }

}
package com.demo.service.impl;

import com.demo.dao.UserDao;
import com.demo.pojo.User;
import com.demo.service.UserService;
import org.springframework.beans.factory.annotation.*;
import org.springframework.stereotype.Service;

@Service
public class UserServiceImpl implements UserService {
    @Autowired
    @Qualifier(value = "userDaoImpl")
    private UserDao userDao;

    public void addUser(User user) {
        userDao.addUser(user);
    }
}
(1-3)测试代码
import com.demo.pojo.User;
import com.demo.service.UserService;
import org.junit.Test;
import org.springframework.context.ApplicationContext;
import org.springframework.context.support.ClassPathXmlApplicationContext;

public class DruidTest {
    @Test
    public void test() {
        ApplicationContext context = new ClassPathXmlApplicationContext("Druid.xml");
        UserService userService = context.getBean("userServiceImpl", UserService.class);
        userService.addUser(new User("wyt", "statusA"));
    }
}
(2)运行结果

三、修改和删除功能
修改和删除的做法,基本与添加操作一致,都是使用 update 方法。
1、示例
(1)代码
(1-1)UserDao 与 UserService
package com.demo.dao.impl;

import com.demo.dao.UserDao;
import com.demo.pojo.User;
import org.springframework.beans.factory.annotation.*;
import org.springframework.jdbc.core.JdbcTemplate;
import org.springframework.stereotype.Repository;

@Repository
public class UserDaoImpl implements UserDao {
    @Autowired
    @Qualifier(value = "jdbcTemplate")
    private JdbcTemplate jdbcTemplate;

    public int addUser(User user) {
        String sql = "insert into \"MyUser\"(username, status) values(?, ?);";
        return jdbcTemplate.update(sql, user.getUsername(), user.getStatus());
    }

    public int updateUser(User user) {
        String sql = "update \"MyUser\" set username=?, status=? where id=?";
        return jdbcTemplate.update(sql, user.getUsername(), user.getStatus(), user.getId());
    }

    public int deleteUserById(Integer id) {
        String sql = "delete from \"MyUser\" where id=?";
        return jdbcTemplate.update(sql, id);
    }

}
package com.demo.service.impl;

import com.demo.dao.UserDao;
import com.demo.pojo.User;
import com.demo.service.UserService;
import org.springframework.beans.factory.annotation.*;
import org.springframework.stereotype.Service;

@Service
public class UserServiceImpl implements UserService {
    @Autowired
    @Qualifier(value = "userDaoImpl")
    private UserDao userDao;

    public void addUser(User user) {
        userDao.addUser(user);
    }

    public void updateUser(User user) {
        userDao.updateUser(user);
    }

    public void deleteUserById(Integer id) {
        userDao.deleteUserById(id);
    }
}
(1-2)测试代码
- 先添加两个 User,然后修改第 2 个 User,删除第 1 个 User
import com.demo.pojo.User;
import com.demo.service.UserService;
import org.junit.Test;
import org.springframework.context.ApplicationContext;
import org.springframework.context.support.ClassPathXmlApplicationContext;

public class DruidTest {
    @Test
    public void test() {
        ApplicationContext context = new ClassPathXmlApplicationContext("Druid.xml");
        UserService userService = context.getBean("userServiceImpl", UserService.class);

        userService.addUser(new User(null, "wyt", "statusA"));
        User tmp = new User(null, "gyt", "statusB");
        userService.addUser(tmp);

        tmp.setStatus("statusC");
        userService.updateUser(tmp);

        userService.deleteUserById(1);
    }
}
(2)运行结果

四、查询功能
1、查询记录数
@Override
public int selectCount() {
    String sql = "select count(*) from \"MyUser\"";
    return jdbcTemplate.queryForObject(sql, Integer.class);
}
2、查询返回 bean 对象
RowMapper 是接口,针对返回不同类型数据,使用这个接口的实现类完成数据封装。
@Override
public User queryForUserById(Integer id) {
    String sql = "select * from \"MyUser\" where id=?";
    return (User) jdbcTemplate.queryForObject(sql, new BeanPropertyRowMapper<User>(User.class), id);
}
3、查询返回集合
@Override
public List<User> queryForAllUsers() {
    String sql = "select * from \"MyUser\"";
    return (List<User>) jdbcTemplate.query(sql, new BeanPropertyRowMapper<User>(User.class));
}
4、测试
上面三种查询都是 dao 层的,还需要再 service 层中调用,这里就不写出来了。
(1)代码
import com.demo.pojo.User;
import com.demo.service.UserService;
import org.junit.Test;
import org.springframework.context.ApplicationContext;
import org.springframework.context.support.ClassPathXmlApplicationContext;

import java.util.List;

public class DruidTest {
    @Test
    public void test() {
        ApplicationContext context = new ClassPathXmlApplicationContext("Druid.xml");
        UserService userService = context.getBean("userServiceImpl", UserService.class);

        userService.addUser(new User(null, "wyt", "statusA"));
        userService.addUser(new User(null, "gyt", "statusB"));

        System.out.println("行数:" + userService.selectCount());
        System.out.println(userService.queryForUserById(2));

        List<User> userList = userService.queryForAllUsers();
        System.out.println(userList);
    }
}
(2)输出结果

五、批量增删改功能
前面的 insert、delete、update 都只能操作一条记录,而批量操作就可以做到 insert、delete、update 多条记录。
1、批量添加
使用 batchUpdate,传入 Object 数组的 List 集合,那么该方法就会遍历 List,将每一个 Object 数组执行 sql 语句。
(1)代码
(1-1)UserDao
@Override
public void batchAddUsers(List<Object[]> batchArgs) {
    String sql = "insert into \"MyUser\"(username, status) values(?,?)";
    int[] ints = jdbcTemplate.batchUpdate(sql, batchArgs);
}
(1-2)测试代码
import com.demo.pojo.User;
import com.demo.service.UserService;
import org.junit.Test;
import org.springframework.context.ApplicationContext;
import org.springframework.context.support.ClassPathXmlApplicationContext;

import java.util.ArrayList;
import java.util.List;

public class DruidTest {
    @Test
    public void test() {
        ApplicationContext context = new ClassPathXmlApplicationContext("Druid.xml");
        UserService userService = context.getBean("userServiceImpl", UserService.class);

        List<Object[]> batchArgs = new ArrayList<>();
        Object[] o1 = {"wyt", "statusA"}; batchArgs.add(o1);
        Object[] o2 = {"gyt", "statusB"}; batchArgs.add(o2);
        Object[] o3 = {"lyt", "statusC"}; batchArgs.add(o3);

        userService.batchAddUsers(batchArgs);

        System.out.println(userService.queryForAllUsers());
    }
}
(2)输出结果

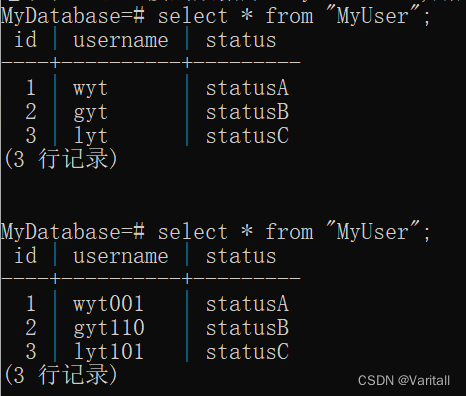
2、批量修改
(1)代码
(1-1)UserDao
@Override
public void batchUpdateUsers(List<Object[]> batchArgs) {
    String sql = "update \"MyUser\" set username=?, status=? where id=?";
    int[] ints = jdbcTemplate.batchUpdate(sql, batchArgs);
}
(1-2)测试代码
import com.demo.pojo.User;
import com.demo.service.UserService;
import org.junit.Test;
import org.springframework.context.ApplicationContext;
import org.springframework.context.support.ClassPathXmlApplicationContext;

import java.util.ArrayList;
import java.util.List;

public class DruidTest {
    @Test
    public void test() {
        ApplicationContext context = new ClassPathXmlApplicationContext("Druid.xml");
        UserService userService = context.getBean("userServiceImpl", UserService.class);

        List<Object[]> batchArgs = new ArrayList<>();
        Object[] o1 = {"wyt001", "statusA", 1}; batchArgs.add(o1);
        Object[] o2 = {"gyt110", "statusB", 2}; batchArgs.add(o2);
        Object[] o3 = {"lyt101", "statusC", 3}; batchArgs.add(o3);

        userService.batchUpdateUsers(batchArgs);

        System.out.println(userService.queryForAllUsers());
    }
}
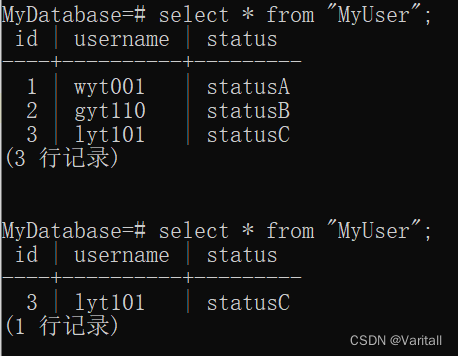
(2)运行结果
3、批量删除
(1)代码
(1-1)UserDao
@Override
public void batchDeleteUsersById(List<Object[]> batchArgs) {
    String sql = "delete from \"MyUser\" where id=?";
    int[] ints = jdbcTemplate.batchUpdate(sql, batchArgs); // 返回影响行数
}
(1-2)测试代码
- 将 id 为 1、2 的删除。
import com.demo.pojo.User;
import com.demo.service.UserService;
import org.junit.Test;
import org.springframework.context.ApplicationContext;
import org.springframework.context.support.ClassPathXmlApplicationContext;

import java.util.ArrayList;
import java.util.List;

public class DruidTest {
    @Test
    public void test() {
        ApplicationContext context = new ClassPathXmlApplicationContext("Druid.xml");
        UserService userService = context.getBean("userServiceImpl", UserService.class);

        List<Object[]> batchArgs = new ArrayList<>();
        Object[] o1 = {1}; batchArgs.add(o1);
        Object[] o2 = {2}; batchArgs.add(o2);

        userService.batchDeleteUsersById(batchArgs);

        System.out.println(userService.queryForAllUsers());
    }
}
(2)输出结果
