VUE3照本宣科——响应式与生命周期钩子
- 前言
- 一、响应式
- 1.ref()
- 2.reactive()
- 3.computed()
- 4.watch()
- 5.代码演示
- 二、defineProps() 和 defineEmits()
- 三、生命周期钩子
- 1.onMounted()
- 2.onUpdated()
- 3.onUnmounted()
- 4.onBeforeMount()
- 5.onBeforeUpdate()
- 6.onBeforeUnmount()
- 7.onErrorCaptured()
- 8.onRenderTracked()
- 9.onRenderTriggered()
- 10.onActivated()
- 11.onDeactivated()
- 12.onServerPrefetch()
- 13.代码演示
前言
👨💻👨🌾📝记录学习成果,以便温故而知新
“VUE3照本宣科”是指照着中文官网和菜鸟教程这两个“本”来学习一下VUE3。以前也学过VUE2,当时只再gitee留下一些代码,却没有记录学习的心得体会,有时也免不了会追忆一下。
以后出现“中文官网”不做特殊说明就是指:https://cn.vuejs.org/;菜鸟教程就是指:https://www.runoob.com/vue3/vue3-tutorial.html
这一篇是对前篇中<script setup>的扩展,有些虽然zbxk项目中没有涉及,但是属于基本原理性质的,所以捎带介绍一下。
一、响应式
1.ref()
ref 对象是可更改的,也就是说你可以为 .value 赋予新的值。它也是响应式的,即所有对 .value 的操作都将被追踪,并且写操作会触发与之相关的副作用。
2.reactive()
响应式转换是“深层”的:它会影响到所有嵌套的属性。一个响应式对象也将深层地解包任何 ref 属性,同时保持响应性。
3.computed()
1.接受一个 getter 函数,返回一个只读的响应式 ref 对象。该 ref 通过 .value 暴露 getter 函数的返回值。
2.接受一个带有 get 和 set 函数的对象来创建一个可写的 ref 对象。
4.watch()
第一个参数是侦听器的源。这个来源可以是以下几种:
- 一个函数,返回一个值
- 一个 ref
- 一个响应式对象
- 或是由以上类型的值组成的数组
第二个参数是在发生变化时要调用的回调函数。
第三个可选的参数是一个对象,支持immediate、deep、flush、onTrack及onTrigger
详情参见https://cn.vuejs.org/api/reactivity-core.html
5.代码演示
新建TestView1.vue文件,代码如下:
<script setup>
import { computed, reactive, ref, watch } from 'vue'

// 参数基本类型
const count = ref(0)

// 代码中修改值
count.value = 1

function add(){
    count.value = count.value + 1
}

function sub(){
    count.value = count.value - 1
}

// 参数对象
const user = ref({
  'name': 'Tom',
  'age': '18'
})

// 参数是对象
const role = reactive({
  'name': '动物',
  'remark': '备注'
})

// 接受一个带有 get 和 set 函数的对象来创建一个可写的 ref 对象
const twiceCount = computed({
  get: () => count.value + 2,
  set: (val) => {
    count.value = val - 1
  }
})


// 接受一个 getter 函数
const helloUser = computed(() => 'Hello,' + user.value.name)

const x = ref(0)
const y = ref(0)

// 单个 ref
watch(x, (newX) => {
  console.log(`x is ${newX}`)
})

// getter 函数
watch(
  () => x.value + y.value,
  (sum) => {
    console.log(`sum of x + y is: ${sum}`)
  }
)

// 多个来源组成的数组
watch([x, () => y.value], ([newX, newY]) => {
  console.log(`x is ${newX} and y is ${newY}`)
})

// 响应式对象
watch(role, (newValue, oldValue) => {
  // 在嵌套的属性变更时触发
  // 注意:`newValue` 此处和 `oldValue` 是相等的
  // 因为它们是同一个对象!
  console.log(newValue)
  console.log(oldValue)
})

</script>

<template>
  <div>
    <div>数量:{{ count }},计算属性加倍:{{ twiceCount }}</div>
    <div><input type="number" v-model="count" /></div>
    <div><button @click="add">增加</button><button @click="sub">减少</button></div>

    <div>姓名:{{ user.name }},年龄;{{ user.age }}</div>
    <div>{{ helloUser }}</div>
    <div>
      <input type="text" v-model="user.name" />
      <input type="number" v-model="user.age" />
    </div>

    <div>角色:{{ role.name }},备注:{{ role.remark }}</div>
    <div>
      <input type="text" v-model="role.name" />
      <input type="text" v-model="role.remark" />
    </div>

    <div>
      X:<input type="text" v-model="x" />
      Y:<input type="text" v-model="y" />
    </div>
  </div>
</template>
添加路由代码:
{
      path: '/test1',
      name: 'test1',
      // route level code-splitting
      // this generates a separate chunk (About.[hash].js) for this route
      // which is lazy-loaded when the route is visited.
      component: () => import('../views/TestView1.vue')
}
运行效果如图:
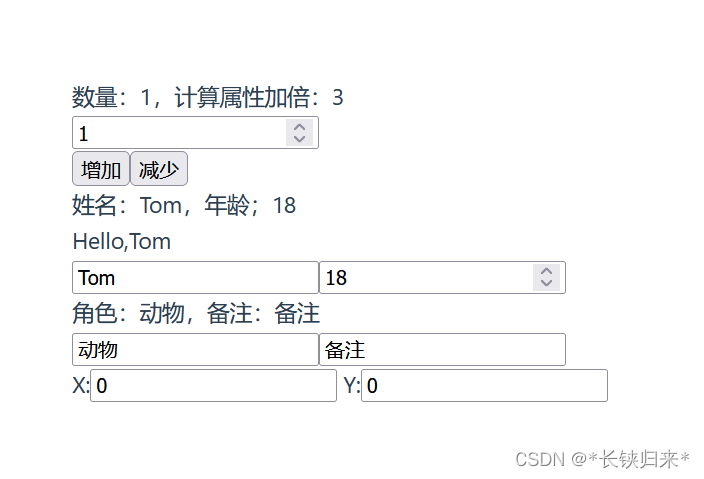 当如下图修改X或Y中任何值或者角色值,如图:
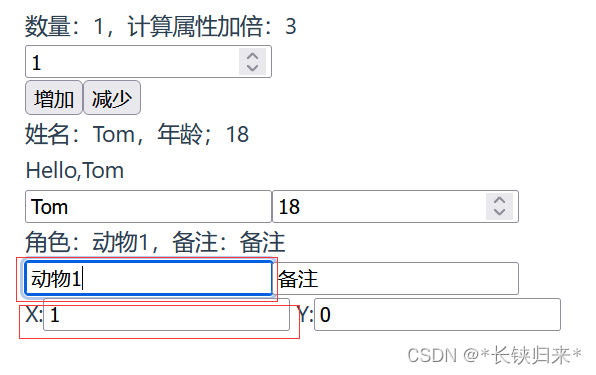
有如下输出:
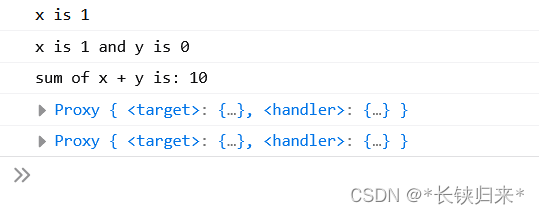 代码中watch响应式对象是role时,修改角色是有效果的,如果改成watch对象user实测没有效果。
二、defineProps() 和 defineEmits()
defineProps()在zbxk项目默认文件“HelloWorld.vue”中出现过,但是不能不完整。现在定义一个父主件与一个子主件来稍微说明一下。
父主件TestParent.vue,代码如下:
<script setup>
import { ref } from 'vue'
import child from '/src/components/TestChild1.vue'

const msg = ref('hello')

const updateMsg = (m) => msg.value = m
</script>

<template>
  <div>
    <div>父主件:{{ msg }}</div>
    <child @update="updateMsg" :msg="msg"></child>
  </div>
</template>
子主件TestChild1.vue代码如下:
<script setup>

const p = defineProps({
  msg: {
    type: String,
    required: true
  }
})

const emit = defineEmits(['update'])

const updateMsg = () => { emit('update', '修改后消息:' + p.msg) }

</script>

<template>
  <div>
    <div>子主件:{{ msg }}</div>
    <div><button @click="updateMsg">修改消息</button></div>
  </div>
</template>
添加路由代码:
{
      path: '/testParent',
      name: 'testParent',
      // route level code-splitting
      // this generates a separate chunk (About.[hash].js) for this route
      // which is lazy-loaded when the route is visited.
      component: () => import('../views/testParent.vue')
}
运行效果如下图:
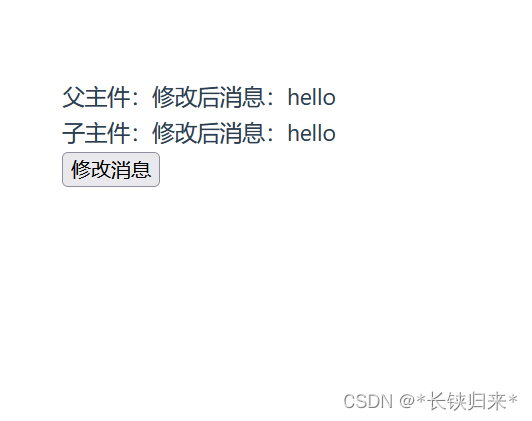
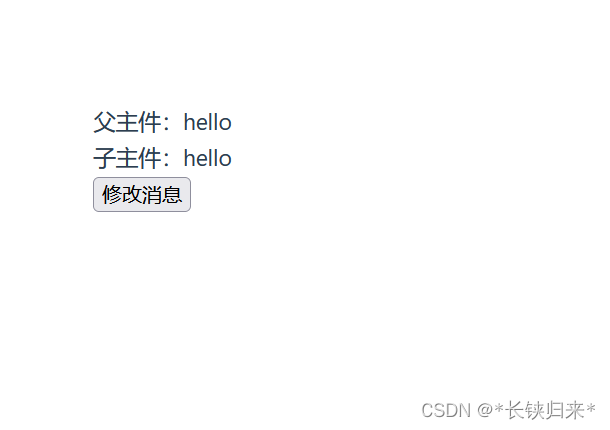 点击“修改”消息按钮后,显示如下图:
先看父主件中的重要代码:
<child @update=“updateMsg” :msg=“msg”></child>
@update相当于是子主件中defineEmits定义的时间,"updateMsg"是父主件中的处理函数;:msg冒号后的msg相当于是defineProps定义的子主件入参,"msg"是绑定的父主件的响应式变量。
再看子主件中的重要带啊
emit(‘update’, ‘修改后消息:’ + p.msg)
这是子主件中触发自定事件“update”。
三、生命周期钩子
VUE3的生命周期钩子与VUE2相比,变化还是挺大的,所以这里罗列一下。
1.onMounted()
注册一个回调函数,在组件挂载完成后执行。
2.onUpdated()
注册一个回调函数,在组件因为响应式状态变更而更新其 DOM 树之后调用。
3.onUnmounted()
注册一个回调函数,在组件实例被卸载之后调用。
4.onBeforeMount()
注册一个钩子,在组件被挂载之前被调用。
5.onBeforeUpdate()
注册一个钩子,在组件即将因为响应式状态变更而更新其 DOM 树之前调用。
6.onBeforeUnmount()
注册一个钩子,在组件实例被卸载之前调用。
7.onErrorCaptured()
注册一个钩子,在捕获了后代组件传递的错误时调用。
错误可以从以下几个来源中捕获:
- 组件渲染
- 事件处理器
- 生命周期钩子
- setup() 函数
- 侦听器
- 自定义指令钩子
- 过渡钩子
这个钩子带有三个实参:错误对象、触发该错误的组件实例,以及一个说明错误来源类型的信息字符串。
8.onRenderTracked()
注册一个调试钩子,当组件渲染过程中追踪到响应式依赖时调用。
这个钩子仅在开发模式下可用,且在服务器端渲染期间不会被调用。
9.onRenderTriggered()
注册一个调试钩子,当响应式依赖的变更触发了组件渲染时调用。
这个钩子仅在开发模式下可用,且在服务器端渲染期间不会被调用。
10.onActivated()
注册一个回调函数,若组件实例是 缓存树的一部分,当组件被插入到 DOM 中时调用。
11.onDeactivated()
注册一个回调函数,若组件实例是 缓存树的一部分,当组件从 DOM 中被移除时调用。
12.onServerPrefetch()
注册一个异步函数,在组件实例在服务器上被渲染之前调用。
这个系列不涉及服务端渲染。
13.代码演示
新建TestView2.vue文件,代码如下:
<script setup>
import { ref, onMounted, onUpdated, onUnmounted, onBeforeMount,
  onBeforeUpdate, onBeforeUnmount, onErrorCaptured, onRenderTracked,
  onRenderTriggered, onActivated, onDeactivated, onServerPrefetch } from 'vue'

  import child from '/src/components/TestChild.vue'

onMounted(() => {
  console.log("onMounted")
})

//调用两次,证明钩子函数可以重复注册
onMounted(() => {
  console.log("onMounted2")
})

onUpdated(() => {
  console.log("onUpdated")
})

onUnmounted(() => {
  console.log("onUnmounted")
})

onBeforeMount(() => {
  console.log("onBeforeMount")
})

onBeforeUpdate(() => {
  console.log("onBeforeUpdate")
})

onBeforeUnmount(() => {
  console.log("onBeforeUnmount")
})

onErrorCaptured(() => {
  console.log("onErrorCaptured")
})

onRenderTracked(() => {
  console.log("onRenderTracked")
})

onRenderTriggered(() => {
  console.log("onRenderTriggered")
})

onActivated(() => {
  console.log("onActivated")
})

onDeactivated(() => {
  console.log("onDeactivated")
})

onServerPrefetch(() => {
  console.log("onServerPrefetch")
})

const count = ref(0)

const view = ref(true)
</script>

<template>
  <div>
    <div>数量:{{ count }}</div>
    <div><button @click="count++">自增改变状态</button></div>

    <KeepAlive>
      <child v-if="view"></child>
    </KeepAlive>
    <div><button @click="view=!view">改变KeepAlive</button></div>
  </div>
</template>
新增子组件TestChild2.vue,代码如下:
<script setup>
import {  onActivated, onDeactivated } from 'vue'

onActivated(() => {
  console.log("onActivated")
})

onDeactivated(() => {
  console.log("onDeactivated")
})

</script>

<template>
  <div>
    <div>子组件</div>
  </div>
</template>
添加路由代码:
{
      path: '/test2',
      name: 'test2',
      // route level code-splitting
      // this generates a separate chunk (About.[hash].js) for this route
      // which is lazy-loaded when the route is visited.
      component: () => import('../views/TestView2.vue')
}
运行效果如下图:
 终端输出如下:
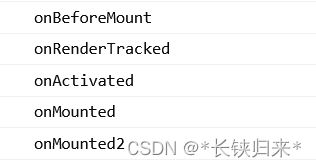
共执行了注册的5个钩子,正如代码注释里所说,钩子函数可以重复注册。点击“自增改变状态”按钮,终端输出如图:
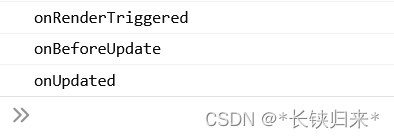
共执行了注册的3个钩子。再点击“改变KeepAlive”按钮,终端输出如图:

又执行了注册的4个钩子。再点击一次“改变KeepAlive”按钮,终端输出如图:
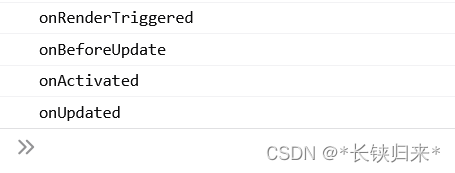
“改变KeepAlive”按钮重点是演示的onActivated与onDeactivated钩子。点击其它有路由跳转的链接,离开TestView2组件,终端输出如图:
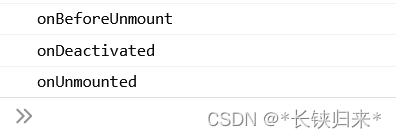
从终端输出来看,除onServerPrefetch()钩子以外,都有调用。
