文章目录
- @[toc]
- 1 :peach:云备份的认识:peach:
- 1.1 :apple:功能了解:apple:
- 1.2 :apple:实现目标:apple:
- 1.3 :apple:服务端程序负责功能:apple:
- 1.4 :apple:服务端功能模块划分:apple:
- 1.5 :apple:客户端程序负责功能:apple:
- 1.6 :apple:客户端功能模块划分:apple:
- 2 :peach:环境搭建:peach:
- 2.1 :apple:`gcc`升级到7.3版本:apple:
- 2.2 :apple:安装`jsoncpp`库:apple:
- 2.3 :apple:下载`bundle`数据压缩库:apple:
- 2.4 :apple:下载`httplib`库:apple:
- 3 :peach:第三方库的基本认识:peach:
- 3.1 :apple:`json`:apple:
- 3.1.1 :lemon:`json`认识:lemon:
- 3.1.2 :lemon:`json`的使用:lemon:
- 3.2 :apple:`bundle`:apple:
- 3.2.1 :lemon:`bundle`文件压缩库认识:lemon:
- 3.2.2 :lemon:`bundle`的使用:lemon:
- 3.3 :apple:`httplib`:apple:
- 3.3.1 :lemon:`httplib`认识:lemon:
- 3.3.2 :lemon:`httplib`使用:lemon:
- 4 :peach:服务端工具类实现:peach:
- 4.1 :apple:文件实用工具类设计:apple:
- 4.2 :apple:`json`实用工具类设计:apple:
- 5 :peach:服务端配置信息模块实现:peach:
- 5.1 :apple:系统配置信息:apple:
- 5.2 :apple:测试系统配置信息类:apple:
- 6 :peach:服务端数据管理模块实现:peach:
- 6.1 :apple:备份信息类的实现:apple:
- 6.2 :apple:服务端数据管理模块实现:apple:
- 6.3 :apple:验证服务端数据管理模块:apple:
- 7 :peach:服务端热点管理模块实现:peach:
- 7.1 :apple:热点管理实现思路:apple:
- 7.2 :apple:热点管理类的设计:apple:
- 7.3 :apple:验证服务端热点管理模块:apple:
- 8 :peach:服务端业务处理模块实现:peach:
- 8.1 :apple:网络通信接口设计:apple:
- 8.2 :apple:业务处理类设计:apple:
- 8.2.1 :lemon:`upload`:lemon:
- 8.2.2 :lemon:`list_show`:lemon:
- 8.2.3 :lemon:`download`:lemon:
- 9 :peach:服务端整体模块的测试:peach:
- 10 :peach:客户端文件检测模块实现:peach:
- 11 :peach:客户端数据管理模块实现:peach:
- 12 :peach:客户端文件备份模块实现:peach:
- 13 :peach:服务器与客户端联合测试:peach:
- 14 :peach:项目总结:peach:
1 🍑云备份的认识🍑
1.1 🍎功能了解🍎
自动将本地计算机上指定文件夹中需要备份的文件上传备份到服务器中。并且能够随时通过浏览器进行查看并且下载,其中下载过程支持断点续传功能,而服务器也会对上传文件进行热点管理,将非热点文件进行压缩存储,节省磁盘空间。
1.2 🍎实现目标🍎
该云备份项目需要我们实现两端程序,其中包括部署在用户机的客户端程序,上传需要备份的文件,以及运行在服务器上的服务端程序,实现备份文件的存储和管理,两端合作实现总体的自动云备份功能。
1.3 🍎服务端程序负责功能🍎
- 对客户端上传的文件进行备份存储;
- 能够对文件进行热点文件管理,对非热点文件进行压缩存储,节省磁盘空间;
- 支持客户端浏览器查看访问文件列表;
- 支持客户端浏览器下载文件,并且下载支持断点续传。
1.4 🍎服务端功能模块划分🍎
- 配置信息模块:负责将配置信息加载到程序中;
- 数据管理模块:负责服务器上备份文件的信息管理;
- 热点管理模块:负责文件的热点判断,以及非热点文件的压缩存储;
- 业务处理模块:针对客户端的各个请求进行对应业务处理并响应结果;
- 网络通信模块:搭建网络通信服务器,实现与客户端通信。
1.5 🍎客户端程序负责功能🍎
- 能够自动检测客户机指定文件夹中的文件,并判断是否需要备份;
- 将需要备份的文件逐个上传到服务器。
1.6 🍎客户端功能模块划分🍎
- 文件检测模块:遍历获取指定文件夹中所有文件路径名称;
- 数据管理模块:负责客户端备份的文件信息管理,通过这些数据可以确定一个文件是否需要备份;
- 网络通信模块:搭建网络通信客户端,实现将文件数据备份上传到服务器。
2 🍑环境搭建🍑
2.1 🍎gcc升级到7.3版本🍎
使用如下命令即可完成:
sudo yum install centos-release-scl-rh centos-release-scl
sudo yum install devtoolset-7-gcc devtoolset-7-gcc-c++
source /opt/rh/devtoolset-7/enable
echo "source /opt/rh/devtoolset-7/enable" >> ~/.bashrc
2.2 🍎安装jsoncpp库🍎
使用如下命令:
sudo yum install epel-release
sudo yum install jsoncpp-devel
查看是否安装成功可以使用下面命令:
ls /usr/include/jsoncpp/json/
但是要注意,centos版本不同有可能安装的jsoncpp版本不同,安装的头文件位置也就可能不同了。在其他的版本下可能会直接没有json这个文件夹,但是我们安装成功后一定会得到下面的文件:

2.3 🍎下载bundle数据压缩库🍎
命令:
git clone https://github.com/r-lyeh-archived/bundle.git
大家也可以到gitup下载:【bundle】
2.4 🍎下载httplib库🍎
命令:
git clone https://github.com/yhirose/cpp-httplib.git
gitup仓库地址:【httplib】
3 🍑第三方库的基本认识🍑
3.1 🍎json🍎
3.1.1 🍋json认识🍋
在网络的学习中我们知道json是一种数据交换格式,可以用来进行序列化与反序列化的,是采用完全独于编程语言的文本格式来存储和表示数据,除此之外我们常用的数据交换格式还有protobuf。
例如:小明同学的学生信息
char name = "小明";
int age = 18;
float score[3] = {88.5, 99, 58};
json这种数据交换格式是将这多种数据对象组织成为一个字符串:
[
   {
        "姓名" : "小明",
        "年龄" : 18,
        "成绩" : [88.5, 99, 58]
   },
   {
        "姓名" : "小黑",
        "年龄" : 18,
        "成绩" : [88.5, 99, 58]
   }
]
json数据类型:对象,数组,字符串,数字:
- 对象:使用花括号
{}括起来的表示一个对象; - 数组:使用中括号
[]括起来的表示一个数组; - 字符串:使用常规双引号
""括起来的表示一个字符串; - 数字:包括整形和浮点型,可以直接使用。
jsoncpp库用于实现json格式的序列化和反序列化,完成将多个数据对象组织成为json格式字符串,以及将json格式字符串解析得到多个数据对象的功能。
这其中主要借助三个类以及其对应的少量成员函数完成:
//Json数据对象类
class Json::Value
{
    Value &operator=(const Value &other); //Value重载了[]和=,因此所有的赋值和获取数据都可以通过[]和=处理
    Value& operator[](const std::string& key);//简单的方式完成 val["姓名"] = "小明";
    Value& operator[](const char* key);
    Value removeMember(const char* key);//移除元素
    const Value& operator[](ArrayIndex index) const; //val["成绩"][0]
    Value& append(const Value& value);//添加数组元素val["成绩"].append(88);
    ArrayIndex size() const;//获取数组元素个数 val["成绩"].size();
    std::string asString() const;//转string string name = val["name"].asString();
    const char* asCString() const;//转char*   char *name = val["name"].asCString();
    Int asInt() const;//转int int age = val["age"].asInt();
    float asFloat() const;//转float
    bool asBool() const;//转 bool
};

//json序列化类,低版本用这个更简单
class JSON_API Writer
{
  virtual std::string write(const Value& root) = 0;
}
class JSON_API FastWriter : public Writer
{
  virtual std::string write(const Value& root);
}
class JSON_API StyledWriter : public Writer
{
  virtual std::string write(const Value& root);
}
//json序列化类,高版本推荐,如果用低版本的接口可能会有警告
class JSON_API StreamWriter
{
    virtual int write(Value const& root, std::ostream* sout) = 0;
}
class JSON_API StreamWriterBuilder : public StreamWriter::Factory
{
    virtual StreamWriter* newStreamWriter() const;
}
//json反序列化类,低版本用起来更简单
class JSON_API Reader
{
 bool parse(const std::string& document, Value& root, bool collectComments = true);
}
//json反序列化类,高版本更推荐
class JSON_API CharReader
{
    virtual bool parse(char const* beginDoc, char const* endDoc, Value* root, std::string* errs) = 0;
}
class JSON_API CharReaderBuilder : public CharReader::Factory
{
    virtual CharReader* newCharReader() const;
}
在json的序列化类中我们可以看见实现了有低版本和高版本的方法,但是我们强烈推荐使用高版本的成员方法。
3.1.2 🍋json的使用🍋
json实现序列化:
#include<iostream>
#include<jsoncpp/json/json.h>
#include<sstream>
#include<string>
#include<memory>

int main()
{
    const char* name="刘纯缘";
    int age=21;
    float score[]={88.5,77.6,74.9};

    Json::Value val;
    val["姓名"]=name;
    val["年龄"]=age;
    val["得分"].append(score[0]);
    val["得分"].append(score[1]);
    val["得分"].append(score[2]);
    Json::StreamWriterBuilder swb;
    std::unique_ptr<Json::StreamWriter> sw(swb.newStreamWriter());
    std::stringstream ss;
    sw->write(val,&ss);
    std::cout<<ss.str()<<std::endl;
    return 0;
}

json实现反序列化:
#include<iostream>
#include<jsoncpp/json/json.h>
#include<sstream>
#include<string>
#include<memory>


int main()
{
    std::string str=R"({"姓名":"刘纯缘", "年龄":21, "得分":[88.5,77.6,74.9]})";
    Json::Value val;
    Json::CharReaderBuilder crb;
    std::unique_ptr<Json::CharReader> cr(crb.newCharReader());
    std::string err;
    cr->parse(str.c_str(),str.c_str()+str.size(),&val,&err);

    std::cout<<val["姓名"].asCString()<<std::endl;
    std::cout<<val["年龄"].asInt()<<std::endl;

    //使用两种方式遍历
    int n=val["得分"].size();
    for(int i=0; i<n; ++i)
        std::cout<<val["得分"][i].asFloat()<<std::endl;

    for(auto it=val["得分"].begin(); it!=val["得分"].end(); ++it)
        std::cout<<it->asFloat()<<std::endl;

    return 0;
}

注意点:
- 1️⃣无论是序列化还是反序列化的时候我们使用g++编译程序的时候我们都得加上
ljsoncpp来连接第三方库。 - 2️⃣在反序列化的时候第一行代码中
R"()"是C++11引入的专门处理解析""时错误的解析为"{"为一个单独的字符串,我们当然也可以加上‘\’进行转义处理,不过没这个使用方便。
3.2 🍎bundle🍎
3.2.1 🍋bundle文件压缩库认识🍋
bundle 是一个嵌入式压缩库,支持23种压缩算法和2种存档格式。使用的时候只需要加入两个文件bundle.h 和 bundle.cpp 即可。
namespace bundle
{
  // low level API (raw pointers)
  bool is_packed( *ptr, len );
  bool is_unpacked( *ptr, len );
  unsigned type_of( *ptr, len );
  size_t len( *ptr, len );
  size_t zlen( *ptr, len );
  const void *zptr( *ptr, len );
  bool pack( unsigned Q, *in, len, *out, &zlen );
  bool unpack( unsigned Q, *in, len, *out, &zlen );
  // medium level API, templates (in-place)
  bool is_packed( T );
  bool is_unpacked( T );
  unsigned type_of( T );
  size_t len( T );
  size_t zlen( T );
  const void *zptr( T );
   bool unpack( T &, T );
  bool pack( unsigned Q, T &, T );
  // high level API, templates (copy)
  T pack( unsigned Q, T );
  T unpack( T );
}
3.2.2 🍋bundle的使用🍋
bundle库实现文件压缩:
#include <iostream>
#include <string>
#include <fstream>
#include "bundle.h"
int main(int argc, char *argv[])
{
    if (argc != 3)
    {
        std::cout << "argv[1] 是原始文件路径名称\n";
        std::cout << "argv[2] 是压缩包名称\n";
        return -1;
    }

    std::string ifilename = argv[1];
    std::string ofilename = argv[2];
    std::ifstream ifs;
    ifs.open(ifilename, std::ios::binary);
    ifs.seekg(0, std::ios::end);
    size_t fsize = ifs.tellg();
    ifs.seekg(0, std::ios::beg);
    std::string body;
    body.resize(fsize);
    ifs.read(&body[0], fsize);

    std::string packed = bundle::pack(bundle::LZIP, body); //压缩文件

    std::ofstream ofs;
    ofs.open(ofilename, std::ios::binary);
    ofs.write(&packed[0], packed.size());
    ifs.close();
    ofs.close();
    return 0;
}
当我们运行时:
./test httplib.h httplib.lz
我们生成了httplib.lz文件后我们再解压然后对比源文件与解压后的文件的md5值就可以验证压缩与解压的正误。
不过这里我们使用Makefile时要注意连接pthread库以及将bundle.cpp添加编译。

bundle库实现文件解压缩:
int main(int argc, char* argv[])
{
    if(argc != 3)
    {
        std::cout << "argv[1] 是压缩包名称\n";
        std::cout << "argv[2] 是原始文件路径名称\n";
        return -1;
    }

    std::string ifilename = argv[1];
    std::string ofilename = argv[2];
    std::ifstream ifs;
    ifs.open(ifilename, std::ios::binary);
    ifs.seekg(0, std::ios::end);
    size_t fsize=ifs.tellg();
    ifs.seekg(0, std::ios::beg);
    std::string body;
    body.resize(fsize);
    ifs.read(&body[0],fsize);

    std::string unpacked = bundle::unpack(body);//解压文件

    std::ofstream ofs;
    ofs.open(ofilename,std::ios::binary);
    ofs.write(&unpacked[0],unpacked.size());
    ifs.close();
    ofs.close();

    return 0;
}
当我们运行时:
./test httplib.lz httplib-cp.h
接下来便是测试环节了:

我们测试发现两个文件的md5sum值一模一样,所以之前的代码应该是没啥问题的。
3.3 🍎httplib🍎
3.3.1 🍋httplib认识🍋
httplib库,一个 C++11 单文件头的跨平台 HTTP/HTTPS 库。安装起来非常容易。只需包含 httplib.h 在你的代码中即可。
httplib 库实际上是用于搭建一个简单的 http 服务器或者客户端的库,这种第三方网络库,可以让我们免去搭建服务器或客户端的时间,把更多的精力投入到具体的业务处理中,提高开发效率。
namespace httplib
{
    struct MultipartFormData
    {
        std::string name;
        std::string content;
        std::string filename;
        std::string content_type;
   };
    using MultipartFormDataItems = std::vector<MultipartFormData>;
    struct Request
    {
        std::string method;//请求方法
        std::string path;//资源路径
        Headers headers;//头部字段
        std::string body;//正文
        // for server
        std::string version;//协议版本
        Params params;//查询字符串
        MultipartFormDataMap files;//保存的是客户端上传的文件信息
        Ranges ranges;//实现断点续传的请求区间
        bool has_header(const char *key) const;
        std::string get_header_value(const char *key, size_t id = 0) const;
        void set_header(const char *key, const char *val);
        bool has_file(const char *key) const;
        MultipartFormData get_file_value(const char *key) const;
   };
    struct Response
    {
        std::string version;
        int status = -1;
        std::string reason;
        Headers headers;
        std::string body;
        std::string location; // Redirect location
 		void set_header(const char *key, const char *val);
        void set_content(const std::string &s, const char *content_type);
   };
 class Server
 {
        using Handler = std::function<void(const Request &, Response &)>;
        using Handlers = std::vector<std::pair<std::regex, Handler>>;//请求与处理函数的映射表
        std::function<TaskQueue *(void)> new_task_queue;//线程池:用于处理请求
        Server &Get(const std::string &pattern, Handler handler);
 		Server &Post(const std::string &pattern, Handler handler);
        Server &Put(const std::string &pattern, Handler handler);
 		Server &Patch(const std::string &pattern, Handler handler);
 		Server &Delete(const std::string &pattern, Handler handler);
 		Server &Options(const std::string &pattern, Handler handler);
        bool listen(const char *host, int port, int socket_flags = 0);//搭建并启动http服务器
 };
    class Client
    {
        Client(const std::string &host, int port);
 		Result Get(const char *path, const Headers &headers);
        Result Post(const char *path, const char *body, size_t content_length, const char *content_type);
        Result Post(const char *path, const MultipartFormDataItems &items);//POST提交多区域数据,常用于多文件上传
   }
}
上面Request类的作用:
- 1️⃣客户端保存有关
http请求相关的信息,最终组织成http请求发送给服务器; - 2️⃣服务器对收到的
http请求进行解析,将解析过的数据保存在Request类中,等待后续处理。
上面Response类的作用:
- 用户将响应的数据放在
Response类中,httplib会按照其响应格式组织发送给客户端。
3.3.2 🍋httplib使用🍋
httplib库搭建简单服务器:
#include<string>
#include<iostream>
#include"httplib.h"

int main()
{

    httplib::Server ser;
    ser.Get("/hello", [](const httplib::Request &req, httplib::Response &rps)
            { rps.set_content("hello world", "text/plain"); });
    ser.Get(R"(/numbers/(\d+))", [](const httplib::Request &req, httplib::Response &rps)
            {
        auto numbers=req.matches[1];//matches[0]是路径
        rps.set_content(numbers,"text/plain"); });

    ser.Post("/load", [](const httplib::Request &req, httplib::Response &rps)
             {
        auto ret=req.has_file("file");
        if(ret == false)
        {
            rps.status=404;
            std::cout<<"not file load"<<std::endl;
            return;
        }

        const auto& file=req.get_file_value("file");
        rps.body.clear();
        rps.body+=file.filename;
        rps.body+=file.content;
        rps.body+=file.content_type;
        rps.set_header("Content-Type","text/plain");
        rps.status=200; });

    ser.listen("0.0.0.0",9090);
    return 0;
}
注意使用httplib库编译时要连接pthread库。
我们启动服务器:

然后在浏览器上来访问:


httplib库搭建简单客户端:
#include<string>
#include<iostream>
#include"httplib.h"

#define SERVER_IP "8.137.105.247"
#define SERVER_PORT 9090
int main()
{
    httplib::Client cli(SERVER_IP,SERVER_PORT);
    auto res=cli.Get("/hello");
    std::cout<<res->status<<std::endl;
    std::cout<<res->body<<std::endl;

    res = cli.Get("/numbers/123456");
    std::cout << res->status << std::endl;
    std::cout << res->body << std::endl;

    httplib::MultipartFormDataItems items = {
        {"file", "this is file content", "hello.txt", "text/plain"},
    };
    res=cli.Post("/load",items);
    std::cout << res->status << std::endl;
    std::cout << res->body << std::endl;
    return 0;
}
Makefile:
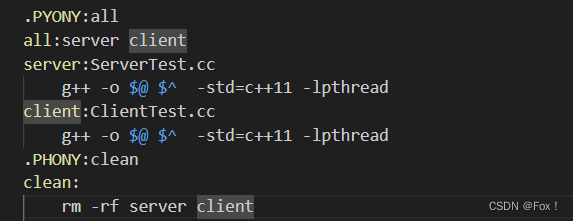
我们先启动服务端,然后再启动客户端测试:

从客户端的打印数据来看可以看出已经是验证成功的了。
4 🍑服务端工具类实现🍑
4.1 🍎文件实用工具类设计🍎
不管是客户端还是服务端,文件的传输备份都涉及到文件的读写,包括数据管理信息的持久化也是如此,因此首先设计封装文件操作类,这个类封装完毕之后,则在任意模块中对文件进行操作时都将变的简单化。
类中实现的成员接口主要是:获取文件最后一次修改时间,获取文件最后一次访问时间,获取文件大小,删除文件,获取文件名称,读写文件(将文件中内容读到字符串中以及将字符串中内容写入文件),判断文件是否存在,创建文件以及浏览文件,压缩以及解压缩等。
其中值得注意的是我们判断文件是否存在,创建文件以及浏览文件用的是C++17提供的文件系统【C++17文件系统】
编译时要记得连接stdc++fs库。
namespace fs = std::experimental::filesystem;
namespace grmcloud
{
    class FileUtil
    {
    public:
        FileUtil(const std::string& path)
        :_pathname(path)
        {}
        int64_t getfile_size()
        {
            struct stat st;
            if(stat(_pathname.c_str(), &st) < 0)
            {
                std::cout<<"get file size fail"<<std::endl;
                return -1;
            }
            return st.st_size;
        }
        time_t get_mtime() // 文件内容最后一次修改时间
        {
            struct stat st;
            if (stat(_pathname.c_str(), &st) < 0)
            {
                std::cout << "get file mtime fail" << std::endl;
                return 0;
            }

            return st.st_mtim.tv_sec;
        }
        time_t get_atime()//文件最后一次访问时间
        {
            struct stat st;
            if (stat(_pathname.c_str(), &st) < 0)
            {
                std::cout << "get file atime fail" << std::endl;
                return 0;
            }
            return st.st_atim.tv_sec;
        }
        bool remove_file()
        {
            if(exist() == false)
                return true;
            remove(_pathname.c_str());
        }
        std::string get_filename()
        {
            auto pos=_pathname.find_last_of("/");
            if(pos == std::string::npos)
                return _pathname;
            return _pathname.substr(pos+1);
        }

        bool get_pos_len(std::string& body, size_t pos, size_t len)
        {
            if(pos+len > getfile_size())
            {
                std::cout<<"get_pos_len fail"<<std::endl;
                return false;
            }

            std::ifstream ifs;
            ifs.open(_pathname.c_str(), std::ios::binary);
            if(ifs.is_open() == false)
            {
                std::cout<<"read open file fail"<<std::endl;
                return false;
            }
            ifs.seekg(pos, std::ios::beg);//从起始开始偏移到pos位置
            body.resize(len);
            ifs.read(&body[0], len);
            if(ifs.good() == false)
            {
                std::cout<<"read file fail"<<std::endl;
                ifs.close();
                return false;
            }
            ifs.close();
            return true;
        }
        bool get_content(std::string& body)
        {
            return get_pos_len(body,0,getfile_size());
        }
        bool set_content(const std::string& body)
        {
            std::ofstream ofs;
            ofs.open(_pathname, std::ios::binary);
            if (ofs.is_open() == false)
            {
                std::cout << "write open file fail" << std::endl;
                return false;
            }
            ofs.write(&body[0], body.size());
            if(ofs.good() == false)
            {
                std::cout<<"write file fail"<<std::endl;
                ofs.close();
                return false;
            }
            ofs.close();
            return true;
        }

        bool compress(const std::string& packname)//压缩后文件的名字
        {
            //1将原文件的内容解析到body中
            std::string body;
            get_content(body);
            //2压缩body为unpacked
            std::string packed = bundle::pack(bundle::LZIP, body);
            //3将unpacked中的内容写到packname文件中
            FileUtil fu(packname);
            fu.set_content(packed);
            return true;
        }
        bool uncompress(const std::string& unpackname)
        {
            // 1将原文件的内容解析到body中
            std::string body;
            get_content(body);
            // 2解压缩body为packed
            std::string unpacked = bundle::unpack(body);
            // 3将unpacked中的内容写到packname文件中
            FileUtil fu(unpackname);
            fu.set_content(unpacked);
            return true;
        }

        //使用C++17的filesystem要引入 -lstdc++fs
        bool exist()
        {
            return fs::exists(_pathname);
        }
        bool create_directory()
        {
            return fs::create_directories(_pathname);
        }
        bool browse_directory(std::vector<std::string>& vs)//浏览目录
        {
            for(auto& p:fs::directory_iterator(_pathname))
            {
                //如果是目录就跳过
                if(fs::is_directory(p) == true)
                    continue;

                vs.push_back(fs::path(p).relative_path().string());
            }
        }

    private:
        std::string _pathname;

    };

}
我们可以设置一些简单的测试程序来验证上面的一些接口:
测试:获取文件最后一次修改时间,获取文件最后一次访问时间,获取文件大小,读写文件以及压缩和解压缩;
    std::string path="Util.hpp";
    grmcloud::FileUtil file(path);
    std::cout<<file.getfile_size()<<std::endl;
    std::cout<<file.get_atime()<<std::endl;
    std::cout<<file.get_mtime()<<std::endl;

    std::string body;
    file.get_content(body);

    grmcloud::FileUtil nfile("Util.txt");
    nfile.set_content(body);

    grmcloud::FileUtil fu1("Util.hpp");
    fu1.compress("Util.lz");
    grmcloud::FileUtil fu2("Util.lz");
    fu2.uncompress("Util-cp.txt");
运行结果:

验证md5sum值:

不难发现基本上是没问题的。
测试浏览文件:
我们先建立一个dir目录,并向里面添加a.txt,b.txt,c.txt,d.txt四个文件,然后测试:
    grmcloud::FileUtil fu("dir");
    fu.create_directory();
    std::vector<std::string> vs;
    fu.browse_directory(vs);

    for (auto &str : vs)
        std::cout << str << std::endl;
测试结果:

其实从之前使用bundle库的时候编译程序会比较慢,大概要等个10秒左右,我们其实完全可以把bundle.cpp打包成一个静态库。
具体方式可参考下面:
gcc -c bundle.cpp
ar -rc libbundle.a bundle.o
此时就生成了libbundle.a静态库:

此时我们删除bundle.cpp然后使用下面的Makefile编译程序:

此时就会发现编译速度快了很多,仍然可以得到正确的结果:

4.2 🍎json实用工具类设计🍎
namespace grmcloud
{

    class JsonUtil
    {
    public:
        static bool serialize(const Json::Value& root, std::string& str)
        {
            Json::StreamWriterBuilder swb;
            std::unique_ptr<Json::StreamWriter> sw(swb.newStreamWriter());
            std::stringstream ss;
            sw->write(root, &ss);
            str=ss.str();
            return true;
        }
        static bool unserialize(const std::string& str, Json::Value& root)
        {
            Json::CharReaderBuilder crb;
            std::unique_ptr<Json::CharReader> cr(crb.newCharReader());
            std::string err;
            cr->parse(str.c_str(), str.c_str() + str.size(), &root, &err);
            return true;
        }
    };
}
这个类很简单,与我们之前讲解json的使用如出一辙,这里就不再测试了。
5 🍑服务端配置信息模块实现🍑
5.1 🍎系统配置信息🍎
使用文件配置加载一些程序的运行关键信息可以让程序的运行更加灵活。
配置信息:
- 热点判断时间
- 文件下载URL前缀路径
- 压缩包后缀名称
- 上传文件存放路径
- 压缩文件存放路径
- 服务端备份信息存放文件
- 服务器访问 IP 地址
- 服务器访问端口
使用单例模式管理系统配置信息,能够让配置信息的管理控制更加统一灵活,所以我们使用单例模式来管理配置信息的加载。
为了方便系统加载,我们可以使用json来组织配置信息。创建一个系统配置文件Cloud.fig:
{
    "hot_time" : 30,
    "server_ip" : "8.137.105.247",
    "server_port" : 9090,
    "url_prefix" : "/download/",
    "pack_suffix" : ".lz",
    "back_dir" : "./backdir/",
    "pack_dir" : "./packdir/",
    "server_backups" : "./backups.data"
}
然后来实现Config类:
#define CONFIG "Cloud.fig"
namespace grmcloud
{
    class Config
    {
    public:
        static Config* get_instance()
        {
            if (_instance == nullptr)
            {
                if (_instance == nullptr)
                {
                    _mutex.lock();
                    _instance = new Config;
                    _mutex.unlock();
                }
            }
            return _instance;
        }

        time_t get_hottime()
        {
            return _hot_time;
        }
        std::string get_serverip()
        {
            return _server_ip;
        }
        int get_serverport()
        {
            return _server_port;
        }
        std::string get_urlprefix()
        {
            return _url_prefix;
        }
        std::string get_packsuffix()
        {
            return _pack_suffix;
        }
        std::string get_backdir()
        {
            return _back_dir;
        }
        std::string get_packdir()
        {
            return _pack_dir;
        }
        std::string get_server_backups()
        {
            return _server_backups;
        }
    private:
        time_t _hot_time;
        std::string _server_ip;
        int _server_port;
        std::string _url_prefix;//文件下载URL前缀路径,如/download/
        std::string _pack_suffix;//压缩包后缀名称,如.lz
        std::string _back_dir;//上传文件存放路径
        std::string _pack_dir;//压缩文件存放路径
        std::string _server_backups;//服务端备份信息存放文件-->配置文件如./backups.data

        static Config* _instance;
        static std::mutex _mutex;

        Config()
        {
           read_config();
        }
        Config(const Config& con)=delete;
        Config& operator=(const Config& con)=delete;
        void read_config()
        {
            //1将配置文件的信息读到body中
            FileUtil fu(CONFIG);
            std::string body;
            if(fu.get_content(body) == false)
            {
                std::cout<<"get_content fail"<<std::endl;
                return;
            }
            //2 将body中内容反序列化放进root
            Json::Value root;
            if(JsonUtil::unserialize(body, root) == false)
            {
                std::cout<<"unserialize fail"<<std::endl;
                return;
            }
            //3将root中的信息传递给成员变量
            _hot_time=root["hot_time"].asInt();
            _server_ip=root["server_ip"].asString();
            _server_port=root["server_port"].asInt();
            _url_prefix=root["url_prefix"].asString();
            _pack_suffix=root["pack_suffix"].asString();
            _back_dir=root["back_dir"].asString();
            _pack_dir=root["pack_dir"].asString();
            _server_backups=root["server_backups"].asString();

        }

    };
    Config* Config::_instance=nullptr;
    std::mutex Config::_mutex;

}
单例模式的讲解我们这里用的是双重if判断来解决的,博主讲解的上个项目日志系统直接用的是C++11的静态变量是线程安全来处理的,大家不要弄混了。
5.2 🍎测试系统配置信息类🍎
    grmcloud::Config* conf=grmcloud::Config::get_instance();
    std::cout<<conf->get_hottime()<<std::endl;
    std::cout<<conf->get_packdir()<<std::endl;
    std::cout<<conf->get_packsuffix()<<std::endl;
    std::cout<<conf->get_server_backups()<<std::endl;
    std::cout<<conf->get_serverip()<<std::endl;
    std::cout<<conf->get_serverport()<<std::endl;
    std::cout<<conf->get_backdir()<<std::endl;
    std::cout<<conf->get_urlprefix()<<std::endl;
运行结果:

可以看出是没有太大问题的。
6 🍑服务端数据管理模块实现🍑
6.1 🍎备份信息类的实现🍎
该类的主要作用是方便我们更好的管理备份信息:
    class BackUpInfor
    {
    public:
        BackUpInfor(const std::string& realpath="")
        {
            FileUtil fu(realpath);
            if(fu.exist() == false)
            {
                //std::cout<<"file no exist"<<std::endl;
                return;
            }
            _real_path=realpath;
            _pack_flag=false;
            _sz=fu.getfile_size();
            _atime=fu.get_atime();
            _mtime=fu.get_mtime();

            Config* conf=Config::get_instance();
            std::string pack_dir=conf->get_packdir();
            std::string filename=fu.get_filename();
            std::string url_prefix=conf->get_urlprefix();
            std::string pack_suffix=conf->get_packsuffix();
            //./backdir/a.txt  ->   ./packdir/a.txt.lz
            _packpath=pack_dir+filename+pack_suffix;
            //./backdir/a.txt  ->   /download/a.txt
            _url=url_prefix+filename;

        }

        bool _pack_flag;//文件是否被压缩标志
        size_t _sz;//文件大小
        time_t _atime;//文件最后一次访问时间
        time_t _mtime;//文件内容最后一次修改时间
        std::string _real_path;//文件实际存储路径
        std::string _packpath;//压缩包存储路径
        std::string _url;//文件访问url
    };
6.2 🍎服务端数据管理模块实现🍎
- 内存中以文件访问URL为key,数据信息结构为val,使用哈希表进行管理,查询速度快。使用url作为key是因为往后客户端浏览器下载文件的时候总是以 url 作为请求;
- 采用文件形式对数据进行持久化存储(序列化方式采用 json 格式或者自定义方式)
    class DataManager
    {
    public:
        DataManager()
        {
            _backups_file=Config::get_instance()->get_server_backups();
            pthread_rwlock_init(&_rwlock,nullptr);
            init_load();
        }
        ~DataManager()
        {
            pthread_rwlock_destroy(&_rwlock);
        }
        bool insert(const BackUpInfor& infor)
        {
            pthread_rwlock_wrlock(&_rwlock);
            _hash[infor._url]=infor;
            pthread_rwlock_unlock(&_rwlock);
            storage();//一定要放在锁外面,否则死锁
            return true;
        }
        bool update(const BackUpInfor& infor)
        {
            pthread_rwlock_wrlock(&_rwlock);
            _hash[infor._url]=infor;
            pthread_rwlock_unlock(&_rwlock);
            storage();//一定要放在锁外面,否则死锁
            return true;
        }

        bool get_one_by_url(const std::string& url, BackUpInfor& infor)
        {
            pthread_rwlock_wrlock(&_rwlock);
            auto res=_hash.find(url);
            if(res != _hash.end())
            {
                infor=res->second;
                pthread_rwlock_unlock(&_rwlock);
                return true;
            }

            pthread_rwlock_unlock(&_rwlock);
            return false;
        }
        bool get_one_by_realpath(const std::string& realpath, BackUpInfor& infor)
        {
            pthread_rwlock_wrlock(&_rwlock);
            for(auto& it:_hash)
            {
                if(it.second._real_path == realpath)
                {
                    infor = it.second;
                    pthread_rwlock_unlock(&_rwlock);
                    return true;
                }
            }
            pthread_rwlock_unlock(&_rwlock);
            return false;
        }
        bool get_all(std::vector<BackUpInfor>& vp)
        {
            pthread_rwlock_wrlock(&_rwlock);
            for(auto& it:_hash)
            {
                vp.push_back(it.second);
            }
            pthread_rwlock_unlock(&_rwlock);
            return true;
        }

        bool storage()//当有信息发生改变时(insert/update)时就需要持久化存储一次,本质来说就是存储信息到配置文件中
        {
            //1 获得所有的数据管理信息
            std::vector<BackUpInfor> vp;
            get_all(vp);
            //2 添加到Jsonval中
            Json::Value root;
            for(auto& infor:vp)
            {
                Json::Value tmp;
                tmp["pack_flag"]=infor._pack_flag;
                tmp["atime"]=(Json::Int64)infor._atime;
                tmp["mtime"]=(Json::Int64)infor._mtime;
                tmp["packpath"]=infor._packpath;
                tmp["real_path"]=infor._real_path;
                tmp["sz"]=(Json::Int64)infor._sz;
                tmp["url"]=infor._url;
                root.append(tmp);
            }
            //3 序列化
            std::string body;
            JsonUtil::serialize(root, body);
            //4 将序列化后的数据写进配置文件中
            FileUtil fu(_backups_file);
            fu.set_content(body);
            return true;
        }
        bool init_load()//初始化程序运行时从配置文件读取数据
        {
            if (FileUtil(_backups_file).exist())
            {
                // 1 从配置文件读取消息到body
                FileUtil fu(_backups_file);
                std::string body;
                fu.get_content(body);
                // 2 反序列化
                Json::Value root;
                JsonUtil::unserialize(body, root);
                // 3 将反序列化后的Json::Value添加到_hash中
                for (int i = 0; i < root.size(); ++i)
                {
                    BackUpInfor tmp;
                    tmp._pack_flag = root[i]["pack_flag"].asBool();
                    tmp._atime = root[i]["atime"].asInt64();
                    tmp._mtime = root[i]["mtime"].asInt64();
                    tmp._packpath = root[i]["packpath"].asString();
                    tmp._real_path = root[i]["real_path"].asString();
                    tmp._sz = root[i]["sz"].asInt64();
                    tmp._url = root[i]["url"].asCString();
                    insert(tmp);
                }
            }

            return true;

        }
    private:
        std::string _backups_file;//服务端备份信息存放文件
        std::unordered_map<std::string , BackUpInfor> _hash;//使用url与PackUpInfor建立映射
        pthread_rwlock_t _rwlock;//读写锁


    };
注意点:
- 1️⃣在进行数据操纵的时候我们使用的是读写锁而并非是互斥锁,因为当我们只是想读取某个数据时而并不想要修改该数据时使用读写锁的效率会更加高效(读共享,写互斥)
- 2️⃣在插入或者修改时我们都要进行持久化存储(其本质就是更新配置文件中的信息),在初始化程序时我们也要能够从配置文件中读取数据。
6.3 🍎验证服务端数据管理模块🍎
测试程序:
void test_packupinfor(const std::string& realpath)
{
    std::cout<<"insert"<<std::endl;
    grmcloud::BackUpInfor pui(realpath);
    grmcloud::DataManager manager;
    manager.insert(pui);

    grmcloud::BackUpInfor tmp("Data.hpp");
    std::cout<<"Data.hpp 修改前的配置信息"<<std::endl;
    std::cout << tmp._pack_flag << std::endl;
    std::cout << tmp._atime << std::endl;
    std::cout << tmp._mtime << std::endl;
    std::cout << tmp._packpath << std::endl;
    std::cout << tmp._real_path << std::endl;
    std::cout << tmp._sz << std::endl;
    std::cout << tmp._url << std::endl <<std::endl;

    std::cout<<"Data.hpp 修改后的配置信息(修改为Util.hpp的信息)"<<std::endl;
    manager.get_one_by_url("/download/Util.hpp", tmp);
    std::cout << tmp._pack_flag << std::endl;
    std::cout << tmp._atime << std::endl;
    std::cout << tmp._mtime << std::endl;
    std::cout << tmp._packpath << std::endl;
    std::cout << tmp._real_path << std::endl;
    std::cout << tmp._sz << std::endl;
    std::cout << tmp._url << std::endl<<std::endl;

    std::cout<<"update"<<std::endl;
    pui._pack_flag=true;
    manager.update(pui);
    std::vector<grmcloud::BackUpInfor> vp;
    manager.get_all(vp);
    for(auto& v:vp)
    {
        std::cout << v._pack_flag << std::endl;
        std::cout << v._atime << std::endl;
        std::cout << v._mtime << std::endl;
        std::cout << v._packpath << std::endl;
        std::cout << v._real_path << std::endl;
        std::cout << v._sz << std::endl;
        std::cout << v._url << std::endl << std::endl;
    }

    std::cout<<std::endl;
    std::cout<<"get_one_by_realpath"<<std::endl;
    manager.get_one_by_realpath(realpath, tmp);
    std::cout << tmp._pack_flag << std::endl;
    std::cout << tmp._atime << std::endl;
    std::cout << tmp._mtime << std::endl;
    std::cout << tmp._packpath << std::endl;
    std::cout << tmp._real_path << std::endl;
    std::cout << tmp._sz << std::endl;
    std::cout << tmp._url << std::endl << std::endl;
}
int main()
{
    test_packupinfor("Util.hpp");
}
测试结果:
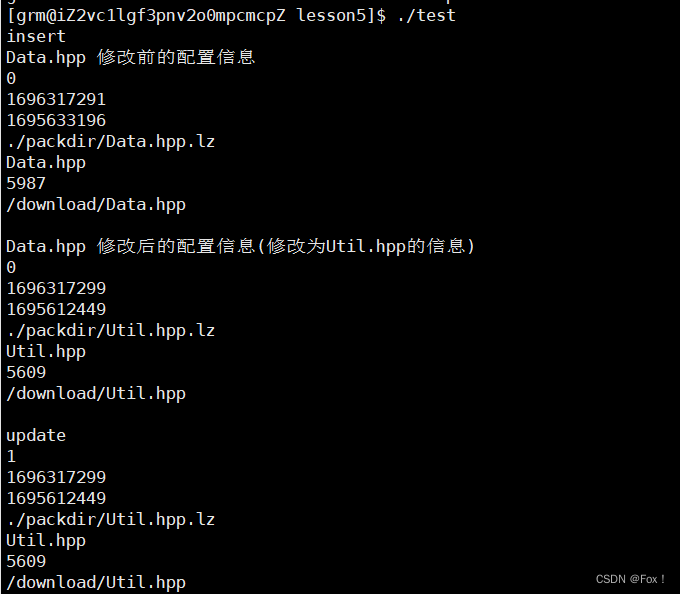

从结果上来看应该是没有什么问题的。
7 🍑服务端热点管理模块实现🍑
7.1 🍎热点管理实现思路🍎
服务器端的热点文件管理是对上传的非热点文件进行压缩存储,节省磁盘空间。
而热点文件的判断在于上传的文件的最后一次访问时间是否在热点判断时间之内,比如如果一个文件一天都没有被访问过我们就认为这是一个非热点文件,其实就是当前系统时间,与文件最后一次访问时间之间的时间差是否在一天之内的判断。而我们需要对上传的文件每隔一段时间进行热点检测,相当于遍历上传文件的存储文件夹,找出所有的文件,然后通过对逐个文件进行时间差的判断,来逐个进行热点处理。
基于这个思想,我们需要将上传的文件存储位置与压缩后压缩文件的存储位置分开。这样在遍历上传文件夹的时候不至于将压缩过的文件又进行非热点处理了。
关键点:
- 上传文件有自己的上传存储位置,非热点文件的压缩存储有自己的存储位置;
- 遍历上传存储位置文件夹,获取所有文件信息;
- 获取每个文件最后一次访问时间,进而完成是否热点文件的判断;
- 对非热点文件进行压缩存储,删除原来的未压缩文件。
7.2 🍎热点管理类的设计🍎
    class HotManager
    {
    public:
        HotManager()
        {
            Config* conf=Config::get_instance();
            _hot_time=conf->get_hottime();
            _backdir=conf->get_backdir();
            _packdir=conf->get_packdir();
            _pack_suffix=conf->get_packsuffix();
            //要记得创建目录
            FileUtil f1(_backdir);
            FileUtil f2(_packdir);
            f1.create_directory();
            f2.create_directory();
        }
        bool run_module()
        {
            while (true)//周而复始的运行
            {
                // 1 遍历备份目录获得所有的文件名称
                FileUtil fu(_backdir);
                std::vector<std::string> vs;
                fu.browse_directory(vs);
                // 2 判断文件是否是非热点文件
                for (auto &name : vs)
                {
                    std::cout<<name<<std::endl;
                    if (is_hotfile(name) == false)
                    {
                        BackUpInfor infor(name);
                        if (_data->get_one_by_realpath(name, infor) == false)
                        {
                            // 文件存在,但是却没有备份信息
                            BackUpInfor tmp(name);
                            infor = tmp; // 设置新的备份信息
                        }
                        // 3 对非热点文件进行压缩
                        FileUtil fna(name);
                        fna.compress(infor._packpath); // 传入的是压缩后文件的名字
                        // 4 删除源文件,修改备份信息
                        fna.remove_file();
                        infor._pack_flag = true; // 修改标志位表示已经压缩
                        _data->update(infor);
                    }
                }
                usleep(1000);
            }
            return true;
        }
    private:
        bool is_hotfile(const std::string& name)//是热点文件返回true,否则返回false
        {
            FileUtil fu(name);
            time_t atime=fu.get_atime();
            time_t curtime=time(nullptr);
            std::cout<<atime<<":"<<curtime<<"hot:"<<_hot_time<<std::endl;
            std::cout<<(curtime-atime)<<std::endl;
            if((curtime-atime) > _hot_time)
                return false;
            return true;
        }

        time_t _hot_time;
        std::string _backdir;
        std::string _packdir;
        std::string _pack_suffix;
    };
7.3 🍎验证服务端热点管理模块🍎
测试程序:
grmcloud::DataManager* _data;
void test_hot()
{
    grmcloud::HotManager hot;
    hot.run_module();
}
int main(int argc, char*argv[])
{
    _data=new grmcloud::DataManager;
    test_hot();
}
我们先拷贝httplib.h到backdir文件夹中:

然后等待30s后:
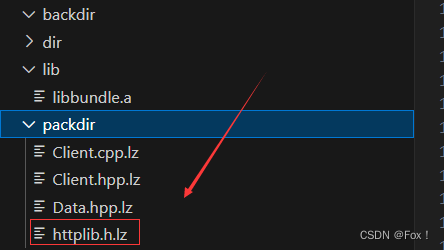
我们发现在backdir中的httplib.h已经消失,而packdir文件夹中多了一个httplib.h.lz的压缩包。
8 🍑服务端业务处理模块实现🍑
云备份项目中 ,业务处理模块是针对客户端的业务请求进行处理,并最终给与响应。而整个过程中包含以下要实现的功能:
- 借助网络通信模块httplib库搭建http服务器与客户端进行网络通信;
- 针对收到的请求进行对应的业务处理并进行响应(文件上传,列表查看,文件下载(包含断点续传))
8.1 🍎网络通信接口设计🍎
业务处理模块要对客户端的请求进行处理,那么我们就需要提前定义好客户端与服务端的通信,明确客户端发送什么样的请求,服务端处理后应该给与什么样的响应,而这就是网络通信接口的设计。
HTTP文件上传:
POST /upload HTTP/1.1;
Content-Length:11;
Content-Type:multipart/form-data;boundary=—WebKitFormBoundary+16字节随机字符
------WebKitFormBoundary
Content-Disposition:form-data;filename=“a.txt”;
hello world;
------WebKitFormBoundary–
HTTP/1.1 200 OK
Content-Length: 0
HTTP文件列表获取:
GET /list HTTP/1.1
Content-Length: 0
HTTP/1.1 200 OK
Content-Length:
Content-Type: text/html
<html>
 <head>
   <meta http-equiv="Content-Type" content="text/html; charset=UTF-8" />
 <title>Page of Download</title>
 </head>
 <body>
 <h1>Download</h1>
 <table>
 <tr>
   <td><a href="/download/a.txt"> a.txt </a></td>
   <td align="right"> 1994-07-08 03:00 </td>
   <td align="right"> 27K </td>
 </tr>
 </table>
 </body>
 </html>
HTTP文件下载:
GET /download/a.txt http/1.1
Content-Length: 0
HTTP/1.1 200 OK
Content-Length: 100000
ETags: "filename-size-mtime一个能够唯一标识文件的数据"
Accept-Ranges: bytes
文件数据
这里面有一个字段是ETags,这个是资源的唯一标识,当客户端第一次下载文件时就会收到这个信息,当客户端再次下载时会先将该消息发送给服务器,让其判断是否被修改,如果没有就可以直接使用原先缓存的数据,不用再重新下载了。
HTTP断点续传:
GET /download/a.txt http/1.1
Content-Length: 0
If-Range: “文件唯一标识”
Range: bytes=89-999
HTTP/1.1 206 Partial Content
Content-Length:
Content-Range: bytes 89-999/100000
Content-Type: application/octet-stream
ETag: "inode+size+mtime一个能够唯一标识文件的数据"
Accept-Ranges: bytes
对应文件从89到999字节的数据。
If-Range字段是客户端告诉服务端是否支持断点续传;
Accept-Ranges字段用于服务端告诉客户端支持断点续传,单位是字节。
8.2 🍎业务处理类设计🍎
	extern grmcloud::DataManager *_data;
	//因为业务处理的回调函数没有传入参数的地方,因此无法直接访问外部的数据管理模块数据
	//可以使用lamda表达式解决,但是所有的业务功能都要在一个函数内实现,于功能划分上模块不够清晰
	//因此将数据管理模块的对象定义为全局数据,在这里声明一下,就可以在任意位置访问了
    class Service
    {
    public:
        Service()
        {
            Config* conf=Config::get_instance();
            _server_ip=conf->get_serverip();
            _server_port=conf->get_serverport();
            _download_prefix=conf->get_urlprefix();
        }
        bool run_module()
        {
            _server.Post("/upload", upload);
            _server.Get("/listshow", list_show);
            _server.Get("/", list_show);
            std::string download_prefix=_download_prefix+"(.*)";
            _server.Get(download_prefix, download);
            _server.listen("0.0.0.0", _server_port);//云服务器的公网是一个子网共享的,个人的机器是接受从公网ip转发的数据,所以必须绑定0.0.0.0才行
            return true;
        }
    private:
        static void upload(const httplib::Request &req, httplib::Response &rsp)//上传文件
        {
        }
        static void list_show(const httplib::Request &req, httplib::Response &rsp)
        {
        }
        static void download(const httplib::Request &req, httplib::Response &rsp)
        {
        }

        std::string _server_ip;
        int _server_port;
        std::string _download_prefix;
        httplib::Server _server;
    };
接下来我们便来实现上面类中函数。
8.2.1 🍋upload🍋
        static void upload(const httplib::Request &req, httplib::Response &rsp)//上传文件
        {
            //文件的数据是在正文中的,但正文中还包括其他字段,不仅仅是文件数据
            auto ret=req.has_file("file");//判断是否有上传的文件区域(客户端与服务端要保持一致)
            if(ret == false)
            {
                std::cout<<"no file upload"<<std::endl;
                rsp.status=404;
                return;
            }
            const auto& file=req.get_file_value("file");
            std::string backdir=Config::get_instance()->get_backdir();
            std::string realpath=backdir+FileUtil(file.filename).get_filename();
            FileUtil fu(realpath);
            fu.set_content(file.content);//将文件的数据写入到存储文件中

            BackUpInfor infor(realpath);
            _data->insert(infor);//将文件信息添加到数据管理的模块中(同时也增加了备份信息)
        }
验证:
我们新建立一个html文件,具体源码参照下面(ps:博主不是搞前端的,所以界面做的很简陋,请见谅)
<!DOCTYPE HTML>
<html>
	<body>
 	<form action="http://8.137.105.247:9090/upload" method="post" enctype="multipart/form-data">
		<div>
      			<input type="file" name="file">
		</div>
  		<div><input type="submit" value="上传"></div>
 		</form>
  	</body>
</html>
我们先上传文件:

然后再观察:
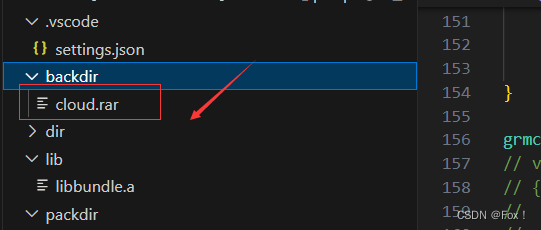
我们发现文件已经上传成功了。
8.2.2 🍋list_show🍋
我们想要的界面很简单,参考下面html代码:
<html>
	<head>
		<title>Download</title>
	</head>
	<body>
		<h1>Download</h1>
		<table>
			<tr>
				<td><a href="/download/test.txt">test.txt</a></td>
				<td align="right">  2021-12-29 10:10:10 </td>
				<td align="right">  28k </td>
			</tr>
		</table>
	</body>
</html>
list_show实现:
        static void list_show(const httplib::Request &req, httplib::Response &rsp)
        {
            //1 获取所有的文件备份信息
            std::vector<BackUpInfor> vb;
            _data->get_all(vb);
            //2 根据备份信息来组织html数据
            std::stringstream ss;
            ss << "<html><head><title>Download</title></head>";
            ss << "<body><h1>Download</h1><table>";
            for (auto &infor : vb)
            {
                ss << "<tr>";
                std::string filename = FileUtil(infor._real_path).get_filename();
                ss << "<td><a href='" << infor._url << "'>" << filename << "</a></td>";
                ss << "<td align='right'>" << time_transfor(infor._mtime) << "</td>";
                ss << "<td align='right'>" << infor._sz / 1024 << "k</td>";
                ss << "</tr>";
            }
            ss << "</table></body></html>";
            rsp.body = ss.str();
            rsp.set_header("Content-Type", "text/html");
            rsp.status = 200;
        }
        static const char* time_transfor(time_t t)
        {
            return std::ctime(&t);
        }
验证:

8.2.3 🍋download🍋
        static void download(const httplib::Request &req, httplib::Response &rsp)
        {
            //1 获取客户端的资源路径,根据资源路径来获取文件的备份信息
            //客户端的资源路径在req.path中
            BackUpInfor infor;
            _data->get_one_by_url(req.path, infor);
            //2 判断文件是否被压缩,如果被压缩了就要先进行解压缩
            if(infor._pack_flag == true)
            {
                FileUtil fu(infor._packpath);
                fu.uncompress(infor._real_path);//将压缩文件解压到真实路径下
                fu.remove_file();//删除压缩包
                infor._pack_flag=false;
                _data->update(infor);//更新配置信息
            }

            bool retrans = false;
            std::string old_etag;
            if (req.has_header("If-Range"))
            {
                old_etag = req.get_header_value("If-Range");
                // 有If-Range字段且这个字段的值与请求文件的最新etag一致则符合断点续传
                if (old_etag == get_etag(infor))
                {
                    retrans = true;
                }
            }
            //3 读取文件放进rsp的body中
            FileUtil fu(infor._real_path);
            fu.get_content(rsp.body);
            //4 设置响应头部字段: ETag  Accept-Ranges: bytes
            rsp.set_header("Accept-Ranges", "bytes");
            rsp.set_header("ETag", get_etag(infor));
            rsp.set_header("Content-Type", "application/octet-stream");//这个字段必须有,否则下载就会出问题
            if(retrans == false)
                rsp.status = 200;
            else
                rsp.status = 206;
        }
        static std::string get_etag(const BackUpInfor& infor)//格式:文件名+文件大小+文件最近修改时间
        {
            std::string etag=infor._real_path;
            etag+="+";
            etag+=std::to_string(infor._sz);
            etag+="+";
            etag+=std::to_string(infor._mtime);
            return etag;
        }
普通验证:

我们将我们下载的文件与源文件进行比对:
 我们再来测试断点续传:先删除刚才下载好的文件
测试方式为当我们下载一会儿时就立马关掉服务器,然后再重启继续下载:
终止服务器:

下载网断了:

重启服务器:

继续下载:

这样断点续传基本验证完毕了。
9 🍑服务端整体模块的测试🍑
在前面模块的实现中我们知道业务处理模块与热点管理模块都是死循环,所以我们可以使用多线程来测试这两个模块。
grmcloud::DataManager* _data;
void test_hot()
{
    grmcloud::HotManager hot;
    hot.run_module();
}
void test_server()
{
    grmcloud::Service ser;
    ser.run_module();
}
int main(int argc, char*argv[])
{
    _data=new grmcloud::DataManager;
    std::thread hot_thread(test_hot);
    std::thread ser_thread(test_server);
    hot_thread.join();
    ser_thread.join();
}
为了方便验证我们将backdir中文件清空,然后重新上传文件:


 等待了30s后:

非热点文件已经被压缩了。
10 🍑客户端文件检测模块实现🍑
为了让用户有更加好的体验,客户端我们就在Windows下编写,这样操作Windows的体验会对用户更加友好一些。
这个其实与服务端的文件实用工具类雷同,只是功能需求并没有服务端那么多:
#pragma once
#define _SILENCE_EXPERIMENTAL_FILESYSTEM_DEPRECATION_WARNING
#include<iostream>
#include<string>
#include<fstream>
#include<sys/stat.h>
#include<ctime>
#include<experimental/filesystem>
#include<vector>

namespace fs = std::experimental::filesystem;
namespace grmcloud
{
    class FileUtil
    {
    public:

        FileUtil(const std::string& path)
            :_pathname(path)
        {}
        int64_t getfile_size()
        {
            struct stat st;
            if (stat(_pathname.c_str(), &st) < 0)
            {
                std::cout << "get file size fail" << std::endl;
                return -1;
            }
            return st.st_size;
        }
        time_t get_mtime() // 文件内容最后一次修改时间
        {
            struct stat st;
            if (stat(_pathname.c_str(), &st) < 0)
            {
                std::cout << "get file mtime fail" << std::endl;
                return 0;
            }

            return st.st_mtime;
        }
        time_t get_atime()//文件最后一次访问时间
        {
            struct stat st;
            if (stat(_pathname.c_str(), &st) < 0)
            {
                std::cout << "get file atime fail" << std::endl;
                return 0;
            }
            return st.st_atime;
        }
        bool remove_file()
        {
            if (exist() == false)
                return true;
            remove(_pathname.c_str());
        }
        std::string get_filename()
        {
            auto pos = _pathname.find_last_of("\\");
            if (pos == std::string::npos)
                return _pathname;
            return _pathname.substr(pos + 1);
        }

        bool get_pos_len(std::string& body, size_t pos, size_t len)
        {
            if (pos + len > getfile_size())
            {
                std::cout << "get_pos_len fail" << std::endl;
                return false;
            }

            std::ifstream ifs;
            ifs.open(_pathname.c_str(), std::ios::binary);
            if (ifs.is_open() == false)
            {
                std::cout << "read open file fail" << std::endl;
                return false;
            }
            ifs.seekg(pos, std::ios::beg);//从起始开始偏移到pos位置
            body.resize(len);
            ifs.read(&body[0], len);
            if (ifs.good() == false)
            {
                std::cout << "read file fail" << std::endl;
                ifs.close();
                return false;
            }
            ifs.close();
            return true;
        }
        bool get_content(std::string& body)
        {
            return get_pos_len(body, 0, getfile_size());
        }
        bool set_content(const std::string& body)
        {
            std::ofstream ofs;
            ofs.open(_pathname, std::ios::binary);
            if (ofs.is_open() == false)
            {
                std::cout << "write open file fail" << std::endl;
                return false;
            }
            ofs.write(&body[0], body.size());
            if (ofs.good() == false)
            {
                std::cout << "write file fail" << std::endl;
                ofs.close();
                return false;
            }
            ofs.close();
            return true;
        }

        //使用C++17的filesystem要引入 -lstdc++fs
        bool exist()
        {
            return fs::exists(_pathname);
        }
        bool create_directory()
        {
            return fs::create_directories(_pathname);
        }
        bool browse_directory(std::vector<std::string>& vs)//浏览目录
        {
            //create_directory();
            for (auto& p : fs::directory_iterator(_pathname))
            {
                //如果是目录就跳过
                if (fs::is_directory(p) == true)
                    continue;

                vs.push_back(fs::path(p).relative_path().string());
            }
            return true;
        }

    private:
        std::string _pathname;

    };
}
这里面值得注意的是在Windows中目录分割符用的是'\',与Linux中使用的'/'不同。
11 🍑客户端数据管理模块实现🍑
这里为了简便实现客户端就不再使用像服务端那样从配置文件加载以及使用Json进行序列化和反序列化了,而是直接使用\n作为序列化与反序列化时的分隔符。
namespace grmcloud
{
	class DataManager
	{
	public:
		DataManager(const std::string& backupfile)
			:_backupfile(backupfile)
		{
			init_load();
		}
		bool insert(const std::string& filename, const std::string& identifi)
		{
			_hash[filename] = identifi;
			storage();
			return true;
		}
		bool update(const std::string& filename, const std::string& identifi)
		{
			_hash[filename] = identifi;
			storage();
			return true;
		}
		bool get_one_by_filename(const std::string& filename, std::string& identifi)
		{
			auto res = _hash.find(filename);
			if (res == _hash.end())
				return false;
			identifi = res->second;
			return true;
		}
	private:
		bool storage()//持久化存储
		{
			//1 读取所有的备份信息并组织格式化信息
			std::stringstream ss;
			for (auto& e : _hash)
			{
				ss << e.first << " " << e.second << "\n";
			}
			//2 将格式化信息保存到_packdir文件中
			FileUtil fu(_backupfile);
			fu.set_content(ss.str());
			return true;
		}
		bool init_load()
		{
			//1 读取配置文件中的信息
			std::string body;
			FileUtil fu(_backupfile);
			fu.get_content(body);
			//2 解析body中的数据
			std::vector<std::string> vs;
			split(body, "\n", vs);
			for (auto& e : vs)
			{
				std::vector<std::string> line;
				split(e, " ", line);
				if (line.size() != 2)
					continue;
				_hash[line[0]] = line[1];
			}
			return true;
		}
		size_t split(const std::string& str, const std::string& sep, std::vector<std::string>& vs)
		{
			int prev = 0, cur = 0;
			while (cur < str.size())
			{
				cur = str.find(sep, prev);
				if (cur == prev)
				{
					prev += sep.size();
					continue;
				}
				std::string tmp = str.substr(prev, cur - prev);//注意截取不包括sep
				vs.push_back(tmp);
				prev = cur;
				cur += sep.size();
			}
			return vs.size();
		}
		std::string _backupfile;
		std::unordered_map<std::string, std::string> _hash;
	};
}
12 🍑客户端文件备份模块实现🍑
#pragma once
#include"Data.hpp"
#include"httplib.h"
#include<Windows.h>
#define SERVER_IP "8.137.105.247"
#define SERVER_PORT 9090

namespace grmcloud
{
	class Backup
	{
	public:
		Backup(const std::string& backdir, const std::string& backupfile)
			:_backdir(backdir)
			, _data(new DataManager(backupfile))
		{}
		~Backup()
		{
			delete _data;
		}
		bool upload(const std::string& filename)
		{
			std::string body;
			FileUtil fu(filename);
			fu.get_content(body);
			httplib::Client cli(SERVER_IP, SERVER_PORT);
			httplib::MultipartFormData item;
			item.content = body;
			item.content_type = "application/octet-stream";
			item.filename = fu.get_filename();
			item.name = "file";
			httplib::MultipartFormDataItems items;
			items.push_back(item);

			auto res = cli.Post("/upload", items);
			if (!res || res->status != 200)
				return false;
			return true;
		}
		void run_module()
		{
			while (true)
			{
				FileUtil fu(_backdir);
				std::vector<std::string> vs;
				fu.browse_directory(vs);

				for (auto& e : vs)
				{
					if (check_upload(e))
					{
						if (upload(e))
						{
							_data->insert(e, trans_identifi(e));
						}
					}
				}
				/*for (auto& e : vs)
				{
					std::string ident = trans_identifi(e);
					_data->insert(e, ident);
				}*/
				Sleep(1);
			}
		}

	private:
		std::string trans_identifi(const std::string& filename)
		{
			FileUtil fu(filename);
			std::stringstream ss;
			ss << fu.get_filename() << "+" << fu.getfile_size()
				<< "+" << fu.get_mtime();
			return ss.str();
		}
		bool check_upload(const std::string& filename)//检查文件是否需要上传
		{
			std::string id;
			if (_data->get_one_by_filename(filename, id))
			{
				std::string new_id = trans_identifi(filename);
				if (id == new_id)
					return false;
			}

			//走到这里还要思考一个问题:假如传送大文件会发生什么?
			//由于大文件传送需要一定时间,所以在传送过程中id会随着文件大小的变化而发生改变,这样显然是不合理的
			//因为客户端会在传送完毕前一直向服务器传送文件
			//所以我们可以设定一个规定时间,只要在规定时间内就认为该文件不需要上传
			FileUtil fu(filename);
			if (time(nullptr) - fu.get_mtime() <= 5)
				return false;//小于等于规定时间认为不用上传
			return true;

		}
		std::string _backdir;
		DataManager* _data;
	};
}
里面需要注意的地方都写有注释。
13 🍑服务器与客户端联合测试🍑
我们先启动服务器,然后再启动客户端:

 进入到VS中我们项目的目录中,创建一个上传文件的目录。
然后我们复制一些文件到该目录下:
 此时我们观察客户端的备份信息:

可以发现没有什么问题,当过了30秒后我们在服务端观察:
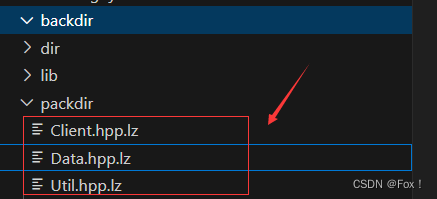
这3个文件已经全部被压缩了。
综上,该验证是符合我们预期的。
14 🍑项目总结🍑
- 项目名称:云备份系统
- 项目功能:搭建云备份服务器与客户端,客户端程序运行在客户机上自动将指定目录下的文件备份到服务器,并且能够支持浏览器查看与下载,其中下载支持断点续传功能,并且服务器端对备份的文件进行热点管理,将长时间无访问文件进行压缩存储。
开发环境: centos7.9/vscode、g++、gdb、makefile 以及 windows11/vs2022
技术特点: http客户端/服务器搭建, json序列化,文件压缩,热点管理,断点续传,线程池,读写锁,单例模式等。
项目模块:
服务端:
- 配置信息模块:负责将配置信息加载到程序中;
- 数据管理模块:负责服务器上备份文件的信息管理;
- 热点管理模块:负责文件的热点判断,以及非热点文件的压缩存储;
- 业务处理模块:针对客户端的各个请求进行对应业务处理并响应结果;
- 网络通信模块:搭建网络通信服务器,实现与客户端通信。
客户端:
- 文件检测模块:遍历获取指定文件夹中所有文件路径名称;
- 数据管理模块:负责客户端备份的文件信息管理,通过这些数据可以确定一个文件是否需要备份;
- 网络通信模块:搭建网络通信客户端,实现将文件数据备份上传到服务器。
项目扩展:
- 给客户端开发一个好看的界面,让监控目录可以选择;
- 内存中的管理的数据也可以采用热点管理;
- 压缩模块也可以使用线程池实现;
- 实现用户管理,不同的用户分文件夹存储以及查看;
- 实现断点上传;
- 客户端限速,收费则放开。


