文章目录
- 一、不求甚解
- 二、人云亦云
- 三、刨根问底
- 四、曲突徙薪
一、不求甚解
在开发中经常可以利用Spring事件监听来实现观察者模式,进行一些非事务性的操作,如记录日志之类的。
Controller
Controller中注入ApplicationEventPublisher,并利用它发布事件即可。
import org.springframework.context.ApplicationEventPublisher;
import org.springframework.web.bind.annotation.GetMapping;
import org.springframework.web.bind.annotation.RequestMapping;
import org.springframework.web.bind.annotation.RequestParam;
import org.springframework.web.bind.annotation.RestController;

import javax.annotation.Resource;

@RestController
@RequestMapping("/controller")
public class TestController {

    @Resource
    private ApplicationEventPublisher applicationEventPublisher;

    @GetMapping("/test")
    public String test(@RequestParam String name){
        System.out.println("请求进来了");
        TestEvent event = new TestEvent(this,name);
        applicationEventPublisher.publishEvent(event);
        return "success";
    }
}
Event
event继承ApplicationEvent即可。
import org.springframework.context.ApplicationEvent;

public class TestEvent extends ApplicationEvent {

    private String name;

    public TestEvent(Object source,String name) {
        super(source);
        this.name=name;
    }

    public String getName() {
        return name;
    }

    public void setName(String name) {
        this.name = name;
    }
}
Listener
Listener实现ApplicationListener接口即可。
import org.springframework.context.ApplicationListener;
import org.springframework.scheduling.annotation.Async;
import org.springframework.stereotype.Component;

@Component
@Async
public class TestListener implements ApplicationListener<TestEvent> {
    @Override
    public void onApplicationEvent(TestEvent testEvent) {
        System.out.println(testEvent.getName());
    }
}
Postman测试
http://localhost:8080/controller/test?name=lisi

控制台打印:
请求进来了
lisi
曾经,我一直以为这样就实现了异步,因为我看公司的代码都是这样写的,现网也没什么问题。每次照着前辈们的代码CV一下就可以了,也没太多想。
二、人云亦云
@Async注解
以前一直用@Async注解,但我好像没有去深入了解过她。使用她就像使用@Resource一样自然一样随心所欲。
直到某天闲了下来,突发奇想,想要深入了解一下她。
@Async注解很容易踩坑,首先是必须在启动类上开启异步配置@EnableAsync才行,否则还是同步执行。如果不指定线程池,则使用Spring默认的线程池 SimpleAsyncTaskExecutor。 方法上一旦标记了@Async注解,当其它线程调用这个方法时,就会开启一个新的子线程去异步处理该业务逻辑。
    1)在方法上使用该@Async注解,申明该方法是一个异步任务;在类上面使用该@Async注解,申明该类中的所有方法都是异步任务;
    2)使用此注解的方法的类对象,必须是Spring管理下的bean对象; 所以需要在类上加上@Component注解。
    3)要想使用异步任务,需要在主类上开启异步配置,即,配置上@EnableAsync注解;
    4)如果不指定线程池的名称,则使用Spring默认的线程池SimpleAsyncTaskExecutor。
SimpleAsyncTaskExecutor特性:
1)为每个任务启动一个新线程,异步执行它。
2)支持通过“concurrencyLimit” bean 属性限制并发线程。默认情况下,并发线程数是无限的。
3)注意:此实现不重用线程!
4)考虑一个线程池 TaskExecutor 实现,特别是用于执行大量短期任务。
以上内容是我百度后所得,到底对不对呢?我决定亲自验证一下。
所以,使用@Async注解的时候一定要指定自己的线程池!!!
在启动类没有指定注解@EnableAsync的情况下,测试一下打印出当前的线程
 @GetMapping("/test")
    public String test(@RequestParam String name){
        System.out.println("TestController请求进来了:"+Thread.currentThread().getName());
        TestEvent event = new TestEvent(this,name);
        applicationEventPublisher.publishEvent(event);
        System.out.println("TestController请求出去了:"+Thread.currentThread().getName());
        return "success";
    }
    @Override
    public void onApplicationEvent(TestEvent testEvent) {
        System.out.println("TestListener:"+Thread.currentThread().getName());
        System.out.println("TestListener:"+testEvent.getName());
    }

根据上述结果可证明在没有开启异步配置@EnableAsync的情况下还是同步执行!
三、刨根问底
Springboot中异步默认使用的线程池真的是SimpleAsyncTaskExecutor吗???
源码不会看,看也看不懂。菜鸡只会debug!!!
菜是原罪!!!

在不指定线程池的情况下,debug查看spring中异步默认的线程池。
开启异步
在启动类上添加该注解 @EnableAsync
import org.springframework.boot.SpringApplication;
import org.springframework.boot.autoconfigure.SpringBootApplication;
import org.springframework.scheduling.annotation.EnableAsync;

@SpringBootApplication
@EnableAsync
public class TestApplication {

    public static void main(String[] args) {
        SpringApplication.run(TestApplication.class, args);
    }
}
获取spring管理的bean实例,实现这个接口即可: ApplicationContextAware
import org.springframework.beans.BeansException;
import org.springframework.context.ApplicationContext;
import org.springframework.context.ApplicationContextAware;
import org.springframework.context.ApplicationEventPublisher;
import org.springframework.util.CustomizableThreadCreator;
import org.springframework.web.bind.annotation.GetMapping;
import org.springframework.web.bind.annotation.RequestMapping;
import org.springframework.web.bind.annotation.RequestParam;
import org.springframework.web.bind.annotation.RestController;

import javax.annotation.Resource;

@RestController
@RequestMapping("/controller")
public class TestController implements ApplicationContextAware {

    private static ApplicationContext applicationContext;

    @Resource
    private ApplicationEventPublisher applicationEventPublisher;

    @GetMapping("/test")
    public String test(@RequestParam String name){
        System.out.println("TestController请求进来了:"+Thread.currentThread().getName());
        TestEvent event = new TestEvent(this,name);
        // 获取spring管理的所有的bean的名称
        String[] beanDefinitionNames = applicationContext.getBeanDefinitionNames();
        for (int i = 0; i <beanDefinitionNames.length ; i++) {
            System.out.println(beanDefinitionNames[i]);
        }
        applicationEventPublisher.publishEvent(event);
        System.out.println("TestController请求出去了:"+Thread.currentThread().getName());
        // 根据class对象获取spring管理的bean实例
        CustomizableThreadCreator bean = applicationContext.getBean(CustomizableThreadCreator.class);
        System.out.println("CustomizableThreadCreator:"+bean.getThreadNamePrefix());
        return "success";
    }

    @Override
    public void setApplicationContext(ApplicationContext applicationContext) throws BeansException {
        TestController.applicationContext=applicationContext;
    }
}
在TestListener中打上断点。
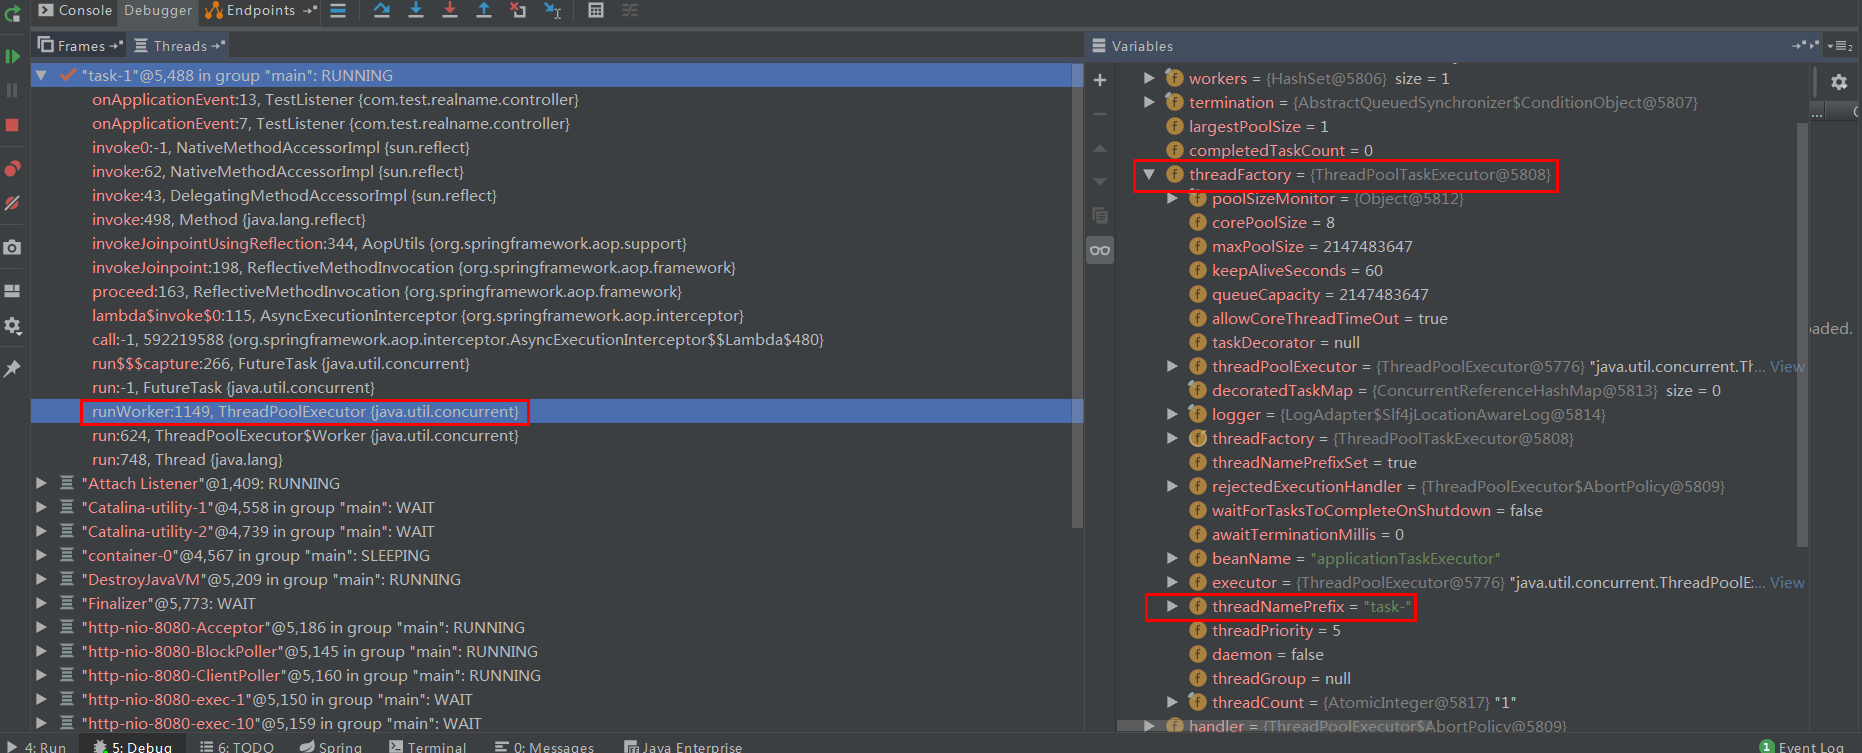 当前spring版本为5.2.12,可能与spring版本有关,当前版本的线程池默认是ThreadPoolTaskExecutor。可以看到线程池最大容量是Integer的最大值,在高并发场景下可能导致OOM。因此需要自定义线程池,并在@Async上指定为自定义线程池。
打印出了spring中所管理的bean的名称,applicationTaskExecutor果然也在。
 打印出线程池的前缀,再一次验证确认线程池默认是ThreadPoolTaskExecutor。

四、曲突徙薪
最近写了一个接口,要求响应时间1s以内,并且请求量很大,明确要求一些非重要业务的操作都必须异步操作。
按着以前的套路,我还是照着上面一操作了一遍。还好今天研究了一下,否则以后的某天怕是要背一口大锅。
保持好奇,富有探索,始终对技术有敏感性!!!
自定义线程池
import org.springframework.context.annotation.Bean;
import org.springframework.context.annotation.Configuration;
import org.springframework.scheduling.concurrent.ThreadPoolTaskExecutor;

import java.util.concurrent.Executor;
import java.util.concurrent.ThreadPoolExecutor;

@Configuration
public class MyExecutorConfig {

    @Bean("MyExecutor")
    public Executor myExecutor() {
        ThreadPoolTaskExecutor executor = new ThreadPoolTaskExecutor();
        executor.setCorePoolSize(10);
        executor.setMaxPoolSize(50);
        executor.setQueueCapacity(2000);
        executor.setKeepAliveSeconds(60);
        executor.setThreadNamePrefix("myExecutor");
        executor.setRejectedExecutionHandler( new ThreadPoolExecutor.CallerRunsPolicy());
        executor.initialize();
        return executor;
    }
}
在异步注解上标明使用自定义线程池
@Async(“MyExecutor”)
Jmeter压测
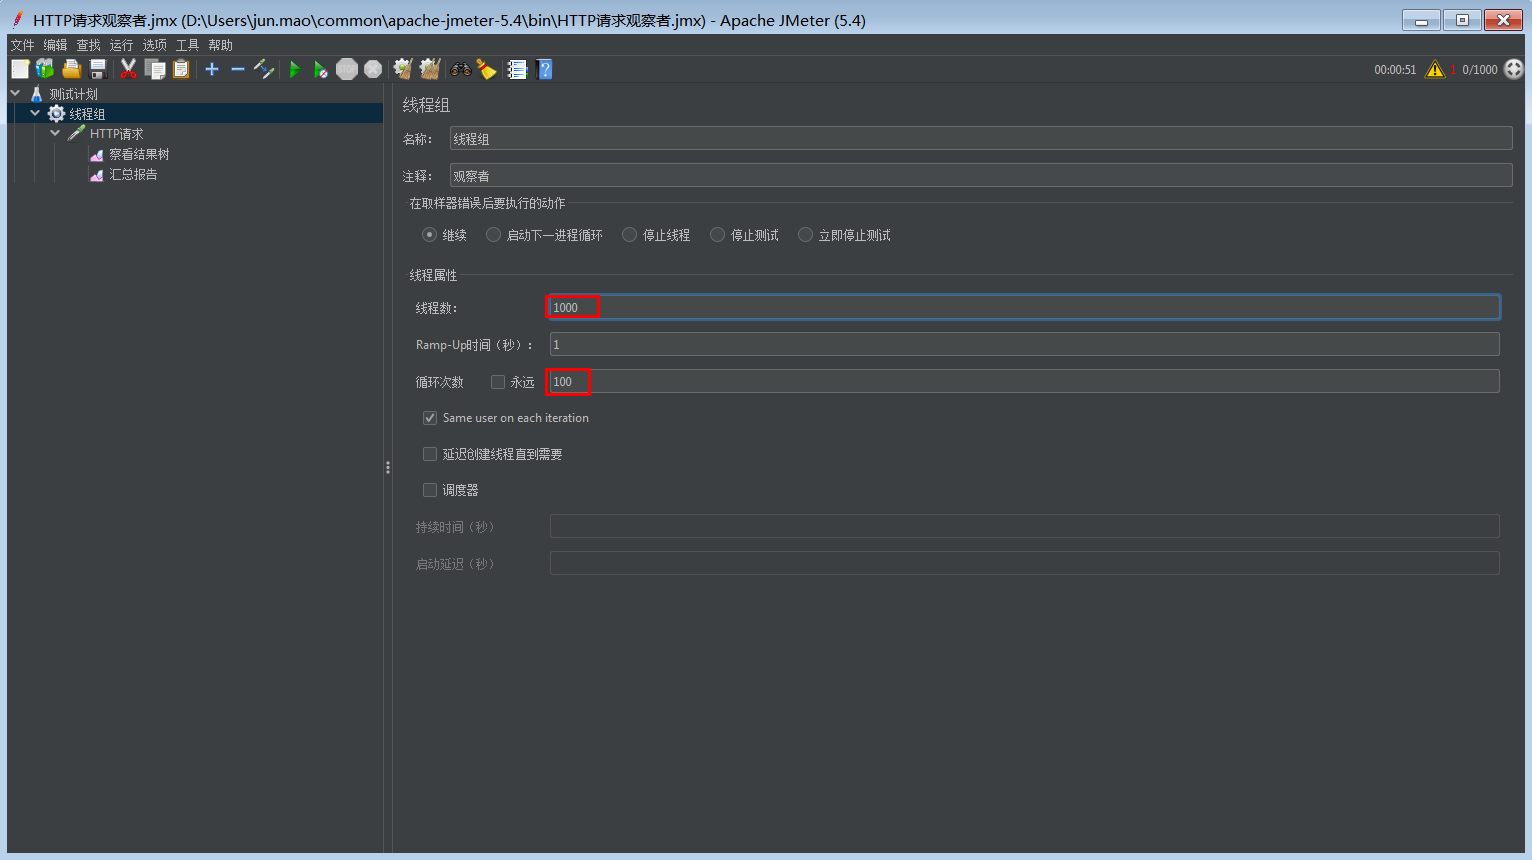
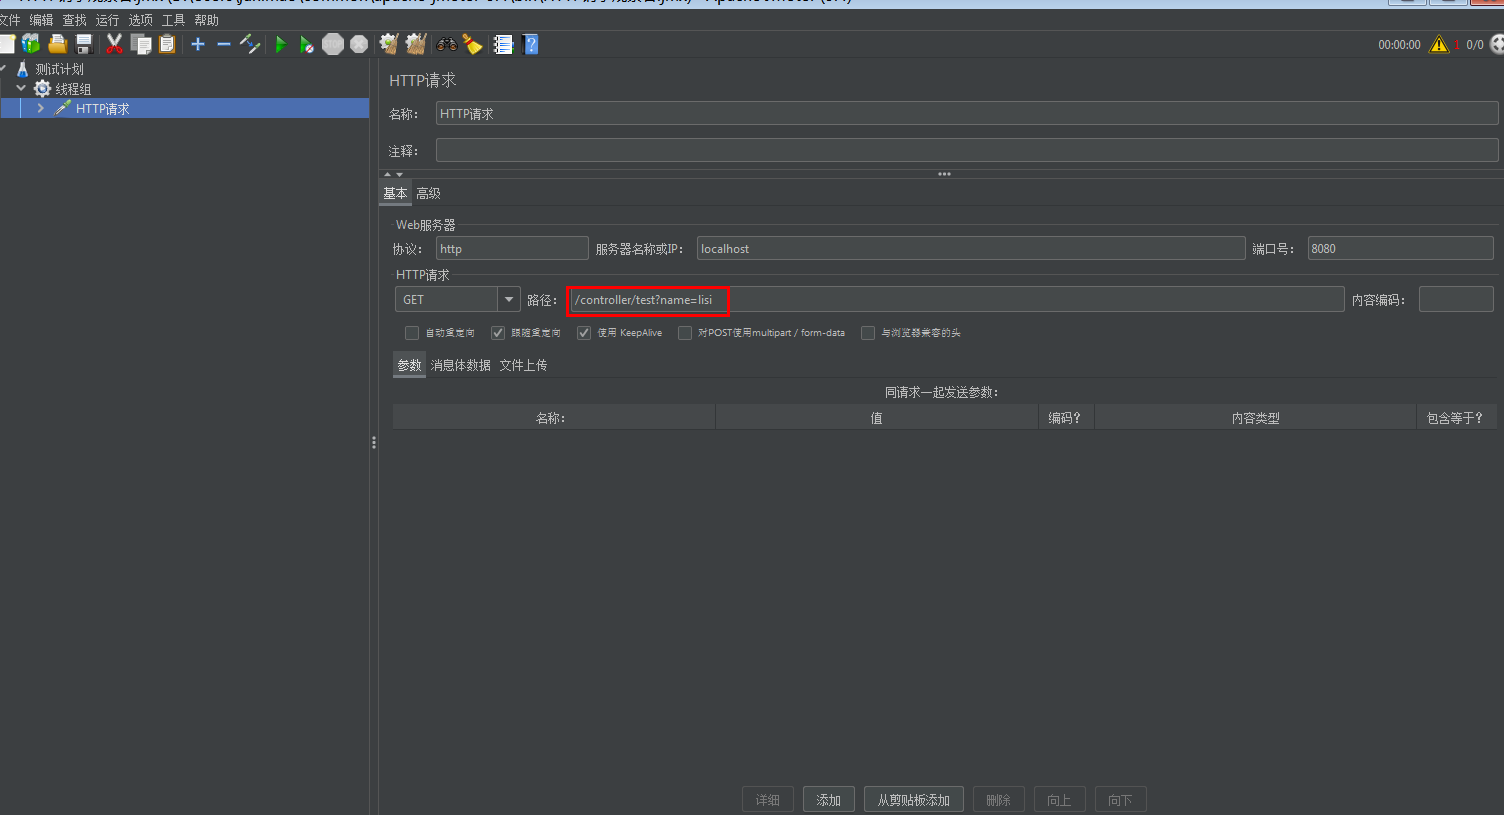
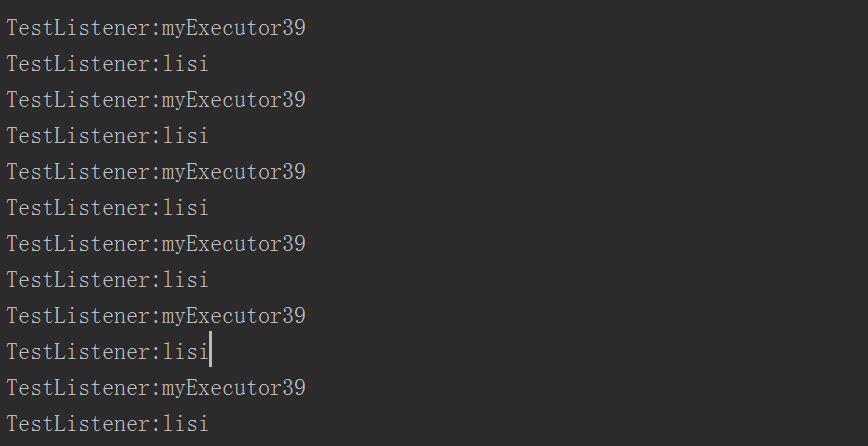
压测结果表明确实切换了线程池,使用了自定义的线程池,并且阻塞队列已满,开始朝着最大线程数迈进!

![[前端攻坚]:Set的使用](https://img-blog.csdnimg.cn/0aa6c21bd35c4921b8e0803c7b667d09.png#pic_center)


