一、libcurl下载地址:curl - Download

二、解压下载的压缩包,进入projects\Windows\VC14目录

三、用vs2019打开curl-all.sln工程,选择LIB Debug,x64进行编译

编译后的文件为:curl-8.2.1\build\Win64\VC14\LIB Debug\libcurld.lib
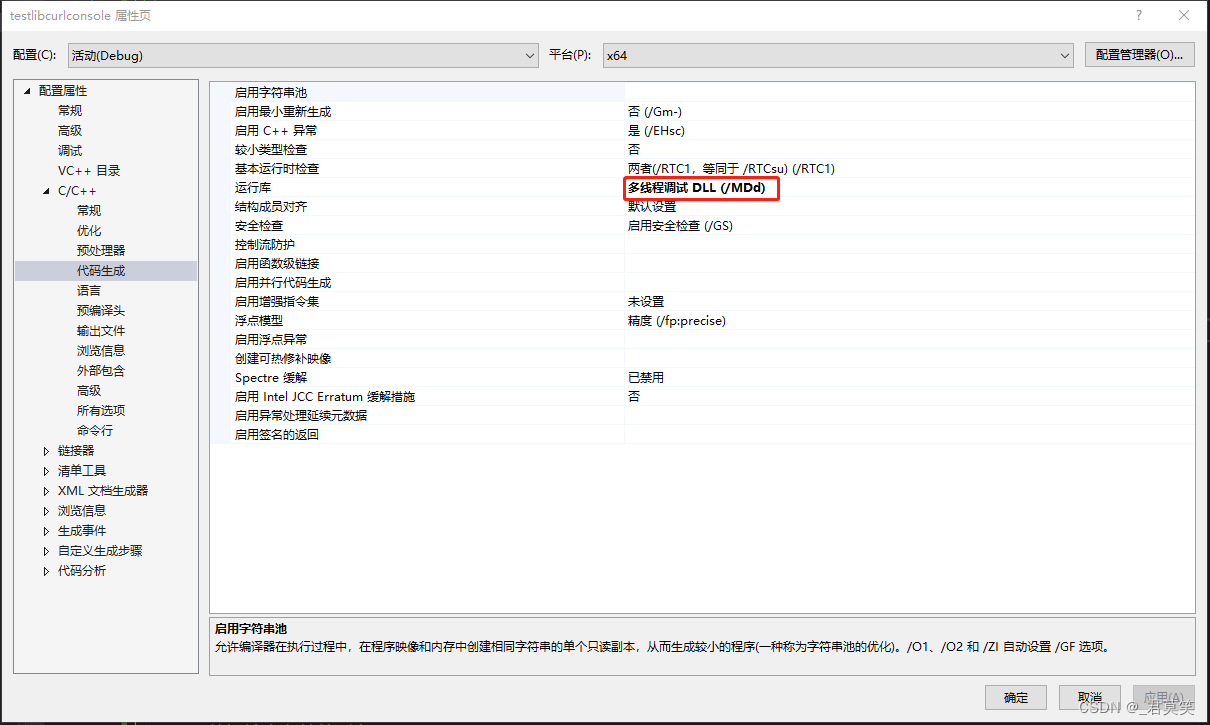
四、新建测试工程,依次添加如下配置




五、测试代码
// testlibcurl.cpp: 定义应用程序的入口点。
//

#include <iostream>
#include "curl/curl.h"
#include <future>
#include <string>
#include <sstream>
#include <stdexcept>

using namespace std;

size_t write_data(void* buffer, size_t size, size_t nmemb, void* userp)
{

    //将void* 指针转换成char* 指针, 并且读取对应长度
    std::string data((char*)buffer, size * nmemb);
    //输出到开发者设置的数据类型中, 这里是stringstream
    *((std::stringstream*)userp) << data << std::endl;

    return  size * nmemb;
}


std::string network(const std::string& url)
{
    //创建一个easy_handle, 不要在线程直接共享easy_handle
    CURL* easy_handle = curl_easy_init();

    //数据输出存储的对象
    std::stringstream out;

    //检查是否创建成功
    if (easy_handle == NULL)
    {
        //抛出错误异常
        throw std::runtime_error("create easy_handle fail");
    }

    curl_easy_setopt(easy_handle, CURLOPT_URL, url.c_str());

    //如果不提供这样的回调函数,那个curl只是简单的把数据输出到标准输出流中
    curl_easy_setopt(easy_handle, CURLOPT_WRITEFUNCTION, &write_data);

    //绑定数据输出
    curl_easy_setopt(easy_handle, CURLOPT_WRITEDATA, &out);

    //开始进行请求
    curl_easy_perform(easy_handle);

    //清理curl_easy
    curl_easy_cleanup(easy_handle);

    return out.str();
}

void printRet(std::future<std::string>& future)
{
    //异常处理
    try {
        //获取请求的结果,为了避免住主线程堵塞, 我们在子线程中等待结果完成
        std::string ret = future.get();
        //输出结果
        std::cout << "curl result:" << ret << std::endl;
    }
    catch (std::exception& e)
    {
        e.what();
    }
}

int main()
{
    curl_global_init(CURL_GLOBAL_ALL);
    //2.请求地址
    std::string url = "http://www.baidu.com";
    //3.这里我们使用异步来处理网络请求的任务
    std::packaged_task<std::string(std::string)> task(network);
    std::future<std::string> ret = task.get_future();


    //4.将任务移新的线程中去, std::move, std::ref 分别对应右值移动, 和引用绑定
    std::thread t = std::thread(std::move(task), std::ref(url));

    //5.开辟另外一个线程处理数据
    std::thread t2 = std::thread(std::move(printRet), std::ref(ret));

    //6.等待子线程处理任务完成
    t.join();
    t2.join();

    //7.清理全局curl
    curl_global_cleanup();
    cout << "Hello CMake." << endl;
    return 0;
}
六、编译成功


