Qt5开发及实例V2.0-第二十三章-Qt-多功能文档查看器实例
- 第23章 多功能文档查看器实例
- 23.1. 简介
- 23.2. 界面与程序框架设计
- 23.2.1. 图片资源
- 23.2.2. 网页资源
- 23.2.3. 测试用文件
- 23.3 主程序代码框架
- 23.4 浏览网页功能实现
- 23.4.1 实现HtmIHandler处理器
- 23.5. 部分代码实现
- 23.5.1 定义主显示区元素
- 23.5.2 实现“打开图片”对话框
- 23.5.3 本例对图片的处理
- 本章相关例程源码下载
- 1.Qt5开发及实例-CH2301.rar,多功能文档查看器 代码下载
第23章 多功能文档查看器实例
23.1. 简介
我们将会使用Qt5开发一个多文档浏览器,多功能文档查看器。该应用程序可以打开文本文件、图片和网页,对图片进行操作(放大、缩小、旋转等),并支持基本的编辑功能(剪切、复制、粘贴等)。此外,还将提供帮助功能。
该程序可用于浏览网页、阅读文本和查看图片,并支持对文本进行编辑以及对图片进行缩放、
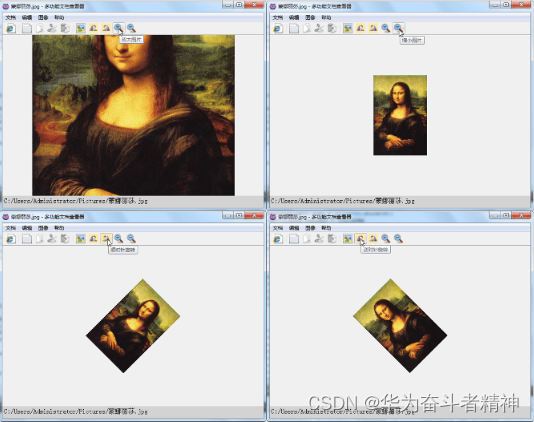
旋转等操作,运行效果如图所示。
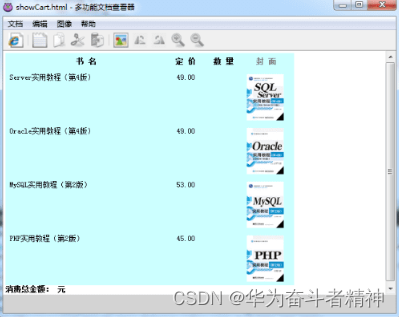
查看图片
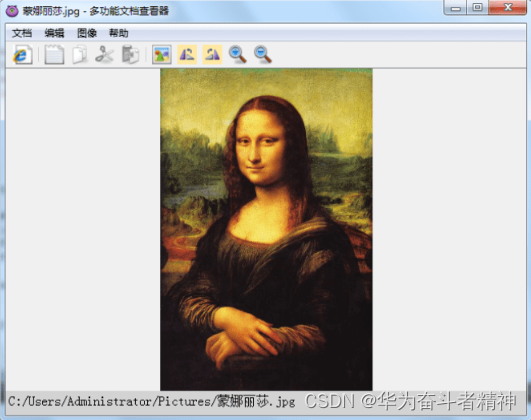
缩放与旋转图片
23.2. 界面与程序框架设计
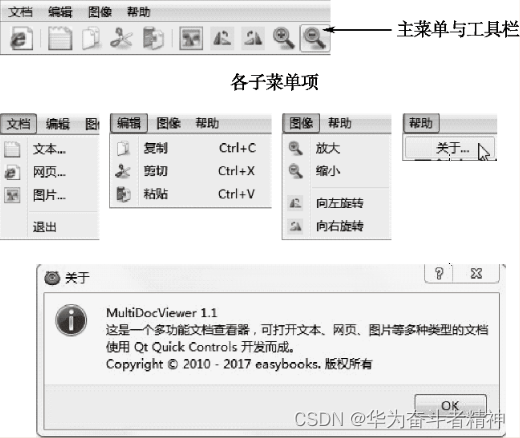
新建Qt Quick Controls应用程序,项目名为“MultiDocViewer”。这个文档查看器的界面菜单系统及工具栏的设计如图所示,其中还展示了程序的“关于”对话框 (单击主菜单“帮助”一“关于…”项打开),内有软件功能简介及版权声明信息。
23.2.1. 图片资源
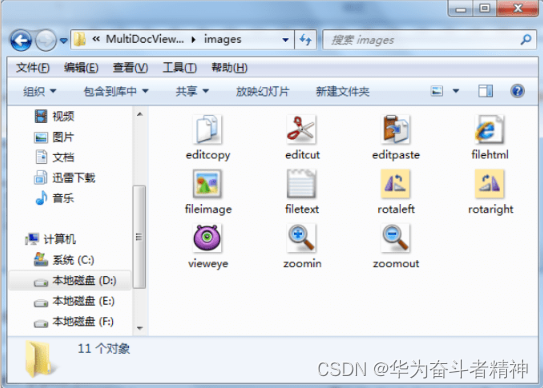
程序运行时要显示在各菜单项前和工具栏按钮上的图标,必须以图片资源的形式载入项目中方可正常使用。这里为项目准备的资源图片都放在项目工程目录的images文件夹中,如图所示,总共有11个尺寸为32像素x32像素的PNG格式图片。
23.2.2. 网页资源
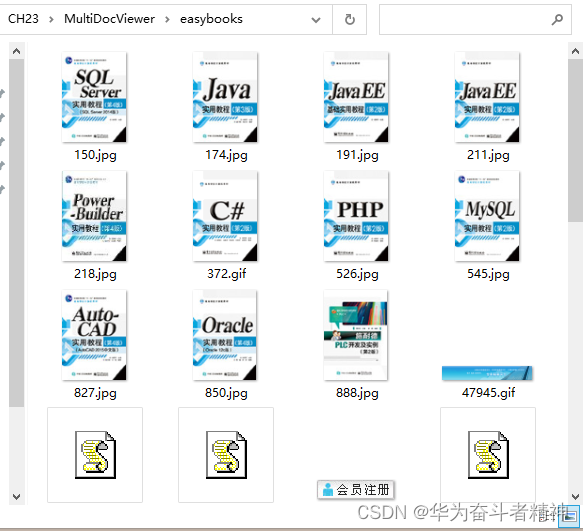
easybooks.htm及其资源文件夹easybooks (如图所示),
程序启动时初始打开的网页 (如图所示)也要作为资源事先载入项目中,准备网页文件
将它们一起复制到项目工程目录下。
23.2.3. 测试用文件
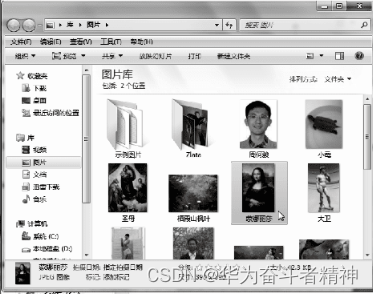
为方便测试程序的功能,还要在计算机上创建一些文件和准备一些图片,如图所示。
23.3 主程序代码框架
本例程序主体部分的代码写在main.qml文件中,代码量较多,为了给读者一个总体印象以便于理解,这里先只给出程序整体的代码框架。
其中
(a) Action: Action是Qt Quick为菜单式桌面应用开发提供的一种特殊元素,它的主要作用是将界面上UI控件之间的关联属性及需要完成的动作单独分离出来并重新封装成为一个实体,以便用户在设计界面时可以随时引用。Action的功能相当强大,Action类有text、iconSource、iconName、shortcut等属性及triggered信号,因为几乎所有Menultem里的属性在Action里都能找到对应的成员,故Menultem的text、iconSource、 trigger信号等实现的效果都可以通过Action来实现,这两种方式是等同的。例如,本例中定义的一个Action(“打开图片” Action)代码为 :
Action {
    id: imgOpenAction                   //Action:
    iconSource:"images/fileimage.png    //图标来源
    iconName:"image-open"               //图标名
    text:"打开图片"                     //提示文本
    onTriggered: imgDlg.open()          //触发动作
}
这样定义后,在设计菜单项时就可直接引用该Action的标识名,如下
Menultem {
    text:"图片..."
    action: imgOpenAction       //指定所用Action的标识名
}
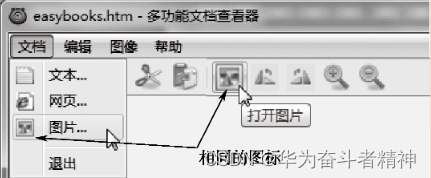
如此一来,该菜单项就具备了这个Action的全部功能。若有需要,用户还可以只定义一个Action而在多个预设功能完全相同的子菜单项中重复多次使用(提高代码复用性) 。使用Action还有一大好处即在设计工具栏时只须指定工具按钮ToolButton的action属性为之前定义的某个Action的标识,就能很容易将它与对应菜单项关联起来,如本例中的语句 :
ToolButton {action:imgOpenAction }
就生成了一个“打开图片”工具按钮,其上的图标、功能都与“图片.”菜单项相同,如图所示的效果。
(b) ToolSeparator什:因Qt Quick中并没有提供工具栏分隔条元素,故需要用户自己定义。本例采用自定义组件的方式来设计工具栏上按钮间的分隔条,代码在ToolSeparator.qml文件中,如下:
import QtQuick 2.4

Item {
    width: 8
    anchors.top: parent.top
    anchors.bottom: parent.bottom
    anchors.margins: 6
    Rectangle {
        width: 1
        height: parent.height
        anchors.horizontalCenter: parent.horizontalCenter
        color: "#22000000"
    }
    Rectangle {
        width: 1
        height: parent.height
        anchors.horizontalCenterOffset: 1
        anchors.horizontalCenter: parent.horizontalCenter
        color: "#33ffffff"
    }
}
©/* 定义界面主显示区域的元素 /: 界面中央是主显示区,用于显示打开文档的内容。根据打开文档的类型不同,本例定义了不同的组件元素来加以显示,它们都包含在统一的ltem元素中,作为其子元素存在,并以控制可见性的方式分别显示和隐藏
(d)/ 定义各种文档处理器对象 */:处理打开的文档内容,有两种方式。第一种是在主程序(main.qml) 中直接编写文件处理函数。第二种是通过自定义的文档处理器对象。本例定义了两个处理器对象 (HtmlHandler和TextHandler) ,分别用来处理网页和文本格式的文档。
23.4 浏览网页功能实现
23.4.1 实现HtmIHandler处理器
具体实现步骤如下 :
(1) 右击项目视图的项目名“MultiDocViewer”一“添加新文件…”项,弹出“新建文件”对话框,如图所示,选择文件和类“C++”下的“C++ Header File”(C++头文件) 模板。
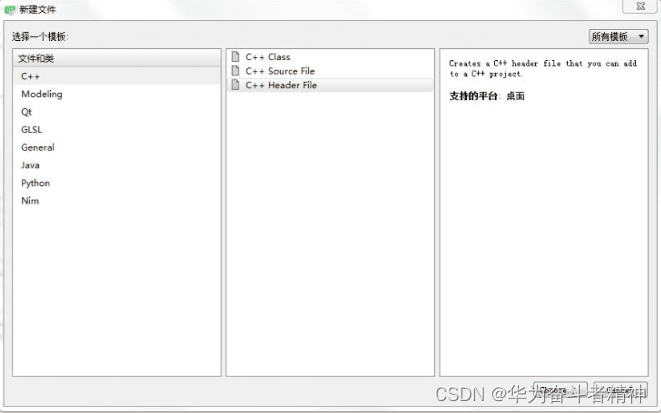
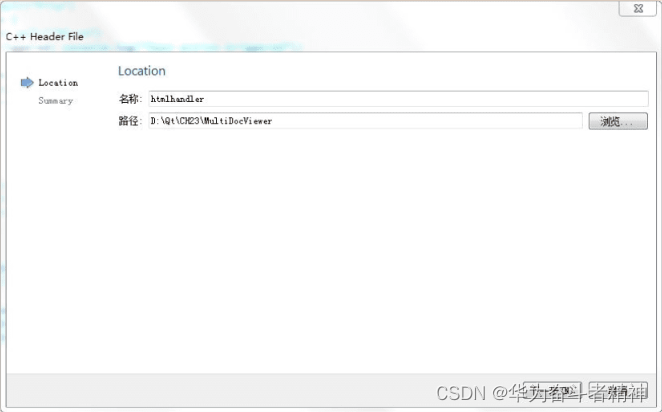
单击“Choose…”按钮,在“Location”页的“名称”栏中输入“htmlhandler”单击“下一步”按钮,再单击“完成”按钮,就创建好了一个C++头文件 (后缀为.h),系统会自动在“头文件”项目视图中生成一个节点以存放该文件。
如图所示。
(2)在htmlhandler.h文件中编写如下代码.
(3)创建htmlhandler.cpp源文件,方法同第 (1) 步创建头文件的方法,不同的仅仅是在选择模板时要选“C++ Source File” (C++源文件)
(4) 编写htmlhandler.cpp文件,代码
(5) 处理器编写完成后,要注册为QML类型的元素才能使用,注册语句写在main.cpp中:
qmlRegisterType<HtmlHandler>("org.qtproject.easybooks", 1, 0,"HtmlHandler");
注册之后,再在main.qmI开头导入命名空间:
import org.qtproject.easybooks 1.0
这样就可以在Qt Quick编程中直接使用HtmlHandler处理器元素了。
23.5. 部分代码实现
23.5.1 定义主显示区元素
图像的主显示区元素是一个Image,定义如下
Image {
    id: imageArea
    anchors.fill: parent
    visible: false
    asynchronous: true
    fillMode: Image.PreserveAspectFit
    onStatusChanged: {
        if (status === Image.Loading) {
            busy.running = true;
        }else if(status === Image.Ready) {
            busy.running = false;
        }else if(status === Image.Error) {
            busy.running = false;
            mainStatusBar.text = "图片无法显示"
        }
    }
}
23.5.2 实现“打开图片”对话框
打开图片”对话框的实现代码如下:
FileDialog {
    id: imgDlg
    title: "打开图片"
    nameFilters: ["图像文件 (*.jpg *.png *.gif *.bmp *.ico)"]
    onAccepted: {
        var filepath = new String(fileUrl);
        mainStatusBar.text = filepath.slice(8);
        var dot = filepath.lastIndexOf(".");
        var sep = filepath.lastIndexOf("/");
        if(dot > sep){
            var filename = filepath.substring(sep + 1);
            main.processFile(fileUrl, filename);
        }else{
            mainStatusBar.text = "出错!MultiDocViewer不支持此格式的图片";
        }
    }
}
23.5.3 本例对图片的处理
与网页和文本不同,本例对图片的处理采用在main.qml中直接编写文件处理函数的方式来实现文件处理函数processFile的代码如下
import QtQuick 2.4
import QtQuick.Controls 1.3
import QtQuick.Controls.Styles 1.3
import QtQuick.Layouts 1.1
import QtQuick.Window 2.2
import QtQuick.Dialogs 1.2
import org.qtproject.easybooks 1.0

ApplicationWindow {
    id: main
    title: htmldoc.htmlTitle + " - 多功能文档查看器"
    width: 640
    height: 480
    visible: true
    minimumWidth: 400
    minimumHeight: 300
    property color textBackgroundColor: "black"
    property color textColor: "white"

    Action {
        id: cutAction
        text: "剪切"
        shortcut: "Ctrl+X"
        iconSource: "images/editcut.png"
        iconName: "edit-cut"
        enabled: false
        onTriggered: textArea.cut()
    }

    Action {
        id: copyAction
        text: "复制"
        shortcut: "Ctrl+C"
        iconSource: "images/editcopy.png"
        iconName: "edit-copy"
        enabled: false
        onTriggered: textArea.copy()
    }

    Action {
        id: pasteAction
        text: "粘贴"
        shortcut: "Ctrl+V"
        iconSource: "images/editpaste.png"
        iconName: "edit-paste"
        enabled: false
        onTriggered: textArea.paste()
    }

    Action {
        id: htmlOpenAction
        iconSource: "images/filehtml.png"
        iconName: "html-open"
        text: "打开网页"
        onTriggered: htmlDlg.open()
    }

    Action {
        id: txtOpenAction
        iconSource: "images/filetext.png"
        iconName: "text-open"
        text: "打开文本"
        onTriggered: txtDlg.open()
    }

    Action {
        id: imgOpenAction
        iconSource: "images/fileimage.png"
        iconName: "image-open"
        text: "打开图片"
        onTriggered: imgDlg.open()
    }

    Action {
        id: imgZoominAction
        iconSource: "images/zoomin.png"
        iconName: "image-zoomin"
        text: "放大图片"
        enabled: false
        onTriggered: {
            imageArea.scale += 0.1
            if(imageArea.scale > 3) {
                imageArea.scale = 1
            }
        }
    }

    Action {
        id: imgZoomoutAction
        iconSource: "images/zoomout.png"
        iconName: "image-zoomout"
        text: "缩小图片"
        enabled: false
        onTriggered: {
            imageArea.scale -= 0.1
            if(imageArea.scale < 0.1) {
                imageArea.scale = 1
            }
        }
    }

    Action {
        id: imgRotaleftAction
        iconSource: "images/rotaleft.png"
        iconName: "image-rotaleft"
        text: "逆时针旋转"
        enabled: false
        onTriggered: {
            imageArea.rotation -= 45
        }
    }

    Action {
        id: imgRotarightAction
        iconSource: "images/rotaright.png"
        iconName: "image-rotaright"
        text: "顺时针旋转"
        enabled: false
        onTriggered: {
            imageArea.rotation += 45
        }
    }

    menuBar: MenuBar {
        Menu {
            title: "文档"
            MenuItem {
                text: "文本..."
                action: txtOpenAction
            }
            MenuItem {
                text: "网页..."
                action: htmlOpenAction
            }
            MenuItem {
                text: "图片..."
                action: imgOpenAction
            }
            MenuSeparator {}
            MenuItem {
                text: "退出"
                onTriggered: Qt.quit();
            }
        }
        Menu {
            title: "编辑"
            MenuItem { action: copyAction }
            MenuItem { action: cutAction }
            MenuItem { action: pasteAction }
        }
        Menu {
            title: "图像"
            MenuItem {
                text: "放大"
                action: imgZoominAction
            }
            MenuItem {
                text: "缩小"
                action: imgZoomoutAction
            }
            MenuSeparator {}
            MenuItem {
                text: "向左旋转"
                action: imgRotaleftAction
            }
            MenuItem {
                text: "向右旋转"
                action: imgRotarightAction
            }
        }
        Menu {
            title: "帮助"
            MenuItem {
                text: "关于..."
                onTriggered: aboutBox.open()
            }
        }
    }

    toolBar: ToolBar {
        id: mainToolBar
        width: parent.width
        RowLayout {
            anchors.fill: parent
            spacing: 0
            ToolButton { action: htmlOpenAction }

            ToolSeparator {}

            ToolButton { action: txtOpenAction }
            ToolButton { action: copyAction }
            ToolButton { action: cutAction }
            ToolButton { action: pasteAction }

            ToolSeparator {}

            ToolButton { action: imgOpenAction }
            ToolButton { action: imgRotaleftAction }
            ToolButton { action: imgRotarightAction }
            ToolButton { action: imgZoominAction }
            ToolButton { action: imgZoomoutAction }

            Item { Layout.fillWidth: true }
        }
    }

    Item {
        id: centralArea
        anchors.fill: parent
        visible: true
        property var current: htmlArea          //当前显示的区域元素

        BusyIndicator {
            id: busy
            anchors.centerIn: parent
            running: false
            z: 3
        }

        TextArea {
            id: htmlArea
            anchors.fill: parent
            readOnly: true
            frameVisible: false
            baseUrl: "qrc:/"
            text: htmldoc.text
            textFormat: Qt.RichText
        }

        TextArea {
            id: textArea
            anchors.fill: parent
            visible: false
            frameVisible: false
            wrapMode: TextEdit.WordWrap
            font.pointSize: 12
            text: textdoc.text
            style: TextAreaStyle {
                backgroundColor: main.textBackgroundColor
                textColor: main.textColor
                selectedTextColor: "red"
                selectionColor: "aqua"          //水绿色
            }
            Component.onCompleted: forceActiveFocus()
        }

        Image {
            id: imageArea
            anchors.fill: parent
            visible: false
            asynchronous: true
            fillMode: Image.PreserveAspectFit
            onStatusChanged: {
                if (status === Image.Loading) {
                    busy.running = true;
                }else if(status === Image.Ready) {
                    busy.running = false;
                }else if(status === Image.Error) {
                    busy.running = false;
                    mainStatusBar.text = "图片无法显示"
                }
            }
        }
    }

    statusBar: Rectangle {
        id: mainStatusBar
        color: "lightgray";
        implicitHeight: 30;
        width: parent.width;
        property alias text: status.text;
        Text {
            id: status;
            anchors.fill: parent;
            anchors.margins: 4;
            font.pointSize: 12;
        }
    }

    FileDialog {
        id: htmlDlg
        title: "打开网页"
        nameFilters: ["网页 (*.htm *.html *.mht)"]
        onAccepted: {
            htmldoc.fileUrl = fileUrl;
            var filepath = new String(fileUrl);
            mainStatusBar.text = filepath.slice(8);
            centralArea.current = htmlArea
            textArea.visible = false;
            imageArea.visible = false;
            htmlArea.visible = true;
            main.title = htmldoc.htmlTitle + " - 多功能文档查看器"
            //设置功能可用性
            copyAction.enabled = false
            cutAction.enabled = false
            pasteAction.enabled = false
            imgRotaleftAction.enabled = false
            imgRotarightAction.enabled = false
            imgZoominAction.enabled = false
            imgZoomoutAction.enabled = false
        }
    }

    FileDialog {
        id: txtDlg
        title: "打开文本"
        nameFilters: ["文本文件 (*.txt)"]
        onAccepted: {
            textdoc.fileUrl = fileUrl
            var filepath = new String(fileUrl);
            mainStatusBar.text = filepath.slice(8);
            centralArea.current = textArea
            htmlArea.visible = false;
            imageArea.visible = false;
            textArea.visible = true;
            main.title = textdoc.textTitle + " - 多功能文档查看器"
            //设置功能可用性
            copyAction.enabled = true
            cutAction.enabled = true
            pasteAction.enabled = true
            imgRotaleftAction.enabled = false
            imgRotarightAction.enabled = false
            imgZoominAction.enabled = false
            imgZoomoutAction.enabled = false
        }
    }

    FileDialog {
        id: imgDlg
        title: "打开图片"
        nameFilters: ["图像文件 (*.jpg *.png *.gif *.bmp *.ico)"]
        onAccepted: {
            var filepath = new String(fileUrl);
            mainStatusBar.text = filepath.slice(8);
            var dot = filepath.lastIndexOf(".");
            var sep = filepath.lastIndexOf("/");
            if(dot > sep){
                var filename = filepath.substring(sep + 1);
                main.processFile(fileUrl, filename);
            }else{
                mainStatusBar.text = "出错!MultiDocViewer不支持此格式的图片";
            }
        }
    }

    MessageDialog {
        id: aboutBox
        title: "关于"
        text: "MultiDocViewer 1.1 \n这是一个多功能文档查看器,可打开文本、网页、图片等多种类型的文档 \n使用 Qt Quick Controls 开发而成。 \nCopyright © 2010 - 2017 easybooks. 版权所有"
        icon: StandardIcon.Information
    }

    HtmlHandler {
        id: htmldoc
        Component.onCompleted: htmldoc.fileUrl = "qrc:/easybooks.htm"
    }

    TextHandler {
        id: textdoc
    }

    function processFile(fileUrl, name) {
        if(centralArea.current != imageArea) {
            if(centralArea.current != null) {
                centralArea.current.visible = false;
            }
            imageArea.visible = true;
            centralArea.current = imageArea;
        }
        imageArea.source = fileUrl;
        main.title = name + " - 多功能文档查看器"
        //设置功能可用性
        copyAction.enabled = false
        cutAction.enabled = false
        pasteAction.enabled = false
        imgRotaleftAction.enabled = true
        imgRotarightAction.enabled = true
        imgZoominAction.enabled = true
        imgZoomoutAction.enabled = true
    }
}
本章相关例程源码下载
1.Qt5开发及实例-CH2301.rar,多功能文档查看器 代码下载
Qt5开发及实例_CH2301.rar

