CBOW (以txt文本小说为例) pytorch实战

news2024/10/6 10:29:06

CBOW (以txt文本小说为例 pytorch实战

今天博主做了一个不错的实验,我认为,很多小伙伴可能都可以从中学到东西。

我先说一下这个实验,我做了什么,在这个实验中,博主会从零,开始从一个txt文件开始,对这个文件的中文词语进行分词,并进行one-hot编码,处理完数据之后,还搭建了cbow网络。之后,我们训练了自己的模型,在此基础上,我们也对模型进行了些许验证,就是通过我们得到的嵌入词向量,然后计算某一个词语与其最近的k个词语,在验证过程中,我们发现数据集质量很差,不过,经过验证确实,模型还是有一定效果的。

先看一下,我们能数据集处理和模型训练的代码:


#coding=gbk

import os
import jieba


import torch
from torch import nn, optim
from torch.autograd import Variable
import torch.nn.functional as F

path="E:\\data\\dataz.txt"


def   read_file(path):
    fp=open(path,encoding='utf8')
    text=fp.readlines()
    fp.close()
    return text


def cut_words(text):
    dict_index={}
    index=0
    words_list=[]
    for line in text:
        line=line.replace('"','')
        line=line.replace('“','')
        line=line.replace('”','')
        line=line.replace('。','')
        line=line.replace('\n','')
        line=line.replace(' ','')
        words_cut=line.split(',')
        for i in words_cut:
            words_l=jieba.lcut(i)
            
            for word in words_l:
                if word  not in dict_index.keys():
                    dict_index[word]=index
                    index=index+1
            if  len(words_l)>0:
                    words_list.append(words_l)


    return words_list,dict_index


def get_data_corpus(words_list,window_size):
    data_corpus=[]
    for words in  words_list:
        if len(words)<2:
            continue
        else:
           
            for index in range(len(words)):
                l=[]
                target=words[index]
                l.append(target)
                try:
                    l.append(words[index+1])
                    l.append(words[index+2])
                except:
                    pass
                try:
                    l.append(words[index-1])
                    l.append(words[index-2])
                except:
                    pass
                data_corpus.append(l)
    return data_corpus
text=read_file(path)
words_list,dict_index=cut_words(text)
#print(words_list,dict_index)
data_corpus=get_data_corpus(words_list,2)
#print(data_corpus)
class CBOW(nn.Module):

    def __init__(self, vocab_size, embedding_dim):

        super(CBOW, self).__init__()

        self.embeddings = nn.Embedding(vocab_size, embedding_dim)

      #  self.proj = nn.Linear(embedding_dim, vocab_size)

        self.output = nn.Linear(embedding_dim, vocab_size)
        

    def forward(self, inputs):

        embeds = sum(self.embeddings(inputs)).view(1, -1)

       # out = F.relu(self.proj(embeds))

        out = self.output(embeds)

        nll_prob = F.log_softmax(out, dim=-1)

        return nll_prob

length=len(dict_index.keys())

data_final=[]
for words in data_corpus[0:10000]:
    target_vector=torch.zeros(length)
    context_id=[]
    if len(words)==5:
        target_vector[dict_index[words[0]]]=1
        for i in words[1:]:
            context_id.append(dict_index[i])
        data_final.append([target_vector,context_id])
#print(data_final)
epochs=5

model=CBOW(length,100)

loss_function=nn.NLLLoss()
optimizer=optim.SGD(model.parameters(), lr=0.01, momentum=0.9)
losses=[]
for epoch in range(epochs):

    total_loss = 0

    for data in data_final:
        target=data[0]
        context=data[1]

      #  context_vector = make_context_vector(context, word_to_idx).to(device)  # 把训练集的上下文和标签都放到cpu中

        target = torch.tensor(target).type(dtype=torch.long)
        context=torch.tensor(context)
        model.zero_grad()                                                      # 梯度清零

        train_predict = model(context)                                  # 开始前向传播
        # print("train_predict",train_predict[0])
        # print("target",target)
        loss = loss_function(train_predict[0], target)

        loss.backward()                                                        # 反向传播

        optimizer.step()                                                       # 更新参数

        total_loss += loss.item()
    print("loss ",total_loss)
    losses.append(total_loss) 
#保存
torch.save(model,'E:\\data\\cbow.pt')
#读取


os.system("pause")

下面则是对某一个词语进行最近词汇测评的代码:

#coding=gbk
import os
import jieba


import torch
from torch import nn, optim
from torch.autograd import Variable
import torch.nn.functional as F

path="E:\\data\\dataz.txt"


def   read_file(path):
    fp=open(path,encoding='utf8')
    text=fp.readlines()
    fp.close()
    return text


def cut_words(text):
    dict_index={}
    index=0
    words_list=[]
    for line in text:
        line=line.replace('"','')
        line=line.replace('“','')
        line=line.replace('”','')
        line=line.replace('。','')
        line=line.replace('\n','')
        line=line.replace(' ','')
        words_cut=line.split(',')
        for i in words_cut:
            words_l=jieba.lcut(i)
            
            for word in words_l:
                if word  not in dict_index.keys():
                    dict_index[word]=index
                    index=index+1
            if  len(words_l)>0:
                    words_list.append(words_l)


    return words_list,dict_index
            
        
class CBOW(nn.Module):

    def __init__(self, vocab_size, embedding_dim):

        super(CBOW, self).__init__()

        self.embeddings = nn.Embedding(vocab_size, embedding_dim)

      #  self.proj = nn.Linear(embedding_dim, vocab_size)

        self.output = nn.Linear(embedding_dim, vocab_size)
        

    def forward(self, inputs):

        embeds = sum(self.embeddings(inputs)).view(1, -1)

       # out = F.relu(self.proj(embeds))

        out = self.output(embeds)

        nll_prob = F.log_softmax(out, dim=-1)

        return nll_prob

def get_data_corpus(words_list,window_size):
    data_corpus=[]
    for words in  words_list:
        if len(words)<2:
            continue
        else:
           
            for index in range(len(words)):
                l=[]
                target=words[index]
                l.append(target)
                try:
                    l.append(words[index+1])
                    l.append(words[index+2])
                except:
                    pass
                try:
                    l.append(words[index-1])
                    l.append(words[index-2])
                except:
                    pass
                data_corpus.append(l)
    return data_corpus
text=read_file(path)
words_list,dict_index=cut_words(text)
print(dict_index)
path='E:\\data\\cbow.pt'
model = torch.load('E:\\data\\cbow.pt')

print(type(model.state_dict()))  # 查看state_dict所返回的类型,是一个“顺序字典OrderedDict”
 
for param_tensor in model.state_dict(): # 字典的遍历默认是遍历 key,所以param_tensor实际上是键值
    print(param_tensor,'\t',model.state_dict()[param_tensor].size())
    

embedings=model.state_dict()['embeddings.weight']
print(embedings)
print(len(embedings[0]))


# print("萧炎:",dict_index['萧炎'])


dict_values={}
for key in dict_index.keys():
    dict_values[dict_index[key]]=key


def get_most_approch(embedings,target_id,k):
    target_vec=embedings[target_id]
    
    dict_k={}
    index=0
    for vec in embedings:
        dict_k[index]=float(torch.dot(vec,target_vec))
        index=index+1
    
    sort_z=sorted(dict_k.items(),key=lambda e:e[1],reverse=True
                  ) #排序
    for i in sort_z[0:k]:
        print(dict_values[i[0]])
    
get_most_approch(embedings,dict_index['萧炎'],10)


os.system("pause")

看一下,我们的一个测试结果:
在这里插入图片描述
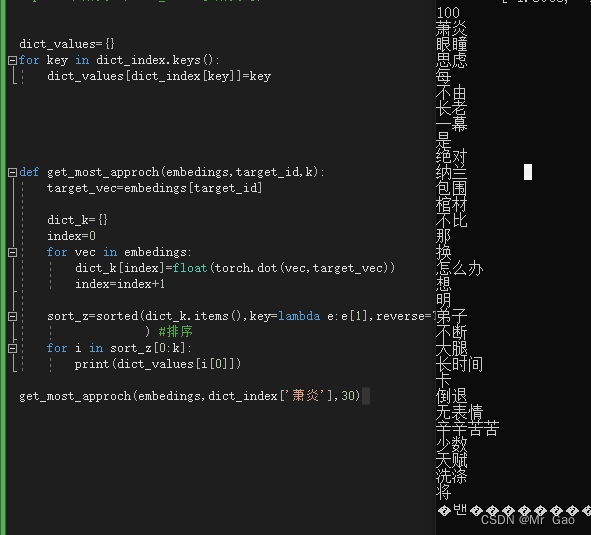
上图是我们测试跟萧炎有关的30个词语,大家可以发现还还是可以的,因为上面很多词语都是人发出的,萧炎是一个人名,其次弟子,长老,纳兰,跟其萧炎很有关系,说明该模型是有一定效果的。
数据集我会上传到我的资源,想运行代码的可以下载数据集。

本文来自互联网用户投稿,该文观点仅代表作者本人,不代表本站立场。本站仅提供信息存储空间服务,不拥有所有权,不承担相关法律责任。如若转载,请注明出处:http://www.coloradmin.cn/o/1032591.html

如若内容造成侵权/违法违规/事实不符,请联系多彩编程网进行投诉反馈,一经查实,立即删除!

相关文章

从零开始的 MyBatis 拦截器之旅:实战经验分享

文章目录 MyBatis拦截器可以做什么&#xff1f;Mybatis核心对象介绍四大核心对象如何实现&#xff1f;接口讲解Interceptor接口intercept方法plugin方法setProperties 完整SQL打印拦截器实战拦截器实现拦截器注册 MyBatis拦截器可以做什么&#xff1f; MyBatis拦截器是MyBatis…

某手新版本sig3参数算法还原

Frida Native层主动调用 1 2 3 4 5 6 7 8 9 10 11 12 13 14 15 16 17 18 19 20 21 22 23 24 25 26 27 28 29 30 31 32 33 34 35 36 37 38 39 40 41 42 43 44 45 46 47 48 49 50 51 52 53 54 55 56 57 58 59 60 61 62 63 64 65 66 67 68 69 70 71 72 73 74 75 76 77 78 79 80 81…

#循循渐进学51单片机#指针基础与1602液晶的初步认识#not.11

1、把本节课的指针相关内容&#xff0c;反复学习3到5遍&#xff0c;彻底弄懂指针是怎么回事&#xff0c;即使是死记硬背也要记住&#xff0c;等到后边用的时候可以实现顿悟。学会指针&#xff0c;就是突破了C语言的一道壁垒。 2&#xff0c;1602所有的指令功能都应用一遍&#…

内网穿透,轻松实现PostgreSQL数据库公网远程连接!

文章目录 前言1. 安装postgreSQL2. 本地连接postgreSQL3. Windows 安装 cpolar4. 配置postgreSQL公网地址5. 公网postgreSQL访问6. 固定连接公网地址7. postgreSQL固定地址连接测试 前言 PostgreSQL是一个功能非常强大的关系型数据库管理系统&#xff08;RDBMS&#xff09;,下…

外汇天眼:CFTC处罚Advantage Futures 39.5万美元

美国商品期货交易委员会&#xff08;CFTC&#xff09;对Advantage Futures处以39.5万美元罚款&#xff0c;原因是其监管不力。 CFTC今天发布了一项命令&#xff0c;同时提起并解决了对Advantage Futures LLC的指控&#xff0c;这是一家注册的期货佣金经纪商&#xff0c;因未能…

Linux命令基础

一、linux目录结构。 Linux没有windows的盘的概念&#xff0c;是一个树形的结构。唯一的根目录为/&#xff0c;所有的文件都在他下面。 描述方式也与windows有所不同 二、命令基础格式。 command [-options] [parameter]&#xff08;[ ]表示可选的&#xff09; command:必…

智思Ai企联系统去授权版本+uniapp前后端(内含教程)

智思AI企联系统是一款企业级AI系统&#xff0c;与普通版AI产品相比具备显著差异。该系统允许企业按需选择和定制二开任意功能&#xff0c;以满足不同企业的个性化需求和场景要求。企业可以根据实际业务需求扩展和改进系统功能模块&#xff0c;使之更好地适应企业独特需求。

ESP8266 WiFi物联网智能插座—电能计量

目录 1、芯片功能 2、性能指标 3、寄存器说明 4、UART通信协议 4.1、写操作帧格式和时序 4.2、读操作帧格式和时序 4.3、读取全电参数数据包 4.4、配置波特率 4.5、UART保护机制 5、功能说明 5.1、电流电压瞬态波形计量 5.2、有功功率 5.3、有功功率防潜动 5.4、电能计量 5.5、…

【C++】静态成员变量 ( 静态成员变量概念 | 静态成员变量声明 | 静态成员变量初始化 | 静态成员变量访问 | 静态成员变量生命周期 )

文章目录 一、静态成员变量概念1、静态成员变量引入2、静态成员变量声明3、静态成员变量初始化4、静态成员变量访问5、静态成员变量生命周期 二、完整代码示例 一、静态成员变量概念 1、静态成员变量引入 在 C 类中 , 静态成员变量 又称为 静态属性 ; 静态成员归属 : 静态成员…

一百八十二、大数据离线数仓——离线数仓从Kafka采集、最终把结果数据同步到ClickHouse的完整数仓流程(待续)

一、目的 经过6个月的奋斗&#xff0c;项目的离线数仓部分终于可以上线了&#xff0c;因此整理一下离线数仓的整个流程&#xff0c;既是大家提供一个案例经验&#xff0c;也是对自己近半年的工作进行一个总结。 二、项目背景 项目行业属于交通行业&#xff0c;因此数据具有很…

please choose a certificate and try again.(-5)报错怎么解决

the server you want to connect to requests identification,please choose a certificate and try again.(-5)

英语——分享篇——每日100词——301-400

straight——str街道(熟词street)aight八(形似eight)——街道上的八条路是笔直的 valley——v维生素(编码)all所有(熟词)ey鳄鱼(拼音)——维生素被所有的鳄鱼在山谷里吃掉了 deer——d狗(编码)ee眼睛(象形)r小草(编码)——狗眼睛看着小草变成一只鹿 goose——goo900(象形)se色(…

git:二、git的本地配置+工作区域和文件状态+git add/commit/log +git reset回退版本

git的使用方式 命令行&#xff08;最常用&#xff09;图形化界面IDE插件/拓展&#xff08;次常用&#xff09; git的本地/系统配置 之前的文章提到过git的全局配置。如下&#xff1a; git config --global user.name "ss" git config --global user.email "…

[杂谈]-八进制数

八进制数 文章目录 八进制数1、概述2、八进制数的表示2.1 八进制数2.2 以八进制计数2.3 二进制数补零 3、八进制到十进制转换4、十进制到八进制转换5、二进制到八进制转换示例6、八进制到二进制和十进制转换示例7、总结 1、概述 八进制编号系统是另一种使用基数为8计数系统&am…

医疗革命的关键推手,看AIGC弥合医疗差距的未来之路

随着科技的飞速进步&#xff0c;医疗水平在过去几十年里取得了巨大的突破。这些科技创新不仅改变了我们对健康和医疗的认知&#xff0c;也深刻地塑造了社会的现状。其中&#xff0c;人工智能作为医疗领域的一项前沿技术&#xff0c;正以前所未有的方式影响着我们的生活。它不仅…

CUDA和cuDNN的安装

参考资料&#xff1a;https://zhuanlan.zhihu.com/p/83971195 目录 CUDA和cuDNN介绍安装验证 CUDA和cuDNN介绍 CUDA(ComputeUnified Device Architecture)&#xff0c;是显卡厂商NVIDIA推出的运算平台。 CUDA是一种由NVIDIA推出的通用并行计算架构&#xff0c;该架构使GPU能够…

python-docx办公自动化批量生成离职证明

关注公众号&#xff1a;Python Lab 首先&#xff0c;在网络找到这样一份模板内容&#xff0c;可以根据这么模板进行排版 这是存放在Excel中的数据&#xff0c;根据数据遍历其中的内容&#xff0c;写入word当中 完整代码实现 from docx import Document import pandas as pd …

sqlmap tamper脚本编写

文章目录 tamper脚本是什么&#xff1f;指定tamper脚本运行sqlmap安全狗绕过tamper脚本 tamper脚本是什么&#xff1f; SQLMap 是一款SQL注入神器&#xff0c;可以通过tamper 对注入payload 进行编码和变形&#xff0c;以达到绕过某些限制的目的。但是有些时候&#xff0c;SQLM…

SLAM从入门到精通(参数处理)

【 声明&#xff1a;版权所有&#xff0c;欢迎转载&#xff0c;请勿用于商业用途。 联系信箱&#xff1a;feixiaoxing 163.com】 在编写ros程序的过程中&#xff0c;很多时候需要不停修改程序的参数。比如说&#xff0c;我们有一个配置文件。在程序还没有运行之前&#xff0c;我…

实至名归!优维科技荣膺NIISA联盟2022年度双项技术创新奖

日前&#xff0c;国家互联网数据中心产业技术创新战略联盟&#xff08;以下简称&#xff1a;NIISA联盟&#xff09;2022年度技术创新奖评选结果公布&#xff01;经过激烈角逐&#xff0c;优维科技脱颖而出&#xff0c;荣膺双项大奖&#xff01; “EasyCore—CMDB超融合数据库”…