Vuex
getters配置项
*Count.vue
<template>
	<div>
		<h1>当前求和为:{{$store.state.sum}}</h1>
		<h3>当前求和的10倍为:{{$store.getters.bigSum}}</h3>
		<select v-model.number="n">
			<option value="1">1</option>
			<option value="2">2</option>
			<option value="3">3</option>
		</select>
		<button @click="increment">+</button>
		<button @click="decrement">-</button>
		<button @click="incrementOdd">当前求和为奇数再加</button>
		<button @click="incrementWait">等一等再加</button>
	</div>
</template>

<script>
	export default {
		name:'Count',
		data() {
			return {
				n:1, //用户选择的数字
			}
		},
		methods: {
			increment(){
				this.$store.commit('ADD',this.n)
			},
			decrement(){
				this.$store.commit('SUBTRACT',this.n)
			},
			incrementOdd(){
				this.$store.dispatch('addOdd',this.n)
			},
			incrementWait(){
				this.$store.dispatch('addWait',this.n)
			},
		},
	}
</script>

<style>
	button{
		margin-left: 5px;
	}
</style>
index.js
//引入Vue核心库
import Vue from 'vue'
//引入Vuex
import Vuex from 'vuex'
//应用Vuex插件
Vue.use(Vuex)

//准备actions对象——响应组件中用户的动作
const actions = {
    addOdd(context,value){
        console.log("actions中的addOdd被调用了")
        if(context.state.sum % 2){
            context.commit('ADD',value)
        }
    },
    addWait(context,value){
        console.log("actions中的addWait被调用了")
        setTimeout(()=>{
			context.commit('ADD',value)
		},500)
    },
}
//准备mutations对象——修改state中的数据
const mutations = {
    ADD(state,value){
        state.sum += value
    },
    SUBTRACT(state,value){
        state.sum -= value
    }
}
//准备state对象——保存具体的数据
const state = {
    sum:0 //当前的和
}
//准备getters对象——用于将state中的数据进行加工
const getters = {
    bigSum(){
        return state.sum * 10
    }
}

//创建并暴露store
export default new Vuex.Store({
    actions,
    mutations,
    state,
    getters
})
getters配置项的使用:
-
概念:当state中的数据需要经过加工后再使用时,可以使用getters加工
-
在
store.js中追加getters配置
const getters = {
	bigSum(state){
		return state.sum * 10
	}
}

//创建并暴露store
export default new Vuex.Store({
	...
	getters
})
- 组件中读取数据:
$store.getters.bigSum
四个map方法的使用
mapState与mapGetters
index.js
//引入Vue核心库
import Vue from 'vue'
//引入Vuex
import Vuex from 'vuex'
//应用Vuex插件
Vue.use(Vuex)

//准备actions对象——响应组件中用户的动作
const actions = {
    addOdd(context,value){
        console.log("actions中的addOdd被调用了")
        if(context.state.sum % 2){
            context.commit('ADD',value)
        }
    },
    addWait(context,value){
        console.log("actions中的addWait被调用了")
        setTimeout(()=>{
			context.commit('ADD',value)
		},500)
    },
}
//准备mutations对象——修改state中的数据
const mutations = {
    ADD(state,value){
        state.sum += value
    },
    SUBTRACT(state,value){
        state.sum -= value
    }
}
//准备state对象——保存具体的数据
const state = {
    sum:0, //当前的和
    name:'JOJO',
    school:'尚硅谷',
}
//准备getters对象——用于将state中的数据进行加工
const getters = {
    bigSum(){
        return state.sum * 10
    }
}

//创建并暴露store
export default new Vuex.Store({
    actions,
    mutations,
    state,
    getters
})
Count.vue
<template>
	<div>
		<h1>当前求和为:{{sum}}</h1>
		<h3>当前求和的10倍为:{{bigSum}}</h3>
		<h3>我是{{name}},我在{{school}}学习</h3>
		<select v-model.number="n">
			<option value="1">1</option>
			<option value="2">2</option>
			<option value="3">3</option>
		</select>
		<button @click="increment">+</button>
		<button @click="decrement">-</button>
		<button @click="incrementOdd">当前求和为奇数再加</button>
		<button @click="incrementWait">等一等再加</button>
	</div>
</template>

<script>
	import {mapState,mapGetters} from 'vuex'

	export default {
		name:'Count',
		data() {
			return {
				n:1, //用户选择的数字
			}
		},
		methods: {
			increment(){
				this.$store.commit('ADD',this.n)
			},
			decrement(){
				this.$store.commit('SUBTRACT',this.n)
			},
			incrementOdd(){
				this.$store.dispatch('addOdd',this.n)
			},
			incrementWait(){
				this.$store.dispatch('addWait',this.n)
			},
		},
		computed:{
			// 借助mapState生成计算属性(数组写法)
			// ...mapState(['sum','school','name']),
			// 借助mapState生成计算属性(对象写法)
			...mapState({sum:'sum',school:'school',name:'name'}),

			...mapGetters(['bigSum'])
		}
	}
</script>

<style>
	button{
		margin-left: 5px;
	}
</style>
mapState方法:用于帮助我们映射state中的数据
computed: {
    //借助mapState生成计算属性:sum、school、subject(对象写法)
     ...mapState({sum:'sum',school:'school',subject:'subject'}),

    //借助mapState生成计算属性:sum、school、subject(数组写法)
    ...mapState(['sum','school','subject']),
},
mapGetters方法:用于帮助我们映射getters中的数据
computed: {
    //借助mapGetters生成计算属性:bigSum(对象写法)
    ...mapGetters({bigSum:'bigSum'}),

    //借助mapGetters生成计算属性:bigSum(数组写法)
    ...mapGetters(['bigSum'])
},
mapActions与mapMutations
Count.vue
<template>
	<div>
		<h1>当前求和为:{{sum}}</h1>
		<h3>当前求和的10倍为:{{bigSum}}</h3>
		<h3>我是{{name}},我在{{school}}学习</h3>
		<select v-model.number="n">
			<option value="1">1</option>
			<option value="2">2</option>
			<option value="3">3</option>
		</select>
		<button @click="increment(n)">+</button>
		<button @click="decrement(n)">-</button>
		<button @click="incrementOdd(n)">当前求和为奇数再加</button>
		<button @click="incrementWait(n)">等一等再加</button>
	</div>
</template>

<script>
	import {mapState,mapGetters,mapMutations,mapActions} from 'vuex'

	export default {
		name:'Count',
		data() {
			return {
				n:1, //用户选择的数字
			}
		},
		methods: {
			// 借助mapActions生成:increment、decrement(对象形式)
			...mapMutations({increment:'ADD',decrement:'SUBTRACT'}),

			// 借助mapActions生成:incrementOdd、incrementWait(对象形式)
			...mapActions({incrementOdd:'addOdd',incrementWait:'addWait'})
		},
		computed:{
			// 借助mapState生成计算属性(数组写法)
			// ...mapState(['sum','school','name']),
			// 借助mapState生成计算属性(对象写法)
			...mapState({sum:'sum',school:'school',name:'name'}),

			...mapGetters(['bigSum'])
		}
	}
</script>

<style>
	button{
		margin-left: 5px;
	}
</style>
mapActions方法:用于帮助我们生成与actions对话的方法,即:包含$store.dispatch(xxx)的函数
methods:{
    //靠mapActions生成:incrementOdd、incrementWait(对象形式)
    ...mapActions({incrementOdd:'jiaOdd',incrementWait:'jiaWait'})

    //靠mapActions生成:incrementOdd、incrementWait(数组形式)
    ...mapActions(['jiaOdd','jiaWait'])
}
mapMutations方法:用于帮助我们生成与mutations对话的方法,即:包含$store.commit(xxx)的函数
=
备注:mapActions与mapMutations使用时,若需要传递参数,则需要在模板中绑定事件时传递好参数,否则参数是事件对象
vue-router路由
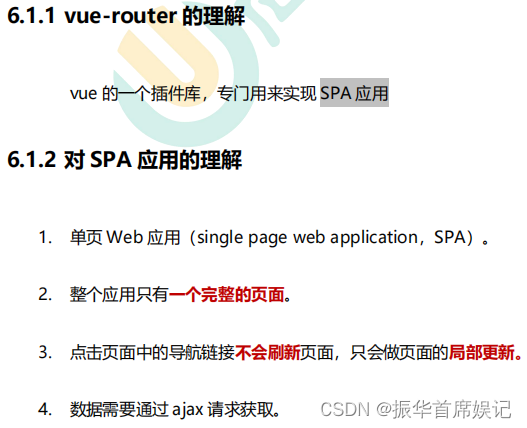
下载vue-router:npm i vue-router
基本路由
- 安装vue-router,命令:npm i vue-router
- 应用插件:Vue.use(VueRouter)
- 编写router配置项:
//引入VueRouter
import VueRouter from 'vue-router'
//引入Luyou 组件
import About from '../components/About' import Home from '../components/Home'

//创建router实例对象,去管理一组一组的路由规则
const router = new VueRouter({
routes:[
{
path:'/about',
component:About
},
{
path:'/home',
component:Home
}
]
})
//暴露router export default router
实现切换(active-class可配置高亮样式):
<router-link active-class="active" to="/about">About</router-link> 1 指定展示位:<router-view></router-view>
嵌套路由
- 配置路由规则,使用children配置项:
routes:[
	{
		path:'/about',
		component:About,
	},
	{
		path:'/home',
		component:Home,
		children:[ //通过children配置子级路由
			{
				path:'news', //此处一定不要写:/news
				component:News
			},
			{
				path:'message', //此处一定不要写:/message
				component:Message
			}
		]
	}
]
- 跳转(要写完整路径):News
路由的query参数
- 传递参数:
<!-- 跳转并携带query参数,to的字符串写法 -->
<router-link :to="/home/message/detail?id=666&title=你好">跳转</router-link>

<!-- 跳转并携带query参数,to的对象写法 -->
<router-link :to="{
	path:'/home/message/detail',
	query:{
		id:666,
        title:'你好'
	}
}">跳转</router-link>
- 接收参数:
$route.query.id
$route.query.title
命名路由
- 作用:可以简化路由的跳转
- 给路由命名:
{
	path:'/demo',
	component:Demo,
	children:[
		{
			path:'test',
			component:Test,
			children:[
				{
                    name:'hello' //给路由命名
					path:'welcome',
					component:Hello,
				}
			]
		}
	]
}
- 简化跳转:
<!--简化前,需要写完整的路径 -->
<router-link to="/demo/test/welcome">跳转</router-link>

<!--简化后,直接通过名字跳转 -->
<router-link :to="{name:'hello'}">跳转</router-link>

<!--简化写法配合传递参数 -->
<router-link
	:to="{
		name:'hello',
		query:{
		    id:666,
            title:'你好'
		}
	}"
>跳转</router-link>
路由的params参数
- 配置路由,声明接收params参数:
{
	path:'/home',
	component:Home,
	children:[
		{
			path:'news',
			component:News
		},
		{
			component:Message,
			children:[
				{
					name:'xiangqing',
					path:'detail/:id/:title', //使用占位符声明接收params参数
					component:Detail
				}
			]
		}
	]
}
- 传递参数:
<!-- 跳转并携带params参数,to的字符串写法 -->
<router-link :to="/home/message/detail/666/你好">跳转</router-link>

<!-- 跳转并携带params参数,to的对象写法 -->
<router-link
	:to="{
		name:'xiangqing',
		params:{
		   id:666,
            title:'你好'
		}
	}"

>跳转</router-link>
特别注意:路由携带params参数时,若使用to的对象写法,则不能使用path配置项,必须使用name配置!
- 接收参数:
$route.params.id
$route.params.title
路由的props配置
作用:让路由组件更方便的收到参数
{
	name:'xiangqing',
	path:'detail/:id',
	component:Detail,

	//第一种写法:props值为对象,该对象中所有的key-value的组合最终都会通过props传给Detail组件
	// props:{a:900}

	//第二种写法:props值为布尔值,布尔值为true,则把路由收到的所有params参数通过props传给Detail组件
	// props:true

	//第三种写法:props值为函数,该函数返回的对象中每一组key-value都会通过props传给Detail组件
	props(route){
		return {
			id:route.query.id,
			title:route.query.title
		}
	}
}
路由跳转的replace方法
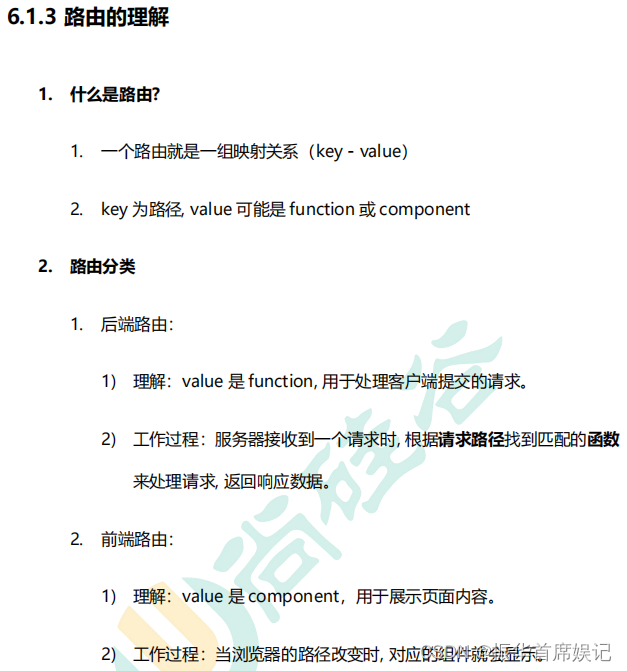
- 作用:控制路由跳转时操作浏览器历史记录的模式
- 浏览器的历史记录有两种写入方式:push和replace,其中push是追加历史记录,replace是替换当前记录。路由跳转时候默认为push方式
开启replace模式:<router-link replace …>News
编程式路由导航
作用:不借助实现路由跳转,让路由跳转更加灵活
具体编码:
this.$router.push({
	name:'xiangqing',
    params:{
        id:xxx,
        title:xxx
    }
})

this.$router.replace({
	name:'xiangqing',
    params:{
        id:xxx,
        title:xxx
    }
})
this.$router.forward() //前进
this.$router.back() //后退
this.$router.go() //可前进也可后退
缓存路由组件
作用:让不展示的路由组件保持挂载,不被销毁
具体编码:
//缓存一个路由组件
<keep-alive include="News"> //include中写想要缓存的组件名,不写表示全部缓存
    <router-view></router-view>
</keep-alive>

//缓存多个路由组件
<keep-alive :include="['News','Message']">
    <router-view></router-view>
</keep-alive>
activated和deactivated
activated和deactivated是路由组件所独有的两个钩子,用于捕获路由组件的激活状态
具体使用:
activated路由组件被激活时触发
deactivated路由组件失活时触发
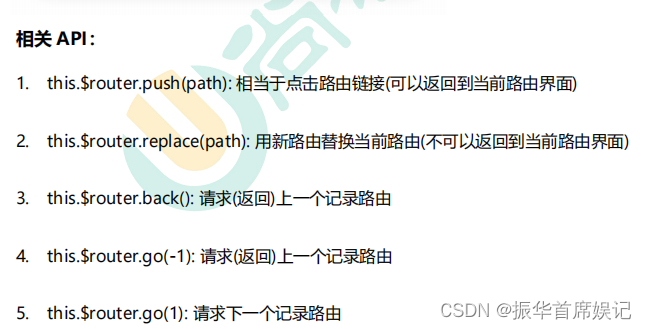
UI组件库
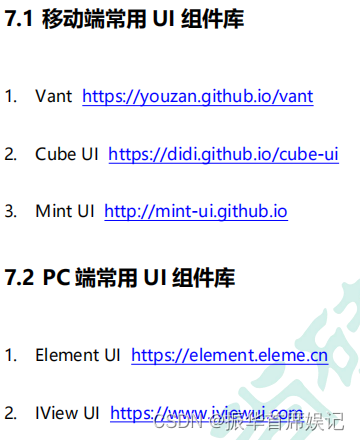
安装 element-ui:npm i element-ui -S
main.js:
import Vue from 'vue'
import App from './App.vue'
//引入ElementUI组件库
import ElementUI from 'element-ui';
//引入ElementUI全部样式
import 'element-ui/lib/theme-chalk/index.css';

Vue.config.productionTip = false
//使用ElementUI
Vue.use(ElementUI)

new Vue({
    el:"#app",
    render: h => h(App),
})
安装 babel-plugin-component:npm install babel-plugin-component -D
修改 babel-config-js:
module.exports = {
  presets: [
    '@vue/cli-plugin-babel/preset',
    ["@babel/preset-env", { "modules": false }]
  ],
  plugins: [
    [
      "component",
      {
        "libraryName": "element-ui",
        "styleLibraryName": "theme-chalk"
      }
    ]
  ]
}


![C++之vector元素访问函数operator[]、at、front、back、data总结(二百零三)](https://img-blog.csdnimg.cn/20190106163945739.jpg#pic_center)
