基本概念
Fragment是Android3.0后引入的一个新的API,他出现的初衷是为了适应大屏幕的平板电脑, 普通手机开发也会加入这个Fragment, 可以把他看成一个小型的Activity,又称Activity片段!
如果一个很大的界面,就一个布局,写起界面会很麻烦,而且如果组件多的话是管理起来也很麻烦!而使用Fragment 我们可以把屏幕划分成几块,然后进行分组,进行一个模块化的管理!从而可以更加方便的在 运行过程中动态地更新Activity的用户界面!
另外Fragment并不能单独使用,他需要嵌套在Activity 中使用,尽管他拥有自己的生命周期,但是还是会受到宿主Activity的生命周期的影响,比如Activity 被destory销毁了,他也会跟着销毁!
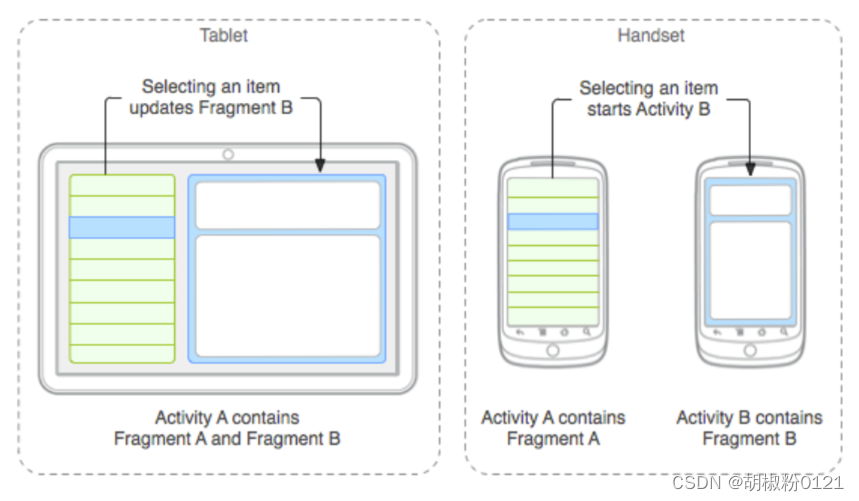
下图是文档中给出的一个Fragment分别对应手机与平板间不同情况的处理图:
PS: 简单的新闻浏览页面,使用两个Fragment分别显示新闻列表与新闻内容
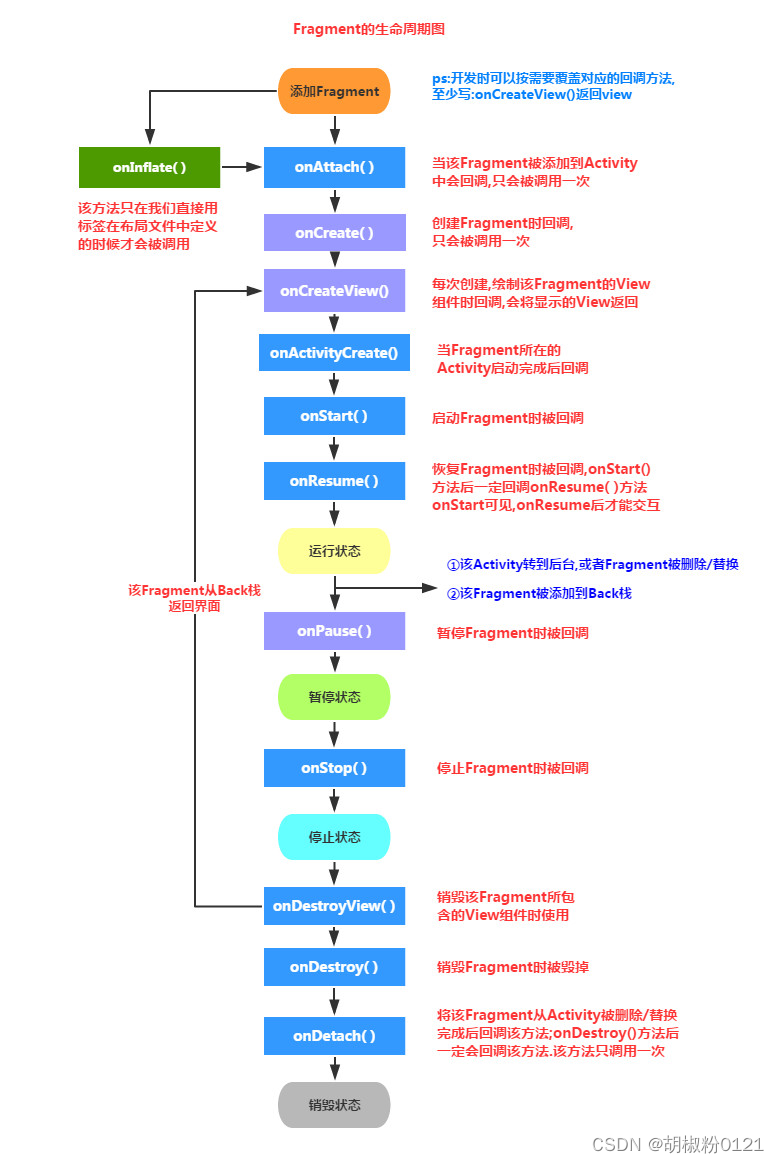
Fragment的生命周期图
使用Fragment的一些要点
Fragment需要嵌套在Activity中使用,当然也可以嵌套到另外一个Fragment中,但这个被嵌套 的Fragment也是需要嵌套在Activity中的,间接地说,Fragment还是需要嵌套在Activity中!! 受寄主Activity的生命周期影响,当然他也有自己的生命周期!另外不建议在Fragment里面 嵌套Fragment因为嵌套在里面的Fragment生命周期不可控!!!
官方文档说创建Fragment时至少需要实现三个方法:onCreate( ),onCreateView( ),OnPause( ); 不过貌似只写一个onCreateView也是可以的
Fragment的生命周期和Activity有点类似:三种状态:
Resumed:在允许中的Fragment可见
Paused:所在Activity可见,但是得不到焦点
Stoped: ①调用addToBackStack(),Fragment被添加到Bcak栈 ②该Activity转向后台,或者该Fragment被替换/删除
ps:停止状态的fragment仍然活着(所有状态和成员信息被系统保持着),然而,它对用户 不再可见,并且如果activity被干掉,他也会被干掉.
Fragment的几个子类
ps:很多时候我们都是直接重写Fragment,inflate加载布局完成相应业务了,子类用的不多,等需要的 时候在深入研究!
- 对话框:DialogFragment
- 列表:ListFragment
- 选项设置:PreferenceFragment
- WebView界面:WebViewFragment
使用哪个包下的Fragment
相信很多朋友在使用Fragment的时候都会遇到下面这种情况:
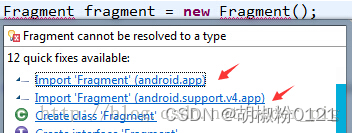
那么我们到底是使用android.app下的Fragment还是用的android.support.v4.app包下 的Fragment呢?
其实都可以,前面说过Fragment是Android 3.0(API 11)后引入的,那么如果开发的app需要 在3.0以下的版本运行呢?比如还有一点点市场份额的2.3!于是乎,v4包就这样应运而生了, 而最低可以兼容到1.6版本!至于使用哪个包看你的需求了,现在3.0下手机市场份额其实已经不多了,随街都是4.0以上的,6.0十月份都出了,你说呢...所以这个时候,你可以直接使用app包下的Fragment 然后调用相关的方法,通常都是不会有什么问题的;如果你Fragment用了app包的, FragmentManager和FragmentTransaction都需要是app包的!要么用全部用app,要么全部用v4, 不然可是会报错的哦!当然如果你要自己的app对于低版本的手机也兼容的话,那么就可以选择用v4包!
使用v4包下Fragment要注意的地方
如果你使用了v4包下的Fragment,那么所在的那个Activity就要继承FragmentActivity哦! 案例:今天在xml文件中静态地载入fragment,然后重写了Fragment,但是在加载Activity的时候就报错了, 大概的提示就是Fragment错误还是找不到什么的,name属性改了几次还是错!最后才发现是用了 v4的包的缘故,只需让自己的Activity改成FragmentActivity即可!
之前写了下面这段代码,然后报错:

有点莫名其妙啊,Fragment,FragmentManager,FragmentTransaction都是用的v4包啊, Activity也是继承FragmentActivity的啊?都改成app包就可以了,但是这不和我们用v4包的 前提冲突了么?其实也是有解决方法的哈?
只需要把getFragmentManager( )改成getSupportFragmentManager( )就可以了
创建一个Fragment
静态加载Fragment
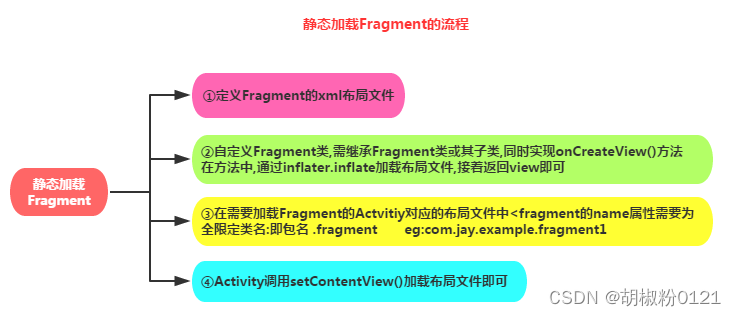
定义Fragment的布局,就是fragment显示的内容
自定义一个Fragment类,需要继承Fragment或者他的子类,重写onCreateView()方法 在该方法中调用:inflater.inflate()方法加载Fragment的布局文件,接着返回加载的view对象
步骤一: 首先在MainActivity中绑定布局文件, 并且点击布局文件中的文字
public class MainActivitys extends AppCompatActivity {
    @Override
    protected void onCreate(Bundle savedInstanceState) {
        super.onCreate(savedInstanceState);
        setContentView(R.layout.activity_main);

        //find views on onclick event
        findViewById(R.id.main_textView).setOnClickListener(v -> {
            // static load fragment.
            startActivity(new Intent(MainActivitys.this, StaticLoadFragmentActivity.class));
        });
    }
}
<?xml version="1.0" encoding="utf-8"?>
<LinearLayout
xmlns:android="http://schemas.android.com/apk/res/android"
xmlns:tools="http://schemas.android.com/tools"
android:layout_width="match_parent"
android:layout_height="match_parent"
android:orientation="vertical"
tools:context=".MainActivity2">
<TextView
android:id="@+id/main_textView"
android:layout_width="wrap_content"
android:layout_height="100dp"
android:gravity="center"
android:text="static load fragment"
android:layout_marginBottom="@android:dimen/thumbnail_width"
android:layout_marginLeft="@android:dimen/thumbnail_height"
android:layout_marginTop="@android:dimen/thumbnail_height" />
</LinearLayout>步骤二: 再点击activety_main中的文字的时候加载StaticLoadFragmentActivity
public class StaticLoadFragmentActivity extends AppCompatActivity {
    @Override
    protected void onCreate(@Nullable Bundle savedInstanceState) {
        super.onCreate(savedInstanceState);
        setContentView(R.layout.activity_static_load_fragment);
    }
}
在对应的布局文件activity_static_load_fragment, 导入真正要加载的那个fragment
<?xml version="1.0" encoding="utf-8"?>
<LinearLayout
    xmlns:android="http://schemas.android.com/apk/res/android"
    xmlns:tools="http://schemas.android.com/tools"
    android:layout_width="match_parent"
    android:layout_height="match_parent"
    android:orientation="vertical"
    tools:context=".MainActivity">

    <fragment
        android:id="@+id/listFragment"
        android:name="com.example.testapplication.ListFragments"
        android:layout_width="300dp"
        android:layout_height="200dp" />

    <!-还可以添加很多fragment-->

</LinearLayout>
步骤三: 创建需要加载的fragment
public class ListFragments extends Fragment {

    // 创建视图
    @Nullable
    @Override
    public View onCreateView(LayoutInflater inflater, @Nullable ViewGroup container, @Nullable Bundle savedInstanceState) {
        View view = inflater.inflate(R.layout.fragment_test, container, false);

        TextView textView = view.findViewById(R.id.textView);

        textView.setText("Fragment test");

        return view;
    }
}
<?xml version="1.0" encoding="utf-8"?>
<RelativeLayout
xmlns:android="http://schemas.android.com/apk/res/android"
android:layout_width="match_parent"
android:layout_height="match_parent"
android:background="@color/cardview_dark_background">
<TextView
android:id="@+id/textView"
android:layout_width="wrap_content"
android:layout_height="wrap_content"
android:layout_centerInParent="true"
android:textColor="#FFFFFF"
android:textSize="20sp"
android:text="TextView" />
</RelativeLayout>动态加载Fragment
动态加载Fragment的好处是加载比较灵活, 可以加任何的判断加什么fragment, 在哪里添加fragment
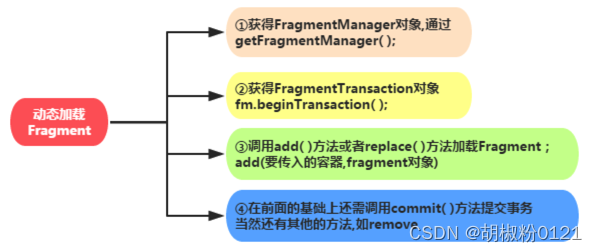
步骤一: 在activity_main中创建container, 如下面代码中过的listContainer和detailContainer
<?xml version="1.0" encoding="utf-8"?>
<LinearLayout
    xmlns:android="http://schemas.android.com/apk/res/android"
    xmlns:tools="http://schemas.android.com/tools"
    android:layout_width="match_parent"
    android:layout_height="match_parent"
    android:orientation="vertical"
    tools:context=".MainActivity2">

    <TextView
        android:id="@+id/main_textView"
        android:layout_width="match_parent"
        android:layout_height="100dp"
        android:gravity="center"
        android:text="static load fragment" />

    <LinearLayout
        android:orientation="horizontal"
        android:layout_width="match_parent"
        android:layout_height="match_parent">

        <LinearLayout
            android:orientation="horizontal"
            android:id="@+id/listContainer"
            android:layout_width="150dp"
            android:layout_margin="1dp"
            android:layout_height="match_parent">
        </LinearLayout>

        <LinearLayout
            android:orientation="horizontal"
            android:id="@+id/detailContainer"
            android:layout_width="200dp"
            android:layout_margin="1dp"
            android:layout_height="match_parent">
        </LinearLayout>
    </LinearLayout>
</LinearLayout>
步骤二: 创建fragment
public class ListFragments extends Fragment {

    // 创建视图
    @Nullable
    @Override
    public View onCreateView(LayoutInflater inflater, @Nullable ViewGroup container, @Nullable Bundle savedInstanceState) {
        View view = inflater.inflate(R.layout.fragment_test, container, false);
        return view;
    }
}
<?xml version="1.0" encoding="utf-8"?>
<RelativeLayout
xmlns:android="http://schemas.android.com/apk/res/android"
android:layout_width="match_parent"
android:layout_height="match_parent"
android:background="@color/cardview_dark_background">
<TextView
android:id="@+id/textView"
android:layout_width="wrap_content"
android:layout_height="wrap_content"
android:layout_centerInParent="true"
android:textColor="#FFFFFF"
android:textSize="20sp"
android:text="TextView" />
</RelativeLayout>步骤三: 通过FragmentManager将上面创建的fragment添加并且提交
public class MainActivity extends AppCompatActivity {
    @Override
    protected void onCreate(Bundle savedInstanceState) {
        super.onCreate(savedInstanceState);
        setContentView(R.layout.activity_main);

        //find views on onclick event
        findViewById(R.id.main_textView).setOnClickListener(v -> {
            // static load fragment.
            startActivity(new Intent(MainActivity.this, StaticLoadFragmentActivity.class));
        });

        ListFragments listFragment = new ListFragments();
        getSupportFragmentManager()
                .beginTransaction()
                .add(R.id.listContainer, listFragment)
                .commit();

        ListFragments detailFragment = new ListFragments();
        getSupportFragmentManager()
                .beginTransaction()
                .add(R.id.detailContainer, detailFragment)
                .commit();


        // 移除fragment
        getSupportFragmentManager()
                .beginTransaction()
                .remove(detailFragment)
                .commit();


        // 替换fragment
        getSupportFragmentManager()
                .beginTransaction()
                .replace(R.id.detailContainer, listFragment)
                .commit();

    }
}
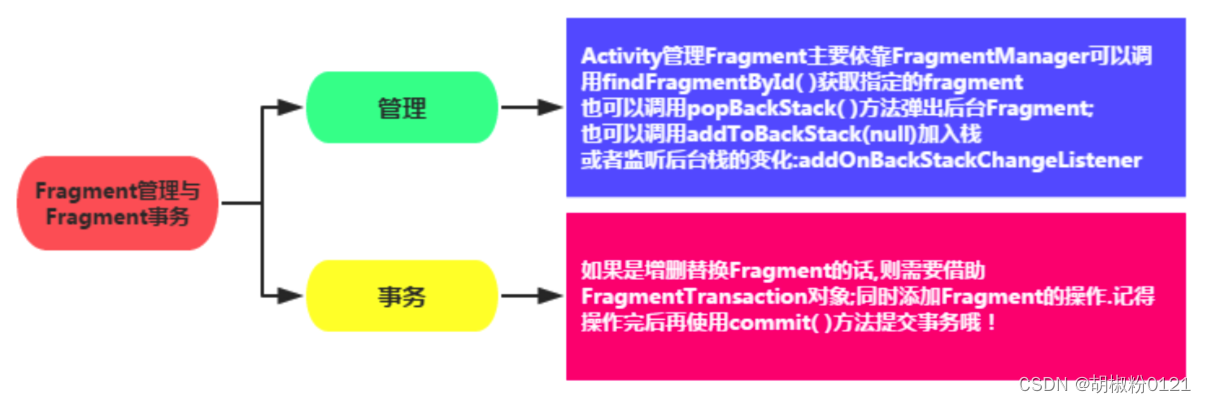
Fragment管理与Fragment事务
Fragment与Activity的交互

Activit传递数据给Fragment
在Activity中创建Bundle数据包,调用Fragment实例的setArguments(bundle) 从而将Bundle数据包传给Fragment,然后Fragment中调用getArguments获得 Bundle对象,然后进行解析就可以了
public class MainActivity extends AppCompatActivity {
    @Override
    protected void onCreate(Bundle savedInstanceState) {
        super.onCreate(savedInstanceState);
        setContentView(R.layout.activity_main);

        //find views on onclick event
        findViewById(R.id.main_textView).setOnClickListener(v -> {
            // static load fragment.
            startActivity(new Intent(MainActivity.this, StaticLoadFragmentActivity.class));
        });

        // activity ---> fragment value
        ListFragments listFragment = ListFragments.newInstance("list");
        getSupportFragmentManager()
                .beginTransaction()
                .add(R.id.listContainer, listFragment)
                .commit();

        ListFragments detailFragment = ListFragments.newInstance("detail");
        getSupportFragmentManager()
                .beginTransaction()
                .add(R.id.detailContainer, detailFragment)
                .commit();

    }
}
public class ListFragments extends Fragment {
public static final String BUNDLE_TITLE = "bundle_title";
private String mTitle = "sky";
public static ListFragments newInstance(String title) {
ListFragments fragments = new ListFragments();
Bundle bundle = new Bundle();
bundle.putString(BUNDLE_TITLE, title);
fragments.setArguments(bundle);
return fragments;
}
// 创建视图
@Nullable
@Override
public View onCreateView(LayoutInflater inflater, @Nullable ViewGroup container, @Nullable Bundle savedInstanceState) {
View view = inflater.inflate(R.layout.fragment_test, container, false);
TextView textView = view.findViewById(R.id.textView);
textView.setText(mTitle);
return view;
}
@Override
public void onCreate(@Nullable Bundle savedInstanceState) {
super.onCreate(savedInstanceState);
// 在生命周期函数onCreate中获取这个参数
if(getArguments() != null){
mTitle = getArguments().getString(BUNDLE_TITLE);
}
}
}如果传递的是一个对象, 那么可以用fragment对象调用需要传递的对象的set方法
private User mUser;

public void setUser(User user) {
    mUser = user;
}

public class User {

}

public static ListFragments newInstance(String title, User user){
    ListFragments fragments = new ListFragments();
    Bundle bundle = new Bundle();
    bundle.putString(BUNDLE_TITLE, title);
    fragments.setArguments(bundle);
    fragments.setUser(user);
    return fragments;
}
Fragment传递数据给Activity
在Fragment中定义一个内部回调接口,再让包含该Fragment的Activity实现该回调接口, Fragment就可以通过回调接口传数据了
步骤一: Fragment中定义一个回调接口并且接口回调
public class ListFragments extends Fragment {
    public  static final String BUNDLE_TITLE = "bundle_title";
    private String mTitle = "sky";

    public static ListFragments newInstance(String title) {
        ListFragments fragments = new ListFragments();
        Bundle bundle = new Bundle();
        bundle.putString(BUNDLE_TITLE, title);
        fragments.setArguments(bundle);
        return fragments;
    }

    // 创建视图
    @Nullable
    @Override
    public View onCreateView(LayoutInflater inflater, @Nullable ViewGroup container, @Nullable Bundle savedInstanceState) {
        View view = inflater.inflate(R.layout.fragment_test, container, false);

        TextView textView = view.findViewById(R.id.textView);
        textView.setText(mTitle);


        // 点击textView, 调用回调方法
        textView.setOnClickListener(v -> {
            if(mOnTitleClickListener != null){
                mOnTitleClickListener.onClick(mTitle);
            }
        });

        return view;
    }

    @Override
    public void onCreate(@Nullable Bundle savedInstanceState) {
        super.onCreate(savedInstanceState);

        // 在生命周期函数onCreate中获取这个参数
        if(getArguments() != null){
            mTitle = getArguments().getString(BUNDLE_TITLE);
        }
    }

    // 设置接口的方法
    public void setOnTitleClickListener(OnTitleClickListener onTitleClickListener) {
        mOnTitleClickListener = onTitleClickListener;
    }

    // 定义变量
    private OnTitleClickListener mOnTitleClickListener;

    // 定义接口
    public interface OnTitleClickListener{
        void onClick(String title);
    }
}步骤二:Activity中使用接口回调方法读数据
public class MainActivity extends AppCompatActivity {
    @Override
    protected void onCreate(Bundle savedInstanceState) {
        super.onCreate(savedInstanceState);
        setContentView(R.layout.activity_main);

        //find views on onclick event
        findViewById(R.id.main_textView).setOnClickListener(v -> {
            // static load fragment.
            startActivity(new Intent(MainActivity.this, StaticLoadFragmentActivity.class));
        });

        // activity ---> fragment value
        ListFragments listFragment = ListFragments.newInstance("list");
        getSupportFragmentManager()
                .beginTransaction()
                .add(R.id.listContainer, listFragment)
                .commit();

        // fragment value ---> activity
        listFragment.setOnTitleClickListener(this::onClick);

        ListFragments detailFragment = ListFragments.newInstance("detail");
        getSupportFragmentManager()
                .beginTransaction()
                .add(R.id.detailContainer, detailFragment)
                .commit();

        // fragment value ---> activity
        detailFragment.setOnTitleClickListener(this::onClick);

    }

    public void onClick(String title) {
        setTitle(title); // 设置activity的标题
    }
}
总结下方法
在Fragment定义一个接口,接口中定义抽象方法,你要传什么类型的数据参数就设置为什么类型;
接着还有写一个调用接口中的抽象方法,把要传递的数据传过去
再接着就是Activity了,调用Fragment提供的那个方法,然后重写抽象方法的时候进行数据 的读取就可以了!
Fragment与Fragment之间的数据互传
找到要接受数据的fragment对象,直接调用setArguments传数据进去就可以了 通常的话是replace时,即fragment跳转的时候传数据的,那么只需要在初始化要跳转的Fragment 后调用他的setArguments方法传入数据即可!
如果是两个Fragment需要即时传数据,而非跳转的话,就需要先在Activity获得f1传过来的数据, 再传到f2了,就是以Activity为媒介~
FragmentManager fManager = getSupportFragmentManager( );
FragmentTransaction fTransaction = fManager.beginTransaction();
Fragmentthree t1 = new Fragmentthree();
Fragmenttwo t2 = new Fragmenttwo();
Bundle bundle = new Bundle();
bundle.putString("key",id);
t2.setArguments(bundle);
fTransaction.add(R.id.fragmentRoot, t2, "~~~");
fTransaction.addToBackStack(t1);
fTransaction.commit(); 