目录
前言
1、 --cluster create 创建集群
2、--cluster check 检查集群
3、--cluster info 查看集群
4、--cluster fix 修复集群
5、--cluster rehard 迁移槽位
6、 --cluster rebalance 平衡集群
7、 --cluster add-node 集群扩容
8、--cluster del-node 集群缩容
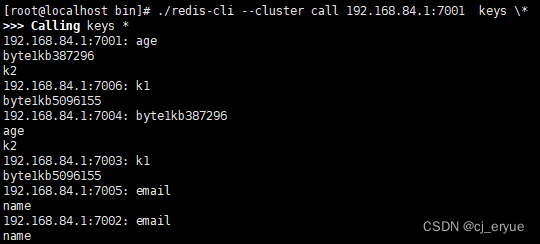
9、 --cluster call 在集群中执行命令
10、--cluster set-timeout 整个集群的cluster-node-timeout时间
11、--cluster import 导入输入至集群
12、--cluster backup 备份集群rdb文件
前言
redis-trib.rb是官方提供的Redis Cluster的管理工具,它提供了集群创建、检查、修复、均衡等命令行工具。Redis Cluster 在5.0之后取消了ruby脚本的支持,而是直接集合到redis-cli里,避免了再安装ruby的相关环境。
[root@localhost bin]# ./redis-cli --cluster help
Cluster Manager Commands:
  create         host1:port1 ... hostN:portN
                 --cluster-replicas <arg>
  check          host:port
                 --cluster-search-multiple-owners
  info           host:port
  fix            host:port
                 --cluster-search-multiple-owners
                 --cluster-fix-with-unreachable-masters
  reshard        host:port
                 --cluster-from <arg>
                 --cluster-to <arg>
                 --cluster-slots <arg>
                 --cluster-yes
                 --cluster-timeout <arg>
                 --cluster-pipeline <arg>
                 --cluster-replace
  rebalance      host:port
                 --cluster-weight <node1=w1...nodeN=wN>
                 --cluster-use-empty-masters
                 --cluster-timeout <arg>
                 --cluster-simulate
                 --cluster-pipeline <arg>
                 --cluster-threshold <arg>
                 --cluster-replace
  add-node       new_host:new_port existing_host:existing_port
                 --cluster-slave
                 --cluster-master-id <arg>
  del-node       host:port node_id
  call           host:port command arg arg .. arg
                 --cluster-only-masters
                 --cluster-only-replicas
  set-timeout    host:port milliseconds
  import         host:port
                 --cluster-from <arg>
                 --cluster-from-user <arg>
                 --cluster-from-pass <arg>
                 --cluster-from-askpass
                 --cluster-copy
                 --cluster-replace
  backup         host:port backup_directory
  help

For check, fix, reshard, del-node, set-timeout you can specify the host and port of any working node in the cluster.

Cluster Manager Options:
  --cluster-yes  Automatic yes to cluster commands prompts
下面我们来详细的说下各命令的用法和作用:
1、 --cluster create 创建集群
create host1:port1 ... hostN:portN
--cluster-replicas <arg>
该命令用来创建集群,假设我现在想搭建三主三从的集群127.0.0.1:7001~7006
启动所有节点后,可通过如下命令进行搭建:
redis-cli --cluster create 127.0.0.1:7001 127.0.0.1:7002 127.0.0.1:7003 127.0.0.1:7004 127.0.0.1:7005 127.0.0.1:7006 --cluster-replicas 1--cluster-replicas 1 :表示每个主节点需要1个从节点。这里随机分配主从关系,如果需要定制,则可以不加该参数,使用add-node来定制,查看第7节
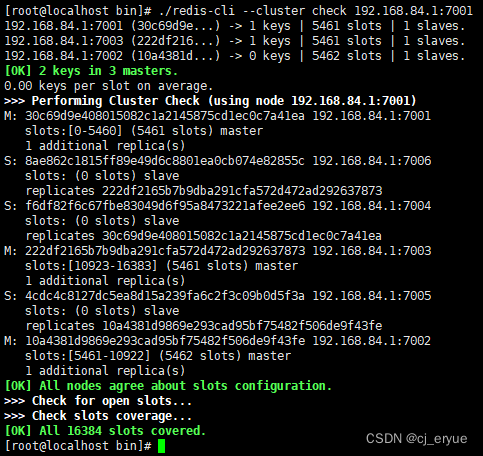
2、--cluster check 检查集群
check host:port
--cluster-search-multiple-owners #检查是否有槽同时被分配给了多个节点
该命令经常使用,需要拥有槽位的所有节点为启动状态,用于检查集群状态是否正常,只有当所有的槽位正常时,集群状态才OK
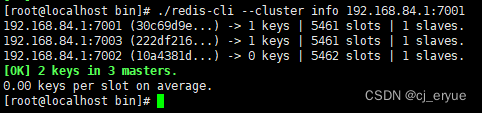
3、--cluster info 查看集群
用于查看集群的简易信息
4、--cluster fix 修复集群
fix host:port
--cluster-search-multiple-owners
--cluster-fix-with-unreachable-masters
该命令十分有用,说明如下:
--cluster-search-multiple-owners : 是否修复多个拥有者的槽位。当集群中的槽位在迁移过程中,出现意外时,使用fix可使用该参数。fix功能,redis内部在槽位的某些异常情况下会交互式的询问操作者是否同意它的修复策略,一般情况下,默认即可。
--cluster-fix-with-unreachable-masters : 是否修复不可达的主节点上的槽位。例如,集群中某个主节点就是坏掉了,也没有故障转移成功。此时如何恢复该主节点上的所有槽位呢,这时就可以使用该参数,会将处于该主节点上的所有槽位恢复到存活的主节点上(之前的数据会丢失,仅仅是恢复了槽位)。
5、--cluster rehard 迁移槽位
reshard host:port
--cluster-from <arg> #槽位来源的节点运行id,多个用,分割,all表示全部节点
--cluster-to <arg> #目标节点的运行id,只允一个
--cluster-slots <arg> #迁移的槽位数
--cluster-yes #是否默认同意集群内部的迁移计划(默认同意就可以)
--cluster-timeout <arg> #迁移命令(migrate)的超时时间
--cluster-pipeline <arg> #迁移key时,一次取出 的key数量,默认10
--cluster-replace #是否直接replace到目标节点
迁移一个或者多个(--cluster-from)节点上的--cluster-slots个槽位至一个目标节点(--cluster-to)上。
--cluster-from 的值不为all的情况下, --cluster-from不能包含--cluster-to
可以使用如下命令查看整个集群中的所有运行id
[root@localhost bin]# ./redis-cli -h 192.168.84.1 -p 7001 cluster nodes
8ae862c1815ff89e49d6c8801ea0cb074e82855c 192.168.84.1:7006@17006 slave 222df2165b7b9dba291cfa572d472ad292637873 0 1694427906290 3 connected
f6df82f6c67fbe83049d6f95a8473221afee2ee6 192.168.84.1:7004@17004 slave 30c69d9e408015082c1a2145875cd1ec0c7a41ea 0 1694427905000 1 connected
222df2165b7b9dba291cfa572d472ad292637873 192.168.84.1:7003@17003 master - 0 1694427904000 3 connected 10923-16383
4cdc4c8127dc5ea8d15a239fa6c2f3c09b0d5f3a 192.168.84.1:7005@17005 slave 10a4381d9869e293cad95bf75482f506de9f43fe 0 1694427905255 2 connected
30c69d9e408015082c1a2145875cd1ec0c7a41ea 192.168.84.1:7001@17001 myself,master - 0 1694427902000 1 connected 0-5460
10a4381d9869e293cad95bf75482f506de9f43fe 192.168.84.1:7002@17002 master - 0 1694427902000 2 connected 5461-10922
通过集群的配置文件查看也可以
6、 --cluster rebalance 平衡集群
rebalance host:port
--cluster-weight <node1=w1...nodeN=wN>
--cluster-use-empty-masters
--cluster-timeout <arg> #迁移命令(migrate)的超时时间
--cluster-simulate # 模拟rebalance操作,不会真正执行迁移操作
--cluster-pipeline <arg> #定义 getkeysinslot命令一次取出的key数量,默认值为10
--cluster-threshold <arg>
--cluster-replace #是否直接replace到目标节点
--cluster-weight: 槽位权重(浮点型)比值,例如(这里使用端口号代替运行id): 7001=1.0,7002=1.0,7003=2.0 则表示,总权重为4.0, 7001和7002将分配到 (16384/4)*1 个槽位,7003则是(16384/4)*2个槽位。
--cluster-threshold: 平衡触发的阈值条件,默认为2.00%。例如上一步,7001和7002应该有4096个槽位,如果7001的槽位数不够4096个,且超过 (4096*0.02 约等于)82个及以上;或者7001的槽位数比4096少于82个及以上,则会触发自平衡。
7、 --cluster add-node 集群扩容
add-node new_host:new_port #新加入集群的ip和port
existing_host:existing_port #集群中任一节点的ip和port
--cluster-slave #新节点作为从节点,默认随机一个主节点
--cluster-master-id <arg> #给新节点指定主节点,值为节点的运行id
可用于向集群中添加主、从节点(即扩容)
假设我现在集群中有7001 7002 7003三个主节点了,想为7001添加一个从节点127.0.0.1:7006,则可执行如下命令:
redis-cli --cluster add-node 127.0.0.1:7006 127.0.0.1:7001 --cluster-slave --cluster-master-id 30c69d9e408015082c1a2145875cd1ec0c7a41ea不传入--cluster-slave --cluster-master-id 参数,表示添加一个主节点。
当添加的是一个主节点时,此时,该主节点没有任何槽位,可以使用rebalance或者reshard来迁移槽位给它。
8、--cluster del-node 集群缩容
del-node host:port node_id #删除给定的一个节点,成功后关闭该节点服务
也就是缩容。
删除一个主节点要求先迁移走改主节点上的槽位(数据),这时就可以使用reshard命令了。
[root@localhost bin]# ./redis-cli --cluster del-node 192.168.84.1:7002 10a4381d9869e293cad95bf75482f506de9f43fe
>>> Removing node 10a4381d9869e293cad95bf75482f506de9f43fe from cluster 192.168.84.1:7002
[ERR] Node 192.168.84.1:7002 is not empty! Reshard data away and try again.
9、 --cluster call 在集群中执行命令
call host:port command arg arg .. arg #在集群的所有节点执行相关命令
--cluster-only-masters #是否只在主节点上执行
--cluster-only-replicas #是否只在从节点上执行
10、--cluster set-timeout 整个集群的cluster-node-timeout时间
set-timeout host:port milliseconds
设置整个集群的cluster-node-timeout时间
11、--cluster import 导入输入至集群
import host:port
--cluster-from <arg>
--cluster-from-user <arg>
--cluster-from-pass <arg>
--cluster-from-askpass
--cluster-copy #migrate时指定类型为copy
--cluster-replace #migrate时指定类型为replace
将外部redis的数据导入集群
redis-cli --cluster import 127.0.01:6379 --cluster-from 127.0.0.2:6379 --cluster-replace --cluster-copy
说明:外部Redis实例(127.0.0.2:6379)导入到集群中的任意一节点,倒入之后,原来集群的key变为空,导入到新集群的key会自动分片到各个mater节点的slot
--cluster-replace 如果集群(127.0.01:6379)中存在外部redis实例(127.0.0.2:6379)的key,则会覆盖掉(10.35.2.68:6379)的value
--cluster-copy 默认情况下,import 命令在向集群导入数据的同时,还会删除单机服务器中源数据。如果用户想要保留单机服务器中的数据,那么可以在执行命令的同时给定 –cluster-copy 选项
该命令将正在运行的实例的所有键(从源实例中删除键)移动到指定的预先存在的 Redis 集群。
实际项目上,数据导入应该用redis-shake工具的比较多。
12、--cluster backup 备份集群rdb文件
backup host:port backup_directory
备份主节点上的数据值RDB文件
[root@localhost bin]# mkdir backup
[root@localhost bin]# ./redis-cli --cluster backup 192.168.84.1:7001  ./backup
>>> Performing Cluster Check (using node 192.168.84.1:7001)
M: 30c69d9e408015082c1a2145875cd1ec0c7a41ea 192.168.84.1:7001
   slots:[0-5460] (5461 slots) master
   1 additional replica(s)
S: 8ae862c1815ff89e49d6c8801ea0cb074e82855c 192.168.84.1:7006
   slots: (0 slots) slave
   replicates 222df2165b7b9dba291cfa572d472ad292637873
S: f6df82f6c67fbe83049d6f95a8473221afee2ee6 192.168.84.1:7004
   slots: (0 slots) slave
   replicates 30c69d9e408015082c1a2145875cd1ec0c7a41ea
M: 222df2165b7b9dba291cfa572d472ad292637873 192.168.84.1:7003
   slots:[10923-16383] (5461 slots) master
   1 additional replica(s)
S: 4cdc4c8127dc5ea8d15a239fa6c2f3c09b0d5f3a 192.168.84.1:7005
   slots: (0 slots) slave
   replicates 10a4381d9869e293cad95bf75482f506de9f43fe
M: 10a4381d9869e293cad95bf75482f506de9f43fe 192.168.84.1:7002
   slots:[5461-10922] (5462 slots) master
   1 additional replica(s)
[OK] All nodes agree about slots configuration.
>>> Check for open slots...
>>> Check slots coverage...
[OK] All 16384 slots covered.
>>> Node 192.168.84.1:7001 -> Saving RDB...
SYNC sent to master, writing 232 bytes to './backup/redis-node-192.168.84.1-7001-30c69d9e408015082c1a2145875cd1ec0c7a41ea.rdb'
Transfer finished with success.
>>> Node 192.168.84.1:7003 -> Saving RDB...
SYNC sent to master, writing 226 bytes to './backup/redis-node-192.168.84.1-7003-222df2165b7b9dba291cfa572d472ad292637873.rdb'
Transfer finished with success.
>>> Node 192.168.84.1:7002 -> Saving RDB...
SYNC sent to master, writing 206 bytes to './backup/redis-node-192.168.84.1-7002-10a4381d9869e293cad95bf75482f506de9f43fe.rdb'
Transfer finished with success.
Saving cluster configuration to: ./backup/nodes.json
[OK] Backup created into: ./backup

nodes.json保存的是集群结构:
[root@localhost bin]# cat nodes.json
[
  {
    "name": "30c69d9e408015082c1a2145875cd1ec0c7a41ea",
    "host": "192.168.84.1",
    "port": 7001,
    "replicate": null,
    "slots": [[0,5460]],
    "slots_count": 5461,
    "flags": "master",
    "current_epoch": 1
  },
  {
    "name": "8ae862c1815ff89e49d6c8801ea0cb074e82855c",
    "host": "192.168.84.1",
    "port": 7006,
    "replicate": "222df2165b7b9dba291cfa572d472ad292637873",
    "slots": [],
    "slots_count": 0,
    "flags": "slave",
    "current_epoch": 3
  },
  {
    "name": "f6df82f6c67fbe83049d6f95a8473221afee2ee6",
    "host": "192.168.84.1",
    "port": 7004,
    "replicate": "30c69d9e408015082c1a2145875cd1ec0c7a41ea",
    "slots": [],
    "slots_count": 0,
    "flags": "slave",
    "current_epoch": 1
  },
  {
    "name": "222df2165b7b9dba291cfa572d472ad292637873",
    "host": "192.168.84.1",
    "port": 7003,
    "replicate": null,
    "slots": [[10923,16383]],
    "slots_count": 5461,
    "flags": "master",
    "current_epoch": 3
  },
  {
    "name": "4cdc4c8127dc5ea8d15a239fa6c2f3c09b0d5f3a",
    "host": "192.168.84.1",
    "port": 7005,
    "replicate": "10a4381d9869e293cad95bf75482f506de9f43fe",
    "slots": [],
    "slots_count": 0,
    "flags": "slave",
    "current_epoch": 2
  },
  {
    "name": "10a4381d9869e293cad95bf75482f506de9f43fe",
    "host": "192.168.84.1",
    "port": 7002,
    "replicate": null,
    "slots": [[5461,10922]],
    "slots_count": 5462,
    "flags": "master",
    "current_epoch": 2
  }
]


![[每周一更]-(第61期):Rust入门策略(持续更新)](https://img-blog.csdnimg.cn/b58ef74f2335447296942335b335182d.jpeg#pic_center)