调度系列
调度系列之goroutine
上一篇中介绍了goroutine,最本质的一句话就是goroutine是用户态的任务。我们通常说的goroutine运行其实严格来说并不准确,因为任务只能被执行。那么goroutine是被谁执行呢?是被m执行。
在GMP的架构中,m代表的是主动执行的能力,一个m对应的是一个线程。注意的是m只是对应操作系统的线程,因为线程是由操作系统来管理的,但是在用户态中我们可以通过一些同步机制来实现一定程度的操纵。
同样类比一个任务系统的话,goroutine对应task,m对应的就是worker。任务系统中创建一定数量的worker,worker获取task并执行,循环往复。通常在简单的任务系统中,只有worker和task两个对象完全可以胜任,所有task出于全局的队列(或者其他数据结构中)。golang的调度系统最开始也确实是GM架构。但是golang的调度体系显然不属于简单的任务系统,所以go在G和M中增加了一个中间层P。P对应的是执行的权限、执行的资源,这个会在下篇介绍。
文章目录
- m的状态图
- m的操作
- newm
- mstart
- mexit
- startm
m的状态图
在介绍具体的细节前,同样先来一个整体的状态图。
需要说明的是,m不同于g,g有明确的status字段来记录状态,m没有记录状态的字段。虽然m没有status字段以及可枚举的状态值,但仍然可以抽象出相应的状态,来做状态的流转。
先介绍下几个状态值的含义。
- running。
表示m在运行中。处于running状态的m在执行某个goroutine或者在调用findrunnable寻找可执行的goroutine。需要注意的是,m处于running状态时,其g可能会处于running状态或者syscall状态。 - spinning。
表示m处于自旋状态,m有spinning字段表示是否处于自旋状态。此时系统中没有goroutine可执行时,但是m不会立即挂起,而是尝试寻找可执行的任务。spinning的设计是为了减少线程的切换,因为线程切换的损耗是比较高的。 - idle。
表示m处于空闲状态。此时m位于全局的队列(schedt.midle)中,对应的线程阻塞在condition上,等待唤醒。通常来说,m会在尝试spinning后再切换为idle。但是go中对最大的spinning的数量做了限制,如果正在spining的数量过多,则会直接转换为idle。
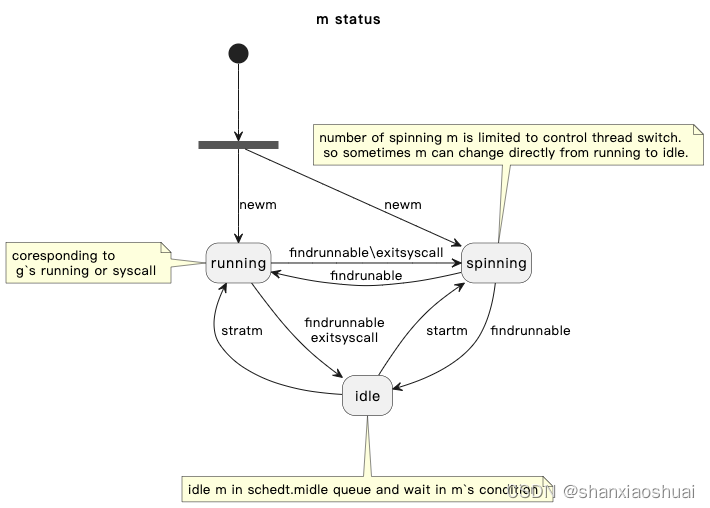
m开始创建时会处于running或者spinning状态(哪些情况下会处于spinning状态还不确定)。
当running状态的m找不到可执行的goroutine时,会切换为spinning状态,spinning一段时间后会转变为idle;另一个种情况时,当m从系统调用中返回时,获取不到p,则会转换为spinning状态。
当然我们上面也说过,处于spining状态的m的数量是有限制的,当达到这个限制,running会直接转变为idle。当需要新的m时,会先尝试从schedt.midle这个队列中获取m,如果没有再通过newm进行创建。
m流转的大概情况如此,下面我们来介绍细节。
m的操作
m的操作中,主要涉及到newm、mstart、mexit、startm等几个方法,下面逐一进行介绍。
newm
newm是创建m的入口(应该也是唯一的入口)。newm创建m对象,并将其同os线程关联起来运行,fn为传入的运行的函数。在某些情况下(这里暂时不深究),不能直接创建os线程,通过newmHandoff来操作,代码块中略过。
// src/proc.go 2096
func newm(fn func(), _p_ *p, id int64) {
   // allocm adds a new M to allm, but they do not start until created by
   // the OS in newm1 or the template thread.
   //
   // doAllThreadsSyscall requires that every M in allm will eventually
   // start and be signal-able, even with a STW.
   //
   // Disable preemption here until we start the thread to ensure that
   // newm is not preempted between allocm and starting the new thread,
   // ensuring that anything added to allm is guaranteed to eventually
   // start.
   acquirem()

   mp := allocm(_p_, fn, id)
   mp.nextp.set(_p_)
   mp.sigmask = initSigmask
   if gp := getg(); gp != nil && gp.m != nil && (gp.m.lockedExt != 0 || gp.m.incgo) && GOOS != "plan9" {...}
   newm1(mp)
   releasem(getg().m)
}
newm函数开始时,首先调用acquirem来防止发生抢占,并在结束时调用releasem来解锁。acquirem和releasem是通过对m的locks字段进行操作来达成目的的。
//go:nosplit
func acquirem() *m {
   _g_ := getg()
   _g_.m.locks++
   return _g_.m
}

//go:nosplit
func releasem(mp *m) {
   _g_ := getg()
   mp.locks--
   if mp.locks == 0 && _g_.preempt {
      // restore the preemption request in case we've cleared it in newstack
      _g_.stackguard0 = stackPreempt
   }
}
之后调用allocm创建m对象,并做一些初始化的操作,主要是为g0和gsignal分配内存。 g0在上一篇介绍g的时候提到过,这是和每个m绑定的,主要执行系统任务,协程调度等任务都是在g0中执行的。gsignal是为信号处理分配的栈。然后会将m加入全局的队列(allm)中。allocm的代码这里就不贴了,感兴趣可以自己查看。
allocm创建的m调用newm1函数运行。忽略cgo的部分。newm1中调用了newosproc方法来运行m。
func newm1(mp *m) {
   if iscgo {...}
   execLock.rlock() // Prevent process clone.
   newosproc(mp)
   execLock.runlock()
}
newosproc调用了一些真正的底层方法,在准备工作(略过)之后调用pthread_create创建了os线程。os线程执行的入口为mstart_stub,其会指向mstart,创建的m作为参数传入。通过这里就讲os线程同m关联起来了。
// glue code to call mstart from pthread_create.
func mstart_stub()
// May run with m.p==nil, so write barriers are not allowed.
//
//go:nowritebarrierrec
func newosproc(mp *m) {
   // 忽略准备工作
   ....

   // Finally, create the thread. It starts at mstart_stub, which does some low-level
   // setup and then calls mstart.
   var oset sigset
   sigprocmask(_SIG_SETMASK, &sigset_all, &oset)
   err = pthread_create(&attr, abi.FuncPCABI0(mstart_stub), unsafe.Pointer(mp))
   sigprocmask(_SIG_SETMASK, &oset, nil)
   if err != 0 {
      write(2, unsafe.Pointer(&failthreadcreate[0]), int32(len(failthreadcreate)))
      exit(1)
   }
}
mstart
newm是创建m的入口,mstart是m执行的入口。mstart是汇编实现,调用了mstart0。
// mstart is the entry-point for new Ms.
// It is written in assembly, uses ABI0, is marked TOPFRAME, and calls mstart0.
func mstart()
mstart0初始化了栈相关的字段,是我们在goroutine中提到的stackguard0字段。这里getg()得到的应该是对应m的g0。然后调用mstart1。最后调用mexit。需要注意的是mstart1是不会返回的(这点下面详细介绍),所以不用担心mexit一下就执行了。
func mstart0() {
   _g_ := getg()

   osStack := _g_.stack.lo == 0
   if osStack {...}
   // Initialize stack guard so that we can start calling regular
   // Go code.
   _g_.stackguard0 = _g_.stack.lo + _StackGuard
   // This is the g0, so we can also call go:systemstack
   // functions, which check stackguard1.
   _g_.stackguard1 = _g_.stackguard0
   mstart1()

   // Exit this thread.
   if mStackIsSystemAllocated() {
      // Windows, Solaris, illumos, Darwin, AIX and Plan 9 always system-allocate
      // the stack, but put it in _g_.stack before mstart,
      // so the logic above hasn't set osStack yet.
      osStack = true
   }
   mexit(osStack)
}
mstart1保证是非内联的,这是为了保证能够记录mstart调用mstart1时的执行状态(pc和sp),将其保存在g0.sched中。这样调用gogo(&g0.sched)能够回到mstart该节点继续执行,后面的就会执行mexit。保证m的退出能够执行mexit。
mstart1中会先调用fn,然后调用schedule。g的介绍中提到过schedule方法是不会返回的,也是前面提到mstart1不会返回的原因。此时,m真正进入不断寻找就绪的g并执行的过程中,也进入了状态图中running、spinning、idle之间不断状态流转的过程中。
// The go:noinline is to guarantee the getcallerpc/getcallersp below are safe,
// so that we can set up g0.sched to return to the call of mstart1 above.
//
//go:noinline
func mstart1() {
   _g_ := getg()

   if _g_ != _g_.m.g0 {
      throw("bad runtime·mstart")
   }

   // Set up m.g0.sched as a label returning to just
   // after the mstart1 call in mstart0 above, for use by goexit0 and mcall.
   // We're never coming back to mstart1 after we call schedule,
   // so other calls can reuse the current frame.
   // And goexit0 does a gogo that needs to return from mstart1
   // and let mstart0 exit the thread.
   _g_.sched.g = guintptr(unsafe.Pointer(_g_))
   _g_.sched.pc = getcallerpc()
   _g_.sched.sp = getcallersp()

   asminit()
   minit()

   // Install signal handlers; after minit so that minit can
   // prepare the thread to be able to handle the signals.
   if _g_.m == &m0 {
      mstartm0()
   }

   if fn := _g_.m.mstartfn; fn != nil {
      fn()
   }

   if _g_.m != &m0 {
      acquirep(_g_.m.nextp.ptr())
      _g_.m.nextp = 0
   }
   schedule()
}
mexit
mexit主要是做一些释放资源的操作,包括:将分配的栈内存释放、从全局的队列中移除m、将持有的p释放移交,然后退出os线程。这里就不做过多的详细的介绍。代码也不贴了,位于 src/go/proc.go 1471
startm
newm是创建m的唯一入口,但实际上大多数时候需要m的时候都是调用了startm。startm和newm的唯一区别时,其会先去全局的空闲队列里寻找,如果找不到再去调用newm进行创建。如果找到了,则获取idle的m,并唤醒该m。
//go:nowritebarrierrec
func startm(_p_ *p, spinning bool) {
   mp := acquirem()
   lock(&sched.lock)
   if _p_ == nil {
      _p_, _ = pidleget(0)
      if _p_ == nil {
         unlock(&sched.lock)
         if spinning {
            // The caller incremented nmspinning, but there are no idle Ps,
            // so it's okay to just undo the increment and give up.
            if int32(atomic.Xadd(&sched.nmspinning, -1)) < 0 {
               throw("startm: negative nmspinning")
            }
         }
         releasem(mp)
         return
      }
   }
   nmp := mget()
   if nmp == nil {
      // No M is available, we must drop sched.lock and call newm.
      // However, we already own a P to assign to the M.
      //
      // Once sched.lock is released, another G (e.g., in a syscall),
      // could find no idle P while checkdead finds a runnable G but
      // no running M's because this new M hasn't started yet, thus
      // throwing in an apparent deadlock.
      //
      // Avoid this situation by pre-allocating the ID for the new M,
      // thus marking it as 'running' before we drop sched.lock. This
      // new M will eventually run the scheduler to execute any
      // queued G's.
      id := mReserveID()
      unlock(&sched.lock)

      var fn func()
      if spinning {
         // The caller incremented nmspinning, so set m.spinning in the new M.
         fn = mspinning
      }
      newm(fn, _p_, id)
      // Ownership transfer of _p_ committed by start in newm.
      // Preemption is now safe.
      releasem(mp)
      return
   }
   unlock(&sched.lock)
   if nmp.spinning {
      throw("startm: m is spinning")
   }
   if nmp.nextp != 0 {
      throw("startm: m has p")
   }
   if spinning && !runqempty(_p_) {
      throw("startm: p has runnable gs")
   }
   // The caller incremented nmspinning, so set m.spinning in the new M.
   nmp.spinning = spinning
   nmp.nextp.set(_p_)
   notewakeup(&nmp.park)
   // Ownership transfer of _p_ committed by wakeup. Preemption is now
   // safe.
   releasem(mp)
}
写在最后
本篇呢,依旧是只聚焦于m本身。同样的道理,抛开G和P,很难讲到面面俱到。但是同样的,读完本篇,详细对m也会有一个本质的理解。m就是一个worker,其同一个os线程关联。我们通过一些同步机制在用户态控制m的运行。









![Modelsim仿真问题解疑二:ERROR: [USF-ModelSim-70]](https://img-blog.csdnimg.cn/img_convert/b31ab1d00592df0a0871369166ec3bf1.png)
