Thread 类 详解
- 一. 创建线程
- 1. 继承 Thread 类
- 2. 实现 Runnable 接口
- 3. 其他变形
- 4. 多线程的优势-增加运行速度
- 二. Thread 类
- 1. 构造方法
- 2. 常见属性
- 3. 启动线程-start()
- 4. 中断线程-interrupt()
- 5. 线程等待-join()
- 6. 线程休眠-sleep()
- 7. 获取当前线程引用
- 三. 线程的状态
- 1. 观察线程的所有状态
- 2. 线程状态和状态转移的意义
- 3. 观察线程的状态和转移
一. 创建线程
1. 继承 Thread 类
- 继承 Thread 来创建一个线程类,并重写 run() 方法
class MyThread extends Thread {
    @Override
    public void run() {
        System.out.println("这里是线程运行的代码");
   }
}
- 创建 MyThread 类的实例
MyThread t = new MyThread();
- 调用 start 方法启动线程
t.start(); // 线程开始运行
注意:只有调用 start 函数才真正的创建了一个线程。
2. 实现 Runnable 接口
更推荐使用这种方法, 因为 Runnable 只是描述了一个任务,至于任务通过进程、线程、线程池还是什么来执行的,Runnable 并不关心,使代码更好的解耦合。
- 实现 Runnable 接口
class MyRunnable implements Runnable {
    @Override
    public void run() {
        System.out.println("这里是线程运行的代码");
   }
}
- 创建 Thread 类实例, 调用 Thread 的构造方法时将 Runnable 对象作为 target 参数.
Thread t = new Thread(new MyRunnable());
- 调用 start 方法
t.start(); // 线程开始运行
对比上面两种方法:
- 继承 Thread 类, 直接使用 this 就表示当前线程对象的引用.
- 实现 Runnable 接口, this 表示的是 MyRunnable 的引用. 需要使用 Thread.currentThread() 来获取当前线程引用。
3. 其他变形
- 匿名内部类创建 Thread 子类对象
// 使用匿名类创建 Thread 子类对象
Thread t1 = new Thread() {
    @Override
    public void run() {
        System.out.println("使用匿名类创建 Thread 子类对象");
   }
};
- 匿名内部类创建 Runnable 子类对象
// 使用匿名类创建 Runnable 子类对象
Thread t2 = new Thread(new Runnable() {
    @Override
    public void run() {
        System.out.println("使用匿名类创建 Runnable 子类对象");
   }
});
- lambda 表达式创建 Runnable 子类对象
// 使用 lambda 表达式创建 Runnable 子类对象
Thread t3 = new Thread(() -> System.out.println("使用匿名类创建 Thread 子类对象"));
Thread t4 = new Thread(() -> {
    System.out.println("使用匿名类创建 Thread 子类对象");
});
4. 多线程的优势-增加运行速度
可以观察多线程在一些场合下是可以提高程序的整体运行效率的。
- 使用 System.nanoTime() 可以记录当前系统的 纳秒 级时间戳.
- serial 串行的完成一系列运算. concurrency 使用两个线程并行的完成同样的运算.
class ThreadAdvantage {
    // 多线程并不一定就能提高速度,可以观察,count 不同,实际的运行效果也是不同的
    private static final long count = 10_0000_0000;
    public static void main(String[] args) throws InterruptedException {
        // 使用并发方式
        concurrency();
        // 使用串行方式
        serial();
    }
    private static void concurrency() throws InterruptedException {
        long begin = System.nanoTime();

        // 利用一个线程计算 a 的值
        Thread thread = new Thread(new Runnable() {
            @Override
            public void run() {
                int a = 0;
                for (long i = 0; i < count; i++) {
                    a--;
                }
            }
        });
        thread.start();
        // 主线程内计算 b 的值
        int b = 0;
        for (long i = 0; i < count; i++) {
            b--;
        }
        // 等待 thread 线程运行结束
        thread.join();

        // 统计耗时
        long end = System.nanoTime();
        double ms = (end - begin) * 1.0 / 1000 / 1000;
        System.out.printf("并发: %f 毫秒%n", ms);
    }
    private static void serial() {
        // 全部在主线程内计算 a、b 的值
        long begin = System.nanoTime();
        int a = 0;
        for (long i = 0; i < count; i++) {
            a--;
        }
        int b = 0;
        for (long i = 0; i < count; i++) {
            b--;
        }
        long end = System.nanoTime();
        double ms = (end - begin) * 1.0 / 1000 / 1000;
        System.out.printf("串行: %f 毫秒%n", ms);
    }
}
结果:

不是使用了多线程,速度一定提高
- 多线程更适合于 CPU 密集型的程序,程序需要进行大量计算,使用多线程就可以充分利用 CPU 多核资源,如果计算量不大,主要时间用在创建线程上就得不偿失了。
- 一个进程的多个线程共享同一份资源,资源是有限的,线程变多,竞争进一步加剧,如果时间很多浪费在竞争资源上,有可能拖慢整体的速度。
- 多个线程之间到底是并发执行,还是并行执行是不确定的,只有真正的并行执行时,效率才有显著提升。
二. Thread 类
Thread 类是 JVM 用来管理线程的一个类,换句话说,每个线程都有一个唯一的 Thread 对象与之关联。 Thread 类的对象就是用来描述一个线程执行流的,JVM 会将这些 Thread 对象组织起来,用于线程调度,线程管理。
1. 构造方法
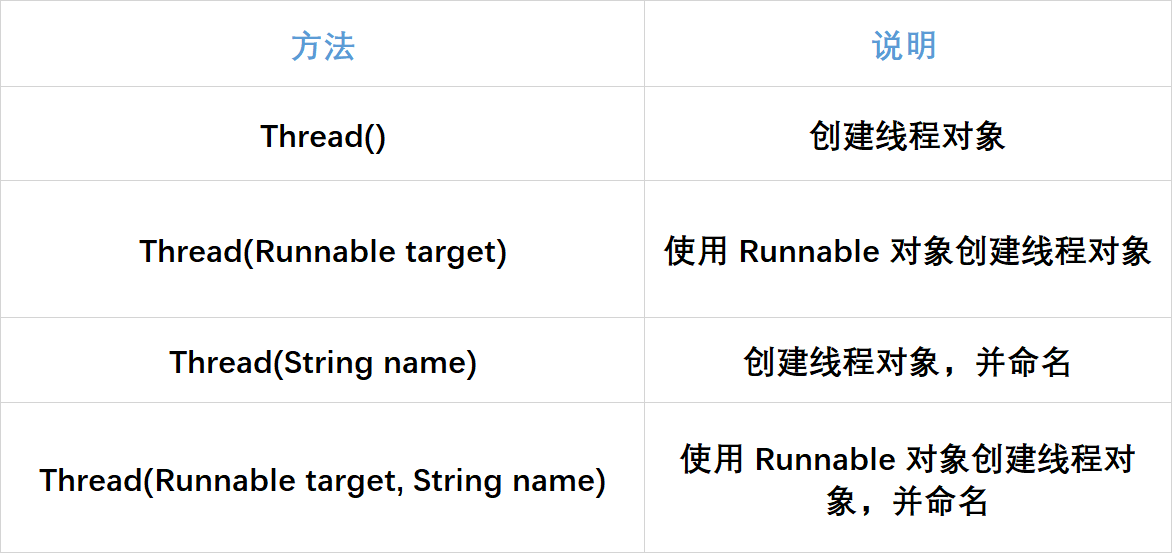
Thread t1 = new Thread();
Thread t2 = new Thread(new MyRunnable());
Thread t3 = new Thread("这是我的名字");
Thread t4 = new Thread(new MyRunnable(), "这是我的名字");
2. 常见属性
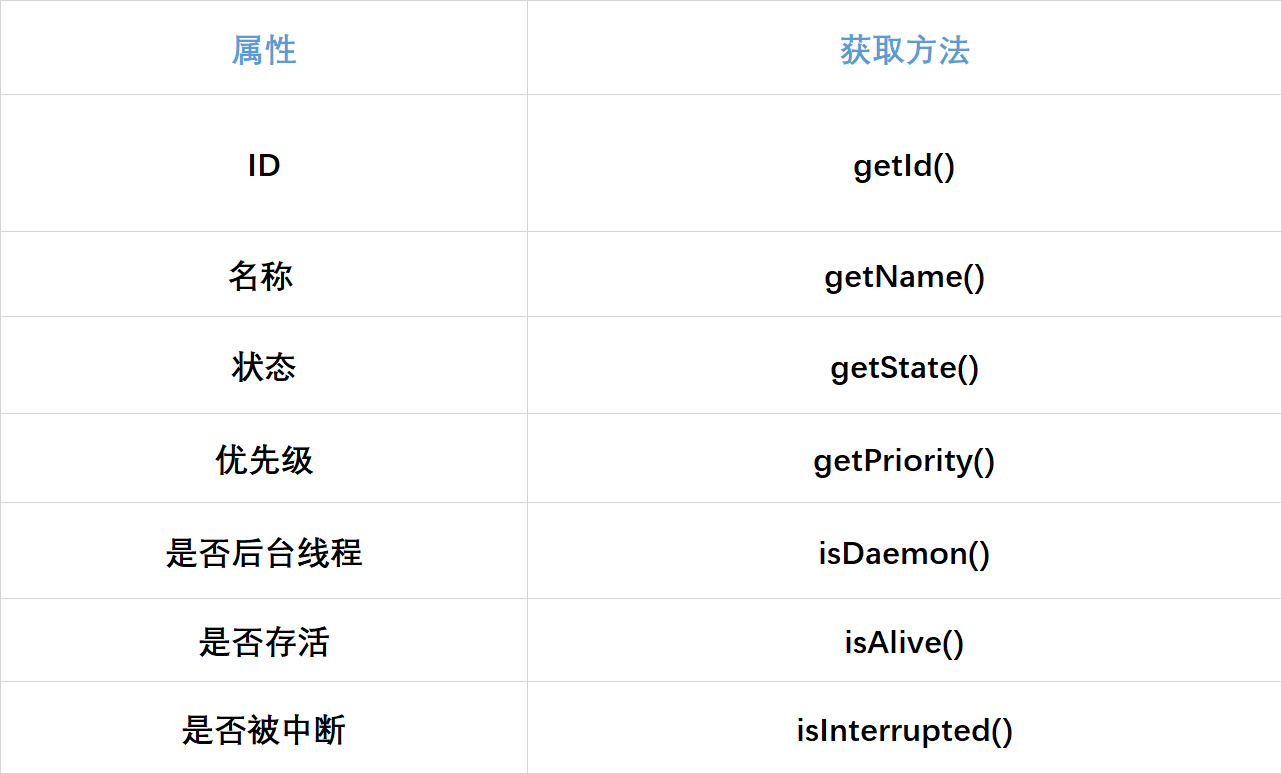
- ID: 线程的唯一标识,不同线程不会重复
- 名称: 是各种调试工具用到
- 状态: 表示线程当前所处的一个情况,下面将会进一步说明
- 优先级: 优先级高的线程理论上来说更容易被调度到
- 后台线程: 关于后台线程需要记住:JVM会在一个进程的所有非后台线程结束后,才会结束运行。
- 是否存活: 即简单的理解,为 run 方法是否运行结束了
- 线程的中断问题: 下面将进一步说明
    public static void main(String[] args) {
        // 创建线程
        Thread thread = new Thread(() -> {
            for (int i = 0; i < 5; i++) {
                try {
                    System.out.println(Thread.currentThread().getName() + ": 我还活着");
                            Thread.sleep(1 * 1000);
                } catch (InterruptedException e) {
                    e.printStackTrace();
                }
            }
            System.out.println(Thread.currentThread().getName() + ": 我即将死去");
        });
        // (从 main 线程)获取 thread 线程的参数
        System.out.println("thread: ID: " + thread.getId());
        System.out.println("thread: 名称: " + thread.getName());
        System.out.println("thread: 状态: " + thread.getState());
        System.out.println("thread: 优先级: " + thread.getPriority());
        System.out.println("thread: 后台线程: " + thread.isDaemon());
        System.out.println("thread: 活着: " + thread.isAlive());
        System.out.println("thread: 被中断: " + thread.isInterrupted());
        // 启动 thread 线程
        thread.start();
        // 循环一直空转,至 thread 线程死亡
        while (thread.isAlive()) {}
        // 判断 thread 线程是否还活着
        System.out.println("thread: 状态: " + thread.getState());
    }
输出:
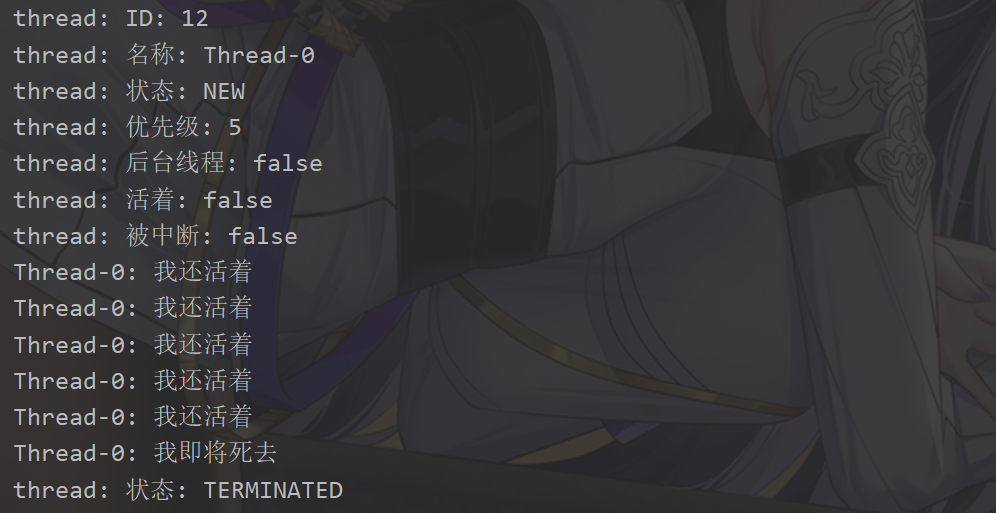
是否为后台线程:
-
若是后台线程,不影响程序的退出,前台线程才会影响程序的退出。
(前台线程通常执行一些重要的任务,而后台线程用于执行一些辅助性的或者周期性的任务,以支持前台线程的工作。) -
我们创建的线程默认是前台进程,所以即使 main 线程执行完毕了,进程也不能退出,需要等待我们创建的线程执行完毕。
假如我们创建的是后台线程,那么 main 线程执行完毕后,进程直接退出,我们创建的线程即使没有执行完也被强制终止。
是否存活:
- 调用 start() 之前,run() 方法执行完之后为 isAlive 为 false
- 调用 start() 之后,run() 方法执行完之前为 isAlive 为 false
注意:Thread t 的生命周期和内核中线程的生命周期并不完全一致:
创建 t 对象后,调用 start() 之前,系统中没有对应的线程,
run() 执行完,系统中的线程销毁了,但 t 对象可能还在。
3. 启动线程-start()
之前我们已经看到了如何通过覆写 run 方法创建一个线程对象,但线程对象被创建出来并不意味着线程就开始运行了。
- 覆写 run 方法是提供给线程要做的事情的指令清单
- 而调用 start() 方法,就是喊一声:”行动起来!“,线程才真正独立去执行了。
调用 start 方法, 才真的在操作系统的底层创建出一个线程。
注意:一个线程只能 start 一次
start() 和 run() 的区别
- run 单纯的只是一个普通方法,描述了任务的内容,
start 则是一个特殊的方法,内部会在系统中创建一个线程。 - run 只是一个普通的方法,在 main 线程里面调用 run, 并不会创建线程,只是在 main 线程中执行 run 中的代码,既然 run 和其他代码一样都是 在 main 线程中执行的,那么就得按照从前到后的顺序执行代码。
4. 中断线程-interrupt()
注意:中断一个线程,不是让线程立即就停止,只是通知该线程说你该停止了,具体是否真的停止,取决于线程里面代码的写法。(与操作系统里面的中断不一样)
线程一旦进到工作状态,他就会按照行动指南上的步骤(run 方法)去进行工作,不完成是不会结束的。但有时我们需要增加一些机制,例如张三(主线程)让 李四 (新创建的线程)进行转账业务,李四正在工作时,老板突然来电话了,说转账的对方是个骗子,需要赶紧停止转账,那张三该如何通知李四停止呢?这就涉及到我们的停止线程的方式了。
目前常见的有以下两种方式:
- 通过共享的标记来进行沟通
- 调用 interrupt() 方法来通知
示例-1: 使用自定义的变量来作为标志位.
因为多个线程共用一块空间,所以 多个线程修改的标志位是同一个。
注意需要给标志位上加 volatile 关键字,防止编译器优化为不访问内存,从而感知不到了标志位的变化。
class ThreadDemo {
    private static class MyRunnable implements Runnable {
        public volatile boolean isQuit = false;
        @Override
        public void run() {
            while (!isQuit) {
                System.out.println(Thread.currentThread().getName()
                        + ": 别管我,我忙着转账呢!");
                try {
                    Thread.sleep(1000);
                } catch (InterruptedException e) {
                    e.printStackTrace();
                }
            }
            System.out.println(Thread.currentThread().getName()
                    + ": 啊!险些误了大事");
        }
    }
    public static void main(String[] args) throws InterruptedException {
        MyRunnable target = new MyRunnable();
        Thread thread = new Thread(target, "李四");
        System.out.println(Thread.currentThread().getName()
                + ": 让李四开始转账。");
        thread.start();
        Thread.sleep(10 * 1000);
        System.out.println(Thread.currentThread().getName()
                + ": 老板来电话了,得赶紧通知李四对方是个骗子!");
        target.isQuit = true;
    }
}
输出:

使用共享的标记来进行沟通的话,线程收到通知不及时,比如说线程在休眠,需要等到休眠结束后才能收到通知。
示例-2: 使用 Thread.interrupted() 或者 Thread.currentThread().isInterrupted() 代替自定义标志位.
(Thread 内部包含了一个 boolean 类型的变量作为线程是否被中断的标记. )

- 使用 thread 对象的 interrupt() 方法通知线程结束.
(interrupt() 方法只是设置了一个标志位,具体要不要中断,还要被中断线程的配合,还是取决于被中断线程决定是否中断。)
class ThreadDemo {
    private static class MyRunnable implements Runnable {
        @Override
        public void run() {
            // 两种方法均可以
            while (!Thread.interrupted()) {
//                while (!Thread.currentThread().isInterrupted()) {
                System.out.println(Thread.currentThread().getName()
                        + ": 别管我,我忙着转账呢!");
                try {
                    Thread.sleep(1000);
                } catch (InterruptedException e) {
                    e.printStackTrace();
                    System.out.println(Thread.currentThread().getName()
                            + ": 有内鬼,终止交易!");
                    // 注意此处的 break
                    break;
                }
            }
            System.out.println(Thread.currentThread().getName()
                    + ": 啊!险些误了大事");
        }
    }

    public static void main(String[] args) throws InterruptedException {
        MyRunnable target = new MyRunnable();
        Thread thread = new Thread(target, "李四");
        System.out.println(Thread.currentThread().getName()
                + ": 让李四开始转账。");
        thread.start();
        Thread.sleep(10 * 1000);
        System.out.println(Thread.currentThread().getName()
                + ": 老板来电话了,得赶紧通知李四对方是个骗子!");
        thread.interrupt();
    }
}
thread 收到通知的方式有两种:
- 如果线程因为调用 wait/join/sleep 等方法而阻塞挂起,则以 InterruptedException 异常的形式通知,清除中断标志,也就是说 中断标志位为 false
- 当出现 InterruptedException 的时候, 要不要结束线程取决于 catch 中代码的写法. 可以选择忽略这个异常, 也可以跳出循环结束线程.
- 否则,只是内部的一个中断标志被设置,thread 可以通过
- Thread.interrupted() 判断当前线程的中断标志被设置,清除中断标志
- Thread.currentThread().isInterrupted() 判断指定线程的中断标志被设置,不清除中断标志
使用 interrupt() 这种方式通知收到的更及时,即使线程正在 sleep 也可以马上收到,但是如果是自己使用的标志位的话,线程不能及时收到中断通知。
示例-3: 观察标志位是否清除
标志位是否清除, 就类似于一个开关.
- Thread.isInterrupted() 相当于按下开关, 开关自动弹起来了. 这个称为 “清除标志位”
- Thread.currentThread().isInterrupted() 相当于按下开关之后, 开关弹不起来, 这个称为 “不清除标志位”.
使用 Thread.isInterrupted() , 线程中断会清除标志位.
观察源码可以发现, Thread.isInterrupted() 内部实际上是调用了 Thread.currentThread().isInterrupted() 只不过参数传了一个 true, 代表清除标志位。
class ThreadDemo {
    private static class MyRunnable implements Runnable {
        @Override
        public void run() {
            for (int i = 0; i < 10; i++) {
                System.out.println(Thread.interrupted());
            }
        }
    }
    public static void main(String[] args) throws InterruptedException {
        MyRunnable target = new MyRunnable();
        Thread thread = new Thread(target, "李四");
        thread.start();
        thread.interrupt();
    }
}
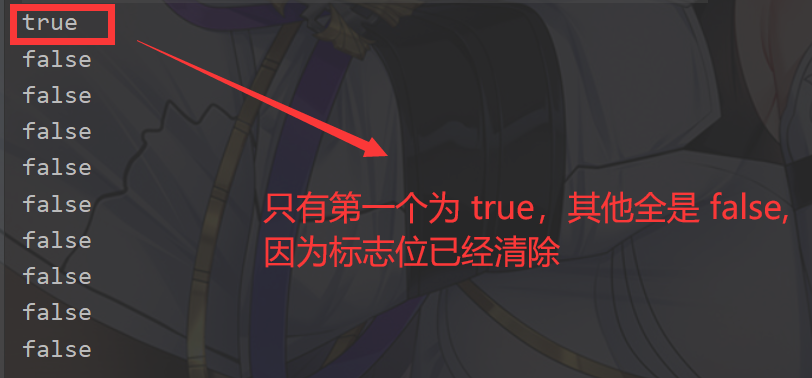
使用 Thread.currentThread().isInterrupted() , 线程中断标记位不会清除.
class ThreadDemo {
    private static class MyRunnable implements Runnable {
        @Override
        public void run() {
            for (int i = 0; i < 10; i++) {
                System.out.println(Thread.currentThread().isInterrupted());
            }
        }
    }
    public static void main(String[] args) throws InterruptedException {
        MyRunnable target = new MyRunnable();
        Thread thread = new Thread(target, "李四");
        thread.start();
        thread.interrupt();
    }
}
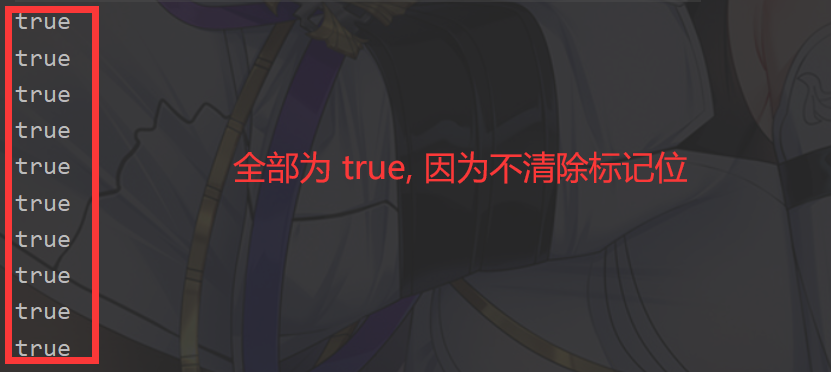
为什么一个清除,一个不清除?它们都用于什么场景 ?
Thread.interrupted() 清除标志位是为了下次继续检测标志位。如果一个线程被设置中断标志后,选择结束线程那么自然不存在下次的问题,而如果一个线程被设置中断标识后,进行了一些处理后选择继续进行任务,而且这个任务也是需要被中断的,那么当然需要清除标志位了。重新设置为 false, 这样就可以下次继续检测标志位。
5. 线程等待-join()
线程等待主要是为了控制线程结束的先后顺序。
有时,我们需要等待一个线程完成它的工作后,才能进行自己的下一步工作。例如,张三只有等李四转账成功,才决定是否存钱,这时我们需要一个方法明确等待线程的结束。
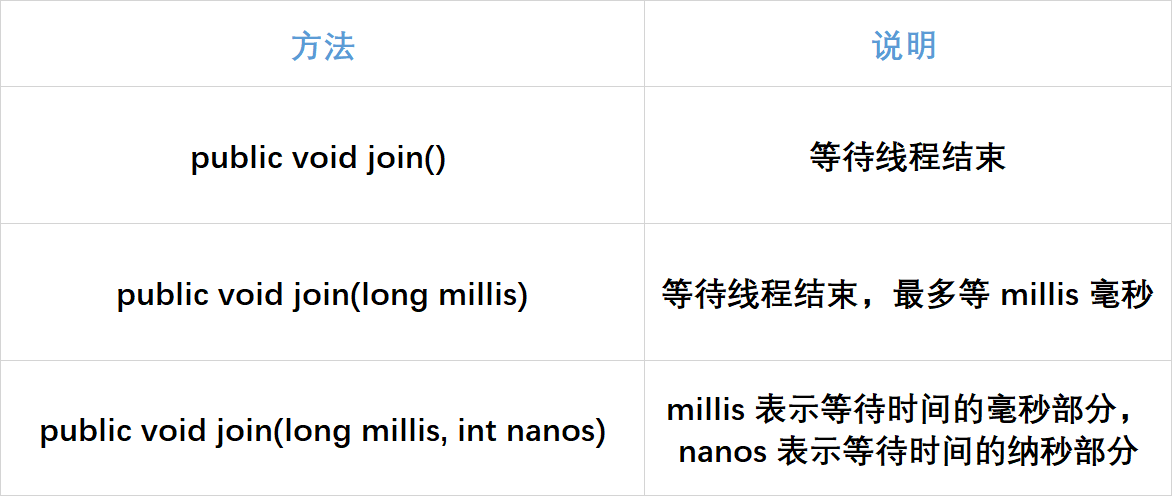
class ThreadDemo {
    public static void main(String[] args) throws InterruptedException {
        Runnable target = () -> {
            for (int i = 0; i < 4; i++) {
                try {
                    System.out.println(Thread.currentThread().getName()
                            + ": 我还在工作!");
                    Thread.sleep(100);
                } catch (InterruptedException e) {
                    e.printStackTrace();
                }
            }
            System.out.println(Thread.currentThread().getName() + ": 我结束了!");
        };
        Thread thread1 = new Thread(target, "李四");
        Thread thread2 = new Thread(target, "王五");
        System.out.println("先让李四开始工作");
        thread1.start();
        // 这行代码是在 main 线程中调用的,所以是 main 线程等待 thread1 线程结束,main 线程才能继续往下执行
        thread1.join();
        System.out.println("李四工作结束了,让王五开始工作");
        thread2.start();
        // 同理,这行代码是在 main 线程中调用的,所以是 main 线程等待 thread2 线程结束,main 线程才能继续往下执行下面的打印代码
        thread2.join();
        System.out.println("王五工作结束了");
    }
}
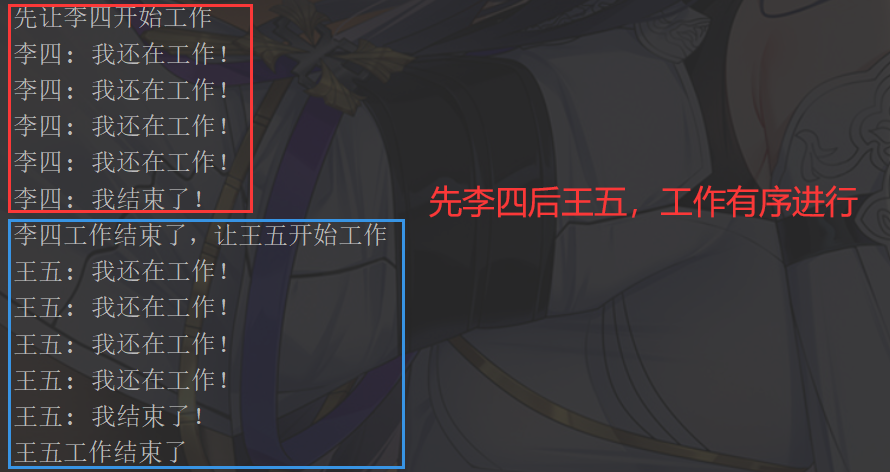
当把 join 方法注释掉:
class ThreadDemo {
    public static void main(String[] args) throws InterruptedException {
        Runnable target = () -> {
            for (int i = 0; i < 4; i++) {
                try {
                    System.out.println(Thread.currentThread().getName()
                            + ": 我还在工作!");
                    Thread.sleep(100);
                } catch (InterruptedException e) {
                    e.printStackTrace();
                }
            }
            System.out.println(Thread.currentThread().getName() + ": 我结束了!");
        };
        Thread thread1 = new Thread(target, "李四");
        Thread thread2 = new Thread(target, "王五");
        System.out.println("先让李四开始工作");
        thread1.start();
//        thread1.join();
        System.out.println("李四工作结束了,让王五开始工作");
        thread2.start();
//        thread2.join();
        System.out.println("王五工作结束了");
    }
}

6. 线程休眠-sleep()
有一点要记得,因为线程的调度是不可控的,所以,这个方法只能保证实际休眠时间是大于等于参数设置的休眠时间的。

class ThreadDemo {
    public static void main(String[] args) throws InterruptedException {
        System.out.println(System.currentTimeMillis());
        Thread.sleep(3 * 1000);
        System.out.println(System.currentTimeMillis());
    }
}
Thread.sleep(3 * 1000) 并不是 3s 后就上 CPU 执行 , 而是 3s 内上不了 CPU , 因为 sleep 就被放到阻塞队列里面了,休眠完成后被放入到就绪队列中,而就绪队列中不只 你这一个线程,而是多个线程都是就绪状态,等着上 CPU 执行。

线程休眠实质上就是将线程放到阻塞队列中。所以休眠是阻塞的一种,会释放 CPU(持有锁的话,并不会释放锁)。
7. 获取当前线程引用

注意,在哪个线程里面调用 Thread.currentThread() 得到的就是哪个线程
在 main 线程中调用:
class ThreadDemo {
    public static void main(String[] args) {
        // 注意,在哪个线程里面调用 Thread.currentThread() 得到的就是哪个线程
        Thread thread = Thread.currentThread();
        System.out.println(thread.getName());
    }
}

在创建出来的其他线程中调用:
class ThreadDemo {
    public static void main(String[] args) {
        // 注意,在哪个线程里面调用 Thread.currentThread() 得到的就是哪个线程
        Thread thread = new Thread(()->{
            // 这个是在 创建出来的线程里面调用的
            System.out.println(Thread.currentThread().getName());
        });
        thread.start();
    }
}

三. 线程的状态
1. 观察线程的所有状态
线程的状态是一个枚举类型 Thread.State
class ThreadState {
    public static void main(String[] args) {
        for (Thread.State state : Thread.State.values()) {
            System.out.println(state);
        }
    }
}
输出:

- NEW: 安排了工作, 还未开始行动
- RUNNABLE: 可工作的. 又可以分成正在工作中和即将开始工作.
- BLOCKED: 表示排队等着其他事情,比如等待锁 (阻塞状态)
- WAITING: 这几个都表示排队等着其他事情(阻塞状态)
- TIMED_WAITING: 这几个都表示排队等着其他事情(阻塞状态)
- TERMINATED: 工作完成了.
为什么要这么细分 ?
因为开发过程中经常遇到程序卡死的情况,分析卡死的原因时,我们可以查看各个线程的状态,从而定位问题。
2. 线程状态和状态转移的意义
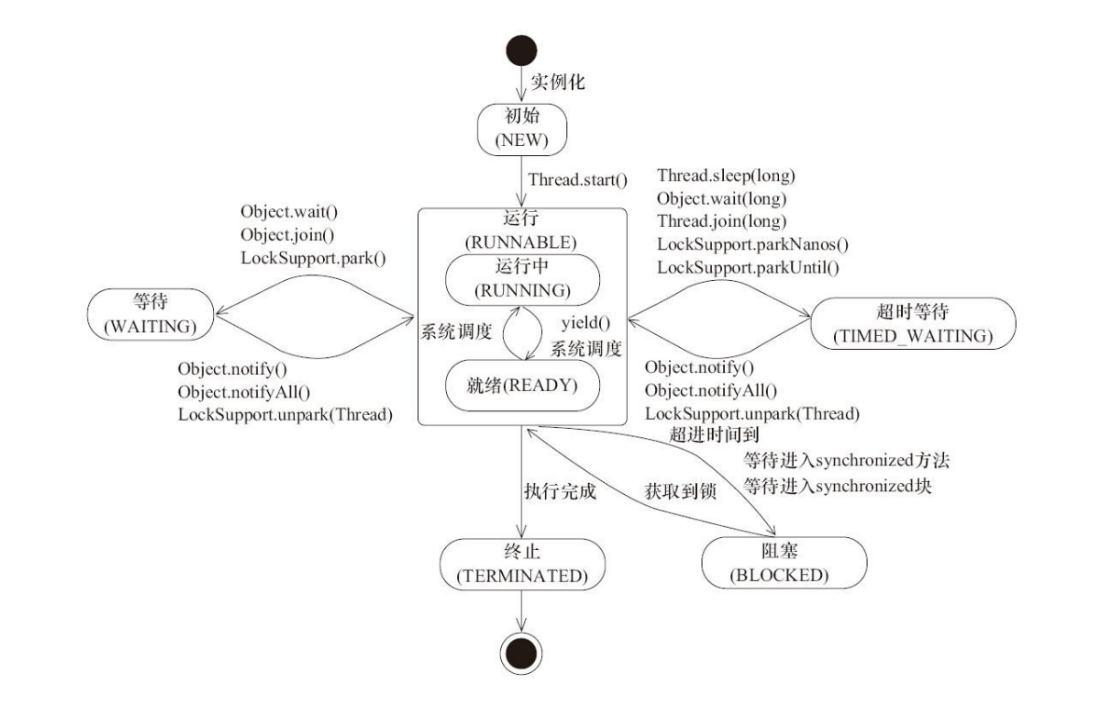
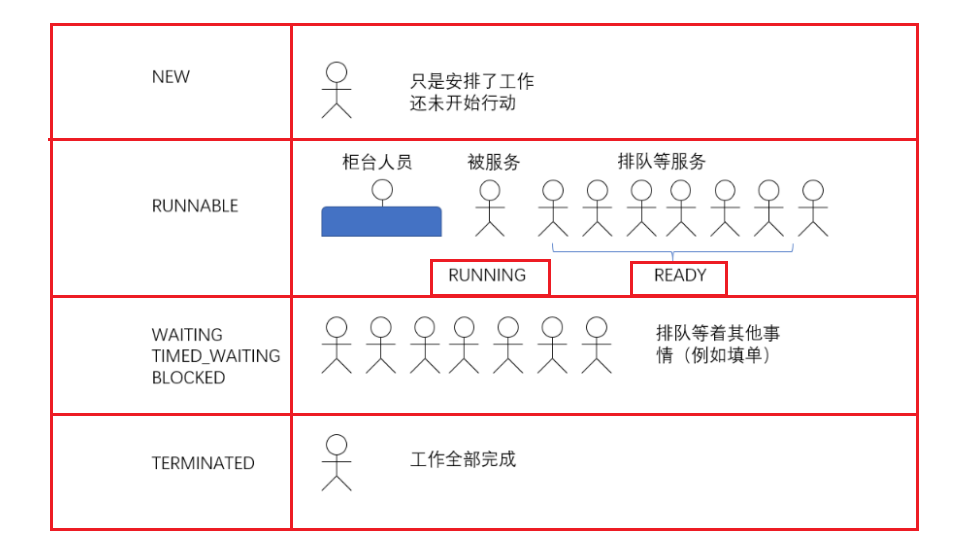
还是之前的例子:
-
刚把李四、王五找来,还是给他们在安排任务,没让他们行动起来,就是 NEW 状态;
-
当李四、王五开始去窗口排队,等待服务,就进入到 RUNNABLE 状态。该状态并不表示已经被银行工作人员开始接待,排在队伍中也是属于该状态,即可被服务的状态,是否开始服务,则看调度器的调度;
-
当李四、王五因为一些事情需要去忙,例如需要填写信息、回家取证件、发呆一会等等时,进入 BLOCKED 、 WATING 、 TIMED_WAITING 状态;
-
如果李四、王五已经忙完,为 TERMINATED 状态。
所以,之前我们学过的 isAlive() 方法,可以认为是处于不是 NEW 和 TERMINATED 的状态都是活着的。
3. 观察线程的状态和转移
- 观察 1: 关注 NEW 、 RUNNABLE 、 TERMINATED 状态的转换
- 使用 isAlive 方法判定线程的存活状态.
class ThreadStateTransfer {
    public static void main(String[] args) throws InterruptedException {
        Thread t = new Thread(() -> {
            for (int i = 0; i < 1000_0000; i++) {
            }
        }, "李四");
        System.out.println(t.getName() + ": " + t.getState()); // NEW
        t.start();
        while (t.isAlive()) {
            System.out.println(t.getName() + ": " + t.getState()); // RUNNABLE
        }
        System.out.println(t.getName() + ": " + t.getState()); // TERMINATED
    }
}
- 观察 2: 关注 WAITING 、 BLOCKED 、 TIMED_WAITING 状态的转换
class ThreadStateTransfer {
    public static void main(String[] args) {
        final Object object = new Object();
        Thread t1 = new Thread(new Runnable() {
            @Override
            public void run() {
                synchronized (object) {
                    while (true) {
                        try {
                            Thread.sleep(1000);
                        } catch (InterruptedException e) {
                            e.printStackTrace();
                        }
                    }
                }
            }
        }, "t1");
        t1.start();
        Thread t2 = new Thread(new Runnable() {
            @Override
            public void run() {
                synchronized (object) {
                    System.out.println("hehe");
                }
            }
        }, "t2");
        t2.start();
    }
}
通过 jconsole 可以看出 t1 是 TIMED_WAITING,t2 是 BLOCKED
t1:
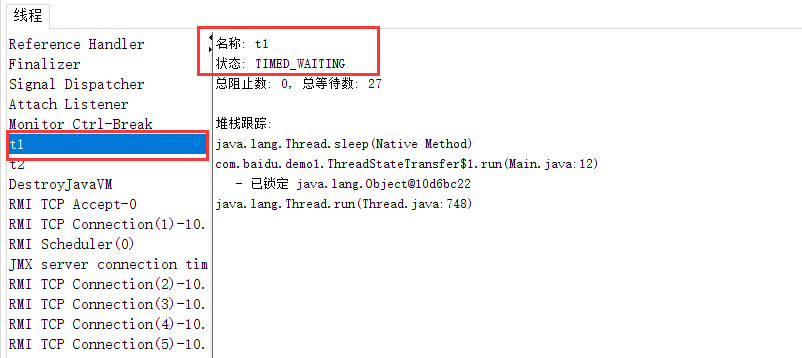
t2:
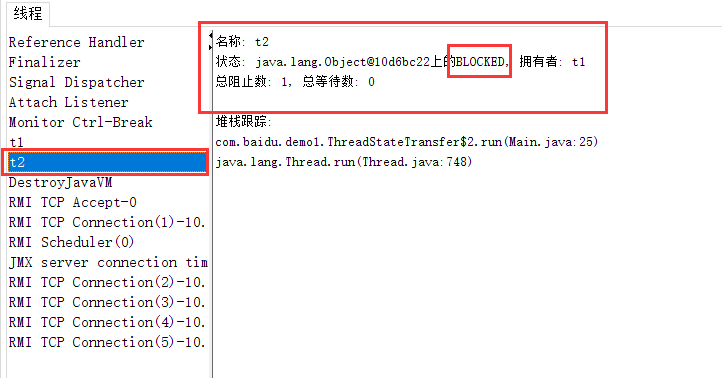
修改上面的代码, 把 t1 中的 sleep 换成 wait:
class ThreadStateTransfer {
    public static void main(String[] args) {
        final Object object = new Object();
        Thread t1 = new Thread(new Runnable() {
            @Override
            public void run() {
                synchronized (object) {
                    while (true) {
                        try {
                            // [修改这里就可以了!!!!!]
                            // Thread.sleep(1000);
                            object.wait();
                        } catch (InterruptedException e) {
                            e.printStackTrace();
                        }
                    }
                }
            }
        }, "t1");
        t1.start();
        Thread t2 = new Thread(new Runnable() {
            @Override
            public void run() {
                synchronized (object) {
                    System.out.println("hehe");
                }
            }
        }, "t2");
        t2.start();
    }
}
使用 jconsole 可以看到 t1 的状态是 WAITING
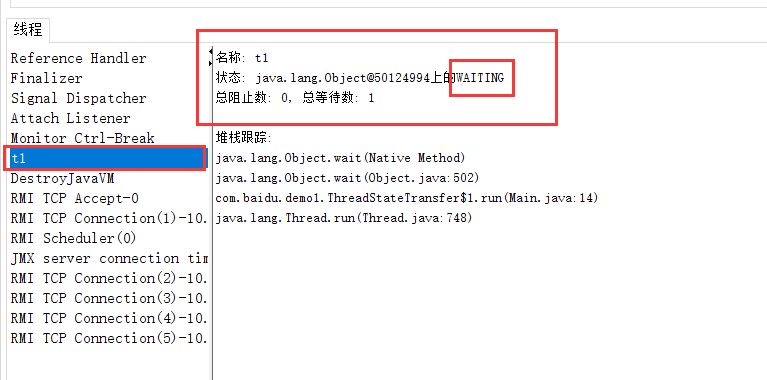
结论:
- BLOCKED 表示等待获取锁, WAITING 和 TIMED_WAITING 表示等待其他线程发来通知.
- TIMED_WAITING 线程在等待唤醒,但设置了时限; WAITING 线程在无限等待唤醒
- 观察-3: yield() 大公无私,让出 CPU
class ThreadStateTransfer {
    public static void main(String[] args) {
        Thread t1 = new Thread(new Runnable() {
            @Override
            public void run() {
                while (true) {
                    System.out.println("张三");
//                     先注释掉, 再放开
//                     Thread.yield();
                }
            }
        }, "t1");
        t1.start();
        Thread t2 = new Thread(new Runnable() {
            @Override
            public void run() {
                while (true) {
                    System.out.println("李四");
                }
            }
        }, "t2");
        t2.start();
    }
}
可以看到:
- 不使用 yield 的时候, 张三李四大概五五开
- 使用 yield 时, 张三的数量远远少于李四
结论:
yield 不改变线程的状态, 但是会重新去排队.
好啦! 以上就是对 Thread 类的 详细讲解 !希望能帮到你 !
评论区欢迎指正 !
