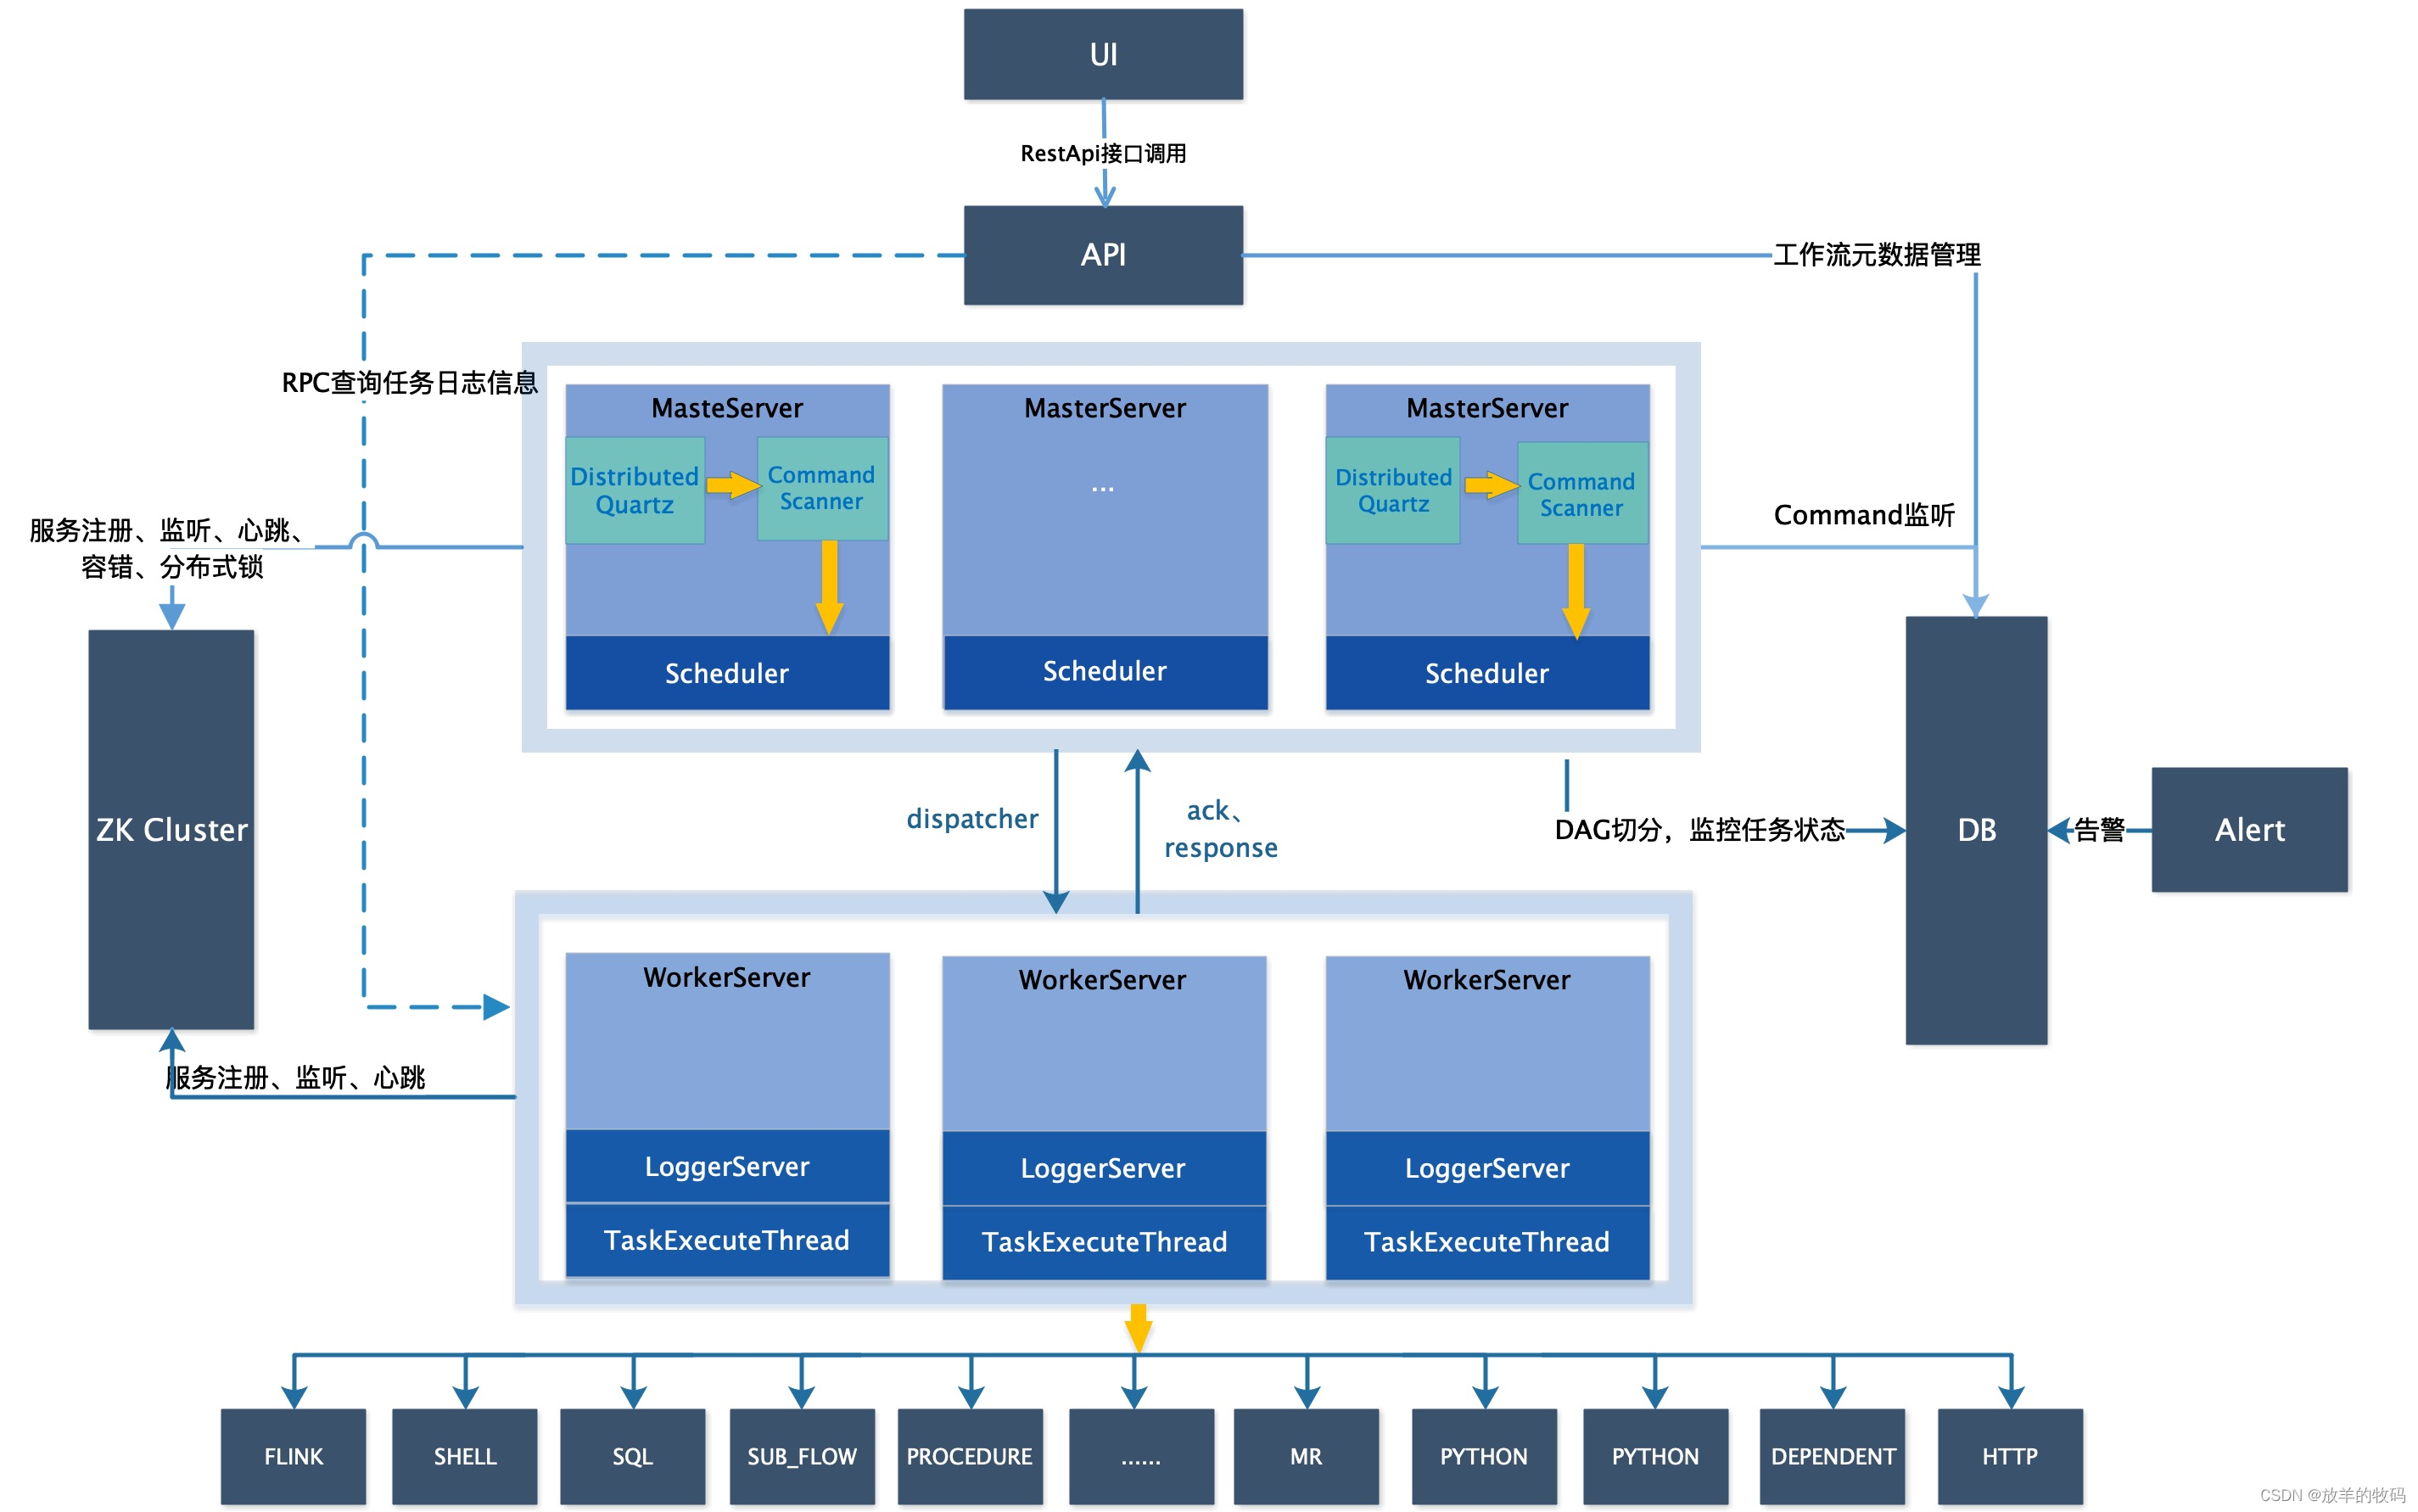
目前在大数据生态中,调度系统是不可或缺的一个重要组件。Apache DolphinScheduler 作为一个顶级的 Apache 项目,其稳定性和易用性也可以说是名列前茅的。而对于一个调度系统来说,能够支持的可调度的任务类型同样是一个非常重要的因素,在调度、分布式、高可用、易用性解决了的情况下,随着业务的发展或者各种需求使用到的组件增多,用户自然而然会希望能够快速、方便、简洁地对 Apache Dolphinscheduler 可调度的任务类型进行扩充。本文便带大家了解如何方便、极速扩充一个 Apache DolphinScheduler Task,如图底部一栏是我们本次需要讨论的他们是如何从 0 到 1 扩展的 Task 插件!
先吃点凉菜……
一、什么是 SPI 服务发现(What is SPI)
SPI 全称为 (Service Provider Interface) ,是 JDK 内置的一种服务提供发现机制。大多数人可能会很少用到它,因为它的定位主要是面向开发厂商的,在 java.util.ServiceLoader 的文档里有比较详细的介绍,其抽象的概念是指动态加载某个服务实现。
二、为什么要引入 SPI(Why did we introduce SPI)
不同的企业可能会有自己的组件需要通过 task 去执行,大数据生态中最为常用数仓工具 Apache Hive 来举例,不同的企业使用 Hive 方法各有不同。有的企业通过 HiveServer2 执行任务,有的企业使用 HiveClient 执行任务,而 Apache DolphinScheduler 提供的开箱即用的 Task 中并没有支持 HiveClient 的 Task,所以大部分使用者都会通过 Shell 去执行。然而,Shell 哪有天然的TaskTemplate 好用呢?所以,Apache DolphinScheduler 为了使用户能够更好地根据企业需求定制不同的 Task,便支持了 TaskSPI 化。
我们首先要了解一下 Apache DolphinScheduler 的 Task 改版历程,在 DS 1.3.x 时,扩充一个 Task 需要重新编译整个 Apache DolphinScheduler,耦合严重,所以在 Apache DolphinScheduler 2.0.x 引入了 SPI。前面我们提到了 SPI 的抽象概念是动态加载某个服务的实现,这里我们具象一点,将 Apache DolphinScheduler 的 Task 看成一个执行服务,而我们需要根据使用者的选择去执行不同的服务,如果没有的服务,则需要我们自己扩充,相比于 1.3.x 我们只需要完成我们的 Task 具体实现逻辑,然后遵守 SPI 的规则,编译成 Jar 并上传到指定目录,即可使用我们自己编写的 Task。
三、谁在使用它(Who is using it)
1、Apache DolphinScheduler
-
task
-
datasource
2、Apache Flink
-
flink sql connector:用户实现了一个flink-connector后,Flink也是通过SPI来动态加载
3、Spring Boot
-
spring boot spi
4、Jdbc
-
jdbc4.0以前, 开发人员还需要基于 Class.forName("xxx") 的方式来装载驱动,jdbc4也基于spi的机制来发现驱动提供商了,可以通过META-INF/services/java.sql.Driver文件里指定实现类的方式来暴露驱动提供者
5、更多
-
dubbo
-
common-logging
四、Apache DolphinScheduler SPI Process
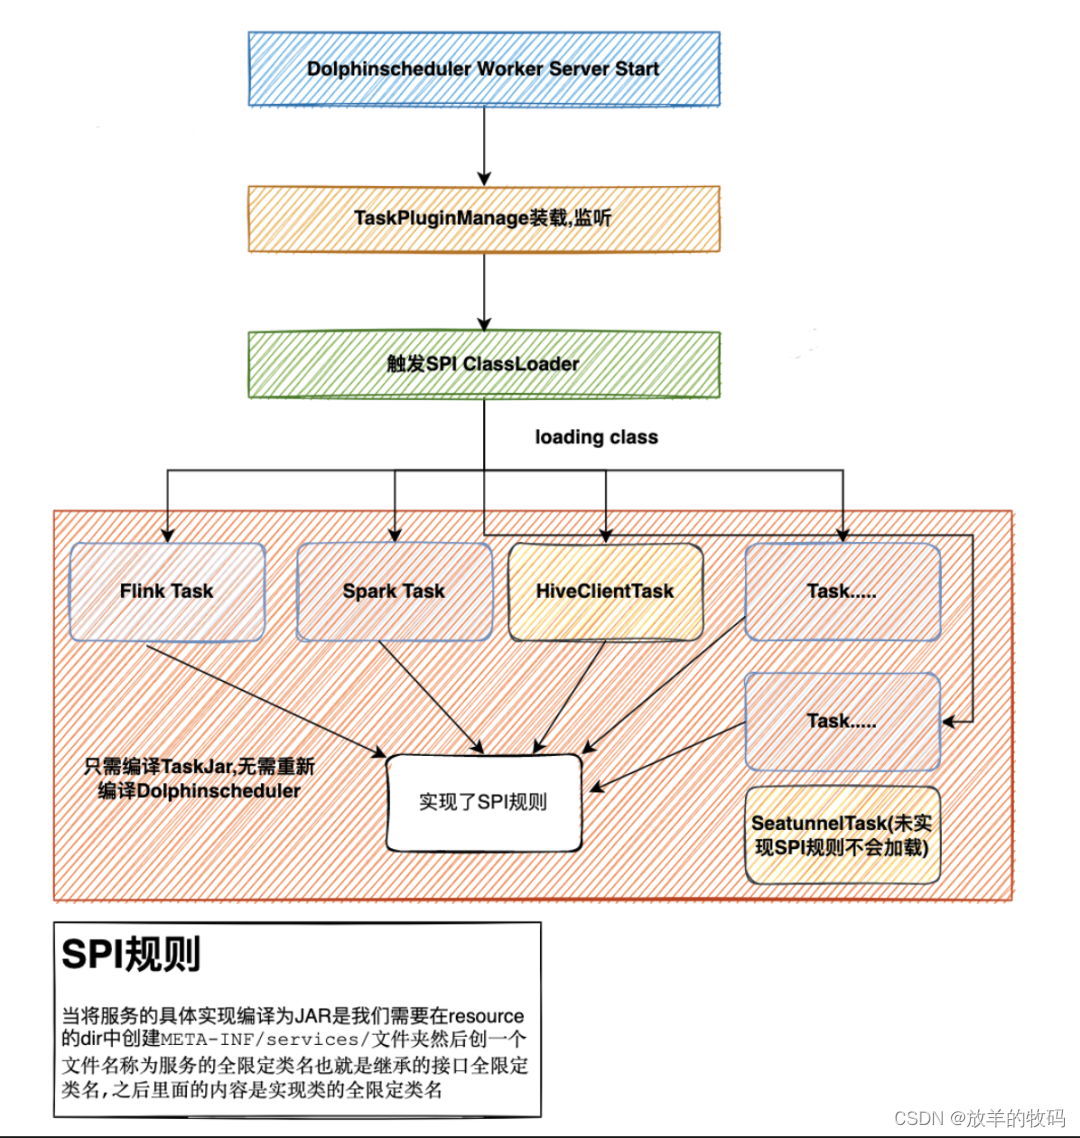
剖析一下上面这张图,我给 Apache DolphinScheduler 分为逻辑 Task 以及物理 Task,逻辑 Task 指 DependTask,SwitchTask 这种逻辑上的 Task;物理 Task 是指 ShellTask,SQLTask 这种执行任务的 Task。而在 Apache DolphinScheduler中,我们一般扩充的都是物理 Task,而物理 Task 都是交由 Worker 去执行,所以我们要明白的是,当我们在有多台 Worker 的情况下,要将自定义的 Task 分发到每一台有 Worker 的机器上,当我们启动 Worker 服务时,worker 会去启动一个 ClassLoader 来加载相应的实现了规则的 Task lib,可以看到 HiveClient 和 SeatunnelTask 都是用户自定义的,但是只有 HiveTask 被 Apache DolphinScheduler TaskPluginManage 加载了,原因是 SeatunnelTask 并没有去遵守 SPI 的规则。SPI 的规则图上也有赘述,也可以参考 java.util.ServiceLoader 这个类,下面有一个简单的参考(摘出的一部分代码,具体可以自己去看看)
public final class ServiceLoader<S> implements Iterable<S> {
    //scanning dir prefix
    private static final String PREFIX = "META-INF/services/";

    //The class or interface representing the service being loaded
    private final Class<S> service;

    //The class loader used to locate, load, and instantiate providers
    private final ClassLoader loader;

    //Private inner class implementing fully-lazy provider lookup
    private class LazyIterator implements Iterator<S> {
        Class<S> service;
        ClassLoader loader;
        Enumeration<URL> configs = null;
        String nextName = null;

        //......
        private boolean hasNextService() {
            if (configs == null) {
                try {
                    //get dir all class
                    String fullName = PREFIX + service.getName();
                    if (loader == null)
                        configs = ClassLoader.getSystemResources(fullName);
                    else
                        configs = loader.getResources(fullName);
                } catch (IOException x) {
                    //......
                }
                //......
            }
        }
    }
}- Ps:当然下文会有更简便的方式来实现 SPI——注解 @AutoService
好,接下来正式开始我们的正餐——如何扩展一个 Task Plugin
翠花,上热菜~
一、业务背景
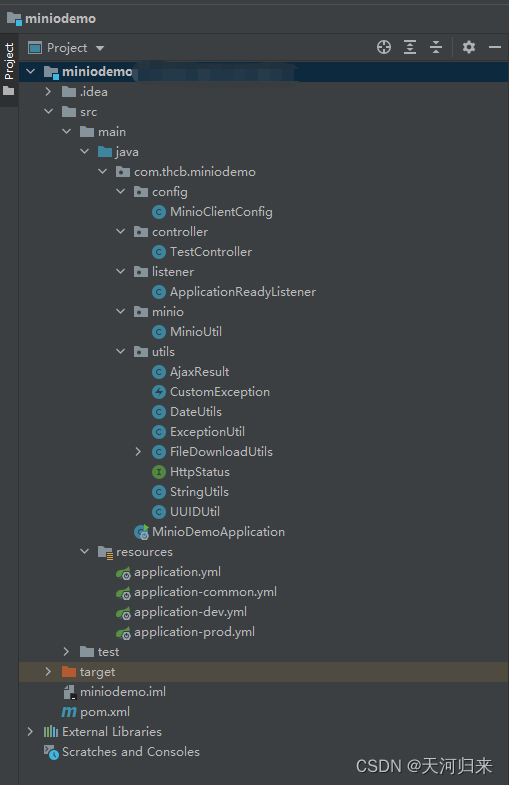
我们需要实现一个 Lock 分布式锁的插件,方便多个工作流同时执行某一段业务时,有一定的业务同步阻塞功能,以免出现并发问题。如图是项目结构图

二、Maven 依赖
<?xml version="1.0" encoding="UTF-8"?>
<project xmlns="http://maven.apache.org/POM/4.0.0"
         xmlns:xsi="http://www.w3.org/2001/XMLSchema-instance"
         xsi:schemaLocation="http://maven.apache.org/POM/4.0.0 http://maven.apache.org/xsd/maven-4.0.0.xsd">

    <parent>
        <artifactId>dolphinscheduler-task-plugin</artifactId>
        <groupId>org.apache.dolphinscheduler</groupId>
        <version>3.1.7</version>
    </parent>

    <modelVersion>4.0.0</modelVersion>
    <artifactId>dolphinscheduler-task-lock</artifactId>
    <packaging>jar</packaging>

    <properties>
        <maven.compiler.source>8</maven.compiler.source>
        <maven.compiler.target>8</maven.compiler.target>
    </properties>

    <dependencies>
        <dependency>
            <groupId>org.apache.dolphinscheduler</groupId>
            <artifactId>dolphinscheduler-spi</artifactId>
        </dependency>

        <dependency>
            <groupId>org.apache.dolphinscheduler</groupId>
            <artifactId>dolphinscheduler-task-api</artifactId>
        </dependency>
    </dependencies>
</project>三、创建 Task 通道工厂(TaskChannelFactory)
首先我们需要创建任务服务的工厂,其主要作用是帮助构建 TaskChannel 以及 TaskPlugin 参数,同时给出该任务的唯一标识,ChannelFactory 在 Apache DolphinScheduler 的 Task 服务组中,其作用属于是在任务组中的承上启下,交互前后端以及帮助 Worker 构建 TaskChannel
package org.apache.dolphinscheduler.plugin.task.lock;

/*
 * Licensed to the Apache Software Foundation (ASF) under one or more
 * contributor license agreements.  See the NOTICE file distributed with
 * this work for additional information regarding copyright ownership.
 * The ASF licenses this file to You under the Apache License, Version 2.0
 * (the "License"); you may not use this file except in compliance with
 * the License.  You may obtain a copy of the License at
 *
 *    http://www.apache.org/licenses/LICENSE-2.0
 *
 * Unless required by applicable law or agreed to in writing, software
 * distributed under the License is distributed on an "AS IS" BASIS,
 * WITHOUT WARRANTIES OR CONDITIONS OF ANY KIND, either express or implied.
 * See the License for the specific language governing permissions and
 * limitations under the License.
 */

import com.google.auto.service.AutoService;
import org.apache.dolphinscheduler.plugin.task.api.TaskChannel;
import org.apache.dolphinscheduler.plugin.task.api.TaskChannelFactory;
import org.apache.dolphinscheduler.spi.params.base.PluginParams;
import java.util.List;

@AutoService(TaskChannelFactory.class)
public class LockTaskChannelFactory implements TaskChannelFactory {

	/**
	 * 创建任务通道, 基于该通道执行任务
	 * @return 任务通道
	 */
    @Override
    public TaskChannel create() {
        return new LockTaskChannel();
    }

	/**
	 * 返回当前任务的全局唯一标识
	 * @return 任务类型名称
	 */
    @Override
    public String getName() {
        return "LOCK";
    }

	/**
	 * 前端页面需要用到的渲染, 一般也同步到
	 * @return
	 */
    @Override
    public List<PluginParams> getParams() {
        return null;
    }
}- Tips:这个注解就是我们上文提到过的,我们在文章末尾会稍微讲解下 @AutoService(TaskChannelFactory.class)
四、创建 TaskChannel
有了工厂之后,我们会根据工厂创建出 TaskChannel,TaskChannel 包含如下两个方法,一个是取消,一个是创建,目前不需要关注取消,主要关注创建任务
package org.apache.dolphinscheduler.plugin.task.lock;

/*
 * Licensed to the Apache Software Foundation (ASF) under one or more
 * contributor license agreements.  See the NOTICE file distributed with
 * this work for additional information regarding copyright ownership.
 * The ASF licenses this file to You under the Apache License, Version 2.0
 * (the "License"); you may not use this file except in compliance with
 * the License.  You may obtain a copy of the License at
 *
 *    http://www.apache.org/licenses/LICENSE-2.0
 *
 * Unless required by applicable law or agreed to in writing, software
 * distributed under the License is distributed on an "AS IS" BASIS,
 * WITHOUT WARRANTIES OR CONDITIONS OF ANY KIND, either express or implied.
 * See the License for the specific language governing permissions and
 * limitations under the License.
 */

import org.apache.dolphinscheduler.common.utils.JSONUtils;
import org.apache.dolphinscheduler.plugin.task.api.TaskChannel;
import org.apache.dolphinscheduler.plugin.task.api.TaskExecutionContext;
import org.apache.dolphinscheduler.plugin.task.api.parameters.AbstractParameters;
import org.apache.dolphinscheduler.plugin.task.api.parameters.ParametersNode;
import org.apache.dolphinscheduler.plugin.task.api.parameters.resource.ResourceParametersHelper;

public class LockTaskChannel implements TaskChannel {

    @Override
    public void cancelApplication(boolean status) {

    }

    @Override
    public LockTask createTask(TaskExecutionContext taskRequest) {
        return new LockTask(taskRequest);
    }

    @Override
    public AbstractParameters parseParameters(ParametersNode parametersNode) {
        return JSONUtils.parseObject(parametersNode.getTaskParams(), LockParameters.class);
    }

    @Override
    public ResourceParametersHelper getResources(String parameters) {
        return null;
    }
}
五、创建 Task 实现
通过 TaskChannel 我们得到了可执行的物理 Task,但是我们需要给当前 Task 添加相应的实现,才能够让 Apache DolphinScheduler 去执行你的任务,首先在编写 Task 之前我们需要先了解一下 Task 之间的关系
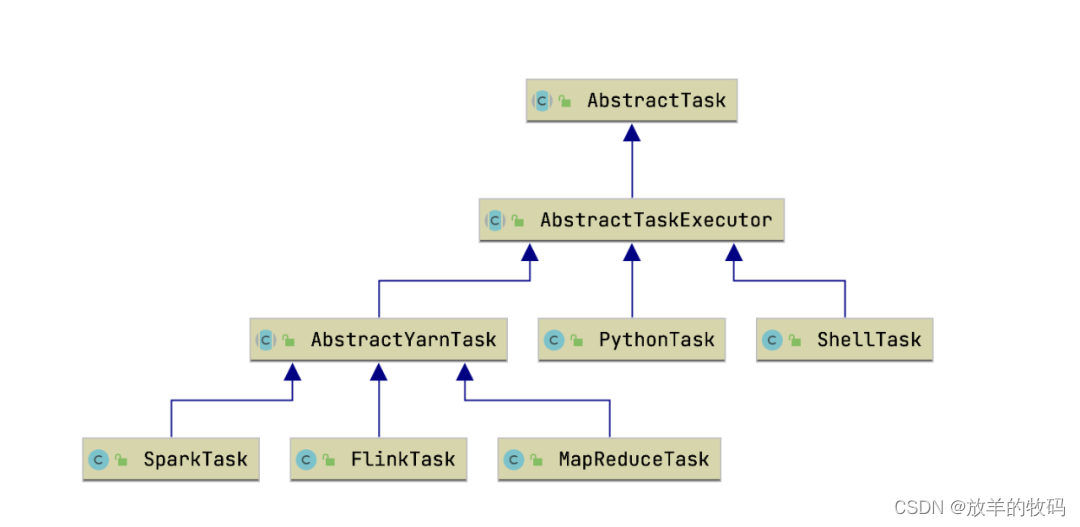
通过上图我们可以看到,基于 Yarn 执行任务的 Task 都会去继承 AbstractYarnTask,不需要经过 Yarn 执行的都会去直接继承 AbstractTaskExecutor,主要是包含一个 AppID,以及 CanalApplication setMainJar 之类的方法,想知道的小伙伴可以自己去深入研究一下,如上可知我们实现的 LockTask 就需要继承 AbstractTask,在构建 Task 之前,我们需要构建一下适配 LockTask 的 LockParameters 对象用来反序列化
这里其实主要根据自己的业务情况来增加需要的参数,顺便提醒下:如果自己在 DS 的上一层还有 SDK 封装的话,记得补齐这边对应的参数 TaskParams
package org.apache.dolphinscheduler.plugin.task.lock;

/*
 * Licensed to the Apache Software Foundation (ASF) under one or more
 * contributor license agreements.  See the NOTICE file distributed with
 * this work for additional information regarding copyright ownership.
 * The ASF licenses this file to You under the Apache License, Version 2.0
 * (the "License"); you may not use this file except in compliance with
 * the License.  You may obtain a copy of the License at
 *
 *    http://www.apache.org/licenses/LICENSE-2.0
 *
 * Unless required by applicable law or agreed to in writing, software
 * distributed under the License is distributed on an "AS IS" BASIS,
 * WITHOUT WARRANTIES OR CONDITIONS OF ANY KIND, either express or implied.
 * See the License for the specific language governing permissions and
 * limitations under the License.
 */

import org.apache.dolphinscheduler.plugin.task.api.parameters.AbstractParameters;

public class LockParameters extends AbstractParameters {

    private String key;

    private Long timeout;

    private Integer lockType;

    public Integer getLockType() {
        return lockType;
    }

    public void setLockType(Integer lockType) {
        this.lockType = lockType;
    }

    public String getKey() {
        return key;
    }

    public void setKey(String key) {
        this.key = key;
    }

    public Long getTimeout() {
        return timeout;
    }

    public void setTimeout(Long timeout) {
        this.timeout = timeout;
    }

    @Override
    public boolean checkParameters() {
        // 创建 Task 时,会调用该方法进行参数校验
        return key != null && !key.isEmpty() && timeout != null && lockType != null;
    }
}
继续把常量类也提一嘴,这个就是在 Task 实现类里如需要用到一些常量可以在这里定义
package org.apache.dolphinscheduler.plugin.task.lock;

/*
 * Licensed to the Apache Software Foundation (ASF) under one or more
 * contributor license agreements.  See the NOTICE file distributed with
 * this work for additional information regarding copyright ownership.
 * The ASF licenses this file to You under the Apache License, Version 2.0
 * (the "License"); you may not use this file except in compliance with
 * the License.  You may obtain a copy of the License at
 *
 *    http://www.apache.org/licenses/LICENSE-2.0
 *
 * Unless required by applicable law or agreed to in writing, software
 * distributed under the License is distributed on an "AS IS" BASIS,
 * WITHOUT WARRANTIES OR CONDITIONS OF ANY KIND, either express or implied.
 * See the License for the specific language governing permissions and
 * limitations under the License.
 */

public class LockConstants {

	public static final String LOG_TASK_NAME = "lock";
}
现在真的看 Task 实现类了……主要关注 handle 核心方法,这里如果有 redisson 相关报红的只需要注入下即可,当然这里因为不是 Bean 容器,所以需要从外面通过静态类单例模式来引入即可
package org.apache.dolphinscheduler.plugin.task.lock;

/*
 * Licensed to the Apache Software Foundation (ASF) under one or more
 * contributor license agreements.  See the NOTICE file distributed with
 * this work for additional information regarding copyright ownership.
 * The ASF licenses this file to You under the Apache License, Version 2.0
 * (the "License"); you may not use this file except in compliance with
 * the License.  You may obtain a copy of the License at
 *
 *    http://www.apache.org/licenses/LICENSE-2.0
 *
 * Unless required by applicable law or agreed to in writing, software
 * distributed under the License is distributed on an "AS IS" BASIS,
 * WITHOUT WARRANTIES OR CONDITIONS OF ANY KIND, either express or implied.
 * See the License for the specific language governing permissions and
 * limitations under the License.
 */

import org.apache.dolphinscheduler.common.enums.LockType;
import org.apache.dolphinscheduler.common.redis.LockClient;
import org.apache.dolphinscheduler.common.utils.JSONUtils;
import org.apache.dolphinscheduler.plugin.task.api.*;
import org.apache.dolphinscheduler.plugin.task.api.parameters.AbstractParameters;
import org.apache.dolphinscheduler.plugin.task.lock.LockParameters;
import org.redisson.api.RLock;
import org.redisson.api.RedissonClient;
import java.util.concurrent.TimeUnit;

/**
 * lock task
 */
public class LockTask extends AbstractTask {

    protected LockParameters lockParameters;

    protected TaskExecutionContext taskRequest;

    public LockTask(TaskExecutionContext taskRequest) {
        super(taskRequest);
        this.taskRequest = taskRequest;
    }

    @Override
    public void init() {
        logger.info(LockConstants.LOG_TASK_NAME + " task params {}", taskRequest.getTaskParams());

        lockParameters = JSONUtils.parseObject(taskRequest.getTaskParams(), LockParameters.class);

        if (!lockParameters.checkParameters()) {
            throw new TaskException(LockConstants.LOG_TASK_NAME + " task params is not valid");
        }
    }

    @Override
    public void handle(TaskCallBack taskCallBack) throws TaskException {
        try {
            run();
        } catch (Exception e) {
            logger.error(LockConstants.LOG_TASK_NAME + " task failure", e);
            setExitStatusCode(TaskConstants.EXIT_CODE_FAILURE);
            throw new TaskException("run " + LockConstants.LOG_TASK_NAME + " task error", e);
        }
    }

    /**
     * 核心处理
     * @param
     */
    private void run() {
        Integer lockType = lockParameters.getLockType();
        if (lockType == LockType.LCOKED.getCode()) {
            lockHandle();
        } else if (lockType == LockType.UNLOCKED.getCode()) {
            unlockHandle();
        } else {
            setExitStatusCode(TaskConstants.EXIT_CODE_FAILURE);
        }
    }

    /**
     * 加锁处理
     * @param
     */
    private void lockHandle() {
        boolean islock = false;
        RedissonClient redissonClient = LockClient.get();
        String key = lockParameters.getKey();
        Long timeout = lockParameters.getTimeout();
        RLock lock = redissonClient.getLock(key);
        try {
            islock = lock.tryLock(timeout, TimeUnit.SECONDS);
            setExitStatusCode(TaskConstants.EXIT_CODE_SUCCESS);
        } catch (Exception e) {
            throw new RuntimeException(e);
        } finally {
            if (!islock) {
                lock.forceUnlock();
            }
        }
    }

    /**
     * 解锁处理
     * @param
     */
    private void unlockHandle() {
        RedissonClient redissonClient = LockClient.get();
        String key = lockParameters.getKey();
        RLock lock = redissonClient.getLock(key);
        if (lock.isLocked()) {
            lock.forceUnlock();
        }
        setExitStatusCode(TaskConstants.EXIT_CODE_SUCCESS);
    }

    @Override
    public void cancel() throws TaskException {}

    @Override
    public AbstractParameters getParameters() {
        return lockParameters;
    }
}六、遵守 SPI 规则
方法一
(1)Resource下创建META-INF/services文件夹,创建接口全类名相同的文件
└── META-INF
└── services
└── org.apache.dolphinscheduler.spi.task.TaskChannelFactory

(2)在文件中写入实现类的全限定类名
org.apache.dolphinscheduler.plugin.task.lock.LockTaskChannelFactory方法二(推荐)
使用上文一直提到的 @AutoService 注解,只要加在工厂类头上即可,注意别引入错了 package 是 google 旗下的。这样一来就会在编译的时候自动出现在 target 里
import com.google.auto.service.AutoService;

@AutoService(TaskChannelFactory.class)
public class LockTaskChannelFactory implements TaskChannelFactory {…}
七、打包 & 部署
mvn clean installTips:当然在其他的 Api-Server 等其他 Xxx-Server 里,如果用到了该插件也是需要放在其路径下,重点在 worker-server 和 api-server,其余看情况。好了,本次教程到此结束~





![[docker]笔记-存储管理](https://img-blog.csdnimg.cn/77488b9225ac437fbfd10209e4219b3f.png)
