应用程序中的View框架
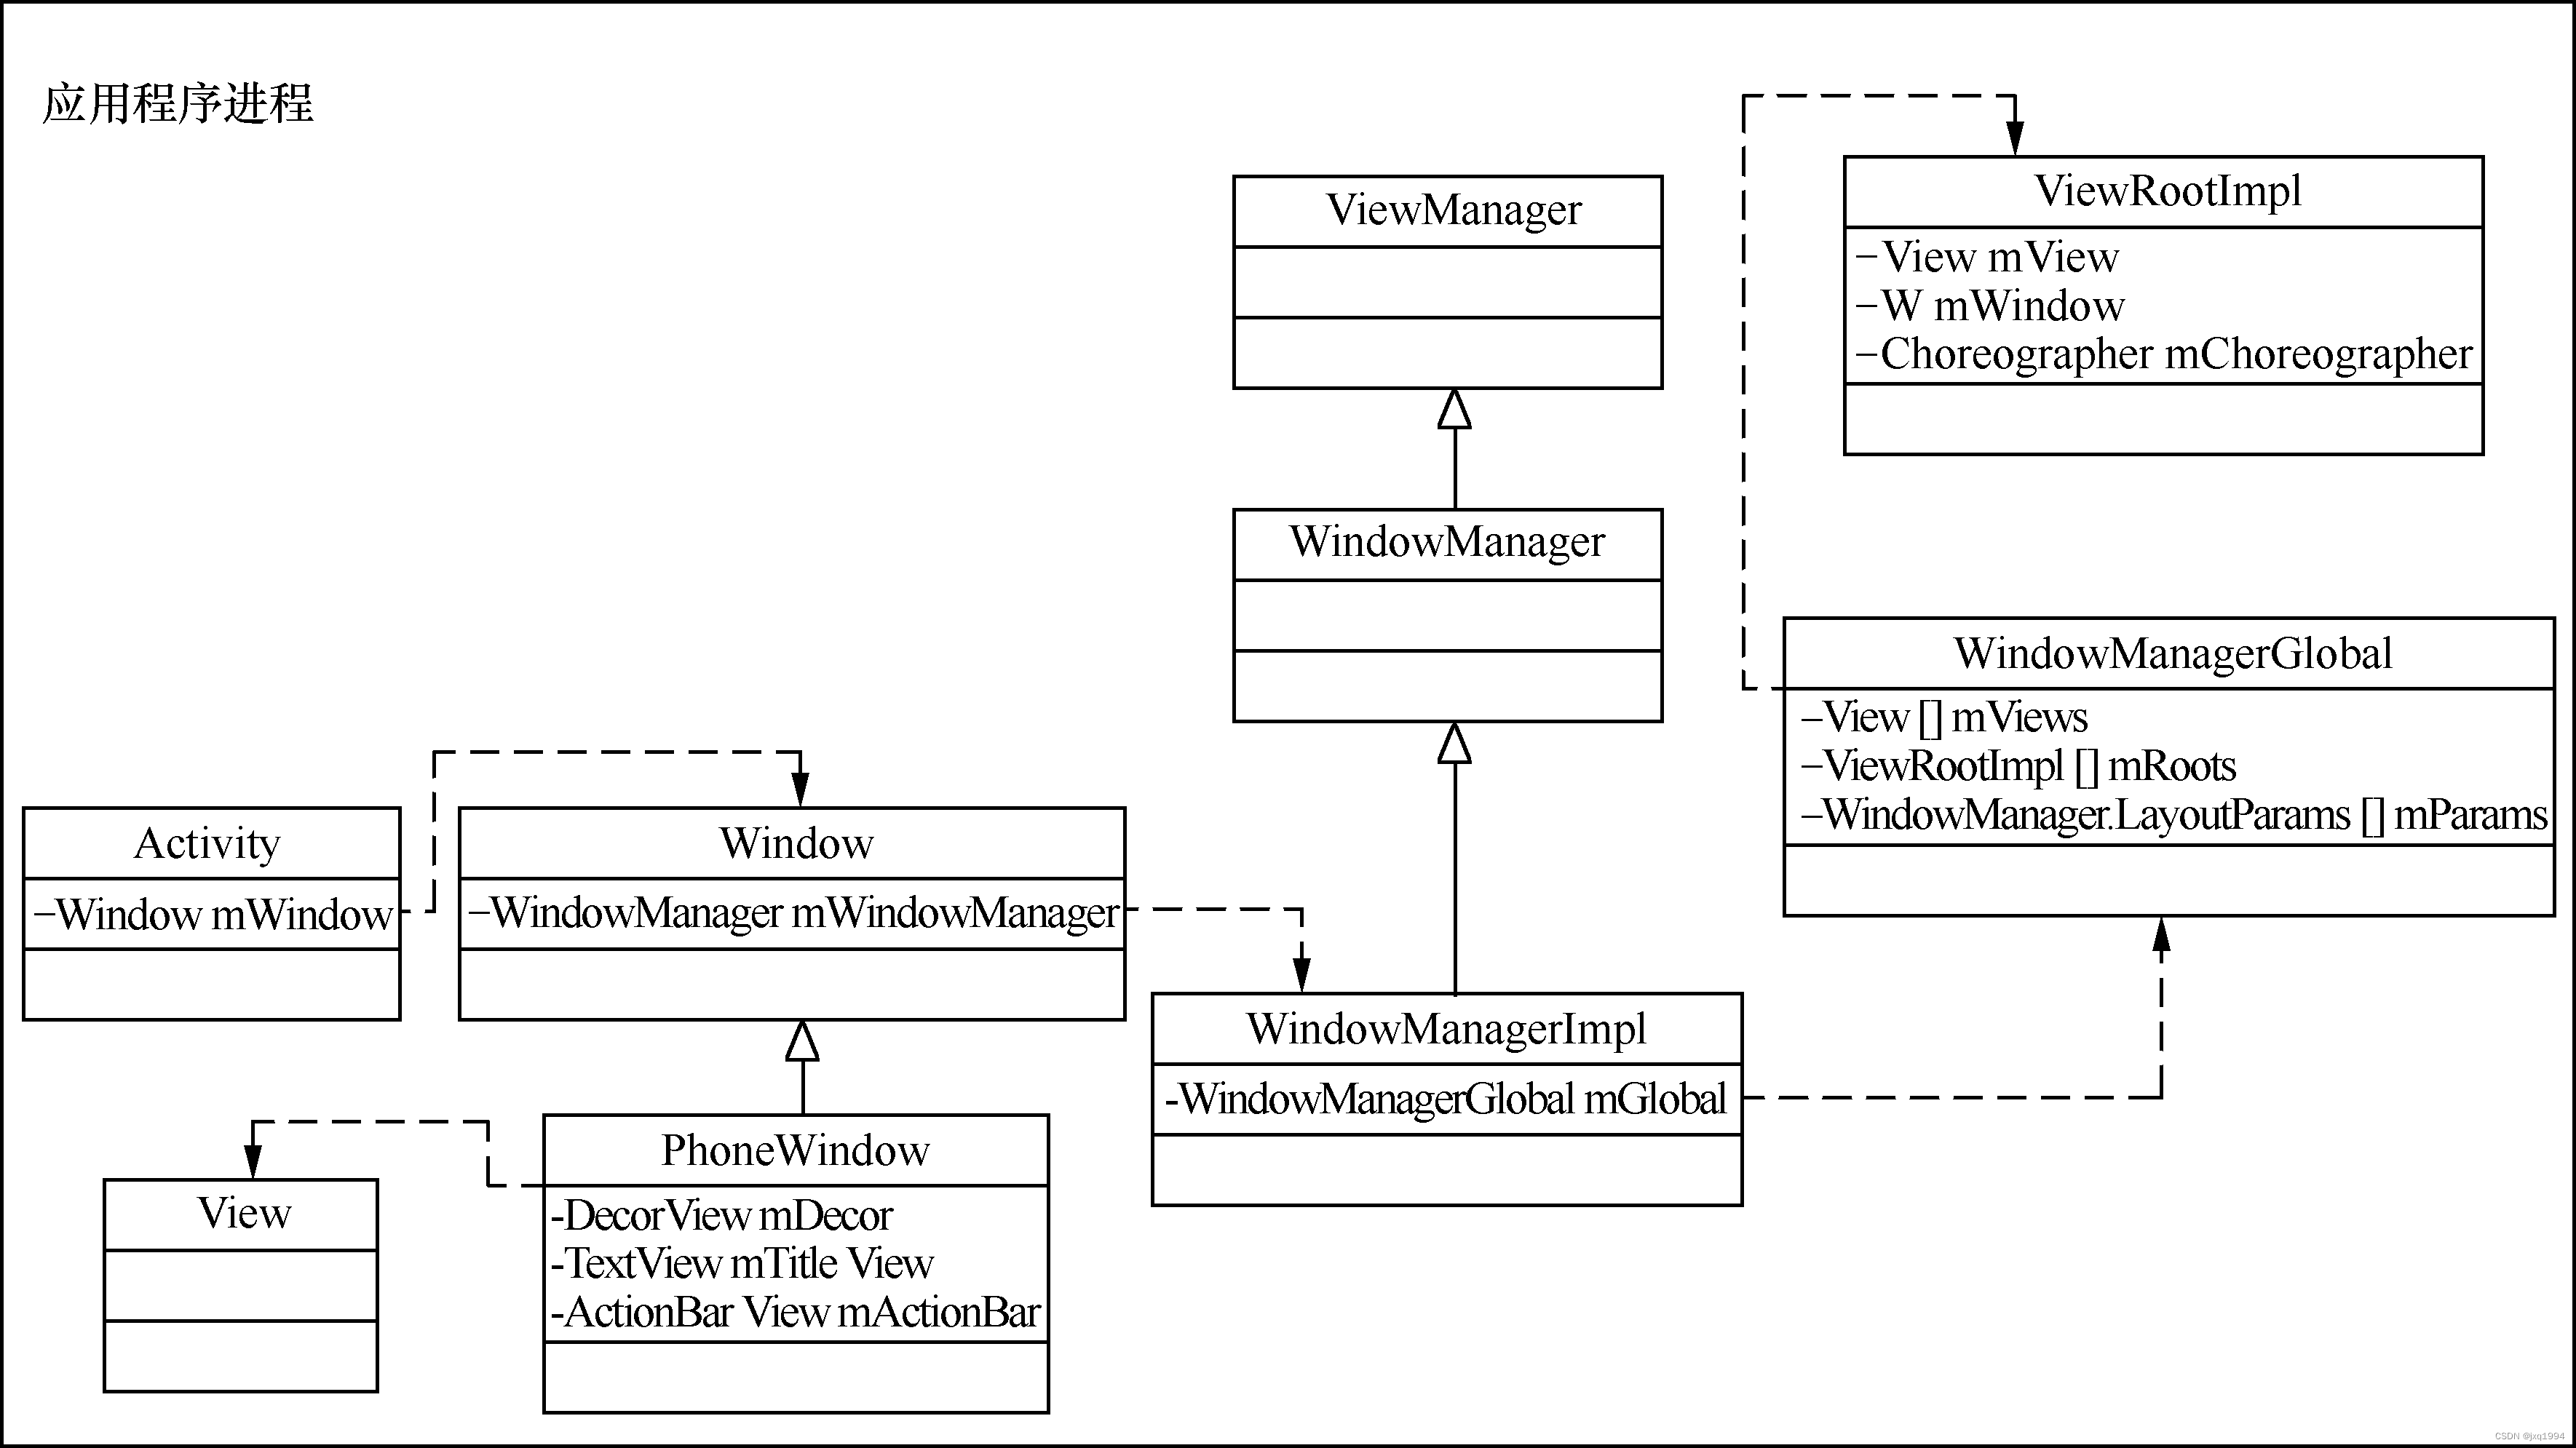
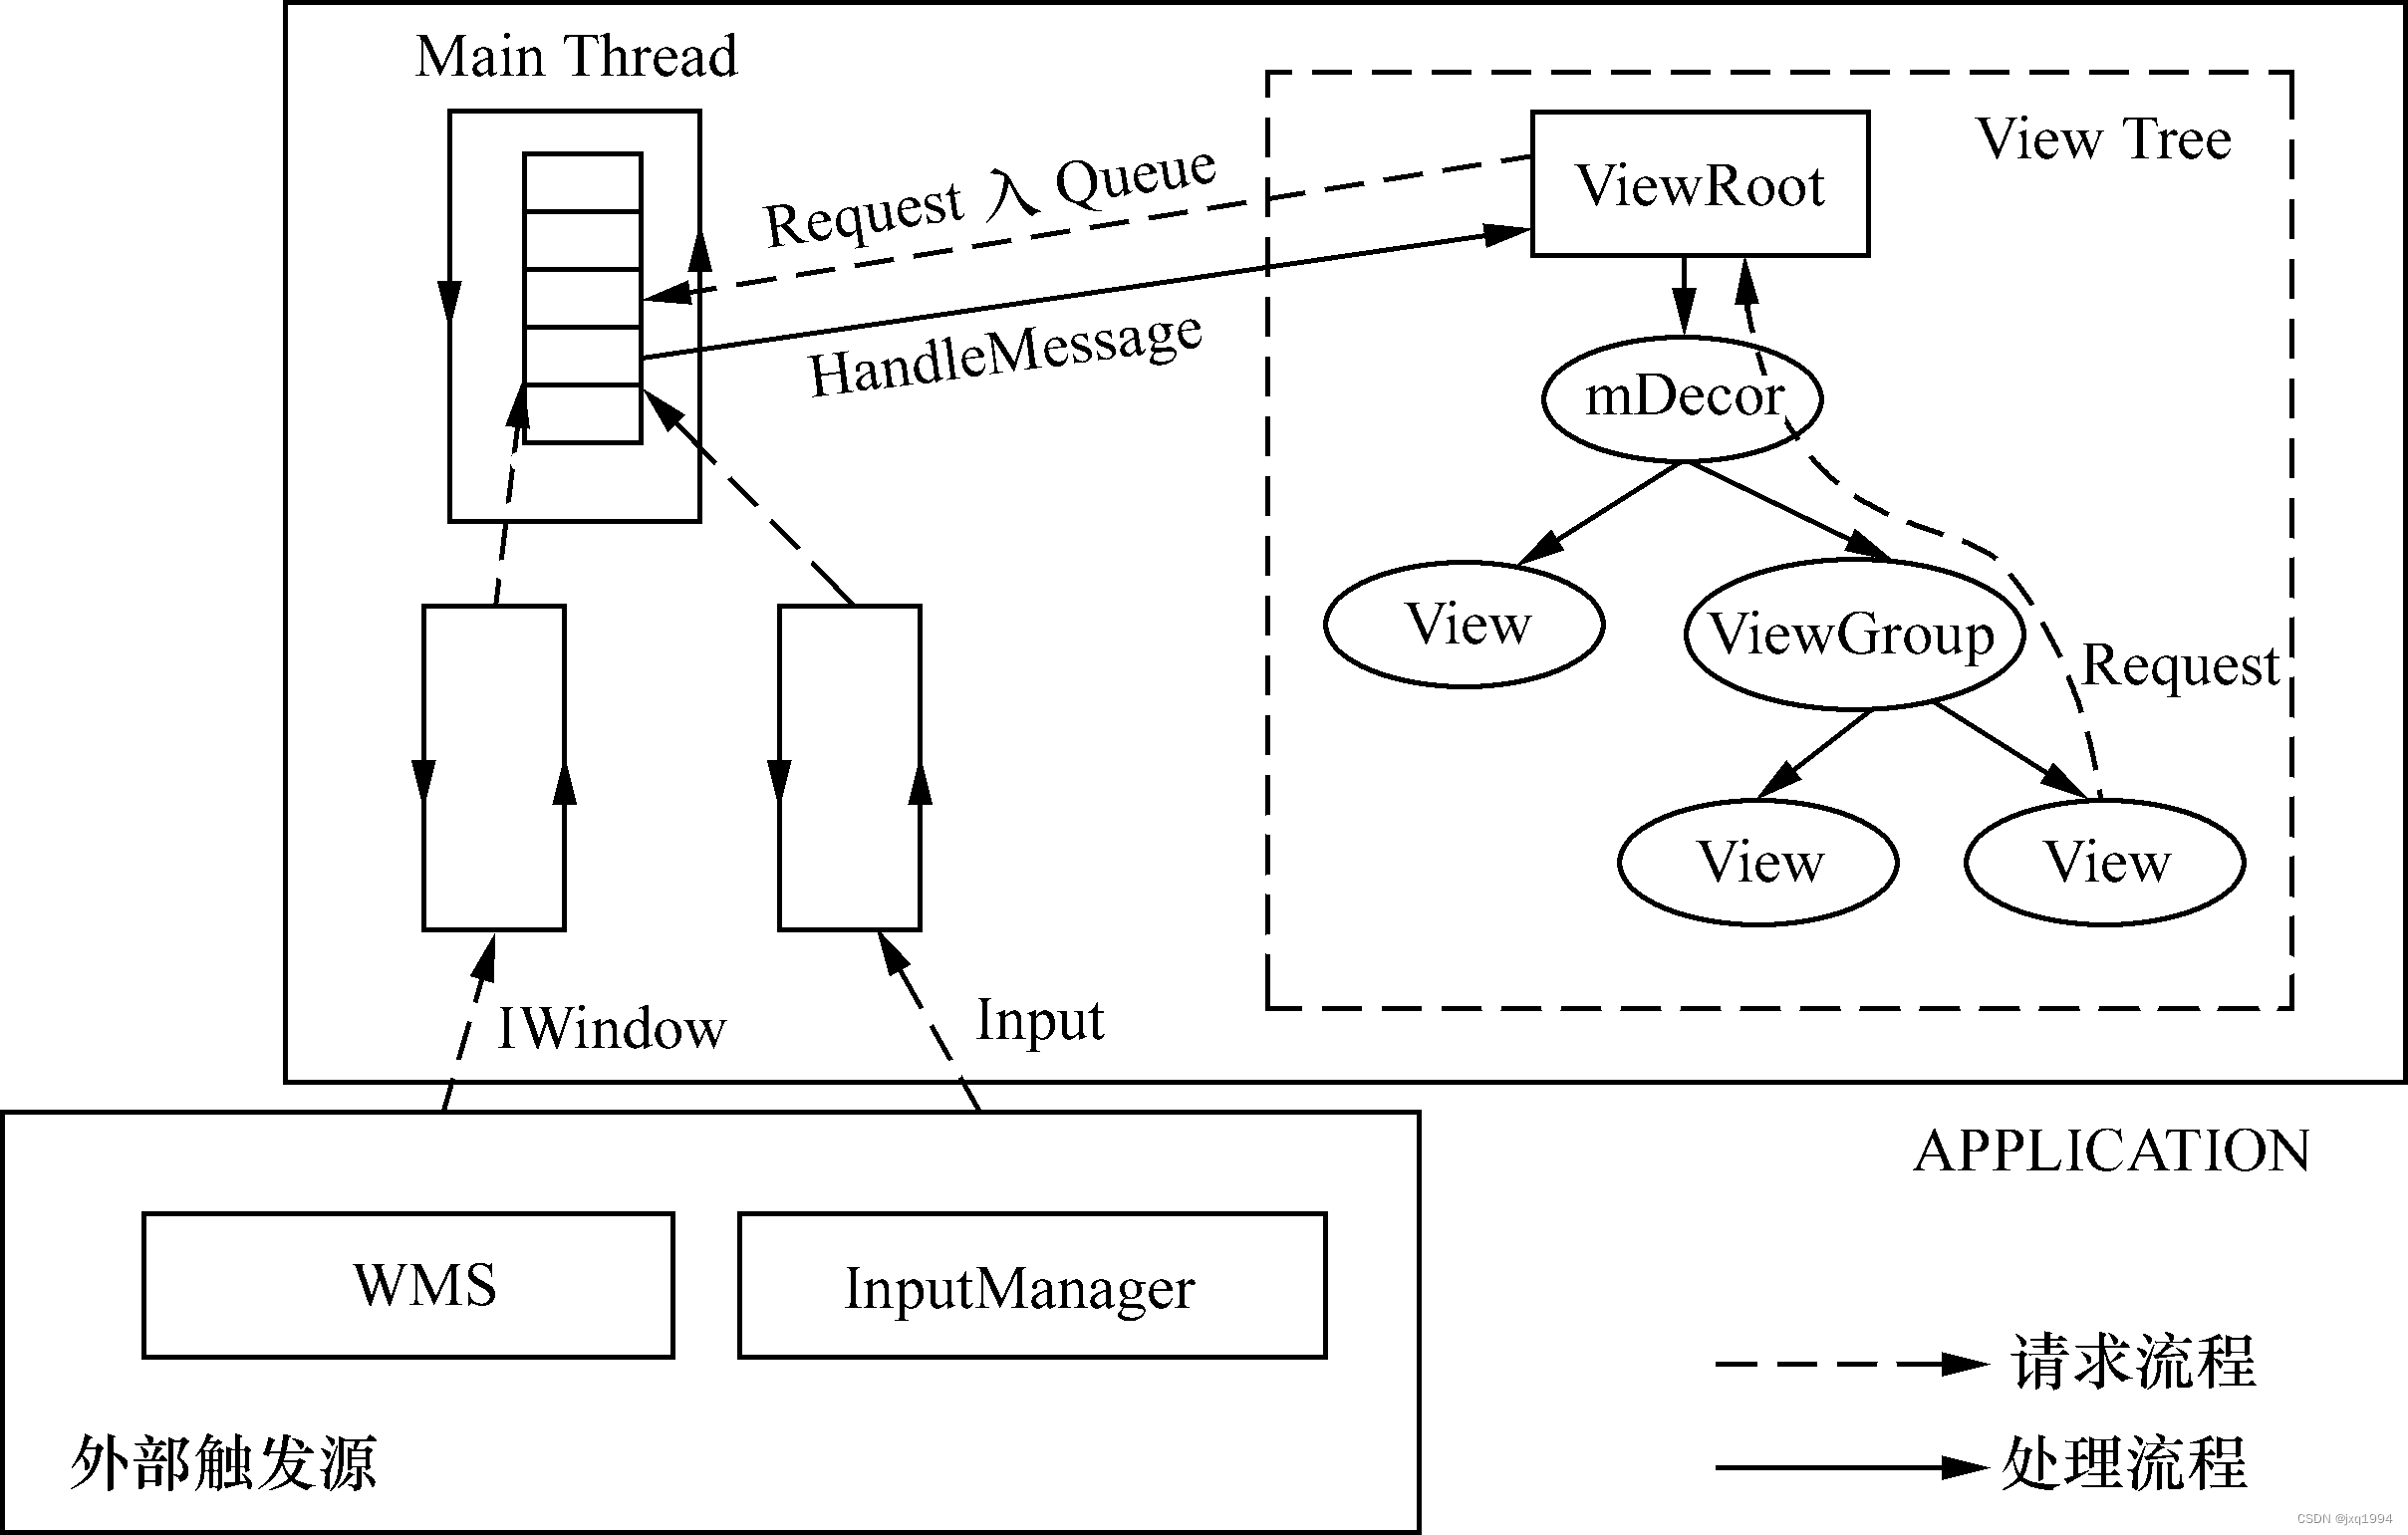
应用程序中的View框架如图所示。
View和ViewRoot
如果以xml文件来描述UI界面的layout,可以发现里面的所有元素实际上都形成了树状结构的关系,比如:
<LinearLayout xmlns:android="http://schemas.android.com/apk/res/android"
    android:id="@+id/top"...>
 <LinearLayout android:id="@+id/digits_container"...>
  <com.android.contacts.dialpad.DigitsEditText android:id="@+id/digits".../>
  <ImageButton  android:id="@+id/deleteButton".../>
 </LinearLayout>
 <View android:id="@+id/viewEle".../>
</LinearLayout>
这个xml文件中各元素的关系如图所示。
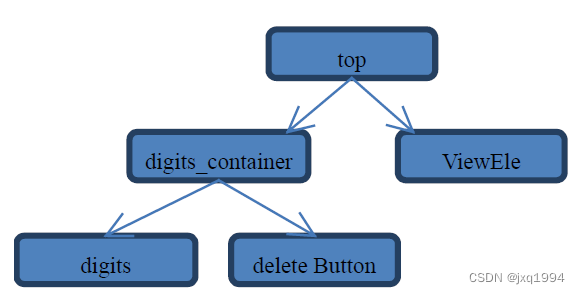
从名称来理解,“ViewRoot”似乎是“View树的根”。这很容易让人产生误解,因为ViewRoot并不属于View树的一分子。从源码实现上来看,ViewRoot和View对象并没有任何“血缘”关系,它既非View的子类,也非View的父类。更确切地说,ViewRoot可以被理解为“View树的管理者”——它有一个mView成员变量,指向的是它所管理的View树的根,即图中id为“top”的元素。
ViewRoot的核心任务就是与WindowManagerService进行通信。
Activity和Window的关系
Activity是支持UI显示的,那么它是否直接管理View树或者ViewRoot呢?答案是否定的。Activity并没有与这两者产生直接的联系,这中间还有一个被称为“Window”的对象。
具体而言,Activity内部有一个mWindow成员变量。如下所示:
private Window mWindow;
Window的字面意思是“窗口”,这很好地解释了它存在的意义。Window是基类,根据不同的产品可以衍生出不同的子类——具体则是由系统在Activity.attach中调用PolicyManager.make NewWindow决定的,目前版本的Android系统默认生成的都是PhoneWindow。
Window与WindowManagerImpl的关系
先来看Window,它是面向Activity的,表示“UI界面的外框”;而“框里面”具体的东西包括布局和内容等,是由具体的Window子类,如PhoneWindow来规划的。但无论最终生成的窗口怎样,Activity都是不需要修改的。
Window的另一层含义是要与WindowManagerService进行通信,但它并没有直接在自身实现这一功能。原因就是:一个应用程序中很可能存在多个Window。如果它们都单独与WMS通信,那么既浪费资源,又会造成管理的混乱。换句话说,它们需要统一的管理。于是就有了WindowManager,它作为Window的成员变量mWindowManager存在。这个WindowManager是一个接口类,其真正的实现是WindowManagerImpl,后者同时也是整个应用程序中所有Window的管理者
ViewRoot和WindowManagerImpl的关系
在WindowManagerImpl内部通过WindowManagerGlobal类来统一管理ViewRoot与View树,WindowManagerGlobal存在3个全局变量:
private final ArrayList<View> mViews = new ArrayList<View>();
private final ArrayList<ViewRootImpl> mRoots = new ArrayList<ViewRootImpl>();
private final ArrayList<WindowManager.LayoutParams> mParams = new ArrayList<WindowManager.LayoutParams>();
它们分别用于表示View树的根节点、ViewRoot以及Window的属性。由此也可以看出,一个进程中不仅有一个ViewRoot;而Activity与ViewRoot则是一对一的关系。
ViewRoot与WindowManagerService的关系
每一个ViewRootImpl内部,都有一个全局变量:
static IWindowSession sWindowSession;
这个变量用于ViewRoot到WMS的连接,它是ViewRoot利用WMS的opneSession()接口来创建得到的。在此基础上,ViewRoot也会通过IWindowSession.add()方法提供一个IWindow对象——从而让WMS也可以通过这个Binder对象来与ViewRoot进行双向通信。
Activity、WindowManagerGlobal和WMS等的关系如图:
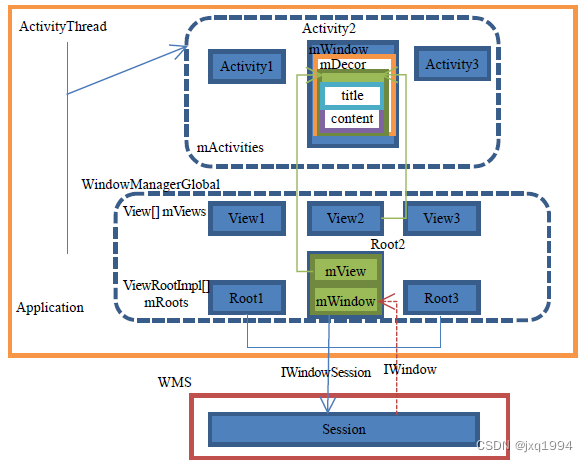
每个Application都有一个ActivityThread主线程以及mActivities全局变量,后者记录了运行在应用程序中的所有Activity对象。一个Activity对应唯一的WindowManager以及ViewRootImpl。WindowManagerGlobal作为全局管理者,其内部的mRoots和mViews记录了各Activity的ViewRootImpl和View树的顶层元素。ViewRootImpl的另一个重要角色就是负责与WMS进行通信。从ViewRootImpl到WMS间的通信利用的是IWindowSession,而反方向则是由IWindow来完成的。
Activity中View Tree的创建过程
Activity与其他组件最大的不同,就是其内部拥有完整的界面显示机制,这涉及了ViewRootImpl,Window以及由它们管理的View Tree等。
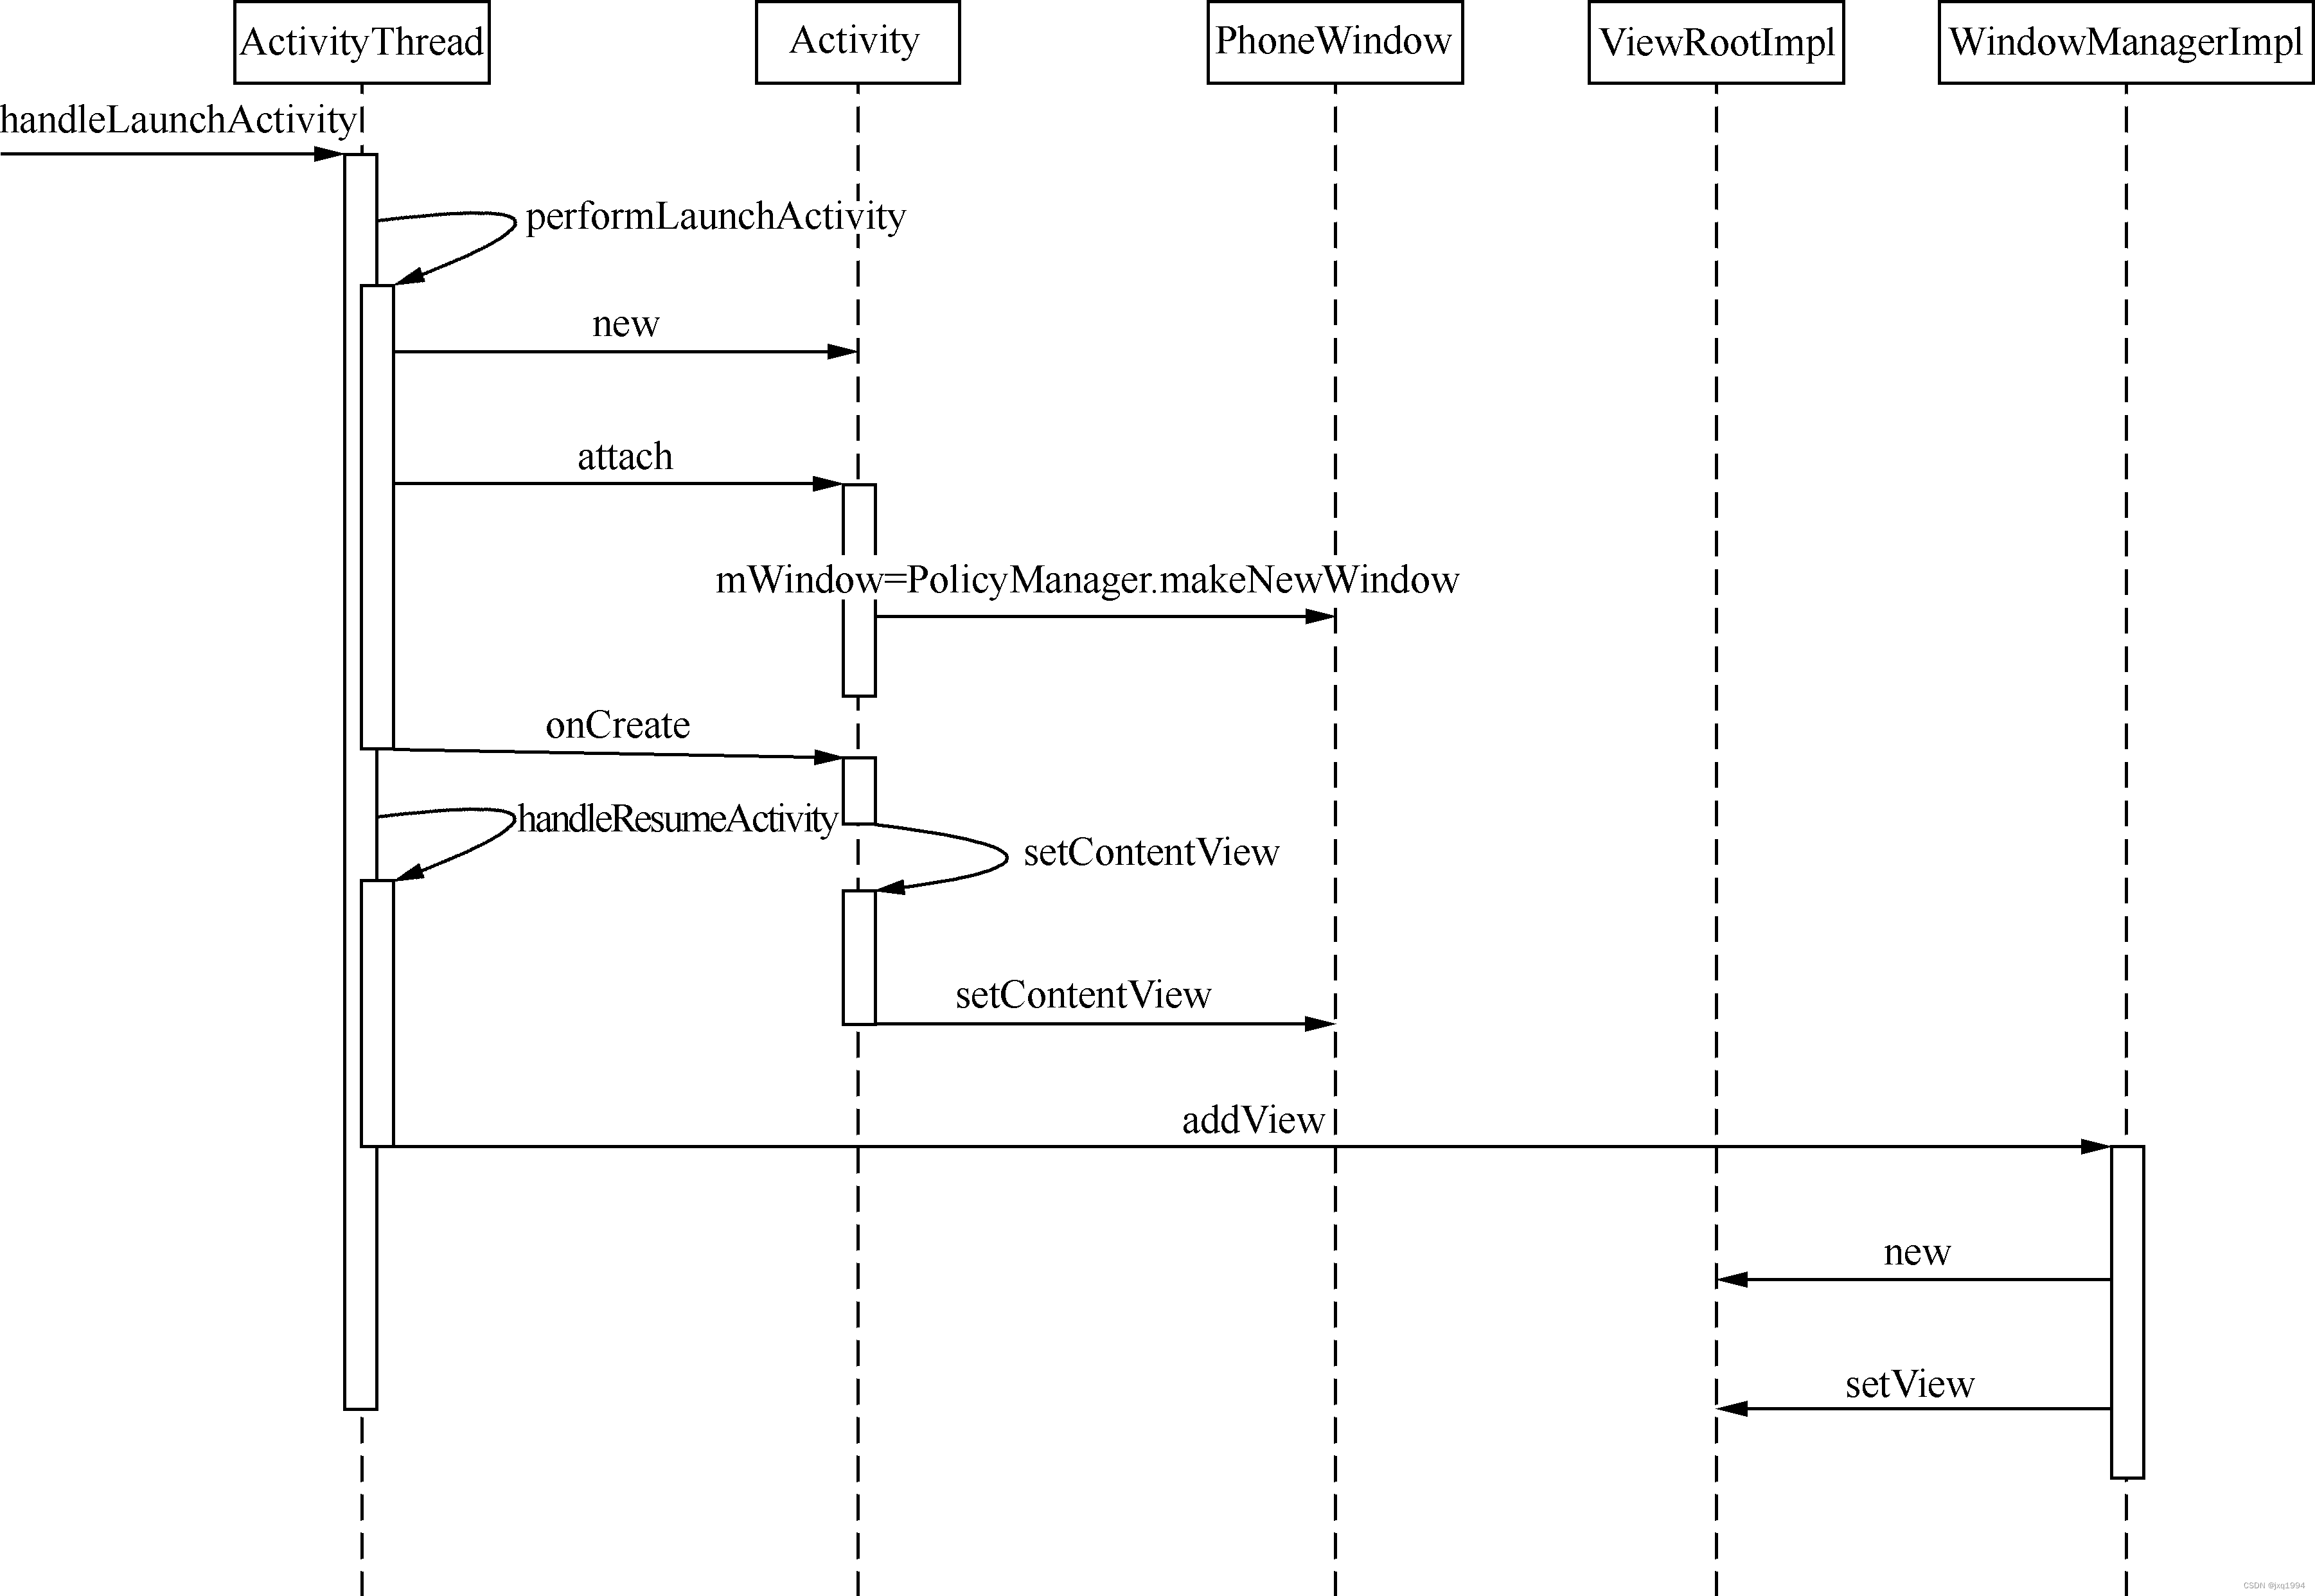 参与View Tree创建的有几个主体,即ActivityThread、Activity、PhoneWindow、ViewRootImpl和WM(这里先不严格区分是本地的WindowManager还是服务端的WindowManagerService)。
-
Step1. 作为应用程序的主线程,ActivityThread负责处理各种核心事件。比如“AMS通知应用进程去启动一个Activity”这个任务,最终将转化为ActivityThread所管理的LAUNCH_ ACTIVITY消息,然后调用handleLaunchActivity,这是整个ViewTree建立流程的起点。
-
Step2.在handleLaunchActivity内部,又可以细分为两个子过程 (
performLaunchActivity和handleResumeActivity):
/*frameworks/base/core/java/android/app/ActivityThread.java*/
private void handleLaunchActivity(ActivityClientRecord r, Intent customIntent) {
    …
    Activity a = performLaunchActivity(r, customIntent);//启动(加载)Activity
    if (a != null) {
 handleResumeActivity(r.token, false, r.isForward);//Resume这个Activity
        …
    }…
performLaunchActivity
private Activity performLaunchActivity(ActivityClientRecord r, Intent customIntent) {
        …
        Activity activity = null;
        try {
            java.lang.ClassLoader cl = r.packageInfo.getClassLoader();//类加载器
            activity = mInstrumentation.newActivity(cl, component.getClassName(), r.intent);
            /*加载这个Activity对象*/
            …
        } catch (Exception e) {
           …
        }

        try {
            Application app = r.packageInfo.makeApplication(false, mInstrumentation);
            …
            if (activity != null) {
                …
                activity.attach(appContext, this, getInstrumentation(), r.token,
                        r.ident, app, r.intent, r.activityInfo, title, r.parent,
                        r.embeddedID, r.lastNonConfigurationInstances, config);
                …
                mInstrumentation.callActivityOnCreate(activity, r.state);/*最终会调用
                                                                 Activity.onCreate()*/
                …
        } catch (SuperNotCalledException e) {
            …
            return activity;
        }
这个函数的主要任务是生成一个Activity对象,并调用它的attach方法,然后通过Instrumentation.callActivityOnCreate间接调用Activity.onCreate。其中attach将为Activity内部众多全局变量赋值——最重要的就是mWindow。源代码如下:
mWindow = PolicyManager.makeNewWindow(this);
这里得到的就是一个PhoneWindow对象,它在每个Activity中有且仅有一个实例。我们知道,“Window”在Activity中可以被看成“界面的框架抽象”,所以有了Window后,下一步肯定还要生成具体的View内容,即Activity中的mDecor。Decor的原义是“装饰”。换句话说,它除了包含Activity中实际想要显示的内容外,还必须具备所有应用程序共同的“装饰”部分,如Title,ActionBar等(最终是否要显示这些“装饰”,则取决于应用程序自身的需求)。
产生DecorView的过程是由setContentView发起的,这也就是开发者需要在onCreate时调用这个函数的原因。而onCreate本身则是由mInstrumentation.callActivityOnCreate(activity, r.state)间接调用的。
Activity中的setContentView只是一个中介,它将通过对应的Window对象来完成DecorView的构造:
/*frameworks/base/policy/src/com/android/internal/policy/impl/PhoneWindow.java*/
      public void setContentView(int layoutResID) {
        if (mContentParent == null) {//如果是第一次调用这个函数的情况下
 installDecor();//需要首先生成mDecor对象
        } else {
            mContentParent.removeAllViews();//不是第一次调用此函数,先移除掉旧的
        }
        mLayoutInflater.inflate(layoutResID, mContentParent);//根据ResId来创建View对象
      …
    }
变量mContentParent是一个ViewGroup对象,它用于容纳“ContentView”。当mContentParent为空时,说明是第一次调用setContentView。此时mDecor也必定为空,因而调用installDecor创建一个DecorView;否则先清理mContentParent中已有的所有View对象。最后通过layoutResID来inflate新的内容(mContentParent就是这个由layoutResID生成的View树的根)。
函数installDecor有两个任务,即生成mDecor和mContentParent。
private void installDecor() {
        if (mDecor == null) {
            mDecor = generateDecor();
            …
        }
		...
		 if (mContentParent == null) {
            mContentParent = generateLayout(mDecor);
            …
        }
}
 protected ViewGroup generateLayout(DecorView decor) {
       TypedArray a = getWindowStyle();//获取窗口样式
       mIsFloating =a.getBoolean(com.android.internal.R.styleable.Window_windowIsFloa
       ting, false);
       …
       int layoutResource;
       int features = getLocalFeatures();
       if ((features & ((1 << FEATURE_LEFT_ICON) | (1 << FEATURE_RIGHT_ICON))) != 0) {
           …//根据具体的样式为layoutResource挑选匹配的资源
       } else if ((features & ((1 << FEATURE_PROGRESS) | (1 <<
                   FEATURE_INDETERMINATE_PROGRESS))) != 0
                   && (features & (1 << FEATURE_ACTION_BAR)) == 0) {
           …
       } else if ((features & (1 << FEATURE_CUSTOM_TITLE)) != 0) {
          …
       } else if ((features & (1 << FEATURE_NO_TITLE)) == 0) {
          …
       } else if ((features & (1 << FEATURE_ACTION_MODE_OVERLAY)) != 0) {
           …
       } else {
          …
            //默认加载该布局
            layoutResource = R.layout.screen_simple;
       }
       …
       View in = mLayoutInflater.inflate(layoutResource, null);//将资源inflate出来
       // 根据feature确定DecorView子布局,并添加填充满DecorView
       decor.addView(in, new ViewGroup.LayoutParams(MATCH_PARENT, MATCH_PARENT));
       ViewGroup contentParent = (ViewGroup)findViewById(ID_ANDROID_CONTENT);
       …
       return contentParent;
    }
-
取出Window样式,如windowIsFloating、windowNoTitle,windowFullscreen等。
-
根据上一步得出的样式来挑选符合要求的layout资源,并由layoutResource来表示。
比如通过以下语句:
(features & ((1 << FEATURE_LEFT_ICON) | (1 << FEATURE_RIGHT_ICON))) != 0)
可以得知应用程序的UI界面是否需要左、右两个icon;系统framework提供的这些默认layout文件统一存放在frameworks/base/core/res/res/layout中。要特别注意的是,不论哪种layout都必须包含id值为“content”的View对象,否则将发生异常。
根据layoutResource指定的layout(xml)文件,来inflate出相应的View对象。然后把这一新对象addView到mDecor(DecorView是一个FrameLayout)中;最后,整个generateLayout函数的返回值是一个id为ID_ANDROID_CONTENT= com.android.internal.R.id.content的对象,即mContentParent。
 这个mContentParent是一个id为com.android.internal.R.id.content的View,它的作用是加载setContentView中传进来的资源文件。
由此可知,setContentView实际上做的工作就是把应用程序想要显示的视图(ContentView)加上系统策略中的其他元素(比如Title,Action),合成出用户所看到的最终应用程序的界面(如上图所示)。需要注意的是,setContentView并不负责将这一视图真正地显示出来。有一个实验也可以证明一点,读者可以尝试在Activity中不调用setContentView,看下最终应用程序的界面是否还能照常显示出来——只是中间的“content”部分为空而已。
handleResumeActivity
通过performLaunchActivity,Activity内部已经完成了Window和DecorView的创建过程。可以说整棵View Tree实际上已经生成了,只不过还不为外界所知。换句话说,无论是WMS还是SurfaceFlinger,都还不知道它的存在。所以接下来还需要把它添加到本地的WindowManagerGlobal中(还记得吗?WindowManagerGlobal中有3个数组mViews,mRoots和mParams),继而注册到WMS里。
final void handleResumeActivity(…) {…
        ActivityClientRecord r = performResumeActivity(token, clearHide);/*这将导致
        Activity. onResume最终被调用*/
        if (r != null) {
            final Activity a = r.activity;
            …
            if (r.window == null && !a.mFinished && willBeVisible) {
                r.window = r.activity.getWindow();//Activity对应的Window对象
                View decor = r.window.getDecorView();//最外围的mDecor
                decor.setVisibility(View.INVISIBLE);//先设置为不可见
                ViewManager wm = a.getWindowManager();//即WindowManager
                WindowManager.LayoutParams l = r.window.getAttributes();
                a.mDecor = decor;
                l.type = WindowManager.LayoutParams.TYPE_BASE_APPLICATION;//窗口类型
                l.softInputMode |= forwardBit;
                if (a.mVisibleFromClient) {
                    a.mWindowAdded = true;
                    wm.addView(decor, l);//首先添加decor到本地的全局记录中,再注册到WMS中
                }
            } else if (!willBeVisible) {
                …
            }
…
变量wm声明的类型是ViewManager。这是因为WindowManager继承自ViewManager,而getWindowManager真正返回的是一个WindowManagerImpl对象。后者的addView又间接调用了WindowManager Global中的实现:
/*frameworks/base/core/java/android/view/WindowManagerGlobal.java*/
    public void addView(View view, ViewGroup.LayoutParams params,
            Display display, Window parentWindow) {…
        ViewRootImpl root;
        View panelParentView = null;
        synchronized (mLock) {…
            int index = findViewLocked(view, false);//是不是添加过此View?是的话函数直接返回
            …
            root = new ViewRootImpl(view.getContext(), display);/*为这个View生成一个配套的
                                                          ViewRootImpl*/
            view.setLayoutParams(wparams);
            if (mViews == null) {//第一次添加元素到mViews中
                index = 1;
                mViews = new View[1];
                mRoots = new ViewRootImpl[1];
                mParams = new WindowManager.LayoutParams[1];
            } else {//不是第一次操作
                …//动态分配数组容量,代码省略
            }
            index--;
            mViews[index] = view;
            mRoots[index] = root;
            mParams[index] = wparams;
        }
        try {
            root.setView(view, wparams, panelParentView);//将View注册到WMS中的关键调用
        } catch (RuntimeException e) {…
        }
    }
如果上面代码段中的index小于0,表示之前未添加过此View对象,因而程序可以继续执行;否则说明调用者多次添加了同一个View对象,因而函数直接返回。
addView需要添加一个新的ViewRootImpl到WindowManagerGlobal的mRoots数组中,mViews记录的是DecorView,mParams记录的是布局属性,这3个数组中的元素是一一对应的。
函数通过root.setView把DecorView同步记录到ViewRootImpl内部的mView变量中。因为后面ViewRootImpl将会频繁访问到这棵View Tree——比如当收到某个按键事件或者触摸事件时,需要把它传递给后者进行处理。
由此一个Activity中的一棵View Tree就完整地建立起来,并纳入本地的全局管理中。不过我们还没看到与WMS及SurfaceFlinger发生实质性交互的地方,如向WMS申请一个用于显示的窗口(注意和PhoneWindow的概念区别开来);也还没有分析View Tree中的各个对象是如何借用这个Window来绘制最终的UI内容的。
在WMS中注册窗口
首先还要再次强调一下“窗口”的概念,PhoneWindow继承自Window类,它表达了窗口的一种约束机制;而WMS中的Window则是一个抽象的概念,其有一个WindowState用于描述状态。
也可以简单地理解:PhoneWindow是应用进程端对于“窗口”的描述,WindowState则是WMS中对“窗口”的描述。
当ViewRootImpl构造的时候,它需要建立与WMS通信的双向通道。
- ViewRootImplWMS: IwindowSession;
- WMSViewRootImpl: Iwindow。
因为WMS是在ServiceManager中注册的实名Binder Server(详见Binder章节的描述),因而任何程序都能在任何时候通过向Service Manager发起查询来获取WMS的服务。而IWindowSession和IWindow则是两个匿名的Binder Server,它们需要借助一定的方式才能提供服务。
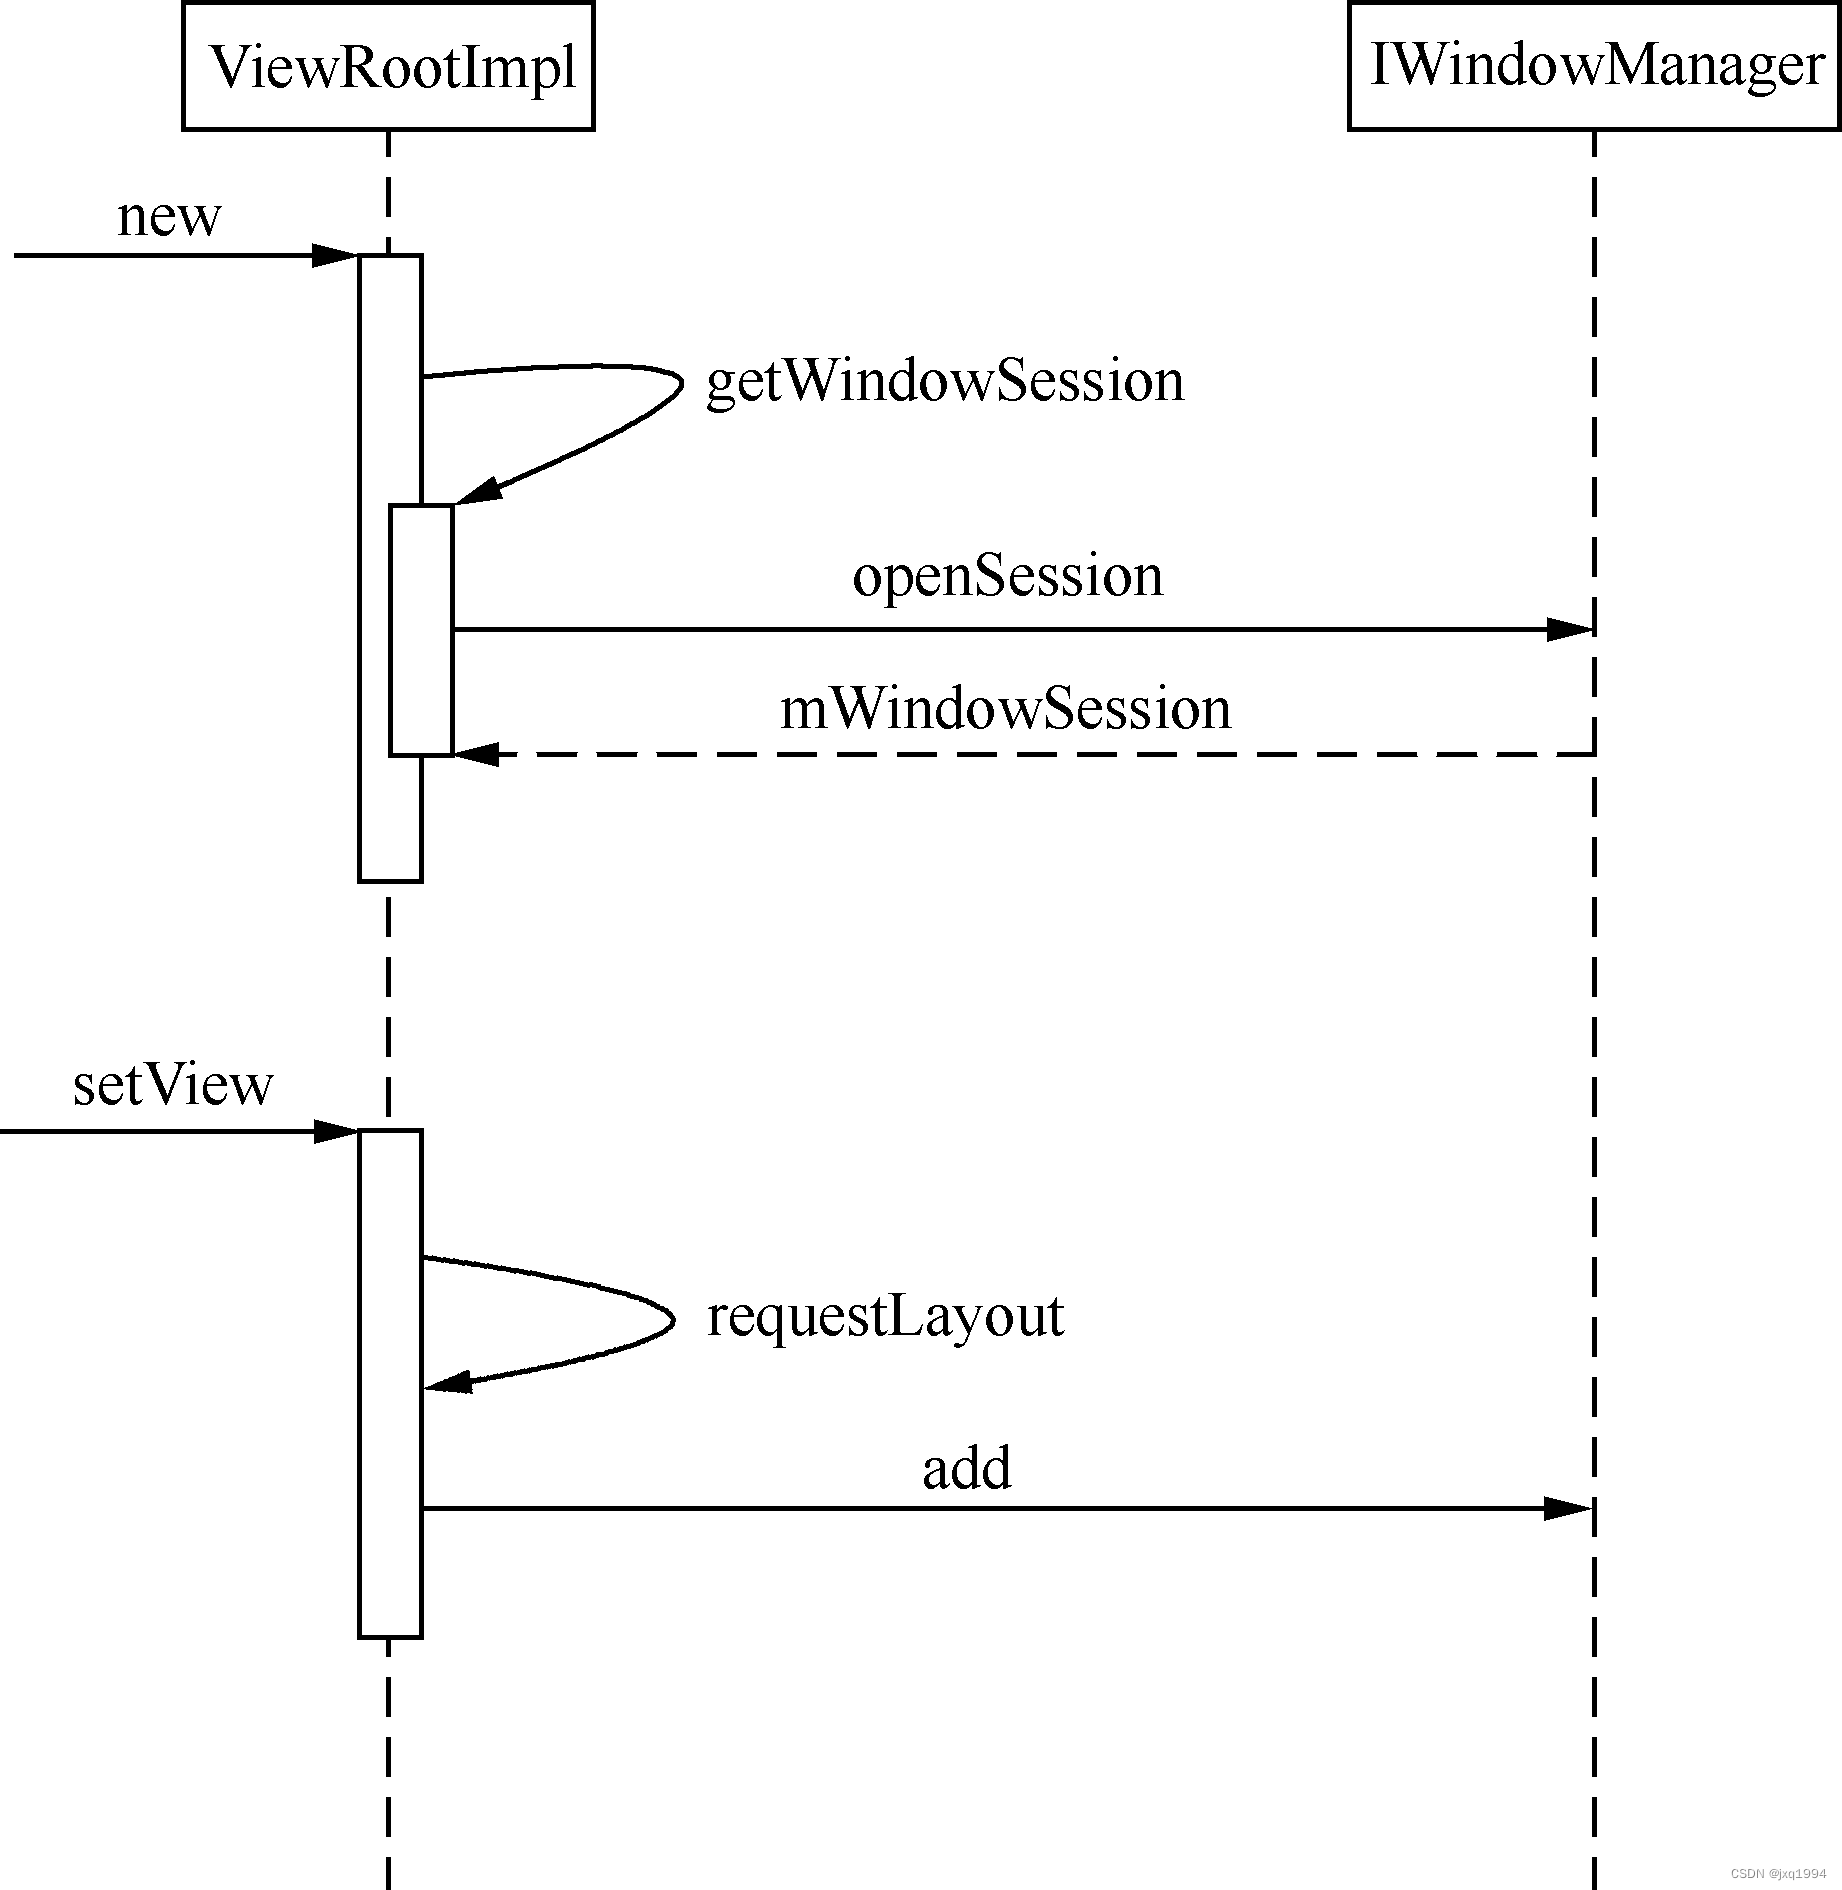
- Step1. ViewRootImpl在构造函数中,首先会利用WMS提供的openSession接口打开一条Session通道,并存储到内部的mWindowSession变量中:
public ViewRootImpl(Context context, Display display) {…
       mWindowSession = WindowManagerGlobal.getWindowSession();//IWindowSession
       …
       mWindow = new W(this);//IWindow
       …
    }
函数getWindowSession负责建立应用程序与WMS间的Session连接:
public static IWindowSession getWindowSession() {
       synchronized (WindowManagerGlobal.class) {
           if (sWindowSession == null) {
               try {
                   InputMethodManager imm = InputMethodManager.getInstance();
                   IWindowManager windowManager = getWindowManagerService();
                   sWindowSession = windowManager.openSession(imm.getClient(),
                                                             imm.getInputContext());
                   …
               } catch (RemoteException e) {
                   Log.e(TAG, "Failed to open window session", e);
               }
           }
           return sWindowSession;
       }
}
如果sWindowSession不为空,那么就没必要再重复打开Session连接了;否则需要先通过ServiceManager来获取WMS服务,再利用它提供的openSession接口来建立与WMS的“通道”。
上述代码段中的windowManager变量和前一小节handleResumeActivity中见到的WindowManager对象是不一样的。
我们可以这么理解这两种WindowManager:前者是WindowManagerService在本地进程中的代理;后者则完全是属于本地端的,存储于应用进程内部用于窗口管理的相关事务。前者最终由由WindowManagerService在远程端实现,而后者则是 WindowManagerImpl来实现。
- Step2. 在前一小节我们看到,函数addView在最后会调用ViewRootImpl.setView——这个函数一方面会把DecorView,也就是View树的根设置到VierRootImpl中;另一方面会向WMS申请注册一个窗口,同时将ViewRootImpl中的W(IWindow的子类)对象作为参数传递给WMS。
/*frameworks/base/core/java/android/view/ViewRootImpl.java*/
    public void setView(View view, WindowManager.LayoutParams attrs,
                                View panelParent View) {
        synchronized (this) {
            if (mView == null) {
 mView = view;//ViewRoot内部记录了它所管理的View树的根
                …
 requestLayout();//执行Layout
                …
                try {…
                    res = mWindowSession.addToDisplay(mWindow, mSeq, mWindowAttributes,
                            getHostVisibility(), mDisplay.getDisplayId(),
                            mAttachInfo.mContentInsets, mInputChannel);
                } catch (RemoteException e) {…
                } finally {…
                }…
            }…
    }
上述代码段中最关键的一步,就是通过IWindowSession提供的addToDisplay(这个函数将调用WMS的addWindow),向WMS申请注册一个窗口。
ViewRoot的基本工作方式
每棵View Tree只对应一个ViewRoot,它将和WindowManagerService进行一系列的通信,包括窗口注册、大小调整等(可以参见IWindowSession提供的接口方法)。那么,ViewRoot在什么情况下会执行这些操作呢?
- View Tree内部的请求
比如某个View对象需要更新UI时,它会通过invalidate或者其他方式发起请求。随后这些请求会沿着View Tree层层往上传递,最终到达ViewRoot——这个View Tree的管理者再根据一系列实际情况来采取相应措施(比如是否发起一次遍历、是否需要通知WMS等)。
- 外部的状态更新
除了内部的变化外,ViewRoot同样可以接收来自外部的各种请求。比如WMS会回调ViewRoot通知界面大小改变、触摸事件、按键事件等。
不论是内部还是外部的请求,通常情况下ViewRoot并不会直接去处理它们,而是先把消息入队后再依次处理。ViewRoot内部定义了ViewRootHandler类来对这些消息进行统一处理。有意思的是,这个Handler实际上是和主线程的MessageQueue挂钩的,这也就验证了ViewRoot相关的操作确实是在主线程中进行的。正因为此,我们在ViewRootHandler中执行具体的事件处理时要特别注意不要有耗时的操作,否则很可能会阻塞主线程而引发ANR。
各种内外部请求和状态更新都首先入队到程序主线程的MessageQueue中,再由ViewRoot具体处理。这样做避免了应用程序因长时间处理某个事件而导致的响应速度降低。
View Tree的遍历时机
所谓“遍历”(Traversal),是指程序按照一定的算法路径依次对一个集合(如View Tree)中的所有元素进行有且仅有一次访问的过程。
- 1.应用程序刚启动时
根据前面几个小节的分析,应用程序启动后会逐步构造出自己的整棵View Tree,然后进行一次全面的遍历:
public void setView(View view, WindowManager.LayoutParams attrs, View panelParentView) {…
        // Schedule the first layout -before- adding to the window
        // manager, to make sure we do the relayout before receiving
        // any other events from the system.//从注释中也可以看出这是第一次执行遍历的地方
 requestLayout();
在setView中调用的requestLayout就是执行第一次遍历的触发源。这个函数将通过向Choreographer注册一个CALLBACK_TRAVERSAL回调事件来间接驱动Layout的执行。最终的“遍历”工作由performTraversals来完成。
-
2.外部事件
对于应用程序来说,外部事件才是驱动ViewRoot工作的主要触发源。比如由用户产生的触摸、按键等事件,经过层层传递最终分配到应用进程中。这些事件除了可以改变应用程序的内部状态外,还可能影响到UI界面的显示——在必要的情况下,ViewRoot就会通过遍历来确定事件对各View对象产生的具体影响。 -
3.内部事件
除了外来触发源,程序在自身运行的过程中有时也需要主动发起一些触发事件。比如我们写一个时钟应用,最少每隔一秒就需要刷新一次界面;又比如当一个View的Visibility从GONE到VISIBLE,都涉及界面的调整和重绘。所以程序在这些情况下要主动请求系统进行界面刷新,并可能引发遍历的执行。
不论是外部还是内部事件,只要ViewRoot在处理过程中发现它可能引发UI界面的大小、位置等属性的变化,那么就很可能会执行“遍历”操作。遍历的主导者自然还是ViewRootImpl,因为只有它才能自上而下地管理整棵View Tree。
遍历流程的入口如下:
 /*frameworks/base/core/java/android/view/ViewRootImpl.java*/
      void scheduleTraversals() {
        if (!mTraversalScheduled) {//当前是否已经在做遍历了
            mTraversalScheduled = true;
            …
 mChoreographer.postCallback(
                    Choreographer.CALLBACK_TRAVERSAL, mTraversalRunnable, null);
            …
        }
    }
变量mTraversalScheduled用于指示当前是否已经在做“Traversal”,以避免多次进入。整个函数的重点是mChoreographer.postCallback。一旦VSYNC信号来临,mTraversalRunnable中的run函数将被调用,以保证在最短的时间内有序地组织UI界面的更新。函数run的实现也很简单,它直接调用了doTraversal:
 void doTraversal() {
        if (mTraversalScheduled) {
            mTraversalScheduled = false;//变量在这里就复位了
            …
            try {
 performTraversals();//执行遍历
            } finally {
                Trace.traceEnd(Trace.TRACE_TAG_VIEW);
            }
            …
        }
    }
可以看到,这个函数也并不是最终执行遍历的地方,还需要进一步调用performTraversals。
View Tree的遍历流程
UI显示的3要素是尺寸大小、位置和内容,它们在遍历过程中分别对应以下3个函数:
-
performMeasure(尺寸大小)
用于计算View对象在UI界面上的绘图区域大小。 -
performLayout(位置)
用于计算View对象在UI界面上的绘图位置。 -
performDraw(绘制)
上述两个属性确定后,View对象就可以在此基础上绘制UI内容了。
遍历的主体是performTraversals。

 private void performTraversals() {…
       if (mFirst || windowShouldResize || insetsChanged ||viewVisibilityChanged || params !=
       null) {//层级1
           …
           if (!mStopped) {//层级2
              boolean focusChangedDueToTouchMode = ensureTouchModeLocally(
               (relayoutResult&WindowManagerImpl.RELAYOUT_RES_IN_TOUCH_MODE) != 0);
              if (focusChangedDueToTouchMode || mWidth != host.getMeasuredWidth()
                     || mHeight != host.getMeasuredHeight() || contentInsetsChanged) {//层级3
                 int childWidthMeasureSpec = getRootMeasureSpec(mWidth, lp.width);
                 int childHeightMeasureSpec = getRootMeasureSpec(mHeight, lp.height);
                 // Ask host how big it wants to be
 performMeasure(childWidthMeasureSpec, childHeightMeasureSpec);
执行performMeasure的条件:

如果mLayoutRequested为true,并且当前不处于stopped状态,那么layoutRequested为true。变量windowSizeMayChange正如其名所示,表明窗口的尺寸大小有可能发生变化——比如当前宽高与期望值不相符。假设当前有layout需求,并且window size确实需要改变,那么windowShouldResize就是true。
performMeasure
一旦上述3个层级的条件都满足,程序就开始执行performMeasure。实际上这个函数什么也没做,只是简单地调用了View Tree顶层元素的measure函数:
mView.measure(childWidthMeasureSpec, childHeightMeasureSpec);
这样ViewRootImpl就将控制权转交给View树的根元素,真正的Traversal才刚刚开始。
View类 的 measure()函数会回调onMeasure()。真正的测量工作也是在onMeasure中进行的,如下:
protected void onMeasure(int widthMeasureSpec, int heightMeasureSpec) {
       setMeasuredDimension(getDefaultSize(getSuggestedMinimumWidth(), widthMeasureSpec),
             getDefaultSize(getSuggestedMinimumHeight(), heightMeasureSpec));
    }
这里以DecorView的测量过程为例,比如mDecor是一个FrameLayout,其onMeasure源码如下:
 /*frameworks/base/core/java/android/widget/FrameLayout.java*/
    @Override //这是一个重载函数
    protected void onMeasure(int widthMeasureSpec, int heightMeasureSpec) {
        int count = getChildCount();//子对象个数
        /*Step1. 判断父对象的mode要求*/
        final boolean measureMatchParentChildren =
                MeasureSpec.getMode(widthMeasureSpec) != MeasureSpec.EXACTLY ||
                MeasureSpec.getMode(heightMeasureSpec) != MeasureSpec.EXACTLY;
        mMatchParentChildren.clear();
        int maxHeight = 0;//所有子对象中测量到的最大高度
        int maxWidth = 0;//所有子对象中测量到的最大宽度
        int childState = 0;

        for (int i = 0; i < count; i++) {//循环处理所有子对象
            final View child = getChildAt(i);//获取一个子对象
            if (mMeasureAllChildren || child.getVisibility() != GONE) {//需要测量吗?
 measureChildWithMargins(child, widthMeasureSpec, 0, heightMeasureSpec,
  0);//Step2.
                final LayoutParams lp = (LayoutParams) child.getLayoutParams();
                /*Step3. 取得最大值*/
 maxWidth = Math.max(maxWidth, child.getMeasuredWidth() +
  lp.leftMargin + lp.rightMargin);
 maxHeight = Math.max(maxHeight,child.getMeasuredHeight() +
  lp.topMargin + lp.bottomMargin);
               childState = combineMeasuredStates(childState, child.getMeasuredState());
                …
            }
        }

        /*Step4. 综合考虑其他因素 */
        // 检查padding
        maxWidth += getPaddingLeftWithForeground() + getPaddingRightWithForeground();
        maxHeight += getPaddingTopWithForeground() + getPaddingBottomWithForeground();

        // 检查建议的最小宽高值
        maxHeight = Math.max(maxHeight, getSuggestedMinimumHeight());
        maxWidth = Math.max(maxWidth, getSuggestedMinimumWidth());

        // 检查foreground背景宽高值
        final Drawable drawable = getForeground();
        if (drawable != null) {
            maxHeight = Math.max(maxHeight, drawable.getMinimumHeight());
            maxWidth = Math.max(maxWidth, drawable.getMinimumWidth());
        }
        /*记录结果*/
 setMeasuredDimension(resolveSizeAndState(maxWidth, widthMeasureSpec,
  childState),resolveSizeAndState(maxHeight, heightMeasureSpec,
                        childState << MEASURED_HEIGHT_STATE_SHIFT));//将结果保存下来
        …
    }
关于具体的测量过程还可看:
测量过程
performLayout
经过上面的performMeasure,View Tree中各元素的大小已经基本确定下来,并保存在自己的内部成员变量中。接下来,ViewRootImpl会进入另一个“遍历”过程,即位置测量。Layout这个词在设计领域的释义类似于“构图”、“布局”,因而它既需要“大小”,也需要“位置”信息。函数performMeasure得到的便是对象的尺寸大小,而performLayout更确切地说是在此基础上进一步完善“位置”信息,然后组合成真正的“layout”。
函数performLayout在performTraversals中的调用位置只有一处:
    private void performTraversals() {…
        final boolean didLayout = layoutRequested && !mStopped;
        …
        if (didLayout) {
 performLayout();
           …
performLayout执行条件
变量didLayout取决于两个因素,即layoutRequested和mStopped——其中后者已经分析过,此处不再赘述。而layoutRequested主要由下面的语句赋值:
boolean layoutRequested = mLayoutRequested && !mStopped
简而言之,一旦ViewRootImpl发现需要执行layout,那么它会调用performLayout进行位置测量。具体实现与performMeasure基本一致,只是间接调用了View Tree的顶层根元素(mView)的layout:
private void performLayout() {…
        final View host = mView;
        …
        try {
            host.layout(0, 0, host.getMeasuredWidth(), host.getMeasuredHeight());
        } …
    }
我们仍然以FrameLayout为例来看看View对象是如何计算layout的:
/*frameworks/base/core/java/android/view/View.java*/
public void layout(int l, int t, int r, int b) {…
       boolean changed = isLayoutModeOptical(mParent) ?
              setOpticalFrame(l, t, r, b) : setFrame(l, t, r, b);//将4个边距记录到成员变量中
       if (changed||(mPrivateFlags & PFLAG_LAYOUT_REQUIRED) == PFLAG_LAYOUT_REQUIRED){
 onLayout(changed, l, t, r, b);//执行layout
            …
        }
        mPrivateFlags &= ~PFLAG_FORCE_LAYOUT;
    }
上面这个函数的l、t、r、b分别代表此View对象与父对象的左、上、右、下边框的距离。和measure的很大差异,是layout直接将这些值记录(setFrame)到成员变量中,即mLeft,mTop,mRight和mBottom。接下来,如果changed为true,则意味着本次设置的边距与上一次相比发生了变化;或者flags中强制要求layout,那么就会调用onLayout。既然该View对象本身的layout已经确定下来,可以猜想到这个函数应该是对其子对象进行布局调整的过程。也正因如此,View类中的onLayout函数实现体是空的——这就要求各ViewGroup的扩展类,如FrameLayout需要重载并具体实现它们所需的功能:
/*frameworks/base/core/java/android/widget/FrameLayout.java*/
    @Override//这是个重载函数
    protected void onLayout(boolean changed, int left, int top, int right, int bottom) {
        final int count = getChildCount();//子对象的个数

        final int parentLeft = getPaddingLeftWithForeground();//这些变量的含义可参见后面的图示
        final int parentRight = right - left - getPaddingRightWithForeground();
        final int parentTop = getPaddingTopWithForeground();
        final int parentBottom = bottom - top - getPaddingBottomWithForeground();
        …
        for (int i = 0; i < count; i++) {//循环处理所有子对象
            final View child = getChildAt(i);//当前子对象
            if (child.getVisibility() != GONE) {//如果为GONE的话,表示不需要在界面上显示,因而略过
                final LayoutParams lp = (LayoutParams) child.getLayoutParams();//child
                设置的layout属性
                final int width = child.getMeasuredWidth();//child在measure中测量到的宽度
                final int height = child.getMeasuredHeight();//child在measure中测量到的高度

                int childLeft;//最终计算出的child的左边距
                int childTop;//最终计算出的child上边距

                int gravity = lp.gravity;//这个属性值是后面计算的依据
                …
                final int layoutDirection = getResolvedLayoutDirection();
                final int absoluteGravity = Gravity.getAbsoluteGravity(gravity,layout
                Direction);
                final int verticalGravity = gravity & Gravity.VERTICAL_GRAVITY_MASK;

                switch (absoluteGravity & Gravity.HORIZONTAL_GRAVITY_MASK) {
                    case Gravity.LEFT:
                        childLeft = parentLeft + lp.leftMargin;
                        break;
                    case Gravity.CENTER_HORIZONTAL://后面以此为例做详细分析
                        childLeft = parentLeft + (parentRight - parentLeft - width) / 2 +
                        lp.leftMargin - lp.rightMargin;
                        break;
                    case Gravity.RIGHT:
                        childLeft = parentRight - width - lp.rightMargin;
                        break;
                    default://default情况下的处理,应用开发人员要特别留意下
                        childLeft = parentLeft + lp.leftMargin;
                }
                …//省略childTop的计算过程,和childLeft是类似的
                child.layout(childLeft, childTop, childLeft + width, childTop + height);
            }
        }
    }
和onMeasure类似,它首先计算所包含子对象的个数,然后通过for循环逐个处理。每次循环的最后一行都调用了child.layout,由此传入的4个参数就是此child的layout信息。
首先要知道,一个长方体的layout只需要left,top和width,height就可以确定下来了——后两者在measure中已经有了确切的结果,所以最终的问题就转化为对left和top的计算。
下面以mLeft在Gravity.CENTER_HORIZONTAL情况下的处理过程为例来做详细讲解。为了让读者看得更清楚些,同时假设lp.leftMargin和lp.rightMargin为0:
childLeft = parentLeft + (parentRight - parentLeft - width) / 2 +lp.leftMargin - lp.rightMargin;
        =parentLeft + (parentRight - parentLeft - width) / 2;
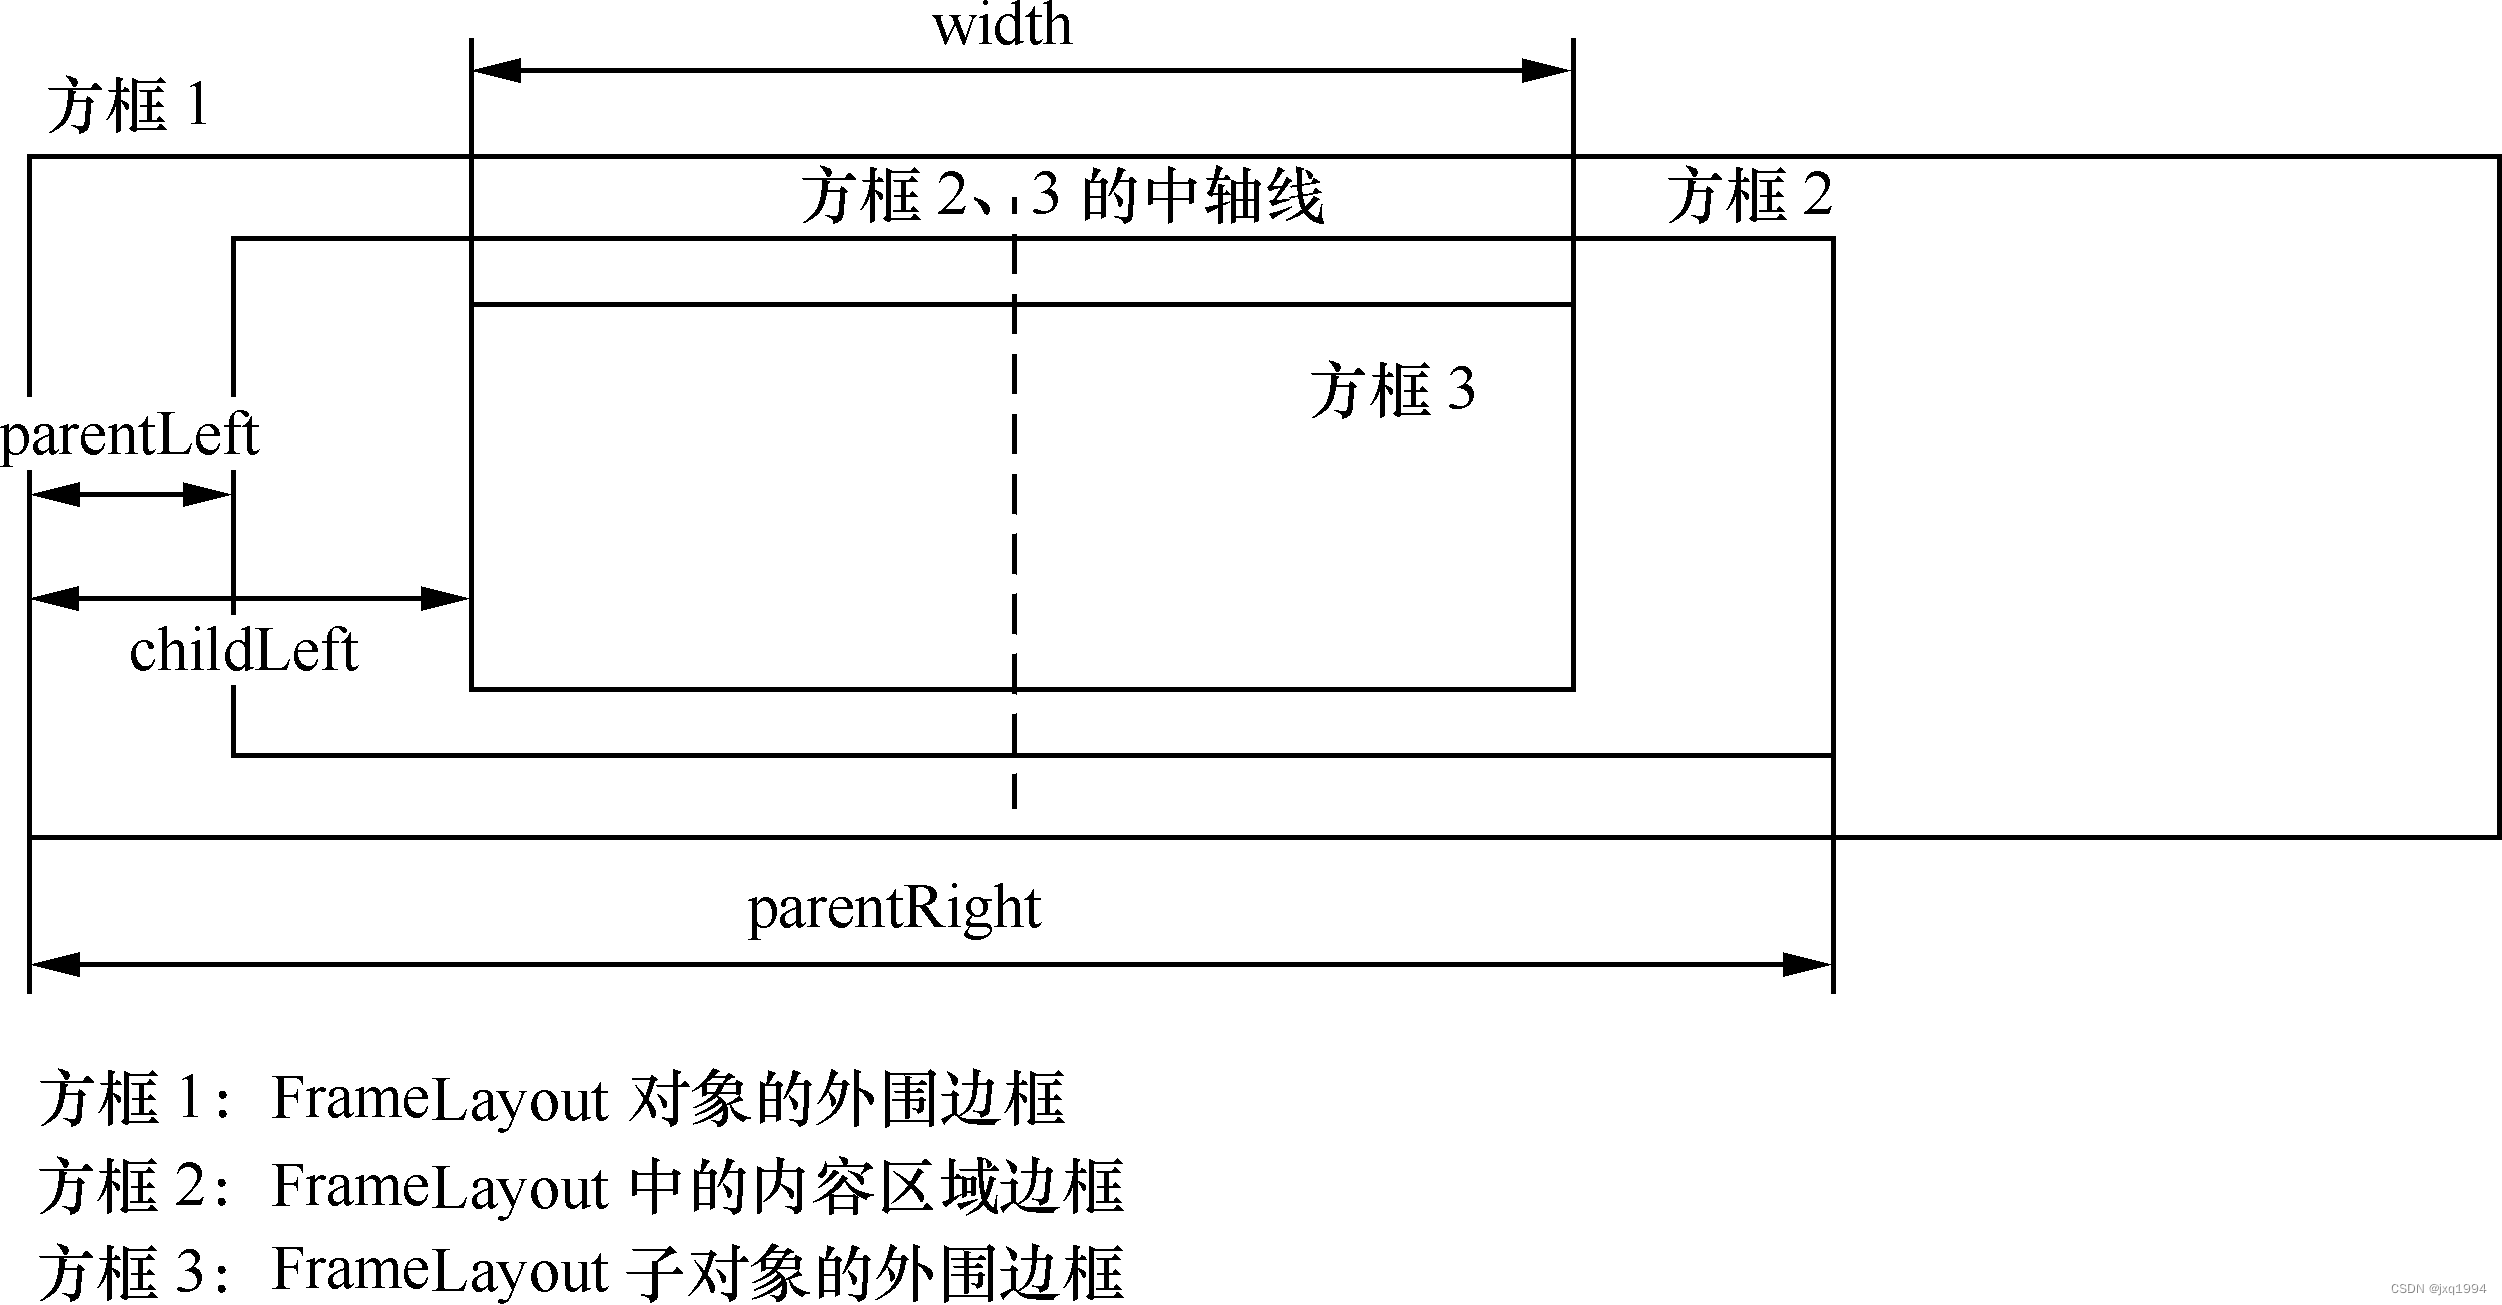
根据上图,parentRight-parentLeft得到的是方框2,即FrameLayout内容区域的宽度。因为子对象是要放置在这里的,其“center”的中心也是以图中的中轴线为标准。所以 (parentRight-parentLeft– width) / 2得到的是方框3左边线与方框2对应边线的距离,最终childLeft还要在此基础上加parentLeft。
计算出childLeft,程序下一步将按照类似的方法得出childTop。我们说过,对于一个长方形来说,left+top+width+height已经足够确认它的layout了。因而调用
child.layout(childLeft, childTop, childLeft + width, childTop + height);
来设置子对象的layout区域。如此循环往复,直到View Tree中所有元素都处理完成。
关于具体的布局过程,可以看:
Layout过程
performDraw
一个对象的layout确定后,它才能在此基础上执行“Draw”。函数performDraw是遍历流程中最后被调用的,将在“画板”上产生UI数据,然后在适当的时机由SurfaceFlinger进行整合,最终显示到屏幕上。图形绘制的方式有两种,即硬件和软件。
以软件渲染方式为例:
 /*frameworks/base/core/java/android/view/ViewRootImpl.java*/
    private boolean drawSoftware(Surface surface, AttachInfo attachInfo, int yoff,
            boolean scalingRequired, Rect dirty) {…//dirty表示需要重绘的区域
        Canvas canvas;//后续小节有详细介绍
        try {…
            canvas = mSurface.lockCanvas(dirty);//先取得一个Canvas对象,在此基础上作图
            …
        } catch (Surface.OutOfResourcesException e) {
            …
        } catch (IllegalArgumentException e) {
            …
        }

        try {…
            try {
                canvas.translate(0, -yoff);//坐标变换
                if (mTranslator != null) {
                    mTranslator.translateCanvas(canvas);
                }
                …
                mView.draw(canvas);//由顶层元素开始遍历绘制
            } finally {…
            }
        } finally {
            try {
                surface.unlockCanvasAndPost(canvas);//绘制完毕,释放Canvas并“提交结果”
            } catch (IllegalArgumentException e) {…
            }
        }
        return true;//true表示成功
    }
重点看这句:mView.draw(canvas);
draw和onDraw
View对象绘制图形的一般流程是怎样的呢?
一旦ViewRootImpl成功lock到Canvas,它就可以通过ViewTree的根元素逐步把这个“画板工具”往下传输。因而第一个被处理的元素是最外围的DecorView(针对PhoneWindow的情况),如下所示(假设是在软件渲染的情况下):
 private boolean drawSoftware(…) {…
 mView.draw(canvas);
        …
    }
变量mView是ViewRootImpl内部用于记录ViewTree根元素的成员变量,它的draw函数就是整棵ViewTree绘图遍历的起点。另外,虽然Decor View是ViewGroup,但并不重载draw方法,所以上述代码段中还是调用了View.draw。
在分析源码前先来思考一下:如果你是View的设计者,将如何编排这个draw函数呢?至少有两个大方向要特别注意:
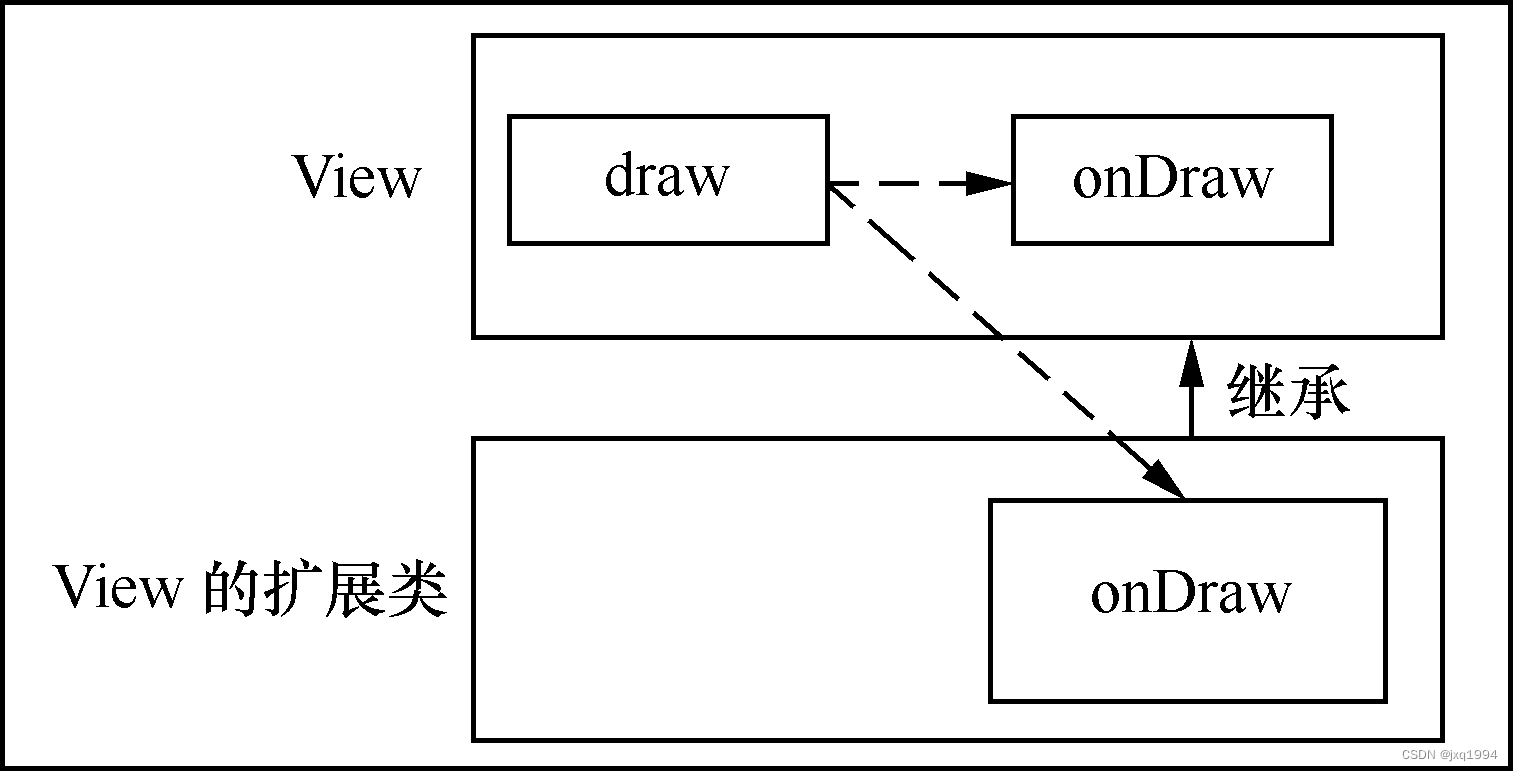
- draw与onDraw的分离
因为后续的View子类希望只重载onDraw,而不是整个draw函数。这就给我们提出了强制性要求,即View的draw函数设计要具有共性——因为我们没有办法预先知晓所有扩展子类的行为。
-
draw中的绘图顺序
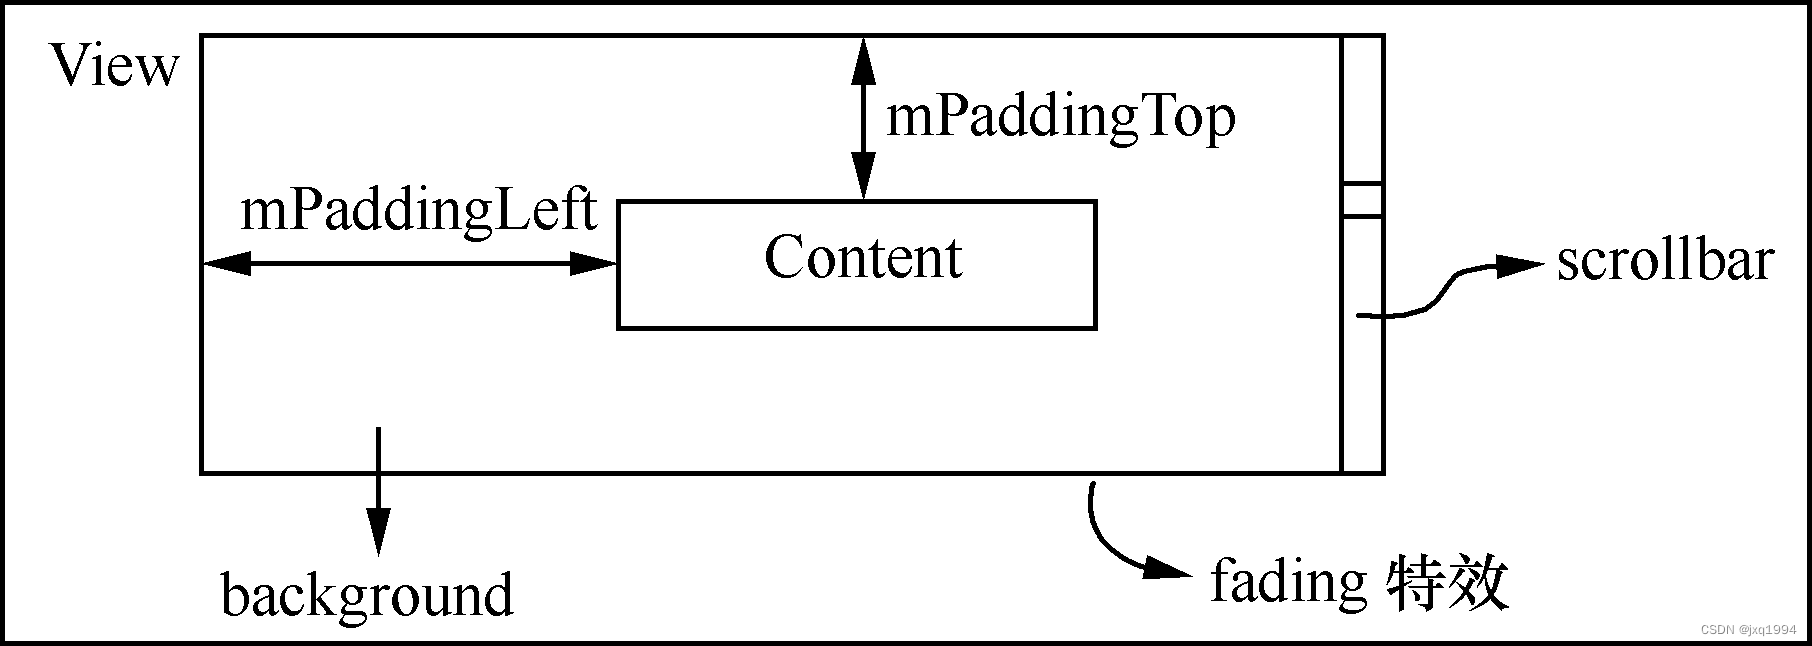 View类中有如下UI元素:
 -
background
View视图通常需要设置一个背景,如一张图片。 -
content
内容区域是这个View真正想表达的画面,所以是重中之重。根据以前的分析,这个区域与外边框通常情况下会有一定的距离,即padding。 -
decorations
主要是指scrollbar。滚动条分为垂直和水平两种,位置也是可以调整的。 -
fading
为了呈现比较好的UI效果,我们也可以选择给View视图增加fading特效。
我们来看看View类中draw函数的源码实现:
 public void draw(Canvas canvas) {…
        final int privateFlags = mPrivateFlags;
        final boolean dirtyOpaque = (privateFlags & PFLAG_DIRTY_MASK) ==
          PFLAG_DIRTY_ OPAQUE&& (mAttachInfo == null || !mAttachInfo.mIgnoreDirtyState);
        mPrivateFlags = (privateFlags & ~PFLAG_DIRTY_MASK) | PFLAG_DRAWN;
        // Step 1.绘制背景:
        int saveCount;
        if (!dirtyOpaque) {
            …//具体代码稍后分析
        }
        /*接下来分为两种情况:要么完整执行Step2-6;要么跳过其中的Step2和Step5(稍后会有各个Step
        的详细说明,请结合起来阅读)*/
        final int viewFlags = mViewFlags;
        boolean horizontalEdges = (viewFlags & FADING_EDGE_HORIZONTAL) != 0;
        boolean verticalEdges = (viewFlags & FADING_EDGE_VERTICAL) != 0;
        if (!verticalEdges && !horizontalEdges) {//情况1. 没有fading edges的情况
            if (!dirtyOpaque) onDraw(canvas);// Step 3, 绘制内容
            dispatchDraw(canvas);// Step 4, 绘制子对象
            onDrawScrollBars(canvas);// Step 6, 绘制decoration
            …
            return;//直接返回
        }

        /*情况2. 如果程序走到这里,说明我们要完整执行Step2-Step6(uncommon case)*/
        …//具体代码略
    }
绘制顺序
(1)绘制背景。
显然背景在最底层,会被其他元素所覆盖,因而需要最先被绘制。
(2)保存canvas的layers,以备后续fading所需。
(3)绘制内容区域。
(4)绘制子对象(如果有的话)。
(5)绘制fading(如果有的话),restore第(2)步保存的layers。
(6)绘制decorations(主要是scrollbars)。
上述6个步骤并不是每次draw过程都会被全部执行。比如step 2和step5对于很多应用程序来讲都是可选的,并不需要考虑。由此,整个draw函数分为两种Cases。
Case1(Common Case):假如horizontalEdges和verticalEdges都为空,那么可以跳过第2步和第5步——这将大大简化整个函数流程。
View.onDraw()
- 每个View的大小都会受到其他View的制约
- View的“潜在”显示内容有可能超过其可视区域
- View的可视区域是不变的。
- 当滚动条操作时,显示内容会发生变化。
接下来我们以ImageView为例,来分析onDraw的源代码实现:
  /*frameworks/base/core/java/android/widget/ImageView.java*/
    protected void onDraw(Canvas canvas) {
        super.onDraw(canvas);
        if (mDrawable == null) {//如果Drawable为空,直接返回
            return; // couldn't resolve the URI
        }
        if (mDrawableWidth == 0 || mDrawableHeight == 0) {//且Drawable的大小是合法的
            return;     // nothing to draw (empty bounds)
        }
        if (mDrawMatrix == null && mPaddingTop == 0 && mPaddingLeft == 0) {//最简单的情况
            mDrawable.draw(canvas);
        } else {
            int saveCount = canvas.getSaveCount();
            canvas.save();//保存这一场景,稍后还要恢复
            if (mCropToPadding) {
                final int scrollX = mScrollX;
                final int scrollY = mScrollY;
                canvas.clipRect(scrollX + mPaddingLeft, scrollY + mPaddingTop,
                        scrollX + mRight - mLeft - mPaddingRight,
                        scrollY + mBottom - mTop - mPaddingBottom);
            }

            canvas.translate(mPaddingLeft, mPaddingTop);//坐标变换
            if (mDrawMatrix != null) {
                canvas.concat(mDrawMatrix);
            }
            mDrawable.draw(canvas);
            canvas.restoreToCount(saveCount);//恢复Canvas
        }
    }
关于具体的绘制过程,还可以查看:
onDraw过程
View的触摸分析
View的事件传递



![【Linux】- Linux下搭建Java环境[IDEA,JDK8,Tomcat]](https://img-blog.csdnimg.cn/7acebbc8cf3e4cd78cec63c845c6c956.jpeg#pic_center)
