九、HttpMessageConverter
HttpMessageConverter
,报文信息转换器,将请求报文转换为
Java
对象,或将
Java
对象转换为响应报文 HttpMessageConverter提供了两个注解和两个类型:
@RequestBody
,
@ResponseBody
, RequestEntity, ResponseEntity
1、@RequestBody
@RequestBody
可以获取请求体,需要在控制器方法设置一个形参,使用
@RequestBody
进行标识,当前请求的请求体就会为当前注解所标识的形参赋值
<!DOCTYPE html>
<html lang="en" xmlns:th="http://www.thymeleaf.org">
<head>
    <meta charset="UTF-8">
    <title>首页</title>
</head>
<body>
<h1>首页</h1>
<form th:action="@{/testRequestBody}" method="post">
    <input type="text" name="username"><br>
    <input type="text" name="password"><br>
    <input type="submit" value="测试@RequestBody"><br>
</form>
</body>
</html>
@Controller
public class HttpController {
@RequestMapping("testRequestBody")
public String testRequestBody(@RequestBody String requestBody){
System.out.println("requestBody:"+requestBody);
return "success";
}
}<!DOCTYPE html>
<html lang="en" xmlns:th="http://www.thymeleaf.org">
<head>
<meta charset="UTF-8">
<title>Title</title>
</head>
<body>
成功了呀!
</body>
</html>
输出结果: requestBody:username=helloWorld&password=123456
2、RequestEntity
RequestEntity
封装请求报文的一种类型,需要在控制器方法的形参中设置该类型的形参,当前请求的请求报文就会赋值给该形参,可以通过getHeaders()
获取请求头信息,通过
getBody()
获取请求体信息
<form th:action="@{/testRequestEntity}" method="post">
    <input type="text" name="username"><br>
    <input type="text" name="password"><br>
    <input type="submit" value="测试RequestEntity"><br>
</form>
@RequestMapping("/testRequestEntity")
public String testRequestEntity(RequestEntity<String> requestEntity){
//当前requestEntity表示整个请求报文的信息
System.out.println("请求头:"+requestEntity.getHeaders());
System.out.println("请求体:"+requestEntity.getBody());
return "success";
}
输出结果:
请求头:[host:"localhost:8080", user-agent:"Mozilla/5.0 (Windows NT 10.0; Win64; x64; rv:109.0) Gecko/20100101 Firefox/116.0", accept:"text/html,application/xhtml+xml,application/xml;q=0.9,image/avif,image/webp,*/*;q=0.8", accept-language:"zh-CN,zh;q=0.8,zh-TW;q=0.7,zh-HK;q=0.5,en-US;q=0.3,en;q=0.2", accept-encoding:"gzip, deflate, br", content-length:"29", origin:"http://localhost:8080", connection:"keep-alive", referer:"http://localhost:8080/springMVC/", cookie:"JSESSIONID=05A1276222C18EB3F9DB64EDC1381B98; Idea-4579b2af=cf1f07a0-0b0d-40ab-934f-8398b410993b", upgrade-insecure-requests:"1", sec-fetch-dest:"document", sec-fetch-mode:"navigate", sec-fetch-site:"same-origin", sec-fetch-user:"?1", Content-Type:"application/x-www-form-urlencoded;charset=UTF-8"]
请求体:username=admin&password=12314
请求体:username=admin&password=12314
3、@ResponseBody
@ResponseBody
用于标识一个控制器方法,可以将该方法的返回值直接作为响应报文的响应体响应到浏览器
<a th:href="@{/testResponse}">通过servletAPI的response对象响应浏览器数据</a><br>
<a th:href="@{/testResponseBody}">通过@ResponseBody响应浏览器数据</a><br>
@RequestMapping("/testResponse")
public void testResponse(HttpServletResponse response) throws IOException {
//将print中的内容直接作为响应报文的响应体,响应到浏览器中
response.getWriter().print("hello,response");
}
@RequestMapping("/testResponseBody")
@ResponseBody
public String testResponseBody(){
//加上@ResponseBody注解,就是success直接作为返回值,而不加@ResponseBody注解,就是跳转到success视图
return "success";
}<!DOCTYPE html>
<html lang="en" xmlns:th="http://www.thymeleaf.org">
<head>
<meta charset="UTF-8">
<title>Title</title>
</head>
<body>
<h1>成功了呀!</h1>
</body>
</html>
结果:浏览器页面显示
success
4、SpringMVC处理json
@ResponseBody
处理
json
的步骤:
a>
导入
jackson
的依赖
        <dependency>
            <groupId>com.fasterxml.jackson.core</groupId>
            <artifactId>jackson-databind</artifactId>
            <version>2.13.4.2</version>
        </dependency>
b>
在
SpringMVC
的核心配置文件中开启
mvc
的注解驱动,此时在
HandlerAdaptor
中会自动装配一个消息转换器:MappingJackson2HttpMessageConverter
,可以将响应到浏览器的
Java
对象转换为
Json
格式的字符串
<mvc:annotation-driven />
c>
在处理器方法上使用
@ResponseBody
注解进行标识
d>
将
Java
对象直接作为控制器方法的返回值返回,就会自动转换为
Json
格式的字符串
    @RequestMapping("/testResponseUser")
    @ResponseBody
    public User testResponseUser(){
        return new User(1001,"admin","123456",22,"男");
    }
浏览器的页面中展示的结果:
{"id":1001,"username":"admin","password":"123456","age":22,"sex":"
男
"}
5、SpringMVC处理ajax
a>
请求超链接
<a th:href="@{/testResponseUser}">通过@ResponseBody响应浏览器User对象</a><br>6、@RestController注解
@RestController
注解是
springMVC
提供的一个复合注解,标识在控制器的类上,就相当于为类添加了
@Controller
注解,并且为其中的每个方法添加了
@ResponseBody
注解
7、ResponseEntity
ResponseEntity
用于控制器方法的返回值类型,该控制器方法的返回值就是响应到浏览器的响应报文
十、文件上传和下载
1、文件下载
使用
ResponseEntity
实现下载文件的功能
<!DOCTYPE html>
<html lang="en" xmlns:th="http://www.thymeleaf.org">
<head>
<meta charset="UTF-8">
<title>测试文件上传和下载</title>
</head>
<body>
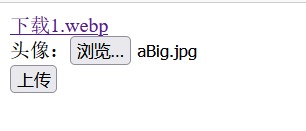
<a th:href="@{/testDown}">下载1.webp</a>
</body>
</html> <mvc:view-controller path="/file" view-name="file"></mvc:view-controller>@Controller
public class FileAndDownController {
@RequestMapping("/testDown")
public ResponseEntity<byte[]> testResponseEntity(HttpSession session) throws IOException {
//获取ServletContext对象
ServletContext servletContext = session.getServletContext();
//获取服务器中文件的真实路径
String realPath = servletContext.getRealPath("/static/img/1.webp");
//创建输入流
InputStream is = new FileInputStream(realPath);
//创建字节数组
byte[] bytes = new byte[is.available()];//is.available()获取输入流文件所有的字节
//将流读到字节数组中
is.read(bytes);
//创建HttpHeaders对象设置响应头信息
MultiValueMap<String, String> headers = new HttpHeaders();
//设置要下载方式以及下载文件的名字,固定的,只需要修改下载的名字
headers.add("Content-Disposition", "attachment;filename=1.webp");
//设置响应状态码
HttpStatus statusCode = HttpStatus.OK;
//创建ResponseEntity对象
ResponseEntity<byte[]> responseEntity = new ResponseEntity<>(bytes, headers, statusCode);
//关闭输入流
is.close();
return responseEntity;
}
}
2、文件上传
文件上传要求
form
表单的请求方式必须为
post
,并且添加属性
enctype="multipart/form-data"
SpringMVC
中将上传的文件封装到
MultipartFile
对象中,通过此对象可以获取文件相关信息
上传步骤:
a>
添加依赖
        <!-- https://mvnrepository.com/artifact/commons-fileupload/commons-fileupload -->
        <dependency>
            <groupId>commons-fileupload</groupId>
            <artifactId>commons-fileupload</artifactId>
            <version>1.3.1</version>
        </dependency>
b>
在
SpringMVC
的配置文件中添加配置:
    <!--配饰文件上传解析器,将上传的文件封装为MultipartFile-->
    <bean id="multipartResolver" class="org.springframework.web.multipart.commons.CommonsMultipartResolver"></bean>
c>
控制器方法:
@RequestMapping("/testUp")
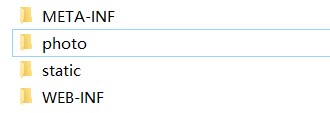
public String testUp(MultipartFile photo,HttpSession session) throws IOException {
String filename = photo.getOriginalFilename();
ServletContext servletContext = session.getServletContext();
String photoPath = servletContext.getRealPath("photo");
File file = new File(photoPath);
//判断photoPath对应的路径是否存在
if(!file.exists()){
//若不存在,则创建目录
file.mkdirs();
}
String finalPath=photoPath+File.separator+filename;
photo.transferTo(new File(finalPath));
return "success";
}
但是有一个问题,上传同名文件会被替代。
解决:
    @RequestMapping("/testUp")
    public String testUp(MultipartFile photo,HttpSession session) throws IOException {
        //获取上传文件的文件名
        String filename = photo.getOriginalFilename();
        //获取上传的文件的后缀名
        String suffixName=filename.substring(filename.lastIndexOf("."));
        //将UUID作为文件名
        String uuid= UUID.randomUUID().toString();
        //将uuid和后缀名拼接后的结果作为最终的文件名
        filename=uuid+suffixName;
        //通过ServletContext获取服务器中photo目录的路径
        ServletContext servletContext = session.getServletContext();
        String photoPath = servletContext.getRealPath("photo");
        File file = new File(photoPath);
        //判断photoPath对应的路径是否存在
        if(!file.exists()){
            //若不存在,则创建目录
            file.mkdirs();
        }
        String finalPath=photoPath+File.separator+filename;
        photo.transferTo(new File(finalPath));
        return "success";
    }
此时上传相同的文件就不会替换了
十一、拦截器
1、拦截器的配置
SpringMVC
中的拦截器用于拦截控制器方法的执行
SpringMVC
中的拦截器需要实现
HandlerInterceptor
SpringMVC
的拦截器必须在
SpringMVC
的配置文件中进行配置:
    <!--配置拦截器-->
    <mvc:interceptors>
        <!-- 以上两种配置方式都是对DispatcherServlet所处理的所有的请求进行拦截 -->
<!--        <bean class="com.atguigu.mvc.interceptors.FirstInterceptor"></bean>-->
<!--        <ref bean="firstInterceptor"></ref>-->
        <mvc:interceptor>
            <mvc:mapping path="/**"/>
            <mvc:exclude-mapping path="/"/>
            <ref bean="firstInterceptor"></ref>
        </mvc:interceptor>
    </mvc:interceptors>
<!--
以上配置方式可以通过ref或bean标签设置拦截器,通过mvc:mapping设置需要拦截的请求,通过
mvc:exclude-mapping设置需要排除的请求,即不需要拦截的请求
-->
TestController:
@Controller
public class TestController {

    @RequestMapping("/**/testInterceptor")
    public String testInterceptor(){
        return "success";
    }
}
<!DOCTYPE html>
<html lang="en" xmlns:th="http://www.thymeleaf.org">
<head>
<meta charset="UTF-8">
<title>Title</title>
</head>
<body>
<h1>首页来了</h1>
<a th:href="@{/testInterceptor}">测试拦截器</a>
</body>
</html>FirstInterceptor:
@Component
public class FirstInterceptor implements HandlerInterceptor {
    @Override
    //控制器执行方法前执行
    public boolean preHandle(HttpServletRequest request, HttpServletResponse response, Object handler) throws Exception {
        System.out.println("FirstInterceptor---->preHandle");
        //返回false进行拦截,返回true放行
        return true;
    }

    @Override
    //控制器执行方法后执行
    public void postHandle(HttpServletRequest request, HttpServletResponse response, Object handler, ModelAndView modelAndView) throws Exception {
        System.out.println("FirstInterceptor---->postHandle");
    }

    @Override
    //视图渲染后执行
    public void afterCompletion(HttpServletRequest request, HttpServletResponse response, Object handler, Exception ex) throws Exception {
        System.out.println("FirstInterceptor---->afterCompletion");
    }
}
2、拦截器的三个抽象方法
SpringMVC
中的拦截器有三个抽象方法:
preHandle
:控制器方法执行之前执行
preHandle()
,其
boolean
类型的返回值表示是否拦截或放行,返回true
为放行,即调用控制器方法;返回
false
表示拦截,即不调用控制器方法
postHandle
:控制器方法执行之后执行
postHandle()
afterComplation
:处理完视图和模型数据,渲染视图完毕之后执行
afterComplation()
3、多个拦截器的执行顺序
a>
若每个拦截器的
preHandle()
都返回
true
此时多个拦截器的执行顺序和拦截器在
SpringMVC
的配置文件的配置顺序有关:
preHandle()
会按照配置的顺序执行,而
postHandle()
和
afterComplation()
会按照配置的反序执行
b>
若某个拦截器的
preHandle()
返回了
false
preHandle()
返回
false
和它之前的拦截器的
preHandle()
都会执行,
postHandle()
都不执行,返回
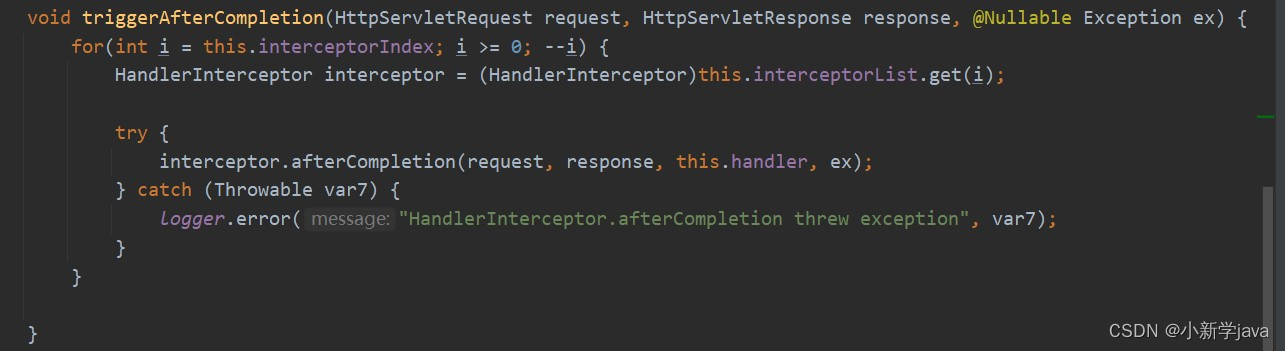
false的拦截器之前的拦截器的afterComplation()
会执行
当secondInterceptor的
preHandle()
返回了
false
输出结果:
FirstInterceptor---->preHandle
secondInterceptor---->preHandle
secondInterceptor---->preHandle
FirstInterceptor---->afterComplation
FirstInterceptor:
@Component
public class FirstInterceptor implements HandlerInterceptor {
    @Override
    //控制器执行方法前执行
    public boolean preHandle(HttpServletRequest request, HttpServletResponse response, Object handler) throws Exception {
        System.out.println("FirstInterceptor---->preHandle");
        //返回false进行拦截,返回true放行
        return true;
    }

    @Override
    //控制器执行方法后执行
    public void postHandle(HttpServletRequest request, HttpServletResponse response, Object handler, ModelAndView modelAndView) throws Exception {
        System.out.println("FirstInterceptor---->postHandle");
    }

    @Override
    //视图渲染后执行
    public void afterCompletion(HttpServletRequest request, HttpServletResponse response, Object handler, Exception ex) throws Exception {
        System.out.println("FirstInterceptor---->afterCompletion");
    }
}
SecondInterceptor:
@Component
public class SecondInterceptor implements HandlerInterceptor {
    @Override
    //控制器执行方法前执行
    public boolean preHandle(HttpServletRequest request, HttpServletResponse response, Object handler) throws Exception {
        System.out.println("secondInterceptor---->preHandle");
        //返回false进行拦截,返回true放行
        return true;
    }

    @Override
    //控制器执行方法后执行
    public void postHandle(HttpServletRequest request, HttpServletResponse response, Object handler, ModelAndView modelAndView) throws Exception {
        System.out.println("secondInterceptor---->postHandle");
    }

    @Override
    //视图渲染后执行
    public void afterCompletion(HttpServletRequest request, HttpServletResponse response, Object handler, Exception ex) throws Exception {
        System.out.println("secondInterceptor---->afterCompletion");
    }
}
输出结果:

看源码:

十二、异常处理器
1、基于配置的异常处理
SpringMVC
提供一个处理控制器方法执行过程中所出现的异常的接口:
HandlerExceptionResolver
HandlerExceptionResolver
接口的实现类有:
DefaultHandlerExceptionResolver
和
SimpleMappingExceptionResolver
SpringMVC
提供了自定义的异常处理器
SimpleMappingExceptionResolver
,使用方式:
    <!--配置异常处理-->
    <bean class="org.springframework.web.servlet.handler.SimpleMappingExceptionResolver">
        <property name="exceptionMappings">
            <!--
                properties的键表示处理器方法执行过程中出现的异常
                properties的值表示若出现指定异常时,设置一个新的视图名称,跳转到指定页面
                -->
            <props>
                <prop key="java.lang.ArithmeticException">error</prop>
            </props>
        </property>
        <!--设置将异常信息共享在请求域中的键-->
        <property name="exceptionAttribute" value="ex"></property>
    </bean>
@RequestMapping("/testException")
public String testExceptionHandler(){
System.out.println(1/0);
return "success";
}<a th:href="@{/testException}">测试异常处理</a><br><!DOCTYPE html>
<html lang="en" xmlns:th="http://www.thymeleaf.org">
<head>
<meta charset="UTF-8">
<title>Title</title>
</head>
<body>
<h1>出现错误!</h1><br>
<p th:text="${ex}"></p><br>
</body>
</html>

2、基于注解的异常处理
ExceptionController:
//是@Component的一个扩展组件
@ControllerAdvice
public class ExceptionController {
    @ExceptionHandler(value ={ArithmeticException.class,NullPointerException.class})
    public String testException(Exception ex, Model model){
        //使用Model共享数据,也就是获取异常信息
        model.addAttribute("ex",ex);
        return "error";
    }
}
<!DOCTYPE html>
<html lang="en" xmlns:th="http://www.thymeleaf.org">
<head>
<meta charset="UTF-8">
<title>Title</title>
</head>
<body>
<h1>出现错误!</h1><br>
<p th:text="${ex}"></p><br>
</body>
</html> @RequestMapping("/testException")
public String testExceptionHandler(){
System.out.println(1/0);
return "success";
}十三、注解配置SpringMVC
使用配置类和注解代替
web.xml
和
SpringMVC
配置文件的功能
1、创建初始化类,代替web.xml
在
Servlet3.0
环境中,容器会在类路径中查找实现
javax.servlet.ServletContainerInitializer
接口的类, 如果找到的话就用它来配置Servlet
容器。
Spring
提供了这个接口的实现,名为
SpringServletContainerInitializer
,这个类反过来又会查找实现
WebApplicationInitializer
的类并将配置的任务交给它们来完成。Spring3.2
引入了一个便利的
WebApplicationInitializer
基础实现,名为 AbstractAnnotationConfigDispatcherServletInitializer,当我们的类扩展了
AbstractAnnotationConfigDispatcherServletInitializer
并将其部署到
Servlet3.0
容器的时候,容器会自动发现它,并用它来配置Servlet
上下文。
//web工程的初始化类,用来代替web.xml
public class WebInit extends AbstractAnnotationConfigDispatcherServletInitializer {

    //指定spring的配置类
    @Override
    protected Class<?>[] getRootConfigClasses() {
        return new Class[]{SpringConfig.class};
    }

    //指定springMVC的配置类
    @Override
    protected Class<?>[] getServletConfigClasses() {
        return new Class[]{WebConfig.class};
    }

    //指定DispatcherServlet的映射规则,即url-pattern
    @Override
    protected String[] getServletMappings() {
        return new String[]{"/"};
    }

    //注册过滤器
    @Override
    protected Filter[] getServletFilters() {
        CharacterEncodingFilter characterEncodingFilter = new CharacterEncodingFilter();
        characterEncodingFilter.setEncoding("UTF-8");
        characterEncodingFilter.setForceResponseEncoding(true);
        HiddenHttpMethodFilter hiddenHttpMethodFilter = new HiddenHttpMethodFilter();
        return new Filter[]{characterEncodingFilter,hiddenHttpMethodFilter};
    }
}2、创建SpringConfig配置类,代替spring的配置文件
@Configuration
public class SpringConfig {
    //ssm整合之后,spring的配置信息写在此类中
}3、创建WebConfig配置类,代替SpringMVC的配置文件
/*代替springMVC的配置文件
 *   1.扫描组件      2.视图解析器     3.view-controller       4.default-servlet-handler
 *   5.mvc注解驱动   6.文件上传解析器   7.异常处理  8,拦截器
 * */

//将当前类标识为一个配置类
@Configuration
//1.扫描组件
@ComponentScan("com.atguigu.mvc")
//5.mvc注解驱动
@EnableWebMvc
public class WebConfig implements WebMvcConfigurer {
    //4.default-servlet-handler
    //使用默认的servlet处理静态资源
    @Override
    public void configureDefaultServletHandling(DefaultServletHandlerConfigurer configurer) {
        configurer.enable();
    }

    //6.文件上传解析器
    //配置文件上传解析器
    @Bean
    public CommonsMultipartResolver multipartResolver() {
        return new CommonsMultipartResolver();
    }

    //8,拦截器
    //配置拦截器
    @Override
    public void addInterceptors(InterceptorRegistry registry) {
        TestInterceptor testInterceptor = new TestInterceptor();
        registry.addInterceptor(testInterceptor).addPathPatterns("/**");
    }

    //3.view-controller
    //配置视图控制
    @Override
    public void addViewControllers(ViewControllerRegistry registry) {
        registry.addViewController("/hello").setViewName("index");
    }

    //7.异常处理
    //配置异常映射
    @Override
    public void configureHandlerExceptionResolvers(List<HandlerExceptionResolver> resolvers) {
        SimpleMappingExceptionResolver exceptionResolver = new SimpleMappingExceptionResolver();
        Properties prop = new Properties();
        prop.setProperty("java.lang.ArithmeticException", "error");
        //设置异常映射
        exceptionResolver.setExceptionMappings(prop);
        //设置共享异常信息的键
        exceptionResolver.setExceptionAttribute("ex");
        resolvers.add(exceptionResolver);
    }

    //配置生成模板解析器
    @Bean
    public ITemplateResolver templateResolver() {
        WebApplicationContext webApplicationContext = ContextLoader.getCurrentWebApplicationContext();
    // ServletContextTemplateResolver需要一个ServletContext作为构造参数,可通过WebApplicationContext 的方法获得
        ServletContextTemplateResolver templateResolver = new ServletContextTemplateResolver(
                webApplicationContext.getServletContext());
        templateResolver.setPrefix("/WEB-INF/templates/");
        templateResolver.setSuffix(".html");
        templateResolver.setCharacterEncoding("UTF-8");
        templateResolver.setTemplateMode(TemplateMode.HTML);
        return templateResolver;
    }

    //生成模板引擎并为模板引擎注入模板解析器
    @Bean
    public SpringTemplateEngine templateEngine(ITemplateResolver templateResolver) {
        SpringTemplateEngine templateEngine = new SpringTemplateEngine();
        templateEngine.setTemplateResolver(templateResolver);
        return templateEngine;
    }

    //生成视图解析器并未解析器注入模板引擎
    @Bean
    public ViewResolver viewResolver(SpringTemplateEngine templateEngine) {
        ThymeleafViewResolver viewResolver = new ThymeleafViewResolver();
        viewResolver.setCharacterEncoding("UTF-8");
        viewResolver.setTemplateEngine(templateEngine);
        return viewResolver;
    }
}4、测试功能
@Controller
public class TestController {
    @RequestMapping("/")
    public String index(){
        return "index";
    }
}
十三、SpringMVC执行流程
1、SpringMVC常用组件
- DispatcherServlet:前端控制器,不需要工程师开发,由框架提供
作用:统一处理请求和响应,整个流程控制的中心,由它调用其它组件处理用户的请求
- HandlerMapping:处理器映射器,不需要工程师开发,由框架提供
作用:根据请求的
url
、
method
等信息查找
Handler
,即控制器方法
- Handler:处理器,需要工程师开发
作用:在
DispatcherServlet
的控制下
Handler
对具体的用户请求进行处理
- HandlerAdapter:处理器适配器,不需要工程师开发,由框架提供
作用:通过
HandlerAdapter
对处理器(控制器方法)进行执行
- ViewResolver:视图解析器,不需要工程师开发,由框架提供
作用:进行视图解析,得到相应的视图,例如:
ThymeleafView
、
InternalResourceView
、
RedirectView
- View:视图
作用:将模型数据通过页面展示给用户
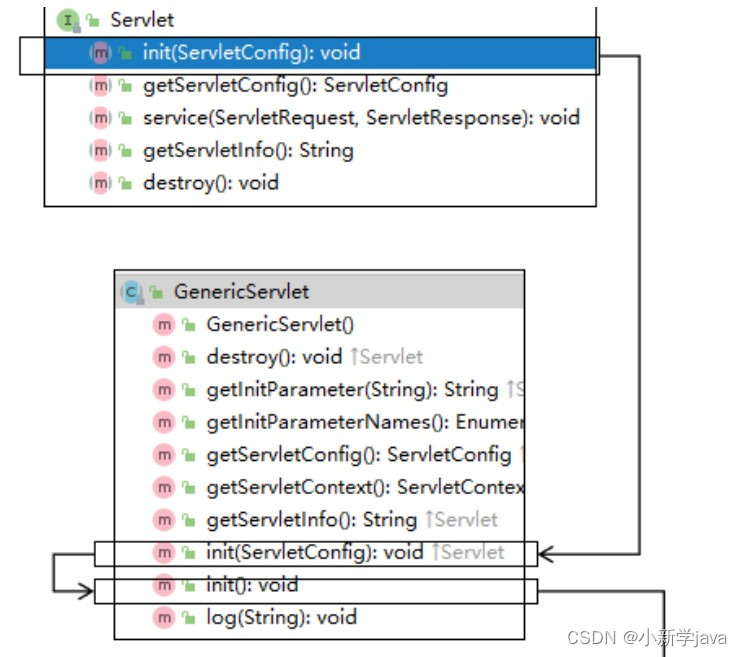
2、DispatcherServlet初始化过程
DispatcherServlet
本质上是一个
Servlet
,所以天然的遵循
Servlet
的生命周期。所以宏观上是
Servlet 生命周期来进行调度。
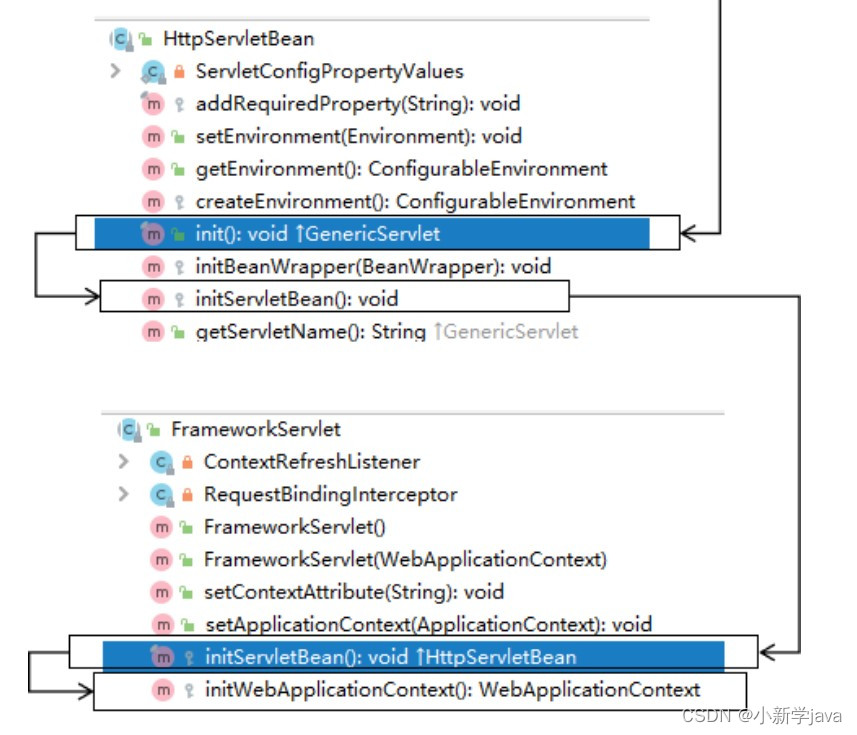
a>
初始化
WebApplicationContext
所在类:
org.springframework.web.servlet.FrameworkServlet
protected WebApplicationContext initWebApplicationContext() {
        WebApplicationContext rootContext = WebApplicationContextUtils.getWebApplicationContext(this.getServletContext());
        WebApplicationContext wac = null;
        if (this.webApplicationContext != null) {
            wac = this.webApplicationContext;
            if (wac instanceof ConfigurableWebApplicationContext) {
                ConfigurableWebApplicationContext cwac = (ConfigurableWebApplicationContext)wac;
                if (!cwac.isActive()) {
                    if (cwac.getParent() == null) {
                        cwac.setParent(rootContext);
                    }

                    this.configureAndRefreshWebApplicationContext(cwac);
                }
            }
        }

        if (wac == null) {
            wac = this.findWebApplicationContext();
        }

        if (wac == null) {
            wac = this.createWebApplicationContext(rootContext);
        }

        if (!this.refreshEventReceived) {
            synchronized(this.onRefreshMonitor) {
                this.onRefresh(wac);
            }
        }

        if (this.publishContext) {
            String attrName = this.getServletContextAttributeName();
            this.getServletContext().setAttribute(attrName, wac);
        }

        return wac;
    }
b>
创建
WebApplicationContext
所在类:
org.springframework.web.servlet.FrameworkServlet
protected WebApplicationContext createWebApplicationContext(@Nullable ApplicationContext parent) {
        Class<?> contextClass = this.getContextClass();
        if (!ConfigurableWebApplicationContext.class.isAssignableFrom(contextClass)) {
            throw new ApplicationContextException("Fatal initialization error in servlet with name '" + this.getServletName() + "': custom WebApplicationContext class [" + contextClass.getName() + "] is not of type ConfigurableWebApplicationContext");
        } else {
            ConfigurableWebApplicationContext wac = (ConfigurableWebApplicationContext)BeanUtils.instantiateClass(contextClass);
            wac.setEnvironment(this.getEnvironment());
            wac.setParent(parent);
            String configLocation = this.getContextConfigLocation();
            if (configLocation != null) {
                wac.setConfigLocation(configLocation);
            }

            this.configureAndRefreshWebApplicationContext(wac);
            return wac;
        }
    }
c>DispatcherServlet
初始化策略
FrameworkServlet
创建
WebApplicationContext
后,刷新容器,调用
onRefresh(wac)
,此方法在
DispatcherServlet
中进行了重写,调用了
initStrategies(context)
方法,初始化策略,即初始化
DispatcherServlet
的各个组件
所在类:
org.springframework.web.servlet.DispatcherServlet
protected void initStrategies(ApplicationContext context) {
        this.initMultipartResolver(context);
        this.initLocaleResolver(context);
        this.initThemeResolver(context);
        this.initHandlerMappings(context);
        this.initHandlerAdapters(context);
        this.initHandlerExceptionResolvers(context);
        this.initRequestToViewNameTranslator(context);
        this.initViewResolvers(context);
        this.initFlashMapManager(context);
}3、DispatcherServlet调用组件处理请求
a>processRequest()
FrameworkServlet
重写
HttpServlet
中的
service()
和
doXxx()
,这些方法中调用了
processRequest(request, response)
所在类:
org.springframework.web.servlet.FrameworkServlet
protected final void processRequest(HttpServletRequest request, HttpServletResponse response) throws ServletException, IOException {
        long startTime = System.currentTimeMillis();
        Throwable failureCause = null;
        LocaleContext previousLocaleContext = LocaleContextHolder.getLocaleContext();
        LocaleContext localeContext = this.buildLocaleContext(request);
        RequestAttributes previousAttributes = RequestContextHolder.getRequestAttributes();
        ServletRequestAttributes requestAttributes = this.buildRequestAttributes(request, response, previousAttributes);
        WebAsyncManager asyncManager = WebAsyncUtils.getAsyncManager(request);
        asyncManager.registerCallableInterceptor(FrameworkServlet.class.getName(), new FrameworkServlet.RequestBindingInterceptor());
        this.initContextHolders(request, localeContext, requestAttributes);

        try {
            this.doService(request, response);
        } catch (IOException | ServletException var16) {
            failureCause = var16;
            throw var16;
        } catch (Throwable var17) {
            failureCause = var17;
            throw new NestedServletException("Request processing failed", var17);
        } finally {
            this.resetContextHolders(request, previousLocaleContext, previousAttributes);
            if (requestAttributes != null) {
                requestAttributes.requestCompleted();
            }

            this.logResult(request, response, (Throwable)failureCause, asyncManager);
            this.publishRequestHandledEvent(request, response, startTime, (Throwable)failureCause);
        }

    }
b>doService()
所在类:
org.springframework.web.servlet.DispatcherServlet
 protected void doService(HttpServletRequest request, HttpServletResponse response) throws Exception {
        this.logRequest(request);
        Map<String, Object> attributesSnapshot = null;
        if (WebUtils.isIncludeRequest(request)) {
            attributesSnapshot = new HashMap();
            Enumeration attrNames = request.getAttributeNames();

            label116:
            while(true) {
                String attrName;
                do {
                    if (!attrNames.hasMoreElements()) {
                        break label116;
                    }

                    attrName = (String)attrNames.nextElement();
                } while(!this.cleanupAfterInclude && !attrName.startsWith("org.springframework.web.servlet"));

                attributesSnapshot.put(attrName, request.getAttribute(attrName));
            }
        }

        request.setAttribute(WEB_APPLICATION_CONTEXT_ATTRIBUTE, this.getWebApplicationContext());
        request.setAttribute(LOCALE_RESOLVER_ATTRIBUTE, this.localeResolver);
        request.setAttribute(THEME_RESOLVER_ATTRIBUTE, this.themeResolver);
        request.setAttribute(THEME_SOURCE_ATTRIBUTE, this.getThemeSource());
        if (this.flashMapManager != null) {
            FlashMap inputFlashMap = this.flashMapManager.retrieveAndUpdate(request, response);
            if (inputFlashMap != null) {
                request.setAttribute(INPUT_FLASH_MAP_ATTRIBUTE, Collections.unmodifiableMap(inputFlashMap));
            }

            request.setAttribute(OUTPUT_FLASH_MAP_ATTRIBUTE, new FlashMap());
            request.setAttribute(FLASH_MAP_MANAGER_ATTRIBUTE, this.flashMapManager);
        }

        RequestPath previousRequestPath = null;
        if (this.parseRequestPath) {
            previousRequestPath = (RequestPath)request.getAttribute(ServletRequestPathUtils.PATH_ATTRIBUTE);
            ServletRequestPathUtils.parseAndCache(request);
        }

        try {
            this.doDispatch(request, response);
        } finally {
            if (!WebAsyncUtils.getAsyncManager(request).isConcurrentHandlingStarted() && attributesSnapshot != null) {
                this.restoreAttributesAfterInclude(request, attributesSnapshot);
            }

            if (this.parseRequestPath) {
                ServletRequestPathUtils.setParsedRequestPath(previousRequestPath, request);
            }

        }

    }
c>doDispatch()
所在类:
org.springframework.web.servlet.DispatcherServlet
protected void doDispatch(HttpServletRequest request, HttpServletResponse response) throws Exception {
HttpServletRequest processedRequest = request;
HandlerExecutionChain mappedHandler = null;
boolean multipartRequestParsed = false;
WebAsyncManager asyncManager = WebAsyncUtils.getAsyncManager(request);
try {
try {
ModelAndView mv = null;
Object dispatchException = null;
try {
processedRequest = this.checkMultipart(request);
multipartRequestParsed = processedRequest != request;
mappedHandler = this.getHandler(processedRequest);
if (mappedHandler == null) {
this.noHandlerFound(processedRequest, response);
return;
}
HandlerAdapter ha = this.getHandlerAdapter(mappedHandler.getHandler());
String method = request.getMethod();
boolean isGet = HttpMethod.GET.matches(method);
if (isGet || HttpMethod.HEAD.matches(method)) {
long lastModified = ha.getLastModified(request, mappedHandler.getHandler());
if ((new ServletWebRequest(request, response)).checkNotModified(lastModified) && isGet) {
return;
}
}
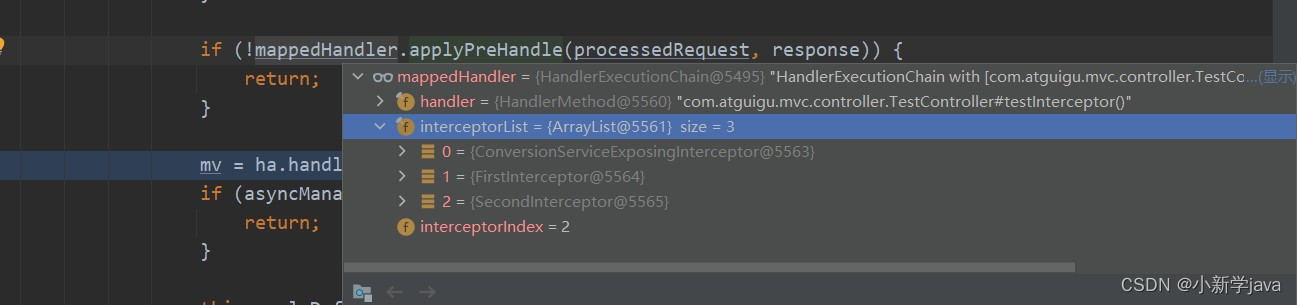
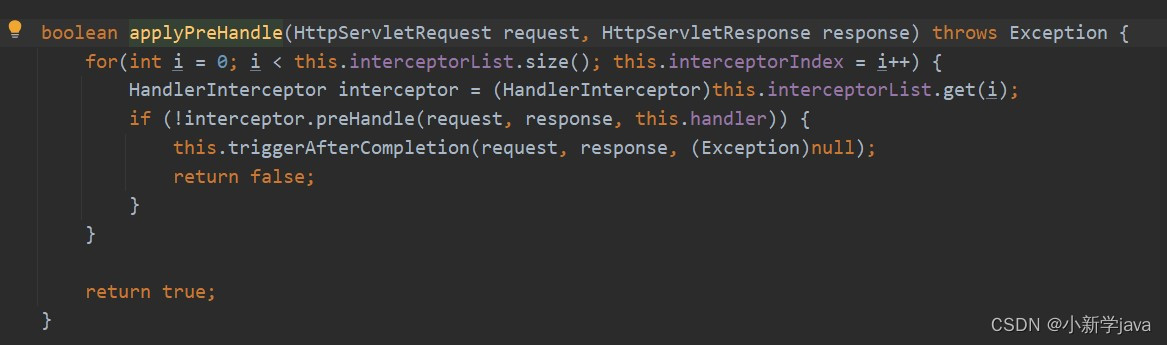
if (!mappedHandler.applyPreHandle(processedRequest, response)) {
return;
}
mv = ha.handle(processedRequest, response, mappedHandler.getHandler());
if (asyncManager.isConcurrentHandlingStarted()) {
return;
}
this.applyDefaultViewName(processedRequest, mv);
mappedHandler.applyPostHandle(processedRequest, response, mv);
} catch (Exception var20) {
dispatchException = var20;
} catch (Throwable var21) {
dispatchException = new NestedServletException("Handler dispatch failed", var21);
}
this.processDispatchResult(processedRequest, response, mappedHandler, mv, (Exception)dispatchException);
} catch (Exception var22) {
this.triggerAfterCompletion(processedRequest, response, mappedHandler, var22);
} catch (Throwable var23) {
this.triggerAfterCompletion(processedRequest, response, mappedHandler, new NestedServletException("Handler processing failed", var23));
}
} finally {
if (asyncManager.isConcurrentHandlingStarted()) {
if (mappedHandler != null) {
mappedHandler.applyAfterConcurrentHandlingStarted(processedRequest, response);
}
} else if (multipartRequestParsed) {
this.cleanupMultipart(processedRequest);
}
}
}
d>processDispatchResult()
 private void processDispatchResult(HttpServletRequest request, HttpServletResponse response, @Nullable HandlerExecutionChain mappedHandler, @Nullable ModelAndView mv, @Nullable Exception exception) throws Exception {
        boolean errorView = false;
        if (exception != null) {
            if (exception instanceof ModelAndViewDefiningException) {
                this.logger.debug("ModelAndViewDefiningException encountered", exception);
                mv = ((ModelAndViewDefiningException)exception).getModelAndView();
            } else {
                Object handler = mappedHandler != null ? mappedHandler.getHandler() : null;
                mv = this.processHandlerException(request, response, handler, exception);
                errorView = mv != null;
            }
        }

        if (mv != null && !mv.wasCleared()) {
            this.render(mv, request, response);
            if (errorView) {
                WebUtils.clearErrorRequestAttributes(request);
            }
        } else if (this.logger.isTraceEnabled()) {
            this.logger.trace("No view rendering, null ModelAndView returned.");
        }

        if (!WebAsyncUtils.getAsyncManager(request).isConcurrentHandlingStarted()) {
            if (mappedHandler != null) {
                mappedHandler.triggerAfterCompletion(request, response, (Exception)null);
            }

        }
}4、SpringMVC的执行流程
1)
用户向服务器发送请求,请求被
SpringMVC
前端控制器
DispatcherServlet
捕获。
2) DispatcherServlet
对请求
URL
进行解析,得到请求资源标识符(
URI
),判断请求
URI
对应的映射:
a)
不存在
i.
再判断是否配置了
mvc:default-servlet-handler
ii.
如果没配置,则控制台报映射查找不到,客户端展示
404
错误
iii.
如果有配置,则访问目标资源(一般为静态资源,如:
JS,CSS,HTML
),找不到客户端也会展示
404错误
b)
存在则执行下面的流程
3)
根据该
URI
,调用
HandlerMapping
获得该
Handler
配置的所有相关的对象(包括
Handler
对象以及 Handler对象对应的拦截器),最后以
HandlerExecutionChain
执行链对象的形式返回。
4) DispatcherServlet
根据获得的
Handler
,选择一个合适的
HandlerAdapter
。
5)
如果成功获得
HandlerAdapter
,此时将开始执行拦截器的
preHandler(…)
方法【正向】
6)
提取
Request
中的模型数据,填充
Handler
入参,开始执行
Handler
(
Controller)
方法,处理请求。 在填充Handler
的入参过程中,根据你的配置,
Spring
将帮你做一些额外的工作:
a) HttpMessageConveter
: 将请求消息(如
Json
、
xml
等数据)转换成一个对象,将对象转换为指定的响应信息
b)
数据转换:对请求消息进行数据转换。如
String
转换成
Integer
、
Double
等
c)
数据格式化:对请求消息进行数据格式化。 如将字符串转换成格式化数字或格式化日期等
d)
数据验证: 验证数据的有效性(长度、格式等),验证结果存储到
BindingResult
或
Error
中
7) Handler
执行完成后,向
DispatcherServlet
返回一个
ModelAndView
对象。
8)
此时将开始执行拦截器的
postHandle(...)
方法【逆向】。
9)
根据返回的
ModelAndView
(此时会判断是否存在异常:如果存在异常,则执行
HandlerExceptionResolver
进行异常处理)选择一个适合的
ViewResolver
进行视图解析,根据
Model 和View
,来渲染视图。
10)
渲染视图完毕执行拦截器的
afterCompletion(…)
方法【逆向】。
11)
将渲染结果返回给客户端。