5.Model Ensemble
在此示例中,我们将探索使用模型集成来仅通过单个网络调用在服务器端执行多个模型。这样做的好处是减少了在客户端和服务器之间复制数据的次数,并消除了网络调用固有的一些延迟。
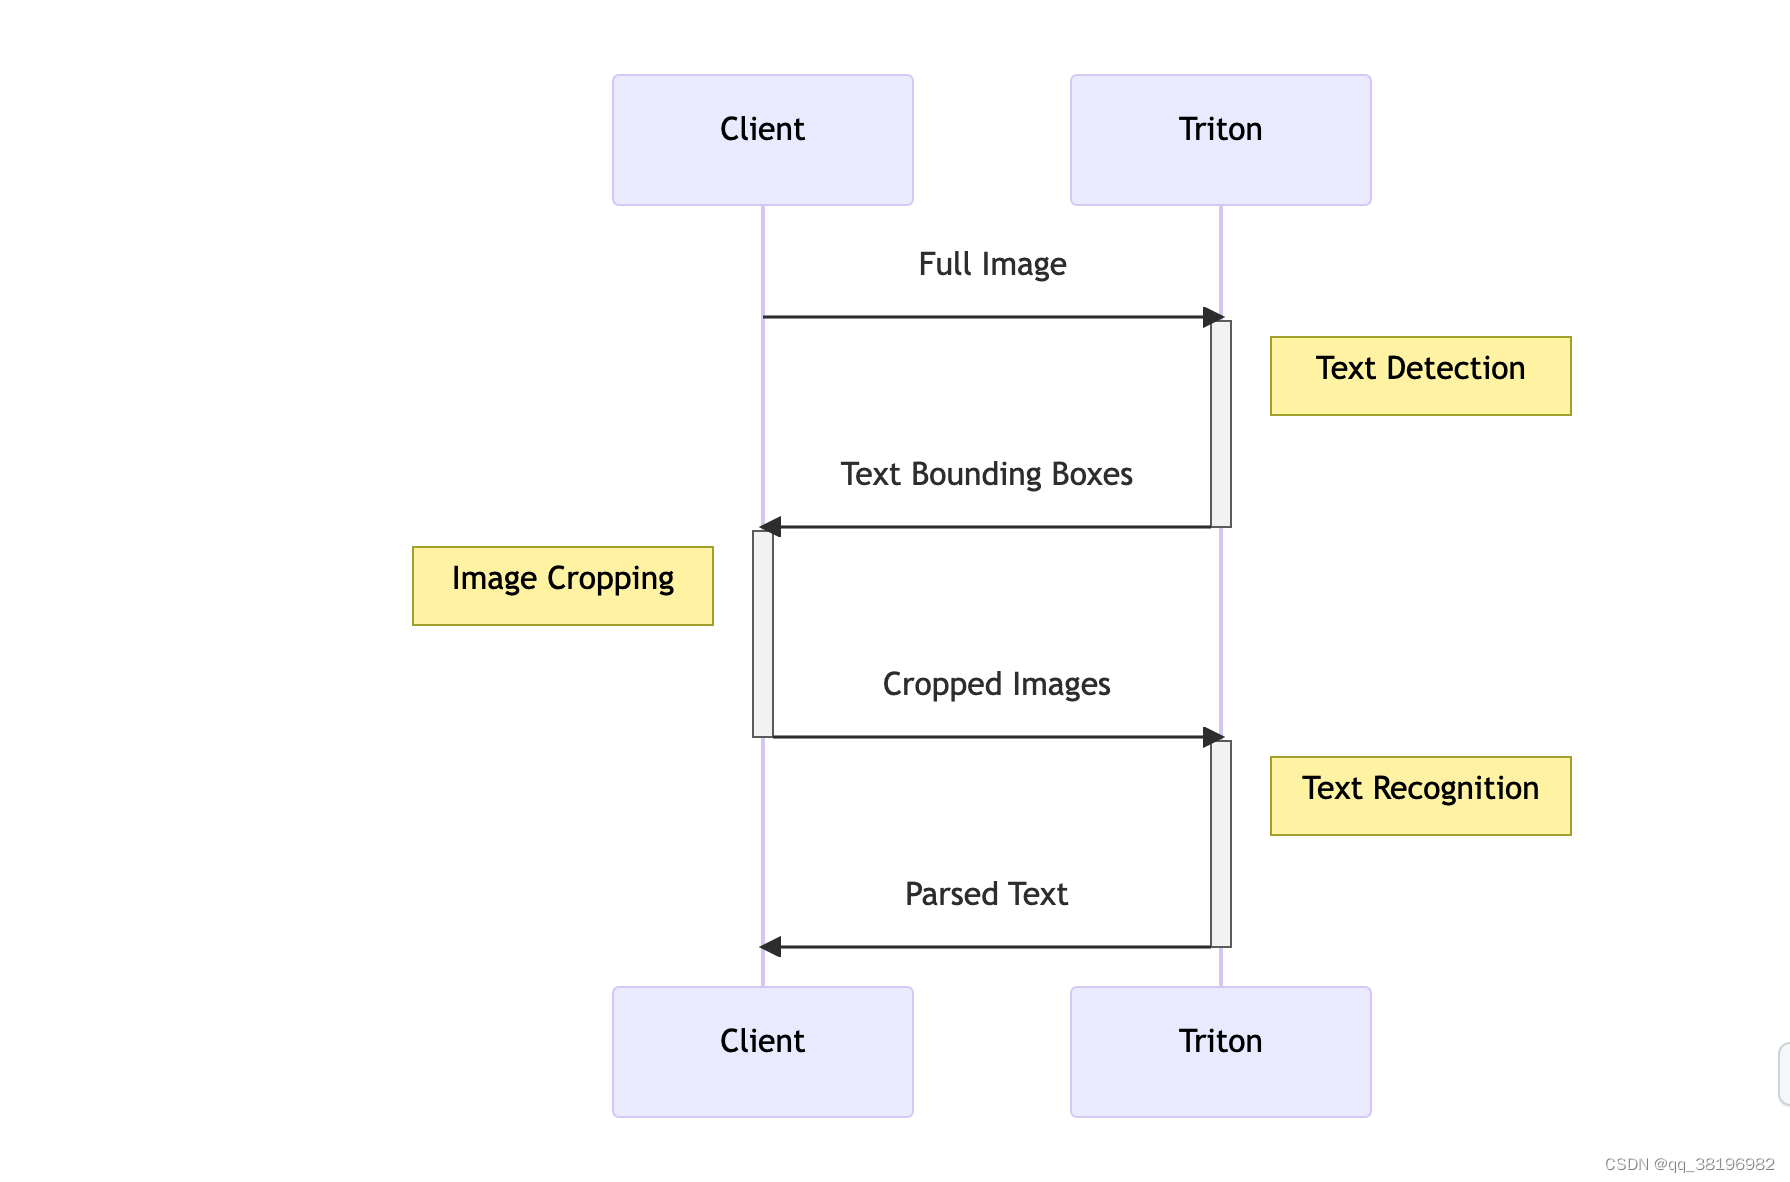
为了说明创建模型集成的过程,我们将重用第 1 部分中首次介绍的模型管道。在前面的示例中,我们分别执行了文本检测和识别模型,我们的客户端进行两个不同的网络调用并在其间执行各种处理步骤,例如裁剪和调整图像大小,或将张量解码为文本。下面是管道的简化图,其中一些步骤发生在客户端,一些步骤发生在服务器上。
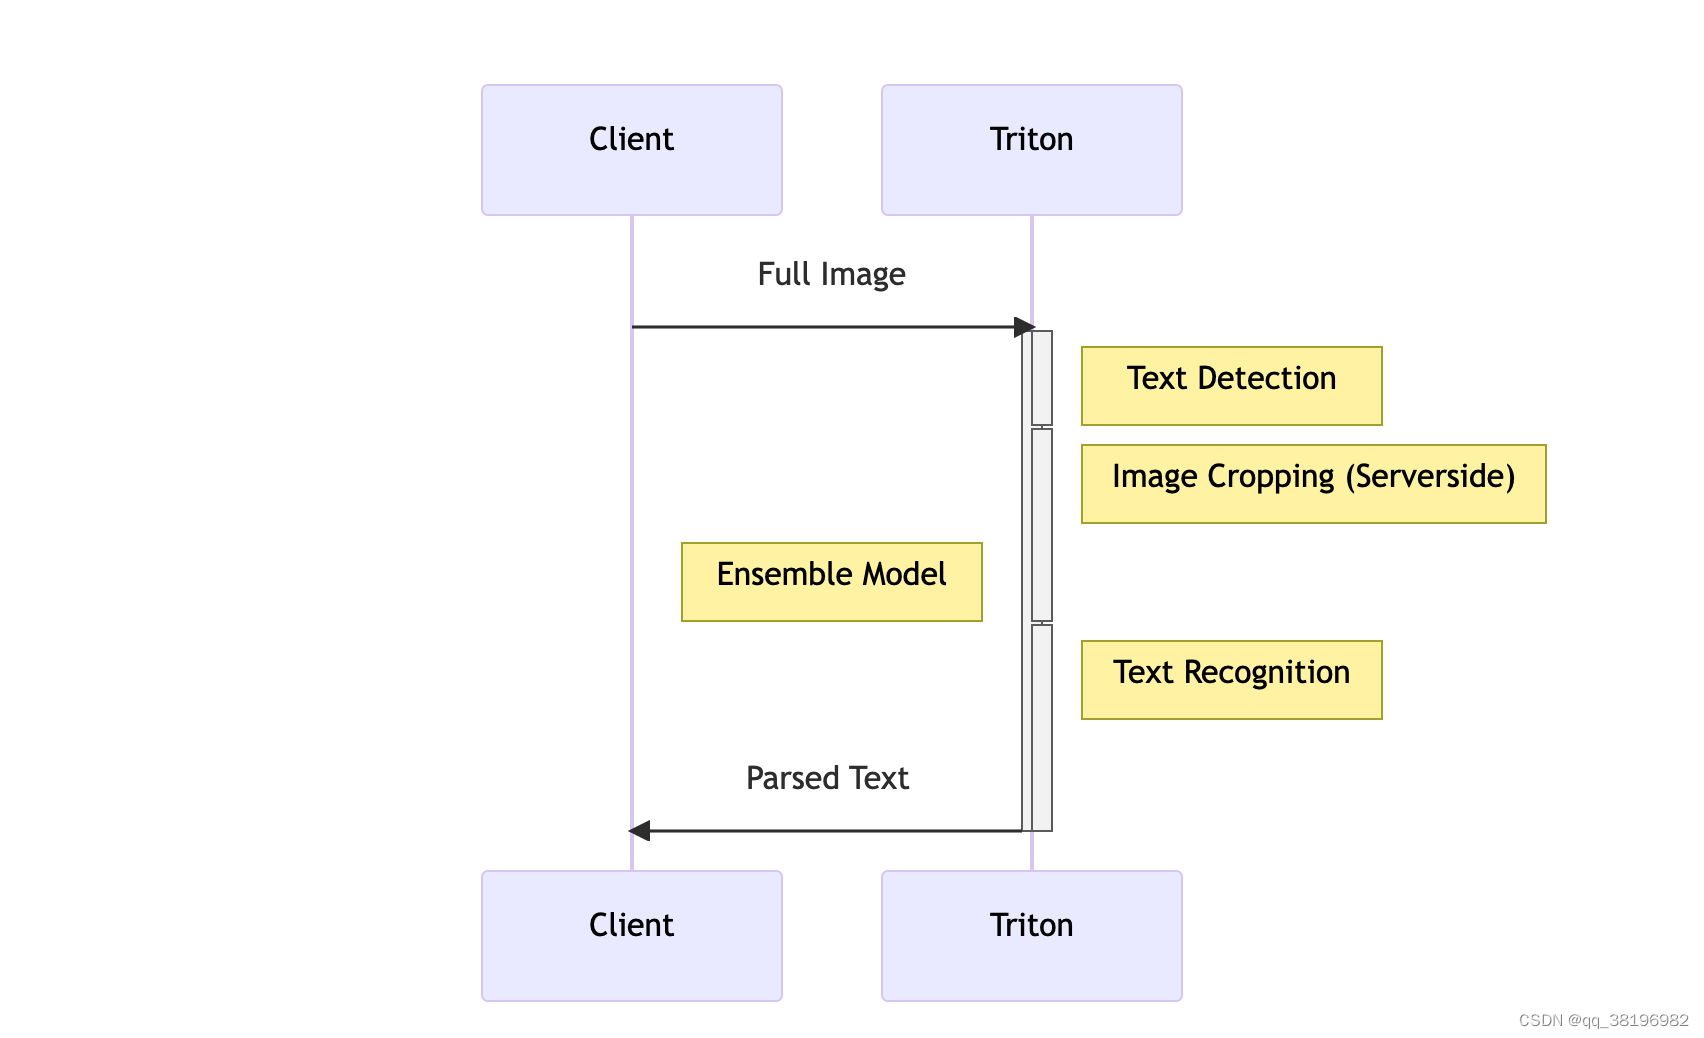
为了减少必要的网络调用和数据复制次数(并利用可能更强大的服务器来执行前/后处理),我们可以使用 Triton 的Model Ensemble功能通过一次网络调用来执行多个模型。
1.部署基础模型
直接执行脚本即可
cd /triton/tutorials/Conceptual_Guide/Part_5-Model_Ensembles
sh utils/export_text_detection.sh
sh utils/export_text_recognition.sh
此时,model_repository的文件结构为

2.使用 Python 后端部署预处理/后处理脚本
在第1部分,client.py用于在客户端进程中执行各种预处理和后处理步骤,包括
- 读取图像
- 对图像进行缩放和标准化
- 将图像发送到 Triton 服务器
- 根据文本检测模型返回的边界框裁剪图像
- 将裁剪后的图像保存回磁盘
现在,实现第二个client,client2.py包括
- 从client.py读取裁剪后的图像
- 对图像进行缩放和标准化
- 将裁剪后的图像发送到 Triton 服务器
- 将文本识别模型返回的张量解码为文本
- 打印解码后的文本
为了将其中许多步骤移至 Triton 服务器,我们可以创建一组将在Triton 的 Python 后端中运行的脚本。Python 后端可用于执行任何 Python 代码,因此我们只需进行一些更改即可将客户端代码直接移植到 Triton。
总的来说,我们将创建 3 种不同的 Python 后端模型,以配合我们现有的 ONNX 模型来为 Triton 提供服务:
detection_preprocessingdetection_postprocessingrecognition_postprocessing
model.py您可以在此目录中的文件夹中找到每个脚本的完整脚本model_repository。
让我们看一个例子。在 model.py中,我们TritonPythonModel使用以下方法创建一个类定义:
class TritonPythonModel:
    def initialize(self, args):
        ...
    def execute(self, requests):
        ...
    def finalize(self):
        ...
initialize和finalize方法是可选的,分别在加载和卸载模型时调用。大部分逻辑将进入该execute方法,该方法接收请求对象列表,并且必须返回响应对象列表。
在我们最初的客户端中,我们使用以下代码来读取图像并对其执行一些简单的转换:
### client.py

image = cv2.imread("./img1.jpg")
image_height, image_width, image_channels = image.shape

# Pre-process image
blob = cv2.dnn.blobFromImage(image, 1.0, (inpWidth, inpHeight), (123.68, 116.78, 103.94), True, False)
blob = np.transpose(blob, (0, 2,3,1))

# Create input object
input_tensors = [
    httpclient.InferInput('input_images:0', blob.shape, "FP32")
]
input_tensors[0].set_data_from_numpy(blob, binary_data=True)
在 python 后端执行时,python代码处理输入列表。但不再是从磁盘读取图像 ,而是直接从 Triton 服务器提供的输入张量检索它们。
### model.py

responses = []
for request in requests:
    # Read input tensor from Triton
    in_0 = pb_utils.get_input_tensor_by_name(request, "detection_preprocessing_input")
    img = in_0.as_numpy()
    image = Image.open(io.BytesIO(img.tobytes()))

    # Pre-process image
    img_out = image_loader(image)
    img_out = np.array(img_out)*255.0

    # Create object to send to next model
    out_tensor_0 = pb_utils.Tensor("detection_preprocessing_output", img_out.astype(output0_dtype))
    inference_response = pb_utils.InferenceResponse(output_tensors=[out_tensor_0])
    responses.append(inference_response)
return responses3.将模型与模型集成结合在一起
创建一个集成“模型”,它可以按顺序执行每个模型,并在每个模型之间传递各种输入和输出。
为此,我们将在模型存储库中创建另一个条目
cd /triton/tutorials/Conceptual_Guide/Part_5-Model_Ensembles
mkdir model_repository/ensemble_model/1
此时ensemble_model的文件结构为
ensemble_model/
├── 1
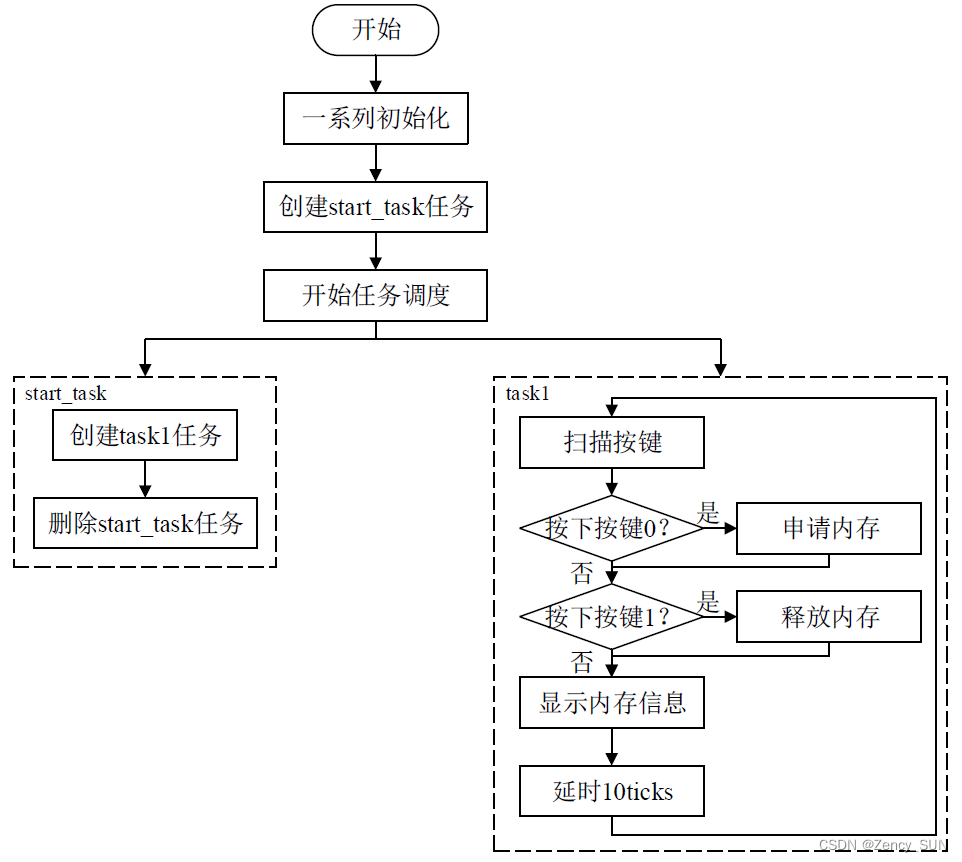
└── config.pbtxt这次,我们只需要配置文件来描述我们的整体以及一个空版本文件夹(您需要使用 来创建mkdir -p model_repository/ensemble_model/1)。在配置文件中,我们将定义整体的执行图。该图描述了集成的总体输入和输出,以及数据如何以有向无环图的形式流过模型。下面是我们模型管道的图形表示。菱形代表整体的最终输入和输出,这是客户端将与之交互的所有内容。圆圈是不同的部署模型,矩形是在模型之间传递的张量。

为了向 Triton 表示该图,我们将创建以下配置文件。请注意我们如何将平台定义为"ensemble"并指定集成本身的输入和输出。然后,在该ensemble_scheduling块中,我们为每个集成创建一个条目step,其中包括要执行的模型的名称,以及该模型的输入和输出如何映射到完整集成或其他模型的输入和输出。
ensemble的config.pbtxt内容为
name: "ensemble_model"
platform: "ensemble"
max_batch_size: 256
input [
  {
    name: "input_image"
    data_type: TYPE_UINT8
    dims: [ -1 ]
  }
]
output [
  {
    name: "recognized_text"
    data_type: TYPE_STRING
    dims: [ -1 ]
  }
]

ensemble_scheduling {
  step [
    {
      model_name: "detection_preprocessing"
      model_version: -1
      input_map {
        key: "detection_preprocessing_input"
        value: "input_image"
      }
      output_map {
        key: "detection_preprocessing_output"
        value: "preprocessed_image"
      }
    },
    {
      model_name: "text_detection"
      model_version: -1
      input_map {
        key: "input_images:0"
        value: "preprocessed_image"
      }
      output_map {
        key: "feature_fusion/Conv_7/Sigmoid:0"
        value: "Sigmoid:0"
      },
      output_map {
        key: "feature_fusion/concat_3:0"
        value: "concat_3:0"
      }
    },
    {
      model_name: "detection_postprocessing"
      model_version: -1
      input_map {
        key: "detection_postprocessing_input_1"
        value: "Sigmoid:0"
      }
      input_map {
        key: "detection_postprocessing_input_2"
        value: "concat_3:0"
      }
      input_map {
        key: "detection_postprocessing_input_3"
        value: "preprocessed_image"
      }
      output_map {
        key: "detection_postprocessing_output"
        value: "cropped_images"
      }
    },
    {
      model_name: "text_recognition"
      model_version: -1
      input_map {
        key: "INPUT__0"
        value: "cropped_images"
      }
      output_map {
        key: "OUTPUT__0"
        value: "recognition_output"
      }
    },
    {
      model_name: "recognition_postprocessing"
      model_version: -1
      input_map {
        key: "recognition_postprocessing_input"
        value: "recognition_output"
      }
      output_map {
        key: "recognition_postprocessing_output"
        value: "recognized_text"
      }
    }
  ]
}
4.启动与测试
/opt/tritonserver/bin/tritonserver --model-repository=/triton/tutorials/Conceptual_Guide/Part_5-Model_Ensembles/model_repository/客户端文件内容为
## client.py

import tritonclient.grpc as grpcclient
import numpy as np

client = grpcclient.InferenceServerClient(url="localhost:8001")

image_data = np.fromfile("img1.jpg", dtype="uint8")
image_data = np.expand_dims(image_data, axis=0)

input_tensors = [grpcclient.InferInput("input_image", image_data.shape, "UINT8")]
input_tensors[0].set_data_from_numpy(image_data)
results = client.infer(model_name="ensemble_model", inputs=input_tensors)
output_data = results.as_numpy("recognized_text").astype(str)
print(output_data)
发起请求
cd /triton/tutorials/Conceptual_Guide/Part_5-Model_Ensembles
python3 client.py
结果为

6.使用BLS
在第5部分,讨论了如何使用模型集成通过单个网络调用在 Triton 上执行多个模型。当模型pipeline采用有向无环图的形式时,模型集成是一个很好的解决方案。然而,并不是所有的管道都可以这样表达。例如,pipeline逻辑需要条件分支或循环执行,则更适合使用业务逻辑脚本(BLS)在 Python 中创建定义更复杂的管道。
1.使用多个后端
为了解决这个挑战,Triton Inference Server的用户可以利用Python或C++后端以及业务逻辑脚本API(BLS API)。这使得用户可以编写脚本来触发模型执行,而不受贡献者使用的特定开发环境的限制。这种方法有助于统一和简化不同贡献者的工作,确保整个深度学习流程能够顺利运行。
总之,BLS API提供了一种通用的方式来集成深度学习模型的执行,无论贡献者使用的是Python还是C++,都可以在整个流程中进行模型推理。这有助于加速开发和部署过程,同时降低了协作和整合的复杂性。
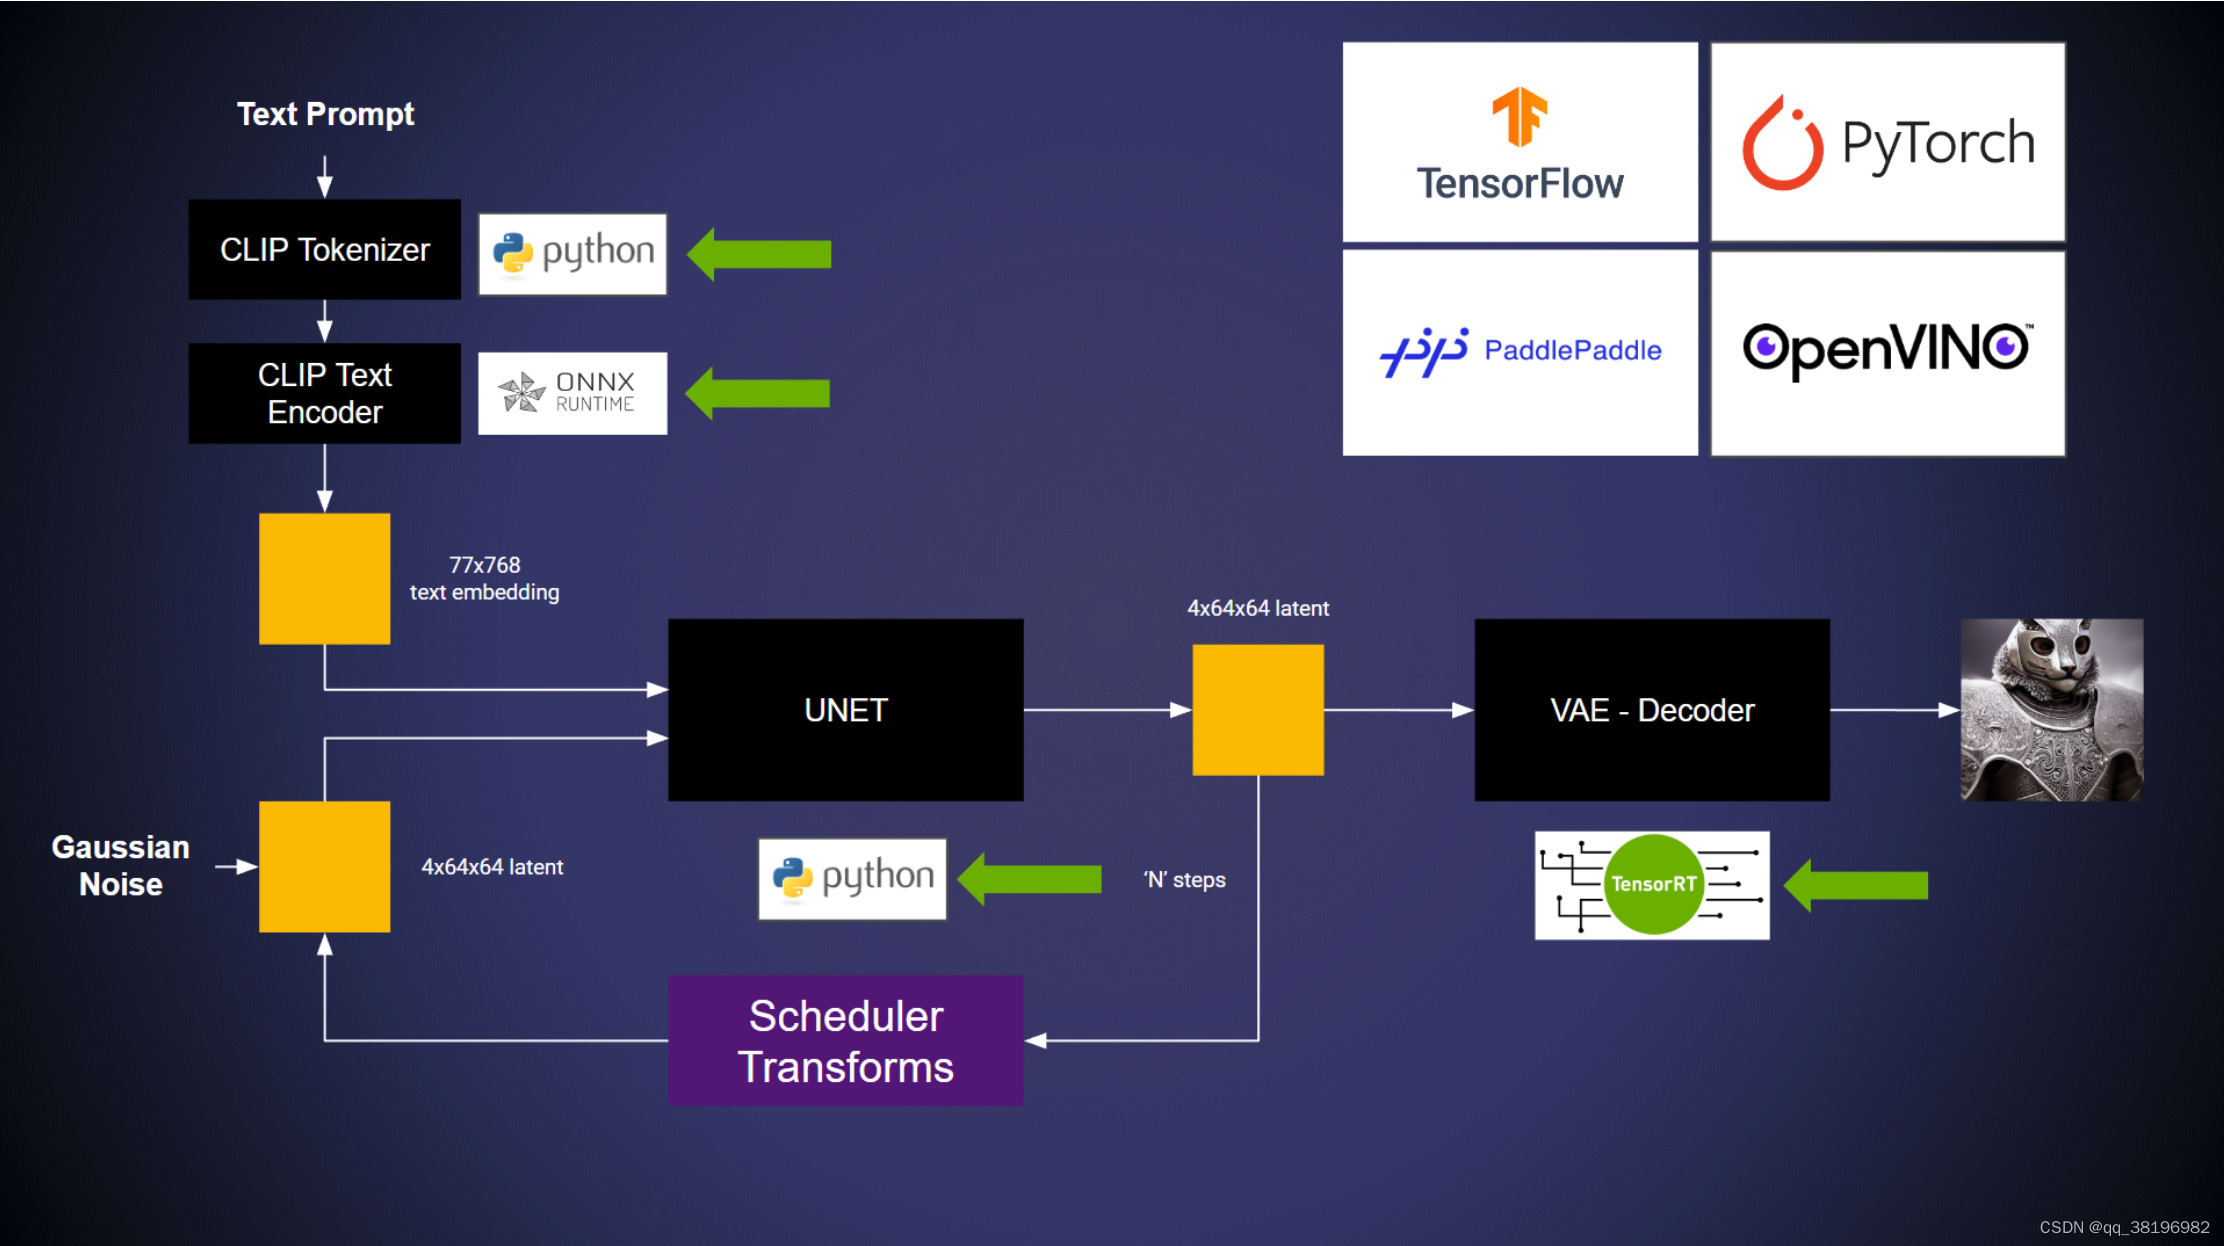
在此示例中,模型运行于:
- ONNX 后端
- TensorRT 后端
- Python后端
部署在框架后端的两个模型都可以使用以下 API 触发:
encoding_request = pb_utils.InferenceRequest(
    model_name="text_encoder",
    requested_output_names=["last_hidden_state"],
    inputs=[input_ids_1],
)

response = encoding_request.exec()
text_embeddings = pb_utils.get_output_tensor_by_name(response, "last_hidden_state")
在/triton/tutorials/Conceptual_Guide/Part_6-building_complex_pipelines/model_repository/pipeline/1路径下的model.py里有完整的pipeline
2.测试示例
安装Python后端运行的模型所需的依赖项
cd /triton/tutorials/Conceptual_Guide/Part_6-building_complex_pipelines
# PyTorch & Transformers Lib
pip install torch torchvision torchaudio
pip install transformers ftfy scipy accelerate
pip install diffusers==0.9.0
pip install transformers[onnxruntime]
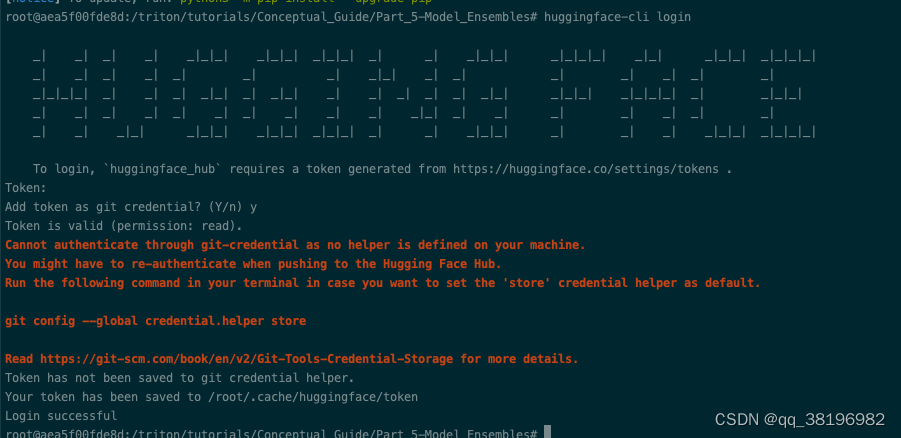
huggingface-cli login需要有hugging face账号,并从setting->Access Tokens里获取token
导出并转换模型
# Accelerating VAE with TensorRT
/usr/src/tensorrt/bin/trtexec --onnx=vae.onnx --saveEngine=vae.plan --minShapes=latent_sample:1x4x64x64 --optShapes=latent_sample:4x4x64x64 --maxShapes=latent_sample:8x4x64x64 --fp16

# Place the models in the model repository
mkdir model_repository/vae/1
mkdir model_repository/text_encoder/1
mv vae.plan model_repository/vae/1/model.plan
mv encoder.onnx model_repository/text_encoder/1/model.onnx
启动模型
/opt/tritonserver/bin/tritonserver --model-repository=/triton/tutorials/Conceptual_Guide/Part_6-building_complex_pipelines/model_repository/发送请求
# Client with no GUI
python3 client.py
结果如下
root@aea5f00fde8d:/triton/tutorials/Conceptual_Guide/Part_6-building_complex_pipelines# python3 client.py
Time taken: 6.338625431060791
# Client with GUI
pip install gradio packaging
python3 gui/client.py --triton_url="localhost:8001"结果如下

7.数据管道
弄清楚如何把tensor从客户端移动到客户端,或者tensor在后端之间如何移动,是非常重要的。
本部分主要包含2个内容:
1. **API 用于在客户端和服务器之间移动数据:** Triton 提供了一组 API,允许用户将数据从客户端发送到服务器,以及在服务器内部移动数据,以便进行推理。这对于将输入数据传递给模型以及将模型的输出传递回客户端非常重要。
2. **如何熟练使用模型集成调度器:** Triton 支持模型集成,这意味着您可以同时部署多个模型,并将它们组合在一起执行以实现更复杂的任务。集成调度器用于管理多个模型之间的数据流和调度。
1.虚拟管道
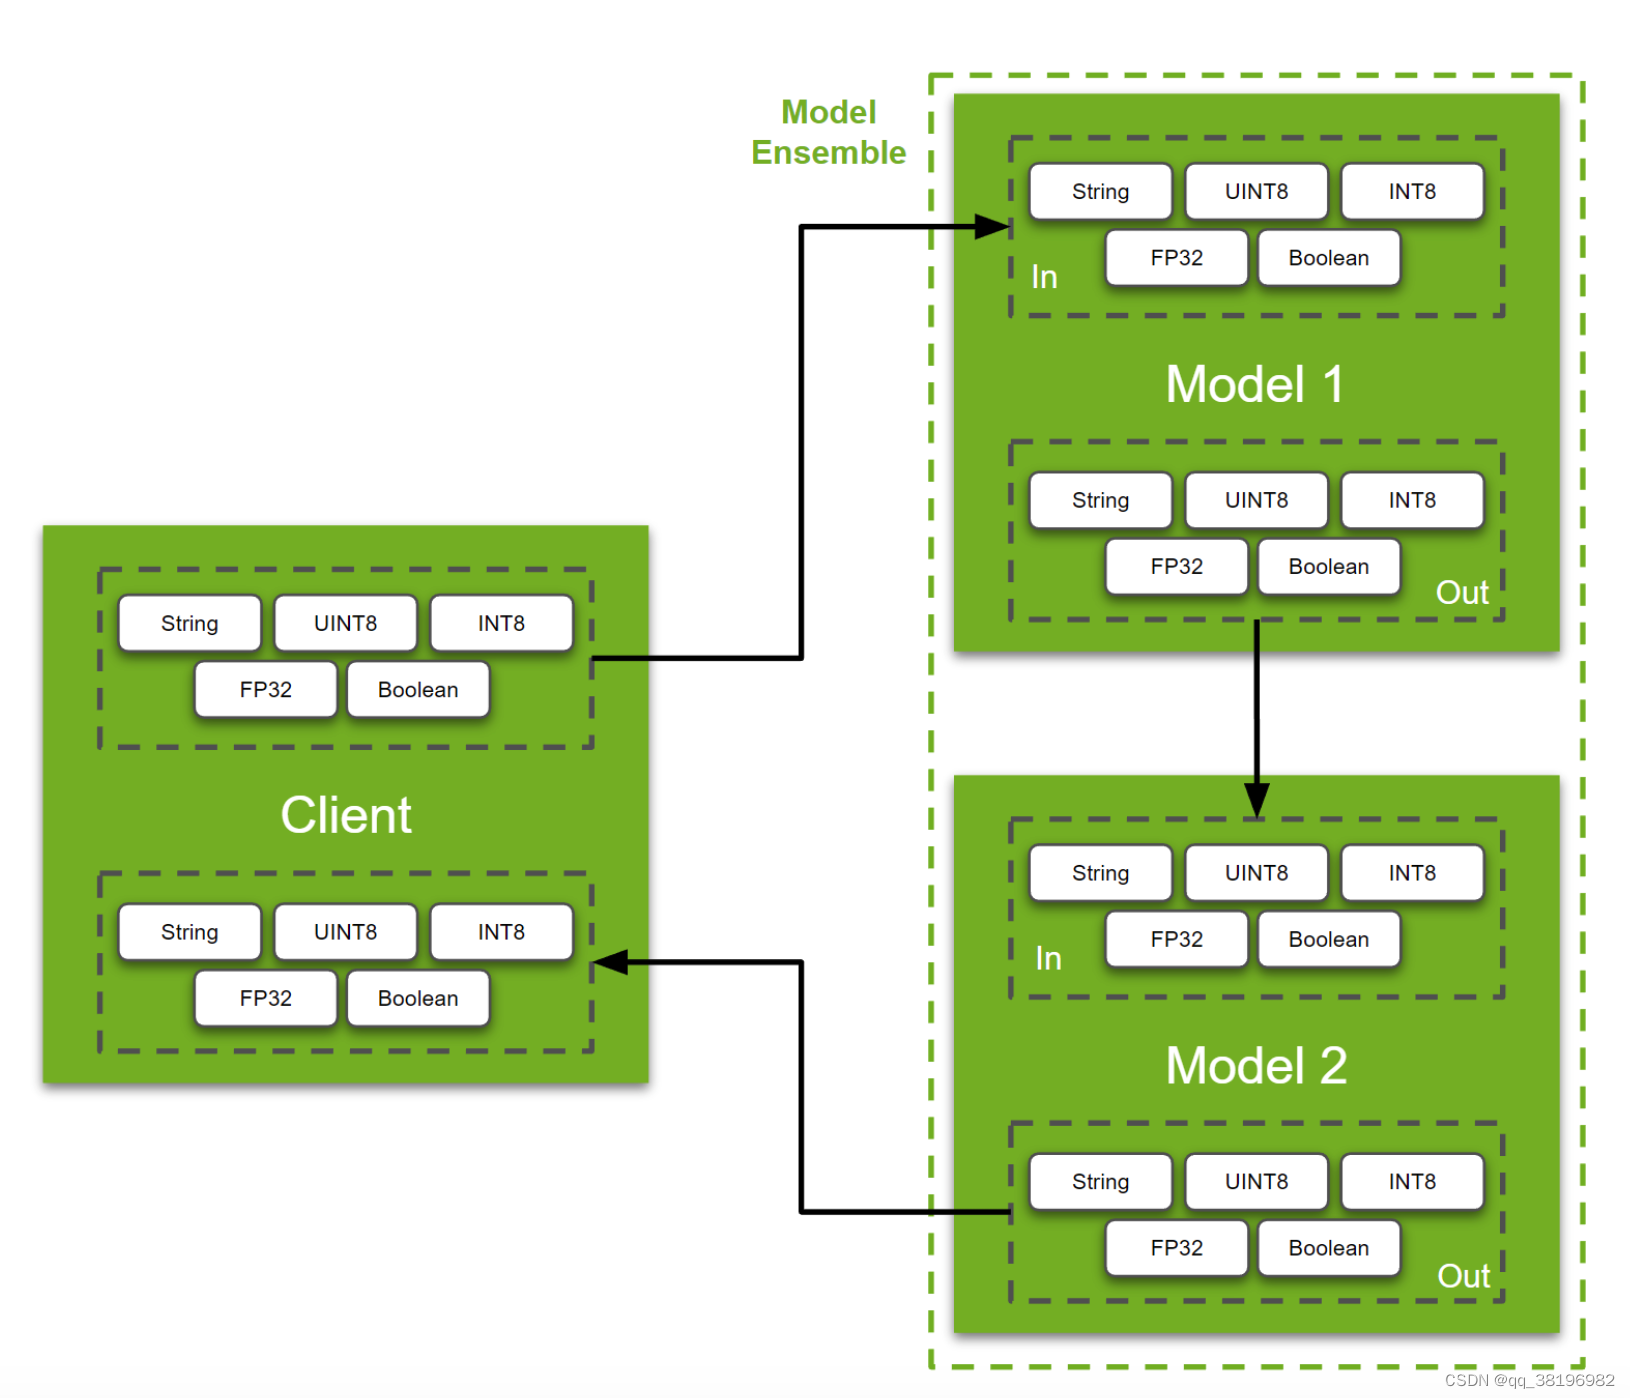
要移动的数据类型取决于您正在构建的管道的类型。因此,没有一个干净的现实世界示例可以用来迎合广大受众。因此,本教程将简单演示如何通过虚拟管道移动字符串、UINT8 和 INT8 数组、FP32 图像和布尔值。
1.设置Model
在我们进一步讨论之前,让我们先建立模型。为了演示的目的,我们使用“Python 模型”。Triton 中的 Python 模型基本上是具有三个 Triton 特定函数的类:initialize、execute和finalize。用户可以自定义这个类来服务他们编写的任何Python函数或任何他们想要的模型,只要它可以在Python运行时加载。该initialize函数在 python 模型加载到内存中时运行,而finalize在模型从内存中卸载时运行。这两个函数都是可选定义的。同样,为了使这个示例简单,我们将仅使用该execute函数来打印“python 模型”接收到的张量。让我们看看它是如何完成的:
def execute(self, requests):
    responses = []
    for request in requests:
        inp = pb_utils.get_input_tensor_by_name(request, "model_1_input_string")
        inp2 = pb_utils.get_input_tensor_by_name(request, "model_1_input_UINT8_array")
        inp3 = pb_utils.get_input_tensor_by_name(request, "model_1_input_INT8_array")
        inp4 = pb_utils.get_input_tensor_by_name(request, "model_1_input_FP32_image")
        inp5 = pb_utils.get_input_tensor_by_name(request, "model_1_input_bool")

        print("Model 1 received", flush=True)
        print(inp.as_numpy(), flush=True)
        print(inp2.as_numpy(), flush=True)
        print(inp3.as_numpy(), flush=True)
        print(inp4.as_numpy(), flush=True)
        print(inp5.as_numpy(), flush=True)

        inference_response = pb_utils.InferenceResponse(output_tensors=[
            pb_utils.Tensor(
                "model_1_output_string",
                inp.as_numpy(),
            ),
            pb_utils.Tensor(
                "model_1_output_UINT8_array",
                inp2.as_numpy(),
            ),
            pb_utils.Tensor(
                "model_1_output_INT8_array",
                inp3.as_numpy(),
            ),
            pb_utils.Tensor(
                "model_1_output_FP32_image",
                inp4.as_numpy(),
            ),
            pb_utils.Tensor(
                "model_1_output_bool",
                inp5.as_numpy(),
            )
        ])
        responses.append(inference_response)
return responses有2个函数需要注意:pb_utils.get_input_tensor_by_name(...)和pb_utils.InferenceResponse(...)。顾名思义,这些函数用于接收和发送张量。Triton Inference Server 支持多种数据类型。在此示例中,我们展示了其中 5 个,但有关支持的数据类型的完整列表,请参阅此处的文档。
在此示例中,“输入层”为model_1_input_string、model_1_input_UINT8_array、model_1_input_INT8_array、model_1_input_FP32_image和model_1_input_bool。在config.pbtxt里定义该模型的预期维度和数据类型
input [
  {
    name: "model_1_input_string"
    data_type: TYPE_STRING
    dims: [-1]
  },
  {
    name: "model_1_input_UINT8_array"
    data_type: TYPE_UINT8
    dims: [-1]
  },
  {
    name: "model_1_input_INT8_array"
    data_type: TYPE_INT8
    dims: [-1]
  },
  {
    name: "model_1_input_FP32_image"
    data_type: TYPE_FP32
    dims: [-1, -1, -1]
  },
  {
    name: "model_1_input_bool"
    data_type: TYPE_BOOL
    dims: [-1]
  }
]类似地,“输出层”是model_1_output_string、model_1_output_UINT8_array、model_1_output_INT8_array和model_1_output_FP32_image,model_1_output_bool。同样定义在config.pbttx里:
output [
  {
    name: "model_1_output_string"
    data_type: TYPE_STRING
    dims: [-1]
  },
  {
    name: "model_1_output_UINT8_array"
    data_type: TYPE_UINT8
    dims: [-1]
  },
  {
    name: "model_1_output_INT8_array"
    data_type: TYPE_INT8
    dims: [-1]
  },
  {
    name: "model_1_output_FP32_image"
    data_type: TYPE_FP32
    dims: [-1, -1, -1]
  },
  {
    name: "model_1_output_bool"
    data_type: TYPE_BOOL
    dims: [-1]
  }
]注意:对于常规onnx、torchscript或tensorflow任何其他模型,我们只需要在 中定义输入和输出层config.pbtxt。ensemble和client之间的交互将保持不变。如果您不确定模型的layers、datatype和w维度,您可以使用Netron或Polygraphy等工具来获取所需的信息。
Netron 和 Polygraphy 是用于深度学习模型开发和分析的两个不同工具:
1. **Netron:** Netron 是一个模型可视化工具,用于可视化和分析深度学习模型的结构和参数。它支持多种深度学习框架(如TensorFlow、PyTorch、ONNX等)的模型可视化,可以帮助开发人员和研究人员更好地理解模型的架构,查看层次结构,参数和张量的形状,以及模型中的各种详细信息。Netron 提供了用户友好的界面,支持交互式浏览和导出模型的能力,是一个有用的工具,用于模型调试和分析。
2. **Polygraphy:** Polygraphy 是一个模型分析工具,用于评估和验证深度学习模型的性能、准确性和稳定性。它可以执行各种模型评估任务,包括模型推理性能的基准测试、模型推理准确性的验证、模型压力测试等。Polygraphy 还可以帮助用户优化模型的性能,包括自动化的模型优化和部署,以满足特定的性能需求。它支持多种深度学习框架和硬件平台,可以帮助开发人员更好地了解模型在不同条件下的行为,并优化模型以适应实际部署。
Netron 主要用于深度学习模型的可视化和架构分析,而 Polygraphy 用于深度学习模型的性能评估、验证和优化。这两个工具可以在深度学习模型的开发、调试和优化过程中发挥重要作用。
本例中的第二个模型与上面的模型相同,将使用该模型展示在model ensemble中的数据流。如果您已经参考过概念指南的第 5 部分,那么以下对ensemble的解释可能看起来很熟悉。
2.设置Ensebmle
ensemble用于构建具有两个或多个模型的pipeline。使用ensemble的好处是 Triton 推理服务器可以处理两个模型之间所需的所有张量/内存移动。此外,用户可以使用简单的配置文件定义模型流程。此功能对于用户设置多个pipeline并在其中共享一些通用模型的情况特别有用。
稍后将讨论model_repository的结构,先看一下ensemble的配置。
由于所有tensors的流程都相同,因此我们将重点关注输入字符串。ensemble model的完整配置如下所示:
name: "ensemble_model"
platform: "ensemble"
max_batch_size: 8
input [
  {
    name: "ensemble_input_string"
    data_type: TYPE_STRING
    dims: [-1]
  },
  ...
]
output [
  {
    name: "ensemble_output_string"
    data_type: TYPE_STRING
    dims: [-1]
  },
  ...
]

ensemble_scheduling {
  step [
    {
      model_name: "model1"
      model_version: -1
      input_map {
        key: "model_1_input_string"
        value: "ensemble_input_string"
      },
      ...

      output_map {
        key: "model_1_output_string"
        value: "model1_to_model2_string"
      },
      ...

    },
    {
      model_name: "model2"
      model_version: -1
      input_map {
        key: "model_2_input_string"
        value: "model1_to_model2_string"
      },
      ...

      output_map {
        key: "model_2_output_string"
        value: "ensemble_output_string"
      },
      ...

    }
  ]
我们分解一下:
1)首先,我们定义整个ensemble的input和output。
input [
  {
    name: "ensemble_input_string"
    data_type: TYPE_STRING
    dims: [-1]
  },
  ...
]
output [
  {
    name: "ensemble_output_string"
    data_type: TYPE_STRING
    dims: [-1]
  },
  ...
]
这和在常规模型中定义input和output层是相似的。
2)其次,定义ensemble的确切流程。该流程由“stemps”组成,其中每个steps定义输入/输出以及要在此步骤执行的模型。
ensemble_scheduling {
  step [
    {
      model_name: "model1"
      model_version: -1
      ...

    },
    {
      model_name: "model2"
      model_version: -1
      ...

    }
  ]
用户需要理解的第一部分是如何定义其ensemble pipeline的一般流程。如哪个模型需要先运行?tensor在每个model/step之间如何流动?为了完成这一点,我们使用input_map和output_map。
ensemble_scheduling {
  step [
    {
      model_name: "model1"
      model_version: -1
      input_map {
        key: "model_1_input_string"       # Model 1's input Tensor
        value: "ensemble_input_string"    # this is the name of the ensemble's input
      },
      ...

      output_map {
        key: "model_1_output_string"      # Model 1's output Tensor
        value: "model1_to_model2_string"  # Mapping output from Model1 to Model2
      },
      ...

    },
    {
      model_name: "model2"
      model_version: -1
      input_map {
        key: "model_2_input_string"       # Model 2's input Tensor
        value: "model1_to_model2_string"  # Mapping output from Model1 to Model2
      },
      ...

      output_map {
        key: "model_2_output_string"      # Model 2's output Tensor
        value: "ensemble_output_string"   # this is the name of the ensemble's output
      },
      ...

    }
]在构建深度学习模型ensemble时,需要定义用于连接模型之间的输入和输出的键(key)和值(value)字段。
- **键字段(Key Field):** 键字段通常由模型所需的层的名称填充。这意味着每个模型都可以通过层的名称来标识其输出,并将其发送给ensemble中的其他模型。例如,如果模型1的某一层的输出需要传递给模型2,那么模型1可以使用该层的名称作为键字段。
- **值字段(Value Field):** 值字段是由ensemble系统识别的。这个字段用于定义数据张量的流动。当一个模型的输出需要传递给另一个模型的输入时,需要使用值字段将它们连接起来。如果你想将model1某一层的输出作为model2某一层的输入,需要将model1的output_map中的值字段,作为model2的input_map中的值字段,以确保数据正确传递。
总之,键字段用于标识模型的输出,而值字段用于定义数据流的路径,以便将一个模型的输出传递给另一个模型的输入。这种方式可以有效地组织和管理模型之间的数据传递,实现深度学习模型的集成。
了解了各个配置后,让我们简要地看一下此示例的模型存储库的结构。本质上我们有两个模型
model_repository/
├── ensemble_model
│   ├── 1               # Empty version folder required for ensemble models
│   └── config.pbtxt    # Config for the Ensemble
├── model1
│   ├── 1
│   │   └── model.py
│   └── config.pbtxt    # Config for model 1
└── model2
    ├── 1
    │   └── model.py
    └── config.pbtxt    # Config for model 2
2.了解 Python 客户端
服务器端设置完成后,我们来讨论客户端代码。
def main():
    client = httpclient.InferenceServerClient(url="localhost:8000")

    # Inputs
    prompts = ["This is a string"]
    text_obj = np.array([prompts], dtype="object")

    url = "http://images.cocodataset.org/val2017/000000039769.jpg"
    image = np.asarray(Image.open(requests.get(url, stream=True).raw)).astype(np.float32)
    uint8_array = np.expand_dims(np.array([1,2,3], dtype = np.uint8), axis = 0)
    int8_array = np.expand_dims(np.array([-1,2,-3], dtype = np.int8), axis = 0)
    image = np.expand_dims(image, axis=0)
    boolean = np.expand_dims(np.array([True]), axis = 0)

    # Set Inputs
    input_tensors = [
        httpclient.InferInput("ensemble_input_string", text_obj.shape,np_to_triton_dtype(text_obj.dtype)),
        httpclient.InferInput("ensemble_input_UINT8_array", uint8_array.shape, datatype="UINT8"),
        httpclient.InferInput("ensemble_input_INT8_array", int8_array.shape, datatype="INT8"),
        httpclient.InferInput("ensemble_input_FP32_image", image.shape, datatype="FP32"),
        httpclient.InferInput("ensemble_input_bool", boolean.shape, datatype="BOOL")
    ]
    input_tensors[0].set_data_from_numpy(text_obj)
    input_tensors[1].set_data_from_numpy(uint8_array)
    input_tensors[2].set_data_from_numpy(int8_array)
    input_tensors[3].set_data_from_numpy(image)
    input_tensors[4].set_data_from_numpy(boolean)

    # Set outputs
    output = [
        httpclient.InferRequestedOutput("ensemble_output_string"),
        httpclient.InferRequestedOutput("ensemble_output_UINT8_array"),
        httpclient.InferRequestedOutput("ensemble_output_INT8_array"),
        httpclient.InferRequestedOutput("ensemble_output_FP32_image"),
        httpclient.InferRequestedOutput("ensemble_output_bool")
    ]

    # Query
    query_response = client.infer(model_name="ensemble_model",
                                  inputs=input_tensors,
                                  outputs=output)

    print(query_response.as_numpy("ensemble_output_string"))
    print(query_response.as_numpy("ensemble_output_UINT8_array"))
    print(query_response.as_numpy("ensemble_output_INT8_array"))
    print(query_response.as_numpy("ensemble_output_FP32_image"))
    print(query_response.as_numpy("ensemble_output_bool"))
让我们看看设置输入和输出。
# Input
input_tensors = [
    httpclient.InferInput("ensemble_input_string", text_obj.shape,np_to_triton_dtype(text_obj.dtype)),
    httpclient.InferInput("ensemble_input_UINT8_array", uint8_array.shape, datatype="UINT8"),
    httpclient.InferInput("ensemble_input_INT8_array", int8_array.shape, datatype="INT8"),
    httpclient.InferInput("ensemble_input_FP32_image", image.shape, datatype="FP32"),
    httpclient.InferInput("ensemble_input_bool", boolean.shape, datatype="BOOL")
]
input_tensors[0].set_data_from_numpy(text_obj)
input_tensors[1].set_data_from_numpy(uint8_array)
input_tensors[2].set_data_from_numpy(int8_array)
input_tensors[3].set_data_from_numpy(image)
input_tensors[4].set_data_from_numpy(boolean)

# Output
output = [
    httpclient.InferRequestedOutput("ensemble_output_string"),
    httpclient.InferRequestedOutput("ensemble_output_UINT8_array"),
    httpclient.InferRequestedOutput("ensemble_output_INT8_array"),
    httpclient.InferRequestedOutput("ensemble_output_FP32_image"),
    httpclient.InferRequestedOutput("ensemble_output_bool")
]
在本例中,我们使用http客户端,并指定输入和输出的名称以及预期的数据类型。请注意,在这种情况下,我们使用的是ensemble inputs/outputs,例如ensemble_input_string作为输入到ensemble中的字符串。如果要单独查询组合模型之一,可以更改输入名称、输出名称和模型名称以匹配所需的模型。
# Creating a client for the server
client = httpclient.InferenceServerClient(url="localhost:8000")

# Querying the Server
query_response = client.infer(model_name="ensemble_model",
                                inputs=input_tensors,
                                outputs=output)

print(query_response.as_numpy("ensemble_output_string"))
print(query_response.as_numpy("ensemble_output_UINT8_array"))
print(query_response.as_numpy("ensemble_output_INT8_array"))
print(query_response.as_numpy("ensemble_output_FP32_image"))
print(query_response.as_numpy("ensemble_output_bool"))3.使用示例
首先不要忘记将
name: "ensemble_model"
backend: "ensemble"
max_batch_size: 8

input [
  {
    name: "ensemble_input_string"
    data_type: TYPE_STRING
    dims: [-1]
  },
  {
    name: "ensemble_input_UINT8_array"
    data_type: TYPE_UINT8
    dims: [-1]
  },
  {
    name: "ensemble_input_INT8_array"
    data_type: TYPE_INT8
    dims: [-1]
  },
  {
    name: "ensemble_input_FP32_image"
    data_type: TYPE_FP32
    dims: [-1, -1, -1]
  },
  {
    name: "ensemble_input_bool"
    data_type: TYPE_BOOL
    dims: [-1]
  }
]
output [
  {
    name: "ensemble_output_string"
    data_type: TYPE_STRING
    dims: [-1]
  },
  {
    name: "ensemble_output_UINT8_array"
    data_type: TYPE_UINT8
    dims: [-1]
  },
  {
    name: "ensemble_output_INT8_array"
    data_type: TYPE_INT8
    dims: [-1]
  },
  {
    name: "ensemble_output_FP32_image"
    data_type: TYPE_FP32
    dims: [-1, -1, -1]
  },
  {
    name: "ensemble_output_bool"
    data_type: TYPE_BOOL
    dims: [-1]
  }
]

ensemble_scheduling {
  step [
    {
      model_name: "model1"
      model_version: -1
      input_map {
        key: "model_1_input_string"
        value: "ensemble_input_string"
      },
      input_map {
        key: "model_1_input_UINT8_array"
        value: "ensemble_input_UINT8_array"
      },
      input_map {
        key: "model_1_input_INT8_array"
        value: "ensemble_input_INT8_array"
      },
      input_map {
        key: "model_1_input_FP32_image"
        value: "ensemble_input_FP32_image"
      },
      input_map {
        key: "model_1_input_bool"
        value: "ensemble_input_bool"
      }
      output_map {
        key: "model_1_output_string"
        value: "model1_to_model2_string"
      },
      output_map {
        key: "model_1_output_UINT8_array"
        value: "model1_to_model2_uint8"
      },
      output_map {
        key: "model_1_output_INT8_array"
        value: "model1_to_model2_int8"
      },
      output_map {
        key: "model_1_output_FP32_image"
        value: "model1_to_model2_image"
      },
      output_map {
        key: "model_1_output_bool"
        value: "model1_to_model2_bool"
      }
    },
    {
      model_name: "model2"
      model_version: -1
      input_map {
        key: "model_2_input_string"
        value: "model1_to_model2_string"
      },
      input_map {
        key: "model_2_input_UINT8_array"
        value: "model1_to_model2_uint8"
      },
      input_map {
        key: "model_2_input_INT8_array"
        value: "model1_to_model2_int8"
      },
      input_map {
        key: "model_2_input_FP32_image"
        value: "model1_to_model2_image"
      },
      input_map {
        key: "model_2_input_bool"
        value: "model1_to_model2_bool"
      }
      output_map {
        key: "model_2_output_string"
        value: "ensemble_output_string"
      },
      output_map {
        key: "model_2_output_UINT8_array"
        value: "ensemble_output_UINT8_array"
      },
      output_map {
        key: "model_2_output_INT8_array"
        value: "ensemble_output_INT8_array"
      },
      output_map {
        key: "model_2_output_FP32_image"
        value: "ensemble_output_FP32_image"
      },
      output_map {
        key: "model_2_output_bool"
        value: "ensemble_output_bool"
      }
    }
  ]
}
要运行此示例,请打开两个终端。
# Server
cd /triton/tutorials/Feature_Guide/Data_Pipelines
/opt/tritonserver/bin/tritonserver --model-repository=/triton/tutorials/Feature_Guide/Data_Pipelines/model_repository/
以上将启动 Triton 推理服务器。在第二个终端中,运行客户端脚本:
# Client

cd /path/to/this/folder
# Replace yy.mm with year and month of release. Eg. 23.02
docker run -it --net=host -v ${PWD}:/workspace/ nvcr.io/nvidia/tritonserver:yy.mm-py3-sdk bash
pip install image
python3 client.py
结果如下
root@aea5f00fde8d:/triton/tutorials/Feature_Guide/Data_Pipelines# python3 client.py
[[b'This is a string']]
[[1 2 3]]
[[-1  2 -3]]
[[[[140.  25.  56.]
   [144.  25.  67.]
   [146.  24.  73.]
   ...
   [ 94.  16.  38.]
   [107.  13.  39.]
   [102.  10.  33.]]

  [[138.  22.  57.]
   [142.  26.  49.]
   [139.  20.  48.]
   ...
   [103.  11.  36.]
   [115.  17.  42.]
   [ 96.  13.  31.]]

  [[135.  22.  42.]
   [150.  33.  59.]
   [142.  23.  53.]
   ...
   [103.   8.  32.]
   [108.  19.  39.]
   [ 93.  10.  26.]]

  ...

  [[237. 100. 190.]
   [225.  84. 196.]
   [236.  96. 203.]
   ...
   [171.  47. 131.]
   [181.  62. 144.]
   [147.  28. 110.]]

  [[230.  84. 221.]
   [226.  80. 213.]
   [238.  99. 202.]
   ...
   [114.  24.  62.]
   [103.   5.  46.]
   [ 89.   9.  44.]]

  [[238. 100. 175.]
   [246. 109. 191.]
   [238.  96. 214.]
   ...
   [ 74.  13.  29.]
   [ 74.  25.  44.]
   [ 73.  17.  42.]]]]
[[ True]]9.部署 HuggingFace 模型
HuggingFace 拥有许多开源模型。此处讨论如何使用 Triton 推理服务器部署 HuggingFace 中的几乎任何模型。在此示例中,使用了HuggingFace上提供的ViT模型。
在 Triton 推理服务器上部署model pipeline有两种主要方法:
-
方法 1:部署pipeline而不显式地将model与pipeline分离。这种方法的核心优势是用户可以快速部署他们的管道。这可以通过使用 Triton 的“Python 后端”来实现。请参阅此示例以获取更多信息。总之,我们使用 Python 后端部署模型/管道。
-
方法 2:分解pipeline,使用不同的后端进行前/后处理,并将核心模型部署在框架后端上。这种情况下的优点是在专用框架后端上运行核心网络可提供更高的性能。此外,还可以利用许多特定于框架的优化。有关详细信息,请参阅概念指南的第 4 部分。这是通过 Triton 的 Ensembles 实现的。对此的解释可以在概念指南的第 5 部分中找到。请参阅文档以获取更多信息。总之,我们构建了一个具有预处理步骤和导出模型的集成。

1.示例
出于本说明的目的,正在使用ViT模型(链接到 HuggingFace )。这个特定的 ViT 模型没有应用程序头(如图像分类),但HuggingFace 提供了具有不同头的 ViT 模型供用户使用。部署模型时的一个好习惯是了解并探索模型的结构(如果您不熟悉模型)。通过图形界面查看结构的一种简单方法是使用Netron等工具。虽然 Triton 自动生成模型的配置文件,但用户可能仍然需要输入和输出层的名称来构建我们可以使用此工具的客户端/模型集合。


1.使用Python后端部署
使用 Triton 的 python 后端需要用户定义TritonPythonModel类的三个函数:
initialize():该函数在 Triton 加载模型时运行。建议使用此函数来初始化/加载任何模型和/或数据对象。此函数是可选的。
def initialize(self, args):
    self.feature_extractor = ViTFeatureExtractor.from_pretrained('google/vit-base-patch16-224-in21k')
self.model = ViTModel.from_pretrained("google/vit-base-patch16-224-in21k")execute():此函数根据每个请求执行。该函数可以容纳容纳所有需要的pipeline逻辑。
def execute(self, requests):
    responses = []
    for request in requests:
        inp = pb_utils.get_input_tensor_by_name(request, "image")
        input_image = np.squeeze(inp.as_numpy()).transpose((2,0,1))
        inputs = self.feature_extractor(images=input_image, return_tensors="pt")

        outputs = self.model(**inputs)

        # Sending results
        inference_response = pb_utils.InferenceResponse(output_tensors=[
            pb_utils.Tensor(
                "label",
                outputs.last_hidden_state.numpy()
            )
        ])
        responses.append(inference_response)
return responsesfinialize():该函数在Triton卸载模型时执行。用于释放任何内存、或安全卸载模型所需的任何操作。定义此函数是可选的。
启动服务
cd /triton/tutorials/HuggingFace
/opt/tritonserver/bin/tritonserver --model-repository=/triton/tutorials/HuggingFace/python_model_repository/
发送请求
cd /triton/tutorials/HuggingFace
python3 client.py --model_name "python_vit"
结果如下:
root@aea5f00fde8d:/triton/tutorials/HuggingFace# python3 client.py --model_name "python_vit"
(1, 197, 768)
2.使用 Triton Ensemble 部署
第一步是下载并导出模型。建议在 NGC 上提供的 PyTorch 容器内运行以下命令。如果这是您第一次尝试在 Triton 中设置模型集成,强烈建议您在继续之前查看本指南。分解管道的主要优点是提高性能并获得多种加速选项。浏览概念指南的第 4 部分,了解有关模型加速的详细信息。
# Install dependencies
pip install transformers
pip install transformers[onnx]

# Export the model
python -m transformers.onnx --model=google/vit-base-patch16-224 --atol=1e-3 onnx/vit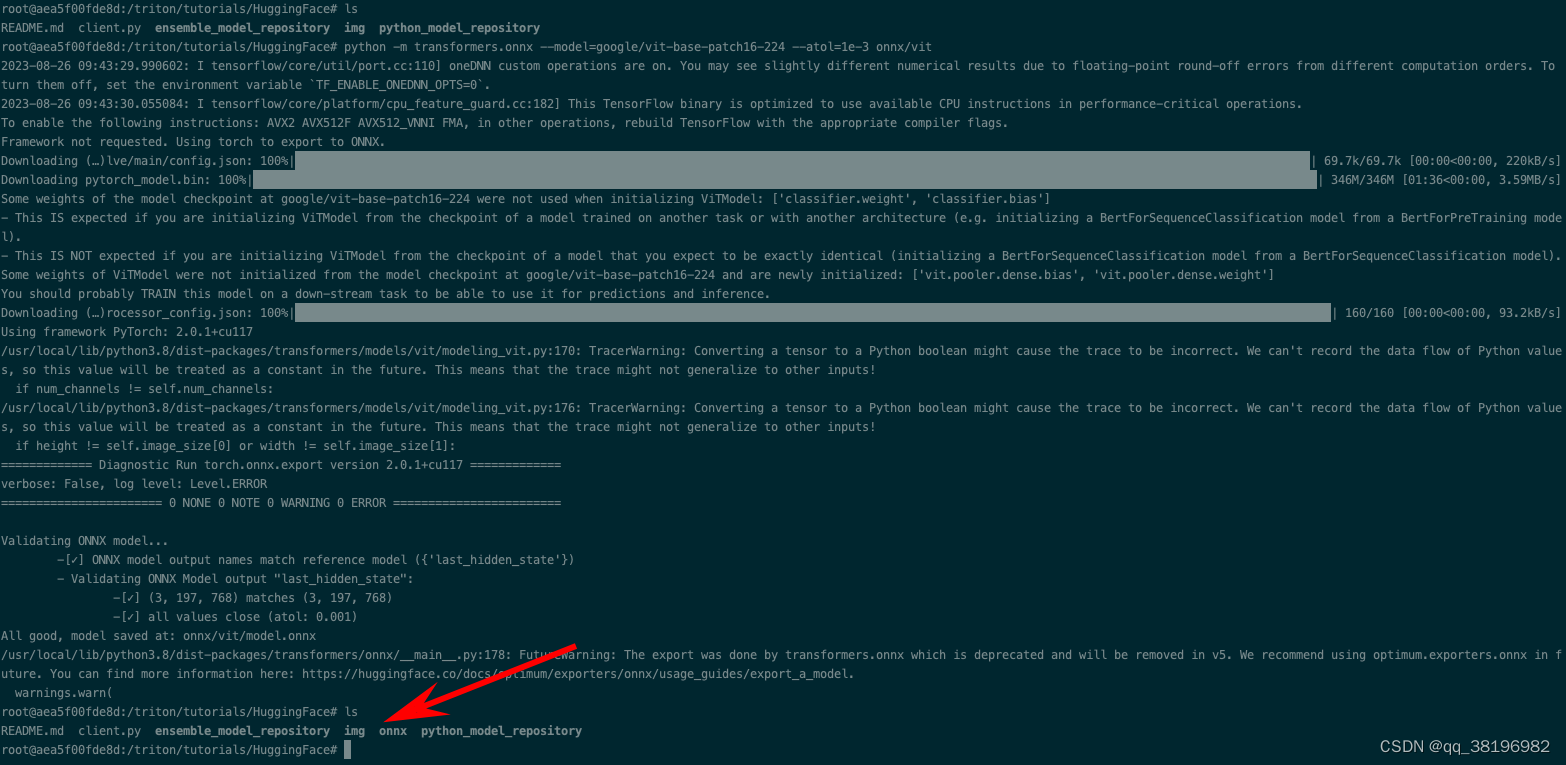
下载模型后,按照下述结构设置模型存储库。模型存储库的基本结构以及所需的配置文件可在ensemble_model_repository获取
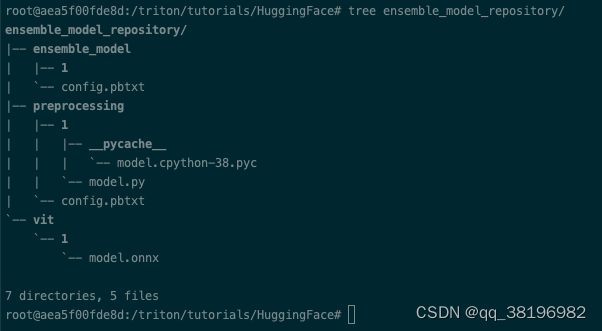
在这种方法中,需要考虑三点。
- 预处理:ViT 的特征提取步骤是在 python 后端完成的。此步骤的实现细节与上一节中遵循的过程相同。
- ViT 模型:只需如上所述将模型放入存储库中即可。Triton 推理服务器将自动生成所需的配置文件。如果您希望查看生成的配置,请
--log-verbose=1在启动服务器时附加。 - ensemble配置:在此配置中,我们映射ensemble中两个部分的输入和输出层,
preprocessing在 python 后端处理,而 ViT 模型部署在 ONNX 后端。
启动服务
cd /triton/tutorials/HuggingFace
/opt/tritonserver/bin/tritonserver --model-repository=/triton/tutorials/HuggingFace/ensemble_model_repository/
发送请求
cd /triton/tutorials/HuggingFace
python3 client.py --model_name "ensemble_model"
结果为
root@aea5f00fde8d:/triton/tutorials/HuggingFace# python3 client.py --model_name "ensemble_model"
(1, 197, 768)
10.迁移到Triton推理服务器
迁移到新的推理堆栈可能看起来具有挑战性,但可以通过分解挑战并了解最佳实践来理解该任务。在本指南中,我们展示了使用 Triton 推理服务器等专用推理服务解决方案的一些好处,并介绍了最适合您采用 Triton 的路径。
1.为什么我们需要专用的推理解决方案?
构建推理所需的基础设施可能相当复杂。让我们考虑一个简单的情况,我们没有任何扩展,并且在不需要负载均衡器的单个节点上运行。我们需要什么来为模型提供服务?
如果您正在使用 Python,并且是模型推理空间的新手,或者只是想快速构建一些东西,您可能会转向Flask这样的工具:一个多功能的微框架,让您可以自由地构建生态系统需要。要在 Flask 中提供任何服务,您所需要的只是一个可以处理传入的 POST 请求的函数。
@app.route('/run_my_model',methods=['POST'])
def predict():
    data = request.get_json(force=True)

    # Pre-processing
    ...

    prediction = model(<data>)

    # Post-processing
    ...

    return output
只需几行代码,我们就可以启动并运行模型。任何人都可以发送请求并使用该模型!但是等等,当我们开始收到多个请求时会发生什么?我们需要一种方法来对这些任务/请求进行排队。假设我们利用Celery来解决这个排队挑战。当我们这样做时,我们还可以构建一个响应缓存来解决重复查询。
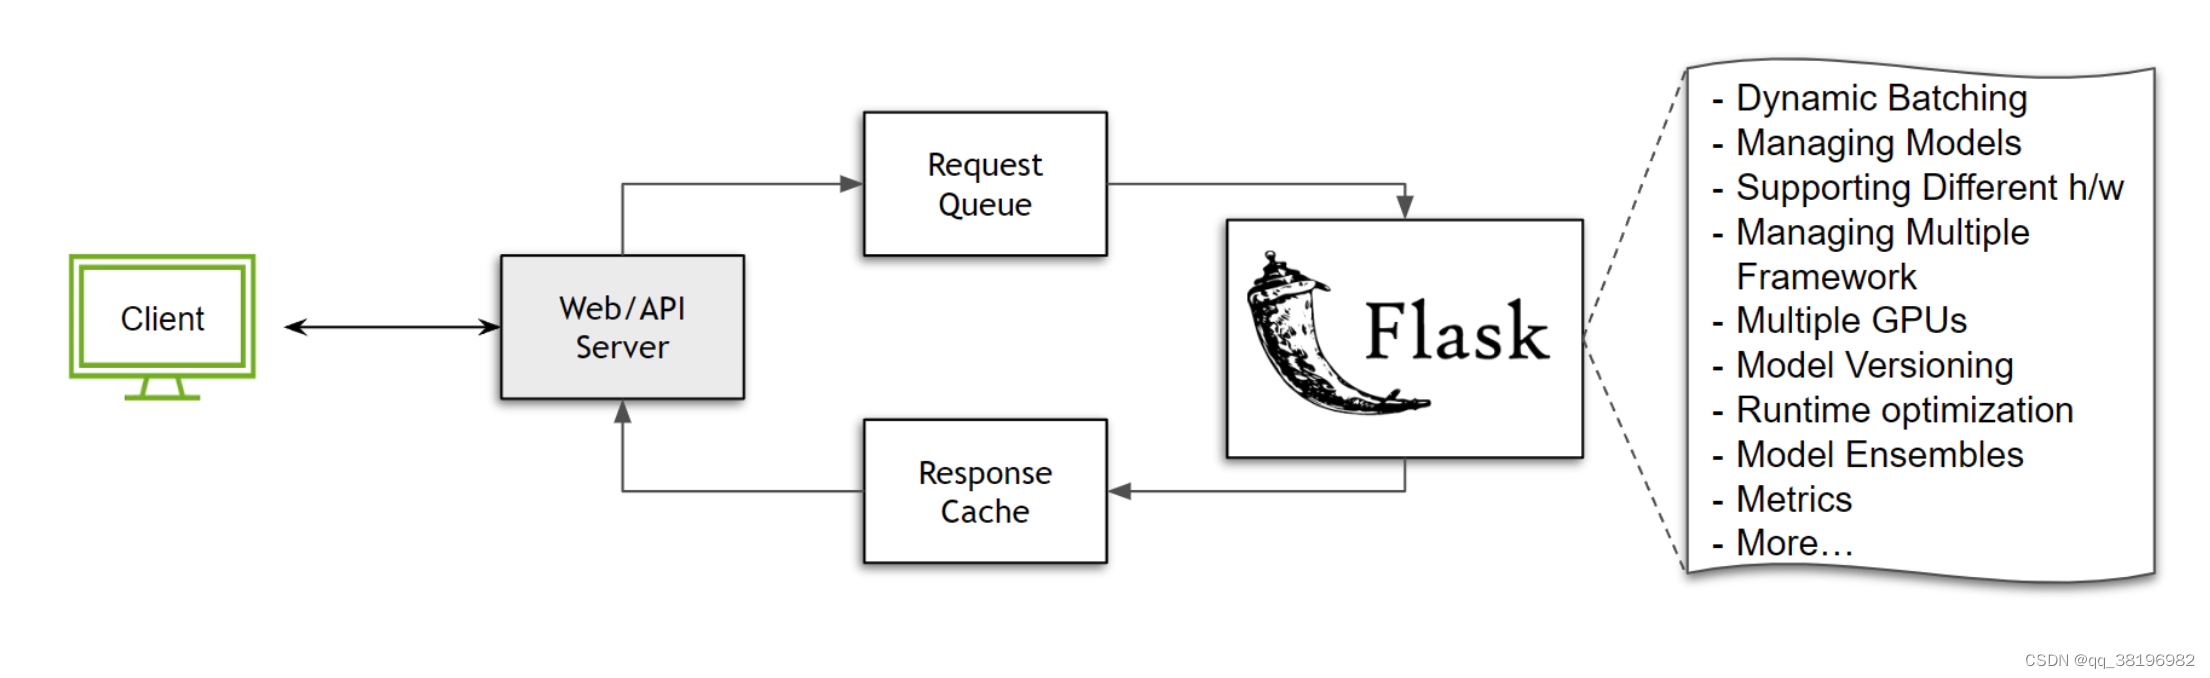
虽然上述设置确实有效,但它的限制性很大并且资源效率低下。如何?假设我们正在使用一个图像分类模型,其最大批量大小为64,并且我们的服务器50每隔 接收一次请求100 ms。如果不实施任何形式的批处理策略,所有这些请求都必须按顺序处理,从而浪费 GPU 资源。这只是冰山一角。考虑以下情况:
- 如果我们想支持多种模型怎么办?每次更新模型都需要重新启动服务器吗?
- 我们如何对模型进行版本控制?
- 我们可以在同一台服务器上提供 PyTorch 和 TensorFlow 模型吗?
- 如果一个模型需要在 CPU 上运行而另一个模型需要 GPU 该怎么办?我们如何优化执行?
- 我们如何管理同一节点上的多个 GPU?
- 我们的执行运行时间优化了吗?我们是否有效地处理 I/O?
- 我们如何与模型合奏合作?
- 监控服务器指标的最佳方法是什么?
这些只是我们必须考虑的一些因素,并投入工程时间进行构建。此外,必须针对软件和硬件加速器或执行上下文的每个主要版本定期维护和优化这些功能。随着部署规模的扩大,这些挑战只会变得更加严峻。显然,解决方案不可能是每个开发人员都从一个多功能框架开始,并花费资源来构建和维护基础设施。这就是像 Triton Inference Server 这样专门构建的推理服务器可以解决很多问题的地方。
2.如何将我的工作流程迁移到 Triton?
本指南假设您在概念层面上了解 Triton 推理服务器的基础知识。如果您是 Triton 推理服务器的新手,您可能需要先查看此入门视频和本指南。
每个现有的推理管道都是独一无二的,因此不存在“一刀切”的解决方案来将当前堆栈迁移到 Triton 推理服务器。也就是说,本指南将尝试建立直觉以简化迁移过程。从广义上讲,大多数推理堆栈分为四个一般类别。
-
与更大的模块紧密耦合:也许您正在迭代或微调模型,其中将模型与现有堆栈解耦将需要相当大的努力。您仍然需要更好的性能来使用尽可能少的硬件资源并与内部团队共享您的开发分支。隔离依赖项、导出模型、设置某种形式的存储等所需的工作是不可行的。您需要的是一个可以注入到现有代码库中的解决方案,该解决方案不会具有侵入性或耗时。
在这种情况下,我们建议使用PyTriton,它是一个类似 Flask/FastAPI 的接口,用户可以利用 Triton 推理服务器来处理他们的用例。
from pytriton.decorators import sample
from pytriton.model_config import ModelConfig, Tensor
from pytriton.triton import Triton

MODEL = ...

@sample
def <your_function_name>(sequence: np.ndarray, labels: np.ndarray):
    # Decode input
    sequence = np.char.decode(sequence.astype("bytes"), "utf-8")
    labels = np.char.decode(labels.astype("bytes"), "utf-8")

    result = MODEL(...)

    return {"scores": results}

# PyTriton code
with Triton() as triton:
    triton.bind(
        model_name="<model name>",
        infer_func=<your_function_name>,      # function you want to serve
        inputs=[
            Tensor(name="sequence", dtype=bytes, shape=(1,)),
            Tensor(name="labels", dtype=bytes, shape=(-1,)),
        ],
        outputs=[
            Tensor(name="scores", dtype=np.float32, shape=(-1,)),
        ],
        # add the features you want to enable here
        config=ModelConfig(batching=False),
    )
triton.serve()-
上面的例子是这个例子的骨架版本。需要注意的关键点是,您希望提供的任何功能,无论是具有模型推理组件还是只是一些 Python 代码,都可以绑定到 Triton。作为用户,您不必担心启动 Triton 推理服务器或构建模型存储库,所需的所有步骤都由 PyTriton 库处理。有关该架构的更多信息可以在这里找到。
-
松散耦合但混乱的管道:假设您正在服务的管道可以隔离到不同的环境中。用户通常处于这个阶段,模型和管道经过内部测试并产生令人满意的结果。他们仍然可能使用混乱的管道,其中某些模型无法导出,并且前/后处理步骤仍然与管道逻辑紧密耦合。
在这种情况下,用户仍然可以使用 pytriton,但如果某些模型是可导出的,则用户可以通过使用 Triton 的 Python 后端以及其他框架后端来获得更高的性能。概念指南的第 6 部分是这种情况的一个很好的例子。
目前,并非所有 Triton 推理服务器的功能都可以使用 PyTriton 来利用。用户还可以选择使用 Python 后端来利用 Triton 推理服务器提供的完整功能集。这个HuggingFace 示例可以引导您了解具体细节。
-
松散耦合的模块化管道:随着管道复杂性的增加,深度学习管道中经常出现大量重叠的情况,即多个管道使用一组通用的模型或前/后处理步骤。在这些情况下,在 Triton 推理服务器上部署管道的所有组件然后构建模型集成是非常有益的。即使对于没有重叠的情况,使用 Triton 的模型集成来管理管道也可以提供扩展和性能优势。有关深入的解释,请参阅本指南。
-
部署单个模型而不进行前/后处理:在许多情况下,管道逻辑以经过多年开发构建的极其优化的低级脚本的形式存在。在这种情况下,用户可能更愿意仅部署模型并避免 HTTP/gRPC 网络调用,因为模型正在被更大的应用程序使用。对于这种情况,可以使用 Triton 的共享内存扩展和C API来访问模型,从而无需网络接口。
11.快速部署
1.ONNX
1.设置 Triton 推理服务器
要使用 Triton,我们需要构建一个模型存储库。存储库的结构如下:
model_repository
|
+-- resnet
    |
    +-- config.pbtxt
    +-- 1
        |
+-- model.onnx配置文件config.pbtxt是可选的。如果用户未提供配置文件,则 Triton 推理服务器会自动生成该文件。如果您是 Triton 新手,强烈建议您查看概念指南的第 1 部分。
mkdir -p model_repository/densenet_onnx/1
wget -O model_repository/densenet_onnx/1/model.onnx \
     https://contentmamluswest001.blob.core.windows.net/content/14b2744cf8d6418c87ffddc3f3127242/9502630827244d60a1214f250e3bbca7/08aed7327d694b8dbaee2c97b8d0fcba/densenet121-1.2.onnx

docker run --gpus all --rm -p 8000:8000 -p 8001:8001 -p 8002:8002 -v ${PWD}/model_repository:/models nvcr.io/nvidia/tritonserver:<xx.yy>-py3 tritonserver --model-repository=/models
2.使用 Triton 客户端查询服务器
安装依赖项并下载示例图像来测试推理。
docker run -it --rm --net=host -v ${PWD}:/workspace/ nvcr.io/nvidia/tritonserver:<yy.mm>-py3-sdk bash
pip install torchvision

wget  -O img1.jpg "https://www.hakaimagazine.com/wp-content/uploads/header-gulf-birds.jpg"
建立客户需要三个基本点。首先,我们设置与 Triton 推理服务器的连接。
client = httpclient.InferenceServerClient(url="localhost:8000")其次,我们指定模型的输入和输出层的名称,并描述预期输入的形状和数据类型。
inputs = httpclient.InferInput("data_0", transformed_img.shape, datatype="FP32")
inputs.set_data_from_numpy(transformed_img, binary_data=True)

outputs = httpclient.InferRequestedOutput("fc6_1", binary_data=True, class_count=1000)
最后,我们向 Triton 推理服务器发送推理请求。
# Querying the server
results = client.infer(model_name="densenet_onnx", inputs=[inputs], outputs=[outputs])
inference_output = results.as_numpy('fc6_1').astype(str)

print(np.squeeze(inference_output)[:5])
其输出应如下所示:
['11.549026:92' '11.232335:14' '7.528014:95' '6.923391:17' '6.576575:88']这里的输出格式是<confidence_score>:<classification_index>. 要了解如何将它们映射到标签名称等,请参阅我们的文档。上面的客户端代码可在client.py.
2.PyTorch
1.导出模型
保存 PyTorch 模型。需要对该模型进行跟踪/脚本化以获得 torchscript 模型。
# <xx.xx> is the yy:mm for the publishing tag for NVIDIA's PyTorch
# container; eg. 22.04

docker run -it --gpus all -v ${PWD}:/workspace nvcr.io/nvidia/pytorch:<xx.xx>-py3
python export.py
2.Triton 推理服务器
要使用 Triton,我们需要构建一个模型存储库。存储库的结构如下:
# <xx.xx> is the yy:mm for the publishing tag for NVIDIA's PyTorch
# container; eg. 22.04

docker run -it --gpus all -v ${PWD}:/workspace nvcr.io/nvidia/pytorch:<xx.xx>-py3
python export.py此演示中包含模型的示例模型配置,格式为config.pbtxt。如果您是 Triton 新手,强烈建议您查看概念指南的第 1 部分。
docker run --gpus all --rm -p 8000:8000 -p 8001:8001 -p 8002:8002 -v ${PWD}/model_repository:/models nvcr.io/nvidia/tritonserver:<xx.yy>-py3 tritonserver --model-repository=/models3.使用 Triton 客户端查询服务器
安装依赖项并下载示例图像来测试推理。
docker run -it --net=host -v ${PWD}:/workspace/ nvcr.io/nvidia/tritonserver:<yy.mm>-py3-sdk bash
pip install torchvision

wget  -O img1.jpg "https://www.hakaimagazine.com/wp-content/uploads/header-gulf-birds.jpg"
建立客户需要三个基本点。首先,我们设置与 Triton 推理服务器的连接。
client = httpclient.InferenceServerClient(url="localhost:8000")其次,我们指定模型的输入和输出层的名称。
inputs = httpclient.InferInput("input__0", transformed_img.shape, datatype="FP32")
inputs.set_data_from_numpy(transformed_img, binary_data=True)

outputs = httpclient.InferRequestedOutput("output__0", binary_data=True, class_count=1000)
最后,我们向 Triton 推理服务器发送推理请求。
# Querying the server
results = client.infer(model_name="resnet50", inputs=[inputs], outputs=[outputs])
predictions = results.as_numpy('output__0')
print(predictions[:5])
其输出应如下所示:
[b'12.468750:90' b'11.523438:92' b'9.664062:14' b'8.429688:136'
b'8.234375:11']这里的输出格式是<confidence_score>:<classification_index>. 要了解如何将它们映射到标签名称等,请参阅我们的文档。上面的客户端代码可在client.py.
3.TensorFlow
1.导出模型
将 TensorFlow 模型导出为已保存模型。
# <xx.xx> is the yy:mm for the publishing tag for NVIDIA's Tensorflow
# container; eg. 22.04

docker run -it --gpus all -v ${PWD}:/workspace nvcr.io/nvidia/tensorflow:<xx.xx>-tf2-py3
python export.py
2.设置 Triton 推理服务器
要使用 Triton,我们需要构建一个模型存储库。存储库的结构如下:
model_repository
|
+-- resnet50
    |
    +-- config.pbtxt
    +-- 1
        |
        +-- model.savedmodel
            |
            +-- saved_model.pb
            +-- variables
                |
                +-- variables.data-00000-of-00001
+-- variables.index此演示中包含模型的示例模型配置,格式为config.pbtxt。如果您是 Triton 新手,强烈建议您查看概念指南的第 1 部分。
docker run --gpus all --rm -p 8000:8000 -p 8001:8001 -p 8002:8002 -v ${PWD}/model_repository:/models nvcr.io/nvidia/tritonserver:<xx.yy>-py3 tritonserver --model-repository=/models --backend-config=tensorflow,version=23.使用 Triton 客户端查询服务器
安装依赖项并下载示例图像来测试推理。
docker run -it --net=host -v ${PWD}:/workspace/ nvcr.io/nvidia/tritonserver:<yy.mm>-py3-sdk bash
pip install --upgrade tensorflow
pip install image

wget  -O img1.jpg "https://www.hakaimagazine.com/wp-content/uploads/header-gulf-birds.jpg"
建立客户需要三个基本点。首先,我们设置与 Triton 推理服务器的连接。
triton_client = httpclient.InferenceServerClient(url="localhost:8000")其次,我们指定模型的输入和输出层的名称。
inputs = httpclient.InferInput("input_1", transformed_img.shape, datatype="FP32")
inputs.set_data_from_numpy(transformed_img, binary_data=True)

output = httpclient.InferRequestedOutput("predictions", binary_data=True, class_count=1000)
最后,我们向 Triton 推理服务器发送推理请求。
# Querying the server
results = triton_client.infer(model_name="resnet50", inputs=[inputs], outputs=[output])
predictions = results.as_numpy('predictions')
print(predictions)
其输出应如下所示:
[b'0.301167:90' b'0.169790:14' b'0.161309:92' b'0.093105:94'
 b'0.058743:136' b'0.050185:11' b'0.033802:91' b'0.011760:88'
 b'0.008309:989' b'0.004927:95' b'0.004905:13' b'0.004095:317'
 b'0.004006:96' b'0.003694:12' b'0.003526:42' b'0.003390:313'
 ...
 b'0.000001:751' b'0.000001:685' b'0.000001:408' b'0.000001:116'
b'0.000001:627' b'0.000001:933' b'0.000000:661' b'0.000000:148']这里的输出格式是<confidence_score>:<classification_index>. 要了解如何将它们映射到标签名称等,请参阅我们的文档。上面的客户端代码可在client.py.