首先放个最终效果图:
三维(3D)概念:
三维(3D)是一个描述物体在三个空间坐标轴上的位置和形态的概念。相比于二维(2D)只有长度和宽度的平面,三维增加了高度或深度这一维度
在三维空间中,我们使用三个独立的坐标轴来描述物体的位置。通常使用笛卡尔坐标系,即X、Y和Z轴。其中,X轴表示横向,Y轴表示纵向,Z轴表示纵深或垂直方向。通过在这些轴上的不同值组合,可以确定一个点或对象在三维空间中的位置
大家可以three编辑器中感受一下三维:three.js editor
ps:默认英文,可以切换中文语言
three前提概念
以舞台展示为例:
- 场景
Sence相当于一个舞台,在这里是布置场景物品和表演者表演的地方 - 相机
Carma相当于观众的眼睛去观看 - 几何体
Geometry相当于舞台的表演者 - 灯光
light相当于舞台灯光照射控制 Controls相当于这出舞台剧的总导演
创建场景与相机
<html>

<head>
    <meta charset="utf-8">
    <title>My first three.js app</title>
</head>

<body>
    <script src="https://code.jquery.com/jquery-3.6.0.min.js"></script>
    <script type="importmap">
        {
            "imports": {
                "three": "./three.module.js"
            }
        }
    </script>
    <script type="module">
        import { Scene, WebGLRenderer, PerspectiveCamera } from 'three'
        let scene,renderer,camera

        //创建场景
        const setScene = () => {
            scene = new Scene()
            renderer = new WebGLRenderer()
            //调用 setSize() 方法设置渲染器的大小为当前窗口的宽度和高度
            renderer.setSize(window.innerWidth, window.innerHeight)
            //将渲染器的 DOM 元素添加到页面的 <body> 元素中
            document.body.appendChild(renderer.domElement)
        }

        //相机的默认坐标
        const defaultMap = {
            x: 0,
            y: 10,
            z: 20,
        }
        //创建相机
        const setCamera = () => {
            const { x, y, z } = defaultMap
            //创建一个 PerspectiveCamera 对象,并传入参数来设置透视相机的属性:视野角度为 45 度,宽高比为窗口的宽高比,近裁剪面为 1,远裁剪面为 1000
            camera = new PerspectiveCamera(45, window.innerWidth / window.innerHeight, 1, 1000)
            //用 position.set() 方法将相机的位置设置为之前从 defaultMap 中提取的坐标
            camera.position.set(x, y, z)
        }

        (function () {
            setScene()
            setCamera()
        })()

    </script>
</body>

</html>
PerspectiveCamera的详细说明:
new THREE.PerspectiveCamera构造函数用来创建透视投影相机,该构造函数总共有四个参数,分别是fov,aspect,near,far 。
fov表示摄像机视锥体垂直视野角度,最小值为0,最大值为180,默认值为50,实际项目中一般都定义45,因为45最接近人正常睁眼角度;aspect表示摄像机视锥体长宽比,默认长宽比为1,即表示看到的是正方形,实际项目中使用的是屏幕的宽高比;near表示摄像机视锥体近端面,这个值默认为0.1,实际项目中都会设置为1;far表示摄像机视锥体远端面,默认为2000,这个值可以是无限的,说的简单点就是我们视觉所能看到的最远距离。
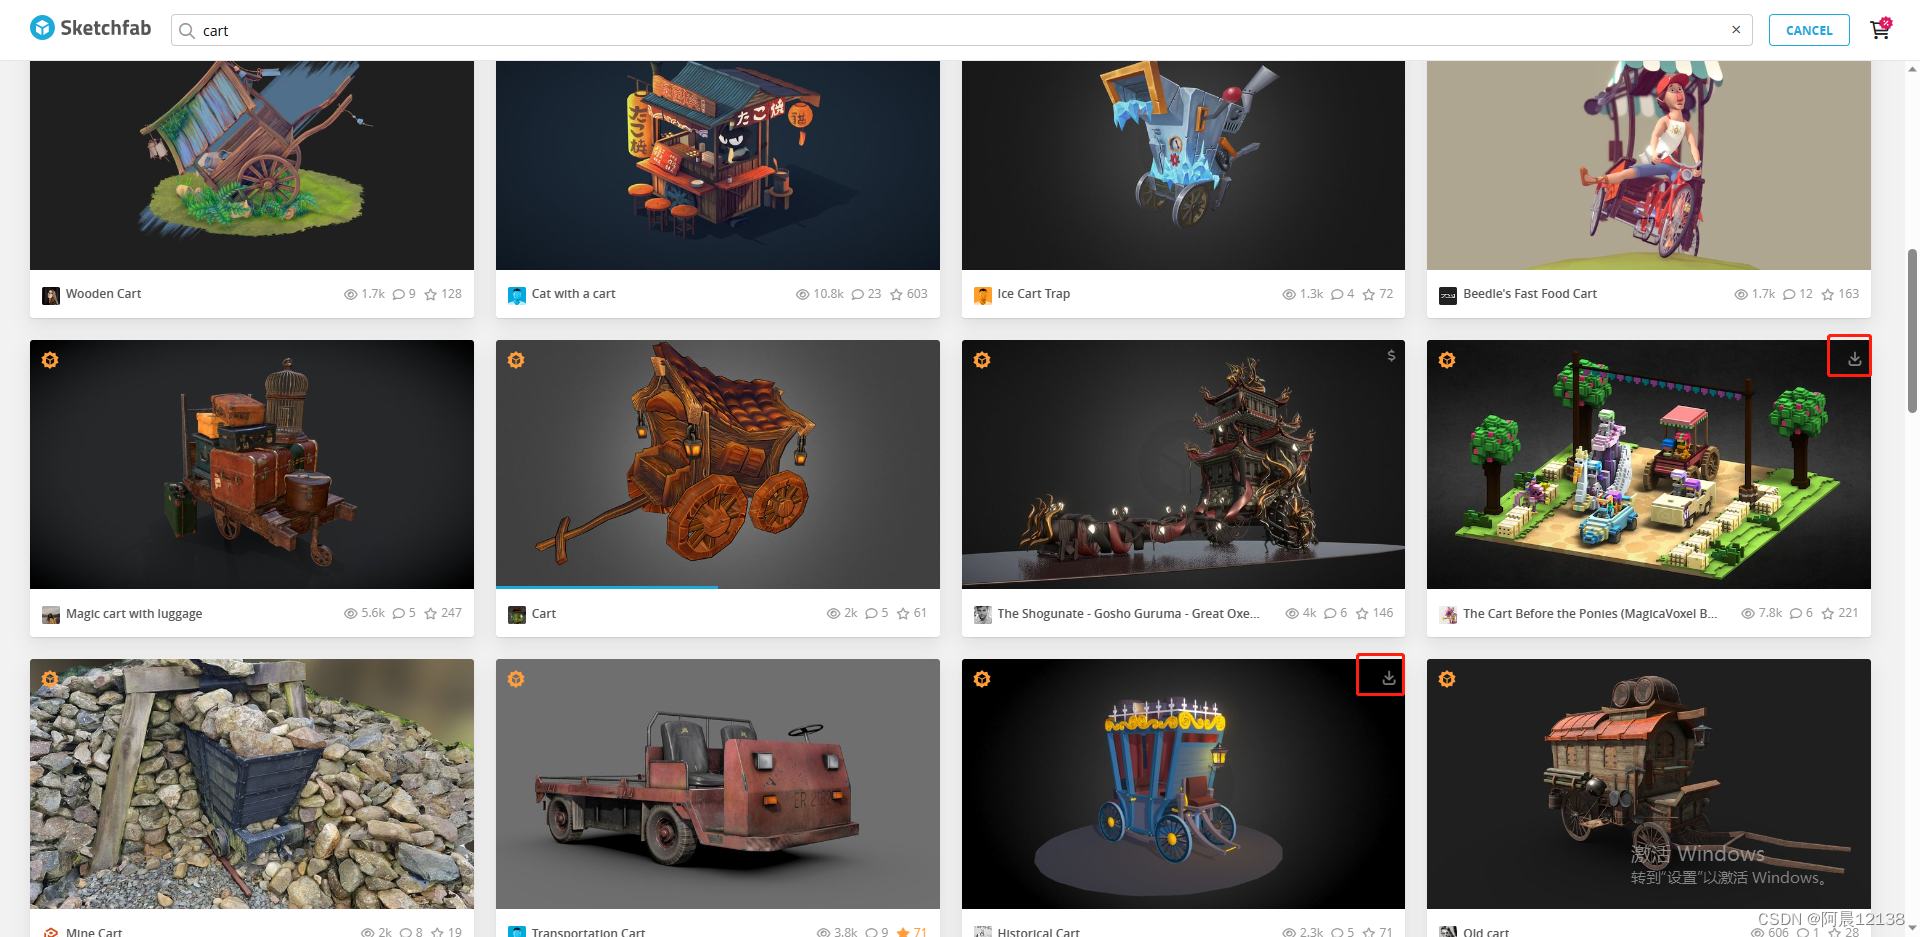
引入模型
国外一个3d模型下载网站,里面有很多免费的模型下载 点击红框处下载
Log in to your Sketchfab account - Sketchfab
<html>

<head>
    <meta charset="utf-8">
    <title>My first three.js app</title>
</head>

<body>
    <script src="https://code.jquery.com/jquery-3.6.0.min.js"></script>
    <script type="importmap">
        {
            "imports": {
                "three": "./three.module.js"
            }
        }
    </script>
    <script type="module">
        import { GLTFLoader } from 'three/examples/jsm/loaders/GLTFLoader'
        import { Scene, WebGLRenderer, PerspectiveCamera } from 'three'
        let scene, renderer, camera, directionalLight, dhelper
        let isLoading = true
        let loadingWidth = 0


        //创建场景
        const setScene = () => {
            scene = new Scene()
            renderer = new WebGLRenderer()
            renderer.setSize(window.innerWidth, window.innerHeight)
            document.body.appendChild(renderer.domElement)
        }

        //相机的默认坐标
        const defaultMap = {
            x: 0,
            y: 10,
            z: 20,
        }
        //创建相机
        const setCamera = () => {
            const { x, y, z } = defaultMap
            camera = new PerspectiveCamera(45, window.innerWidth / window.innerHeight, 1, 1000)
            camera.position.set(x, y, z)
        }

        //通过Promise处理一下loadfile函数
        const loader = new GLTFLoader() //引入模型的loader实例
        const loadFile = (url) => {
            return new Promise(((resolve, reject) => {
                loader.load(url,
                    (gltf) => {
                        resolve(gltf)
                    }, ({ loaded, total }) => {
                        let load = Math.abs(loaded / total * 100)
                        loadingWidth = load
                        if (load >= 100) {
                            setTimeout(() => {
                                isLoading = false
                            }, 1000)
                        }
                        console.log((loaded / total * 100) + '% loaded')
                    },
                    (err) => {
                        reject(err)
                    }
                )
            }))
        }

        (async function () {
            const gltf = await loadFile('./assets/scene.gltf')
            setScene()
            setCamera()
            scene.add(gltf.scene)
        })()

    </script>
</body>

</html>
加载模型代码讲解:
loader.load 用来加载和解析 glTF 文件,接受四个参数:
- 第一个参数
url是要加载的 glTF 模型文件的路径。 - 第二个参数是一个回调函数,当模型加载成功时会被调用
- 第三个参数是一个回调函数,用于跟踪加载进度。回调函数的
{ loaded, total }参数表示已加载和总共需要加载的文件数量,通过计算百分比可以得到当前加载进度。 - 第四个参数是一个回调函数,当加载出错时会被调用。
创建灯光
<html>

<head>
    <meta charset="utf-8">
    <title>My first three.js app</title>
</head>

<body>
    <script src="https://code.jquery.com/jquery-3.6.0.min.js"></script>
    <script type="importmap">
        {
            "imports": {
                "three": "./three.module.js"
            }
        }
    </script>
    <script type="module">
        import { GLTFLoader } from 'three/examples/jsm/loaders/GLTFLoader'
        import { Scene, WebGLRenderer, PerspectiveCamera } from 'three'
        let scene, renderer, camera, directionalLight, dhelper
        let isLoading = true
        let loadingWidth = 0


        //创建场景
        const setScene = () => {
            scene = new Scene()
            renderer = new WebGLRenderer()
            renderer.setSize(window.innerWidth, window.innerHeight)
            document.body.appendChild(renderer.domElement)
        }

        //相机的默认坐标
        const defaultMap = {
            x: 0,
            y: 10,
            z: 20,
        }
        //创建相机
        const setCamera = () => {
            const { x, y, z } = defaultMap
            camera = new PerspectiveCamera(45, window.innerWidth / window.innerHeight, 1, 1000)
            camera.position.set(x, y, z)
        }

        // 设置灯光
        const setLight = () => {
            // 创建一个颜色为白色(0xffffff),强度为 0.5 的平行光对象
            directionalLight = new DirectionalLight(0xffffff, 0.5)
            //设置平行光的位置,这里将其放置在三维坐标 (-4, 8, 4) 的位置
            directionalLight.position.set(-4, 8, 4)
            //创建一个平行光辅助对象,用于可视化平行光的方向和强度
            dhelper = new DirectionalLightHelper(directionalLight, 5, 0xff0000)
            //创建一个颜色为白色(0xffffff),半球颜色为白色(0xffffff),强度为 0.4 的半球光对象
            hemisphereLight = new HemisphereLight(0xffffff, 0xffffff, 0.4)
            hemisphereLight.position.set(0, 8, 0)
            //创建一个半球光辅助对象,用于可视化半球光的方向和强度
            hHelper = new HemisphereLightHelper(hemisphereLight, 5)
            //添加到场景
            scene.add(directionalLight)
            //添加到场景
            scene.add(hemisphereLight)
        }

        //使场景、照相机、模型不停调用
        const loop = () => {
            //requestAnimationFrame(loop) 是浏览器提供的方法,用于在下一次重绘页面之前调用回调函数 loop。这样可以创建一个循环,使场景、相机和模型不断被渲染更新
            requestAnimationFrame(loop)
            //使用渲染器 renderer 渲染场景 scene 中的模型,使用相机 camera 进行投影
            renderer.render(scene, camera)
        }

        //通过Promise处理一下loadfile函数
        const loader = new GLTFLoader() //引入模型的loader实例
        const loadFile = (url) => {
            return new Promise(((resolve, reject) => {
                // loader.load 用来加载和解析 glTF 文件
                loader.load(url,
                    (gltf) => {
                        resolve(gltf)
                    }, ({ loaded, total }) => {
                        let load = Math.abs(loaded / total * 100)
                        loadingWidth = load
                        if (load >= 100) {
                            setTimeout(() => {
                                isLoading = false
                            }, 1000)
                        }
                        console.log((loaded / total * 100) + '% loaded')
                    },
                    (err) => {
                        reject(err)
                    }
                )
            }))
        }

        (async function () {
            const gltf = await loadFile('./assets/scene.gltf')
            setScene()
            setCamera()
            setLight()
            scene.add(gltf.scene)
            loop()
        })()

    </script>
</body>

</html>
DirectionalLight 和 HemisphereLight 是 Three.js 中的两种灯光类型,分别表示平行光和半球光。它们用于模拟现实世界中的光照效果
此刻模型已经可以看见了,如何你只能看见黑黑的一片,无法看到模型,一般两个原因:
- 模型是否加载成功
try {
     gltf = await loadFile('./assets/scene.gltf');
     console.log('Model loading completed:', gltf);
} catch (error) {
     console.error('Error loading model:', error);
}- 相机位置偏差,调整下相机(defaultMap)的位置
控制模型
这一步完成之后,模型就可以通过鼠标移动,旋转了
<html>

<head>
    <meta charset="utf-8">
    <title>My first three.js app</title>
</head>

<body>
    <script src="https://code.jquery.com/jquery-3.6.0.min.js"></script>
    <script type="importmap">
        {
            "imports": {
                "three": "./three.module.js"
            }
        }
    </script>
    <script type="module">
        import { Scene, WebGLRenderer, PerspectiveCamera, DirectionalLight, HemisphereLight, DirectionalLightHelper, HemisphereLightHelper } from 'three'
        import { GLTFLoader } from './jsm/loaders/GLTFLoader.js'
        import { OrbitControls } from './jsm/controls/OrbitControls.js'

        let scene, renderer, camera, directionalLight, hemisphereLight, dhelper, hHelper, controls

        let isLoading = true
        let loadingWidth = 0


        //创建场景
        const setScene = () => {
            scene = new Scene()
            renderer = new WebGLRenderer()
            renderer.setSize(window.innerWidth, window.innerHeight)
            document.body.appendChild(renderer.domElement)
        }

        //相机的默认坐标
        const defaultMap = {
            x: 0,
            y: 10,
            z: 20,
        }
        //创建相机
        const setCamera = () => {
            const { x, y, z } = defaultMap
            camera = new PerspectiveCamera(45, window.innerWidth / window.innerHeight, 1, 1000)
            camera.position.set(x, y, z)
        }

        // 设置灯光
        const setLight = () => {
            directionalLight = new DirectionalLight(0xffffff, 0.5)
            directionalLight.position.set(-4, 8, 4)
            dhelper = new DirectionalLightHelper(directionalLight, 5, 0xff0000)
            hemisphereLight = new HemisphereLight(0xffffff, 0xffffff, 0.4)
            hemisphereLight.position.set(0, 8, 0)
            hHelper = new HemisphereLightHelper(hemisphereLight, 5)
            scene.add(directionalLight)
            scene.add(hemisphereLight)
        }

        //使场景、照相机、模型不停调用
        const loop = () => {
            requestAnimationFrame(loop)
            renderer.render(scene, camera)
            controls.update()
        }

        // 设置模型控制
        const setControls = () => {
            // 创建一个新的 OrbitControls 对象,并将它绑定到相机 camera 和渲染器的 DOM 元素 renderer.domElement 上
            controls = new OrbitControls(camera, renderer.domElement)
            // 设置相机的最大仰角(上下旋转角度),这里将其限制为 0.9 * π / 2
            controls.maxPolarAngle = 0.9 * Math.PI / 2
            //启用相机的缩放功能,允许用户通过鼠标滚轮或触摸手势进行缩放操作
            controls.enableZoom = true
            //监听控制器的变化事件,当用户操作控制器导致相机位置发生改变时,触发渲染函数 render
            controls.addEventListener('change', render)
        }
        //在相机位置发生变化时,将新的相机位置保存到 defaultMap 对象中
        const render = () => {
            defaultMap.x = Number.parseInt(camera.position.x)
            defaultMap.y = Number.parseInt(camera.position.y)
            defaultMap.z = Number.parseInt(camera.position.z)
        }

        //通过Promise处理一下loadfile函数
        const loader = new GLTFLoader() //引入模型的loader实例
        const loadFile = (url) => {
            return new Promise(((resolve, reject) => {
                // loader.load 用来加载和解析 glTF 文件
                loader.load(url,
                    (gltf) => {
                        resolve(gltf)
                    }, ({ loaded, total }) => {
                        let load = Math.abs(loaded / total * 100)
                        loadingWidth = load
                        if (load >= 100) {
                            setTimeout(() => {
                                isLoading = false
                            }, 1000)
                        }
                        console.log((loaded / total * 100) + '% loaded')
                    },
                    (err) => {
                        reject(err)
                    }
                )
            }))
        }

        (async function () {
            setScene()
            setCamera()
            setLight()
            setControls()
            const gltf = await loadFile('./assets/scene.gltf')
            scene.add(gltf.scene)
            loop()
        })()

    </script>
</body>

</html>
ps:这段代码没问题,可正常运行,前两三个可能会有些引入缺失或者声明变量的缺失,大家参考这个补齐,我就不去查漏补缺了
改变车身颜色
scene 有一个traverse函数,它回调了所有模型的子模型信息,只要我们找到对应name属性,就可以更改颜色,和增加贴图等等
        //设置车身颜色
        const setCarColor = (index) => {
            //Color 是 Three.js 中的一个类,用于表示颜色。它的作用是创建和管理三维场景中物体的颜色
            const currentColor = new Color(colorAry[index])
            // 使用 Three.js 中的 traverse 方法遍历场景中的每个子对象
            scene.traverse(child => {
                if (child.isMesh) {
                    console.log(child)
                    if (child.name) {
                        //将当前子对象的材质颜色设置为 currentColor,实现改变颜色的效果
                        child.material.color.set(currentColor)
                    }
                }
            })
        }
整个的完整代码:
<html>

<head>
    <meta charset="utf-8">
    <title>My first three.js app</title>
    <style>
        body {
            margin: 0;
        }

        .maskLoading {
            background: #000;
            position: fixed;
            display: flex;
            justify-content: center;
            align-items: center;
            top: 0;
            left: 0;
            bottom: 0;
            right: 0;
            z-index: 1111111;
            color: #fff;
        }

        .maskLoading .loading {
            width: 400px;
            height: 20px;
            border: 1px solid #fff;
            background: #000;
            overflow: hidden;
            border-radius: 10px;

        }

        .maskLoading .loading div {
            background: #fff;
            height: 20px;
            width: 0;
            transition-duration: 500ms;
            transition-timing-function: ease-in;
        }

        canvas {
            width: 100%;
            height: 100%;
            margin: auto;
        }

        .mask {
            color: #fff;
            position: absolute;
            bottom: 0;
            left: 0;
            width: 100%;
        }

        .flex {
            display: flex;
            flex-wrap: wrap;
            padding: 20px;

        }

        .flex div {
            width: 10px;
            height: 10px;
            margin: 5px;
            cursor: pointer;
        }
    </style>
</head>

<body>
    <div class="boxs">
        <div class="maskLoading">
            <div class="loading">
                <div class="oneDiv"></div>
            </div>
            <div style="padding-left: 10px;" class="twoDiv"></div>
        </div>
        <div class="mask">
            <p class="realTimeDate"></p>
            <button class="rotatingCar">转动车</button>
            <button class="stop">停止</button>
            <div class="flex" id="colorContainer">
            </div>
        </div>
    </div>
    <script src="https://code.jquery.com/jquery-3.6.0.min.js"></script>
    <script type="importmap">
        {
            "imports": {
                "three": "./three.module.js"
            }
        }
    </script>
    <script type="module">
        import {
            Color,
            DirectionalLight,
            DirectionalLightHelper,
            HemisphereLight,
            HemisphereLightHelper,
            PerspectiveCamera,
            Scene,
            WebGLRenderer
        } from 'three'
        import { GLTFLoader } from './jsm/loaders/GLTFLoader.js'
        import { OrbitControls } from './jsm/controls/OrbitControls.js'

        //车身颜色数组
        const colorAry = [
            "rgb(216, 27, 67)", "rgb(142, 36, 170)", "rgb(81, 45, 168)", "rgb(48, 63, 159)", "rgb(30, 136, 229)", "rgb(0, 137, 123)",
            "rgb(67, 160, 71)", "rgb(251, 192, 45)", "rgb(245, 124, 0)", "rgb(230, 74, 25)", "rgb(233, 30, 78)", "rgb(156, 39, 176)",
            "rgb(0, 0, 0)"]
        let scene, camera, renderer, controls, floor, dhelper, hHelper, directionalLight, hemisphereLight
        let gltf
        let isLoading = true
        let loadingWidth = 0
        //相机的默认坐标
        const defaultMap = {
            x: 0,
            y: 10,
            z: 20,
        }
        //遮罩层
        const maskLayer = () => {
            if (isLoading) {
                $('.maskLoading').hide();
            } else {
                $('.maskLoading').show()
            }
        }
        maskLayer()
        // 进度
        const schedule = () => {
            let timer = setInterval(function () {
                $('oneDiv').css('width', `${loadingWidth}%`);
                $('twoDiv').text(`${loadingWidth}%`);
                if (loadingWidth == 100) {
                    clearInterval(timer);
                }
            }, 10);
        }
        schedule()
        //实时更新x,y,z
        const realTime = () => {
            let timer = setInterval(function () {
                $('realTimeDate').text(`x:${defaultMap.x} y:${defaultMap.y} z:${defaultMap.z}`);
            }, 10);
        }
        // 生成颜色旋转块
        $.each(colorAry, function (index, item) {
            $('<div>').appendTo('#colorContainer') // 在 #colorContainer 中创建一个 <div> 元素
                .css('background-color', item) // 设置背景颜色
                .click(function () {
                    setCarColor(index); // 调用 setCarColor 函数并传递索引参数
                });
        });
        //创建场景
        const setScene = () => {
            scene = new Scene()
            renderer = new WebGLRenderer()
            renderer.setSize(window.innerWidth, window.innerHeight)
            document.body.appendChild(renderer.domElement)
        }
        //创建相机
        const setCamera = () => {
            const { x, y, z } = defaultMap
            camera = new PerspectiveCamera(45, window.innerWidth / window.innerHeight, 1, 1000)
            camera.position.set(x, y, z)
        }

        //引入模型的loader实例
        const loader = new GLTFLoader()
        //通过Promise处理一下loadfile函数
        const loadFile = (url) => {
            return new Promise(((resolve, reject) => {
                loader.load(url,
                    (gltf) => {
                        resolve(gltf)
                    }, ({ loaded, total }) => {
                        let load = Math.abs(loaded / total * 100)
                        loadingWidth = load
                        if (load >= 100) {
                            setTimeout(() => {
                                isLoading = false
                            }, 1000)
                        }
                        console.log((loaded / total * 100) + '% loaded')
                    },
                    (err) => {
                        reject(err)
                    }
                )
            }))
        }
        // 设置灯光
        const setLight = () => {
            directionalLight = new DirectionalLight(0xffffff, 0.8)
            directionalLight.position.set(-4, 8, 4)
            dhelper = new DirectionalLightHelper(directionalLight, 5, 0xff0000)
            hemisphereLight = new HemisphereLight(0xffffff, 0xffffff, 0.4)
            hemisphereLight.position.set(0, 8, 0)
            hHelper = new HemisphereLightHelper(hemisphereLight, 5)
            scene.add(directionalLight)
            scene.add(hemisphereLight)
        }
        // 设置模型控制
        const setControls = () => {
            controls = new OrbitControls(camera, renderer.domElement)
            controls.maxPolarAngle = 0.9 * Math.PI / 2
            controls.enableZoom = true
            controls.addEventListener('change', render)
        }
        //返回坐标信息
        const render = () => {
            defaultMap.x = Number.parseInt(camera.position.x)
            defaultMap.y = Number.parseInt(camera.position.y)
            defaultMap.z = Number.parseInt(camera.position.z)
        }

        (async function () {
            setScene()
            setCamera()
            setLight()
            setControls()
            try {
                gltf = await loadFile('./assets/scene.gltf');
                console.log('Model loading completed:', gltf);
            } catch (error) {
                console.error('Error loading model:', error);
            }
            scene.add(gltf.scene)
            loop()
        })()
        //使场景、照相机、模型不停调用
        const loop = () => {
            requestAnimationFrame(loop)
            renderer.render(scene, camera)
            controls.update()
        }
        //是否自动转动
        $('.rotatingCar').click(function () {
            console.log("旋转")
            controls.autoRotate = true
        })

        //停止转动
        $('.stop').click(function () {
            console.log("停止")
            controls.autoRotate = false
        })

        //设置车身颜色
        const setCarColor = (index) => {
            const currentColor = new Color(colorAry[index])
            scene.traverse(child => {
                if (child.isMesh) {
                    console.log(child)
                    if (child.name) {
                        child.material.color.set(currentColor)
                    }
                }
            })
        }

    </script>
</body>

</html>
完结撒花*★,°*:.☆( ̄▽ ̄)/$:*.°★* 。