目录
1. 前言
2. 储备知识
3. 准备工作
4. 代码修改的地方
5.结果展示
1. 前言
之前一直在忙着写文档,之前一直做分类,检测和分割,现在看到跟踪算法,花了几天时间找代码调试,看了看,展示效果比单纯的检测要更加的炸裂一点。
2. 储备知识
DeepSORT(Deep Learning to Track Multi-Object in SORT)是一种基于深度学习的多目标跟踪算法,它结合了深度学习的目标检测和传统的轨迹跟踪方法,旨在实现在复杂场景中准确和稳定地跟踪多个移动目标。以下是关于DeepSORT的检测思想、特点和应用方面的介绍:
检测思想: DeepSORT的核心思想是结合深度学习目标检测和轨迹跟踪方法,以实现多目标跟踪。首先,利用深度学习目标检测模型(如YOLO、Faster R-CNN等)检测出每一帧图像中的所有目标物体,并提取其特征。然后,通过应用传统的轨迹跟踪算法(如卡尔曼滤波器和轨迹关联等),将目标在连续帧之间进行关联,从而生成每个目标的运动轨迹。
特点:
- 多目标跟踪: DeepSORT专注于同时跟踪多个目标,适用于需要同时监测和追踪多个物体的场景,如交通监控、人群管理等。
- 深度特征: 通过使用深度学习模型提取目标的特征,DeepSORT可以更准确地表示目标,从而提高跟踪的精度和鲁棒性。
- 轨迹关联: DeepSORT使用传统的轨迹关联技术来连接不同帧之间的目标,确保在物体出现、消失、重叠等情况下仍能准确跟踪。
- 实时性能: DeepSORT设计用于实时应用,可以在视频流中高效地进行目标跟踪,适用于要求实时性能的应用场景。
需要了解的算法内容:详细介绍
- 目前主流的目标跟踪算法都是基于Tracking-by-Detecton策略,即基于目标检测的结果来进行目标跟踪。DeepSORT运用的就是这个策略,上面的视频是DeepSORT对人群进行跟踪的结果,每个bbox左上角的数字是用来标识某个人的唯一ID号。
-
这里就有个问题,视频中不同时刻的同一个人,位置发生了变化,那么是如何关联上的呢?答案就是匈牙利算法和卡尔曼滤波。
匈牙利算法可以告诉我们当前帧的某个目标,是否与前一帧的某个目标相同。卡尔曼滤波可以基于目标前一时刻的位置,来预测当前时刻的位置,并且可以比传感器(在目标跟踪中即目标检测器,比如Yolo等)更准确的估计目标的位置。
3. 准备工作
基础代码:黄老师的github,参考的是这位博主的,我做了相应的修改
4. 代码修改的地方
具体需要修改的有两个py文件
(1) main.py文件,里面的检测器yolo用onnx做推理,onnx模型参考我的博文yolov5转rknn(聪明的你应该会的)
import cv2
import torch
import numpy as np
import onnxruntime as rt


def sigmoid(x):
    return 1 / (1 + np.exp(-x))


def nms_boxes(boxes, scores):
    """Suppress non-maximal boxes.

    # Arguments
        boxes: ndarray, boxes of objects.
        scores: ndarray, scores of objects.

    # Returns
        keep: ndarray, index of effective boxes.
    """
    x = boxes[:, 0]
    y = boxes[:, 1]
    w = boxes[:, 2] - boxes[:, 0]
    h = boxes[:, 3] - boxes[:, 1]

    areas = w * h
    order = scores.argsort()[::-1]

    keep = []
    while order.size > 0:
        i = order[0]
        keep.append(i)

        xx1 = np.maximum(x[i], x[order[1:]])
        yy1 = np.maximum(y[i], y[order[1:]])
        xx2 = np.minimum(x[i] + w[i], x[order[1:]] + w[order[1:]])
        yy2 = np.minimum(y[i] + h[i], y[order[1:]] + h[order[1:]])

        w1 = np.maximum(0.0, xx2 - xx1 + 0.00001)
        h1 = np.maximum(0.0, yy2 - yy1 + 0.00001)
        inter = w1 * h1

        ovr = inter / (areas[i] + areas[order[1:]] - inter)
        inds = np.where(ovr <= 0.45)[0]
        order = order[inds + 1]
    keep = np.array(keep)
    return keep


def process(input, mask, anchors):

    anchors = [anchors[i] for i in mask]
    grid_h, grid_w = map(int, input.shape[0:2])

    box_confidence = sigmoid(input[..., 4])
    box_confidence = np.expand_dims(box_confidence, axis=-1)

    box_class_probs = sigmoid(input[..., 5:])

    box_xy = sigmoid(input[..., :2])*2 - 0.5

    col = np.tile(np.arange(0, grid_w), grid_w).reshape(-1, grid_w)
    row = np.tile(np.arange(0, grid_h).reshape(-1, 1), grid_h)
    col = col.reshape(grid_h, grid_w, 1, 1).repeat(3, axis=-2)
    row = row.reshape(grid_h, grid_w, 1, 1).repeat(3, axis=-2)
    grid = np.concatenate((col, row), axis=-1)
    box_xy += grid
    box_xy *= int(img_size/grid_h)

    box_wh = pow(sigmoid(input[..., 2:4])*2, 2)
    box_wh = box_wh * anchors

    box = np.concatenate((box_xy, box_wh), axis=-1)

    return box, box_confidence, box_class_probs


def filter_boxes(boxes, box_confidences, box_class_probs):
    """Filter boxes with box threshold. It's a bit different with origin yolov5 post process!

    # Arguments
        boxes: ndarray, boxes of objects.
        box_confidences: ndarray, confidences of objects.
        box_class_probs: ndarray, class_probs of objects.

    # Returns
        boxes: ndarray, filtered boxes.
        classes: ndarray, classes for boxes.
        scores: ndarray, scores for boxes.
    """
    box_classes = np.argmax(box_class_probs, axis=-1)
    box_class_scores = np.max(box_class_probs, axis=-1)
    pos = np.where(box_confidences[..., 0] >= 0.5)


    boxes = boxes[pos]
    classes = box_classes[pos]
    scores = box_class_scores[pos]

    return boxes, classes, scores


def yolov5_post_process(input_data):
    masks = [[0, 1, 2], [3, 4, 5], [6, 7, 8]]
    anchors = [[10, 13], [16, 30], [33, 23], [30, 61], [62, 45],
              [59, 119], [116, 90], [156, 198], [373, 326]]

    boxes, classes, scores = [], [], []
    for input,mask in zip(input_data, masks):
        b, c, s = process(input, mask, anchors)
        b, c, s = filter_boxes(b, c, s)
        boxes.append(b)
        classes.append(c)
        scores.append(s)

    boxes = np.concatenate(boxes)
    boxes = xywh2xyxy(boxes)
    classes = np.concatenate(classes)
    scores = np.concatenate(scores)

    nboxes, nclasses, nscores = [], [], []
    for c in set(classes):
        inds = np.where(classes == c)
        b = boxes[inds]
        c = classes[inds]
        s = scores[inds]

        keep = nms_boxes(b, s)

        nboxes.append(b[keep])
        nclasses.append(c[keep])
        nscores.append(s[keep])

    if not nclasses and not nscores:
        return None, None, None

    boxes = np.concatenate(nboxes)
    classes = np.concatenate(nclasses)
    scores = np.concatenate(nscores)

    return boxes, classes, scores


def letterbox(img, new_shape=(640, 640), color=(114, 114, 114), auto=True, scaleFill=False, scaleup=True, stride=32):
    # Resize and pad image while meeting stride-multiple constraints
    shape = img.shape[:2]  # current shape [height, width]
    if isinstance(new_shape, int):
        new_shape = (new_shape, new_shape)

    # Scale ratio (new / old)
    r = min(new_shape[0] / shape[0], new_shape[1] / shape[1])
    if not scaleup:  # only scale down, do not scale up (for better test mAP)
        r = min(r, 1.0)

    # Compute padding
    ratio = r, r  # width, height ratios
    new_unpad = int(round(shape[1] * r)), int(round(shape[0] * r))
    dw, dh = new_shape[1] - new_unpad[0], new_shape[0] - new_unpad[1]  # wh padding
    if auto:  # minimum rectangle
        dw, dh = np.mod(dw, stride), np.mod(dh, stride)  # wh padding
    elif scaleFill:  # stretch
        dw, dh = 0.0, 0.0
        new_unpad = (new_shape[1], new_shape[0])
        ratio = new_shape[1] / shape[1], new_shape[0] / shape[0]  # width, height ratios

    dw /= 2  # divide padding into 2 sides
    dh /= 2

    if shape[::-1] != new_unpad:  # resize
        img = cv2.resize(img, new_unpad, interpolation=cv2.INTER_LINEAR)
    top, bottom = int(round(dh - 0.1)), int(round(dh + 0.1))
    left, right = int(round(dw - 0.1)), int(round(dw + 0.1))
    img = cv2.copyMakeBorder(img, top, bottom, left, right, cv2.BORDER_CONSTANT, value=color)  # add border
    return img, ratio, (dw, dh)


def clip_coords(boxes, img_shape):
    # Clip bounding xyxy bounding boxes to image shape (height, width)
    boxes[:, 0].clamp_(0, img_shape[1])  # x1
    boxes[:, 1].clamp_(0, img_shape[0])  # y1
    boxes[:, 2].clamp_(0, img_shape[1])  # x2
    boxes[:, 3].clamp_(0, img_shape[0])  # y2


def xywh2xyxy(x):
    # Convert nx4 boxes from [x, y, w, h] to [x1, y1, x2, y2] where xy1=top-left, xy2=bottom-right
    y = x.clone() if isinstance(x, torch.Tensor) else np.copy(x)
    y[:, 0] = x[:, 0] - x[:, 2] / 2  # top left x
    y[:, 1] = x[:, 1] - x[:, 3] / 2  # top left y
    y[:, 2] = x[:, 0] + x[:, 2] / 2  # bottom right x
    y[:, 3] = x[:, 1] + x[:, 3] / 2  # bottom right y

    return y


CLASSES  = ['person', 'bicycle', 'car', 'motorcycle', 'airplane', 'bus', 'train', 'truck', 'boat', 'traffic light',
        'fire hydrant', 'stop sign', 'parking meter', 'bench', 'bird', 'cat', 'dog', 'horse', 'sheep', 'cow',
        'elephant', 'bear', 'zebra', 'giraffe', 'backpack', 'umbrella', 'handbag', 'tie', 'suitcase', 'frisbee',
        'skis', 'snowboard', 'sports ball', 'kite', 'baseball bat', 'baseball glove', 'skateboard', 'surfboard',
        'tennis racket', 'bottle', 'wine glass', 'cup', 'fork', 'knife', 'spoon', 'bowl', 'banana', 'apple', 'sandwich',
        'orange', 'broccoli', 'carrot', 'hot dog', 'pizza', 'donut', 'cake', 'chair', 'couch', 'potted plant', 'bed',
        'dining table', 'toilet', 'tv', 'laptop', 'mouse', 'remote', 'keyboard', 'cell phone', 'microwave', 'oven', 'toaster', 'sink',
        'refrigerator', 'book', 'clock', 'vase', 'scissors', 'teddy bear', 'hair drier', 'toothbrush']


def preprocess(img, img_size):
    img0 = img.copy()
    img = letterbox(img, new_shape=img_size)[0]
    img = img[:, :, ::-1].transpose(2, 0, 1)
    img = np.ascontiguousarray(img).astype(np.float32)
    img = torch.from_numpy(img)
    img /= 255.0
    if img.ndimension() == 3:
        img = img.unsqueeze(0)

    return img0, img


def draw(image, boxes, scores, classes):
    """Draw the boxes on the image.

    # Argument:
        image: original image.
        boxes: ndarray, boxes of objects.
        classes: ndarray, classes of objects.
        scores: ndarray, scores of objects.
        all_classes: all classes name.
    """
    for box, score, cl in zip(boxes, scores, classes):
        top, left, right, bottom = box
        # print('class: {}, score: {}'.format(CLASSES[cl], score))
        # print('box coordinate left,top,right,down: [{}, {}, {}, {}]'.format(top, left, right, bottom))
        top = int(top)
        left = int(left)
        right = int(right)
        bottom = int(bottom)

        cv2.rectangle(image, (top, left), (right, bottom), (255, 0, 0), 2)
        cv2.putText(image, '{0} {1:.2f}'.format(CLASSES[cl], score),
                    (top, left - 6),
                    cv2.FONT_HERSHEY_SIMPLEX,
                    0.6, (0, 0, 255), 2)


def detect(im, img_size, sess, input_name, outputs_name):
    im0, img = preprocess(im, img_size)
    input_data = onnx_inference(img.numpy(), sess, input_name, outputs_name)
    boxes, classes, scores = yolov5_post_process(input_data)

    if boxes is not None:
        draw(im, boxes, scores, classes)
    cv2.imshow('demo', im)
    cv2.waitKey(1)


def onnx_inference(img, sess, input_name, outputs_name):

    # 模型推理:模型输出节点名,模型输入节点名,输入数据(注意节点名的格式!!!!!)
    outputs = sess.run(outputs_name, {input_name: img})
    input0_data = outputs[0]
    input1_data = outputs[1]
    input2_data = outputs[2]

    input0_data = input0_data.reshape([3, 80, 80, 85])
    input1_data = input1_data.reshape([3, 40, 40, 85])
    input2_data = input2_data.reshape([3, 20, 20, 85])

    input_data = list()
    input_data.append(np.transpose(input0_data, (1, 2, 0, 3)))
    input_data.append(np.transpose(input1_data, (1, 2, 0, 3)))
    input_data.append(np.transpose(input2_data, (1, 2, 0, 3)))

    return input_data


def load_onnx_model():
    # onnx模型前向推理
    sess = rt.InferenceSession('./weights/modified_yolov5s.onnx')
    # 模型的输入和输出节点名,可以通过netron查看
    input_name = 'images'
    outputs_name = ['396', '440', '484']

    return sess, input_name, outputs_name


if __name__ == '__main__':
    # create onnx_model
    sess, input_name, outputs_name = load_onnx_model()
    # input_model_size
    img_size = 640
    # read video
    video = cv2.VideoCapture('./video/cut3.avi')
    print("Loaded video ...")
    frame_interval = 2  # 间隔帧数,例如每隔10帧获取一次
    frame_count = 0
    while True:
        # 读取每帧图片
        _, im = video.read()
        if frame_count % frame_interval == 0:
            if im is None:
                break
            # 缩小尺寸,1920x1080->960x540
            im = cv2.resize(im, (640, 640))
            list_bboxs = []
            # det_object
            detect(im, img_size, sess, input_name, outputs_name)
        frame_count += 1
    video.release()
    cv2.destroyAllWindows()
(2) feature_extractor.py的修改:
这里有4种推理情况:ckpt.t7是ReID( Re-identification利用算法),在图像库中找到要搜索的目标的技术,所以它是属于图像检索的一个子问题。
(1) 动态的batch_size推理:由于检测到的目标是多个object,在本项目的代码REID推理中,会将目标通过torch.cat连接起来,变成(n, 64, 128)的形状,所以需要用动态的onnx模型
(2)那我就想要静态的怎么办,安排!!!,思路就是将cat的拆分开就行了,shape变成(1, 64 , 128),单个推理后将结果cat起来就行了,easy的。
重要!!!!ckpt文件转onnx的代码
import os
import cv2
import time
import argparse
import torch
import numpy as np
from deep_sort import build_tracker
from utils.draw import draw_boxes
from utils.parser import get_config
from tqdm import tqdm


if __name__ == '__main__':
    parser = argparse.ArgumentParser()
    parser.add_argument("--config_deepsort", type=str, default="./configs/deep_sort.yaml", help='Configure tracker')
    parser.add_argument("--cpu", dest="use_cuda", action="store_false", default=True, help='Run in CPU')
    args = parser.parse_args()

    cfg = get_config()
    cfg.merge_from_file(args.config_deepsort)
    use_cuda = args.use_cuda and torch.cuda.is_available()
    torch.set_grad_enabled(False)
    model = build_tracker(cfg, use_cuda=False)

    model.reid = True
    model.extractor.net.eval()

    device = 'cpu'
    output_onnx = 'deepsort.onnx'
    # ------------------------ export -----------------------------
    print("==> Exporting model to ONNX format at '{}'".format(output_onnx))
    input_names = ['input']
    output_names = ['output']

    input_tensor = torch.randn(1, 3, 128, 64, device=device)

    torch.onnx.export(model.extractor.net, input_tensor, output_onnx, export_params=True, verbose=False,
                      input_names=input_names, output_names=output_names, opset_version=13,
                      do_constant_folding=True)
(3)但是要转rknn怎么办,ckpt.t7转onnx后,有一个ReduceL2,不支持量化,我就转的fp16(在RK3588上是可以的,rk1808不知道行不行),不过我尝试了将最后两个节点删除,对结果好像没有什么影响(用的是cut后的onnx推理),有懂的朋友可以解释一下!!!
(4) 就是rknn的推理,这里就不展示了,需要的私聊我吧
import torch
import torchvision.transforms as transforms
import numpy as np
import cv2
# import onnxruntime as rt
# from rknnlite.api import RKNNLite


class Extractor(object):
    def __init__(self, model_path):
        self.model_path = model_path
        self.device = "cpu"
        self.size = (64, 128)
        self.norm = transforms.Compose([
            transforms.ToTensor(),
            transforms.Normalize([0.485, 0.456, 0.406], [0.229, 0.224, 0.225]),
        ])

    def _preprocess(self, im_crops):
        """
        TODO:
            1. to float with scale from 0 to 1
            2. resize to (64, 128) as Market1501 dataset did
            3. concatenate to a numpy array
            3. to torch Tensor
            4. normalize
        """

        def _resize(im, size):
            return cv2.resize(im.astype(np.float32) / 255., size)

        im_batch = torch.cat([self.norm(_resize(im, self.size)).unsqueeze(0) for im in im_crops], dim=0).float()

        return im_batch

    def __call__(self, im_crops):
        im_batch = self._preprocess(im_crops)

        # sess = rt.InferenceSession(self.model_path)
        # 模型的输入和输出节点名,可以通过netron查看
        # input_name = 'input'
        # outputs_name = ['output']

        # (1)动态输出
        # features = sess.run(outputs_name, {input_name: im_batch.numpy()})
        # print('features:', np.array(features)[0, :, :].shape)
        # return np.array(features)[0, :, :]


        # (2)静态态输出
        # sort_results = []
        # n = im_batch.numpy().shape[0]
        # for i in range(n):
        #     img = im_batch.numpy()[i, :, :].reshape(1, 3, 128, 64)
        #     feature = sess.run(outputs_name, {input_name: img})
        #     feature = np.array(feature)
        #     sort_results.append(feature)
        # features = np.concatenate(sort_results, axis=1)[0, :, :]
        # print(features.shape)
        # return np.array(features)


        # (3)去掉onnx的最后两个节点的静态模型输出
        # input_name = 'input'
        # outputs_name = ['204']
        # sort_results = []
        # n = im_batch.numpy().shape[0]
        # for i in range(n):
        #     img = im_batch.numpy()[i, :, :].reshape(1, 3, 128, 64)
        #     feature = sess.run(outputs_name, {input_name: img})
        #     feature = np.array(feature)
        #     sort_results.append(feature)
        # features = np.concatenate(sort_results, axis=1)[0, :, :]
        # print(features.shape)
        # return np.array(features)

        # (4 )rk模型修改
        # rknn_lite = RKNNLite()
        # rknn_lite.load_rknn('./weights/ckpt_fp16.rknn')
        # ret = rknn_lite.init_runtime(core_mask=RKNNLite.NPU_CORE_0_1_2)
        # if ret != 0:
        #     print('Init runtime environment failed')
        #     exit(ret)
        # print('done')

        # sort_results = []
        # n = im_batch.numpy().shape[0]
        # for i in range(n):
        #    img = im_batch.numpy()[i, :, :].reshape(1, 3, 128, 64)
        #    feature = self.model_path.inference(inputs=[img])
        #   feature = np.array(feature)
        #    sort_results.append(feature)
        # features = np.concatenate(sort_results, axis=1)[0, :, :]
        # print(features.shape)
        # return np.array(features)
5.结果展示
onnx的转换结果(测试视频地址)
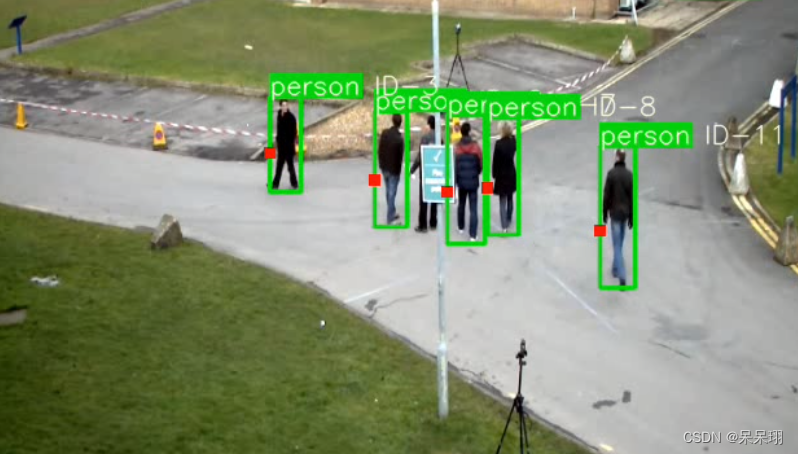
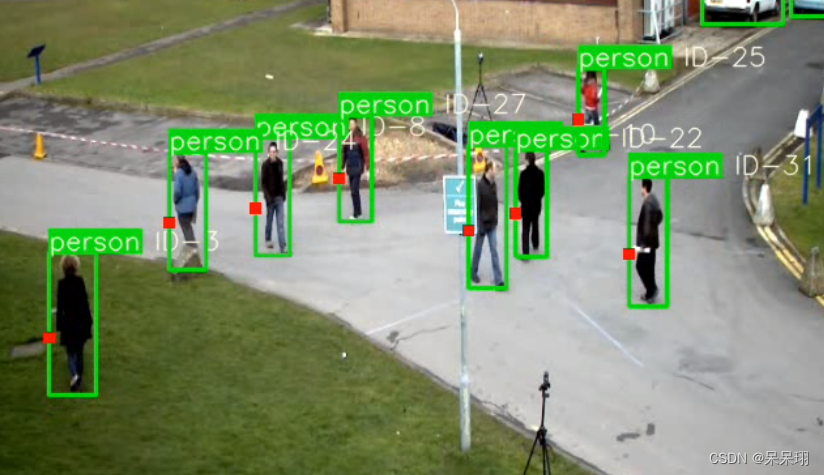
检测结果


![[mars3d 打包]vue3+vite,打包后mars3d找不到](https://img-blog.csdnimg.cn/8c664fff7b814b169600e7703210e9c8.png)