目录
一、项目准备
1.1、Vite搭建项目
1.2、vue_cli创建项目
二、组合式API(基于setup)
2.1、ref
2.2、reactive
2.3、toRefs
2.4、watch和watchEffect
2.5、computed
2.6、生命周期钩子函数
2.7、setup(子组件)的第一个参数-props
2.8、setup(子组件)的第二个参数-context
2.8.1、context.attrs【$attrs】
2.8.2、context.slots【$slots】
2.8.3、context.emit【$emit】
2.8.4、context.expose
2.9、provide-inject
2.10、在单文件组件(SFC)中使用组合式API的编译时语法糖
三、路由Vue-Router
3.1、引入和安装
3.2、带参数的动态路由匹配
3.3、路由正则与重复参数
3.4、嵌套路由与重定向
3.5、替换页面和堆栈中的前进后退(js跳转)
3.6、路由组件传参
3.7、路由懒加载
四、pinia
4.1、安装
4.2、Option Store与Setup Store的定义与使用
4.3、State的基本使用
4.5、Getter的基本使用
4.6、Action的基本使用
4.7、Pinia与vuex的区别
一、项目准备
1.1、Vite搭建项目
Vue3官网地址:快速上手 | Vue.js
Vite官网地址:开始 | Vite 官方中文文档
检查自己电脑npm -v版本,按照以下命令自己选择合适的命令
node -v检查node版本>14.18,可以在官网自行下载Node.js
# npm 6.x
npm create vite@latest my-vue-app --template vue# npm 7+, extra double-dash is needed:
npm create vite@latest my-vue-app -- --template vue# yarn
yarn create vite my-vue-app --template vue# pnpm
pnpm create vite my-vue-app --template vue
注意:只有Node版本在14.18及以上,Vite搭建项目才能生效
创建好项目以后,可以在依赖包看一下,有没有Vite,没有就npm i一下,然后npm run dev,至此,项目创建成功!
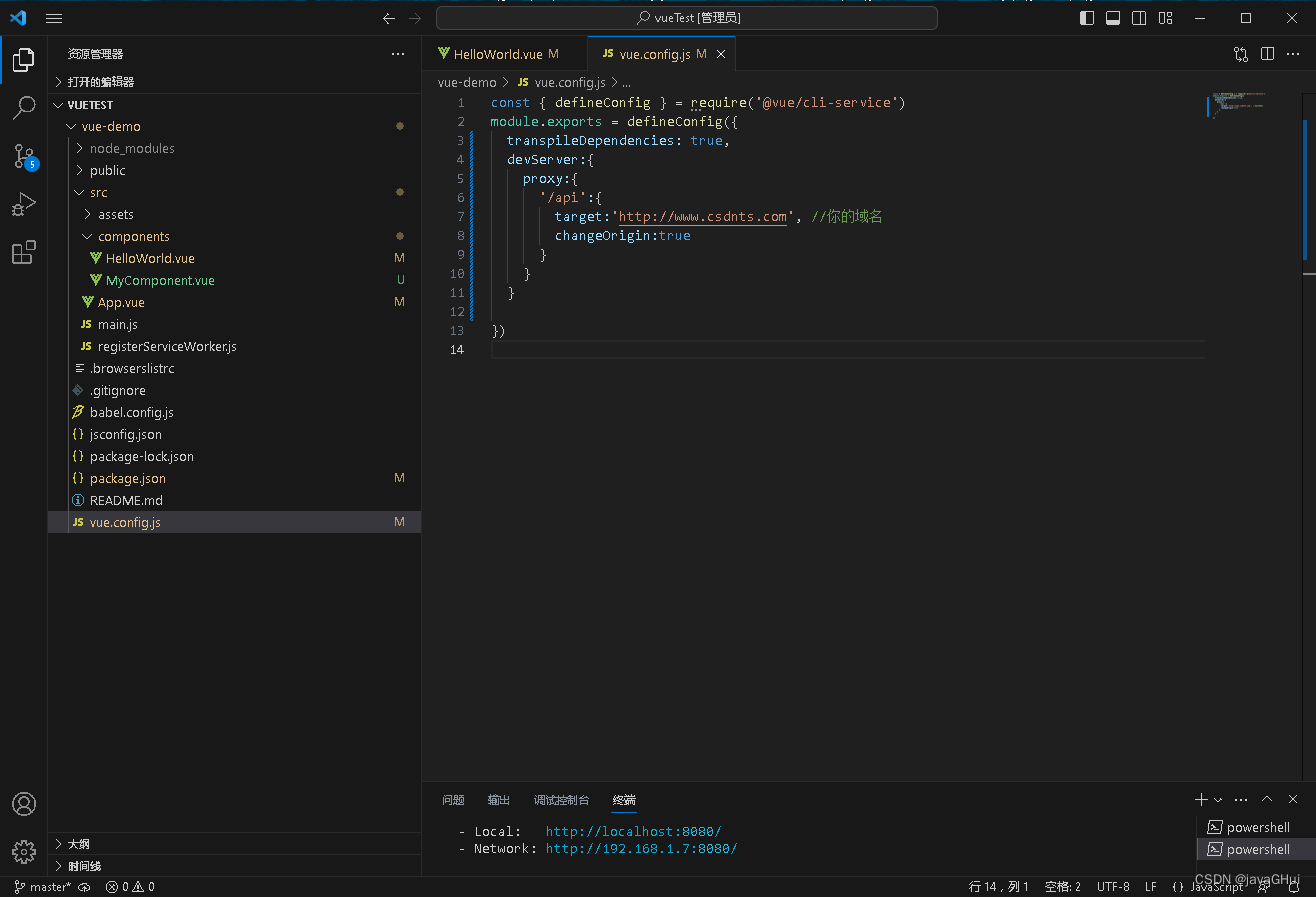
1.2、vue_cli创建项目
先全局安装了CLI,命令:npm install -g @vue/cli
检查版本:vue --version
创建项目:vue create vue_app(项目名)
可以自定义:Manually select features
选择需要的css、router等,然后一直回车,在项目终端npm run serve即可
二、组合式API(基于setup)
形式区别:Vue3采用组合式API;Vue2采用选项式API 。
组合式API:将同一个逻辑关注点的相关代码收集在一起。
组件被创建之前执行,不需要使用this,this不会指向实例。
2.1、ref
响应式变量:通过引入ref定义响应式变量,ref返回带有value属性的对象
在函数里进行修改时要加.value
2.2、reactive
响应式的引用类型:通过引入reactive定义引用类型的数据
2.3、toRefs
因为:ES6扩展运算符进行解构会使得对象中的属性不是响应式
所以:通过引入toRefs(object)函数使解构后的数据重新获得响应式
vue2里是在data里进行定义,而vue3以上内容代码演示如下:
<script>
import { ref, reactive, toRefs } from "vue";
export default {
  setup() {
    // 非响应式(msg相关代码)
    let msg = "hello";
    console.log(msg);
    function changeMsg() {
      msg = "nihao";
      console.log(msg); //nihao,但是视图上不会改变
    }
    // 响应式(counter相关代码)
    // 通过引入ref定义响应式变量【counter=0】,ref返回带有value属性的对象
    let counter = ref(0);
    function changeCounter() {
      counter.value++; //视图上自加1
    }
    // 响应式(obj相关代码)
    // 通过引入reactive定义引用类型的数据
    let obj = reactive({
      name: "张三",
      age: "19",
      children: {
        son: "小宝贝",
      },
    });
    function changeObj() {
      obj.name = "李四"; //视图改变
      obj.children.name = "大王"; //视图改变
    }
    // ES6扩展运算符进行解构会使得对象中的属性不是响应式
    // 故:通过引入toRefs(object)使解构后的数据重新获得响应式
    return {
      msg,
      changeMsg,
      counter,
      changeCounter,
      obj,
      changeObj,
      ...toRefs(obj),
    };
  },
};
</script>
<template>
  <div>
    <h1>{{ msg }}</h1>
    <button @click="changeMsg">改变msg</button>
    <hr />
    <h1>{{ counter }}</h1>
    <button @click="changeCounter">改变counter</button>
    <hr />
    <h1>{{ obj.name }}</h1>
    <h1>{{ children.name }}</h1>    <!-- 一开始没出现,改变后才出现? -->
    <button @click="changeObj">改变name</button>
  </div>
</template>
2.4、watch和watchEffect
这两个写在setup之内,return之前
watch和watchEffect区别:
(1)语法:
watch(监听的响应式变量,回调函数)
watchEffect(回调函数)
(2)作用:
watch监听响应式变量,无法监听引用类型;
watchEffect监听引用类型,不需要指定监听属性,组件初始化时会自动收集依赖(执行一次回调),只要属性值发生改变,回调就会执行。
import {watch, watchEffect } from "vue";
watch(counter, (newVal, oldVal) => {
      console.log("newVal", newVal);
      console.log("oldVal", oldVal);
    });
watchEffect(() => {
      console.log(obj.name);
    });
2.5、computed
输出响应式变量xxx.value,引用类型不用加.value
import { ref,computed } from "vue";
    let Msg = ref("hello");
    let reverMsg = computed(() => {
      return Msg.value.split("").reverse().join("");
    });
    console.log(reverMsg.value); //olleh
2.6、生命周期钩子函数
在vue2基础上加个on;setup本身就相当于beforeCreate 和created;在页面初始化时,会执行onBeforeMount、onMounted;数据发生变化时,会执行onBeforeUpdate、onUpdated;销毁时执行onBeforeUnmount、onUnmounted。
import { onBeforeMount, onBeforeUpdate, onMounted, onUpdated } from "vue";
setup() {
onBeforeMount(() => {
console.log("onBeforeMount");//onBeforeMount
});
onMounted(() => {
console.log("onMounted");//onMounted
});
onBeforeUpdate(() => {
console.log("onBeforeUpdate");
});
onUpdated(() => {
console.log("onUpdated");
});
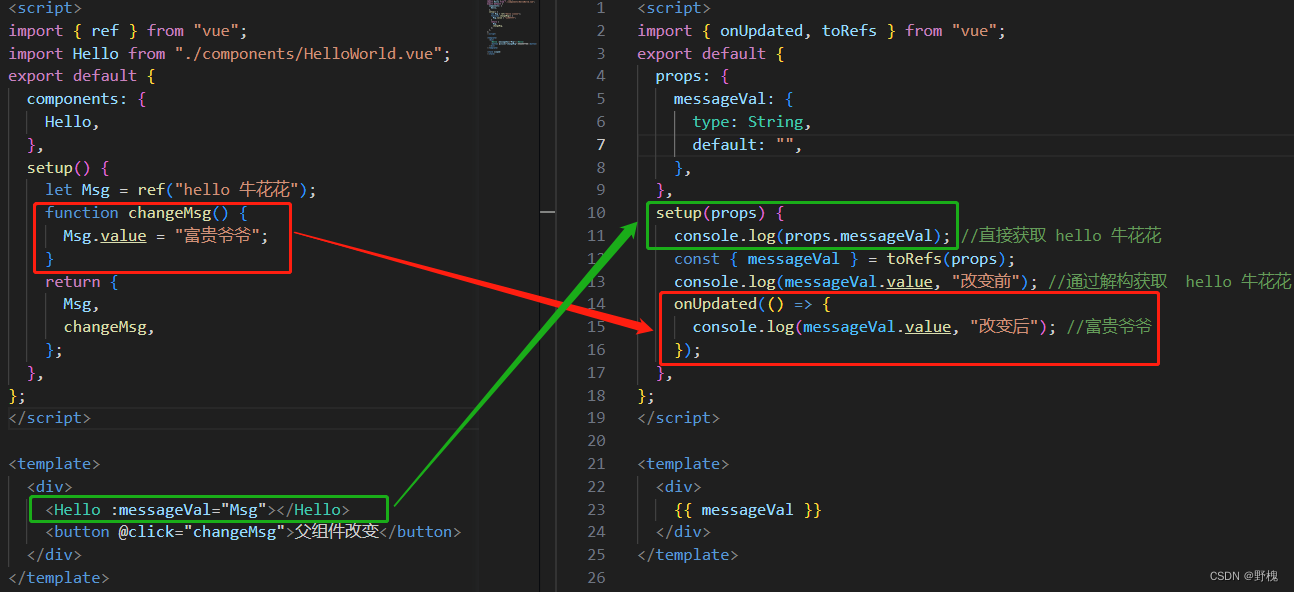
},2.7、setup(子组件)的第一个参数-props
父组件与子组件的传值和vue2一样,在子组件里面获取父组件传来的值,就是通过setup的第一个参数props获取。值改变了,就在onUpdated里面获取改变后的值。
2.8、setup(子组件)的第二个参数-context
2.8.1、context.attrs【$attrs】
Attribute 非响应式对象
console.log(context.attrs);
//{class: 'classBox', id: 'IdBox', __vInternal: 1}
给组件上添加class/id,在子组件这边可以拿到组件的类名,然后做一些样式操作
2.8.2、context.slots【$slots】
插槽 非响应式对象
比如:context.slots.default() 判断子组件标签类型
2.8.3、context.emit【$emit】
(子组件触发事件,等同于$emit)

2.8.4、context.expose
暴露公共 property,这样子组件本身就是变成暴露的内容,记得引入h
//通过expose暴露
context.expose({
counter,
sendParent,
});
//返回渲染函数 没有暴露数据
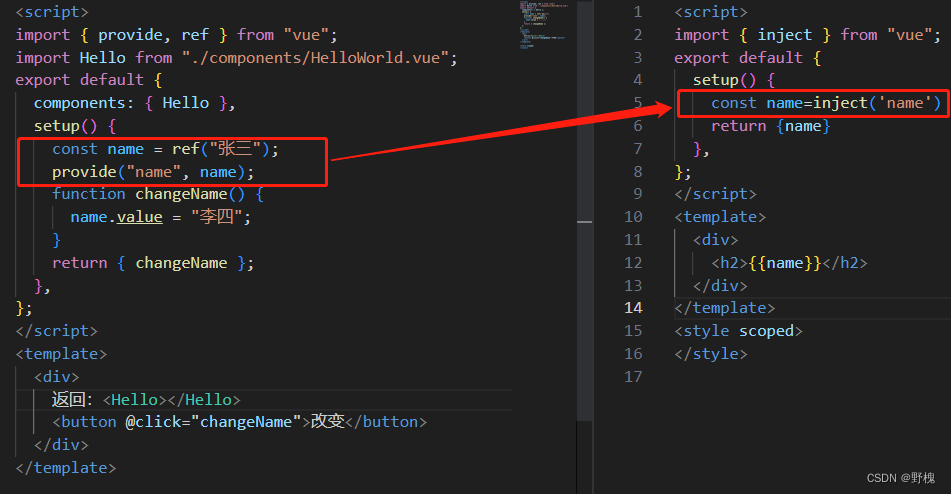
return () => h("div", counter.value);2.9、provide-inject
provide-inject用于跨组件传值,如果想要响应式改变,就要将值用rer/reactive进行定义
2.10、在单文件组件(SFC)中使用组合式API的编译时语法糖
总结:
<script setup>相当于setup() {}函数【顶层的绑定会被暴露给模板】
优势:引入组件,不需要注册;定义变量、方法不需要暴露。
<script setup>
// 顶层的绑定会被暴露给模板
import { ref } from "vue";
// 引入组件,不需要注册
import Hello from "./components/HelloWorld.vue";
// 定义变量、方法不需要暴露
const a = 20;
console.log(a);
const b = ref(10);
function addB() {
  b.value++;
}
</script>
<template>
  <div>
    <h2>{{ a }}</h2>
    <h2>{{ b }}</h2>
    <button @click="addB">改变B</button>
    <Hello/>
  </div>
</template>
三、路由Vue-Router
路由相关内容地址:入门 | Vue Router
3.1、引入和安装
npm install vue-router@4 或者 yarn add vue-router@4
在src包下新建router文件夹,在index.js里面引入配置的路径
import { createRouter, createWebHashHistory } from 'vue-router'
// 1. 定义路由组件.也可以从其他文件导入
import Home from '../views/HomeView.vue'
import User from '../views/UserView.vue'
// 2. 定义一些路由,每个路由都需要映射到一个组件。
const routes = [
    { path: '/', component: Home },
    { path: '/user', component: User },
]
// 3. 创建路由实例并传递 `routes` 配置
const router = createRouter({
    // 4. 内部提供了 history 模式的实现。为了简单起见,我们在这里使用 hash 模式。
    history: createWebHashHistory(),
    routes, // `routes: routes` 的缩写
})
export default router
main.js中进行挂载
import { createApp } from 'vue'
import './style.css'
import App from './App.vue'
import router from './router'
const app = createApp(App)
app.use(router)
app.mount('#app')
路由跳转运用:
<router-link to="/">Go Home</router-link>
<router-link to="/user">Go User</router-link>
    <!-- 路由出口 占位符 -->
    <!-- 相当于组件 路由匹配到的内容页面将渲染在这里 -->
<router-view></router-view>
3.2、带参数的动态路由匹配
路径参数 用冒号表示 { path: '/user/:id', component: User }
<router-link to="/user/1234">Go User</router-link>
页面获取参数:
Vue2: 在mounted里面通过 this.$route.params.xx 获取
vue3:引入useRoute,通过useRoute().params.xx获取
<script setup>
import { useRoute } from "vue-router";
console.log(useRoute().params.id);
</script>
3.3、路由正则与重复参数
404页面:
{ path: '/:path(.*)', component: NotFound },//使用正则,匹配任意的路径,一般放最后
参数限制:
(1)动态路由的参数一定是数字:{ path: '/about/:id(\\d+)', component: About };
(2)多个参数:{ path: '/about/:id+', component: About };
(3)参数可有可无,可以重复添加:{ path: '/about/:id*', component: About };
(4)参数可有可无,不可以重复添加:{ path: '/about/:id?', component: About };
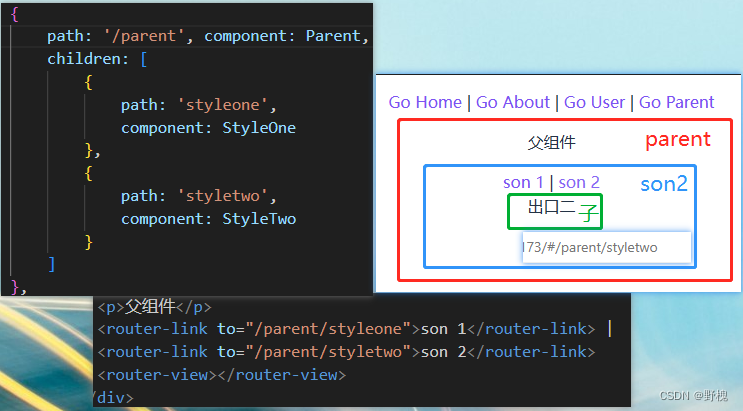
3.4、嵌套路由与重定向
children里面写要嵌套的路由。
{path: '/',redirect: '/home' //重定向。下面肯定有这个路径},
{ path: '/home', component: Home },
3.5、替换页面和堆栈中的前进后退(js跳转)
纯js跳转与带对象跳转:path+query;name+params
页面接收:this.$route.query.name。。。
this.$router.push("/xxx");
this.$router.push({
        path: "/xxx",
        query: {
          name: "zhangsan",
        },
      });
this.$router.push({
        name: "xxx",
        params: {
          name: "zhangsan",
        },
      });
//replace:true  替换当前页面
this.$router.replace({
        path: "/xxx",
        query: {
          name: "zhangsan",
        },
});this.$router.go(xx) //正值为前进,负值为后退;
this.$router.back() //后退,等于go(-1);
this.$router.forword() //前进,等于go(1);
3.6、路由组件传参
defineProps

3.7、路由懒加载
路由守卫同vue2
将import ShopTwo from '../views/shop/ShopTwo.vue'
替换成const ShopTwo =()=>import("../views/shop/ShopTwo.vue")
达到"用到它时再加载"的效果
四、pinia
4.1、安装
pinia官网地址:Pinia | The intuitive store for Vue.js
下载:npm install pinia
在main.js创建一个pinia实例:

4.2、Option Store与Setup Store的定义与使用
import { defineStore } from 'pinia'
// option store
export const useAgeStore = defineStore('dingding', {
    state: () => {//相当于data属性
        return { age: 30 }
    },
    getters: {//相当于computed属性
        gettersAge(state) {
            return state.age + 5
        }
    },
    actions: {//相当于methods属性
        addAge() {
            this.age++;//this指向对应的store仓库
        }

    }
})
import { defineStore } from 'pinia'
import { ref, computed } from 'vue'
// setup store
export const useCounterStore = defineStore('main', () => {
const counter = ref(30);//state
const gettersCounter = computed(() => {//getters
return counter.value + 5
})
function addCounter() {//actions
counter.value++;
}
return { counter, gettersCounter, addCounter }
})使用:
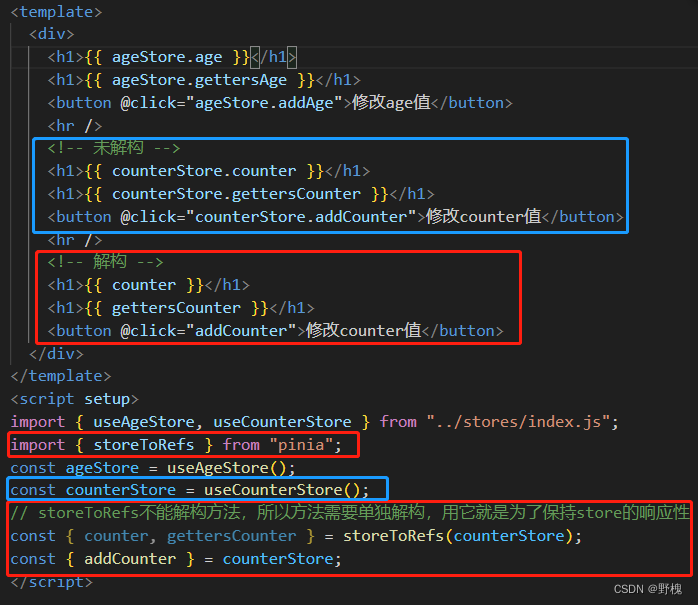
4.3、State的基本使用
为了完整类似推理,推荐使用箭头函数,在Pinia中,state被定义为一个返回初始状态的函数,这使得Pinia可以同时支持服务端和客户端。data(){return{}}防止数据污染(针对于服务端)。
<button @click="changeAge">修改age值</button>
<script setup>
import { useAgeStore } from "../stores/index.js";
const ageStore = useAgeStore();
// 修改state中的状态
function changeAge() {
  // 方式一 直接修改
  ageStore.age++;
  ageStore.name = "张三丰";
  // 方式二 批量修改 $patch(对象) 建议使用
  ageStore.$patch({
    age: 40,
    name: "张三丰",
    arr: [...ageStore.arr, 5],
  });
  // 方式三 批量修改 $patch(函数) 强烈推荐
  ageStore.$patch((state) => {
    state.age = 40;
    state.name = "张三丰";
    state.arr.push(8);
  });
  // 方式四:在actions里面进行修改
}
</script>
=============store中的state===================
 state: () => {//相当于data属性
        return { age: 30, name: '王富贵', arr: [1, 2, 3] }
    },
扩展:(1)重置state: xx.$reset();
(2)监听state: xx.$subscribe();
4.5、Getter的基本使用
    getters: {//相当于computed属性
        gettersAge(state) {
            return state.age + 5
        },
        // 通过this访问其他的getters,注意:不能使用箭头函数
        gettersName(state) {
            return this.gettersAge + state.name
        },
        // 向getters传递参数,返回函数的方式接收参数,和普通函数一样,没有缓存的作用
        gettersAge(state) {
            return (data) => state.age + data
        },
        // 访问其他的store中的getters
        gettersAge(state) {
            const counterStore = useCounterStore()
            return state.age + counterStore.gettersCounter
        },
    },
4.6、Action的基本使用
    actions: {//相当于methods属性,既可以处理同步又可以处理异步
        addAge() {
            this.age++;//this指向对应的store仓库
        },
        // 访问其他store中的actions
        async getList() {
            const counterStore = useCounterStore()
            if (counterStore.addCounter()) {
                let res = await axios.get('http://xxx').then(res => {
                    console.log(res);
                })
                console.log(res);
            }
        }
    }
4.7、Pinia与vuex的区别
(1)Pinia搭配TS一起使用时,有非常可靠的类型推断支持;
(2)Pinia没有mutations,而actions的使用不同,在actions中可以处理同步也可以处理异步,getters的使用是一致的,state与vue2中data是相似的;
(3)Pinia没有总入口全是模块化,需要定义模块名称,当多个模块需要协作的时候,需要引入多个模块;vuex是有总入口的,在使用模块化的时候不需要引入多个模块;
(4)Pinia在修改状态的时候不需要通过其他api,vuex需要通过commit、dispatch去修改,所以在语法上比vuex更容易理解和使用,灵活;
(5)Pinia就是更好的vuex,建议在项目中可以直接使用它了,尤其是使用了TS的项目。