前言
一些老的、Mini 的 ARM 开发板上没有预留网口,这样在调试升级内核或应用程序时很不方便。纵使有串口下载工具,但其速度也是慢地捉急。这种情况下,使用其它接口来扩展出一个网口无疑是一个比较好的方法。
ENC28J60 就是一个使用 SPI 接口来扩展网口的模块,今天我们就来演示下在树莓派上如何使用 ENC28J60。
环境
硬件:树莓派3b+、ENC28J60
软件:buildroot、kernel-5.10.92
摸索
驱动
既然想要使用 ENC28J60,那么肯定得有一份它的驱动程序。
作为一款广泛使用的模块,内核理应有它的驱动程序,搜一下
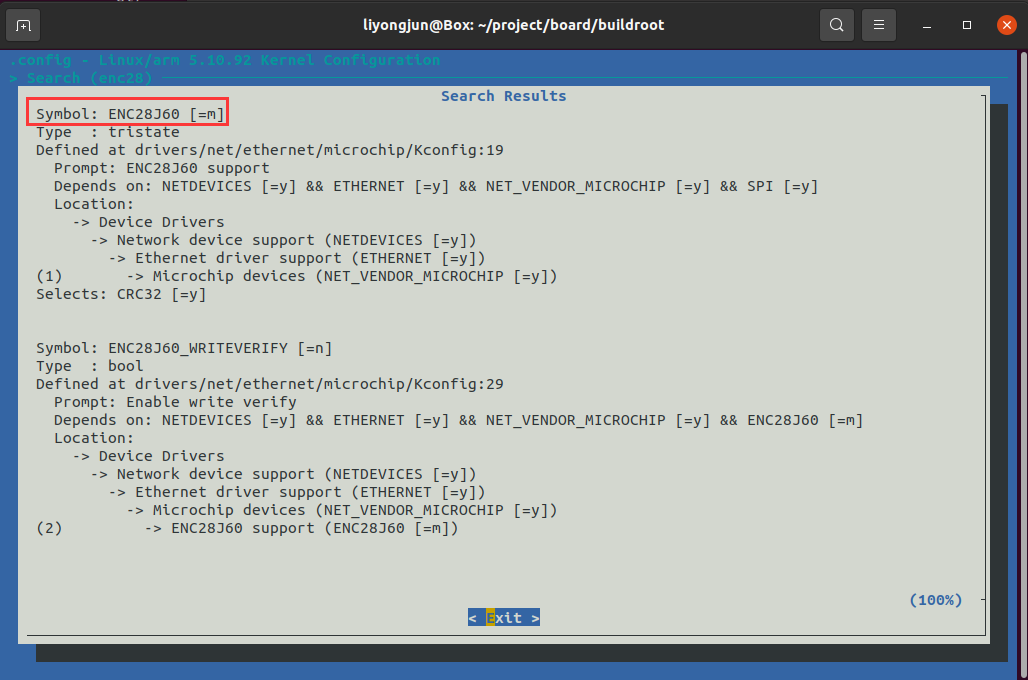
果然,内核有它的驱动程序,且其已经被编译成了内核模块:
liyongjun@Box:~/project/board/buildroot$ find RPi3/build/linux-custom/drivers/ -name "enc28j60.ko"
RPi3/build/linux-custom/drivers/net/ethernet/microchip/enc28j60.ko
硬件
有了驱动,接下来就要看硬件如何连接了。
知道是连 SPI 接口,但是 SPI 接口有 SPI0、SPI1、SPI2 等,要连哪个呢?另外还有 CS、INT 引脚要连接树莓派的哪个引脚?
那就去看设备树。
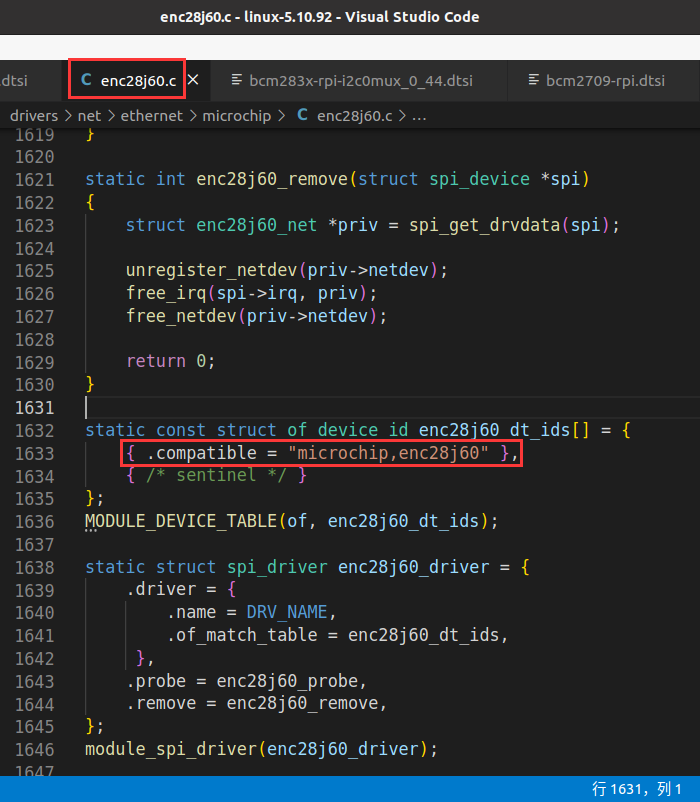
驱动的匹配属性为 “microchip,enc28j60”,那就在设备树中搜下该参数
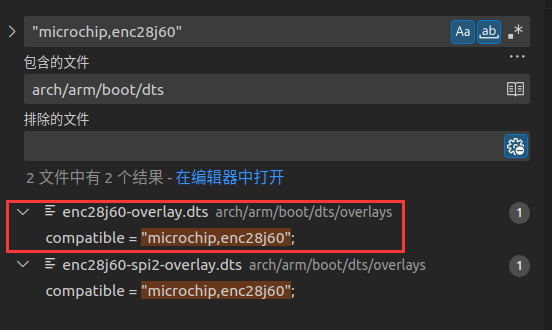
搜到了两个设备树文件,(Device Tree Overlays 相关知识请自行搜索,或查看这篇文章)
arch/arm/boot/dts/overlays/enc28j60-overlay.dts
arch/arm/boot/dts/overlays/enc28j60-spi2-overlay.dts
说明 enc28j60 可以接在不同的 SPI 接口上工作,这里我们研究 enc28j60-overlay.dts,即 SPI0。
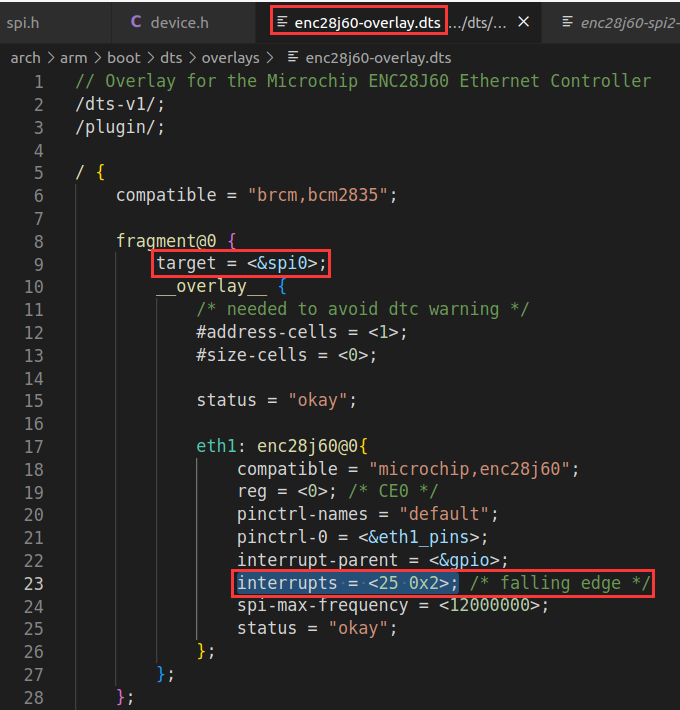
target = <&spi0>;:指定"插件"设备树的父节点是 spi0
所以,查看 SPI0 的引脚分配
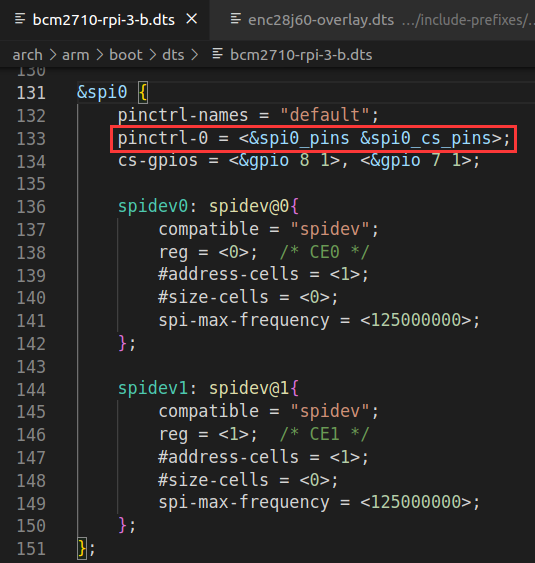
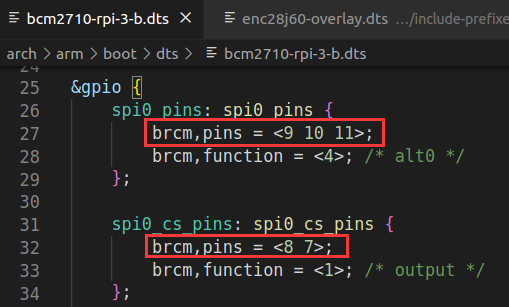
9、10、11 分别是 MISO、MOSI、SCK
8、7 是 CS 引脚,为什么配置两个引脚作为 CS 引脚这里表示不理解,本实验中选取 8 引脚作为 CS 引脚。
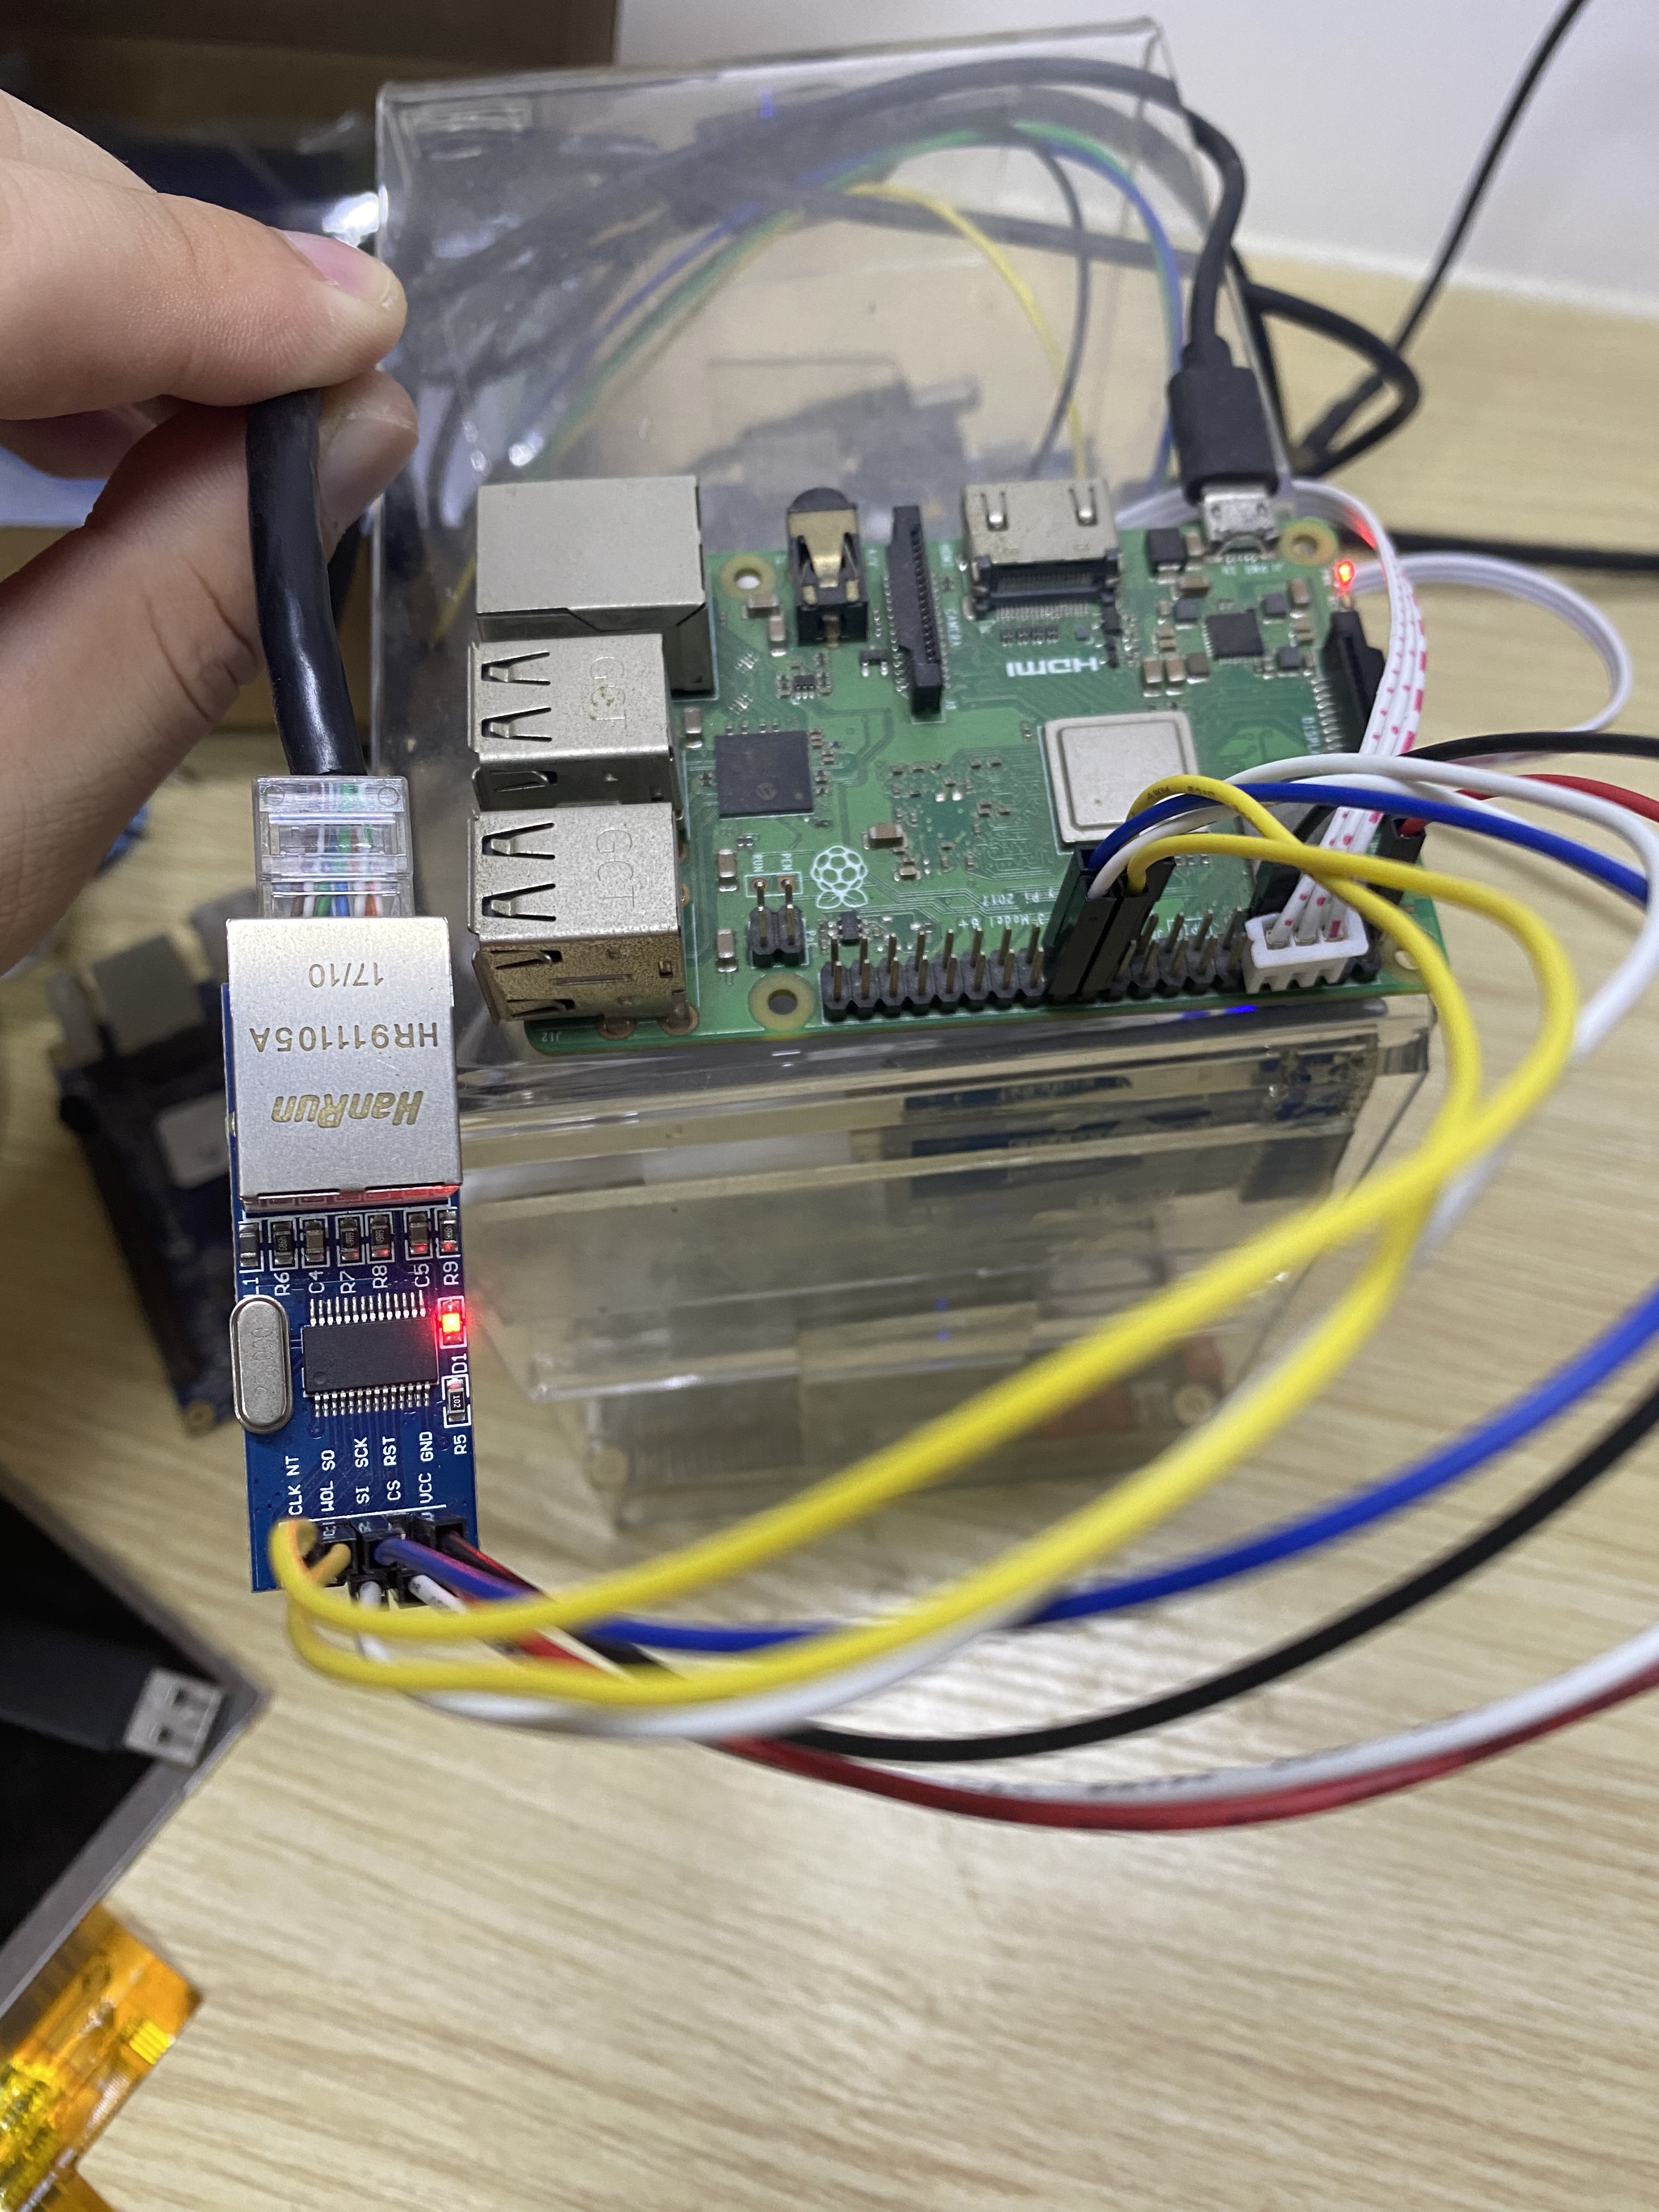
而 INT 引脚是在 enc28j60-overlay.dts 中配置的,使用 25 引脚,所以最终的硬件连接为
RPi3b+            ENC28J60
----------------------------
+3V3              VCC
GPIO10/MOSI       SI
GPIO9/MISO        SO
GPIO11/SCLK       SCK
GND               GND

GPIO25            INT
GPIO8/CE0#        CS
实物连接
配置
树莓派硬件比较特殊,开启 SPI 需要修改板子中的配置文件,如下
# mount /dev/mmcblk0p1 /boot
# cat /boot/config.txt
# Please note that this is only a sample, we recommend you to change it to fit
# your needs.
# You should override this file using BR2_PACKAGE_RPI_FIRMWARE_CONFIG_FILE.
# See http://buildroot.org/manual.html#rootfs-custom
# and http://elinux.org/RPiconfig for a description of config.txt syntax

start_file=start.elf
fixup_file=fixup.dat

kernel=zImage

# To use an external initramfs file
#initramfs rootfs.cpio.gz

# Disable overscan assuming the display supports displaying the full resolution
# If the text shown on the screen disappears off the edge, comment this out
disable_overscan=1

# How much memory in MB to assign to the GPU on Pi models having
# 256, 512 or 1024 MB total memory
gpu_mem_256=100
gpu_mem_512=100
gpu_mem_1024=100

# fixes rpi (3B, 3B+, 3A+, 4B and Zero W) ttyAMA0 serial console
dtoverlay=miniuart-bt

# enable autoprobing of Bluetooth driver without need of hciattach/btattach
dtoverlay=krnbt=on

dtparam=spi=on
dtoverlay=enc28j60
需要手动在 config.txt 文件末尾处添加
dtparam=spi=on
dtoverlay=enc28j60
这两个参数猜测是给 start.elf 使用的,因为在其文件中搜出了相应的字符串
liyongjun@Box:~/project/board/buildroot$ strings RPi3/images/rpi-firmware/start.elf | grep "dtparam"
dtparam: %s=%s
Unknown dtparam '%s' - ignored
dtparam
dtparams
liyongjun@Box:~/project/board/buildroot$ strings RPi3/images/rpi-firmware/start.elf | grep "dtoverlay"
dtoverlay
安装驱动
# insmod /lib/modules/5.10.92-v7/kernel/drivers/spi/spi-bcm2835.ko
# insmod /lib/modules/5.10.92-v7/kernel/drivers/net/ethernet/microchip/enc28j60.ko
[ 6214.374882] enc28j60 spi0.0: Ethernet driver 1.02 loaded
查看网口
# ifconfig -a
eth0      Link encap:Ethernet  HWaddr B8:27:EB:8A:BC:F4
          UP BROADCAST MULTICAST  MTU:1500  Metric:1
          RX packets:0 errors:0 dropped:0 overruns:0 frame:0
          TX packets:0 errors:0 dropped:0 overruns:0 carrier:0
          collisions:0 txqueuelen:1000
          RX bytes:0 (0.0 B)  TX bytes:0 (0.0 B)

eth1      Link encap:Ethernet  HWaddr 76:30:92:53:5E:E4
          BROADCAST MULTICAST  MTU:1500  Metric:1
          RX packets:0 errors:0 dropped:0 overruns:0 frame:0
          TX packets:0 errors:0 dropped:0 overruns:0 carrier:0
          collisions:0 txqueuelen:1000
          RX bytes:0 (0.0 B)  TX bytes:0 (0.0 B)
          Interrupt:200

lo        Link encap:Local Loopback
          inet addr:127.0.0.1  Mask:255.0.0.0
          UP LOOPBACK RUNNING  MTU:65536  Metric:1
          RX packets:0 errors:0 dropped:0 overruns:0 frame:0
          TX packets:0 errors:0 dropped:0 overruns:0 carrier:0
          collisions:0 txqueuelen:1000
          RX bytes:0 (0.0 B)  TX bytes:0 (0.0 B)
多出了一个 eth1,说明 ENC28J60 已经被成功驱动起来了
使能网卡
# ifconfig eth1 up
[ 6239.461085] enc28j60 spi0.0 eth1: link down
[ 6239.469427] enc28j60 spi0.0 eth1: normal mode
[ 6239.477886] enc28j60 spi0.0 eth1: multicast mode
# [ 6240.462780] enc28j60 spi0.0 eth1: link up - Half duplex

# ifconfig
eth0      Link encap:Ethernet  HWaddr B8:27:EB:8A:BC:F4
          UP BROADCAST MULTICAST  MTU:1500  Metric:1
          RX packets:0 errors:0 dropped:0 overruns:0 frame:0
          TX packets:0 errors:0 dropped:0 overruns:0 carrier:0
          collisions:0 txqueuelen:1000
          RX bytes:0 (0.0 B)  TX bytes:0 (0.0 B)

eth1      Link encap:Ethernet  HWaddr 76:30:92:53:5E:E4
          UP BROADCAST RUNNING MULTICAST  MTU:1500  Metric:1
          RX packets:4 errors:0 dropped:0 overruns:0 frame:0
          TX packets:0 errors:0 dropped:0 overruns:0 carrier:0
          collisions:0 txqueuelen:1000
          RX bytes:769 (769.0 B)  TX bytes:0 (0.0 B)
          Interrupt:200

lo        Link encap:Local Loopback
          inet addr:127.0.0.1  Mask:255.0.0.0
          UP LOOPBACK RUNNING  MTU:65536  Metric:1
          RX packets:0 errors:0 dropped:0 overruns:0 frame:0
          TX packets:0 errors:0 dropped:0 overruns:0 carrier:0
          collisions:0 txqueuelen:1000
          RX bytes:0 (0.0 B)  TX bytes:0 (0.0 B)
使能网卡后,并且插上网线,看到 eth1 已经处于 RUNNING 状态,但是还没有 IP,那就手动触发下 dhcpc
# udhcpc -i eth1
udhcpc: started, v1.36.0
[ 6256.013810] enc28j60 spi0.0 eth1: multicast mode
[ 6256.027504] enc28j60 spi0.0 eth1: multicast mode
udhcpc: broadcasting discover
udhcpc: broadcasting select for 192.168.31.239, server 192.168.31.1
udhcpc: lease of 192.168.31.239 obtained from 192.168.31.1, lease time 43200
[ 6256.824266] enc28j60 spi0.0 eth1: multicast mode
[ 6256.832197] enc28j60 spi0.0 eth1: multicast mode
deleting routers
adding dns 192.168.31.1

# ifconfig
eth0      Link encap:Ethernet  HWaddr B8:27:EB:8A:BC:F4
          UP BROADCAST MULTICAST  MTU:1500  Metric:1
          RX packets:0 errors:0 dropped:0 overruns:0 frame:0
          TX packets:0 errors:0 dropped:0 overruns:0 carrier:0
          collisions:0 txqueuelen:1000
          RX bytes:0 (0.0 B)  TX bytes:0 (0.0 B)

eth1      Link encap:Ethernet  HWaddr 76:30:92:53:5E:E4
          inet addr:192.168.31.239  Bcast:192.168.31.255  Mask:255.255.255.0
          UP BROADCAST RUNNING MULTICAST  MTU:1500  Metric:1
          RX packets:27 errors:0 dropped:1 overruns:0 frame:0
          TX packets:2 errors:0 dropped:0 overruns:0 carrier:0
          collisions:0 txqueuelen:1000
          RX bytes:4775 (4.6 KiB)  TX bytes:684 (684.0 B)
          Interrupt:200

lo        Link encap:Local Loopback
          inet addr:127.0.0.1  Mask:255.0.0.0
          UP LOOPBACK RUNNING  MTU:65536  Metric:1
          RX packets:0 errors:0 dropped:0 overruns:0 frame:0
          TX packets:0 errors:0 dropped:0 overruns:0 carrier:0
          collisions:0 txqueuelen:1000
          RX bytes:0 (0.0 B)  TX bytes:0 (0.0 B)
这样,eth1 获得了 IP 地址 192.168.31.239
ping 下外网试试
# ping www.baidu.com
PING www.baidu.com (180.101.50.242): 56 data bytes
64 bytes from 180.101.50.242: seq=0 ttl=53 time=9.520 ms
64 bytes from 180.101.50.242: seq=1 ttl=53 time=10.309 ms
64 bytes from 180.101.50.242: seq=2 ttl=53 time=9.635 ms
可以 ping 通,同时,插拔网线也有相应的 up/down 事件。
# [  106.197318] enc28j60 spi0.0 eth1: link up - Half duplex
#
# [  113.533593] enc28j60 spi0.0 eth1: link down
附录
# ethtool eth1
Settings for eth1:
	Supported ports: [ TP ]
	Supported link modes:   10baseT/Half 10baseT/Full
	Supported pause frame use: No
	Supports auto-negotiation: No
	Supported FEC modes: Not reported
	Advertised link modes:  Not reported
	Advertised pause frame use: No
	Advertised auto-negotiation: No
	Advertised FEC modes: Not reported
	Speed: 10Mb/s
	Duplex: Half
	Port: Twisted Pair
	PHYAD: 0
	Transceiver: internal
	Auto-negotiation: off
	MDI-X: Unknown
	Current message level: 0x00000036 (54)
			       probe link ifdown ifup
ENC28J60 是一款 10Mbps 速率的以太网 MAC+PHY 芯片,和单片机的通信接口为 SPI,SPI 最高时钟频率为 20MHz。
ENC28J60 支持半双工和全双工模式,但是不支持自动协商。在支持自动协商的网络环境中,ENC28J60 默认的工作模式是半双工模式。
黄色灯表示 Activity,即闪烁一次,代表有数据传输一次;绿色灯表示 Link up,即绿色灯常亮,代表网口正常工作。
性能测试(phy rate:10Mbps 半双工)
TCP
PS D:\Tools\iperf-3.0.11-win64> .\iperf3.exe -c 192.168.31.239
Connecting to host 192.168.31.239, port 5201
[  4] local 192.168.31.211 port 1648 connected to 192.168.31.239 port 5201
[ ID] Interval           Transfer     Bandwidth
[  4]   0.00-1.00   sec   896 KBytes  7.34 Mbits/sec
[  4]   1.00-2.00   sec   640 KBytes  5.24 Mbits/sec
[  4]   2.00-3.00   sec   768 KBytes  6.29 Mbits/sec
[  4]   3.00-4.00   sec   768 KBytes  6.29 Mbits/sec
[  4]   4.00-5.00   sec   768 KBytes  6.29 Mbits/sec
[  4]   5.00-6.00   sec   768 KBytes  6.29 Mbits/sec
[  4]   6.00-7.00   sec   640 KBytes  5.24 Mbits/sec
[  4]   7.00-8.00   sec   768 KBytes  6.29 Mbits/sec
[  4]   8.00-9.00   sec   768 KBytes  6.30 Mbits/sec
[  4]   9.00-10.00  sec   768 KBytes  6.29 Mbits/sec
- - - - - - - - - - - - - - - - - - - - - - - - -
[ ID] Interval           Transfer     Bandwidth
[  4]   0.00-10.00  sec  7.38 MBytes  6.19 Mbits/sec                  sender
[  4]   0.00-10.00  sec  7.19 MBytes  6.03 Mbits/sec                  receiver

iperf Done.
UDP
PS D:\Tools\iperf-3.0.11-win64> .\iperf3.exe -c 192.168.31.239 -b10M -u
Connecting to host 192.168.31.239, port 5201
[  4] local 192.168.31.211 port 63892 connected to 192.168.31.239 port 5201
[ ID] Interval           Transfer     Bandwidth       Total Datagrams
[  4]   0.00-1.00   sec  1.08 MBytes  9.03 Mbits/sec  138
[  4]   1.00-2.00   sec  1.20 MBytes  10.0 Mbits/sec  153
[  4]   2.00-3.00   sec  1.19 MBytes  9.95 Mbits/sec  152
[  4]   3.00-4.00   sec  1.20 MBytes  10.0 Mbits/sec  153
[  4]   4.00-5.00   sec  1.24 MBytes  10.4 Mbits/sec  159
[  4]   5.00-6.01   sec  1.15 MBytes  9.62 Mbits/sec  147
[  4]   6.01-7.01   sec  1.14 MBytes  9.57 Mbits/sec  146
[  4]   7.01-8.01   sec  1.15 MBytes  9.62 Mbits/sec  147
[  4]   8.01-9.00   sec  1.13 MBytes  9.57 Mbits/sec  145
[  4]   9.00-10.00  sec  1.14 MBytes  9.56 Mbits/sec  146
- - - - - - - - - - - - - - - - - - - - - - - - -
[ ID] Interval           Transfer     Bandwidth       Jitter    Lost/Total Datagrams
[  4]   0.00-10.00  sec  11.6 MBytes  9.74 Mbits/sec  0.548 ms  0/3 (0%)
[  4] Sent 3 datagrams

iperf Done.
驱动信息
# ethtool -i eth1
driver: enc28j60
version: 1.02
firmware-version:
expansion-rom-version:
bus-info: spi0.0
supports-statistics: no
supports-test: no
supports-eeprom-access: no
supports-register-dump: no
supports-priv-flags: no
