Cobbler介绍:
1)Cobbler是一个Linux服务器安装的服务,可以通过网络启动PXE的方式来快速安装、重装物理服务器和虚拟机,同时还可以管理DHCP、DNS等。
2)Cobbler 可以使用命令行的方式管理,也提供了基于Web的界面管理工具(cobbler-web),还提供了API接口,可以方便二次开发使用。
3)Cobbler是较早前的Kickstart的升级版本,优点是比较容易配置,还自带Web界面比较容易管理。
4)Cobbler内置了一个轻量级配置管理系统,但它也支持和其他配置管理系统集成,如Puppet。

Cobbler的配置结构基于一组注册的对象,每个对象表示一个与另一个实体相关联的实体。当一个对象指向另一个对象时,它就继承了被指向对象的数据,并可覆盖或添加更多特定信息。
发行版:表示一个操作系统。它承载了内核和initrd的信息,以及内核参数等其他数据。
配置文件:包含一个发型版,一个kickstart文件以及可能的存储库,还包括更多特定的内核参数等其他数据。
系统:表示要配给的机器。它还包括一个配置文件和一个镜像,IP地址和MAC地址,电源管理(地址、凭据、类型)以及更为专业的数据等信息。
镜像:可以替换一个保函不屑于此类别的文件的发型版对象(例如:无法分为内核和initrd的对象)。
Cobble集成的服务:
PXE服务支持
DHCP服务管理
DNS服务管理
电源管理
Kickstart服务支持
YUM仓库管理
TFTP
Apache
Cobbler的工作原理:

这个过程跟PXE和Kickstart的过程有点类似。
Cobbler安装:
说明:虚拟机网卡采用NAT模式或者仅主机模式,不要使用桥接模式,因为后面会搭建DHCP服务器,在同一个局域网多个DHCP服务器会引起冲突。VMware的NAT模式的DHCP服务也关闭,避免冲突。


环境准备:
关闭防火墙和Disabled SELINUX。
[root@vm1 network-scripts]# systemctl stop firewalld && systemctl disable firewalld
[root@vm1 network-scripts]#
[root@vm1 network-scripts]# sed -i 's/SELINUX=.*/SELINUX=disabled/g' /etc/selinux/config
[root@vm1 network-scripts]#
[root@vm1 network-scripts]# getenforce
Disabled
安装Cobbler:
安装epel源:
[root@vm1 network-scripts]# yum install -y epel-release
安装cobbler以及cobbler-web、tftp-server、dhcp、xinetd软件:
yum install -y cobbler cobbler-web tftp-server dhcp xinetd httpd启动cobbler和httpd,并设置开机自启动:
[root@vm1 network-scripts]# systemctl start httpd
[root@vm1 network-scripts]# systemctl start cobblerd
[root@vm1 network-scripts]# systemctl enable cobblerd
Created symlink from /etc/systemd/system/multi-user.target.wants/cobblerd.service to /usr/lib/systemd/system/cobblerd.service.
[root@vm1 network-scripts]# systemctl enable httpd
Created symlink from /etc/systemd/system/multi-user.target.wants/httpd.service to /usr/lib/systemd/system/httpd.service.
查看安装后的文件:
[root@cobbler ~]# rpm -ql cobbler
/etc/cobbler                  # 配置文件目录
/etc/cobbler/settings         # cobbler主配置文件,这个文件是YAML格式,Cobbler是python写的程序。
/etc/cobbler/dhcp.template    # DHCP服务的配置模板
/etc/cobbler/tftpd.template   # tftp服务的配置模板
/etc/cobbler/rsync.template   # rsync服务的配置模板
/etc/cobbler/iso              # iso模板配置文件目录
/etc/cobbler/pxe              # pxe模板文件目录
/etc/cobbler/power            # 电源的配置文件目录
/etc/cobbler/users.conf       # Web服务授权配置文件
/etc/cobbler/users.digest     # 用于web访问的用户名密码配置文件
/etc/cobbler/dnsmasq.template # DNS服务的配置模板
/etc/cobbler/modules.conf     # Cobbler模块配置文件
/var/lib/cobbler              # Cobbler数据目录
/var/lib/cobbler/config       # 配置文件
/var/lib/cobbler/kickstarts   # 默认存放kickstart文件
/var/lib/cobbler/loaders      # 存放的各种引导程序
/var/www/cobbler              # 系统安装镜像目录
/var/www/cobbler/ks_mirror    # 导入的系统镜像列表
/var/www/cobbler/images       # 导入的系统镜像启动文件
/var/www/cobbler/repo_mirror  # yum源存储目录
/var/log/cobbler              # 日志目录
/var/log/cobbler/install.log  # 客户端系统安装日志
/var/log/cobbler/cobbler.log  # cobbler日志
配置cobbler:
检查Cobbler的配置,如果看不到下面的结果,再次重启Cobbler:
[root@vm1 ~]# cobbler check
The following are potential configuration items that you may want to fix:

1 : The 'server' field in /etc/cobbler/settings must be set to something other than localhost, or kickstarting features will not work.  This should be a resolvable hostname or IP for the boot server as reachable by all machines that will use it.
2 : For PXE to be functional, the 'next_server' field in /etc/cobbler/settings must be set to something other than 127.0.0.1, and should match the IP of the boot server on the PXE network.
3 : change 'disable' to 'no' in /etc/xinetd.d/tftp
4 : Some network boot-loaders are missing from /var/lib/cobbler/loaders.  If you only want to handle x86/x86_64 netbooting, you may ensure that you have installed a *recent* version of the syslinux package installed and can ignore this message entirely.  Files in this directory, should you want to support all architectures, should include pxelinux.0, menu.c32, elilo.efi, and yaboot.
5 : enable and start rsyncd.service with systemctl
6 : debmirror package is not installed, it will be required to manage debian deployments and repositories
7 : ksvalidator was not found, install pykickstart
8 : The default password used by the sample templates for newly installed machines (default_password_crypted in /etc/cobbler/settings) is still set to 'cobbler' and should be changed, try: "openssl passwd -1 -salt 'random-phrase-here' 'your-password-here'" to generate new one
9 : fencing tools were not found, and are required to use the (optional) power management features. install cman or fence-agents to use them

Restart cobblerd and then run 'cobbler sync' to apply changes.
看到上面的问题,然后一个一个地进行解决,先进行设置为可以动态配置,也可以直接修改配置文件。
[root@vm1 ~]# sed -ri '/allow_dynamic_settings:/c\allow_dynamic_settings: 1' /etc/cobbler/settings
[root@vm1 ~]# grep allow_dynamic_settings /etc/cobbler/settings
allow_dynamic_settings: 1
[root@vm1 ~]# systemctl restart cobblerd
1. server
[root@vm1 ~]# cobbler setting edit --name=server --value=192.168.17.3
[root@vm1 ~]#

2. next_server
[root@vm1 ~]# cobbler setting edit --name=next_server --value=192.168.17.3
[root@vm1 ~]#

3. tftp和xinetd
[root@vm1 ~]# sed -ri '/disable/c\disable = no' /etc/xinetd.d/tftp
[root@vm1 ~]#
[root@vm1 ~]# systemctl restart xinetd
[root@vm1 ~]# systemctl enable xinetd


4. boot-loaders
[root@vm1 ~]# cobbler get-loaders   # 这个操作提示No such command: get-loaders。cobbler给出了其他解决办法,就是安装syslinux。我们系统已经安装syslinux,所以这边可以通过。

5. rsyncd
[root@vm1 ~]# systemctl start rsyncd
[root@vm1 ~]# systemctl enable rsyncd

6. debmirror [optional]
# 这个是可选项的,可以忽略。这里就忽略了

7. pykickstart
[root@vm1 ~]# yum -y install pykickstart

8. default_password_crypted  #注意:这里设置的密码,也就是后面安装完系统的初始化登录密码
[root@vm1 ~]# openssl passwd -1 -salt `openssl rand -hex 4` 'admin'
$1$a11e9369$CmvARPtsJvtZ04xqK6sZg/
[root@vm1 ~]#
[root@vm1 ~]# cobbler setting edit --name=default_password_crypted --value='$1$a11e9369$CmvARPtsJvtZ04xqK6sZg/'

9. fencing tools [optional]
[root@vm1 ~]# yum -y install fence-agents
sed的用法,注意下,我们可以学习应用到PXE-Kickstart的配置中去。
解决完之后,再次查看:
[root@vm1 ~]# cobbler check
The following are potential configuration items that you may want to fix:

1 : Some network boot-loaders are missing from /var/lib/cobbler/loaders.  If you only want to handle x86/x86_64 netbooting, you may ensure that you have installed a *recent* version of the syslinux package installed and can ignore this message entirely.  Files in this directory, should you want to support all architectures, should include pxelinux.0, menu.c32, elilo.efi, and yaboot.
2 : debmirror package is not installed, it will be required to manage debian deployments and repositories

Restart cobblerd and then run 'cobbler sync' to apply changes.
我们看下第一个问题该如何解决:
我们这段英文提示信息,是说确认下是否安装了最近新版本的syslinux。
然后执行安装syslinux。
[root@vm1 ~]# yum install -y syslinux
Loaded plugins: fastestmirror
Repository cr is listed more than once in the configuration
Repository fasttrack is listed more than once in the configuration
Loading mirror speeds from cached hostfile
 * epel: mirrors.bfsu.edu.cn
Package syslinux-4.05-15.el7.x86_64 already installed and latest version
那第一个问题,我们可以跳过。
配置DHCP:
[root@vm1 ~]# cobbler setting edit --name=manage_dhcp --value=1
[root@vm1 ~]# vim /etc/cobbler/dhcp.template

同步Cobbler的配置:
通过Cobbler配置,它会根据配置自动修改dhcp等服务。
[root@vm1 ~]# cobbler sync
task started: 2023-08-10_180857_sync
task started (id=Sync, time=Thu Aug 10 18:08:57 2023)
running pre-sync triggers
cleaning trees
removing: /var/lib/tftpboot/pxelinux.cfg/default
removing: /var/lib/tftpboot/grub/images
removing: /var/lib/tftpboot/grub/efidefault
removing: /var/lib/tftpboot/s390x/profile_list
copying bootloaders
copying distros to tftpboot
copying images
generating PXE configuration files
generating PXE menu structure
rendering DHCP files
generating /etc/dhcp/dhcpd.conf
rendering TFTPD files
generating /etc/xinetd.d/tftp
cleaning link caches
running post-sync triggers
running python triggers from /var/lib/cobbler/triggers/sync/post/*
running python trigger cobbler.modules.sync_post_restart_services
running: dhcpd -t -q
received on stdout:
received on stderr:
running: service dhcpd restart
received on stdout:
received on stderr: Redirecting to /bin/systemctl restart dhcpd.service

running shell triggers from /var/lib/cobbler/triggers/sync/post/*
running python triggers from /var/lib/cobbler/triggers/change/*
running python trigger cobbler.modules.manage_genders
running python trigger cobbler.modules.scm_track
running shell triggers from /var/lib/cobbler/triggers/change/*
*** TASK COMPLETE ***
这个时候创建一个虚拟机可以获得如下信息,
通过DHCP服务,可以分配到IP地址,但是从tftp服务器中获取不到系统引导文件。
没有镜像选择,只能从本地启动:

Cobbler命令帮助:
| 命令 | 说明 |
|---|---|
| cobbler check | 核对当前设置是否有问题 |
| cobbler list | 列出所有的cobbler元素 |
| cobbler report | 列出元素的详细信息 |
| cobbler sync | 同步配置到数据目录,更改配置最好都执行一下 |
| cobbler reposync | 同步yum仓库 |
| cobbler distro | 查看导入的发行版系统信息 |
| cobbler system | 查看添加的系统信息 |
| cobbler profile | 查看配置信息 |
Cobbler配置安装Centos7.0
我这边的Cobbler服务器就是CentOS7的系统,所以直接挂载/dev/cdrom即可。
1)创建挂载点,并进行挂载:
[root@vm1 ~]# mkdir /centos7

[root@vm1 ~]# mount -o loop /dev/cdrom /centos7
2)查看挂载后的目录:
[root@vm1 centos7]# ll
total 110
-rw-r--r--  2 root root    14 Oct 30  2020 CentOS_BuildTag
drwxr-xr-x  3 root root  2048 Oct 27  2020 EFI
-rw-rw-r-- 15 root root   227 Aug 30  2017 EULA
-rw-rw-r-- 15 root root 18009 Dec 10  2015 GPL
drwxr-xr-x  3 root root  2048 Oct 27  2020 images
drwxr-xr-x  2 root root  2048 Nov  3  2020 isolinux
drwxr-xr-x  2 root root  2048 Oct 27  2020 LiveOS
drwxr-xr-x  2 root root 73728 Nov  3  2020 Packages
drwxr-xr-x  2 root root  4096 Nov  3  2020 repodata
-rw-rw-r-- 15 root root  1690 Dec 10  2015 RPM-GPG-KEY-CentOS-7
-rw-rw-r-- 15 root root  1690 Dec 10  2015 RPM-GPG-KEY-CentOS-Testing-7
-r--r--r--  1 root root  2883 Nov  3  2020 TRANS.TBL
3)导入镜像:
[root@vm1 centos7]# cobbler import --path=/centos7 --name=centos7.9 --arch=x86_64
task started: 2023-08-10_201348_import
task started (id=Media import, time=Thu Aug 10 20:13:48 2023)
Found a candidate signature: breed=suse, version=opensuse15.0
Found a candidate signature: breed=suse, version=opensuse15.1
Found a candidate signature: breed=redhat, version=rhel6
Found a candidate signature: breed=redhat, version=rhel7
Found a matching signature: breed=redhat, version=rhel7
Adding distros from path /var/www/cobbler/ks_mirror/centos7.9-x86_64:
creating new distro: centos7.9-x86_64
trying symlink: /var/www/cobbler/ks_mirror/centos7.9-x86_64 -> /var/www/cobbler/links/centos7.9-x86_64
creating new profile: centos7.9-x86_64
associating repos
checking for rsync repo(s)
checking for rhn repo(s)
checking for yum repo(s)
starting descent into /var/www/cobbler/ks_mirror/centos7.9-x86_64 for centos7.9-x86_64
processing repo at : /var/www/cobbler/ks_mirror/centos7.9-x86_64
need to process repo/comps: /var/www/cobbler/ks_mirror/centos7.9-x86_64
looking for /var/www/cobbler/ks_mirror/centos7.9-x86_64/repodata/*comps*.xml
Keeping repodata as-is :/var/www/cobbler/ks_mirror/centos7.9-x86_64/repodata
*** TASK COMPLETE ***
4)查看导入后镜像信息:
[root@vm1 centos7]# cobbler distro report --name=centos7.9-x86_64
Name                           : centos7.9-x86_64
Architecture                   : x86_64
TFTP Boot Files                : {}
Breed                          : redhat
Comment                        :
Fetchable Files                : {}
Initrd                         : /var/www/cobbler/ks_mirror/centos7.9-x86_64/images/pxeboot/initrd.img
Kernel                         : /var/www/cobbler/ks_mirror/centos7.9-x86_64/images/pxeboot/vmlinuz
Kernel Options                 : {}
Kernel Options (Post Install)  : {}
Kickstart Metadata             : {'tree': 'http://@@http_server@@/cblr/links/centos7.9-x86_64'}
Management Classes             : []
OS Version                     : rhel7
Owners                         : ['admin']
Red Hat Management Key         : <<inherit>>
Red Hat Management Server      : <<inherit>>
Template Files                 : {}

看老师的一段配置信息。
5)查看profile信息:
[root@vm1 centos7]# cobbler profile report --name=centos7.9-x86_64
Name                           : centos7.9-x86_64
TFTP Boot Files                : {}
Comment                        :
DHCP Tag                       : default
Distribution                   : centos7.9-x86_64
Enable gPXE?                   : 0
Enable PXE Menu?               : 1
Fetchable Files                : {}
Kernel Options                 : {}
Kernel Options (Post Install)  : {}
Kickstart                      : /var/lib/cobbler/kickstarts/sample_end.ks
Kickstart Metadata             : {}
Management Classes             : []
Management Parameters          : <<inherit>>
Name Servers                   : []
Name Servers Search Path       : []
Owners                         : ['admin']
Parent Profile                 :
Internal proxy                 :
Red Hat Management Key         : <<inherit>>
Red Hat Management Server      : <<inherit>>
Repos                          : []
Server Override                : <<inherit>>
Template Files                 : {}
Virt Auto Boot                 : 1
Virt Bridge                    : xenbr0
Virt CPUs                      : 1
Virt Disk Driver Type          : raw
Virt File Size(GB)             : 5
Virt Path                      :
Virt RAM (MB)                  : 512
Virt Type                      : kvm
6)新建一个centos7.ks文件,然后文件内容如下:
[root@vm1 kickstarts]# cat centos7.ks
# This kickstart file should only be used with EL > 5 and/or Fedora > 7.
# For older versions please use the sample.ks kickstart file.
# Install OS instead of upgrade
install
# Use text mode install
text
# System keyboard
keyboard us
# System language
lang en_US
# System timezone
timezone  Asia/ShangHai
#Root password
#rootpw --plaintext 123456
rootpw --iscrypted $default_password_crypted
# System authorization information
auth  --useshadow  --enablemd5
# Firewall configuration
firewall --disabled
# SELinux configuration
selinux --disabled
# Use network installation
url --url=$tree

# Clear the Master Boot Record
zerombr
# System bootloader configuration
bootloader --location=mbr
# Partition clearing information
clearpart --all --initlabel
part /boot --fstype=xfs --size=500
part swap --fstype=swap --size=2048
part / --fstype=xfs --grow --size=200

# If any cobbler repo definitions were referenced in the kickstart profile, include them here.
$yum_repo_stanza
# Network information
$SNIPPET('network_config')
# Do not configure the X Window System
skipx
# Run the Setup Agent on first boot
firstboot --disable
# Reboot after installation
reboot


%pre
$SNIPPET('log_ks_pre')
$SNIPPET('kickstart_start')
$SNIPPET('pre_install_network_config')
# Enable installation monitoring
$SNIPPET('pre_anamon')
%end

%packages
$SNIPPET('func_install_if_enabled')
@core

%end

%post --nochroot
$SNIPPET('log_ks_post_nochroot')
%end

%post
$SNIPPET('log_ks_post')
# Start yum configuration
$yum_config_stanza
# End yum configuration
$SNIPPET('post_install_kernel_options')
$SNIPPET('post_install_network_config')
$SNIPPET('func_register_if_enabled')
$SNIPPET('download_config_files')
$SNIPPET('koan_environment')
$SNIPPET('redhat_register')
$SNIPPET('cobbler_register')
# Enable post-install boot notification
$SNIPPET('post_anamon')
# Start final steps
$SNIPPET('kickstart_done')
# End final steps

sed -ri "/^#UseDNS/c\UseDNS no" /etc/ssh/sshd_config
sed -ri "/^GSSAPIAuthentication/c\GSSAPIAuthentication no" /etc/ssh/sshd_config
%end
说明:root密码就是开始的时候设置的密码,admin。
7)编辑centos7镜像所使用的kickstart文件:
[root@vm1 kickstarts]# cobbler profile edit --name=centos7.9-x86_64 --kickstart=/var/lib/cobbler/kickstarts/centos7.ks


[root@vm1 kickstarts]# cobbler profile report --name=centos7.9-x86_64
Name                           : centos7.9-x86_64
TFTP Boot Files                : {}
Comment                        :
DHCP Tag                       : default
Distribution                   : centos7.9-x86_64
Enable gPXE?                   : 0
Enable PXE Menu?               : 1
Fetchable Files                : {}
Kernel Options                 : {}
Kernel Options (Post Install)  : {}
Kickstart                      : /var/lib/cobbler/kickstarts/centos7.ks
Kickstart Metadata             : {}
Management Classes             : []
Management Parameters          : <<inherit>>
Name Servers                   : []
Name Servers Search Path       : []
Owners                         : ['admin']
Parent Profile                 :
Internal proxy                 :
Red Hat Management Key         : <<inherit>>
Red Hat Management Server      : <<inherit>>
Repos                          : []
Server Override                : <<inherit>>
Template Files                 : {}
Virt Auto Boot                 : 1
Virt Bridge                    : xenbr0
Virt CPUs                      : 1
Virt Disk Driver Type          : raw
Virt File Size(GB)             : 5
Virt Path                      :
Virt RAM (MB)                  : 512
Virt Type                      : kvm

[root@vm1 kickstarts]# cobbler profile report --name=centos7.9-x86_64 |grep Kickstart
Kickstart                      : /var/lib/cobbler/kickstarts/centos7.ks
Kickstart Metadata             : {}
8)再次同步Cobbler配置:
[root@vm1 kickstarts]# cobbler sync
task started: 2023-08-10_203333_sync
task started (id=Sync, time=Thu Aug 10 20:33:33 2023)
running pre-sync triggers
cleaning trees
removing: /var/www/cobbler/images/centos7.9-x86_64
removing: /var/lib/tftpboot/pxelinux.cfg/default
removing: /var/lib/tftpboot/grub/images
removing: /var/lib/tftpboot/grub/efidefault
removing: /var/lib/tftpboot/images/centos7.9-x86_64
removing: /var/lib/tftpboot/s390x/profile_list
copying bootloaders
copying distros to tftpboot
copying files for distro: centos7.9-x86_64
trying hardlink /var/www/cobbler/ks_mirror/centos7.9-x86_64/images/pxeboot/vmlinuz -> /var/lib/tftpboot/images/centos7.9-x86_64/vmlinuz
trying hardlink /var/www/cobbler/ks_mirror/centos7.9-x86_64/images/pxeboot/initrd.img -> /var/lib/tftpboot/images/centos7.9-x86_64/initrd.img
copying images
generating PXE configuration files
generating PXE menu structure
copying files for distro: centos7.9-x86_64
trying hardlink /var/www/cobbler/ks_mirror/centos7.9-x86_64/images/pxeboot/vmlinuz -> /var/www/cobbler/images/centos7.9-x86_64/vmlinuz
trying hardlink /var/www/cobbler/ks_mirror/centos7.9-x86_64/images/pxeboot/initrd.img -> /var/www/cobbler/images/centos7.9-x86_64/initrd.img
Writing template files for centos7.9-x86_64
rendering DHCP files
generating /etc/dhcp/dhcpd.conf
rendering TFTPD files
generating /etc/xinetd.d/tftp
processing boot_files for distro: centos7.9-x86_64
cleaning link caches
running post-sync triggers
running python triggers from /var/lib/cobbler/triggers/sync/post/*
running python trigger cobbler.modules.sync_post_restart_services
running: dhcpd -t -q
received on stdout:
received on stderr:
running: service dhcpd restart
received on stdout:
received on stderr: Redirecting to /bin/systemctl restart dhcpd.service

running shell triggers from /var/lib/cobbler/triggers/sync/post/*
running python triggers from /var/lib/cobbler/triggers/change/*
running python trigger cobbler.modules.manage_genders
running python trigger cobbler.modules.scm_track
running shell triggers from /var/lib/cobbler/triggers/change/*
*** TASK COMPLETE ***

然后是新建一个虚拟机:

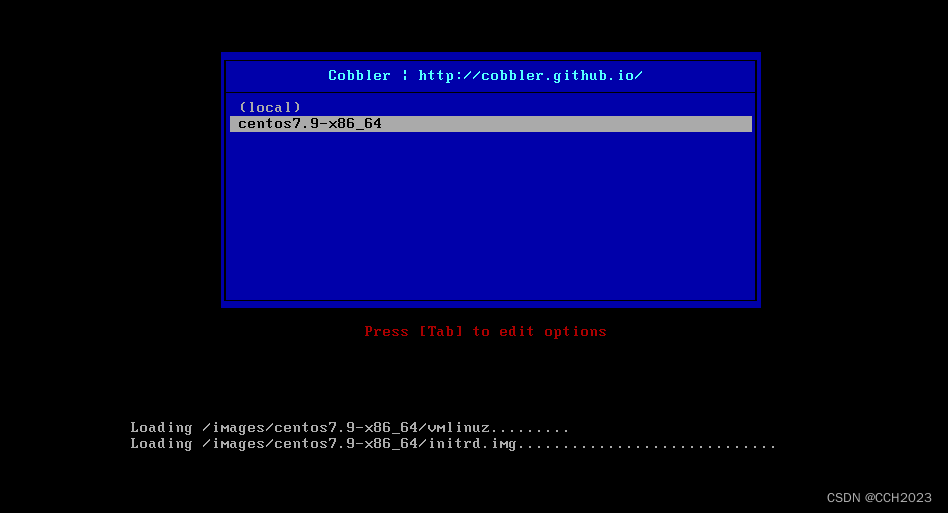
使用向下箭头选择“centos7.9-x86_64”项目。
然后开始安装。
Kickstart这个配置文件的配置方法,等有时间的时候需要细细的推敲下,应该是把系统安装的更加完善。