PNNX
PNNX项目 PyTorch Neural Network eXchange(PNNX)是PyTorch模型互操作性的开放标准。PNNX为PyTorch提供了一种开源的模型格式,它定义了与Pytorch相匹配的数据流图和运算图,我们的框架在PNNX之上封装了一层更加易用和简单的计算图格式。
pytorch训练好一个模型之后,然后模型需要转换到pnnx格式,然后pnnx格式我们再去读取,形成计算图.
PNNX帮我们做了很多的图优化、算子融合的工作,所以底层的用它PNNX的话,我们可以吸收图优化的结果,后面推理更快.
但是不直接在项目中用PNNX,因为别人的工作和自己推理框架开发思路总是有不同的。所以在这上面封装,又快速又好用方便,符合自己的使用习惯。
那该如何将Pytorch导到我们的计算图呢?
https://github.com/Tencent/ncnn/tree/master/tools/pnnx
1 Export your model to TorchScript
import torch
import torchvision.models as models

net = models.resnet18(pretrained=True)
net = net.eval()

x = torch.rand(1, 3, 224, 224)

# You could try disabling checking when tracing raises error
# mod = torch.jit.trace(net, x, check_trace=False)
mod = torch.jit.trace(net, x)

mod.save("resnet18.pt")
2 Convert TorchScript to PNNX
pnnx resnet18.pt inputshape=[1,3,224,224]
之后,我们会得到:
resnet18.pnnx.paramPNNX graph definitionresnet18.pnnx.binPNNX model weightresnet18_pnnx.pyPyTorch script for inference, the python code for model construction and weight initializationresnet18.pnnx.onnxPNNX model in onnx formatresnet18.ncnn.paramncnn graph definitionresnet18.ncnn.binncnn model weightresnet18_ncnn.pypyncnn script for inference
PNNX的格式定义
PNNX由操作数operand(运算数)和operator(运算符号),PNNX::Graph用来管理和操作这两者。
Operand 操作数:
操作数(operand),也可以通过操作数来方向访问到这个数字的产生者和使用者Customer
https://github.com/Tencent/ncnn/blob/master/tools/pnnx/src/ir.h
Operand有以下几个部分组成:
- Producer: 类型是operator, 表示产生了这个操作数的运算符(operator). 也就是说这个操作数(operand)是Producer的输出. Producer这个操作符号产生了当前的Operand,Producer是有个Add,Operand就是对应的Add结果。
- Customer:类型是operator, 表示需要这个操作数下一个操作的的运算符(operator),也就是说这个操作数(operand)作为Customer的输入存在.
Add-->Conv 1
Add中间是Values --Conv Value就是Operand,Add Operator就是她的Producer(有且只有一个),Conv Operator就是她的消费者Producer,当然消费者可以有很多个。
- Name: 类型是std::string, 表示这个操作数的名称.Values
- Shape: 类型是std::vector<int> , 用来表示操作数的大小,Operand操作数,Add-->values-->Conv 1,values可能是(1x3x320x320)
class Operand
{
public:
    void remove_consumer(const Operator* c);

    Operator* producer;
    std::vector<Operator*> consumers;

    // 0=null 1=f32 2=f64 3=f16 4=i32 5=i64 6=i16 7=i8 8=u8 9=bool 10=cp64 11=cp128 12=cp32
    int type;
    std::vector<int> shape;

    // keep std::string typed member the last for cross cxxabi compatibility
    std::string name;

    std::map<std::string, Parameter> params;

private:
    friend class Graph;
    Operand()
    {
    }
};
Operator(操作符):
operator有以下几个部分组成: 可以是一个Conv,也可以是Add
1 Inputs, 类型为std::vector<operand*>, 表示这个运算符计算过程中所需要的输入操作数(operand)
Operator比如是一个Add,Add做需要两个输入才能相加,输入存放在Operand中,operand1和operand2。
Operator是一个Conv, 它只需要一个输入,输入存放在Operand中,operand1.
operand1和operand2之类的输入都存放在inputs结构中。
2 Outputs, 类型为std::vector<operand*>, 表示这个运算符计算过程中得到的输出操作数(operand)
Conv1 operator的输出,输出当然一个Operand类,一个层可能有多个输出,然后用有个一个vector存放。
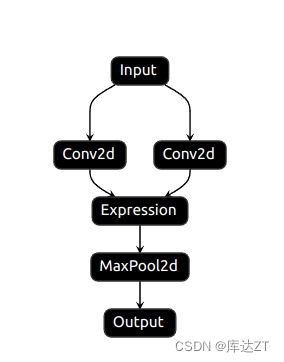
Conv1层的输出,既要送到Conv2也要送到下面的Conv3
outputs1 = self.conv1(inputs)
# outputs用了两次
output2 = self.conv2(outputs1)
output3 = self.conv2(outputs1)
Operator类的结构
- Type, Name 类型均为std::string, 分别表示运算符号的类型和名称
Conv Operator stride,padding,kernel_size之类的
maxPooling Operator 存放 stride,padding,kernel_size
- Params, 类型为std::map,用于存放该运算符的所有参数(例如对应Convolution oprator, params中将存放stride, padding, kernel_size等信息)
卷积核,卷积核需要一个参数,这个是从训练中得到的。
- Attrs,类型为std::map,用于存放运算符号所需要的具体权重属性(例如对应Convolution oprator,它的 attrs中就存放着卷积的权重参数和偏移量参数)
class Operator
{
public:
    std::vector<Operand*> inputs;
    std::vector<Operand*> outputs;

    // keep std::string typed member the last for cross cxxabi compatibility
    std::string type;
    std::string name;

    std::vector<std::string> inputnames;
    std::map<std::string, Parameter> params;
    std::map<std::string, Attribute> attrs;

private:
    friend class Graph;
    Operator()
    {
    }
};
因为不符合框架的使用要求,所以对其重新封装:
对PNNX封装:
1 对Operands(运算数)的封装。
struct RuntimeOperand {
  std::string name; /// 操作数的名称
  std::vector<int32_t> shapes; /// 操作数的形状
  std::vector<std::shared_ptr<Tensor<float>>> datas; /// 存储操作数
  RuntimeDataType type = RuntimeDataType::kTypeUnknown; /// 操作数的类型,一般是float
};
2 对Operator(运算符)本身的封装RuntimeOperator
/// 计算图中的计算节点
struct RuntimeOperator {
  ~RuntimeOperator();
  std::string name; /// 运算符号节点的名称
  std::string type; /// 运算符号节点的类型

  std::shared_ptr<Layer> layer; /// 节点对应的计算Layer

  std::vector<std::string> output_names; /// 运算符号的输出节点名称
// 对PNNX::Operand的一个封装 RuntimeOPerand RuntimeOperator 作为一个操作符号总有输入和输出
  std::shared_ptr<RuntimeOperand> output_operands; /// 运算符号的输出操作数

  std::map<std::string, std::shared_ptr<RuntimeOperand>> input_operands; /// 运算符的输入操作数
  std::vector<std::shared_ptr<RuntimeOperand>> input_operands_seq; /// 运算符的输入操作数,顺序排列
// RuntimeParameterFloat*
// RuntimeParameterIntArray
// kernel_size = {3,3} 一个参数,那他就是需要RuntimeParameterIntArray, "expr" RuntimeParameterString

  std::map<std::string, RuntimeParameter *> params;  /// 算子的参数信息,记录了一个kernel_size,padding之类的信息
  // RuntimeAttribute对PNNX::Attribute的一个封装,也是存放权重的。
std::map<std::string, std::shared_ptr<RuntimeAttribute> > attribute; /// 算子的属性信息,内含权重信息


};
从PNNX计算图到KuiperInfer计算图的过程
在Init函数中
1 、加载PNNX的计算图,PNNX一个加载过程,它加载完毕后,我们将它转换为KuiperInfer::的计算图
param_path 和bin_path里面读取它的网络结构和具体参数 PNNX::Graph存放在这
int load_result = this->graph_->load(param_path_, bin_path_);

这个load还是pnnx里的load
2、获取PNNX计算图中的运算符(operators) 开始自己的转换过程
std::vector<pnnx::Operator *> operators = this->graph_->ops;   // 得到PNNX::opeator
if (operators.empty()) {
    LOG(ERROR) << "Can not read the layers' define";
    return false;
}
3、 遍历PNNX计算图中的运算符,构建KuiperInfer计算图
// 根据const pnnx::Operator *op 去赋值std::shared_ptr<RuntimeOperator> runtime_operator
for (const pnnx::Operator *op : operators) {
if (!op) {
LOG(ERROR) << "Meet the empty node";
continue;
} else {
// 现在是空的,下面
std::shared_ptr<RuntimeOperator> runtime_operator = std::make_shared<RuntimeOperator>();
// 初始化算子的名称
runtime_operator->name = op->name;
runtime_operator->type = op->type;
// 初始化算子中的input,对操作符号operator赋予runtimeoperand作为输入,输入是根据pnnx::operand来的
const std::vector<pnnx::Operand *> &inputs = op->inputs;
if (!inputs.empty()) {
InitInputOperators(inputs, runtime_operator);
}
// 记录输出operand中的名称
// 有一个pnnx::operator 来自与load_graph这个操作
// load_graph pnnx::operators数组 进行遍历 pnnx::operator
// 每一个遍历中operator,我们再初始化自己的kuiperinfer::RuntimeOperator
/// RuntimeOperator根据pnnx::operator赋予inputs和outputs
const std::vector<pnnx::Operand *> &outputs = op->outputs;
if (!outputs.empty()) {
InitOutputOperators(outputs, runtime_operator);
}
// 初始化算子中的attribute(权重)
//没一个pnnx::operator里面有一个权重,我们根据pnnx::Attr这个权重去初始化RuntimeAttr
/// 初始化RutimeAttr之后呢,存放在runtime_operator
const std::map<std::string, pnnx::Attribute> &attrs = op->attrs;
if (!attrs.empty()) {
InitGraphAttrs(attrs, runtime_operator);
}
// 初始化算子中的parameter
// 根据const pnnx::Operator *op 去赋值std::shared_ptr<RuntimeOperator> runtime_operator
// 先得到pnnx::parameter再根据这个去赋值RuntimeOperator中的RuntimeParameter
const std::map<std::string, pnnx::Parameter> ¶ms = op->params;
if (!params.empty()) {
InitGraphParams(params, runtime_operator);
}
// runtime_operator初始化玩成了
this->operators_.push_back(runtime_operator);
}
}
那些Init初始化函数也不难理解:
就是按照pnnx的那些属性的性质,一层一层构建到Kuiper中
4、pnnx::inputs---->KuiperInfer::operator::inputs
初始化RuntimeOperator中的RuntimeOperator.input_operands和RuntimeOperator.input_operands_seq两个属性. 通过解析pnnx的计算图来初始化KuiperInfer计算符号中的输入部分
struct RuntimeOperator {
  /// 本过程要初始化的两个属性
  std::map<std::string, std::shared_ptr<RuntimeOperand>> input_operands; /// 运算符的输入操作数
  std::vector<std::shared_ptr<RuntimeOperand>> input_operands_seq; /// 运算符的输入操作数,顺序排列
  ...
}
这里再梳理一下,pnnx有两部分构成pnnx::operator以及pnnx::operands,通过其中的任意一个部分可以访问到另外一个部分。
PNNX::operator有一个inputs的输入操作数吗(input operand)
本节的内容是要根据pnnx中的两个部分来初始化Kuiper::Operator中的运算符输入部分, 也就是说从pnnx的计算图去初始化得到KuiperInfer计算图运算符(RuntimeOperator)的输入(input_operands和input_operands_seq).
void RuntimeGraph::InitInputOperators(const std::vector<pnnx::Operand *> &inputs,
                                      const std::shared_ptr<RuntimeOperator> &runtime_operator) {
  for (const pnnx::Operand *input : inputs) {
    if (!input) {
      continue;
    }
    // 得到pnnx操作数对应的生产者(类型是pnnx::operator)
    const pnnx::Operator *producer = input->producer;
    // 初始化RuntimeOperator的输入runtime_operand
    std::shared_ptr<RuntimeOperand> runtime_operand = std::make_shared<RuntimeOperand>();
    // 赋值runtime_operand的名称和形状
    runtime_operand->name = producer->name;
    runtime_operand->shapes = input->shape;

    switch (input->type) {
      case 1: {
        runtime_operand->type = RuntimeDataType::kTypeFloat32;
        break;
      }
      case 0: {
        runtime_operand->type = RuntimeDataType::kTypeUnknown;
        break;
      }
      default: {
        LOG(FATAL) << "Unknown input operand type: " << input->type;
      }
    }
    runtime_operator->input_operands.insert({producer->name, runtime_operand});
    runtime_operator->input_operands_seq.push_back(runtime_operand);
  }
}
通过上面的load , 已经得到了graph的结构还有属性等定义。
对input进行遍历。
通过pnnx::Operand得到自己的kuiperinfer::RuntimeOperand 并根据进行赋值
kuiperinfer::RuntimeOperand放回到runtime_operator
5、从pnnx::outputs---->KuiperInfer::operator::output_names
void RuntimeGraph::InitOutputOperators(const std::vector<pnnx::Operand *> &outputs,
                                       const std::shared_ptr<RuntimeOperator> &runtime_operator) {
  for (const pnnx::Operand *output : outputs) {
    if (!output) {
      continue;
    }
    const auto &consumers = output->consumers;
    for (const auto &c : consumers) {
      runtime_operator->output_names.push_back(c->name);
    }
  }
}
6、从pnnx::operators::Attrs去初始化KuiperInfer::RuntimeOperator::RuntimeAttributes
void RuntimeGraph::InitGraphAttrs(const std::map<std::string, pnnx::Attribute> &attrs,
                                  const std::shared_ptr<RuntimeOperator> &runtime_operator) {
  for (const auto &pair : attrs) {
    const std::string &name = pair.first;
    // 1.得到pnnx中的Attribute
    const pnnx::Attribute &attr = pair.second;
    switch (attr.type) {
      case 1: {
        // 2. 根据Pnnx的Attribute初始化KuiperInferOperator中的Attribute
        std::shared_ptr<RuntimeAttribute> runtime_attribute = std::make_shared<RuntimeAttribute>();
        runtime_attribute->type = RuntimeDataType::kTypeFloat32;
         // 2.1 赋值权重weight(此处的data是std::vector<uchar>类型)
        runtime_attribute->weight_data = attr.data;
        runtime_attribute->shape = attr.shape;
        runtime_operator->attribute.insert({name, runtime_attribute});
        break;
      }
      default : {
        LOG(FATAL) << "Unknown attribute type";
      }
    }
  }
}
7、从pnnx::operators::Params去初始化KuiperInfer::RuntimeOperator::Params
KuiperInfer::RuntimeOperator::RuntimeParameter有多个派生类构成,以此来对应中多种多样的参数,例如ConvOperator中有std::string类型的参数,padding_mode,也有像uint32_t类型的kernel_size和padding_size参数,所以我们需要以多种参数类型去支持他。换句话说,一个KuiperInfer::operator::Params,param可以是其中的任意一个派生类,这里我们利用了多态的特性。
KuiperInfer::RuntimeOperator::RuntimeParameter的多种派生类,如下分别表示为Int参数和Float参数,他们都是RuntimeParameter的派生类.
std::map<std::string, RuntimeParameter *> params;  /// 算子的参数信息
// 用指针来实现多态

struct RuntimeParameter { /// 计算节点中的参数信息
  virtual ~RuntimeParameter() = default;

  explicit RuntimeParameter(RuntimeParameterType type = RuntimeParameterType::kParameterUnknown) : type(type) {

  }
  RuntimeParameterType type = RuntimeParameterType::kParameterUnknown;
};
/// int类型的参数
struct RuntimeParameterInt : public RuntimeParameter {
  RuntimeParameterInt() : RuntimeParameter(RuntimeParameterType::kParameterInt) {

  }
  int value = 0;
};
/// float类型的参数
struct RuntimeParameterFloat : public RuntimeParameter {
  RuntimeParameterFloat() : RuntimeParameter(RuntimeParameterType::kParameterFloat) {

  }
  float value = 0.f;
};
...
void RuntimeGraph::InitGraphParams(const std::map<std::string, pnnx::Parameter> ¶ms,
const std::shared_ptr<RuntimeOperator> &runtime_operator) {
for (const auto &pair : params) {
const std::string &name = pair.first;
const pnnx::Parameter ¶meter = pair.second;
const int type = parameter.type;
// 根据PNNX的Parameter去初始化KuiperInfer::RuntimeOperator中的Parameter
switch (type) {
case int(RuntimeParameterType::kParameterUnknown): {
RuntimeParameter *runtime_parameter = new RuntimeParameter;
runtime_operator->params.insert({name, runtime_parameter});
break;
}
// 在这应该使用派生类RuntimeParameterBool
case int(RuntimeParameterType::kParameterBool): {
RuntimeParameterBool *runtime_parameter = new RuntimeParameterBool;
runtime_parameter->value = parameter.b;
runtime_operator->params.insert({name, runtime_parameter});
break;
}
// 在这应该使用派生类RuntimeParameterInt
case int(RuntimeParameterType::kParameterInt): {
RuntimeParameterInt *runtime_parameter = new RuntimeParameterInt;
runtime_parameter->value = parameter.i;
runtime_operator->params.insert({name, runtime_parameter});
break;
}
case int(RuntimeParameterType::kParameterFloat): {
RuntimeParameterFloat *runtime_parameter = new RuntimeParameterFloat;
runtime_parameter->value = parameter.f;
runtime_operator->params.insert({name, runtime_parameter});
break;
}
case int(RuntimeParameterType::kParameterString): {
RuntimeParameterString *runtime_parameter = new RuntimeParameterString;
runtime_parameter->value = parameter.s;
runtime_operator->params.insert({name, runtime_parameter});
break;
}
case int(RuntimeParameterType::kParameterIntArray): {
RuntimeParameterIntArray *runtime_parameter = new RuntimeParameterIntArray;
runtime_parameter->value = parameter.ai;
runtime_operator->params.insert({name, runtime_parameter});
break;
}
case int(RuntimeParameterType::kParameterFloatArray): {
RuntimeParameterFloatArray *runtime_parameter = new RuntimeParameterFloatArray;
runtime_parameter->value = parameter.af;
runtime_operator->params.insert({name, runtime_parameter});
break;
}
case int(RuntimeParameterType::kParameterStringArray): {
RuntimeParameterStringArray *runtime_parameter = new RuntimeParameterStringArray;
runtime_parameter->value = parameter.as;
runtime_operator->params.insert({name, runtime_parameter});
break;
}
default: {
LOG(FATAL) << "Unknown parameter type";
}
}
}
}
遍历得到属性,通过属性初始化RuntimeParameter,再将runtimeparameter存放到Runtime Operator中。啊
8. 将通过如上步骤初始化好的KuiperInfer::Operator存放到一个vector中
this->operators_.push_back(runtime_operator);
总结:
int load_result = this->graph_->load(param_path_, bin_path_); 得到pnnx::graph,一个一个算子去初始化 runtimegraph
得到pnnx::operators -->依次便利
pnnx operator 遍历,初始化一个RuntimeOperator
1. 得到pnnx operator的inputs,再根据这个inputs去初始化我们RuntimeOperator::runtime_operator->input_operands
2. 同理得到pnnx operator的outputs去初始化RuntimeOperator::runtime_operator->output_operands
3. runtimeParameter 根据pnnx::param初始化
4, runtimeAttr根据pnnx::attr初始化
1.2.3.4的初始化过程中, runtimeParameter,runtimeAttr,output_operands.inputs_operand放在一个runtime_operator里面
5. 再把这个runtime_operator存放好
这个runtime_operator中既有输入的参数,又有输出的数、参数,又有层的参数,又有层的权重!
转换成功!

