文章目录
- Log
- 一、现有网络模型的使用及修改
- 1. VGG
- ① ImageNet 数据集下载
- ② 模型加载
- ③ 模型改造
- a. 添加一个线性层
- b. 插入一个线性层
- c. 修改一个线性层
- 二、网络模型的保存与读取
- ① 网络模型的保存
- a. 保存方式一
- b. 保存方式二
- ② 网络模型的读取
- a. 读取方式一
- b. 读取方式二
- 三、完整的模型训练套路
- 四、利用 GPU 训练
- 1. 方法一
- 2. 方法二
- 五、完整的模型验证套路
- 总结
Log
2022.12.11有点感受,不好描述,但是似乎是体会到了生活中的一点东西,充满激情,充满希望,勇敢面对,所以干脆今天就把剩下的部分学完得了(满口胡话)
2022.12.12剩了一点,今天来解决掉
一、现有网络模型的使用及修改
- 语音相关的模型在 torchaudio 中
- 文字相关的模型在 torchtext 中
- 图像相关的模型在 torchvision 中
- 分类:Classification
- 语义分割:Semantic Segmentation
- 目标检测,实例分割和人物关键点检测:Object Detection, Instance Segmentation and Person Keypoint Detection
- 视频分类:Video Classification
1. VGG
- torchvision 中最常用的分类模型 VGG 有 VGG11、VGG13、VGG16、VGG19,其中最常用的是 VGG16 和 VGG19。
① ImageNet 数据集下载
- 想要使用 torchvision.datasets.ImageNet 数据集需要提前安装
scipy包 - 试图下载该数据集:
train_data = torchvision.datasets.ImageNet("../dataset/ImageNet", split='train', download=True,
                                           transform=torchvision.transforms.ToTensor())
- 该数据集已经无法公开访问,需要手动下载,并且大小100G+,所以直接放弃。
② 模型加载
- 预训练参数为
False时,加载的是初始的参数,为True时则是训练好的能够达到较好效果的参数。
vgg16_false = torchvision.models.vgg16(pretrained=False)
vgg16_true = torchvision.models.vgg16(pretrained=True)
- 输出查看网络结构:
print(vgg16_true)
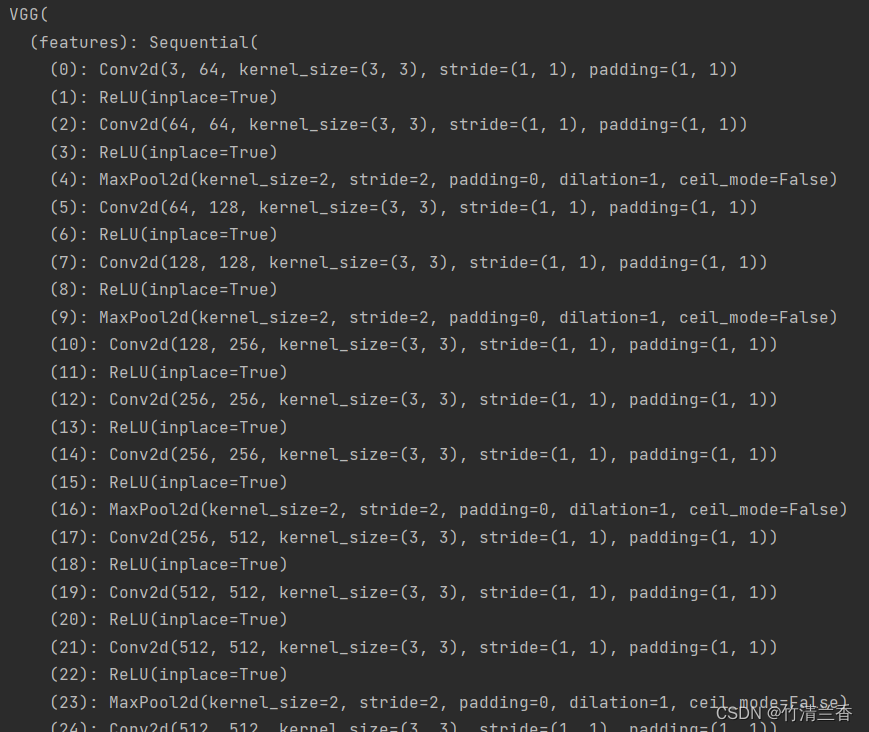
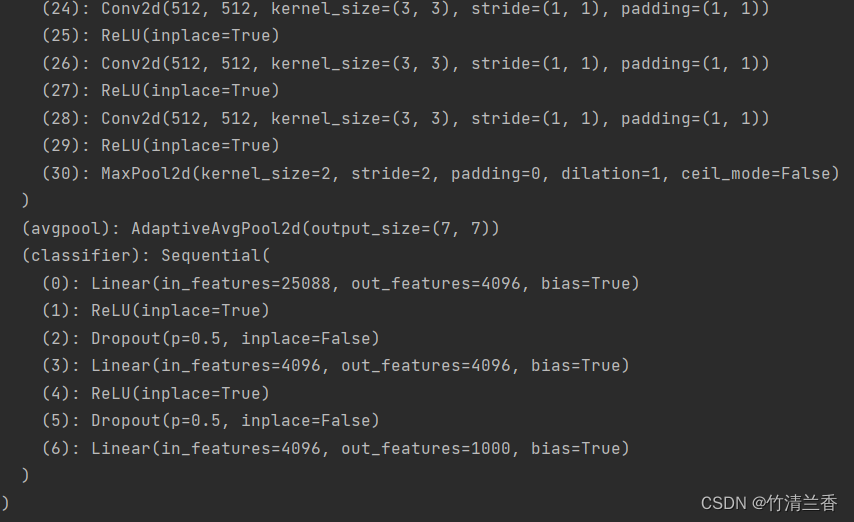
- 可以看到最后的的输出
out_features=1000,即最后可以识别 1000 个分类,在 ImageNet ILSVRC2012 中也可以看到对应共有 1000 个类别:

③ 模型改造
- 现在我们使用上面加载好的模型对 C I F A R 10 \rm CIFAR10 CIFAR10 进行分类,下面是三种不同的方法:
a. 添加一个线性层
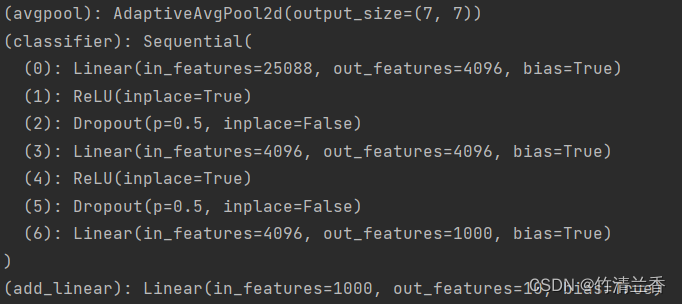
- 我们可以在原网络的基础上再添加一个线性层:输入 1000 个特征,输出 10 个特征
vgg16_true.add_module('add_linear', nn.Linear(1000, 10))
print(vgg16_true)
- 通过观察输出的网络结构可以发现我们在网络的最后添加了一个线性层
add_linear(与classifier在同一级上):
b. 插入一个线性层
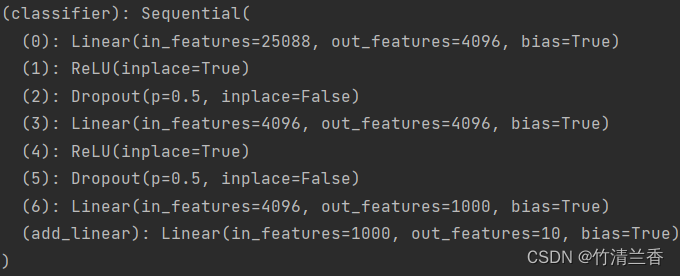
- 对上面的代码稍作修改,就可以将新加入的线性层插入到原有的结构中:
vgg16_true.classifier.add_module('add_linear', nn.Linear(1000, 10))
print(vgg16_true)
- 输出的网络结构如下(
add_linear包含在classifier中):
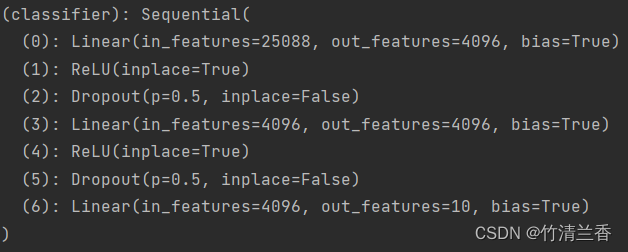
c. 修改一个线性层
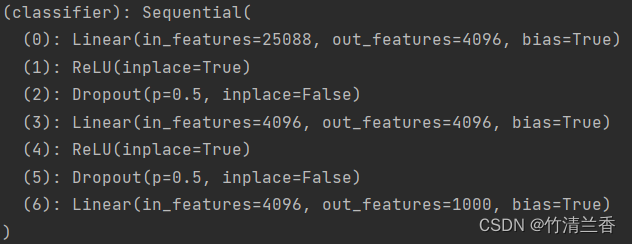
- 直接对原有的模型进行修改,将输出特征数改为 10:
print(vgg16_false)
vgg16_false.classifier[6] = nn.Linear(4096, 10)
print(vgg16_false)
-
原有结构如下:
-
修改的结构如下:
二、网络模型的保存与读取
① 网络模型的保存
- 首先加载未经训练的模型:
vgg16 = torchvision.models.vgg16(pretrained=False)
a. 保存方式一
torch.save(vgg16, "../models/VGG/vgg16_method1.pth")
- 两个参数分别是要保存的模型和保存路径,保存的模型文件一般是
.pth格式的。 - 该方法不仅保存了网络模型的结构,也保存了网络模型的参数。
b. 保存方式二
torch.save(vgg16.state_dict(), "../models/VGG/vgg16_method2.pth")
- 该方法不再保存网络的结构,而是以字典的形式保存网络模型的参数,对应上面的第一个参数,第二个参数则是保存的路径(该方法下模型文件的大小要比方式一稍小一些)
② 网络模型的读取
a. 读取方式一
- 对应上面的保存方式一
model = torch.load("../models/VGG/vgg16_method1.pth")
- 如果保存的是自定义的网络,那么在读取时必须要导入原有的网络定义的类才能够成功加载。
b. 读取方式二
- 对应上面的保存方式二
- 由于只保存了参数,所以我们需要重建网络模型结构
vgg16 = torchvision.models.vgg16(pretrained=False)
vgg16.load_state_dict(torch.load("../models/VGG/vgg16_method2.pth"))
三、完整的模型训练套路
- 加载数据集:
train_data = torchvision.datasets.CIFAR10(root="../dataset/CIFAR10", train=True, transform=torchvision.transforms.ToTensor(),
                                          download=True)
test_data = torchvision.datasets.CIFAR10(root="../dataset/CIFAR10", train=False, transform=torchvision.transforms.ToTensor(),
                                         download=True)
- 获取数据集长度:
train_data_size = len(train_data)
test_data_size = len(test_data)
- 利用 DataLoader 来加载数据集:
train_dataloader = DataLoader(train_data, batch_size=64)
test_dataloader = DataLoader(test_data, batch_size=64)
- 搭建神经网络:
class MyModel(nn.Module):
    def __init__(self):
        super(MyModel, self).__init__()
        self.model = nn.Sequential(
            nn.Conv2d(3, 32, 5, 1, 2),
            nn.MaxPool2d(2),
            nn.Conv2d(32, 32, 5, 1, 2),
            nn.MaxPool2d(2),
            nn.Conv2d(32, 64, 5, 1, 2),
            nn.MaxPool2d(2),
            nn.Flatten(),
            nn.Linear(64*4*4, 64),
            nn.Linear(64, 10)
        )

    def forward(self, x):
        x = self.model(x)
        return x

mo = MyModel()
- 定义损失函数:
loss_fn = nn.CrossEntropyLoss()
- 定义优化器:
learning_rate = 1e-2
optimizer = torch.optim.SGD(mo.parameters(), lr=learning_rate)
- 设置训练网络的参数:
# 训练的次数
total_train_step = 0
# 测试的次数
total_test_step = 0
# 训练的轮数
epoch = 10
- 训练开始:
for i in range(epoch):
    print("-------第 {} 轮训练开始-------".format(i+1))

    # 训练步骤开始
    mo.train()
    for data in train_dataloader:
        imgs, targets = data
        outputs = mo(imgs)
        loss = loss_fn(outputs, targets)

        # 优化器优化模型
        optimizer.zero_grad()
        loss.backward()
        optimizer.step()

        total_train_step = total_train_step + 1
        if total_train_step % 100 == 0:
            print("训练次数:{}, Loss: {}".format(total_train_step, loss.item()))

    # 测试步骤开始
    mo.eval()
    total_test_loss = 0
    total_accuracy = 0
    # 此处没有用到梯度
    with torch.no_grad():
        for data in test_dataloader:
            imgs, targets = data
            outputs = mo(imgs)
            loss = loss_fn(outputs, targets)
            total_test_loss = total_test_loss + loss.item()
            accuracy = (outputs.argmax(1) == targets).sum()
            total_accuracy = total_accuracy + accuracy

    print("整体测试集上的Loss: {}".format(total_test_loss))
    print("整体测试集上的正确率: {}".format(total_accuracy/test_data_size))
    total_test_step = total_test_step + 1

    torch.save(mo, "model_{}.pth".format(i))
    print("模型已保存")
- 其中在计算正确率的时候用到了 argmax 函数。
- 使用 tensorboard:
writer = SummaryWriter("logs_train")

for i in range(epoch):
    print("-------第 {} 轮训练开始-------".format(i+1))

    # 训练步骤开始
    mo.train()
    for data in train_dataloader:
        imgs, targets = data
        outputs = mo(imgs)
        loss = loss_fn(outputs, targets)

        # 优化器优化模型
        optimizer.zero_grad()
        loss.backward()
        optimizer.step()

        total_train_step = total_train_step + 1
        if total_train_step % 100 == 0:
            print("训练次数:{}, Loss: {}".format(total_train_step, loss.item()))
            writer.add_scalar("train_loss", loss.item(), total_train_step)

    # 测试步骤开始
    mo.eval()
    total_test_loss = 0
    total_accuracy = 0
    with torch.no_grad():
        for data in test_dataloader:
            imgs, targets = data
            outputs = mo(imgs)
            loss = loss_fn(outputs, targets)
            total_test_loss = total_test_loss + loss.item()
            accuracy = (outputs.argmax(1) == targets).sum()
            total_accuracy = total_accuracy + accuracy

    print("整体测试集上的Loss: {}".format(total_test_loss))
    print("整体测试集上的正确率: {}".format(total_accuracy/test_data_size))
    writer.add_scalar("test_loss", total_test_loss, total_test_step)
    writer.add_scalar("test_accuracy", total_accuracy/test_data_size, total_test_step)
    total_test_step = total_test_step + 1

    torch.save(mo, "model_{}.pth".format(i))
    print("模型已保存")

writer.close()
- 记录结果如下:

四、利用 GPU 训练
- 咱的电脑是 AMD 的,所以这部分就简单记录一下。
1. 方法一
- 在上面定义的过程后面添加对应的方法即可:
# 模型定义
mo = MyModel()
mo.cuda()
# 损失函数
loss_fn = nn.CrossEntropyLoss()
loss_fn.cuda()
# 训练和测试过程的中
imgs, targets = data
imgs = imgs.cuda()
targets = targets.cuda()
- 在使用
cuda方法之前最好加入以下代码进行判断:
if torch.cuda.is_available():
2. 方法二
- 定义设备并调用
to方法:
# 定义训练的设备
device = torch.device("cuda")
# 模型定义
mo = MyModel()
mo.to(device)
# 损失函数
loss_fn = nn.CrossEntropyLoss()
loss_fn.to(device)
# 训练和测试过程的中
imgs, targets = data
imgs = imgs.to(device)
targets = targets.to(device)
- 如果有多个显卡的话定义设备时可以采用以下方法:
device = torch.device("cuda:0")
device = torch.device("cuda:1")
五、完整的模型验证套路
- 利用训练好的模型进行测试。
import torch
import torchvision
from PIL import Image
from torch import nn

image_path = "../images/dog.jpg"
image = Image.open(image_path)
print(image)
image = image.convert('RGB')
transform = torchvision.transforms.Compose([torchvision.transforms.Resize((32, 32)),
                                            torchvision.transforms.ToTensor()])

image = transform(image)
print(image.shape)

class MyModel(nn.Module):
    def __init__(self):
        super(MyModel, self).__init__()
        self.model = nn.Sequential(
            nn.Conv2d(3, 32, 5, 1, 2),
            nn.MaxPool2d(2),
            nn.Conv2d(32, 32, 5, 1, 2),
            nn.MaxPool2d(2),
            nn.Conv2d(32, 64, 5, 1, 2),
            nn.MaxPool2d(2),
            nn.Flatten(),
            nn.Linear(64*4*4, 64),
            nn.Linear(64, 10)
        )

    def forward(self, x):
        x = self.model(x)
        return x
# 想在 CPU 上运行 GPU 跑出来的模型时添加第二个参数
model = torch.load("tudui_29_gpu.pth", map_location=torch.device('cpu'))
print(model)
image = torch.reshape(image, (1, 3, 32, 32))
model.eval()
with torch.no_grad():
    output = model(image)
print(output)

print(output.argmax(1))
总结
- 本篇文章介绍了如何对已有的模型进行修改或者添加自己想要的结构,保存的读取网络模型的方法,利用 GPU 进行训练,以及完整的模型训练和验证的套路。





![[附源码]JAVA毕业设计迎宾酒店管理系统录屏(系统+LW)](https://img-blog.csdnimg.cn/01fd526dcdf44fb5a399d12d47ad29e3.png)

