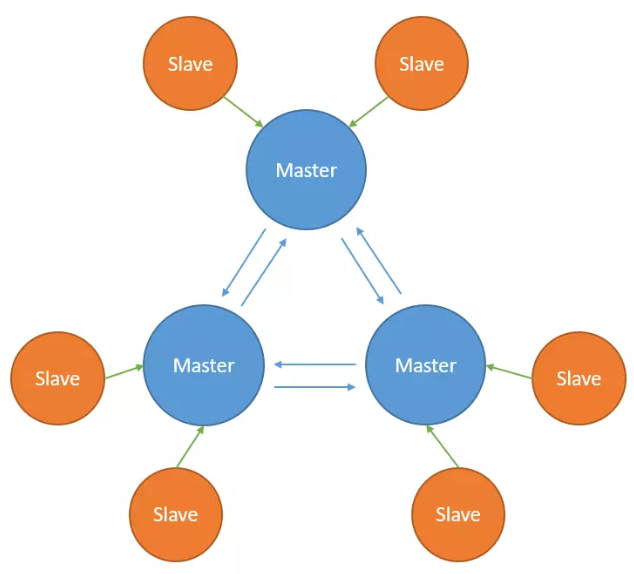
Redis 3.0版本后正式推出Redis集群模式,该模式是Redis的分布式的解决方案,是一个提供在多个Redis节点间共享数据的程序集,且Redis集群是去中心化的,它的每个Master节点都可以进行读写数据,每个节点都拥有平等的关系,每个节点都保持各自的数据和整个集群的状态。
1. 集群架构 #
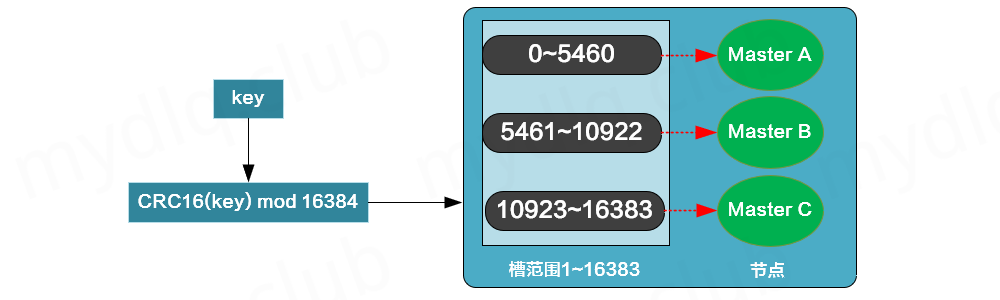
Redis集群没有使用一致性Hash, 而是引入了"哈希槽"的概念。Redis集群有16384个哈希槽,每个key通过CRC16校验后对16384取模来决定放置哪个槽,集群的每个节点负责一部分hash槽。
节点 A包含0到5460号哈希槽;
节点 B包含5461到10922号哈希槽;
节点 C包含10923到16383号哈希槽。
这种结构很容易 "
添加" 或者 "删除" 节点. 比如如果我想新添加个节点 D,我需要从节点A,B,C中得部分槽转移到节点 D上, 如果我想移除节点 A,则需要将A中的槽移到B和C节点上,然后将没有任何槽的A节点从集群中移除即可。由于从一个节点将哈希槽移动到另一个节点并不会停止服务,所以无论添加删除或者改变某个节点的哈希槽的数量都不会造成集群不可用的状态。
2. 集群部署规划 #
在部署
Redis集群模式时,至少需要六个节点组成集群才能保证集群的可用性。在
Redis集群模式下,为了防止集群部分节点因宕机等情况造成不可用,故而Redis集群使用了主从复制模式。在该模式下要求Redis集群至少要存在六个节点,其中三个节点为主节点,能够对外提供读写。还有三个节点为从节点,会同步其对应的主节点的数据。当某个主节点出现问题不可用时,Redis将通过选举算法从主节点对应的从节点中选择一个节点(主节点存在多个从节点的情况下),将其更改为一个新的主节点,且能够对外提供服务。例如,在存在
A,B,C三个主节点和其对应的 (A1、A2),(B1、B2),(C1、C2) 六个从节点,共九个节点中,如果节点A节点挂掉,那么其对应的从节点A1、A2节点将通过选举算法,选择其中一个节点提升为主节点,以确保集群能够正常服务。不过当A1、A2两个从节点或者或者半数以上主节点不可用时,那么集群也是不可用的。
name |
ip |
node 1 |
node 2 |
|---|---|---|---|
master-01 |
127.0.0.1 | 6100 | 6101 |
master-02 |
127.0.0.1 | 6200 | 6201 |
master-03 |
127.0.0.1 | 6300 | 6301 |
3. 安装文件 #
下载源码
-
以
6.2.6版本为例: https://download.redis.io/releases/redis-6.2.6.tar.gz -
其他版本下载:https://redis.io/download
构建源码
将在
src目录下生成可执行文件
tar xzf redis-6.2.6.tar.gz

cd redis-6.2.6

make
复制成功!
4. 集群部署 #
4.1 创建文件目录 #
分别创建三个节点(
master)目录,多个以此类推master-N每个 master 目录中创建 两个节点(
node)目录,多个以此类推node-N
cd /data

mkdir -p redis/dc3/master-01 redis/dc3/master-02 redis/dc3/master-03

mkdir -p redis/dc3/master-01/node-01 redis/dc3/master-01/node-02 redis/dc3/master-02/node-01 redis/dc3/master-02/node-02 redis/dc3/master-03/node-01 redis/dc3/master-03/node-02
复制成功!
为每个节点创建配置、数据、日志目录,其他节点操作一致
cd node-N

mkdir data etc logs
复制成功!
4.2 配置文件 #
在每个节点的
etc下添加配置文件redis.conf
#
# Copyright (c) 2022. Pnoker. All Rights Reserved.
# Licensed under the Apache License, Version 2.0 (the "License");
# you may not use this file except in compliance with the License.
# You may obtain a copy of the License at
#     http://www.apache.org/licenses/LICENSE-2.0
# Unless required by applicable law or agreed to in writing, software
# distributed under the License is distributed on an "AS IS" BASIS,
# WITHOUT WARRANTIES OR CONDITIONS OF ANY KIND, either express or implied.
# See the License for the specific language governing permissions and
# limitations under the License.
#

# Redis configuration file example.
#
# Note that in order to read the configuration file, Redis must be
# started with the file path as first argument:
#
# ./redis-server /path/to/redis.conf

# Note on units: when memory size is needed, it is possible to specify
# it in the usual form of 1k 5GB 4M and so forth:
#
# 1k => 1000 bytes
# 1kb => 1024 bytes
# 1m => 1000000 bytes
# 1mb => 1024*1024 bytes
# 1g => 1000000000 bytes
# 1gb => 1024*1024*1024 bytes
#
# units are case insensitive so 1GB 1Gb 1gB are all the same.

################################## INCLUDES ###################################

# Include one or more other config files here.  This is useful if you
# have a standard template that goes to all Redis servers but also need
# to customize a few per-server settings.  Include files can include
# other files, so use this wisely.
#
# Note that option "include" won't be rewritten by command "CONFIG REWRITE"
# from admin or Redis Sentinel. Since Redis always uses the last processed
# line as value of a configuration directive, you'd better put includes
# at the beginning of this file to avoid overwriting config change at runtime.
#
# If instead you are interested in using includes to override configuration
# options, it is better to use include as the last line.
#
# include /path/to/local.conf
# include /path/to/other.conf

################################## MODULES #####################################

# Load modules at startup. If the server is not able to load modules
# it will abort. It is possible to use multiple loadmodule directives.
#
# loadmodule /path/to/my_module.so
# loadmodule /path/to/other_module.so

################################## NETWORK #####################################

# By default, if no "bind" configuration directive is specified, Redis listens
# for connections from all available network interfaces on the host machine.
# It is possible to listen to just one or multiple selected interfaces using
# the "bind" configuration directive, followed by one or more IP addresses.
# Each address can be prefixed by "-", which means that redis will not fail to
# start if the address is not available. Being not available only refers to
# addresses that does not correspond to any network interfece. Addresses that
# are already in use will always fail, and unsupported protocols will always BE
# silently skipped.
#
# Examples:
#
# bind 192.168.1.100 10.0.0.1     # listens on two specific IPv4 addresses
# bind 127.0.0.1 ::1              # listens on loopback IPv4 and IPv6
# bind * -::*                     # like the default, all available interfaces
#
# ~~~ WARNING ~~~ If the computer running Redis is directly exposed to the
# internet, binding to all the interfaces is dangerous and will expose the
# instance to everybody on the internet. So by default we uncomment the
# following bind directive, that will force Redis to listen only on the
# IPv4 and IPv6 (if available) loopback interface addresses (this means Redis
# will only be able to accept client connections from the same host that it is
# running on).
#
# IF YOU ARE SURE YOU WANT YOUR INSTANCE TO LISTEN TO ALL THE INTERFACES
# JUST COMMENT OUT THE FOLLOWING LINE.
# ~~~~~~~~~~~~~~~~~~~~~~~~~~~~~~~~~~~~~~~~~~~~~~~~~~~~~~~~~~~~~~~~~~~~~~~~
# bind 127.0.0.1 -::1

# Protected mode is a layer of security protection, in order to avoid that
# Redis instances left open on the internet are accessed and exploited.
#
# When protected mode is on and if:
#
# 1) The server is not binding explicitly to a set of addresses using the
#    "bind" directive.
# 2) No password is configured.
#
# The server only accepts connections from clients connecting from the
# IPv4 and IPv6 loopback addresses 127.0.0.1 and ::1, and from Unix domain
# sockets.
#
# By default protected mode is enabled. You should disable it only if
# you are sure you want clients from other hosts to connect to Redis
# even if no authentication is configured, nor a specific set of interfaces
# are explicitly listed using the "bind" directive.
protected-mode yes

# Accept connections on the specified port, default is 6379 (IANA #815344).
# If port 0 is specified Redis will not listen on a TCP socket.
port 6100

# TCP listen() backlog.
#
# In high requests-per-second environments you need a high backlog in order
# to avoid slow clients connection issues. Note that the Linux kernel
# will silently truncate it to the value of /proc/sys/net/core/somaxconn so
# make sure to raise both the value of somaxconn and tcp_max_syn_backlog
# in order to get the desired effect.
tcp-backlog 511

# Unix socket.
#
# Specify the path for the Unix socket that will be used to listen for
# incoming connections. There is no default, so Redis will not listen
# on a unix socket when not specified.
#
# unixsocket /run/redis.sock
# unixsocketperm 700

# Close the connection after a client is idle for N seconds (0 to disable)
timeout 0

# TCP keepalive.
#
# If non-zero, use SO_KEEPALIVE to send TCP ACKs to clients in absence
# of communication. This is useful for two reasons:
#
# 1) Detect dead peers.
# 2) Force network equipment in the middle to consider the connection to be
#    alive.
#
# On Linux, the specified value (in seconds) is the period used to send ACKs.
# Note that to close the connection the double of the time is needed.
# On other kernels the period depends on the kernel configuration.
#
# A reasonable value for this option is 300 seconds, which is the new
# Redis default starting with Redis 3.2.1.
tcp-keepalive 300

################################# TLS/SSL #####################################

# By default, TLS/SSL is disabled. To enable it, the "tls-port" configuration
# directive can be used to define TLS-listening ports. To enable TLS on the
# default port, use:
#
# port 0
# tls-port 6379

# Configure a X.509 certificate and private key to use for authenticating the
# server to connected clients, masters or cluster peers.  These files should be
# PEM formatted.
#
# tls-cert-file redis.crt
# tls-key-file redis.key
#
# If the key file is encrypted using a passphrase, it can be included here
# as well.
#
# tls-key-file-pass secret

# Normally Redis uses the same certificate for both server functions (accepting
# connections) and client functions (replicating from a master, establishing
# cluster bus connections, etc.).
#
# Sometimes certificates are issued with attributes that designate them as
# client-only or server-only certificates. In that case it may be desired to use
# different certificates for incoming (server) and outgoing (client)
# connections. To do that, use the following directives:
#
# tls-client-cert-file client.crt
# tls-client-key-file client.key
#
# If the key file is encrypted using a passphrase, it can be included here
# as well.
#
# tls-client-key-file-pass secret

# Configure a DH parameters file to enable Diffie-Hellman (DH) key exchange:
#
# tls-dh-params-file redis.dh

# Configure a CA certificate(s) bundle or directory to authenticate TLS/SSL
# clients and peers.  Redis requires an explicit configuration of at least one
# of these, and will not implicitly use the system wide configuration.
#
# tls-ca-cert-file ca.crt
# tls-ca-cert-dir /etc/ssl/certs

# By default, clients (including replica servers) on a TLS port are required
# to authenticate using valid client side certificates.
#
# If "no" is specified, client certificates are not required and not accepted.
# If "optional" is specified, client certificates are accepted and must be
# valid if provided, but are not required.
#
# tls-auth-clients no
# tls-auth-clients optional

# By default, a Redis replica does not attempt to establish a TLS connection
# with its master.
#
# Use the following directive to enable TLS on replication links.
#
# tls-replication yes

# By default, the Redis Cluster bus uses a plain TCP connection. To enable
# TLS for the bus protocol, use the following directive:
#
# tls-cluster yes

# By default, only TLSv1.2 and TLSv1.3 are enabled and it is highly recommended
# that older formally deprecated versions are kept disabled to reduce the attack surface.
# You can explicitly specify TLS versions to support.
# Allowed values are case insensitive and include "TLSv1", "TLSv1.1", "TLSv1.2",
# "TLSv1.3" (OpenSSL >= 1.1.1) or any combination.
# To enable only TLSv1.2 and TLSv1.3, use:
#
# tls-protocols "TLSv1.2 TLSv1.3"

# Configure allowed ciphers.  See the ciphers(1ssl) manpage for more information
# about the syntax of this string.
#
# Note: this configuration applies only to <= TLSv1.2.
#
# tls-ciphers DEFAULT:!MEDIUM

# Configure allowed TLSv1.3 ciphersuites.  See the ciphers(1ssl) manpage for more
# information about the syntax of this string, and specifically for TLSv1.3
# ciphersuites.
#
# tls-ciphersuites TLS_CHACHA20_POLY1305_SHA256

# When choosing a cipher, use the server's preference instead of the client
# preference. By default, the server follows the client's preference.
#
# tls-prefer-server-ciphers yes

# By default, TLS session caching is enabled to allow faster and less expensive
# reconnections by clients that support it. Use the following directive to disable
# caching.
#
# tls-session-caching no

# Change the default number of TLS sessions cached. A zero value sets the cache
# to unlimited size. The default size is 20480.
#
# tls-session-cache-size 5000

# Change the default timeout of cached TLS sessions. The default timeout is 300
# seconds.
#
# tls-session-cache-timeout 60

################################# GENERAL #####################################

# By default Redis does not run as a daemon. Use 'yes' if you need it.
# Note that Redis will write a pid file in /var/run/redis.pid when daemonized.
# When Redis is supervised by upstart or systemd, this parameter has no impact.
daemonize yes

# If you run Redis from upstart or systemd, Redis can interact with your
# supervision tree. Options:
#   supervised no      - no supervision interaction
#   supervised upstart - signal upstart by putting Redis into SIGSTOP mode
#                        requires "expect stop" in your upstart job config
#   supervised systemd - signal systemd by writing READY=1 to $NOTIFY_SOCKET
#                        on startup, and updating Redis status on a regular
#                        basis.
#   supervised auto    - detect upstart or systemd method based on
#                        UPSTART_JOB or NOTIFY_SOCKET environment variables
# Note: these supervision methods only signal "process is ready."
#       They do not enable continuous pings back to your supervisor.
#
# The default is "no". To run under upstart/systemd, you can simply uncomment
# the line below:
#
# supervised auto

# If a pid file is specified, Redis writes it where specified at startup
# and removes it at exit.
#
# When the server runs non daemonized, no pid file is created if none is
# specified in the configuration. When the server is daemonized, the pid file
# is used even if not specified, defaulting to "/var/run/redis.pid".
#
# Creating a pid file is best effort: if Redis is not able to create it
# nothing bad happens, the server will start and run normally.
#
# Note that on modern Linux systems "/run/redis.pid" is more conforming
# and should be used instead.
pidfile /data/redis/dc3/master-01/node-01/redis.pid

# Specify the server verbosity level.
# This can be one of:
# debug (a lot of information, useful for development/testing)
# verbose (many rarely useful info, but not a mess like the debug level)
# notice (moderately verbose, what you want in production probably)
# warning (only very important / critical messages are logged)
loglevel notice

# Specify the log file name. Also the empty string can be used to force
# Redis to log on the standard output. Note that if you use standard
# output for logging but daemonize, logs will be sent to /dev/null
logfile /data/redis/dc3/master-01/node-01/logs/redis.log

# To enable logging to the system logger, just set 'syslog-enabled' to yes,
# and optionally update the other syslog parameters to suit your needs.
# syslog-enabled no

# Specify the syslog identity.
# syslog-ident redis

# Specify the syslog facility. Must be USER or between LOCAL0-LOCAL7.
# syslog-facility local0

# To disable the built in crash log, which will possibly produce cleaner core
# dumps when they are needed, uncomment the following:
#
# crash-log-enabled no

# To disable the fast memory check that's run as part of the crash log, which
# will possibly let redis terminate sooner, uncomment the following:
#
# crash-memcheck-enabled no

# Set the number of databases. The default database is DB 0, you can select
# a different one on a per-connection basis using SELECT <dbid> where
# dbid is a number between 0 and 'databases'-1
databases 16

# By default Redis shows an ASCII art logo only when started to log to the
# standard output and if the standard output is a TTY and syslog logging is
# disabled. Basically this means that normally a logo is displayed only in
# interactive sessions.
#
# However it is possible to force the pre-4.0 behavior and always show a
# ASCII art logo in startup logs by setting the following option to yes.
always-show-logo no

# By default, Redis modifies the process title (as seen in 'top' and 'ps') to
# provide some runtime information. It is possible to disable this and leave
# the process name as executed by setting the following to no.
set-proc-title yes

# When changing the process title, Redis uses the following template to construct
# the modified title.
#
# Template variables are specified in curly brackets. The following variables are
# supported:
#
# {title}           Name of process as executed if parent, or type of child process.
# {listen-addr}     Bind address or '*' followed by TCP or TLS port listening on, or
#                   Unix socket if only that's available.
# {server-mode}     Special mode, i.e. "[sentinel]" or "[cluster]".
# {port}            TCP port listening on, or 0.
# {tls-port}        TLS port listening on, or 0.
# {unixsocket}      Unix domain socket listening on, or "".
# {config-file}     Name of configuration file used.
#
proc-title-template "{title} {listen-addr} {server-mode}"

################################ SNAPSHOTTING  ################################

# Save the DB to disk.
#
# save <seconds> <changes>
#
# Redis will save the DB if both the given number of seconds and the given
# number of write operations against the DB occurred.
#
# Snapshotting can be completely disabled with a single empty string argument
# as in following example:
#
# save ""
#
# Unless specified otherwise, by default Redis will save the DB:
#   * After 3600 seconds (an hour) if at least 1 key changed
#   * After 300 seconds (5 minutes) if at least 100 keys changed
#   * After 60 seconds if at least 10000 keys changed
#
# You can set these explicitly by uncommenting the three following lines.
#
save 3600 1
save 300  100
save 60   10000

# By default Redis will stop accepting writes if RDB snapshots are enabled
# (at least one save point) and the latest background save failed.
# This will make the user aware (in a hard way) that data is not persisting
# on disk properly, otherwise chances are that no one will notice and some
# disaster will happen.
#
# If the background saving process will start working again Redis will
# automatically allow writes again.
#
# However if you have setup your proper monitoring of the Redis server
# and persistence, you may want to disable this feature so that Redis will
# continue to work as usual even if there are problems with disk,
# permissions, and so forth.
stop-writes-on-bgsave-error yes

# Compress string objects using LZF when dump .rdb databases?
# By default compression is enabled as it's almost always a win.
# If you want to save some CPU in the saving child set it to 'no' but
# the dataset will likely be bigger if you have compressible values or keys.
rdbcompression yes

# Since version 5 of RDB a CRC64 checksum is placed at the end of the file.
# This makes the format more resistant to corruption but there is a performance
# hit to pay (around 10%) when saving and loading RDB files, so you can disable it
# for maximum performances.
#
# RDB files created with checksum disabled have a checksum of zero that will
# tell the loading code to skip the check.
rdbchecksum yes

# Enables or disables full sanitation checks for ziplist and listpack etc whe