1.认识插槽
◼ 在开发中,我们会经常封装一个个可复用的组件:
前面我们会通过props传递给组件一些数据,让组件来进行展示;
但是为了让这个组件具备更强的通用性,我们不能将组件中的内容限制为固定的div、span等等这些元素;
比如某种情况下我们使用组件,希望组件显示的是一个按钮,某种情况下我们使用组件希望显示的是一张图片;
我们应该让使用者可以决定某一块区域到底存放什么内容和元素;
◼ 举个栗子:假如我们定制一个通用的导航组件 - NavBar
这个组件分成三块区域:左边-中间-右边,每块区域的内容是不固定;
左边区域可能显示一个菜单图标,也可能显示一个返回按钮,可能什么都不显示;
中间区域可能显示一个搜索框,也可能是一个列表,也可能是一个标题,等等;
右边可能是一个文字,也可能是一个图标,也可能什么都不显示;
2.如何使用插槽
◼ 这个时候我们就可以来定义插槽slot:
插槽的使用过程其实是抽取共性、预留不同;
我们会将共同的元素、内容依然在组件内进行封装;
同时会将不同的元素使用slot作为占位,让外部决定到底显示什么样的元素;
◼ 如何使用slot呢?
Vue中将 <slot> 元素作为承载分发内容的出口;
在封装组件中,使用特殊的元素<slot>就可以为封装组件开启一个插槽;
该插槽插入什么内容取决于父组件如何使用;
3.插槽的默认内容
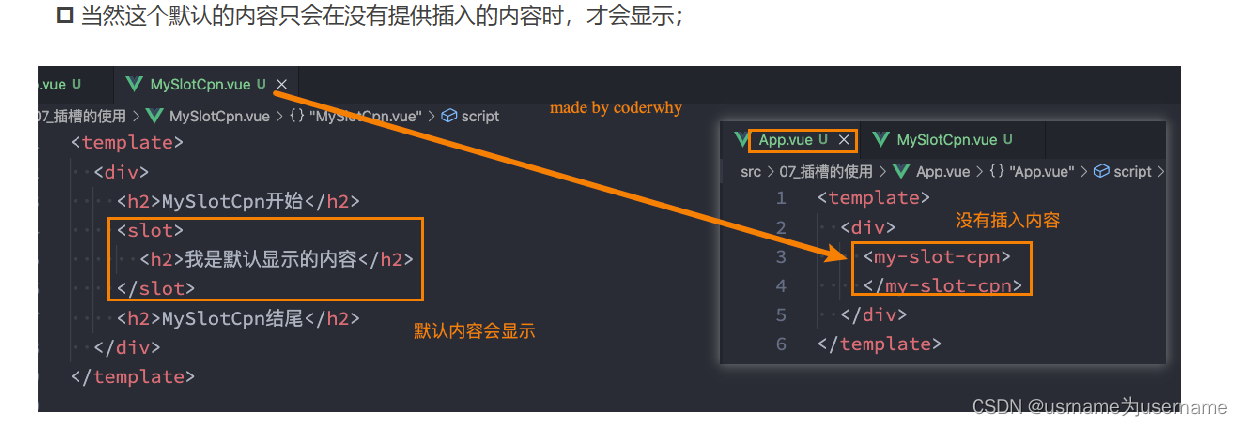
App.vue
<template>
  <div class="app">
    <!-- 1.内容是button -->
    <show-message title="哈哈哈">
      <button>我是按钮元素</button>
    </show-message>

    <!-- 2.内容是超链接 -->
    <show-message>
      <a href="#">百度一下</a>
    </show-message>

    <!-- 3.内容是一张图片 -->
    <show-message>
      <img src="@/img/kobe02.png" alt="">
    </show-message>

    <!-- 4.内容没有传递 -->
    <show-message></show-message>
  </div>
</template>

<script>
  import ShowMessage from './ShowMessage.vue'

  export default {
    components: {
      ShowMessage
    }
  }
</script>

<style scoped>
</style>
showMessage.vue
<template>
  <h2>{{ title }}</h2>
  <div class="content">
    <slot>
      <p>我是默认内容, 哈哈哈</p>
    </slot>
  </div>
</template>

<script>
  export default {
    props: {
      title: {
        type: String,
        default: "我是title默认值"
      }
    }
  }
</script>

<style scoped>
</style>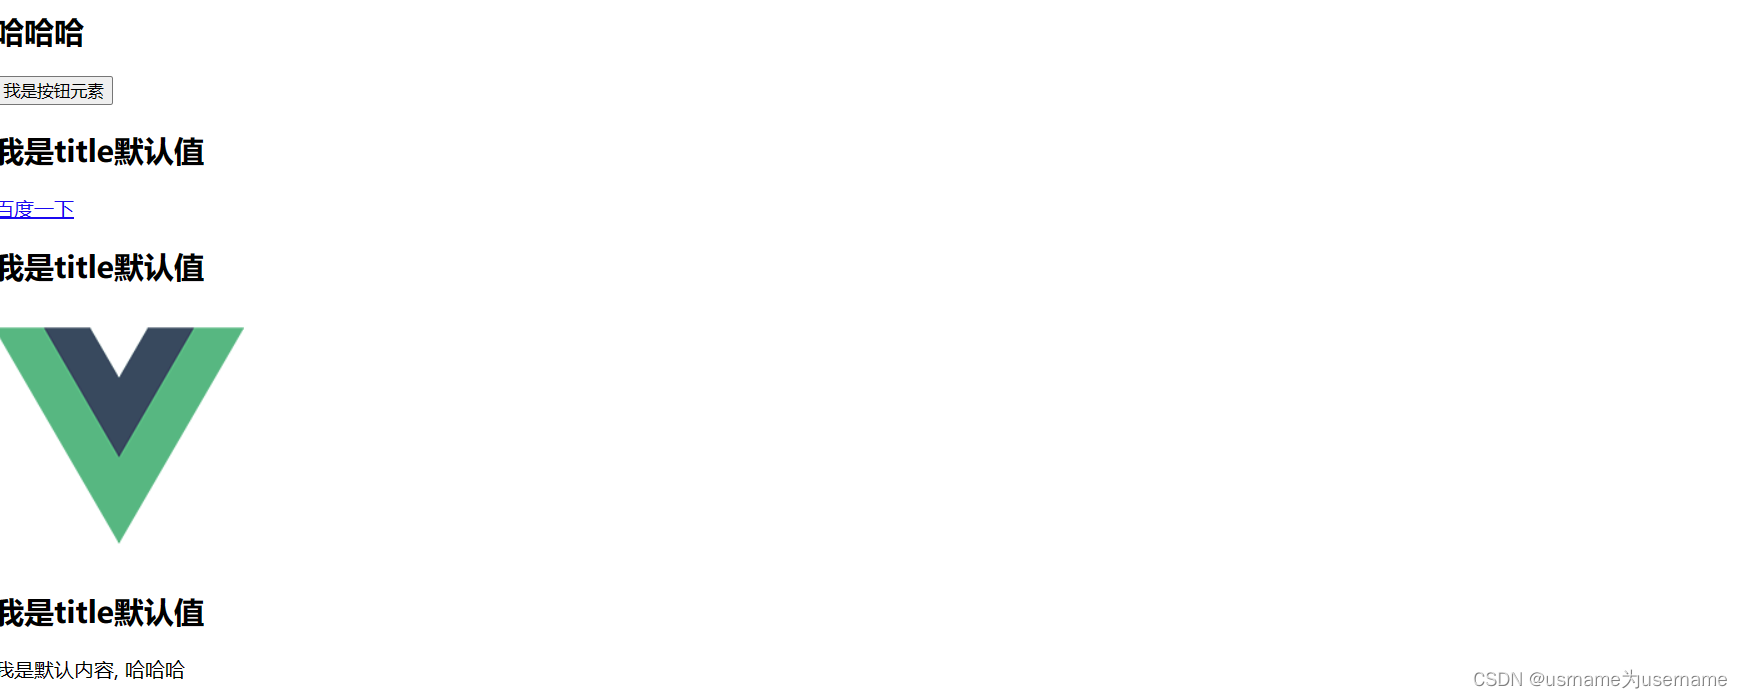
4.具名插槽
当一个组件内多个插槽时,会出现
App.vue
<template>
  <nav-bar>
   <button>返回</button>
	 <span>内容</span>
	 <a href="#">登录</a>
  </nav-bar>
</template>

<script>
  import NavBar from './navBar.vue'

  export default {
    components: {
      NavBar
    }
</script>
navBar.vue
<template>
  <div class="nav-bar">
    <div class="left">
      <slot>left</slot>
    </div>
    <div class="center">
      <slot>center</slot>
    </div>
    <div class="right">
      <slot>right</slot>
    </div>
  </div>
</template>
子组件内预留了三个插槽的位置,在父组件内写了三个标签,但是结果如下:

即这三个插槽内都插入了三个标签
如果不写清楚具体是在哪个插槽内插入,一个具名插槽都没有,则默认在每个插槽内都插入
为了明确到底是什么内容插入什么插槽
每次使用时,将需要插入的内容包裹在 <template v-slot:名字>标签内准确插入,可以缩写为
<template #名字>
App.vue
<template>
  <nav-bar>
    <template v-slot:left>
      <button>返回</button>
    </template>

    <template v-slot:center>
      <span>内容</span>
    </template>

    <template v-slot:right>
      <a href="#">登录</a>
    </template>
  </nav-bar>
</template>

<script>
  import NavBar from './navBar.vue'

  export default {
    components: {
      NavBar
    },
  }
</script>
navBar.vue
给每个插槽加上name
<template>
  <div class="nav-bar">

    <div class="left">
      <slot name="left">left</slot>
    </div>

    <div class="center">
      <slot name="center">center</slot>
    </div>

    <div class="right">
      <slot name="right">right</slot>
    </div>

  </div>
</template>
一个不带 name 的slot,带有隐含的名字 default;
  <div class="other">
    <slot name="default"></slot>
  </div>
5.动态插槽
◼ 什么是动态插槽名呢?
目前我们使用的插槽名称都是固定的;
比如 v-slot:left、v-slot:center等等;
我们可以通过 v-slot:[dynamicSlotName]方式动态绑定一个名称;
App.vue
<nav-bar>
    <template v-slot:[position]>
      <a href="#">注册</a>
    </template>
  </nav-bar>
  <button @click=" position = 'left' ">左边</button>
  <button @click=" position = 'center' ">中间</button>
  <button @click=" position = 'right' ">右边</button>
data内部position初始值为center
6.具名插槽的缩写
具名插槽使用的时候缩写:
跟 v-on 和 v-bind 一样,v-slot 也有缩写;
即把参数之前的所有内容 (v-slot:) 替换为字符 #;
    <template #center>
      <span>内容</span>
    </template>

    <template v-slot:right>
      <a href="#">登录</a>
    </template>
7.作用域插槽(难)
◼ 在Vue中有渲染作用域的概念:
父级模板里的所有内容都是在父级作用域中编译的;
子模板里的所有内容都是在子作用域中编译的;
◼ 如何理解这句话呢?我们来看一个案例:
在我们的案例中ChildCpn自然是可以让问自己作用域中的title内容的;
但是在App中,是访问不了ChildCpn中的内容的,因为它们是跨作用域的访问;

◼ 但是有时候我们希望插槽可以访问到子组件中的内容是非常重要的:
当一个组件被用来渲染一个数组元素时,我们使用插槽,并且希望插槽中没有显示每项的内容;
这个Vue给我们提供了作用域插槽;
◼ 我们来看下面的一个案例:
1.在App.vue中定义好数据
2.传递给ShowNames组件中
3.ShowNames组件中遍历names数据
4.定义插槽的prop
5.通过v-slot:default的方式获取到slot的props
6.使用slotProps中的item和index
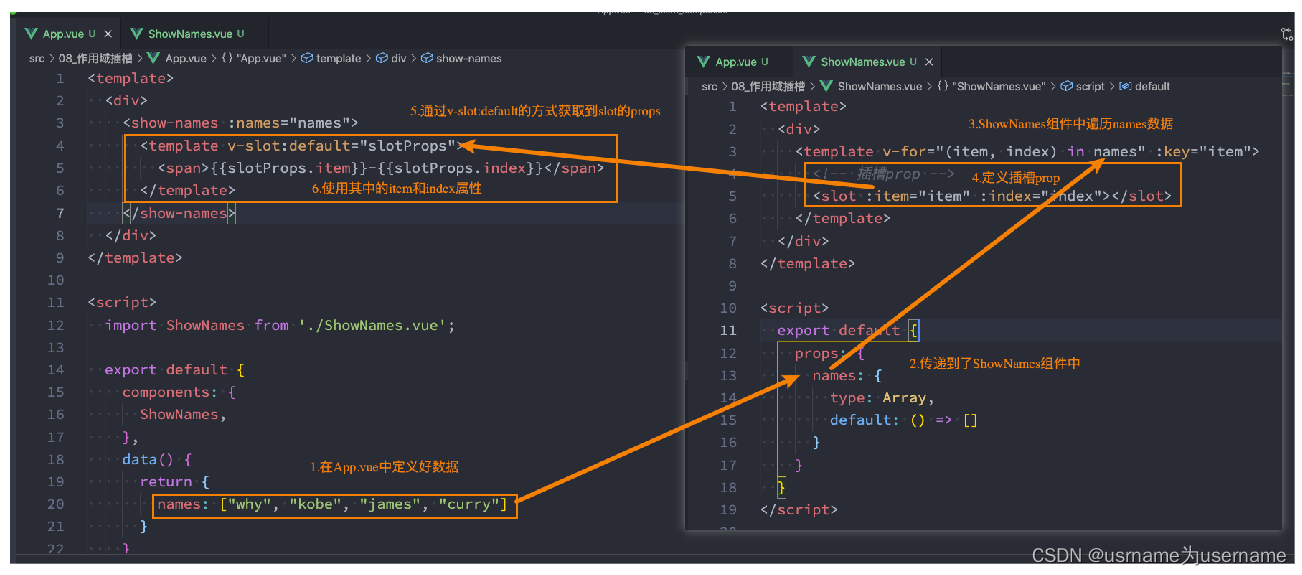
App.vue
<template>
  <div class="app">
    <!-- 1.tab-control -->
    <tab-control :titles="['衣服', '鞋子', '裤子']"
                 @tab-item-click="tabItemClick"/>

    <!-- <tab-control :titles="['流行', '最新', '优选']"/> -->

    <!-- 2.展示内容 -->
    <h1>{{ pageContents[currentIndex] }}</h1>

    <tab-control :titles="['衣服', '鞋子', '裤子']"
                 @tab-item-click="tabItemClick">
      <button>hhh</button>
    </tab-control>
  </div>
</template>
TabControl.vue
<template>
  <div class="tab-control">
    <template v-for="(item, index) in titles" :key="item">
      <div class="tab-control-item"
           :class="{ active: index === currentIndex }"
           @click="itemClick(index)">
        <slot><span>{{ item }}</span></slot>
      </div>
    </template>
  </div>
</template>
如果我们想要让插槽内button的内容变为item,从子组件的data中获取,而非写死的内容
直接在父组件的button元素内使用mustache无法获取子组件内定义的item
App.vue
    <tab-control :titles="['衣服', '鞋子', '裤子']"
                 @tab-item-click="tabItemClick">
      <template v-slot:default="props">
        <button>{{props.item}}</button>
      </template>
    </tab-control>
简写一下具名插槽
    <tab-control :titles="['衣服', '鞋子', '裤子']"
                 @tab-item-click="tabItemClick">
      <template #default="props">
        <button>{{props.item}}</button>
      </template>
    </tab-control>
TabControl.vue
    <template v-for="(item, index) in titles" :key="item">
      <div class="tab-control-item"
           :class="{ active: index === currentIndex }"
           @click="itemClick(index)">
        <slot :item="item">
          <span>{{ item }}</span>
        </slot>
      </div>
    </template>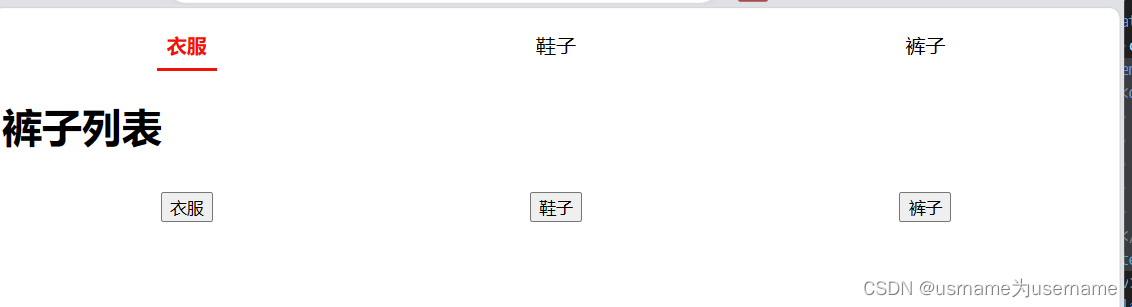
独占默认插槽的缩写