目录
1. 存储 Bean 对象
1.1 配置扫描路径
1.2 添加注解存储 Bean 对象
1.2.1 @Controller(控制器存储)
1.2.2 @Service(服务存储)
1.2.3 @Repository(仓库存储)
1.2.4 @Component(组件存储)
1.2.5 @Configuration(配置存储)
1.3 使用多个类注解的原因
1.3.1 五大注解之间的关系
1.3.1 Bean 的命名规则
1.4 方法注解 @Bean
1.4.1 方法注解要配合类注解使用
1.4.2 重命名 Bean
1.4.3 给有参数的方法添加 Bean 注解
1.4.4 Spring xml 配置的方式进行传参
2. 根据日志定位问题
NoSuchBeanDefinitionException -- 没有找到 Bean

在 Spring 中想要更简单的存储和读取对象的核心是使用注解。
1. 存储 Bean 对象
之前我们存储 Bean 时,需要在 spring-config 中添加⼀行 bean 注册内容才行,如下图所示:

但是现在我们可以通过注解来代替上面的配置。
1.1 配置扫描路径
想要将对象成功的存储到 Spring 中,我们需要配置⼀下存储对象的扫描包路径,只有被配置的包下的所有类,添加了注解才能被正确的识别并保存到 Spring 中。
在 spring-config.xml 添加如下配置:
<?xml version="1.0" encoding="UTF-8"?>
<beans xmlns="http://www.springframework.org/schema/beans"
       xmlns:xsi="http://www.w3.org/2001/XMLSchema-instance"
       xmlns:content="http://www.springframework.org/schema/context"
       xsi:schemaLocation="http://www.springframework.org/schema/beans http://www.springframework.org/schema/beans/spring-beans.xsd http://www.springframework.org/schema/context https://www.springframework.org/schema/context/spring-context.xsd">
    <content:component-scan base-package="com.bit.service"></content:component-scan>
</beans>
也就是说,即使添加了注解,如果不是在配置的扫描包下的类对象,也是不能被存储到 Spring 中的。
1.2 添加注解存储 Bean 对象
想要将对象存储在 Spring 中,有两种注解类型可以实现:
1. 类注解:@Controller、@Service、@Repository、@Component、@Configuration。
2. 方法注解:@Bean。
1.2.1 @Controller(控制器存储)
使用 @Controller 存储对象:
@Controller
public class UseController {
    public void sayHi(){
        System.out.println("hi,Controller...");
    }
}
接下来取对象:
public class App {
    public static void main(String[] args) {
        // 得到 Spring 上下文
        ApplicationContext context = new ClassPathXmlApplicationContext("spring-config.xml");
        // 获取 Bean 对象
        UserController user = (UserController) context.getBean("userController");
        // 使用 Bean
        user.sayHi();
    }
}
可以发现在使用 getBean() 方法时,我们直接使用了注解下类名的小驼峰的形式,可以看到运行无误:

1.2.2 @Service(服务存储)
使用 @Service 存储对象:
@Service
public class UserService {
    public void sayHi(){
        System.out.println("Hi,Service...");
    }
}
接下来取对象:
public class App {
    public static void main(String[] args) {
        // 得到 Spring 上下文
        ApplicationContext context = new ClassPathXmlApplicationContext("spring-config.xml");
        // 获取 Bean 对象
        UserService userService = (UserService)context.getBean("userService");
        // 使用 Bean
        userService.sayHi();
    }
}
1.2.3 @Repository(仓库存储)
使用 @Repository 存储对象:
@Repository
public class UserRepository {
    public void sayHi(){
        System.out.println("Hi,Repository...");
    }
}
接下来取对象:
public class App {
    public static void main(String[] args) {
        // 得到 Spring 上下文
        ApplicationContext context = new ClassPathXmlApplicationContext("spring-config.xml");
        // 获取 Bean 对象
        UserRepository userRepository = (UserRepository)context.getBean("userRepository");
        // 使用 Bean
        userRepository.sayHi();
    }
}
1.2.4 @Component(组件存储)
使用 @Component 存储对象:
@Component
public class UserComponent {
    public void sayHi(){
        System.out.println("Hi,Component...");
    }
}
接下来取对象:
public class App {
    public static void main(String[] args) {
        // 得到 Spring 上下文
        ApplicationContext context = new ClassPathXmlApplicationContext("spring-config.xml");
        // 获取 Bean 对象
        UserComponent userComponent = (UserComponent)context.getBean("userComponent");
        // 使用 Bean
        userComponent.sayHi();
    }
}
1.2.5 @Configuration(配置存储)
使用 @Configuration 存储对象:
@Configuration
public class UserConfiguartion {
    public void sayHi(){
        System.out.println("Hi,Configuration...");
    }
}
接下来取对象:
public class App {
    public static void main(String[] args) {
        // 得到 Spring 上下文
        ApplicationContext context = new ClassPathXmlApplicationContext("spring-config.xml");
        // 获取 Bean 对象
        UserConfiguartion userConfiguartion = (UserConfiguartion)context.getBean("userConfiguartion");
        // 使用 Bean
        userConfiguartion.sayHi();
    }
}
1.3 使用多个类注解的原因
通过不同的类注解更加明确当前类的用途:
- @Controller:表示的是业务逻辑层,控制器,通常是指程序的入口。比如参数校验、参数类型转换、前置处理工作等;
- @Servie:服务层,一般写业务代码、服务编排、调用 DB、调用第三方接口等;
- @Repository:持久层,仓库,通常是指 DB 操作相关的代码(Dao、mapper);
- @Component:其他的对象;
- @Configuration:配置层。
1.3.1 五大注解之间的关系
查看 @Controller / @Service / @Repository / @Configuration 等注解的源码发现:

这些注解里面都有⼀个注解 @Component,说明它们本身就是属于 @Component 的“子类”。
1.3.1 Bean 的命名规则
通过以上举例我们猜测:注解对应的 Bean 的名称是首字母小写。那么,真的如此吗?此时就需要我们去查看一下官方的文档。按住 CTRL + N 键进行搜索:

可以看到第四个是我们所需要的关于注解的,点进去后可以看到:


因此,我们得出结论:
当类名前两位均为大写时,需要返回自身类名;否则,返回首字母小写后的类名。
1.4 方法注解 @Bean
1.4.1 方法注解要配合类注解使用
类注解是添加到某个类上的,而方法注解是放到某个方法上的,如以下代码的实现:
public class Users {
    private String name;
    private Integer age;

    public String getName(){
        return name;
    }
    public void setName(String name){
        this.name = name;
    }
    public void setAge(Integer age){
        this.age = age;
    }
@Configuration
public class BeanConfig {
    @Bean
    public Users user(){
        Users user = new Users();
        user.setName("小明");
        user.setAge(18);
        return user;
    }
    public Users user2(){
        Users user = new Users();
        user.setName("小蓝");
        user.setAge(19);
        return user;
    }
}
public class App {
public static void main(String[] args) {
// 得到 Spring 上下文
ApplicationContext context = new ClassPathXmlApplicationContext("spring-config.xml");
// 获取 Bean 对象
Users users = (Users) context.getBean("user");
// 使用 Bean
System.out.println(users.getName());
}
}

@Bean 无法直接单独使用,必须搭配五大类注解使用。
Bean 对应生成的 Bean 名称是方法名。
1.4.2 重命名 Bean
@Configuration
public class BeanConfig {
    @Bean("aaa")
    public Users user(){
        Users user = new Users();
        user.setName("小明");
        user.setAge(18);
        return user;
    }
    public Users user2(){
        Users user = new Users();
        user.setName("小蓝");
        user.setAge(19);
        return user;
    }
}
@Configuration
public class BeanConfig {
@Bean(name={"aaa","user"})
public Users user(){
Users user = new Users();
user.setName("小明");
user.setAge(18);
return user;
}
public Users user2(){
Users user = new Users();
user.setName("小蓝");
user.setAge(19);
return user;
}
}
@Configuration
public class BeanConfig {
    @Bean({"aaa","user"})
    public Users user(){
        Users user = new Users();
        user.setName("小明");
        user.setAge(18);
        return user;
    }
    public Users user2(){
        Users user = new Users();
        user.setName("小蓝");
        user.setAge(19);
        return user;
    }
}
以上三种方法均可实现 Bean 的重命名,重命名之后则无法使用原来的方法名来获取 Bean:

对五大类注解同样可以使用以上重命名的方法。
1.4.3 给有参数的方法添加 Bean 注解
@Configuration
public class BeanConfig {
    @Bean({"aaa","user"})
    public Users user(Integer age){
        Users user = new Users();
        user.setName("小明");
        user.setAge(age);
        return user;
    }
    public Users user2(){
        Users user = new Users();
        user.setName("小蓝");
        user.setAge(19);
        return user;
    }
}
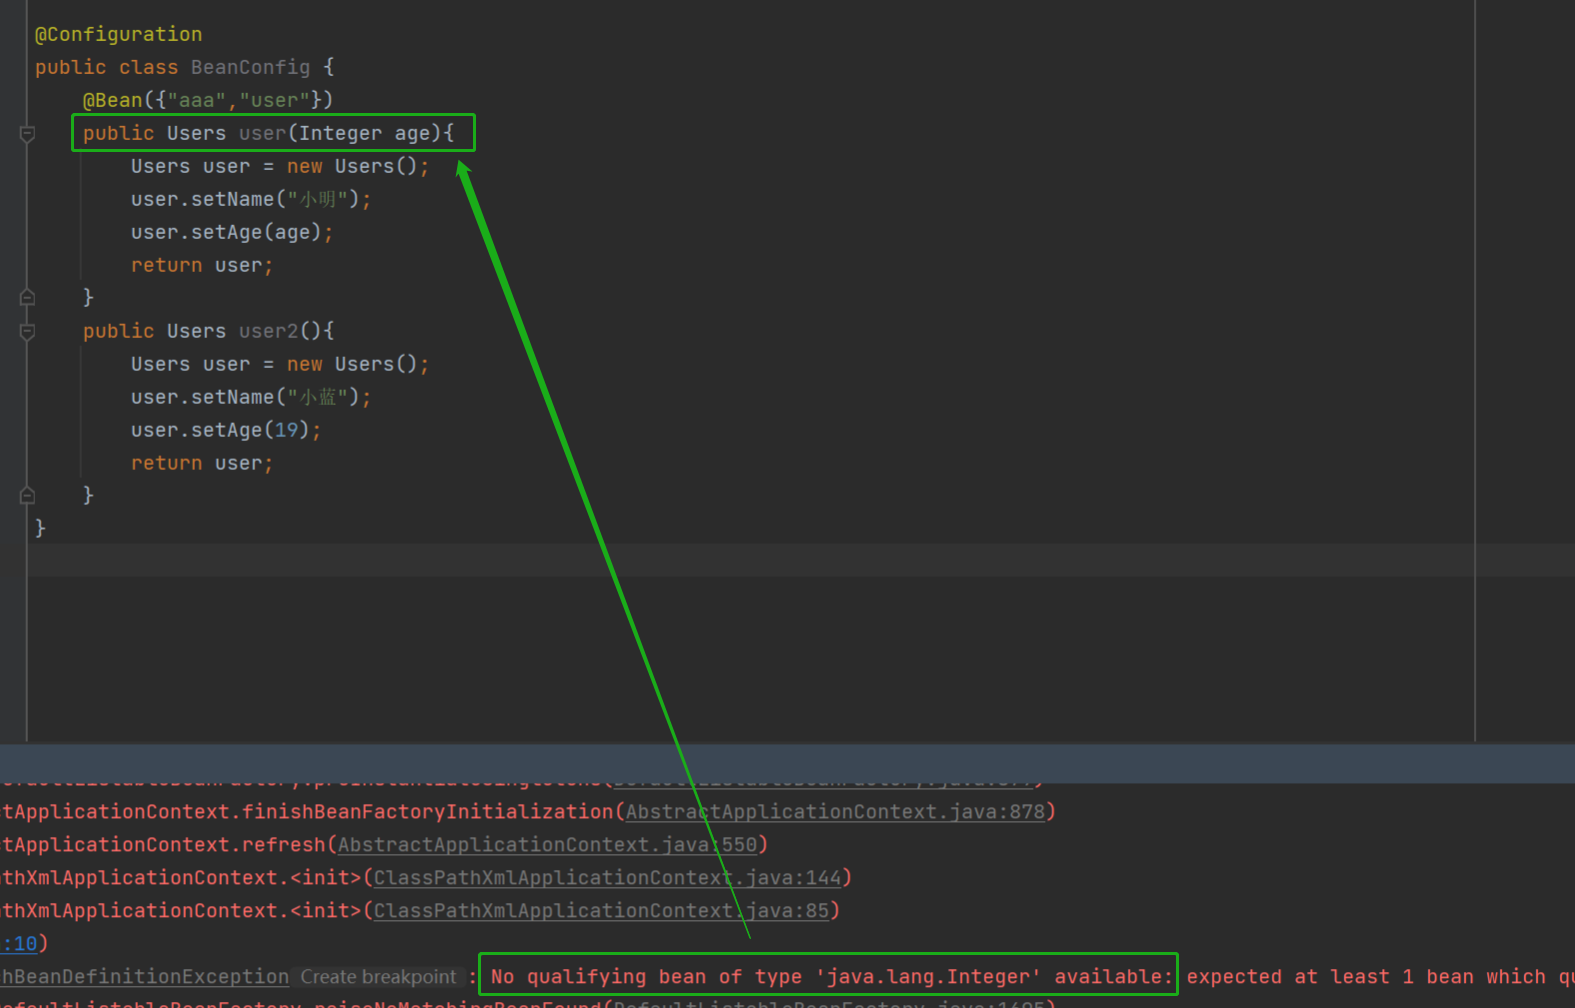
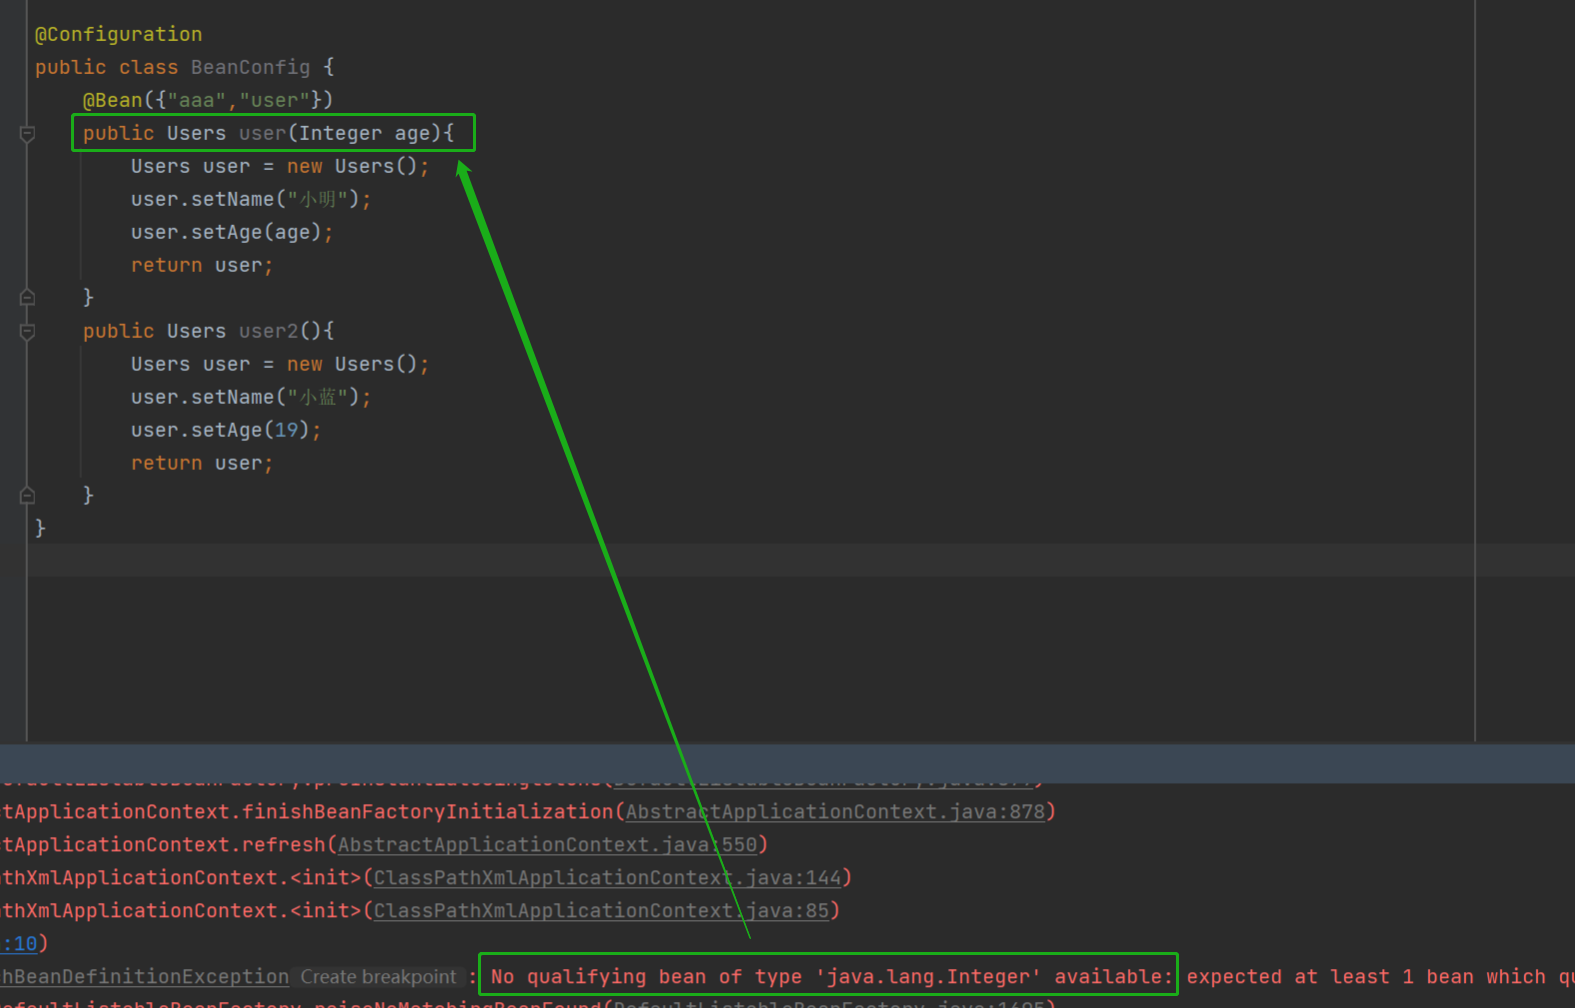
直接运行上述代码会报错,因为并没有找到 age 这个对象:
此时修改代码如下:
@Configuration
public class BeanConfig {
    @Bean
    public Integer age(){
        return 15;
    }
    @Bean({"aaa","user"})
    public Users user(Integer age){
        Users user = new Users();
        user.setName("小明");
        user.setAge(age);
        return user;
    }
    public Users user2(){
        Users user = new Users();
        user.setName("小蓝");
        user.setAge(19);
        return user;
    }
}
将对象交给 Spring 管理后,会自动匹配对应的类型,还可以通过其他方式去读取(比如配置文件中)。当只有一个 @Bean 注解时,根据类型进行匹配;当有多个 @Bean 时,根据名称进行匹配。
1.4.4 Spring xml 配置的方式进行传参
public class BeanConfig {
    public Users user(String name){
        Users user = new Users();
        user.setName(name);
        user.setAge(12);
        return user;
    }
}
<bean id="user" class="springcore">
<constructor-arg name="name" value="小明"></constructor-arg>
</bean>当需要注入的是对象时,要写引用:
public class UserController {
    private UserService userService;
    public UserController(UserService userService){
        this.userService = userService;
    }
    public void sayHi(){
        System.out.println("hi,Controller...");
    }
}
<bean id="user" class="springcore">
    <constructor-arg name="userService" ref="userService"></constructor-arg>
</bean>
2. 根据日志定位问题
NoSuchBeanDefinitionException -- 没有找到 Bean
Exception in thread "main" org.springframework.beans.factory.NoSuchBeanDefinitionException: No bean named 'userController' available
没有名为“userController”的bean可用。

可以看到此时是因为注解被注释了,不再生效的原因。
出现以上日志时还有另一种可能原因,如下图所示:

也就是说当我们的扫描路径与实际不符时,同样会出现找不到 Bean 的情况。
除了以上两种情况当我们通过注解获取 Bean 时,类名不符合要求同样会生成以上的日志,具体如下图所示:

还有一种情况是因为将注解重命名了,但是使用的依然时未重命名之前的注解,同样会生成以上日志:

Caused by: org.springframework.beans.factory.NoSuchBeanDefinitionException: No qualifying bean of type 'java.lang.Integer' available: expected at least 1 bean which qualifies as autowire candidate. Dependency annotations: {}
没有可用的“java.lang.Integer”类型的限定bean。
