文章目录
- 一、项目启动流程
- 二、SpringBootApplication.java源码解析
- 1.准备工作
- 2.源码
- 3.自定义注解
- 4.组合注解
- 5.注解@ComponentScan
- 过滤器
- 6.注解@SpringBootConfiguration
- @Configuration
- 7.注解@EnableAutoConfiguration
- (1)Spring手动装配
- 使用XML配置文件
- 使用Java注解
- 使用Java类
- (2)Spring Boot自动装配
- @AutoConfigurationPackage
- @Import(AutoConfigurationImportSelector.class)
本文章是Spring Boot原理分析系列博客的第一篇,将会介绍一些准备工作和Spring Boot的项目启动的原理和源码。
一、项目启动流程
-
加载Spring Boot的启动类: Spring Boot应用程序的入口点是一个带有@SpringBootApplication注解的Java类。该注解会触发Spring Boot的自动配置和组件扫描。
-
创建Spring应用程序上下文: 在启动类中,使用SpringApplication.run()方法创建一个Spring应用程序上下文。该方法会加载所有的配置、组件和依赖,并创建一个可用于管理应用程序的上下文对象。
-
执行自动装配: Spring Boot会根据类路径上的依赖和配置,自动配置应用程序的各个组件。它会根据约定和默认值,自动配置数据库连接、Web服务器、日志记录等功能。
-
启动内嵌的Web服务器: 如果应用程序是一个Web应用程序,Spring Boot会自动启动一个内嵌的Web服务器(如Tomcat、Jetty等),并将应用程序部署到该服务器上。
-
运行应用程序: 一旦所有的配置和组件都加载完毕,Spring Boot会调用应用程序的主要方法,开始执行应用程序的业务逻辑。
二、SpringBootApplication.java源码解析
1.准备工作
- 环境:
jdk 1.8 + Maven 3.3.9或以上版本 + IDEA
SpringBoot 2.7.13
- 启动类:
创建项目后会自动创建一个启动类,运行main方法就可以启动项目,代码如下:
package tracy.springbootcode;

@SpringBootApplication
public class SpringBootCodeApplication {

    public static void main(String[] args) {
        SpringApplication.run(SpringBootCodeApplication.class, args);
    }

}
可以说,@SpringBootApplication是其中最关键的东西。
2.源码
@Target(ElementType.TYPE)
@Retention(RetentionPolicy.RUNTIME)
@Documented
@Inherited
@SpringBootConfiguration
@EnableAutoConfiguration
@ComponentScan(excludeFilters = { @Filter(type = FilterType.CUSTOM, classes = TypeExcludeFilter.class),
		@Filter(type = FilterType.CUSTOM, classes = AutoConfigurationExcludeFilter.class) })
public @interface SpringBootApplication {

	@AliasFor(annotation = EnableAutoConfiguration.class)
	Class<?>[] exclude() default {};

	@AliasFor(annotation = EnableAutoConfiguration.class)
	String[] excludeName() default {};


	@AliasFor(annotation = ComponentScan.class, attribute = "basePackages")
	String[] scanBasePackages() default {};

	@AliasFor(annotation = ComponentScan.class, attribute = "basePackageClasses")
	Class<?>[] scanBasePackageClasses() default {};

	@AliasFor(annotation = ComponentScan.class, attribute = "nameGenerator")
	Class<? extends BeanNameGenerator> nameGenerator() default BeanNameGenerator.class;

	@AliasFor(annotation = Configuration.class)
	boolean proxyBeanMethods() default true;
}
3.自定义注解
关于自定义注解的相关知识可以先看我这篇博客了解一下。
以下四个元注解用于定义@SpringBootApplication这个注解:
@Target(ElementType.TYPE)//注解的作用目标是类、接口(包括注解类型)或枚举声明。
@Retention(RetentionPolicy.RUNTIME)
@Documented
@Inherited//此注解可被继承
4.组合注解
@SpringBootApplication是一个组合注解,它等价于同时标注 @Configuration + @EnableAutoConfiguration + @ComponentScan 。
@SpringBootConfiguration
@EnableAutoConfiguration
@ComponentScan(excludeFilters = { @Filter(type = FilterType.CUSTOM, classes = TypeExcludeFilter.class),
		@Filter(type = FilterType.CUSTOM, classes = AutoConfigurationExcludeFilter.class) })
public @interface SpringBootApplication {
	...
}

5.注解@ComponentScan
可以指定包扫描的根路径,让 SpringFramework 来扫描指定包及子包下的组件;也可以不指定路径,默认扫描当前配置类所在包及子包里的所有组件,所以启动类才会放到所有类所在包的最外层。
@ComponentScan(excludeFilters = { @Filter(type = FilterType.CUSTOM, classes = TypeExcludeFilter.class),
		@Filter(type = FilterType.CUSTOM, classes = AutoConfigurationExcludeFilter.class) })
过滤器
这段代码是使用Spring框架中的注解来指定Spring Boot自动配置时需要排除的类。
具体来说,这里使用了两个@Filter注解,分别指定了需要排除的类的类型以及具体的类名:
-
第一个@Filter注解的type属性值为FilterType.CUSTOM,表示需要使用自定义的过滤器来进行过滤;
classes属性指定了具体的自定义过滤器类,这里是TypeExcludeFilter.class。 它会从 BeanFactory (可以暂时理解成IOC容器)中获取所有类型为 TypeExcludeFilter 的组件,去执行自定义的过滤方法。由此可见,TypeExcludeFilter 的作用是做扩展的组件过滤。 -
第二个@Filter注解同样是type属性值为FilterType.CUSTOM,表示需要使用自定义过滤器;
classes属性指定了另一个自定义过滤器类,这里是AutoConfigurationExcludeFilter.class。会将不需要自动配置的类屏蔽掉。
这两个自定义过滤器的作用是根据一定的规则来排除不需要自动配置的类。例如,TypeExcludeFilter可以排除特定类型的类,AutoConfigurationExcludeFilter可以排除不需要自动配置的类。这样就可以在Spring Boot自动配置过程中,针对某些类进行自定义的过滤和排除,从而更加灵活地控制自动配置的行为。
6.注解@SpringBootConfiguration
- @SpringBootConfiguration的定义:
@Target({ElementType.TYPE})
@Retention(RetentionPolicy.RUNTIME)
@Documented
@Configuration
@Indexed
public @interface SpringBootConfiguration {
    @AliasFor(
        annotation = Configuration.class
    )
    boolean proxyBeanMethods() default true;
}
@SpringBootConfiguration被 @Configuration 标注,说明它实际上是标注配置类的,而且是标注主启动类的。
也就是说,在启动类上使用这个注解表明该类是一个配置类,也是当前项目的主启动类。
@Configuration
被 @Configuration 标注的类,会被 Spring 的IOC容器认定为配置类。一个被 @Configuration 标注的类,相当于一个 applicationContext.xml 的配置文件。
7.注解@EnableAutoConfiguration
这一个注解是spring boot自动装配的核心注解。
(1)Spring手动装配
Spring Framework提供了多种手动装配的方式,其中比较常见的有以下几种:
使用XML配置文件
在XML配置文件中使用<bean>元素配置需要装配的Bean对象,然后使用ClassPathXmlApplicationContext或者XmlWebApplicationContext启动Spring容器。Spring容器会自动解析XML配置文件,并将其中配置的Bean对象注册为Spring容器中的Bean对象。
示例代码如下:
<beans>
    <bean id="myService" class="com.example.service.MyServiceImpl"/>
    <bean id="myController" class="com.example.controller.MyController">
        <property name="myService" ref="myService"/>
    </bean>
</beans>
使用Java注解
在Java类中使用@Configuration注解标记一个配置类,然后在该类中使用@Bean注解标记需要装配的Bean对象。然后使用AnnotationConfigApplicationContext启动Spring容器。Spring容器会自动扫描@Configuration注解的类,并将其中使用@Bean注解标记的方法的返回值注册为Spring容器中的Bean对象。
示例代码如下:
@Configuration
public class AppConfig {
    @Bean
    public MyService myService() {
        return new MyServiceImpl();
    }

    @Bean
    public MyController myController() {
        MyController controller = new MyController();
        controller.setMyService(myService());
        return controller;
    }
}
使用Java类
直接在Java类中创建需要装配的Bean对象,并将其注册到Spring容器中。然后使用AnnotationConfigApplicationContext启动Spring容器。Spring容器会自动扫描Java类中注册的Bean对象,并将其注册为Spring容器中的Bean对象。
示例代码如下:
public class MyConfig {
    @Bean
    public MyService myService() {
        return new MyServiceImpl();
    }

    @Bean
    public MyController myController() {
        MyController controller = new MyController();
        controller.setMyService(myService());
        return controller;
    }
}

public class MyApp {
    public static void main(String[] args) {
        AnnotationConfigApplicationContext context = new AnnotationConfigApplicationContext(MyConfig.class);
        MyController controller = context.getBean(MyController.class);
        // ...
    }
}
需要注意的是,Spring Framework的手动装配方式适用于需要对Bean进行复杂的配置或者需要根据特定条件进行Bean的选择和装配的场景。对于简单的Bean对象,使用自动装配方式更加方便快捷。
(2)Spring Boot自动装配
SpringBoot的自动配置完全由 @EnableAutoConfiguration 开启,这一注解是上一篇博客中所介绍的@SpringBootApplication注解中的组成之一。
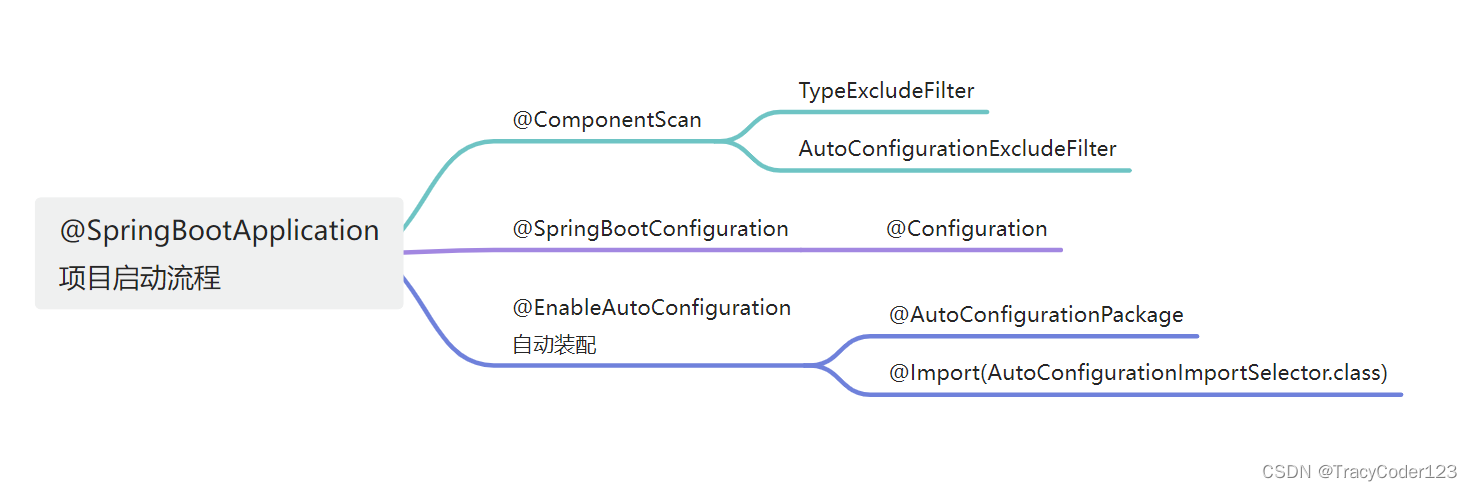
从@EnableAutoConfiguration的定义可以看出,@AutoConfigurationPackage注解是它的组成之一。
@Target(ElementType.TYPE)
@Retention(RetentionPolicy.RUNTIME)
@Documented
@Inherited
@AutoConfigurationPackage
@Import(AutoConfigurationImportSelector.class)
public @interface EnableAutoConfiguration {

	/**
	 * Environment property that can be used to override when auto-configuration is
	 * enabled.
	 */
	String ENABLED_OVERRIDE_PROPERTY = "spring.boot.enableautoconfiguration";

	/**
	 * Exclude specific auto-configuration classes such that they will never be applied.
	 * @return the classes to exclude
	 */
	Class<?>[] exclude() default {};

	/**
	 * Exclude specific auto-configuration class names such that they will never be
	 * applied.
	 * @return the class names to exclude
	 * @since 1.3.0
	 */
	String[] excludeName() default {};

}
@AutoConfigurationPackage
@AutoConfigurationPackage注解的作用是将当前类所在的包及其子包中的所有类都注册到Spring Boot的自动配置中。这样,Spring Boot就可以扫描到这些类,并根据它们的特性和需求进行自动配置。
@Import(AutoConfigurationImportSelector.class)
@Import(AutoConfigurationImportSelector.class)注解的作用是让Spring Boot自动扫描classpath下的META-INF/spring.factories文件,从中获取所有的自动配置类,并将这些自动配置类导入到Spring Boot应用程序中。
spring.factories是一个标准的Java properties文件,它可以在classpath下的任何SpringFramework的jar包中找到。在这个文件中,可以通过键值对的方式指定自动配置类的全限定类名,例如:
org.springframework.boot.autoconfigure.EnableAutoConfiguration=\
org.springframework.boot.autoconfigure.jdbc.DataSourceAutoConfiguration,\
org.springframework.boot.autoconfigure.orm.jpa.HibernateJpaAutoConfiguration
这个键值对指定了两个自动配置类:DataSourceAutoConfiguration和HibernateJpaAutoConfiguration。在Spring Boot启动应用程序时,Spring Boot会自动扫描到这些自动配置类,并根据它们的特性和需求进行自动配置。





![[疑难杂症2023-004]停止服务器自动启动的服务,解决端口占用的问题](https://img-blog.csdnimg.cn/cde9bae1d1e14919adffbbe24dc1e336.png)

