多线程——线程同步器CountDownLatch
- (一)CountDownLatch案例入门
- 【1】CountDownLatch和join的区别
- 【2】CountDownLatch案例一:等待线程等待工作线程
- 【3】CountDownLatch案例二:主线程main等待子线程
- 【4】CountDownLatch案例三:线程池主线程等待子线程
- (二)CountDownLatch的实现原理和源码分析
- 【1】构造方法
- 【2】await() 源码解析:阻塞线程进入等待队列里自旋
- 【3】countDown() 源码解析:计数器减1
- 【4】如何唤醒所有调用 await() 等待的线程呢?
- (三)CountDownLatch的流程总结
(一)CountDownLatch案例入门
【1】CountDownLatch和join的区别
在日常开发中经常会遇到需要在主线程中开启多个线程去并行执行任务,并且主线程需要等待所有子线程执行完毕后再进行汇总的场景。
之前可以使用join方法实现,但是join方法不够灵活,join方法需要线程Thread调用,而在项目中都避免直接操作线程,而是使用线程池来管理线程,这时候就没有办法直接调用这些线程的join方法了,这个时候就需要使用CountDownLatch了。
CountDownLatch是使用计数器来允许子线程运行完毕或者在运行中递减计数。
【2】CountDownLatch案例一:等待线程等待工作线程
下面代码演示2个等待线程通过CountDownLatch去等待3个工作线程完成操作:工作线程在执行结束后调用countDown方法,等待线程在执行开始前调用await方法
public class CountDownLatchTest {

    public static void main(String[] args) throws InterruptedException {
        // 让2个线程去等待3个三个工作线程执行完成
        CountDownLatch c = new CountDownLatch(3);

        // 2 个等待线程
        WaitThread waitThread1 = new WaitThread("wait-thread-1", c);
        WaitThread waitThread2 = new WaitThread("wait-thread-2", c);

        // 3个工作线程
        Worker worker1 = new Worker("worker-thread-1", c);
        Worker worker2 = new Worker("worker-thread-2", c);
        Worker worker3 = new Worker("worker-thread-3", c);

        // 启动所有线程
        waitThread1.start();
        waitThread2.start();
        Thread.sleep(1000);
        worker1.start();
        worker2.start();
        worker3.start();
    }
}

/**
 * 等待线程
 */
class WaitThread extends Thread {

    private String name;
    private CountDownLatch c;

    public WaitThread(String name, CountDownLatch c) {
        this.name = name;
        this.c = c;
    }

    @Override
    public void run() {
        try {
            // 等待
            System.out.println(this.name + " wait...");
            c.await();
            System.out.println(this.name + " continue running...");
        } catch (InterruptedException e) {
            e.printStackTrace();
        }
    }
}

/**
 * 工作线程
 */
class Worker extends Thread {

    private String name;
    private CountDownLatch c;

    public Worker(String name, CountDownLatch c) {
        this.name = name;
        this.c = c;
    }

    @Override
    public void run() {
        System.out.println(this.name + " is running...");
        try {
            Thread.sleep(2);
        } catch (InterruptedException e) {
            e.printStackTrace();
        }
        System.out.println(this.name + " is end.");
        c.countDown();
    }
}
运行结果:
wait-thread-1 wait...
wait-thread-2 wait...
worker-thread-3 is running...
worker-thread-2 is running...
worker-thread-1 is running...
worker-thread-1 is end.
worker-thread-3 is end.
worker-thread-2 is end.
wait-thread-1 continue running...
wait-thread-2 continue running...

Process finished with exit code 0
【3】CountDownLatch案例二:主线程main等待子线程
public class ThreadTest {

    /**初始化CountDownLatch,值为线程数量*/
    private static final CountDownLatch ctl = new CountDownLatch(10);

    public static void main(String[] args)throws Exception{
        System.out.println("主线程正在执行前:"+Thread.currentThread().getName());
        test3();
        ctl.await(20, TimeUnit.SECONDS);//最多等待20秒,不管子线程完没完
        System.out.println("主线程正在执行后:"+Thread.currentThread().getName());
    }


    public static void test3(){
        try {
            for (int i = 1 ;i <= 10;i ++){
                Thread.sleep(1000);
                new Thread(()->{
                    System.out.println("子线程正在执行:"+Thread.currentThread().getName());
                }).start();
                ctl.countDown();
            }
        }catch (Exception ex){
            ex.printStackTrace();
        }
    }

}
执行结果
主线程正在执行前:main
子线程正在执行:Thread-0
子线程正在执行:Thread-1
子线程正在执行:Thread-2
子线程正在执行:Thread-3
子线程正在执行:Thread-4
子线程正在执行:Thread-5
子线程正在执行:Thread-6
子线程正在执行:Thread-7
子线程正在执行:Thread-8
子线程正在执行:Thread-9
主线程正在执行后:main
【4】CountDownLatch案例三:线程池主线程等待子线程
利用 CountDownLatch 定义了要等待的子线程数量,这样在该统计数量不为0的时候,主线代码暂时挂起,直到所有的子线程执行完毕(调用countDown()方法)后主线程恢复执行。否则就需要使用轮询的方法判断子线程是不是都结束了,都结束了才能使用shutdown关闭线程池
(1)轮询的方式
需要注意的是调用isTerminated()前一定要先调用shutdown()或shutdownNow()方法
public static void main(String[] args) throws Exception {
    int n = 3;
    String[] tasks = {"发送短信消息完毕", "发送微信消息完毕", "发送邮箱消息完毕"};
    int[] executeTimes = new int[]{2, 5, 1};
    ExecutorService threadPool = Executors.newFixedThreadPool(n);
    long start = System.currentTimeMillis();

    for (int i = 0; i < n; i++) {
        int finalI = i;
        threadPool.execute(() -> {
            try {
                TimeUnit.SECONDS.sleep(executeTimes[finalI]);
            } catch (InterruptedException e) {
                e.printStackTrace();
            }
            System.out.println(tasks[finalI]);
        });
    }
    // 以下为关键代码
    threadPool.shutdown();
    while (true) {
        if (threadPool.isTerminated()) {
            break;
        } else {
            TimeUnit.SECONDS.sleep(1);
        }
    }
    System.out.println("所有消息都发送完毕了,继续执行主线程任务。\n耗时ms:" + (System.currentTimeMillis() - start));
}
(2)使用CountDownLatch
让主线程等待子线程全部结束后再关闭线程池
public static void main(String[] args) throws Exception {
    int n = 3;
    String[] tasks = {"发短信完毕", "发微信完毕", "发QQ完毕"};
    int[] executeTimes = new int[]{2, 5, 1};
    CountDownLatch countDownLatch = new CountDownLatch(n);
    ExecutorService executorService = Executors.newFixedThreadPool(n);

    long start = System.currentTimeMillis();
    for (int i = 0; i < n; i++) {
        int finalI = i;
        executorService.submit(() -> {
            try {
                TimeUnit.SECONDS.sleep(executeTimes[finalI]);
                System.out.println(tasks[finalI]);
            } catch (InterruptedException e) {
                e.printStackTrace();
            } finally {
                countDownLatch.countDown();
            }
        });
    }
    countDownLatch.await();
    System.out.println("所有消息都发送完毕了,继续执行主线程任务。\n耗时ms:" + (System.currentTimeMillis() - start));
    // 不要忘记关闭线程池,不然会导致主线程阻塞无法退出
    executorService.shutdown();
}
(二)CountDownLatch的实现原理和源码分析
【1】构造方法
CountDownLatch通过内部类Sync来实现同步语义。Sync继承AQS。CountDownLatch通过构造器给state赋值
public CountDownLatch(int count) {
     if (count < 0) throw new IllegalArgumentException("count < 0");
     this.sync = new Sync(count);
 }
//设置初始state为计数器初始值,这使用的是AQS的state,Lock锁中使用了这个变量用来表示重入次数
 Sync(int count) {
     setState(count);
 }
Sync内部类代码如下:
private static final class Sync extends AbstractQueuedSynchronizer {
    private static final long serialVersionUID = 4982264981922014374L;

    // 设置同步状态的值
    Sync(int count) {
        setState(count);
    }

    // 获取同步状态的值
    int getCount() {
        return getState();
    }

    // 尝试获取同步状态,只有同步状态的值为0的时候才成功
    protected int tryAcquireShared(int acquires) {
        return (getState() == 0) ? 1 : -1;
    }

    // 尝试释放同步状态,每次释放通过CAS将同步状态的值减1
    protected boolean tryReleaseShared(int releases) {
        // Decrement count; signal when transition to zero
        for (;;) {
            int c = getState();
            // 如果同步状态的值已经是0了,不要再释放同步状态了,也不要减1了
            if (c == 0)
                return false;
            // 减1
            int nextc = c - 1;
            if (compareAndSetState(c, nextc))
                return nextc == 0;
        }
    }
}
【2】await() 源码解析:阻塞线程进入等待队列里自旋
await()源码如下:
public void await() throws InterruptedException {
    sync.acquireSharedInterruptibly(1);
}
调用的是AQS的acquireSharedInterruptibly(int arg)方法:
public final void acquireSharedInterruptibly(int arg)
        throws InterruptedException {
    // 如果被中断,抛出异常
    if (Thread.interrupted())
        throw new InterruptedException();
    // 尝试获取同步状态
    if (tryAcquireShared(arg) < 0)
        // 获取同步状态失败,自旋
        doAcquireSharedInterruptibly(arg);
}
首先,通过tryAcquireShared(arg)尝试获取同步状态state值,如果同步状态state的值为0,获取成功。这就是CountDownLatch的机制,尝试获取latch的线程只有当latch的值减到0的时候,才能获取成功。
如果获取失败,则会调用AQS的doAcquireSharedInterruptibly(int arg)函数自旋,尝试挂起当前线程:
private void doAcquireSharedInterruptibly(int arg)
    throws InterruptedException {
    // 将当前线程加入同步队列的尾部
    final Node node = addWaiter(Node.SHARED);
    try {
        // 自旋
        for (;;) {
            // 获取当前节点的前驱节点
            final Node p = node.predecessor();
            // 如果前驱节点是头结点,则尝试获取同步状态
            if (p == head) {
                // 当前节点尝试获取同步状态
                int r = tryAcquireShared(arg);
                if (r >= 0) {
                    // 如果获取成功,则设置当前节点为头结点
                    setHeadAndPropagate(node, r);
                    p.next = null; // help GC
                    return;
                }
            }
            // 如果当前节点的前驱不是头结点,尝试挂起当前线程
            if (shouldParkAfterFailedAcquire(p, node) &&
                parkAndCheckInterrupt())
                throw new InterruptedException();
        }
    } catch (Throwable t) {
        cancelAcquire(node);
        throw t;
    }
}
这里,调用shouldParkAfterFailedAcquire(p, node) && parkAndCheckInterrupt() 挂起当前线程。
【3】countDown() 源码解析:计数器减1
countDown()源码如下:
public void countDown() {
    sync.releaseShared(1);
}
调用的是AQS的releaseShared(int arg)方法:
public final boolean releaseShared(int arg) {
    // 尝试释放同步状态
    if (tryReleaseShared(arg)) {
        // 如果成功,进入自旋,尝试唤醒同步队列中头结点的后继节点
        doReleaseShared();
        return true;
    }
    return false;
}
首先,通过tryReleaseShared(arg)尝试释放同步状态,具体的实现被Sync重写了,源码:
protected boolean tryReleaseShared(int releases) {
    // Decrement count; signal when transition to zero
    for (;;) {
        int c = getState();
        if (c == 0)
            return false;
        // 同步状态值减1
        int nextc = c - 1;
        if (compareAndSetState(c, nextc))
            return nextc == 0;
    }
}
如果同步状态值减到0,则释放成功,进入自旋,尝试唤醒同步队列中头结点的后继节点,调用的是AQS的doReleaseShared()函数:
private void doReleaseShared() {
    for (;;) {
        // 获取头结点
        Node h = head;
        if (h != null && h != tail) {
            // 获取头结点的状态
            int ws = h.waitStatus;
            // 如果是SIGNAL,尝试唤醒后继节点
            if (ws == Node.SIGNAL) {
                if (!h.compareAndSetWaitStatus(Node.SIGNAL, 0))
                    continue;            // loop to recheck cases
                // 唤醒头结点的后继节点
                unparkSuccessor(h);
            }
            else if (ws == 0 &&
                     !h.compareAndSetWaitStatus(0, Node.PROPAGATE))
                continue;                // loop on failed CAS
        }
        if (h == head)                   // loop if head changed
            break;
    }
}
这里调用了unparkSuccessor(h)去唤醒头结点的后继节点。
【4】如何唤醒所有调用 await() 等待的线程呢?
此时这个后继节点被唤醒,那么又是如何实现唤醒所有调用await()等待的线程呢?回到线程被挂起的地方,也就是doAcquireSharedInterruptibly(int arg)方法中:
private void doAcquireSharedInterruptibly(int arg)
    throws InterruptedException {
    // 将当前线程加入同步队列的尾部
    final Node node = addWaiter(Node.SHARED);
    try {
        // 自旋
        for (;;) {
            // 获取当前节点的前驱节点
            final Node p = node.predecessor();
            // 如果前驱节点是头结点,则尝试获取同步状态
            if (p == head) {
                // 当前节点尝试获取同步状态
                int r = tryAcquireShared(arg);
                if (r >= 0) {
                    // 如果获取成功,则设置当前节点为头结点
                    setHeadAndPropagate(node, r);
                    p.next = null; // help GC
                    return;
                }
            }
            // 如果当前节点的前驱不是头结点,尝试挂起当前线程
            if (shouldParkAfterFailedAcquire(p, node) &&
                parkAndCheckInterrupt())
                throw new InterruptedException();
        }
    } catch (Throwable t) {
        cancelAcquire(node);
        throw t;
    }
}
该方法里面,通过调用shouldParkAfterFailedAcquire(p, node) && parkAndCheckInterrupt()将线程挂起。
当头结点的后继节点被唤醒后,线程将从挂起的地方醒来,继续执行,因为没有return,所以进入下一次循环。
此时,获取同步状态成功,执行setHeadAndPropagate(node, r)。
// 如果执行这个函数,那么propagate一定等于1
private void setHeadAndPropagate(Node node, int propagate) {
    // 获取头结点
    Node h = head;
    // 因为当前节点被唤醒,设置当前节点为头结点
    setHead(node);
    if (propagate > 0 || h == null || h.waitStatus < 0 ||
        (h = head) == null || h.waitStatus < 0) {
        // 获取当前节点的下一个节点
        Node s = node.next;
        // 如果下一个节点为null或者节点为shared节点
        if (s == null || s.isShared())
            doReleaseShared();
    }
}
这里,当前节点被唤醒,首先设置当前节点为头结点。
如果当前节点的下一个节点是shared节点,调用doReleaseShared(),源码:
private void doReleaseShared() {
    // 自旋
    for (;;) {
        // 获取头结点,也就是当前节点
        Node h = head;
        if (h != null && h != tail) {
            int ws = h.waitStatus;
            if (ws == Node.SIGNAL) {
                if (!h.compareAndSetWaitStatus(Node.SIGNAL, 0))
                    continue;            // loop to recheck cases
                unparkSuccessor(h);
            }
            else if (ws == 0 &&
                     !h.compareAndSetWaitStatus(0, Node.PROPAGATE))
                continue;                // loop on failed CAS
        }
        // 如果head没有改变,则调用break退出循环
        if (h == head)
            break;
    }
}
首先,注意if (h == head) break; 这里每次循环的时候判断head头结点有没有改变,如果没有改变则退出循环。因为只有当新的节点被唤醒之后,新节点才会调用setHead(node)设置自己为头结点,头结点才会改变。
其次,注意if (h != null && h != tail) 这个判断,保证队列至少要有两个节点(包括头结点在内)。
如果队列中有两个或以上个节点,那么检查局部变量h的状态:
(1)如果状态为SIGNAL,说明h的后继节点是需要被通知的。通过对CAS操作结果取反,将compareAndSetWaitStatus(h, Node.SIGNAL, 0)和unparkSuccessor(h)绑定在了一起。说明了只要head成功的从SIGNAL修改为0,那么head的后继节点对应的线程将会被唤醒。
(2)如果状态为0,说明h的后继节点对应的线程已经被唤醒或即将被唤醒,并且这个中间状态即将消失,要么由于acquire thread获取锁失败再次设置head为SIGNAL并再次阻塞,要么由于acquire thread获取锁成功而将自己(head后继)设置为新head并且只要head后继不是队尾,那么新head肯定为SIGNAL。所以设置这种中间状态的head的status为PROPAGATE,让其status又变成负数,这样可能被被唤醒线程检测到。
(3)如果状态为PROPAGATE,直接判断head是否变化。
(三)CountDownLatch的流程总结
CountDownLatch的原理和ReentrantLock的原理类似,都是基于AQS实现的。
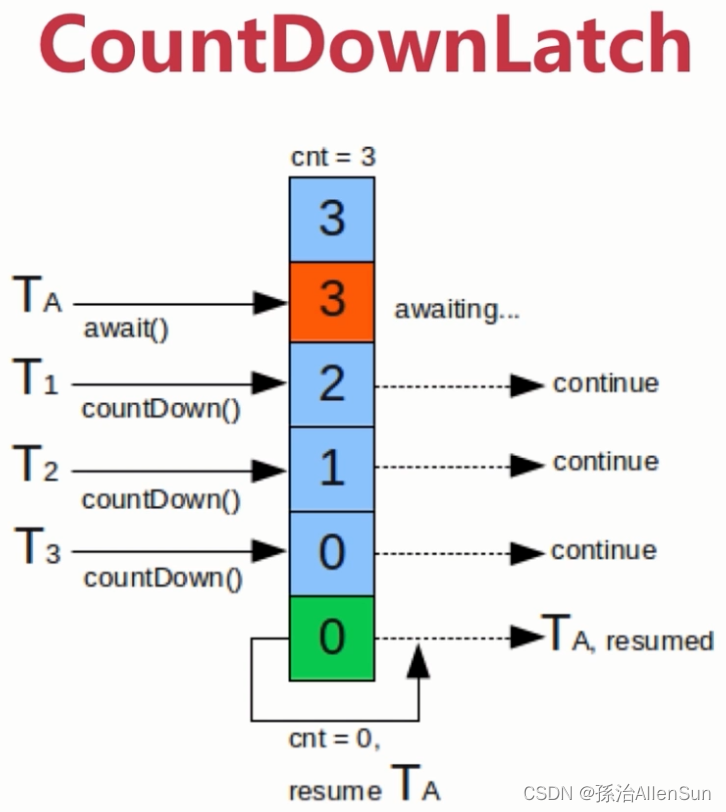
CountDownLatch 用于阻塞当前 1 个或多个线程,其目的是让这些线程等待其它线程的执行完成。可以简单将其理解为一个计数器,当初始化一个 count=n 的 CountDownLatch 对象之后,需要调用该对象的 CountDownLatch#countDown 方法来对计数器进行减值,直到计数器为 0 的时候,等待该计数器的线程才能继续执行。
但是需要注意的一点是,执行 CountDownLatch#countDown 方法的线程在执行完减值操作之后,并不会因此而阻塞。真正阻塞等待事件的是调用 CountDownLatch 对象 CountDownLatch#await 方法的线程,该线程一直会阻塞直到计数器计数变为 0 为止。
流程如下:
(1)初始化一个 count=n 的 CountDownLatch 对象,对象中的数值为n,等于把state值设置为n。相当于重入锁重入了n次。等待队列里也放入n个等待的节点。
(2)每个线程调用countDown方法的时候,获取state值,如果state大于0,就使用CAS给state-1。如果state=0,就调用doReleaseShared方法唤醒等待队列里的等待线程。
(3)而每一个线程调用await方法,会先获取state值,如果state的值为0,获取锁成功,当前被阻塞的线程开始执行。如果state大于0,当前线程就进插入等待队列尾部,所以等待队列里可能会有多个等待的线程节点。当线程被头结点唤醒的时候开始自旋判断state是否为,成功的话就继续出队并唤醒后继节点,这样就依次唤醒等待线程了。
(4)所以当所有工作线程执行完countDown方法后,state值正好减到0了。这个时候等待线程获取state成功,然后被唤醒,收尾!





![[Linux]------线程同步和信号量](https://img-blog.csdnimg.cn/04e5c53d8c114940a6d626e66a50d5ec.png)
