目录
- 前言
- 总体设计
- 系统整体结构图
- 系统流程图
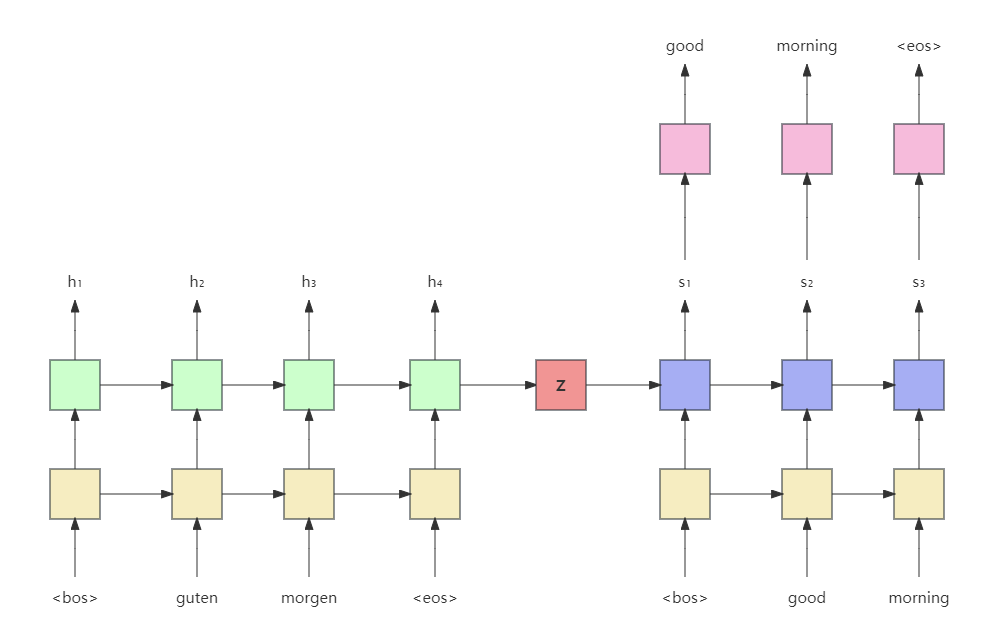
- 孪生神经网络结构图
- 运行环境
- Python 环境
- TensorFlow 环境
- 模块实现
- 1. 数据预处理
- 2. 创建模型并编译
- 3. 模型训练及保存
- 4. 模型应用
- 系统测试
- 1. 训练准确率
- 2. 测试效果
- 3. 模型应用
- 工程源代码下载
- 其它资料下载

前言
本项目利用TF-IDF(Term Frequency-Inverse Document Frequency 词频-逆文档频率)检索模型和CNN(卷积神经网络)精排模型构建了一个聊天机器人,旨在实现一个能够进行日常对话和情感陪伴的聊天机器人。
首先,我们使用TF-IDF技术构建了一个检索模型。TF-IDF可以衡量一个词语在文档中的重要性,通过计算词频和逆文档频率来为每个词分配一个权重。这个模型可以根据用户输入的问题,从预定义的问题-回答对中找到最相关的答案。
其次,我们利用CNN构建了一个精排模型。CNN是一种深度学习模型,可以从大量的训练数据中学习问题和回答之间的语义关系。通过对问题和回答进行特征提取和匹配,这个模型可以进一步提高回答的准确性和质量。
通过结合TF-IDF检索模型和CNN精排模型,我们的聊天机器人能够根据用户的提问,首先通过检索模型找到一组相关的答案候选,然后通过精排模型从中选择最合适的回答。
这个项目的目标是实现一个能够进行日常对话和情感陪伴的聊天机器人。用户可以向机器人提问各种问题,包括娱乐、学习、生活等方面的内容。机器人将根据其训练的知识和模型的学习能力,给出相关的回答,并尽可能地理解用户的情感和需求。
聊天机器人在日常生活中具有广泛的应用潜力,可以为用户提供便捷的信息查询、娱乐互动和情感支持。通过不断改进和训练,我们的目标是打造一个智能、友好和能够真正陪伴用户的聊天机器人。
总体设计
本部分包括系统整体结构图、系统流程图和孪生神经网络结构图。
系统整体结构图
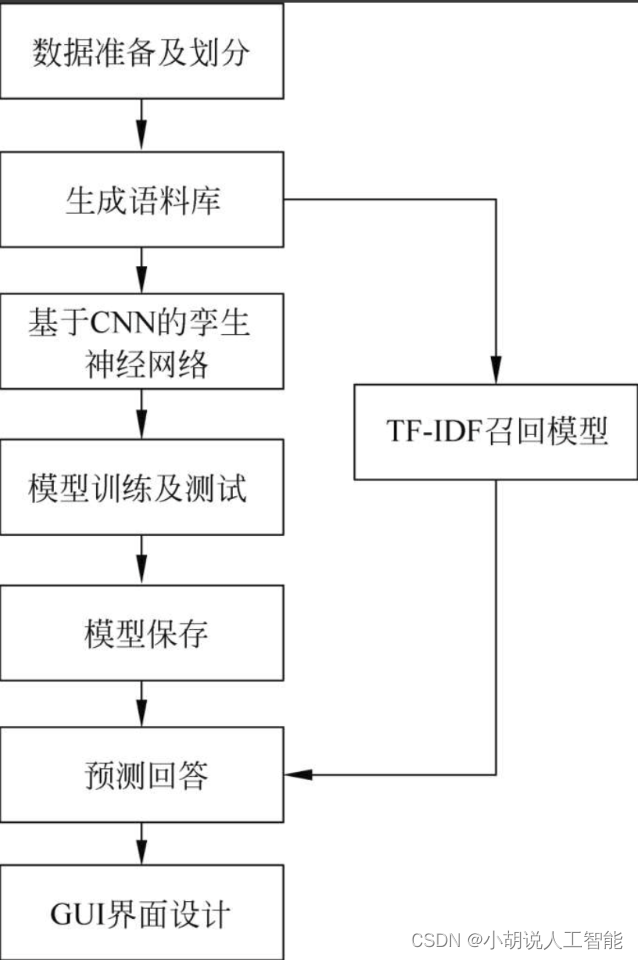
系统整体结构如图所示。
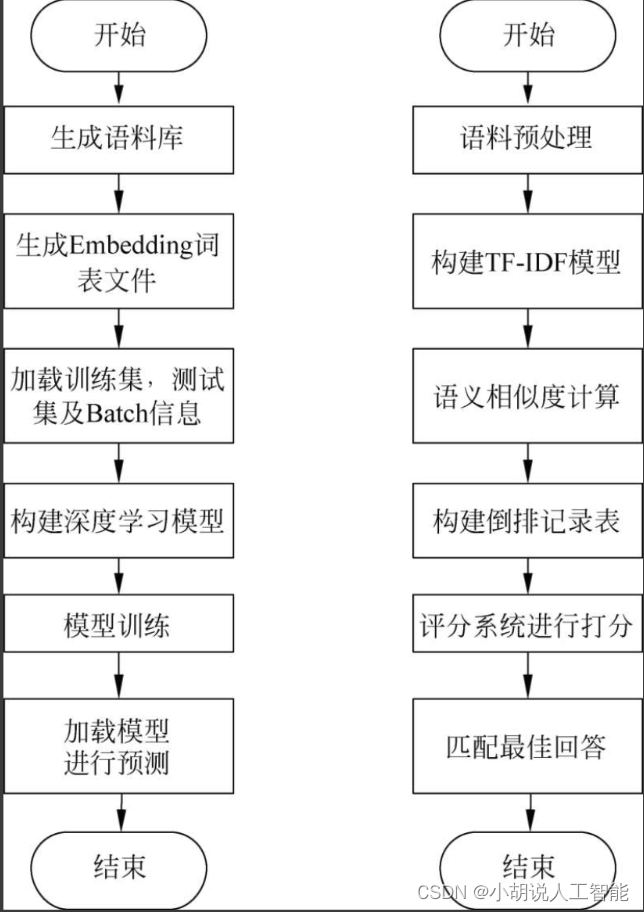
系统流程图
系统流程如图所示。
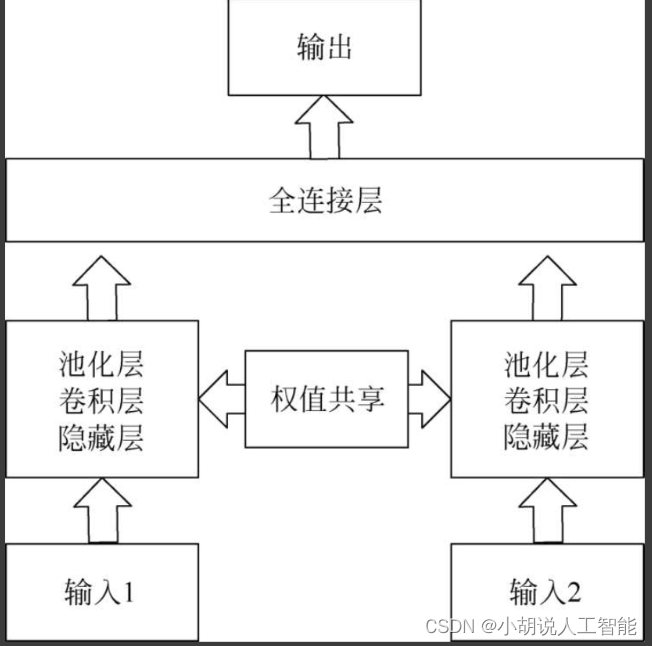
孪生神经网络结构图
孪生神经网络结构如图所示。
运行环境
本部分包括 Python环境、TensorFlow 环境和Python包依赖关系。
Python 环境
需要Python 3.6及以上配置,在Windows环境 下推荐下载Anaconda完成Python所需配置。
Anaconda是开源的Python发行版本,包含conda、Python等180多个科学包及其依赖项。下载文件比较大,如果只需要某些包,或者需要节省带宽、存储空间,也可以使用Miniconda发行版(仅包含conda和Python)。下载地址为: https://www.anaconda.com/。也可以下载虚拟机在Linux环境下运行代码。添加环境变量:单击鼠标右键,依次选择属性、高级系统设置、环境变量、新建系统变量,添加安装Anaconda的路径即可。
用CMD命令行测试,输入:
conda list
显示Anaconda所存的路径以及文件。Anaconda 自带Anaconda Prompt,也可以用于其他类似安装包。
TensorFlow 环境
在Anaconda中配置TensorFlow环境的步骤(针对Windows系统)如下:
打开Anaconda Prompt,使用语句查询Python版本,输入清华仓库镜像,命令为
conda config--add channels https://mirrors.tuna.tsinghua.edu.cn/anaconda/pkgs/free/
conda config-set show_channel_urls yes
创建Python 3.x环境,名称为TensorFlow,此时Python版本和后面TensorFlow的版本有匹配问题,此步选择Python3.10,输入命令:
conda create-n tensorflow python=3.10
有需要确认的地方,都输入y。
在Anaconda Prompt中激活TensorFlow环境,输入命令:
activate tensorflow
安装CPU版本的TensorFlow,输入命令:
pip install --upgrade --ignore-installed tensorflow
安装完毕。
在Anaconda Prompt 中激活TensorFlow环境,输入命令:
activate tensorflow
NumPy是存储和处理大型矩阵的科学计算包,比Python自身的嵌套列表结构高效。安装命令:
pip install numpy
Matplotlib是Python最著名的绘图表,提供了一整套和MATLAB相似的命令API,适合交互式制图。安装命令:
pip install matplotlib
jieba是优秀的第三方中文分词库,中文文本需要通过分词获得单个词语。安装命令:
pip install jieba
Pandas是基于NumPy的一种工具,该工具是为了解决数据分析任务而创建的。Pandas纳入了大量库和一些标准的数据模型,提供了高效操作大型数据集所需的工具。安装命令:
pip install pandas
tqdm是快速、可扩展的Python进度条,在Python长循环中添加一个进度提示信息,用户只需封装任意的迭代器tqdm (iterator) 。安装命令:
pip install tqdm
nltk模块中包含大量的语料库,方便完成自然语言处理的任务,包括分词、词性标注、命名实体识别及句法分析。安装命令:
pip install nltk
gensim是开源的第三方Python工具包,用于从原始、非结构化的文本中无监督学习到文本隐层的主题向量表达。安装命令:
pip install gensim
PyQt是创建GUI应用程序的工具包,它是Python编程语言和Qt库的成功融合。安装命令:
pip install pyqt5
模块实现
本项目包括4个模块:数据预处理、模型创建与编译、模型训练及保存、模型生成。下面分别给出各模块的功能介绍及相关代码。
1. 数据预处理
本部分包括基础数据、数据增强和数据预处理。
1)基础数据
数据来源于GitHub开源语料集,下 载地址为: https://github.com/codemayq。
该库对目前市面上已有的开源中文聊天语料进行搜集和系统化整理,包括chatterbot、 豆瓣多轮、PTT八卦、青云、电视剧对白、贴吧论坛回帖、小黄鸡、微博语料共8个公开闲聊常用语料和短信,并对其进行统一化规整和处理,以便于使用。
将解压后的raw_chat_corpus 文件夹放到当前目录下,执行python main.py,每个来源的语料分别生成一个独立的.tsv文件,放在新生成的clean_chat_corpus文件夹下。
2)数据增强
数据增强一方面可以增加训练数据,提升模型的泛化能力;另一方面可增加噪声数据,增强模型的健壮性。本项目使用同义词替换、随机插入、随机交换、随机删除等数据增强操作。
def synonym_replacement(words, n):  #同义词替换
    new_words = words.copy()
    random_word_list = list(set([word for word in words if word not in stop_words]))
    random.shuffle(random_word_list)
    num_replaced = 0
    for random_word in random_word_list:
        synonyms = get_synonyms(random_word)  #从词林中选择同义词进行替换
        if len(synonyms) >= 1:
            synonym = random.choice(list(synonyms))
            new_words = [synonym if word == random_word else word for word in new_words]
            num_replaced += 1
        if num_replaced >= n:  #最多替换n个词
            break
    sentence = ' '.join(new_words)
    new_words = sentence.split(' ')
return new_words
def random_insertion(words, n):  #随机插入
    new_words = words.copy()
    for _ in range(n):
        add_word(new_words)
    return new_words
def random_swap(words, n): #随机交换
    new_words = words.copy()
    for _ in range(n):
        new_words = swap_word(new_words)
    return new_words
def swap_word(new_words):  #随机把句子里的两个单词交换n次
    random_idx_1 = random.randint(0, len(new_words)-1)
    random_idx_2 = random_idx_1
    counter = 0
    while random_idx_2 == random_idx_1:
        random_idx_2 = random.randint(0, len(new_words)-1)
        counter += 1
        if counter > 3:
            return new_words
    new_words[random_idx_1], new_words[random_idx_2] = new_words[random_idx_2], new_words[random_idx_1]
return new_words
def random_deletion(words, p):  #随机删除
    #如果只有一个词,不用删除
    if len(words) == 1:
        return words
    #以概率p删除词
    new_words = []
    for word in words:
        r = random.uniform(0, 1)
        if r > p:
            new_words.append(word)
    #i如果全部删除,返回随机词
    if len(new_words) == 0:
        rand_int = random.randint(0, len(words)-1)
        return [words[rand_int]]
return new_words
3)数据预处理
将文档中原始字符文本转换成Gensim模型所能理解的稀疏向量,进行分词处理,采用Python中文分词最常用的jieba工具,支持多种切分模式。
#采用非全模式
#采用非全模式
	def cut(self, sentence, stopword= True, cut_all = False):
	        seg_list = jieba.cut(sentence, cut_all)#对原始语料进行分词处理
	        results = []
	        for seg in seg_list:
	            if stopword and seg in self.stopwords: #去除停用词
	                continue
	            results.append(seg)
	        return results
#另一种粒度较细的jieba分词模式
    def cut_for_search(self,sentence, stopword=True):
        seg_list = jieba.cut_for_search(sentence)#对原始语料进行分词处理
        results = []
        for seg in seg_list:
            if stopword and seg in self.stopwords:#去除停用词
                continue
            results.append(seg)
        return results
对于一些特定的语境和特殊的词语,需要载入自定义词典,从而提高分词的准确率。
#载入自定义词典
	def load_userdict(self, file_name):
		jieba.load_userdict(file_name)
停用词是指在信息检索中,为节省存储空间和提高搜索效率,在处理自然语言数据之前或之后自动过滤掉某些字或词,这些字或词被称为停用词。它们没有明确意义,但出现的频率却很高,进行过滤和省略能够节省存储空间、提高搜索效率。
#读入停用词表
    def read_in_stopword(self):
        file_obj = codecs.open(self.stopword_filepath, 'r', 'utf-8')
        while True:
            line = file_obj.readline()
            line=line.strip('\r\n') #去掉换行符
            if not line:
                break
            self.stopwords.add(line)
        file_obj.close()
使用doc2bow()方法对每个不同单词的词频进行统计,将单词转换为编号,以稀疏向量的形式返回结果。
    #对句子分词
    def cut(self, seg):
        return seg.cut_for_search(self.origin_sentence)
    #获取切词后的词列表
    def get_cuted_sentence(self):
        return self.cuted_sentence
    #获取原句子
    def get_origin_sentence(self):
        return self.origin_sentence
    #设置该句子得分
    def set_score(self, score):
        self.score = score
#词袋表示方法
def sentence2vec(self, sentence):
        sentence = Sentence(sentence, self.seg)
        vec_bow = self.dictionary.doc2bow(sentence.get_cuted_sentence())
        return self.model[vec_bow] #返回稀疏向量形式
self.corpus_simple = [self.dictionary.doc2bow(text) for text in self.texts] #生成语料
2. 创建模型并编译
数据加载进模型之后,需要定义模型结构并优化损失函数。
1)定义模型结构
在TF-IDF模型中定义的架构为:计算TF-IDF向量,通过倒排表的方式找到与当前输入类似的问题描述,针对候选问题进行余弦相似度计算。
#初始化模型,将整个语料库转为TF-IDF表示方法,创建余弦相似度索引
#构建其他复杂模型前需要的简单模型
    def simple_model(self, min_frequency = 0):
        self.texts = self.get_cuted_sentences()
        # 删除低频词
        frequency = defaultdict(int)  #创建频率对象
        for text in self.texts:
            for token in text:
                frequency[token] += 1
        self.texts = [[token for token in text if frequency[token] > min_frequency] for text in self.texts]
        self.dictionary = corpora.Dictionary(self.texts) #创建字典
        self.corpus_simple = [self.dictionary.doc2bow(text) for text in self.texts] #生成语料
    #TF-IDF模型
    def TfidfModel(self):
        self.simple_model()
        #转换模型
        self.model = models.TfidfModel(self.corpus_simple)
        self.corpus = self.model[self.corpus_simple]
        #创建相似度矩阵
        self.index = similarities.MatrixSimilarity(self.corpus)
#对新输入的句子(比较的句子)进行预处理
    def sentence2vec(self, sentence):
        sentence = Sentence(sentence, self.seg)
        vec_bow = self.dictionary.doc2bow(sentence.get_cuted_sentence())
        return self.model[vec_bow]
    def bow2vec(self):
        vec = []
        length = max(self.dictionary) + 1
        for content in self.corpus:
            sentence_vectors = np.zeros(length)
            for co in content:
                sentence_vectors[co[0]] = co[1]
#将句子出现的单词TF-IDF表示放入矩阵中
            vec.append(sentence_vectors)
        return vec
    #求最相似的句子
    def similarity(self, sentence):
        sentence_vec = self.sentence2vec(sentence)
        sims = self.index[sentence_vec]
        sim = max(enumerate(sims), key=lambda item: item[1])
        index = sim[0]
        score = sim[1]
        sentence = self.sentences[index]
        sentence.set_score(score)
        return sentence  #返回一个类
在孪生神经网络中,每个CNN都有一个卷积层,卷积后连接一个池化层,进行数据的降维。在每个卷积层上都会使用多个滤波器来提取不同类型的特征。最大池化和全连接层之后,引入dropout进行正则化,用以消除模型的过拟合问题。
	def fc_layer(self, bottom, n_weight, name):  #全连接层
        assert len(bottom.get_shape()) == 2
        n_prev_weight = bottom.get_shape()[1]
        initer = tf.contrib.layers.xavier_initializer()
        W = tf.get_variable(name + 'W', dtype=tf.float32, shape=[n_prev_weight, n_weight], initializer=initer, regularizer=tf.contrib.layers.l2_regularizer(scale=0.0000001))#y=Wx+b线性模型
        b = tf.get_variable(name + 'b', dtype=tf.float32, initializer=tf.constant(0.01, shape=[n_weight],dtype=tf.float32),regularizer=tf.contrib.layers.l2_regularizer(scale=0.0000001))
        fc = tf.nn.bias_add(tf.matmul(bottom, W), b)
        return fc
    def _cnn_layer(self, input):  #卷积和池化层
        all = []
        max_len = input.get_shape()[1]
        for i, filter_size in enumerate(self.window_sizes):
            with tf.variable_scope('filter{}'.format(filter_size)):
                cnn_out = tf.layers.conv1d(input, self.n_filters, filter_size, padding='valid',
activation=tf.nn.relu, name='q_conv_' + str(i))  #卷积
            pool_out = tf.reduce_max(cnn_out, axis=1, keepdims=True)  #池化
                tanh_out = tf.nn.tanh(pool_out)  #tanh激活函数
                all.append(tanh_out)
        cnn_outs = tf.concat(all, axis=-1)
        dim = cnn_outs.get_shape()[-1]
        cnn_outs = tf.reshape(cnn_outs, [-1, dim])
        return cnn_outs
隐藏层的意义是把输入数据的特征,抽象到另一个维度空间,展现其更抽象化的特征,更好的进行线性划分。
    def _HL_layer(self, bottom, n_weight, name):      #隐藏层
        assert len(bottom.get_shape()) == 3
        n_prev_weight = bottom.get_shape()[-1]
        max_len = bottom.get_shape()[1]
        initer = tf.contrib.layers.xavier_initializer()  #初始化
        W = tf.get_variable(name + 'W', dtype=tf.float32, shape=[n_prev_weight, n_weight], initializer=initer, regularizer=tf.contrib.layers.l2_regularizer(scale=0.0000001))
        b = tf.get_variable(name + 'b', dtype=tf.float32, initializer=tf.constant(0.1, shape=[n_weight],dtype=tf.float32),regularizer=tf.contrib.layers.l2_regularizer(scale=0.0000001))  #y=Wx+b线性模型
        bottom_2 = tf.reshape(bottom, [-1, n_prev_weight])
        hl = tf.nn.bias_add(tf.matmul(bottom_2, W), b)  #y=Wx+b单个神经元
        hl_tanh = tf.nn.tanh(hl)  #激活函数
        HL = tf.reshape(hl_tanh, [-1, max_len, n_weight])
        return HL
    def _build(self, embeddings):  #构建层
        if embeddings is not None:
            self.Embedding=tf.Variable(tf.to_float(embeddings), trainable=False, name='Embedding')
        else:  #嵌入构建
            self.Embedding = tf.get_variable('Embedding',shape=[self.vocab_size, self.embedding_size], initializer=tf.uniform_unit_scaling_initializer())
        self.q_embed = tf.nn.dropout(tf.nn.embedding_lookup(self.Embedding, self._ques), keep_prob=self.dropout_keep_prob)
        self.a_embed = tf.nn.dropout(tf.nn.embedding_lookup(self.Embedding, self._ans), keep_prob=self.dropout_keep_prob)
        with tf.variable_scope('siamese') as scope:
            #计算隐藏和卷积层
            #hl_q = self._HL_layer(self.q_embed, self.hidden_size, 'HL_layer')
            conv1_q = self._cnn_layer(self.q_embed)
            scope.reuse_variables()  #权值共享
            #hl_a = self._HL_layer(self.a_embed, self.hidden_size, 'HL_layer')
            conv1_a = self._cnn_layer(self.a_embed)
        with tf.variable_scope('fc') as scope:
            con = tf.concat([conv1_q, conv1_a], axis=-1)
            logits = self.fc_layer(con, 1, 'fc_layer')
            res = tf.nn.sigmoid(logits)
        return logits, res
    def _add_loss_op(self, logits):
        #损失节点
        loss = tf.nn.sigmoid_cross_entropy_with_logits(logits=logits,
labels=tf.cast(tf.reshape(self._y, [-1, 1]), dtype=tf.float32))
        reg_losses = tf.get_collection(tf.GraphKeys.REGULARIZATION_LOSSES)
        l2_loss = sum(reg_losses)
        pointwise_loss = tf.reduce_mean(loss) + l2_loss
        tf.summary.scalar('loss', pointwise_loss)
        return pointwise_loss
def _add_acc_op(self):
#精确度节点
        predictions = tf.to_int32(tf.round(self.res))
        correct_prediction = tf.equal(predictions, self._y)
        accuracy = tf.reduce_mean(tf.cast(correct_prediction, tf.float32))
        tf.summary.scalar('accuracy', accuracy)
        return accuracy
    def _add_train_op(self, loss):
        #训练节点
        with tf.name_scope('train_op'):
            #记录训练步骤
            self.global_step=tf.Variable(0, name='global_step', trainable=False)
            optimizer = tf.train.AdamOptimizer(self.learning_rate)
            #计算梯度,得到梯度和变量
            gradsAndVars = optimizer.compute_gradients(loss)
            #将梯度应用到变量下,生成训练器
            train_op = optimizer.apply_gradients(gradsAndVars, global_step=self.global_step)
            #用summary绘制tensorBoard
            for g, v in gradsAndVars:
                if g is not None:
                    tf.summary.histogram("{}/grad/hist".format(v.name), g)
                    tf.summary.scalar("{}/grad/sparsity".format(v.name), tf.nn.zero_fraction(g))
            self.summary_op = tf.summary.merge_all()
            return train_op
2)优化损失函数
确定模型架构后进行编译,这是二分类问题,使用交叉熵作为损失函数。由于所有标签都带有相似的权重,通常使用精确度作为性能指标。Adam是常用的梯度下降方法,使用它来优化模型参数。
#定义损失函数和优化器
loss = tf.nn.sigmoid_cross_entropy_with_logits(logits=logits,labels=tf.cast(tf.reshape(self._y, [-1, 1]), dtype=tf.float32))optimizer = tf.train.AdamOptimizer(self.learning_rate)
predictions = tf.to_int32(tf.round(self.res))
correct_prediction = tf.equal(predictions, self._y)
accuracy = tf.reduce_mean(tf.cast(correct_prediction, tf.float32))
3. 模型训练及保存
在定义模型架构和编译之后,使用训练集训练模型,使模型可以对语义相似的问句正确分类,用训练集来拟合并保存模型。
1)模型训练
def devStep(corpus):
	iterator = Iterator(corpus)
	dev_Loss = []   #损失
	dev_Acc = []     #准确率
	dev_Prec = []
	dev_Recall = []
	dev_F_beta = []
	for batch_x in iterator.next(config.batch_size, shuffle=False):
	    batch_q,batch_a,batch_qmask,batch_amask,label= zip(*batch_x)
	    batch_q = np.asarray(batch_q)   #批次
	    batch_a = np.asarray(batch_a)
	    loss, summary, step, predictions = sess.run(
	        [model.total_loss,model.summary_op,model.global_step, model.res],
	        feed_dict={model._ques: batch_q,  #传入训练集
	                   model._ans: batch_a,
	                   model._y: label,
	                   model.dropout_keep_prob: 1.0})
	    predictions = [1 if i >= 0.5 else 0 for i in predictions]
	    acc, recall, prec, f_beta = get_binary_metrics(pred_y=predictions, true_y=label)  #预测值
	    dev_Loss.append(loss)
	    dev_Acc.append(acc)
	    dev_Prec.append(prec)
	    dev_Recall.append(recall)
	    dev_F_beta.append(f_beta)
	    evalSummaryWriter.add_summary(summary, step)
	return mean(dev_Loss), mean(dev_Acc), mean(dev_Recall), mean(dev_Prec), mean(dev_F_beta)  #返回参数
	best_acc = 0.0
    for epoch in range(config.num_epochs):  #轮次
        train_time1 = time.time()
        print("----- Epoch {}/{} -----".format(epoch + 1, config.num_epochs))
        train_Loss = []  #损失
        train_Acc = []  #准确率
        train_Prec = []
        train_Recall = []
        train_F_beta = []
        for batch_x in iterator.next(config.batch_size, shuffle=True):
            batch_q,batch_a,batch_qmask,batch_amask,label= zip(*batch_x)
            batch_q = np.asarray(batch_q)  #批次
            batch_a = np.asarray(batch_a)
            train_loss, train_acc, train_prec, train_recall, train_f_beta = trainStep(batch_q, batch_a, label)   #输出训练结果
            train_Loss.append(train_loss)
            train_Acc.append(train_acc)
            train_Prec.append(train_prec)
            train_Recall.append(train_recall)
            train_F_beta.append(train_f_beta)
        print("---epoch %d  -- train loss %.3f -- train acc %.3f -- train recall %.3f -- train precision %.3f"
                    "-- train f_beta %.3f" % (
                    epoch+1, np.mean(train_Loss), np.mean(train_Acc), np.mean(train_Recall),np.mean(train_Prec), np.mean(train_F_beta)))#打印准确率
        test_loss, test_acc, test_recall, test_prec, test_f_beta = devStep(test_corpus)
        print("---epoch %d  -- test loss %.3f -- test acc %.3f -- test recall %.3f -- test precision %.3f"
                   "-- test f_beta %.3f" % (
                   epoch + 1, test_loss, test_acc, test_recall, test_prec, test_f_beta))
2)模型保存
方便训练时读取,将模型保存为ckpt格式的文件,利用TensorFlow中的tf.train.Saver进行保存。
saver = tf.train.Saver(tf.global_variables(), max_to_keep=10)
#定义保存的对象
     best_saver = tf.train.Saver(tf.global_variables(), max_to_keep=5)
     ckpt = tf.train.get_checkpoint_state(save_path)
     checkpoint_path=os.path.join(save_path, 'acc{:.3f}_{}.ckpt'.format(test_acc, epoch + 1))
     bestcheck_path = os.path.join(best_path, 'acc{:.3f}_{}.ckpt'.format(test_acc, epoch + 1))
     saver.save(sess, checkpoint_path, global_step=epoch)#保存模型
4. 模型应用
一是通过中控模块调用召回和精排模型;二是通过训练好的召回和精排模型进行语义分类,并且获取输出。
1)GUI模块
GUI模块是本项目的前端。提供了2个文本框,1个显示用户输入,1个显示对话内容。提供了1个“发送”button,调取control.py中的接口,返回选取的回答内容。
def setupUi(self, Dialog):  #设置界面
        Dialog.setObjectName("智能聊天机器人")
        Dialog.resize(582, 434)
       #palette = QPalette()
       #palette.setBrush(QPalette.Background, QBrush(QPixmap("./background.jpg")))
       #Dialog.setPalette(palette)
        palette = QPalette()
        pix = QPixmap("./background.jpg")
        pix = pix.scaled(Dialog.width(), Dialog.height())
        palette.setBrush(QPalette.Background, QBrush(pix))
        Dialog.setPalette(palette)
        self.label = QtWidgets.QLabel(Dialog)
        self.label.setGeometry(QtCore.QRect(40, 30, 361, 51))
        self.label.setStyleSheet("color: rgb(205, 85, 85);\n"
"font: 16pt \"黑体\";\n"
"text-decoration: underline;")
        self.label.setObjectName("dialog")
        self.plainTextEdit = QtWidgets.QPlainTextEdit(Dialog)
        self.plainTextEdit.setGeometry(QtCore.QRect(40, 80, 501, 181))
        self.plainTextEdit.setObjectName("plainTextEdit")
        self.plainTextEdit.setFocusPolicy(QtCore.Qt.NoFocus)
        self.plainTextEdit_2 = QtWidgets.QPlainTextEdit(Dialog)
        self.plainTextEdit_2.setGeometry(QtCore.QRect(40, 310, 401, 41))
        self.plainTextEdit_2.setObjectName("plainTextEdit_2")
        self.plainTextEdit.setStyleSheet("font: 14pt \"黑体\";\n")
        self.pushButton = QtWidgets.QPushButton(Dialog)
        self.pushButton.setGeometry(QtCore.QRect(480, 320, 75, 23))
        self.pushButton.setStyleSheet("font: 14pt \"黑体\";\n"
"background-color: rgb(255, 192, 203);")
        self.pushButton.setObjectName("pushButton")
        self.label_2 = QtWidgets.QLabel(Dialog)
        self.label_2.setGeometry(QtCore.QRect(50, 280, 54, 12))
        self.label_2.setText("")
        self.label_2.setObjectName("label_2")
        self.label_3 = QtWidgets.QLabel(Dialog)
        self.label_3.setGeometry(QtCore.QRect(50, 280, 71, 16))
        self.label_3.setStyleSheet("font: 75 12pt \"Aharoni\";")
        self.label_3.setObjectName("label_3")
        self.retranslateUi(Dialog)
        QtCore.QMetaObject.connectSlotsByName(Dialog)
2)中控模块
中控模块设定2个阈值max_sim和min_sim,用于缩减响应时间。如果recall_score<min_ sim,说明问答库数量少或者问句噪声大,需要复查分析;如果min_sim<recall_score<max_ sim,进行召回(recall)和精排(rerank);如果recall_score>max_sim, 只进行召回,直接得出答案。
import time    #导入模块
from Rerank.data_helper import *
from Recall import recall_model
from Rerank import rerank_model
class SmartQA:   #定义类
    def __init__(self):  #初始化
        self.top_k = 5
        self.min_sim = 0.10
        self.max_sim = 0.90
        self.embeding_size = 200
        self.vocab_file = './data/word_vocab.txt'
        self.embed_file = './word2vec/5000-small.txt'
        self.embedding = load_embedding(self.embed_file, self.embeding_size, self.vocab_file)
    #分为recall和rerank两部分
        def search_main(self, question):
        #粗排
        candi_questions, questionList, answerList = recall_model.main(question, self.top_k)
        answer_dict = {}
        corpus = []
        indxs = []
        matchmodel_simscore = []
        sim_questions = []
        for indx, candi in zip(*candi_questions):
            #如果在粗排阶段就已经找到了非常相似的问题,则马上返回这个答案,终止循环
            if candi > self.max_sim:
                indxs.append(indx)
                break
            else:
           #如果召回的数据噪声大,生成一个文件,复查分析
                matchmodel_simscore.append(candi)
                corpus.append((question, questionList[indx]))
                indxs.append(indx)
                sim_questions.append(questionList[indx])
        if candi_questions[1][0] < self.min_sim:
            final_answer = '我还没找到相似的答案,请说得再清楚一点'
            return final_answer, sim_questions
        if len(indxs) == 1:
            #找到非常相似的答案
         sim=[questionList[indx] for indx, candi in zip(*candi_questions)]
            return answerList[indxs[0]], sim
        else:
            if len(indxs) != 0 :
             deepmodel_simscore = rerank_model.main(corpus, self.embedding)  #使用精排模型
         final = list(zip(indxs, matchmodel_simscore, deepmodel_simscore))   #输出结果
            for id, score1, score2 in final:
                final_score = (score1 + score2) / 2
                answer_dict[id] = final_score
            if answer_dict:  #如果识别成功
                answer_dict = sorted(answer_dict.items(), key=lambda asd: asd[1], reverse=True)
                final_answer = answerList[answer_dict[0][0]]
            else:
                final_answer = '请说得再清楚一点.'
            return final_answer, sim_questions
def answer(question):  #定义回答的问题
    handler = SmartQA()
    final_answer, sim_questions = handler.search_main(question)
    return final_answer
if __name__ == "__main__":  #主函数
    handler = SmartQA()
    while (1):
        question = input('用户说: \n')
        if question == 'end':
            print('byebye~')
            break
        s1 = time.time()
        final_answer, sim_questions = handler.search_main(question)
        s2 = time.time()
        print('机器人:', final_answer)
3)相关代码
本部分包括召回(Recall) 模型和精排(Rerank) 模型。
1)召回模型
召回模型相关代码如下:
import pandas as pd     #导入模块
import matplotlib as mpl
import numpy as np
from nltk.probability import FreqDist
from .jiebaSegment import *
from .sentenceSimilarity import SentenceSimilarity
mpl.rcParams['font.sans-serif'] = ['Microsoft YaHei']  # enable chinese
#设置外部词
seg = Seg()
seg.load_userdict('./data/userdict.txt')
def read_corpus():
    qList = []
    #问题的关键词列表
    qList_kw = []
    aList = []
    data = pd.read_csv('./data/qa_.csv', header=None)
    data_ls = np.array(data).tolist()
    for t in data_ls:
        qList.append(t[0])
        qList_kw.append(seg.cut(t[0]))
        aList.append(t[1])
    return qList_kw, qList, aList
def invert_idxTable(qList_kw):  #定一个简单的倒排表
    invertTable = {}
    for idx, tmpLst in enumerate(qList_kw):
        for kw in tmpLst:
            if kw in invertTable.keys():
                invertTable[kw].append(idx)
            else:
                invertTable[kw] = [idx]
    return invertTable
def filter_questionByInvertTab(inputQuestionKW, questionList, answerList, invertTable):  #过滤问题
    idxLst = []
    questions = []
    answers = []
    for kw in inputQuestionKW:
        if kw in invertTable.keys():
            idxLst.extend(invertTable[kw])
    idxSet = set(idxLst)
    for idx in idxSet:
        questions.append(questionList[idx])
        answers.append(answerList[idx])
    return questions, answers
def main(question, top_k):#topk控制选出的回答个数
    qList_kw, questionList, answerList = read_corpus()
    questionList_s = questionList
    answerList_s = answerList
    #初始化模型
    ss = SentenceSimilarity(seg)
    ss.set_sentences(questionList_s)
    ss.TfidfModel()  #TF-IDF模型
    question_k = ss.similarity_k(question, top_k)
    return question_k, questionList_s, answerList_s
if __name__ == '__main__':
    #设置外部词
    seg = Seg()
    seg.load_userdict('./userdict/userdict.txt')
    #读取数据
    List_kw, questionList, answerList = read_corpus()
    #初始化模型
    ss = SentenceSimilarity(seg)
    ss.set_sentences(questionList)
    ss.TfidfModel()
    while True:
        question = input("请输入问题(q退出): ")
        if question == 'q':
            break
        question_k = ss.similarity_k(question, 5)
        print("女票: {}".format(answerList[question_k[0][0]]))
        for idx, score in zip(*question_k):
            print("same questions: {}, score: {}".format(questionList[idx], score))
2)精排模型
精排模型相关代码如下:
import time   #导入各种模块
import logging
import warnings
warnings.filterwarnings("ignore")
import numpy as np
import tensorflow as tf
import os
import tqdm
import sys
from copy import deepcopy
stdout = sys.stdout
from Rerank.data_helper import *
from Rerank.data_preprocess import *
from Rerank.model import SiameseQACNN
from Rerank.model_utils import *
from Rerank.metrics import *
from sklearn.metrics import accuracy_score
class NNConfig(object):  #定义类
    def __init__(self, embeddings):  #初始化
        self.ans_length = 15
        self.num_epochs = 10
        self.ques_length = 15
        self.batch_size = 32
        self.window_sizes = [1, 1, 2]
        self.hidden_size = 128
        self.output_size = 128
        self.keep_prob = 0.5
        self.n_filters = 128
        self.embeddings = np.array(embeddings).astype(np.float32)
        self.vocab_size = 3258
        self.embedding_size = 300
        self.learning_rate = 0.0001
        self.optimizer = 'adam'
        self.clip_value = 5
        self.l2_lambda = 0.00001
        self.eval_batch = 100
def train(train_corpus, test_corpus, config):  #定义训练
    iterator = Iterator(train_corpus)
    if not os.path.exists(save_path):
        os.makedirs(save_path)
    if not os.path.exists(best_path):
        os.makedirs(best_path)
    #定义计算图
    with tf.Graph().as_default():
        session_conf = tf.ConfigProto(allow_soft_placement=True, log_device_placement=False)
        with tf.Session(config=session_conf) as sess:
            #训练
            print('Start training and evaluating ...')
            outDir = os.path.abspath(os.path.join(os.path.curdir, "summarys"))
            print("Writing to {}\n".format(outDir))
            trainSummaryDir = os.path.join(outDir, "train")
            trainSummaryWriter = tf.summary.FileWriter(trainSummaryDir, sess.graph)
            evalSummaryDir = os.path.join(outDir, "eval")
            evalSummaryWriter = tf.summary.FileWriter(evalSummaryDir, sess.graph)
            model = SiameseQACNN(config)
            #初始化所有变量
            saver = tf.train.Saver(tf.global_variables(), max_to_keep=10)
            best_saver = tf.train.Saver(tf.global_variables(), max_to_keep=5)
            ckpt = tf.train.get_checkpoint_state(save_path)
            print('Configuring TensorBoard and Saver ...')
            if ckpt and tf.train.checkpoint_exists(ckpt.model_checkpoint_path):
                print('Reloading model parameters ...')
                saver.restore(sess, ckpt.model_checkpoint_path)
            else:
                print('Created new model parameters ...')
                sess.run(tf.global_variables_initializer())
            #计算训练参数
            total_parameters = count_parameters()
            print('Total trainable parameters : {}'.format(total_parameters))
            def trainStep(batch_q, batch_a, batchY):
                _, loss, summary, step, predictions = sess.run(
                    [model.train_op, model.total_loss, model.summary_op, model.global_step, model.res],
                    feed_dict={model._ques: batch_q,
                               model._ans: batch_a,
                               model._y: label,
                               model.dropout_keep_prob: config.keep_prob})
                predictions = [1 if i >= 0.5 else 0 for i in predictions]
                acc, recall, prec, f_beta = get_binary_metrics(pred_y=predictions, true_y=batchY)
                trainSummaryWriter.add_summary(summary, step)
                return loss, acc, prec, recall, f_beta
            def devStep(corpus):
                iterator = Iterator(corpus)  #定义各种参数
                dev_Loss = []
                dev_Acc = []
                dev_Prec = []
                dev_Recall = []
                dev_F_beta = []
                for batch_x in iterator.next(config.batch_size, shuffle=False):
                    batch_q, batch_a, batch_qmask, batch_amask, label = zip(*batch_x)
                    batch_q = np.asarray(batch_q)  #获取批次
                    batch_a = np.asarray(batch_a)
                    loss, summary, step, predictions = sess.run( #输出结果
                        [model.total_loss, model.summary_op, model.global_step, model.res],
                        feed_dict={model._ques: batch_q,
                                   model._ans: batch_a,
                                   model._y: label,
                                   model.dropout_keep_prob: 1.0})
                    predictions = [1 if i >= 0.5 else 0 for i in predictions]
                    acc, recall, prec, f_beta = get_binary_metrics(pred_y=predictions, true_y=label)  #得到参数值
                    dev_Loss.append(loss)
                    dev_Acc.append(acc)
                    dev_Prec.append(prec)
                    dev_Recall.append(recall)
                    dev_F_beta.append(f_beta)
                    evalSummaryWriter.add_summary(summary, step)
                return mean(dev_Loss), mean(dev_Acc), mean(dev_Recall), mean(dev_Prec), mean(dev_F_beta)
            best_acc = 0.0
            for epoch in range(config.num_epochs):  #轮次
                train_time1 = time.time()
                print("----- Epoch {}/{} -----".format(epoch + 1, config.num_epochs))  #输出训练参数
                train_Loss = []
                train_Acc = []
                train_Prec = []
                train_Recall = []
                train_F_beta = []
                for batch_x in iterator.next(config.batch_size, shuffle=True):
                    batch_q, batch_a, batch_qmask, batch_amask, label = zip(*batch_x)
                    batch_q = np.asarray(batch_q)  #批次数据
                    batch_a = np.asarray(batch_a)
                    train_loss, train_acc, train_prec, train_recall, train_f_beta = trainStep(batch_q, batch_a, label)  #训练参数获取
                    train_Loss.append(train_loss)
                    train_Acc.append(train_acc)
                    train_Prec.append(train_prec)
                    train_Recall.append(train_recall)
                    train_F_beta.append(train_f_beta)
                print("---epoch %d  -- train loss %.3f -- train acc %.3f -- train recall %.3f -- train precision %.3f"
                            "-- train f_beta %.3f" % (
                            epoch+1, np.mean(train_Loss), np.mean(train_Acc), np.mean(train_Recall),np.mean(train_Prec), np.mean(train_F_beta)))  #打印训练参数值
                test_loss, test_acc, test_recall, test_prec, test_f_beta = devStep(test_corpus)
                print("---epoch %d  -- test loss %.3f -- test acc %.3f -- test recall %.3f -- test precision %.3f"
                           "-- test f_beta %.3f" % (
                           epoch + 1, test_loss, test_acc, test_recall, test_prec, test_f_beta))  #打印测试参数值
                checkpoint_path = os.path.join(save_path, 'acc{:.3f}_{}.ckpt'.format(test_acc, epoch + 1))  #检查点路径
                bestcheck_path = os.path.join(best_path, 'acc{:.3f}_{}.ckpt'.format(test_acc, epoch + 1))  #最佳检查路径
                saver.save(sess, checkpoint_path, global_step=epoch)
                if test_acc > best_acc:
                    best_acc = test_acc
                    best_saver.save(sess, bestcheck_path, global_step=epoch)
def main():  #主函数
    embedding = load_embedding(embeding, embeding_size, vocab_file)
    preprocess_data1 = preprocess(train_file)  #预处理
    preprocess_data2 = preprocess(test_file)
    train_data = read_train(preprocess_data1, stopword_file, vocab_file)   #训练数据
    test_data = read_train(preprocess_data2, stopword_file, vocab_file)   #测试数据
    train_corpus = load_train_data(train_data, max_q_length, max_a_length)
    test_corpus = load_train_data(test_data, max_q_length, max_a_length)
    config = NNConfig(embedding)   #配置参数
    config.ques_length = max_q_length
    config.ans_length = max_a_length
    #config.embeddings = embedding
    train(deepcopy(train_corpus), test_corpus, config)
if __name__ == '__main__':  #主函数
    save_path = "./model/checkpoint"
    best_path = "./model/bestval"
    train_file = '../data/train.csv'
    test_file = '../data/test.csv'
    stopword_file = '../stopwordList/stopword.txt'
    embeding = '../word2vec/5000-small.txt'
    vocab_file = '../data/word_vocab.txt'
    max_q_length = 15
    max_a_length = 15
    embeding_size = 200
    main()
系统测试
本部分包括训练准确率、测试效果及模型应用。
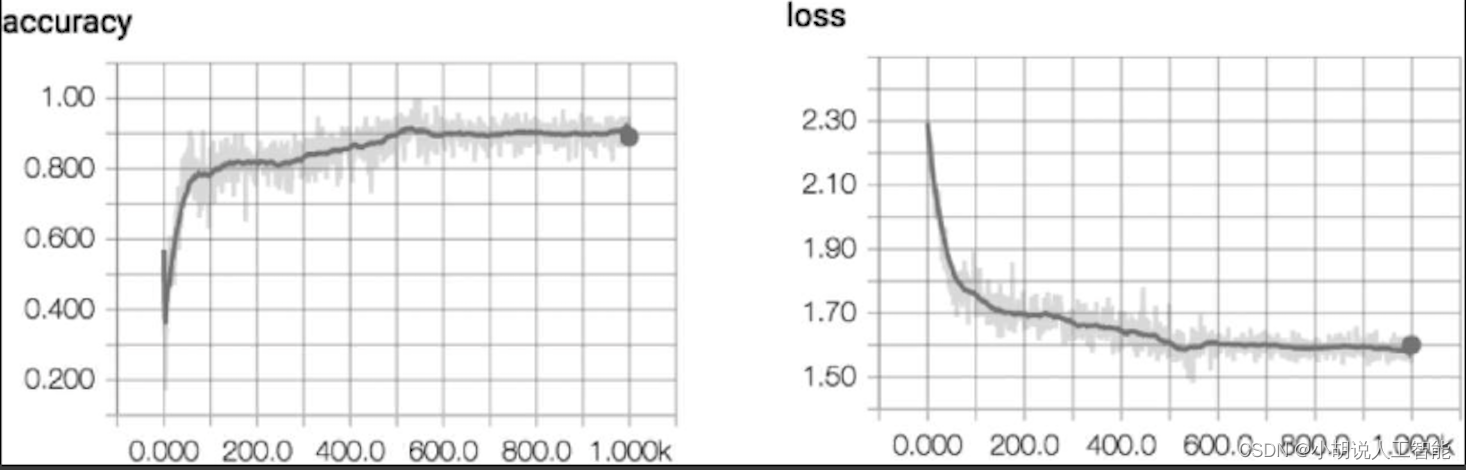
1. 训练准确率
测试准确率在90%左右,损失随训练次数增多而下降,并趋于稳定,如下图所示。
2. 测试效果
将文本输入模型进行测试,如下图所示 。
3. 模型应用
本部分包括程序下载运行、应用使用说明和测试结果。
1)程序下载运行
下载程序压缩包后,在Python环境 下执行gui.py命令即可。
2)应用使用说明
解压程序压缩包后,文件目录如下:

其中,qacnn.py是模型的训练文件,可以单独运行; Control.py控制Recall和Rerank模型的选择,可以单独运行;GUI.py是本项目的图形化界面,调用control.py的接口。
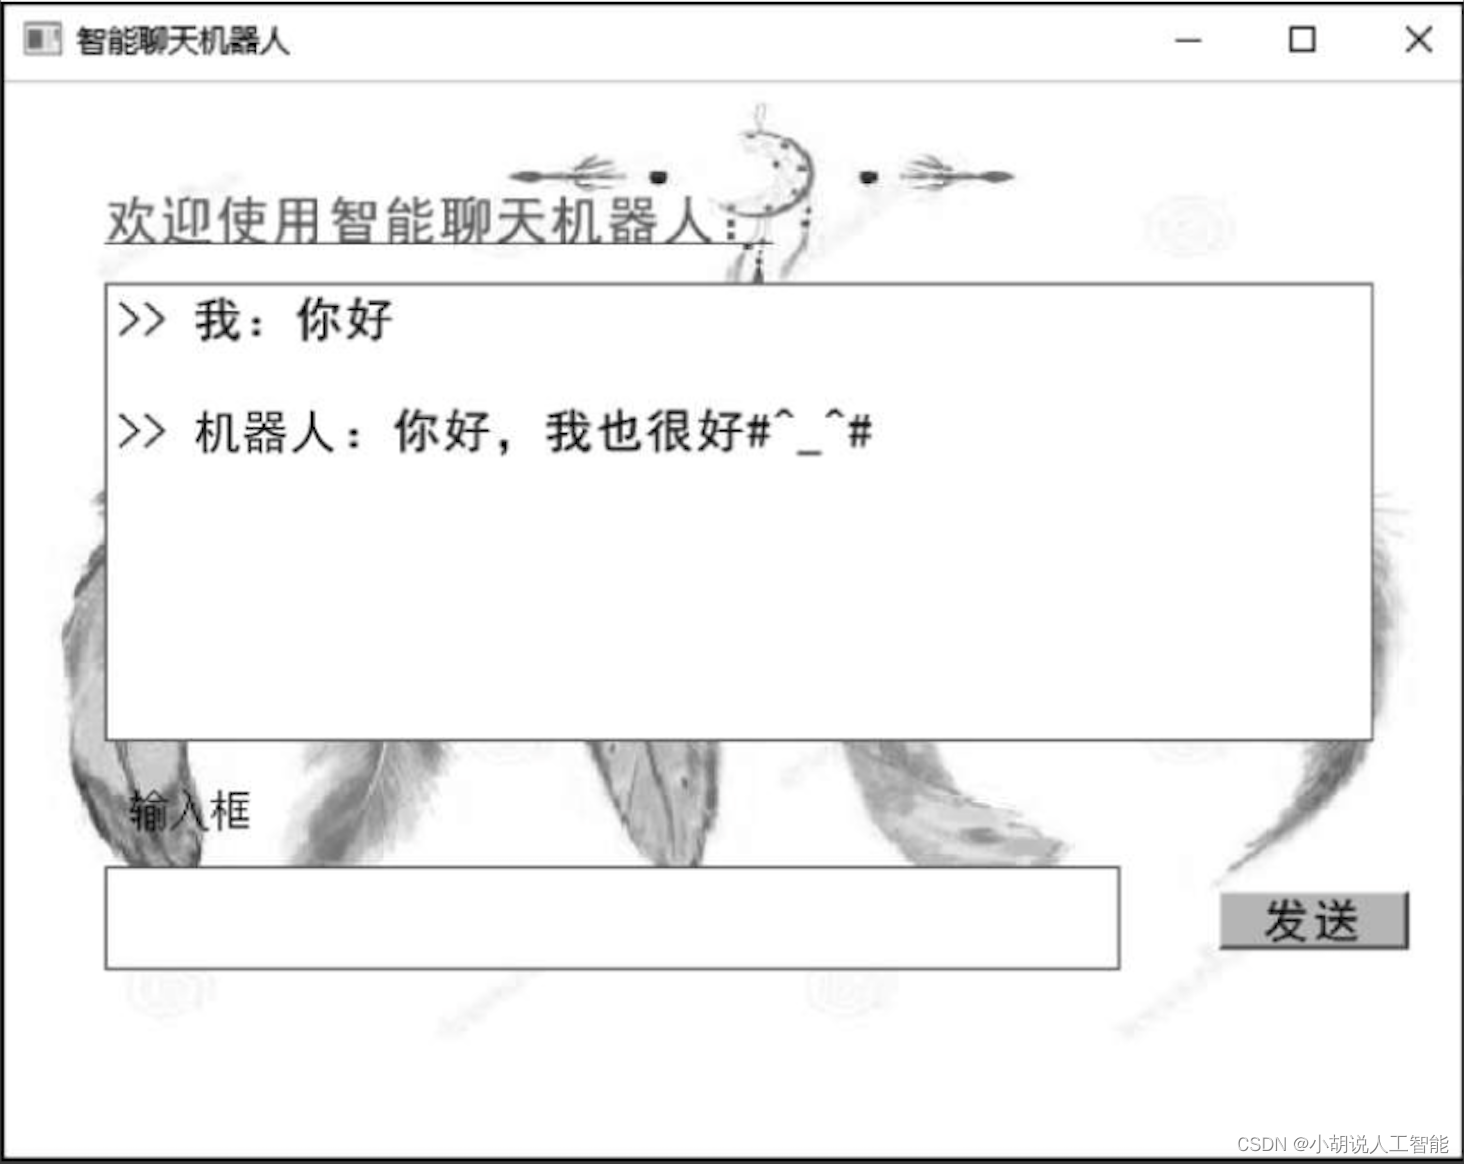
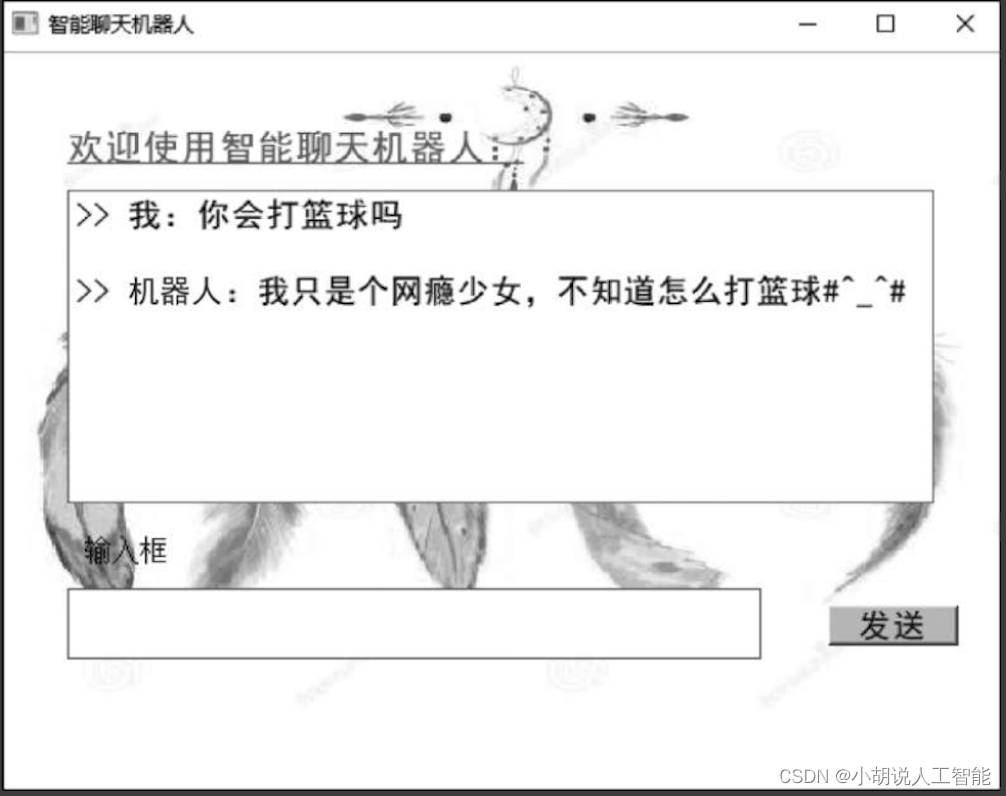
3)测试结果
图形化界面测试结果如图所示。
工程源代码下载
详见本人博客资源下载页
其它资料下载
如果大家想继续了解人工智能相关学习路线和知识体系,欢迎大家翻阅我的另外一篇博客《重磅 | 完备的人工智能AI 学习——基础知识学习路线,所有资料免关注免套路直接网盘下载》
这篇博客参考了Github知名开源平台,AI技术平台以及相关领域专家:Datawhale,ApacheCN,AI有道和黄海广博士等约有近100G相关资料,希望能帮助到所有小伙伴们。