介绍
CountDownLatch是依赖AQS完成的线程阻塞和唤醒,利用AQS的共享锁完成锁的多线程获取和释放。
CountDownLatch 使用了共享锁模式。CountDownLatch 使用一个内部类 Sync来实现CountDownLatch的同步控制,而Sync是AQS的一个实现类,它使用AQS的状态(state)来表示count。
用给定的计数初始化 CountDownLatch。由于调用了 countDown() 方法,所以在当前计数到达零之前,await() 方法会一直受阻塞。之后,会释放所有等待的线程,await() 的所有后续调用都将立即返回。这种现象只出现一次——计数无法被重置。如果需要重置计数,请考虑使用 CyclicBarrier 。
常量&变量
//同步器
private final Sync sync;
构造方法
构造一个用给定计数初始化的 CountDownLatch 。
    /**
     * Constructs a {@code CountDownLatch} initialized with the given count.
     *
     * @param count the number of times {@link #countDown} must be invoked
     *        before threads can pass through {@link #await}
     * @throws IllegalArgumentException if {@code count} is negative
     * 指定计数器总数.
     */
    public CountDownLatch(int count) {
        if (count < 0) throw new IllegalArgumentException("count < 0");
        this.sync = new Sync(count);
    }
内部类
Sync
    /**
     * Synchronization control For CountDownLatch.
     * Uses AQS state to represent count.
     * 内部类Sync完成同步器的实现,Sync继承自AQS实现.
     */
    private static final class Sync extends AbstractQueuedSynchronizer {
        //序列化版本
        private static final long serialVersionUID = 4982264981922014374L;
        //Sync的构造函数
        Sync(int count) {
            //设置AQS的同步状态
            setState(count);
        }

        //获得AQS的同步状态
        int getCount() {
            return getState();
        }
        //尝试获取共享锁 当state=0时,获取锁成功state=1,当state=1时,获取锁失败state=-1进入阻塞
        protected int tryAcquireShared(int acquires) {
            return (getState() == 0) ? 1 : -1;
        }

        // 尝试释放共享锁.
        protected boolean tryReleaseShared(int releases) {
            // Decrement count; signal when transition to zero
            for (;;) {
                int c = getState();
                if (c == 0)
                    return false;
                int nextc = c-1;
                if (compareAndSetState(c, nextc))
                    return nextc == 0;
            }
        }
    }
阻塞流程
await()
使当前线程在锁存器倒计数至零之前一直等待,除非线程被中断
    /**
     * Causes the current thread to wait until the latch has counted down to
     * zero, unless the thread is {@linkplain Thread#interrupt interrupted}.
     *
     * <p>If the current count is zero then this method returns immediately.
     *
     * <p>If the current count is greater than zero then the current
     * thread becomes disabled for thread scheduling purposes and lies
     * dormant until one of two things happen:
     * <ul>
     * <li>The count reaches zero due to invocations of the
     * {@link #countDown} method; or
     * <li>Some other thread {@linkplain Thread#interrupt interrupts}
     * the current thread.
     * </ul>
     *
     * <p>If the current thread:
     * <ul>
     * <li>has its interrupted status set on entry to this method; or
     * <li>is {@linkplain Thread#interrupt interrupted} while waiting,
     * </ul>
     * then {@link InterruptedException} is thrown and the current thread's
     * interrupted status is cleared.
     *
     * @throws InterruptedException if the current thread is interrupted
     *         while waiting
     *   阻塞线程,调用AQS的可中断获取共享锁.
     */
    public void await() throws InterruptedException {
        sync.acquireSharedInterruptibly(1);
    }
当前的线程等待直到count被递减到0,或者线程被中断。
如果当前的count是0,那么方法会立即返回,并且返回值为true。
如果当前的count大于0,则当前线程因为线程调度而变得不可用,并且处于休眠状态,直到发生下面二件事之一:
① 由于countDown方法的调用当前的count达到0;
如果count达到0,那么这个方法将返回true。
② 其他线程中断了当前的线程;
如果当前线程在进入这个方法时设置了中断状态;或者当前线程在等待时被设置了中断状态,那么“InterruptedException”异常将会抛出,并且当前的线程的中断状态会被清除。
acquireSharedInterruptibly
获取共享锁,调用AQS中的acquireSharedInterruptibly(arg)
    AbstractQueuedSynchronizer.java

    /**
     * Acquires in shared mode, aborting if interrupted.  Implemented
     * by first checking interrupt status, then invoking at least once
     * {@link #tryAcquireShared}, returning on success.  Otherwise the
     * thread is queued, possibly repeatedly blocking and unblocking,
     * invoking {@link #tryAcquireShared} until success or the thread
     * is interrupted.
     * @param arg the acquire argument.
     * This value is conveyed to {@link #tryAcquireShared} but is
     * otherwise uninterpreted and can represent anything
     * you like.
     * @throws InterruptedException if the current thread is interrupted
     */
    public final void acquireSharedInterruptibly(int arg)
            throws InterruptedException {
        //判断线程是否被中断
        if (Thread.interrupted())
            throw new InterruptedException();
        //尝试获取共享锁
        if (tryAcquireShared(arg) < 0)
            //当state=-1
            doAcquireSharedInterruptibly(arg);
    }
获取一个共享模式锁,如果发生中断则异常终止。实现首先会检查中断的状态,然后执行至少一次的tryAcquireShared,成功的话返回。否则,线程将会入队,
可能会重复的阻塞和解阻塞,执行tryAcquireShared直到成功或者线程被中断。
① 首先判断当前的线程是否被标志为了中断,如果被标志位了中断,则抛出“InterruptedException”异常,并清除中断标志;否则到第②步;
② 执行『tryAcquireShared』来尝试获取锁,如果成功(即,返回>=0)。则返回true退出方法;否则到第③步
③ 执行doAcquireSharedInterruptibly。线程进入等待队列中
tryAcquireShared(1) < 0
调用CountDownLatch的内部类Sync中的tryAcquireShared()
内部类Sync重写了tryAcquireShared
        //尝试获取共享锁 当state=0时,获取锁成功state=1,当state=1时,获取锁失败state=-1进入阻塞
        protected int tryAcquireShared(int acquires) {
            //获取同步状态
            return (getState() == 0) ? 1 : -1;
        }
doAcquireSharedInterruptibly()
如果计数器值不等于 0,则会调用 doAcquireSharedInterruptibly(int arg) 方法。该方法使用自旋方法会尝试一直去获取同步状态
    /**
     * Acquires in shared interruptible mode.
     * @param arg the acquire argument
     */
    private void doAcquireSharedInterruptibly(int arg)
        throws InterruptedException {
        //①创建一个等待节点  ,共享模式
        final Node node = addWaiter(Node.SHARED);
        boolean failed = true;
        try {
            for (;;) {
                // ② 前驱节点
                final Node p = node.predecessor();
                if (p == head) {
                    //对于CountDownLatch而言,如果计数器值不等于0,那么r 会一直小于0
                    int r = tryAcquireShared(arg);
                    if (r >= 0) {
                        setHeadAndPropagate(node, r);
                        p.next = null; // help GC
                        failed = false;
                        return;
                    }
                }
                //③等待
                if (shouldParkAfterFailedAcquire(p, node) &&
                    parkAndCheckInterrupt())
                    throw new InterruptedException();
            }
        } finally {
            if (failed)
                cancelAcquire(node);
        }
    }
① 创建一个共享模式的节点,并将这个节点加入到等待队列中。
② 获取新创建好节点的前驱节点。如果前驱节点是head节点,则说明当前节点是队列中第一个等待获取锁的节点,那么就执行『tryAcquireShared』方法再次尝试获取共享锁。如果tryAcquireShared方法的返回值小于0.也就说获取共享锁失败。进入步骤③
③ 如果前驱节点不是head节点,或者当前节点获取共享锁失败(即,步骤②)。那么执行『shouldParkAfterFailedAcquire』方法,该方法返回true则说明本次获取共享锁失败需要阻塞(挂起)当前线程。接着执行『parkAndCheckInterrupt』方法,该方法会将当前线程挂起,直到被唤醒。
这就是阻塞情况下的一个主流程,在这个逻辑过程中使用了大量的CAS来进行原子性的修改,当修改失败的时候,是会通过for(;;)来重新循环的,也就是说『doAcquireSharedInterruptibly』使用自旋锁(自旋+CAS)来保证多线程并发的安全,最终使得当前节点要么获取共享锁成功,要么被挂起等待唤醒
addWaiter(Node.SHARED)
创建节点
    /**
     * Creates and enqueues node for current thread and given mode.
     *
     * @param mode Node.EXCLUSIVE for exclusive, Node.SHARED for shared
     * @return the new node
     */
    private Node addWaiter(Node mode) {
        //创建节点
        Node node = new Node(Thread.currentThread(), mode);
        // Try the fast path of enq; backup to full enq on failure
        Node pred = tail;
        if (pred != null) {
            node.prev = pred;
            if (compareAndSetTail(pred, node)) {
                pred.next = node;
                return node;
            }
        }
        enq(node);
        return node;
    }
根据给定的模式创建当前线程的节点,并将创建好的节点入队(加入等待队列尾部)。
首先在队列非空的情况下会尝试一次快速入队,也就是通过尝试一次CAS操作入队,如果CAS操作失败,则调用enq方法进行“自旋+CAS”方法将创建好的节点加入队列尾。
在共享模式下,Node的mode(即,nextWaiter)为’SHARED’。nextWaiter是用于在排他锁模式下当节点处于条件队列时表示下一个等待条件的节点,所以在共享锁模式下,我们使用’SHARED’这个特殊值来表示该字段。排他锁模式为EXCLUSIVE
enq(node)
节点入队
    /**
     * Inserts node into queue, initializing if necessary. See picture above.
     * @param node the node to insert
     * @return node's predecessor
     */
    private Node enq(final Node node) {
        for (;;) {
            Node t = tail;
            //尾节点为null 即等待队列为空
            if (t == null) { // Must initialize
                //创建哨兵节点
                if (compareAndSetHead(new Node()))
                    tail = head;
            } else {
                node.prev = t;
                if (compareAndSetTail(t, node)) {
                    t.next = node;
                    return t;
                }
            }
        }
    }
使用自旋锁的方式(自旋+CAS)插入节点到等待队列,如果等待队列为空则初始化队列。
初始化队列:创建一个空节点emptyNode (即,new Node(),可以成为哨兵节点),将head和tail都指向这个节点。
          +----------+
head ---> | emptyNode|   <----tail
          +----------+
然后才是将我们待插入的节点插入,
          +----------+    prev  +-------+
head ---> | emptyNode|   <----- |  node1|  <----tail
          +----------+   ---->  +-------+
                         next
tryAcquireShared(arg)
在共享模式下尝试获取。这个方法需要查询对象的状态是否允许在共享模式下被获取,如果允许则去获取它。
这个方法总是在线程执行获取共享锁时被调用。如果这个方法报告失败,那么获取方法可能会使线程排队等待,如果它(即,线程)还没入队的话,直到其他的线程发出释放的信号。
AQS默认实现抛出一个“UnsupportedOperationException”
CountDownLatch的内部类Sync对该方法进行了重写:
        //尝试获取共享锁 当state=0时,获取锁成功state=1,当state=1时,获取锁失败state=-1进入阻塞
        protected int tryAcquireShared(int acquires) {
            return (getState() == 0) ? 1 : -1;
        }
如果当前的状态值为0(即,count为0),则表示获取成功(返回’1’);否则表示获取失败(返回’-1’)
获取成功执行相应的出队操作,setHeadAndPropagate(node, r)具体实现下面会详细说明
shouldParkAfterFailedAcquire
尝试获取共享锁失败后的操作
/**
* Checks and updates status for a node that failed to acquire.
* Returns true if thread should block. This is the main signal
* control in all acquire loops. Requires that pred == node.prev.
*
* @param pred node's predecessor holding status
* @param node the node
* @return {@code true} if thread should block
*/
private static boolean shouldParkAfterFailedAcquire(Node pred, Node node) {
//获取当前节点的前置节点的状态
int ws = pred.waitStatus;
if (ws == Node.SIGNAL)
/*
* This node has already set status asking a release
* to signal it, so it can safely park.
*/
//如果是SIGNAL(-1)状态直接返回true,代表此节点可以挂起
//因为前置节点状态为SIGNAL在适当状态 会唤醒后继节点
return true;
//表示请求取消了,
if (ws > 0) {
/*
* Predecessor was cancelled. Skip over predecessors and
* indicate retry.
*/
//如果是cancelled
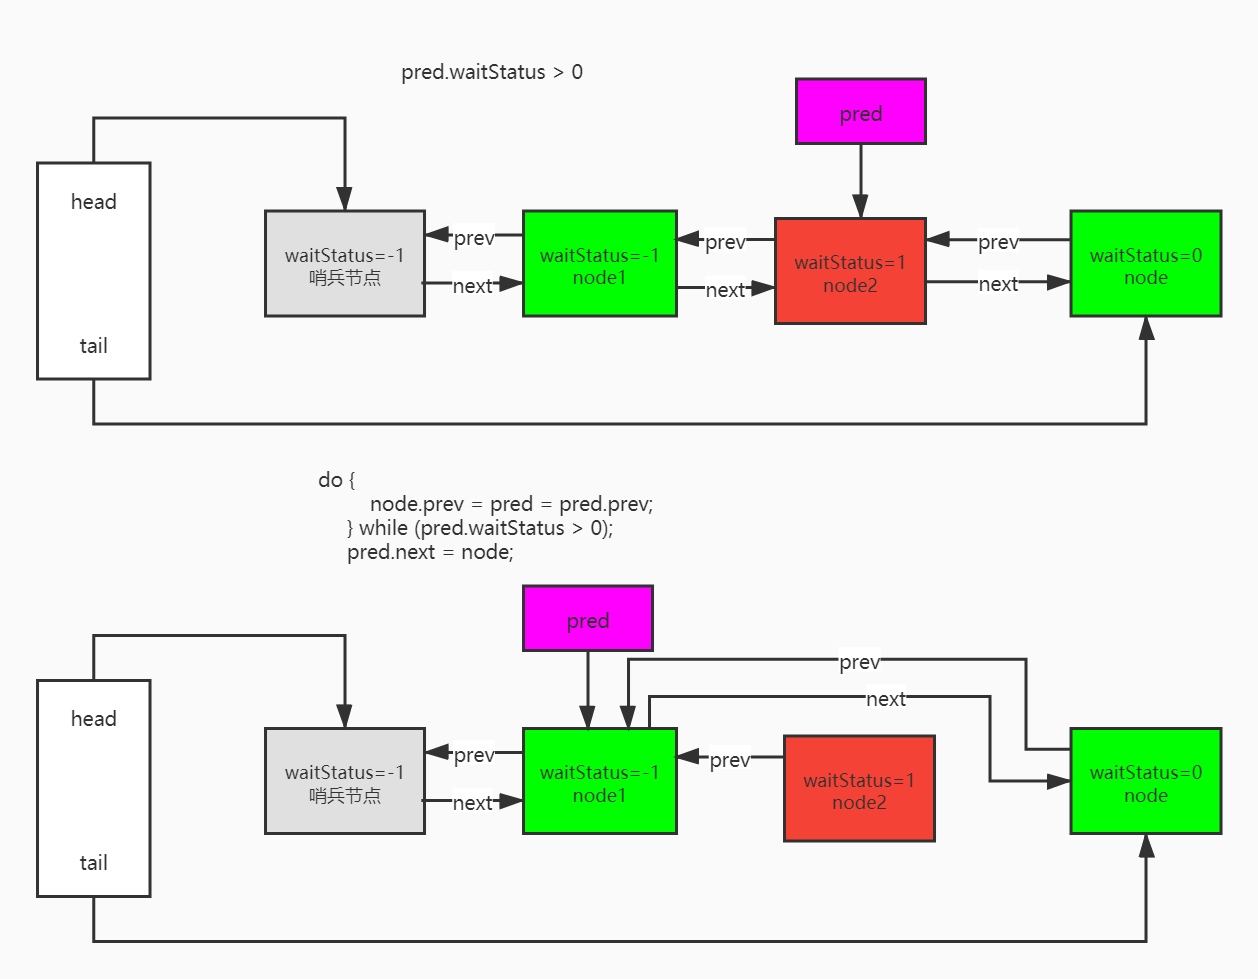
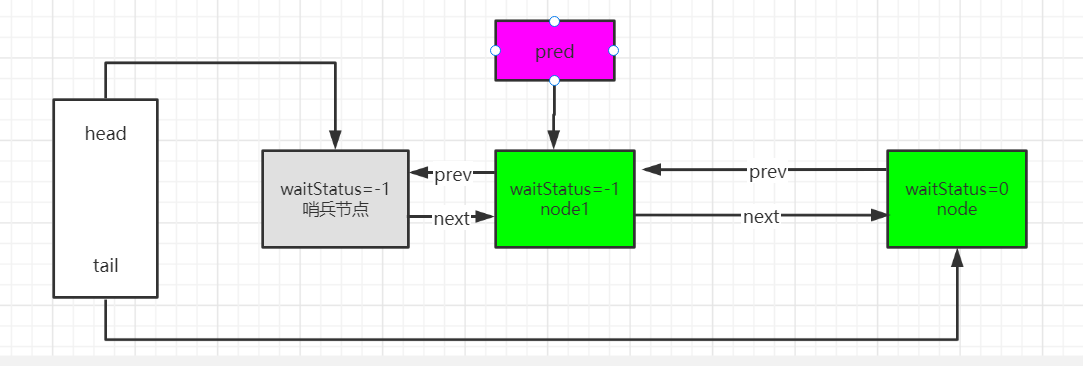
do {
//则从后往前依此跳过cancelled状态的节点
node.prev = pred = pred.prev;
} while (pred.waitStatus > 0);
//将找到的符合标准的节点的后置节点指向当前节点
pred.next = node;
} else {
/*
* waitStatus must be 0 or PROPAGATE. Indicate that we
* need a signal, but don't park yet. Caller will need to
* retry to make sure it cannot acquire before parking.
*/
//则将前置节点等待状态设置为SIGNAL-1
compareAndSetWaitStatus(pred, ws, Node.SIGNAL);
}
return false;
}
检查并修改一个节点的状态,当该节点获取锁失败时。返回true如果线程需要阻塞。这是主要的信号通知控制在所有的获取锁循环中。
可见一顿操作后,队列中跳过了节点状态为cancelled的节点
① 如果pred.waitStatus == Node.SIGNAL。则说明node的前驱节点已经被要求去通知释放它的后继节点,所以node可以安全的被挂起(park)。然后,退出方法,返回true。
② 如果pred.waitStatus > 0。pred状态是CANCELLED,说明有另一个线程取消了pred,使得pred关联的线程放弃了竞争锁的权利,则说明node的前驱节点被取消了(该节点与前驱节点的连接断开)。
那么跳过这个前驱节点并重新标志一个前驱节点,直到标记一个有效的前驱节点(即,waitStatus <= 0 的节点可作为有效的前驱节点),然后,退出方法,返回false。
其中的node.prev = pred = pred.prev;可以看成

pred = pred.prev;//重新标记一个新的前驱节点

node.prev = pred;//node的前指针指向这个新的前驱节点
node 当前节点
pred 前驱节点
nexd 后继节点
vpred 有效前驱节点
vnexd 有效后继节点
prev 前驱指针
next 后继指针
如果pred状态是CANCELLED,说明有另一个线程取消了pred,使得pred关联的线程放弃了竞争锁的权利,因为node即将再次进入for循环尝试获取锁,很自然的我们要更新node的prev指针链和vpred的next指针链,这个过程其实分成三步
1.找到vpred,这个过程就是循环执行pred=pred.prev,pred是什么?是函数的入参pred,指向了一个pred节点,所以这个变量的修改是线程隔离的
2.调整node.prev -> vpred,根据当前线程所找到的它以为的有效节点vpred,把自己node.prev指向vpred,注意其实vpred并不可靠!
从代码的角度来看上述俩个步骤是每次循环都会执行一次,来逐步更新自己的有效前驱,直到退出循环达到最终有效前驱,也就是
node.prev=pred=pred.prev
假设有线程A与线程B进入该流程,那必然有线程A和线程B的前驱节点为已取消,要注意的是线程A和线程B所绑定的node的状态一定不是CANCELLED,为什么?因为后面我们会知道cancelAcquire方法才会修改node状态为CANCELLED,而该方法的执行一定就是node所绑定的那个线程执行的,也就是说此时该线程在执行shouldParkAfterFailedAcquire,所以不可能节点已取消,那么无论线程A,线程B的执行时序如何,后入队的线程找它的vpred最坏的情况下也一定会找到先入队的那个线程的节点,且不为CANCELLED,从而导致退出循环,并设置自己的prev指针,不会产生prev指针链交叉的情况,换句话说,prev指针链没有被破坏!
3.调整vpred.next -> node,这一步就是完成当前线程所看到的vpred和node之间所有CANCELLED节点的出队,正如我们上面所分析的那样,此时的vpred实际上也不可靠,也是有可能是CANCELLED状态的,为什么?因为退出while循环时线程看到的vpred或许是未取消的,但是可能下一秒另一个线程就取消了这个vpred,导致其状态变为CANCELLED,但是这并不影响逻辑,因为执行完这句以后,线程会继续走for循环,并且如果再次进入该方法,它会读取到vpred的最新状态为CANCELLED,就会再次进入该分支逻辑调整它新的prev指针,有人或许会问?如果一直不断的发生这种状况,那不就死循环了吗?理论上来说确实存在可能,但是我们的同步队列是有限的,而且必须明白一点,如果node的状态变为CANCELLED,它就不可能在变成其他状态了,这是一个最终态,意味着最坏的情况也是同步队列中所有节点变成CANCELLED,所以循环一定是有限次数的。
③ 其他情况下,即pred.waitStatus为’0’或’PROPAGATE’。表示我们需要一个通知信号(即,当前的node需要唤醒的通知),但是当前还不能挂起node。调用『compareAndSetWaitStatus(pred, ws, Node.SIGNAL)』方法通过CAS的方式来修改前驱节点的waitStatus为“SIGNAL”。退出方法,返回false。
我们需要一个通知信号,主要是因为当前线程要被挂起了(park)。而如果waitStatus已经是’SIGNAL’的话就无需修改,直接挂起就好,而如果waitStatus是’CANCELLED’的话,说明prev已经被取消了,是个无效节点了,那么无需修改这个无效节点的waitStatus,而是需要先找到一个有效的prev。因此,剩下的情况就只有当waitStatus为’0’和’PROPAGAET’了(注意,waitStatus为’CONDITION’是节点不在等待队列中,所以当下情况waitStatus不可能为’CONDITION’),这是我们需要将prev的waitStatus使用CAS的方式修改为’SIGNAL’,而且只有修改成功的情况下,当前的线程才能安全被挂起。
还值得注意的时,因此该方法的CAS操作都是没有自旋的,所以当它操作完CAS后都会返回false,在外层的方法中会使用自旋,当发现返回的是false时,会再次调用该方法,以检查保证有当前node有一个有效的prev,并且其waitStatus为’SIGNAL’,在此情况下当前的线程才会被挂起(park)。
parkAndCheckInterrupt
使用LockSupport.park挂起当前线程,并且返回线程的中断标志。
/**
 * Convenience method to park and then check if interrupted
 *
 * @return {@code true} if interrupted
 */
private final boolean parkAndCheckInterrupt() {
    //会调用UNSAFE.park()方法将线程阻塞起来
    LockSupport.park(this);
    return Thread.interrupted();
}
线程就一致阻塞在这里,等待唤醒
释放流程
递减锁存器的计数。如果计数到达零,则唤醒所有等待的线程。
countDown()
    /**
     * Decrements the count of the latch, releasing all waiting threads if
     * the count reaches zero.
     *
     * <p>If the current count is greater than zero then it is decremented.
     * If the new count is zero then all waiting threads are re-enabled for
     * thread scheduling purposes.
     *
     * <p>If the current count equals zero then nothing happens.
     * 递减计数器.
     */
    public void countDown() {
        sync.releaseShared(1);
    }
减小latch的count,如果count达到0则释放所有正在等待的线程。
如果当前的count大于0,那么减少count。如果减少后的count值为0,那么所有正在等待的线程因为线程调度的原因被重新启用。
如果当前的count值已经是0了,那么什么都不会发生。
releaseShared(1)
内部调用AQS的releaseShared方法,来释放共享锁同步状态
   AbstractQueuedSynchronizer.java
     /**
     * Releases in shared mode.  Implemented by unblocking one or more
     * threads if {@link #tryReleaseShared} returns true.
     *
     * @param arg the release argument.  This value is conveyed to
     *        {@link #tryReleaseShared} but is otherwise uninterpreted
     *        and can represent anything you like.
     * @return the value returned from {@link #tryReleaseShared}
     * 共享模式下的释放。如果『tryReleaseShared』返回true的话,会使一个或多个线程重新启动
     */
    public final boolean releaseShared(int arg) {
        if (tryReleaseShared(arg)) {
            doReleaseShared();
            return true;
        }
        return false;
    }
tryReleaseShared(arg)
在共享模式下,尝试去设置状态来反映一个释放。
这个方法总是在线程执行释放时被调用。
默认实现抛出一个UnsupportedOperationException异常。
返回:如果当前共享模式可能允许一个正在等待的获取成功(正在等待的获取可能是共享模式的,也可能是排他模式的),则返回true;否则,返回false。
CountDownLatch的内部类Sync对该方法进行了重写:
        // 尝试释放共享锁.
        protected boolean tryReleaseShared(int releases) {
            // Decrement count; signal when transition to zero
            for (;;) {
                //获取锁状态
                int c = getState();
                //释放锁成功
                if (c == 0)
                    return false;
                //计算新的锁计数器
                int nextc = c-1;
                //更新锁状态
                if (compareAndSetState(c, nextc))
                    return nextc == 0;
            }
        }
减少count的值,如果count为0则发出释放信号。
这里使用了"自旋+CAS”的方式来原子性的将state的值减少1,如果在此过程中state已经为0了(在并发情况下,可能已经被其他线程修改为了0),则返回false。否则根据修改后state的值是否等于0来返回boolean值。
doReleaseShared()
    /**
     * Release action for shared mode -- signals successor and ensures
     * propagation. (Note: For exclusive mode, release just amounts
     * to calling unparkSuccessor of head if it needs signal.)
     */
    private void doReleaseShared() {
        /*
         * Ensure that a release propagates, even if there are other
         * in-progress acquires/releases.  This proceeds in the usual
         * way of trying to unparkSuccessor of head if it needs
         * signal. But if it does not, status is set to PROPAGATE to
         * ensure that upon release, propagation continues.
         * Additionally, we must loop in case a new node is added
         * while we are doing this. Also, unlike other uses of
         * unparkSuccessor, we need to know if CAS to reset status
         * fails, if so rechecking.
         */
        for (;;) {
            Node h = head;
            if (h != null && h != tail) {
                int ws = h.waitStatus;
                if (ws == Node.SIGNAL) {
                    if (!compareAndSetWaitStatus(h, Node.SIGNAL, 0))
                        continue;            // loop to recheck cases
                        //唤醒后继节点
                    unparkSuccessor(h);
                }
                else if (ws == 0 &&
                         !compareAndSetWaitStatus(h, 0, Node.PROPAGATE))
                    continue;                // loop on failed CAS
            }
            if (h == head)                   // loop if head changed
                break;
        }
    }
共享模式下的释放动作 ———— 用信号通知后继节点并且确保广播。
确保一个释放的广播,即使有其他线程正在进行获取/释放锁。这个过程通常的方式是尝试head的unparkSuccessor操作如果需要通知释放的话。如果没这么做,状态会被设置为‘PROPAGATE’以确保在释放,广播继续。此外,当我们正在做这个操作的时候如果新的节点被添加的话,我们需要重新循环再进行一次该操作。另外,不同于unparkSuccessor的其他用途,我们需要知道CAS重置状态是否失败,如果失败则重新检查。
在队列非空的时候,该方法会释放head的后继节点,如果该节点可以被释放的话。
『(h != null && h != tail)』表示队列非空,即有等待获取锁的节点;
『(h == head)』表示,已经操作完释放后继节点,或者队列已经空了(即,『(h == null || h == tail)』),那么就退出循环。否则如果循环过程中(即,『h != head』),头结点发生了变化,则重新循环。
如果『if (h != null && h != tail)』为true,那么:
① 如果head的waitStatus为’SIGNAL’,则说明head的后继节点可被通知释放,那么执行CAS操作将head.waitStatus修改为’0’,如果成功,则执行『unparkSuccessor』对head的后继节点进行释放操作,如果CAS操作失败,则说明发送了多线程竞争(即,此时有其他线程也在修改head的waitStatus状态值),那么重新循环检查。
② 如果head的waitStatus为’0’,则使用CAS的方式将其修改为’PROPAGATE’。如果CAS操作失败,则说明发生了多线程竞争,那么重新循环检查。
③ 如果上面的两个操作中有一个成功了,就会走到“if (h == head)”这一步,并且此时head节点没有发生变化,则退出循环,操作结束。否则,说明head节点发生变化了,那么重新循环检查。
『if (h != null && h != tail)』为false,那么:
说明队列中没有等到获取锁的节点。会直接到“if (h == head)”,如果此时head节点没有发生变化,则直接退出循环,操作结束。如果此时head节点发生了变化,那么重新循环检查。
也就是说,该方法在等待队列非空时(即,存在一个有效的等待节点,头结点不是有效节点),会根据head的waitStatus进行后续的操作。
a) 如果『ws == Node.SIGNAL』,则说明需要释放head后继节点,如果此时CAS操作『compareAndSetWaitStatus(h, Node.SIGNAL, 0)』也成功的话(说明,此时没有其他线程在修改head的waitStatus),那么就会执行『unparkSuccessor(h);』来释放head的后继节点。
b) 如果『ws != Node.SIGNAL』并且『ws == 0』,则通过CAS操作将head的waitStatus修改为’PROPAGATE’。
以上两步,当CAS失败,也就是有其他线程也在修改head的waitStatus状态时,需要继续循环进行重新检测,如果head节点改变了也需要继续循环重新检测。
Q:关于node的waitStatus为’0’的情况?
A:当节点不属于任何waitStatus的话,就会是0。比如,创建好的节点。比如,原来是SIGNAL状态,在执行完unparkSuccessor操作后(逻辑上说是执行完unparkSuccessor后,但实际的代码实现必须先将node的waitStatus通过CAS成功从SINGAL修改为0后,才可执行unparkSuccessor操作,以保证多线程竞争情况下的正确性)。比如,将节点从条件队列转移到等待队列的时候,会通过CAS将node的waitStatus从’CONDITION’修改为0。
Q:’PROPAGATE’状态与释放之间的关系?
A:当head的waitStatus为’PROPAGATE’的话,在释放操作时,这个释放会被广播下去,也就是说,第一个线程被释放完后,会继续释放第二个被阻塞的线程。。。
unparkSuccessor(h)
唤醒后继节点
    /**
     * Wakes up node's successor, if one exists.
     *
     * @param node the node
     */
    private void unparkSuccessor(Node node) {
        /*
         * If status is negative (i.e., possibly needing signal) try
         * to clear in anticipation of signalling.  It is OK if this
         * fails or if status is changed by waiting thread.
         */
        int ws = node.waitStatus;
        if (ws < 0)
            compareAndSetWaitStatus(node, ws, 0);

        /*
         * Thread to unpark is held in successor, which is normally
         * just the next node.  But if cancelled or apparently null,
         * traverse backwards from tail to find the actual
         * non-cancelled successor.
         */
        Node s = node.next;
        if (s == null || s.waitStatus > 0) {
            s = null;
            for (Node t = tail; t != null && t != node; t = t.prev)
                if (t.waitStatus <= 0)
                    s = t;
        }
        if (s != null)
            LockSupport.unpark(s.thread);
    }
唤醒后继节点,如果存在的话
① 如果状态值是负数,则在预期发信号通知时清除这个负数状态值。如果状态被等待的线程修改了或者清除负数状态值失败是允许。
② 后继节点的线程被唤醒,后继节点通常就是下一个节点。但是如果下一个节点被取消了或者下一个节点为null,则从队列尾(tail)往前遍历去找真实的未取消的后继节点。
『(s == null || s.waitStatus > 0)』:说明下一个节点为null或被取消了(waitStatus允许的状态值中,只有’CANCELLED’是>0的)。那么,就从队列尾(tail)开始向前遍历,获取第一个非空且未被取消的节点。如果存在这样的一个后继节点的话(即,“s != null”),则执行『LockSupport.unpark(s.thread);』操作来唤醒这个节点的线程。
Q:关于node的waitStatus为’CANCELLED’的情况?
A:关于node的waitStatus为’CANCELLED’的情况:比如,当这个node被中断了,或者设置的超时时间到了,那么说明这个线程获取锁失败,那么此时就应该将其设置为cancelled,因为如果该线程还需要获取锁的话,会重新调用获取锁的方法,而获取锁的方法就是创建一个新的node的。所以,那么线程获取锁失败的时候就会将这个node的waitStatus设置为’CANCELLED’,一个被取消的线程绝不会获取锁成功,一个线程只能被它自己取消,不能被其他线程取消。
Q:关于node为null的情况?
A:关于node为null的情况:比如,一个入队操作(enq)不会被分配到前驱节点的next字段,直到tail成功指向当前节点之后(通过CAS来将tail指向当前节点。『enq』方法实现中,会先将node.prev = oldTailNode;在需要在CAS成功之后,即tail = node之后,再将oldTailNode.next = node;),所以当看到next字段为null时并不意味着当前节点是队列的尾部了。无论如何,如果一个next字段显示为null,我们能够从队列尾向前扫描进行复核。
线程被唤醒
当调用了『LockSupport.unpark(s.thread);』操作后,等待队列中第一个等待的线程被唤醒,就会重新启动。流程回到『doAcquireSharedInterruptibly』方法中,线程从阻塞中恢复:
doAcquireSharedInterruptibly(1)
parkAndCheckInterrupt()方法中被唤醒,继续循环
    /**
     * Acquires in shared interruptible mode.
     * @param arg the acquire argument
     */
    private void doAcquireSharedInterruptibly(int arg)
        throws InterruptedException {
        //①创建一个等待节点  ,共享模式
        final Node node = addWaiter(Node.SHARED);
        boolean failed = true;
        try {
            for (;;) {
                // ② 前驱节点
                final Node p = node.predecessor();
                if (p == head) {
                    int r = tryAcquireShared(arg);
                    if (r >= 0) {
                        setHeadAndPropagate(node, r);
                        p.next = null; // help GC
                        failed = false;
                        return;
                    }
                }
                //③
                if (shouldParkAfterFailedAcquire(p, node) &&
                    parkAndCheckInterrupt())
                    throw new InterruptedException();
            }
        } finally {
            if (failed)
                cancelAcquire(node);
        }
    }
第一个被释放的线程从『parkAndCheckInterrupt』方法中的『LockSupport.park(this)』挂起结束,继续后面的流程。
因为此时是正常的被唤醒流程,线程并没有被设置中断标志,因此『parkAndCheckInterrupt』会返回false。
流程重新开始循环。并且通过『Node p = node.predecessor()』为head,接着执行『tryAcquireShared』方法,此时的count==0,所以该方法也会返回’1’,表示获取共享锁成功。
接着通过『setHeadAndPropagate』将当前节点设置为头节点并进行广播如果需要的话。然后将p(即,旧的head节点)的next置null,有助于p被垃圾收集器收集。然后标识failed为false。结束方法调用,返回true。
setHeadAndPropagate(node, r)
将当前节点设置为头节点并进行广播
    /**
     * Sets head of queue, and checks if successor may be waiting
     * in shared mode, if so propagating if either propagate > 0 or
     * PROPAGATE status was set.
     *
     * @param node the node
     * @param propagate the return value from a tryAcquireShared
     */
    private void setHeadAndPropagate(Node node, int propagate) {
        Node h = head; // Record old head for check below
        setHead(node);
        /*
         * Try to signal next queued node if:
         *   Propagation was indicated by caller,
         *     or was recorded (as h.waitStatus either before
         *     or after setHead) by a previous operation
         *     (note: this uses sign-check of waitStatus because
         *      PROPAGATE status may transition to SIGNAL.)
         * and
         *   The next node is waiting in shared mode,
         *     or we don't know, because it appears null
         *
         * The conservatism in both of these checks may cause
         * unnecessary wake-ups, but only when there are multiple
         * racing acquires/releases, so most need signals now or soon
         * anyway.
         */
        if (propagate > 0 || h == null || h.waitStatus < 0 ||
            (h = head) == null || h.waitStatus < 0) {
            Node s = node.next;
            if (s == null || s.isShared())
                doReleaseShared();
        }
    }
设置’node’节点为头结点,并且检查’node’节点的后继是否正在等待获取共享锁,如果是的话,并且’propagate > 0’或者’node’的waitStatus被设置成了’PROPAGATE’,则广播。
① 设置’node’为head节点
② 尝试通知队列中的下一个节点,如果:
[1]
a) 调用者标识了广播(即,propagate > 0),
b) 或者waitStatus被前面的操作重新记录了(’h.waitStatus’可能在setHead之前或之后被重新记录)(注意,这里使用waitStatus的符号检查,因为PROPAGATE状态可能被转换为SIGNAL)。
并且[2]队列中下一个等待的节点是共享模式的,或者下一个节点为null。
这两次检查的保守性可能导致不必要的唤醒,但是只有当多线程竞争获取/释放锁时,所以大多数情况下现在或即将需要通知(signal)唤醒。(因为在enq新节点入队过程中,可能出现next为null的短暂现象,这是发现在节点入队的过程中,随后节点就会入队成功,next字段就不会为null了。所以这里将next为null的情况也考虑了,在广播释放时,会将这个正在入队的节点对应的线程也进行释放)。
如果符合[1]、[2]个条件则执行『doReleaseShared()』来释放后继的节点。
可设置超时时间的await
使当前线程在锁存器倒计数至零之前一直等待,除非线程被中断,或者等待超时
await(long timeout, TimeUnit unit)
    /**
     * Causes the current thread to wait until the latch has counted down to
     * zero, unless the thread is {@linkplain Thread#interrupt interrupted},
     * or the specified waiting time elapses.
     *
     * <p>If the current count is zero then this method returns immediately
     * with the value {@code true}.
     *
     * <p>If the current count is greater than zero then the current
     * thread becomes disabled for thread scheduling purposes and lies
     * dormant until one of three things happen:
     * <ul>
     * <li>The count reaches zero due to invocations of the
     * {@link #countDown} method; or
     * <li>Some other thread {@linkplain Thread#interrupt interrupts}
     * the current thread; or
     * <li>The specified waiting time elapses.
     * </ul>
     *
     * <p>If the count reaches zero then the method returns with the
     * value {@code true}.
     *
     * <p>If the current thread:
     * <ul>
     * <li>has its interrupted status set on entry to this method; or
     * <li>is {@linkplain Thread#interrupt interrupted} while waiting,
     * </ul>
     * then {@link InterruptedException} is thrown and the current thread's
     * interrupted status is cleared.
     *
     * <p>If the specified waiting time elapses then the value {@code false}
     * is returned.  If the time is less than or equal to zero, the method
     * will not wait at all.
     *
     * @param timeout the maximum time to wait
     * @param unit the time unit of the {@code timeout} argument
     * @return {@code true} if the count reached zero and {@code false}
     *         if the waiting time elapsed before the count reached zero
     * @throws InterruptedException if the current thread is interrupted
     *         while waiting
     *     指定超时时间阻塞线程.
     */
    public boolean await(long timeout, TimeUnit unit)
        throws InterruptedException {
        return sync.tryAcquireSharedNanos(1, unit.toNanos(timeout));
    }
tryAcquireSharedNanos(int arg,long nanosTimeout)
    /**
     * Attempts to acquire in shared mode, aborting if interrupted, and
     * failing if the given timeout elapses.  Implemented by first
     * checking interrupt status, then invoking at least once {@link
     * #tryAcquireShared}, returning on success.  Otherwise, the
     * thread is queued, possibly repeatedly blocking and unblocking,
     * invoking {@link #tryAcquireShared} until success or the thread
     * is interrupted or the timeout elapses.
     *
     * @param arg the acquire argument.  This value is conveyed to
     *        {@link #tryAcquireShared} but is otherwise uninterpreted
     *        and can represent anything you like.
     * @param nanosTimeout the maximum number of nanoseconds to wait
     * @return {@code true} if acquired; {@code false} if timed out
     * @throws InterruptedException if the current thread is interrupted
     */
    public final boolean tryAcquireSharedNanos(int arg, long nanosTimeout)
            throws InterruptedException {
        if (Thread.interrupted())
            throw new InterruptedException();
        return tryAcquireShared(arg) >= 0 ||
            doAcquireSharedNanos(arg, nanosTimeout);
    }
doAcquireSharedNanos(**int **arg, long nanosTimeout)
    /**
     * Acquires in shared timed mode.
     *
     * @param arg the acquire argument
     * @param nanosTimeout max wait time
     * @return {@code true} if acquired
     */
    private boolean doAcquireSharedNanos(int arg, long nanosTimeout)
            throws InterruptedException {
        if (nanosTimeout <= 0L)
            return false;
        final long deadline = System.nanoTime() + nanosTimeout;
        final Node node = addWaiter(Node.SHARED);
        boolean failed = true;
        try {
            for (;;) {
                final Node p = node.predecessor();
                if (p == head) {
                    int r = tryAcquireShared(arg);
                    if (r >= 0) {
                        setHeadAndPropagate(node, r);
                        p.next = null; // help GC
                        failed = false;
                        return true;
                    }
                }
                nanosTimeout = deadline - System.nanoTime();
                if (nanosTimeout <= 0L)
                    return false;
                if (shouldParkAfterFailedAcquire(p, node) &&
                    nanosTimeout > spinForTimeoutThreshold)
                    LockSupport.parkNanos(this, nanosTimeout);
                if (Thread.interrupted())
                    throw new InterruptedException();
            }
        } finally {
            if (failed)
                cancelAcquire(node);
        }
    }
『await(long timeout, TimeUnit unit)』同『await()』方法大体是相同的,主要多了在获取共享锁时对时间的控制。
在尝试获取锁时的区别:
① 如果传入的给定的超时纳秒数是否小于等于0,如果是则直接返回false,获取共享锁失败。
② 如果在使用自旋的方式获取共享锁的过程中,发现已经过了设置的超时时间,那么直接返回false,获取共享锁失败。
③ 如果当前线程无法获取当共享锁,并且『shouldParkAfterFailedAcquire』方法返回true(则说明本次获取共享锁失败需要阻塞/挂起当前线程)。但当『nanosTimeout <= spinForTimeoutThreshold』说明设置的超时时间 <= 自旋超时的阈值。这里spinForTimeoutThreshold的值为1000纳秒,表示当设置的超时时间小于1000纳秒时,使用自旋比使用线程挂起更快。粗略估算这足以去提升响应在一个很短的超时时间内。否则也是使用『LockSupport.parkNanos(this, nanosTimeout);』将当前线程挂起,直到被唤醒或者超时时间到。
取消节点cancelAcquire
当尝试获取锁的节点,因为超时或中断而结束时,说明本次获取锁操作失败,因为本次操作的node就应该被取消。如果线程还需要获取锁的话,会再次尝试获取锁操作,此时如果需要的话是会生成一个新的node的。
一般只有出现异常的时候才会进入该方法,有哪些异常场景呢?我猜测就是tryAcquire这种可以被子类实现的方法,因为AQS也不知道这个方法的实现是什么样的!该方法主要就是设置节点的状态为CANCELLED,同时也负责做一些“善后“工作。
cancelAcquire
    /**
     * Cancels an ongoing attempt to acquire.
     *
     * @param node the node
     */
    private void cancelAcquire(Node node) {
        // Ignore if node doesn't exist
        //如果待取消节点(node)为null,则直接返回。
        if (node == null)
            return;
        // 将node的thread置为null;
        node.thread = null;

        // Skip cancelled predecessors
        Node pred = node.prev;
        while (pred.waitStatus > 0)
            node.prev = pred = pred.prev;

        // predNext is the apparent node to unsplice. CASes below will
        // fail if not, in which case, we lost race vs another cancel
        // or signal, so no further action is necessary.
        Node predNext = pred.next;

        // Can use unconditional write instead of CAS here.
        // After this atomic step, other Nodes can skip past us.
        // Before, we are free of interference from other threads.
        //1只有这里才设置为已取消状态
        node.waitStatus = Node.CANCELLED;

        // If we are the tail, remove ourselves.
        //2
        if (node == tail && compareAndSetTail(node, pred)) {
            compareAndSetNext(pred, predNext, null);
        } else {
            // If successor needs signal, try to set pred's next-link
            // so it will get one. Otherwise wake it up to propagate.
            int ws;
            //3
            if (pred != head &&
                ((ws = pred.waitStatus) == Node.SIGNAL ||
                 (ws <= 0 && compareAndSetWaitStatus(pred, ws, Node.SIGNAL))) &&
                pred.thread != null) {
                Node next = node.next;
                if (next != null && next.waitStatus <= 0)
                    compareAndSetNext(pred, predNext, next);
            } else {
                unparkSuccessor(node);
            }

            node.next = node; // help GC
        }
    }
将node的prev属性指向一个在它之前的有效的节点(即,waitStatus <= 0的节点都为有效节点)。 也就是跳过被取消的前驱节点。
Node predNext = pred.next;』取pred的下一个节点。这个predNext是pred表面上的下一个连接的节点(即,无需考虑该节点是否被取消了)。下面的CAS操作将会失败(『compareAndSetNext(pred, predNext, null);』or『compareAndSetNext(pred, predNext, next);』),如果和其他的取消或通知操作发生竞争时,这时不需要进一步的操作。因为如果产生竞争,说明pred的next已经被修改了,并且是最新的值了,而我们的操作也就没有要执行的必要了。
将node的waitStatus设置为’CANCELLED’。这里可以使用无条件的写代替CAS(注意,node的waitStatus是volatile的)。在这个原子操作之后,其他节点会跳过我们(即,跳过waitStatus被置位CANCELLED的节点),在这个原子操作之前,我们不受其他线程的干扰。也就是说,无论其他线程对node的waitStatus是否有在操作,在当前的情况下我们都需要将这个node的waitStatus置为’CANCELLED’。
step1 调整node的prev指针并更新node状态为CANCELLED
注意这里的调整只调整了prev指针,没有调整next指针,
shouldParkAfterFailedAcquire方法中是俩个指针都调整了,有什么区别呢?有!调整的时机不同,shouldParkAfterFailedAcquire方法中的节点一定未CANCELLED,直接调整next指针,而cancelAcquire方法中节点CANCELLED,需要分场景来调整next指针,具体看下面分析。
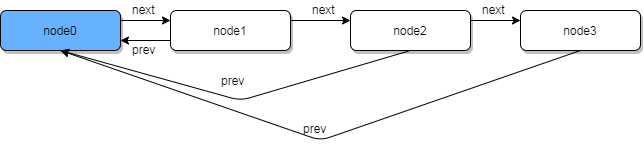
先考虑一下多线程同时调用cancelAcquire的场景,假定某一时刻同步队列的状态如下图,线程A取消node2,线程B取消node3,假定node1状态已经CANCELLED,白色表示已取消

node节点的prev指针调整其实是分为三步,a.调整pred指针,b.调整node.prev=pred,c.调整node状态CANCELLED,所以在调整prev指针前节点状态一定未取消!
场景1 无论线程A执行到了a还是b,此时node2的状态肯定还未取消,线程B的执行最坏的情况也是找到了node2就不会继续往前遍历,接下来的事情就很简单了,无论线程A先执行c还是线程B执行c都没有破坏prev指针链

场景2 线程A执行完了c,而线程B读到node2时,node2的状态已经是已取消了,所以node3的prev指针也指向了node0,这种情况下多个节点的前驱节点都指向了一个节点,也没有问题,因为我们可以看到这里的多个节点的状态都已经变成已取消了,在有线程唤醒时或者下面的逻辑中会主动调整pred.next
如果待取消的node节点是队列尾节点的话(即,『node == tail』),那么删除node自己即可。使用CAS将tail节点设置成前面得到的第一个有效前驱节点(即,『compareAndSetTail(node, pred)』)。并且CAS操作成功的话,执行『compareAndSetNext(pred, predNext, null);』也就是将tail的next置为null的意思。如果该CAS操作失败的话,没关系。说明此时tail已经被修改了。
step2 node为tail节点的情况
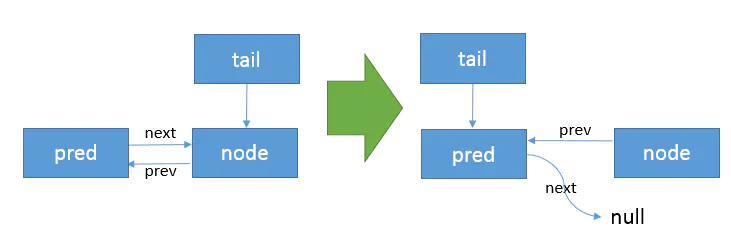
如图可知只要更新tail指针和pred.next指针即可
1.CAS更新tail节点为找到的pred节点
tail节点并不可靠,tail节点在有新的线程添加节点的时候就会改变,如果不用CAS保证就有可能覆盖了新添加的节点导致节点丢失。注意如果此时CAS更新失败,就不会在去尝试更新pred.next了而是走下面的step3或者step4的逻辑了,因为此时的node虽然变成了CANCELLED,但是它又和新的tail节点建立关联了,所以需要做进一步处理。注意和第2点的区别。
2.CAS更新pred节点的next指针为null
这其实也是一个保证,第一步只是保证了我进入该语句时tail==pred,但是在我尝试更新时,很有可能另一个线程入队了,导致tail指向了新的node,所以需要CAS来保证我更新的时候别的线程没有更改tail指针,注意如果此时CAS失败,不做任何处理,直接退出,因为此时新的tail节点已经与pred节点建立关联了,CANCELLED状态的Node此时出队了。
如果待取消的node节点不是队尾节点。并且:pred(即,node的有效前驱节点)不是head节点;
并且“pred.waitStatus为SIGNAL” 或者 “pred.waitStatus <= 0”时通过CAS将pred.waitStatus设置为SIGNAL”成功;
并且 pred的thread非空
那么,当node的next节点非空,且next节点的waitStatus<=0(说明next节点未被取消)时,通过CAS将pred的next执行node的next(即,pred.next = node.next)。同时,如果该CAS操作失败是没关系的,说明有其他线程操作已经修改了该pre的next值。
step3 node不为tail节点且不是head节点的后继节点且满足一堆复杂的判断条件
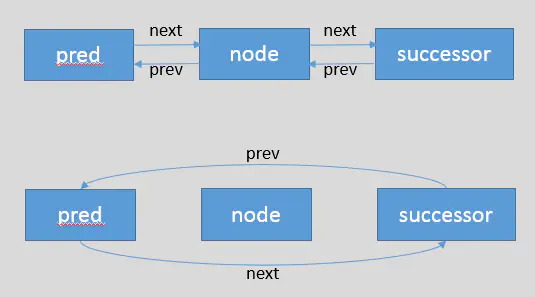
这个场景说明当前被取消的node不是head的后继节点,而我们知道需要唤醒的一般都是head的后继节点,因此当前节点被取消了也不需要考虑去唤醒节点,应该只做pred和nexd节点的指针调整。在真正去看其调整指针的代码前,还需要先解决一堆判断的分析!实际上还需要满足这一堆判断逻辑才会去真正的调整指针。
“略显复杂”的判断条件
if (pred != head &&
                ((ws = pred.waitStatus) == Node.SIGNAL ||
                 (ws <= 0 && compareAndSetWaitStatus(pred, ws, Node.SIGNAL))) &&
                pred.thread != null)
1.pred != head 如前所述
2.pred.waitStatus == Node.SIGNAL为true,这意味着node的有效前驱节点状态为signal,node节点本应该阻塞等待signal,但现在node节点被取消了,所以需要调整
3.pred.waitStatus不是signal状态,需要再次判断ws<=0,因为pred的状态有可能变成了CANCELLED,最后使用CAS更新来再次保证没有别的线程修改了pred的状态
4.pred.thread != null 再次检测是否有另一个线程正在取消pred节点导致pred节点的thread为null,看代码可知thread赋值null是在修改状态为CANCELLED之前的,所以这样判断可以更早的检测出pred即将被取消
综上所述,其实一系列判断都只是为了保证没有别的线程取消或者即将取消pred节点的情况下更新pred.next指针
更新pred.next
这里会检测取消节点node的后继节点是否已取消,如果取消了,我就不做任何修改,如果是的话就CAS更新pred.next
next.waitStatus <=0 的意义?因为将pred.next从指向一个已取消node变成指向另一个取消节点似乎没有意义,从另外一个角度,看图3-3,如果处于这种情况,不判断node的后继节点是否已取消,那么就有可能出现多个线程看到的vpred是同一个节点,并尝试更新这个节点的next指针。这会发生什么?先有一个线程先将node0的next指向一个有效节点,再有另一个线程就将node0.next指向了一个已取消节点,从而导致有效节点的丢失。我们可以确保在进入该方法时每个线程所绑定的节点都达到一致性的CANCELLED状态,所以通过node.next看到的后继节点如果被取消了一定能看到,从而避免了这种情况!
CAS更新pred.next,为什么需要CAS?考虑一下多种场景
1.有没有可能多个线程取消节点,并且它们都看到同一个pred节点并即将更新pred.next呢?不可能!因为这种情况说明pred节点与后入队线程的node之间的节点都已经变成了CANCELLED状态(也包括了先入队线程的node节点),所以先入队线程的判断条件就不可能满足,因为它会读取到CANCELLED状态,从而不会竞争pred节点
2.如果一个线程被唤醒执行shouldParkAfterFailedAcquire更新pred,一个线程取消节点也更新了pred呢?假设有个同步队列
node1->node2->node3->node4->node5
假设node2已取消,线程调用AcancelAcquire(node3),看到了node4的状态不为CANCELLED,然后线程A试图更新node1.next->node4,此时node5对应的线程B被唤醒执行shouldParkAfterFailedAcquire,看到node4的状态为CANCELLED(可能由于另一个线程取消了node4),所以线程B也会向前遍历找到node1,nodeB就会试图更新node1.next->node5,可以看到这与线程A要做的操作产生了竞争,所以需要CAS来保证更新的可靠性。
如果待取消的node节点不是队尾节点,并且step3条件不成立。那么执行『unparkSuccessor(node);』来释放当前这个待取消节点的下一个节点。(也就是说,当prev是head节点,或者prev也被取消的话,会执行『unparkSuccessor(node);』来释放node的下一个节点,其实也就是pred的下一个节点)
step4 node是head的后继节点 | node不是head的后继节点但是它的pred节点已经或者正在CANCELLED
1.node是head的后继节点
这种场景说明node本应该是有权利来竞争锁的,但是现在node被取消了,那我就手动调用unparkSuccessor方法来唤醒后继节点接力,要知道被唤醒的线程会再次进入for循环,因为此时的node只是状态为CANCELLED,并没有出队,所以被唤醒的后继节点并不会去获取锁,而是会进入shouldParkAfterFailedAcquire中它会读到它的pred节点状态CANCELLED,从而完成CANCELLED节点的出队,并再次进入for循环。
2.node不是head的后继节点但是它的pred节点已经或者正在CANCELLED
这种情况说明按理说应该争取让pred节点出队,官方的实现方式是调用unparkSuccessor方法,我们知道这会导致调用shouldParkAfterFailedAcquire方法来完成pred的出队操作,我姑且认为这是一种方法重用吧!
思考
1.为什么一定要调用unparkSuccessor呢?我走step3的更新pred.next指针的策略等待下一个被唤醒的线程来完成已取消节点的出队不也可以吗?
某位同学说的似乎很有道理,假如有这样一种情况,确实有个线程因为锁被释放唤醒了,但是它在获取锁的前恰好发生了中断并响应了中断,比较典型的就是doAcquireInterruptibly方法,那么会调用cancelAcquire方法继续等待锁的释放来唤醒新的线程,而实际上此时压根没有任何线程获取锁,自然也不会有释放锁的操作,所有线程都阻塞了多么糟糕!所以这里才采用的主动唤醒的策略,采用这种策略,即便线程响应中断并再次进入cancelAcquire方法,因为中断位被清空了,所以第二次的主动唤醒就不会进入cancelAcquire而是进入for循环尝试获取锁了!
2.为什么我要处理prev指针和next指针呢?交由被唤醒的线程来更新不也行嘛?
我觉得是考虑唤醒时调用unparkSuccessor的性能问题,在后面的release分析中可以看到unparkSuccessor的实现是先找到后继节点,判断后继节点是否已经取消,已取消,就从tail遍历到head,所以可以理解当cancelAcquire方法被执行时,当前线程应该要主动维护同步队列的状态,更新同步队列的prev和next指针来防止唤醒性能降低,不然老是唤醒一个已经取消的节点会使得每次都从tail遍历到head。
从上面的分析我们可以知道,其实CountDownLatch中线程的释放其实是有顺序的,根据节点入队的顺序依次被释放,先入队的节点的线程会先被释放。
总结
从源码看出,CountDownLatch的实现比较简单,主要都是调用AQS关于共享锁的实现来完成的,初始化时,获取指定计数总数,每个线程每次调用countDown()都会将计数器减一。尽管CountDownLatch看起来完美,但还是存在一些不足,比如:CountDownLatch是一次性的,初始化后,进行业务操作,计数器归零,则这个实例使命完成,无法服务这个实例。如果想要循环使用那就可以选择CyclicBarrier