一、Spring Boot整合Redis缓存
JSR-107、Spring缓存抽象、整合Redis
1、JSR107
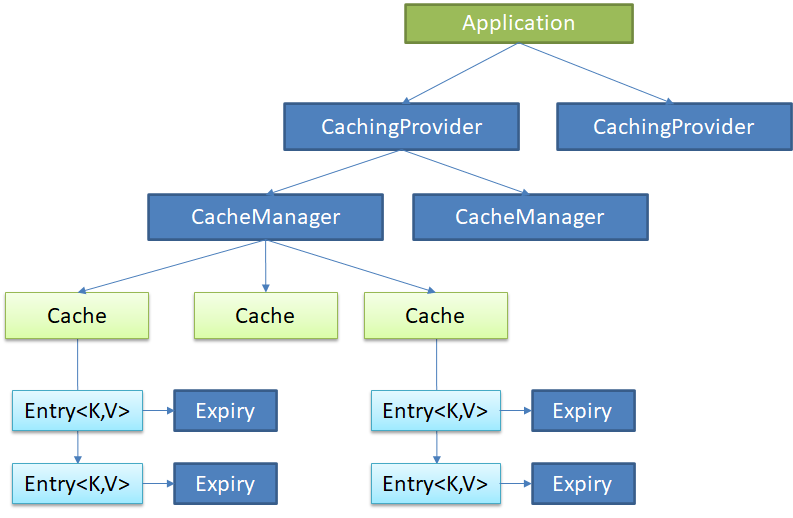
Java Caching定义了5个核心接口,分别是CachingProvider, CacheManager, Cache, Entry 和 Expiry。
• CachingProvider定义了创建、配置、获取、管理和控制多个CacheManager。一个应用可 以在运行期访问多个CachingProvider。
• CacheManager定义了创建、配置、获取、管理和控制多个唯一命名的Cache,这些Cache 存在于CacheManager的上下文中。一个CacheManager仅被一个CachingProvider所拥有。
• Cache是一个类似Map的数据结构并临时存储以Key为索引的值。一个Cache仅被一个 CacheManager所拥有。
• Entry是一个存储在Cache中的key-value对。
• Expiry 每一个存储在Cache中的条目有一个定义的有效期。一旦超过这个时间,条目为过期 的状态。一旦过期,条目将不可访问、更新和删除。缓存有效期可以通过ExpiryPolicy设置 。
2. 缓存抽象
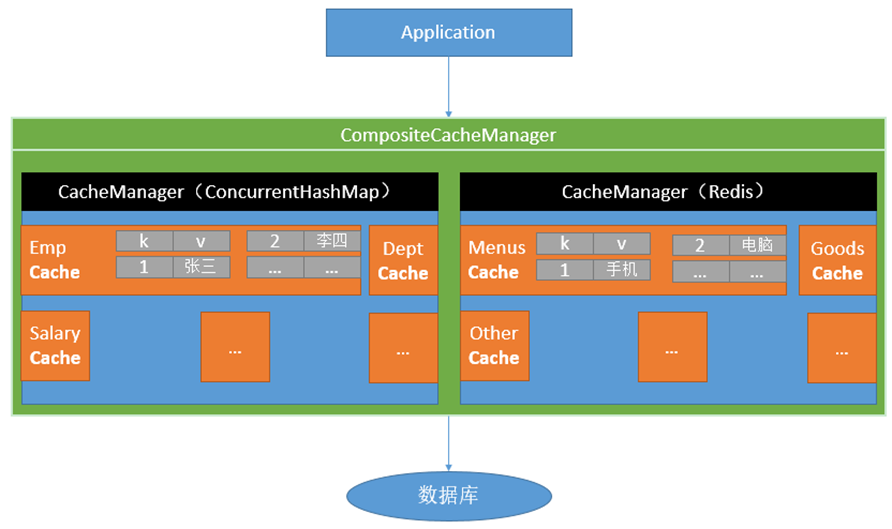
Spring从3.1开始定义了org.springframework.cache.Cache 和org.springframework.cache.CacheManager接口来统一不同的缓存技术; 并支持使用JCache(JSR-107)注解简化我们开发;
• Cache接口为缓存的组件规范定义,包含缓存的各种操作集合;
• Cache接口下Spring提供了各种xxxCache的实现;如RedisCache,EhCacheCache , ConcurrentMapCache等;
• 每次调用需要缓存功能的方法时,Spring会检查检查指定参数的指定的目标方法是否 已经被调用过;如果有就直接从缓存中获取方法调用后的结果,如果没有就调用方法 并缓存结果后返回给用户。下次调用直接从缓存中获取。
• 使用Spring缓存抽象时我们需要关注以下两点; 1、确定方法需要被缓存以及他们的缓存策略 2、从缓存中读取之前缓存存储的数据。
SpEl命名规则:
| 名字 | 位置 | 描述 | 示例 |
|---|---|---|---|
| methodName | root object | 当前被调用的方法名 | #root.methodName |
| method | root object | 当前被调用的方法 | #root.method.name |
| target | root object | 当前被调用的目标对象 | #root.target |
| targetClass | root object | 当前被调用的目标对象类 | #root.targetClass |
| args | root object | 当前被调用的方法的参数列表 | #root.args[0] |
| caches | root object | 当前方法调用使用的缓存列表(如@Cacheable(value={“cache1”, “cache2”})),则有两个cache | #root.caches[0].name |
| argument name | evaluation context | 方法参数的名字. 可以直接 #参数名 ,也可以使用 #p0或#a0 的形式,0代表参数的索引; | #iban 、 #a0 、 #p0 |
| result | evaluation context | 方法执行后的返回值(仅当方法执行之后的判断有效,如‘unless’,’cache put’的表达式 ’cache evict’的表达式beforeInvocation=false) | #result |
3、几个重要概念&缓存注解
| Cache | 缓存接口,定义缓存操作。实现有:RedisCache、EhCacheCache、ConcurrentMapCache等 |
|---|---|
| CacheManager | 缓存管理器,管理各种缓存(Cache)组件 |
| @Cacheable | 主要针对方法配置,能够根据方法的请求参数对其结果进行缓存 |
| @CacheEvict | 清空缓存 |
| @CachePut | 保证方法被调用,又希望结果被缓存 |
| @EnableCaching | 开启基于注解的缓存 |
| keyGenerator | 缓存数据时Key生成策略 |
| serialize | 缓存数据时value序列化策略 |
@Cacheable/@CachePut/@CacheEvict 主要的参数
| value/cacheNames | 缓存的名称,在 spring 配置文件中定义,必须指定 至少一个 | 例如: @Cacheable(value=”cacheName”) 或者 @Cacheable(value={”cache1”,”cache2”} |
|---|---|---|
| key | 缓存的 key,可以为空,如果指定要按照 SpEL 表达 式编写,如果不指定,则缺省按照方法的所有参数 进行组合 | 例如: @Cacheable(value=”cacheName”,key=”#paramName”) |
| condition | 缓存的条件,可以为空,使用 SpEL 编写,返回 true 或者 false,只有为 true 才进行缓存/清除缓存,在 调用方法之前之后都能判断 | 例如: @Cacheable(value=”testcache”,condition=”#userNam e.length()>2”) |
| allEntries (@CacheEvict ) | 是否清空所有缓存内容,缺省为 false,如果指定为 true,则方法调用后将立即清空所有缓存 | 例如: @CachEvict(value=”testcache”,allEntries=true) |
| beforeInvocation (@CacheEvict) | 是否在方法执行前就清空,缺省为 false,如果指定 为 true,则在方法还没有执行的时候就清空缓存, 缺省情况下,如果方法执行抛出异常,则不会清空 缓存 | 例如: @CachEvict(value=”testcache”, beforeInvocation=true) |
| unless (@CachePut) (@Cacheable) | 用于否决缓存的,不像condition,该表达式只在方 法执行之后判断,此时可以拿到返回值result进行判 断。条件为true不会缓存,fasle才缓存 | 例如: @Cacheable(value=”testcache”,unless=”#result == null”) |
4、缓存使用
步骤:
- 1、引入spring-boot-starter-cache模块
- 2、@EnableCaching开启缓存
- 3、使用缓存注解
- 4、切换为其它缓存
实现:
1、搭建进本环境
1)、创建数据库,数据表。
2)、创建Javabean封装数据
3)、整合Mybatis操作数据库
- 配置数据源信息、使用注解版的Mybatis、在主启动类上加注解@MapperScan 指定需要扫描的mapper接口所在包
2、快速体验缓存
1)、开启基于注解的缓存
在主启动大类上加上注解@EnableCaching //开启支持注解版缓存
2)、标注缓存注解 @Cacheable
	/**
     * @Cacheable注解将方法的运行结果进行缓存,以后再要相同的数据,直接存缓存中获取,不调用方法。
     * 		运行时机:方法调用前
     * CacheManager是管理多个Cache组件的,对缓存的正真CRUD操作是在Cache组件中,每一个缓存组件有自己唯一 一个名字。
     * @Cacheable几个属性:
     * 		cacheName/value:指定缓存组件的名字;可以有多个值,代表着可以将返回结果放在多个缓存中
     * 		key:缓存数据使用的key,可以用它来指定,默认是使用方法的参数的值 1 - 方法的返回值
     *             也可以编写SpEl: #id:参数id的值  #a0  #root.args[0]
     * 		keyGenerator:key的生成器,可以自己指定key的生成器的组件id
     *              注:key和keyGenerator只能用一个,不能同时使用。
 	 * 		cacheManager:指定缓存管理器,或者cacheResolver指定获取解析器
  	 * 		condition:指定符合条件的情况下才缓存
  	 * 		unless:否定缓存;当unless指定的条件为true,方法的返回值就不会被缓存,也可以获取到结果进行判断:unless = "#result == null"
     * 		sync:是否使用异步模式
     *
     * @param id
     * @return
     */
    @Cacheable(value = {"emp"},key = "#id")
    public Employee getEmpById(Integer id){
        System.out.println("查询"+id+"号员工");
        Employee employee = employeeMapper.getEmpById(id);
        return  employee;
    }
原理:
1.找自动配置类:CacheAutoConfiguration.class
2.缓存的配置类
	org.springframework.boot.autoconfigure.cache.GenericCacheConfiguration
	org.springframework.boot.autoconfigure.cache.JCacheCacheConfiguration
	org.springframework.boot.autoconfigure.cache.EhCacheCacheConfiguration
	org.springframework.boot.autoconfigure.cache.HazelcastCacheConfiguration
	org.springframework.boot.autoconfigure.cache.InfinispanCacheConfiguration
	org.springframework.boot.autoconfigure.cache.CouchbaseCacheConfiguration
	org.springframework.boot.autoconfigure.cache.RedisCacheConfiguration
	org.springframework.boot.autoconfigure.cache.CaffeineCacheConfiguration
	org.springframework.boot.autoconfigure.cache.SimpleCacheConfiguration【默认开启】
	org.springframework.boot.autoconfigure.cache.NoOpCacheConfiguration
3.哪个配置类默认生效:SimpleCacheConfiguration; 其作用是给容器中注册了一个缓存管理器:ConcurrentMapCacheManager;其里边有个方法getCache(),
	@Override
	@Nullable
	public Cache getCache(String name) {
		Cache cache = this.cacheMap.get(name);
		if (cache == null && this.dynamic) {
			synchronized (this.cacheMap) {
				cache = this.cacheMap.get(name);
				if (cache == null) {
					cache = createConcurrentMapCache(name);
					this.cacheMap.put(name, cache);
				}
			}
		}
		return cache;
	}
其可以获取和创建一个类型为ConcurrentMapCache的缓存组件;而ConcurrentMapCache的作用是将数据保存在ConcurrentMap<Object, Object>中;
运行流程:
①:@Cacheable注解标注的方法运行之前,先查询Cache(缓存组件),按照cacheNames指定的名字获取;
(即cacheManager先获取响应的缓存),第一个获取缓存如果没有Cache组件则会自动创建;
②:去Cache中查找缓存的内容,使用一个Key,默认就是方法的参数;
Key是按照某种策略生成的;默认使用的是keyGenerator生成的,而Generator默认使用的是SimpleKeyGenerator生成的key;
SimpleKeyGenerator生成Key的默认策略:
- 没有参数:key = new SimpleKey();
- 有一个参数:key = 参数的值;
- 有多个参数:key = new SimpleKey(params);
③:没有查到缓存就调用目标方法
④:将目标方法返回的结果放到缓存中
即:@Cacheable标注的方法执行前先来检查缓存中有没有这个数据,默认按照参数的值作为key去查询缓存,如果没有查到,就运行方法并将返回结果放入缓存中;以后再来调用就可直接使用缓存中的数据;
核心:
- 使用CacheManager【默认为:ConcurrentMapCacheManager】按照名字得到Cache【ConcurrentMapCache】组件;
- key使用keyGenerator生成的,而keyGenerator默认是SimpleKeyGenerator生成的
自定制一个keyGenerator策略:
@Configuration
public class MyKeyGenerator {
    @Bean("mykeyGenerator")
    public KeyGenerator keyGenerator(){
        return new KeyGenerator(){
            @Override
            public Object generate(Object target, Method method, Object... params) {
                return method.getName()+"["+Arrays.asList(params).toString()+"]";
            }
        };
    }
}
3)、@CachePut:即调用方法又修改缓存。即同步更新缓存。前提条件:@CachePut的key与@Cacheable的key相同
运行时机:先调用方法,再将方法的返回值放进缓存。
注意点:@CachePut的key要与Cacheable的key相同
	/**
     * @CachePut :即调用方法又修改缓存;相当于修改数据库的同时又修改缓存
     * 执行时机:先调用方法;在方法执行完将结果放进缓存; 即同步更细缓存
     * 注意点:此方法执行后生成的缓存的key要与想要修改emp缓存中的那个key相同,这里的这个方法的参数是一个对象,方法执行完后返回该对象,而这个返回的对象中有一个id属性故key= "employee.id" ,也可以为key = "result.id"
     *
     * @param employee
     * @return
     */
    @CachePut(value = {"emp"} , key = "#employee.id")
    public Employee updateEmp(Employee employee){
        return employeeMapper.updateEmp(employee);
    }
4)、@CacheEvict:清除缓存
一个缓存中可能有多个key-value,可以指定清除某个key
/**
     * @CacheEvict:清除缓存
     * 一个缓存中可能有多个key-value,所以要指定想要清除的缓存的key
     * @CacheEvict的两个特别的方法:
     * 1、allEntries():指定清除这个缓存中的所有数据
     * 2、beforeInvocation():默认为false,代表着在方法执行之后清除缓存; 当值为true时,代表着在方法执行之前清除缓存
     * 比如:这个方法中某句代码报错,方法没有被执行完,所以换粗不能被清除。
     * @param id
     */
    @CacheEvict(value = {"emp"})
    public void delEmp(Integer id){
        System.out.println("删除"+id+"号员工");
        //employeeMapper.delEmp(id);
    }
5)、@Caching:
	/**
     * 既能按照 key = "#lastName"查询缓存,也可以按照 key = "#emp.id",
     * 但按照 key = "#lastName"查询,会再次查询数据库,因为:@CachePut 标注的方法一定被执行,所以按照key = "#lastName"查询
     * 该方法还是被执行
     * @param lastName
     * @return
     */
@Caching(
        cacheable = {
                @Cacheable(value = "emp" ,key = "#lastName")
        },
        put = {
                @CachePut(value = "emp" ,key = "#result.id")
        }
)
public Employee getEmpByLastName(String lastName){
    Employee emp = employeeMapper.getEmpByLastName(lastName);
    return  emp;
}
6)、@CacheConfig:
抽取缓存的公共配置
5、整合Redis
拉取redis镜像
# docker pull redis
运行redis镜像
# docker run -d -p 6379:6379 redis:6.2.6
使用redis Disktop Manager 连接redis
1、引入Redis依赖:
<dependency>
    <groupId>org.springframework.boot</groupId>
    <artifactId>spring-boot-starter-data-redis</artifactId>
</dependency>
2、配置Redis:
#在配置文件中指定Redis的主机地址
spring.redis.host=192.168.2.175
原理:
RedisAutoConfiguration.class
public class RedisAutoConfiguration {

	@Bean
	@ConditionalOnMissingBean(name = "redisTemplate")
	public RedisTemplate<Object, Object> redisTemplate(RedisConnectionFactory redisConnectionFactory)
			throws UnknownHostException {
		RedisTemplate<Object, Object> template = new RedisTemplate<>();
		template.setConnectionFactory(redisConnectionFactory);
		return template;
	}

	@Bean
	@ConditionalOnMissingBean
	public StringRedisTemplate stringRedisTemplate(RedisConnectionFactory redisConnectionFactory)
			throws UnknownHostException {
		StringRedisTemplate template = new StringRedisTemplate();
		template.setConnectionFactory(redisConnectionFactory);
		return template;
	}
}
**redisTemplate():**操作 k-v都是对象的
**stringRedisTemplate():**操作 k-v 都是字符串
 	//直接注入使用
	@Autowired
    RedisTemplate redisTemplate; //操作k-v都是对象的
    @Autowired
    StringRedisTemplate stringRedisTemplate ; //操作k-v都是字符串的
	/**
     * Redis常见的五大数据类型:
     * String(字符串)、List(列表)、Set(集合)、Hash(散列)、ZSet(有序集合)
     * redisTemplate.opsForValue();//操作字符串
     * redisTemplate.opsForList();//操作列表
     * redisTemplate.opsForSet();//操作集合
     * redisTemplate.opsForHash();//操作散列
     * redisTemplate.opsForZSet();//操作有序集合
     */
    @Test
    void testStringRedis(){
        //stringRedisTemplate.opsForValue().append("msg", "hello");
        String msg = stringRedisTemplate.opsForValue().get("msg");
        System.out.println(msg);
    }

	//测试保存一个对象
	@Test
    void testRedis(){
        //如果保存对象,默认使用的是jdk的序列化机制,序列化后的数据保存在Redis中
        //将数据以json的形式保存:
        //1、自己将对象转为json
        //2、重写redisTemplate的序列化规则
        Employee employee = employeeMapper.getEmpById(1);
        redisTemplate.opsForValue().set("emp",employee );
    }
3、重写默认的redisTemplate的序列化规则:
@Configuration
public class RedisConf {
    @Bean("myRedisTemplate")
    public RedisTemplate<Object, Employee> redisTemplate(RedisConnectionFactory redisConnectionFactory)
            throws UnknownHostException {
       	//默认直接就实例化了一个RedisTemplate<>()对象,而他的底层用的就是
        //if (defaultSerializer == null) {
	//defaultSerializer = new JdkSerializationRedisSerializer(classLoader != null ? classLoader : this.getClass().getClassLoader());},所以要重写Jackson2JsonRedisSerializer的序列化规则,再调用template.setValueSerializer(serializer);

        RedisTemplate<Object, Employee> template = new RedisTemplate<>();
        template.setConnectionFactory(redisConnectionFactory);
        Jackson2JsonRedisSerializer<Employee> serializer = new Jackson2JsonRedisSerializer<Employee>(Employee.class);
        template.setValueSerializer(serializer);
        return template;
    }
}
4、自定义CacheManage
由于引入spring-boot-starter-data-redis所以容器中保存的是RedisCacheManager,而RedisCacheManager中的
protected Collection<RedisCache> loadCaches() {
		List<RedisCache> caches = new LinkedList<>();
		for (Map.Entry<String, RedisCacheConfiguration> entry : initialCacheConfiguration.entrySet()) {
			caches.add(createRedisCache(entry.getKey(), entry.getValue()));
        }
		return caches;
	}
loadCaches()方法会创建RedisCache来作为缓存组件。但保存k-v都是对象的时候,保存的数据是序列化后的数据。将数据转换为Json格式
- 2.0+版本中RedisManager操作redis没有使用RedisTemplate ,而其默认使用的序列化机制是JdkSerializationRedisSerializer(),所以要改变序列化机制,就要宠定制RedisManager。
官方的RedisManager:
@Bean
	RedisCacheManager cacheManager(CacheProperties cacheProperties, CacheManagerCustomizers cacheManagerCustomizers,
			ObjectProvider<org.springframework.data.redis.cache.RedisCacheConfiguration> redisCacheConfiguration,
			ObjectProvider<RedisCacheManagerBuilderCustomizer> redisCacheManagerBuilderCustomizers,
			RedisConnectionFactory redisConnectionFactory, ResourceLoader resourceLoader) {
		RedisCacheManagerBuilder builder = RedisCacheManager.builder(redisConnectionFactory).cacheDefaults(
				determineConfiguration(cacheProperties, redisCacheConfiguration, resourceLoader.getClassLoader()));
		List<String> cacheNames = cacheProperties.getCacheNames();
		if (!cacheNames.isEmpty()) {
			builder.initialCacheNames(new LinkedHashSet<>(cacheNames));
		}
		redisCacheManagerBuilderCustomizers.orderedStream().forEach((customizer) -> customizer.customize(builder));
		return cacheManagerCustomizers.customize(builder.build());
	}
首先可以确定的是官方默认的cacheManager便是由这个函数创建的。在创建RedisCacheManagerBuilder的时候设置的cacheDefaults是通过determineConfiguration()这个函数得到的。
查看determineConfiguration()函数:
private org.springframework.data.redis.cache.RedisCacheConfiguration determineConfiguration(
			CacheProperties cacheProperties,
			ObjectProvider<org.springframework.data.redis.cache.RedisCacheConfiguration> redisCacheConfiguration,
			ClassLoader classLoader) {
		return redisCacheConfiguration.getIfAvailable(() -> createConfiguration(cacheProperties, classLoader));
	}
可以看到这里的redisCacheConfiguration就是一个ObjectProvider接口,而这个函数本体只有一行内容
return redisCacheConfiguration.getIfAvailable(() -> createConfiguration(cacheProperties, classLoader));
而这个返回值是由ObjectProvider接口的getIfAvailable()函数产生的。点开getIfAvailable()函数
    default T getIfAvailable(Supplier<T> defaultSupplier) throws BeansException {
        T dependency = this.getIfAvailable();
        return dependency != null ? dependency : defaultSupplier.get();
    }
通过内容大致推测为如果自动注入时容器中本身就存在这个泛型的bean则返回这个bean,否则则返回参数生成的bean。而参数() -> createConfiguration(cacheProperties, classLoader)调用的createConfiguration则是springboot默认创建的RedisCacheConfiguration。而序列化等配置信息就是通过这个createConfiguration来调整的。
那么是否我在config中自定义一个RedisCacheConfiguration放入容器即可修改序列化方式呢?
于是我将createConfiguration的代码复制并进行修改
@Configuration
public class MyRedisConfig {
   @Bean
   RedisCacheConfiguration myConfiguration(
           CacheProperties cacheProperties) {
       CacheProperties.Redis redisProperties = cacheProperties.getRedis();
       RedisCacheConfiguration config = RedisCacheConfiguration
               .defaultCacheConfig();
       //将原本的JdkSerializationRedisSerializer修改为Jackson2JsonRedisSerializer
       Jackson2JsonRedisSerializer serializer = new Jackson2JsonRedisSerializer(Object.class);
       config = config.serializeValuesWith(
               RedisSerializationContext.SerializationPair.fromSerializer(serializer));
       if (redisProperties.getTimeToLive() != null) {
           config = config.entryTtl(redisProperties.getTimeToLive());
       }
       if (redisProperties.getKeyPrefix() != null) {
           config = config.prefixCacheNameWith(redisProperties.getKeyPrefix());
       }
       if (!redisProperties.isCacheNullValues()) {
           config = config.disableCachingNullValues();
       }
       if (!redisProperties.isUseKeyPrefix()) {
           config = config.disableKeyPrefix();
       }
       return config;
   }
}
但是,当我再次刷新时发生了错误LinkedHashMap cannot be cast to。由于我定义的是object.class作为转换。并没有给定具体的对象,所以在反序列化时,被转换成了LinkedHashMap。设置属性DefaultTyping.NON_FINAL后问题解决了。
        Jackson2JsonRedisSerializer serializer = new Jackson2JsonRedisSerializer(Object.class);
        //序列化时添加对象信息
        ObjectMapper objectMapper = new ObjectMapper();
        objectMapper.activateDefaultTyping(objectMapper.getPolymorphicTypeValidator(), ObjectMapper.DefaultTyping.NON_FINAL);
        serializer.setObjectMapper(objectMapper);
        config = config.serializeValuesWith(
                RedisSerializationContext.SerializationPair.fromSerializer(serializer));
自定制RedisCacheConfiguration只仅仅把序列化修改成json格式
也可以自定制一个RedisManager:
@Bean
public RedisCacheManager cacheManager(RedisConnectionFactory redisConnectionFactory){
   ObjectMapper objectMapper = new ObjectMapper();
   objectMapper.activateDefaultTyping(objectMapper.getPolymorphicTypeValidator(), ObjectMapper.DefaultTyping.NON_FINAL);
   Jackson2JsonRedisSerializer serializer = new 				Jackson2JsonRedisSerializer(Object.class);
   serializer.setObjectMapper(objectMapper);
   RedisCacheConfiguration configuration = RedisCacheConfiguration.defaultCacheConfig().
       serializeValuesWith(RedisSerializationContext.SerializationPair.fromSerializer(serializer));
   return RedisCacheManager.builder(redisConnectionFactory).cacheDefaults(configuration).build();
}
但这种会修改完RedisCacheConfiguration得默认配置。
二、SpringBoot整合RabbitMQ
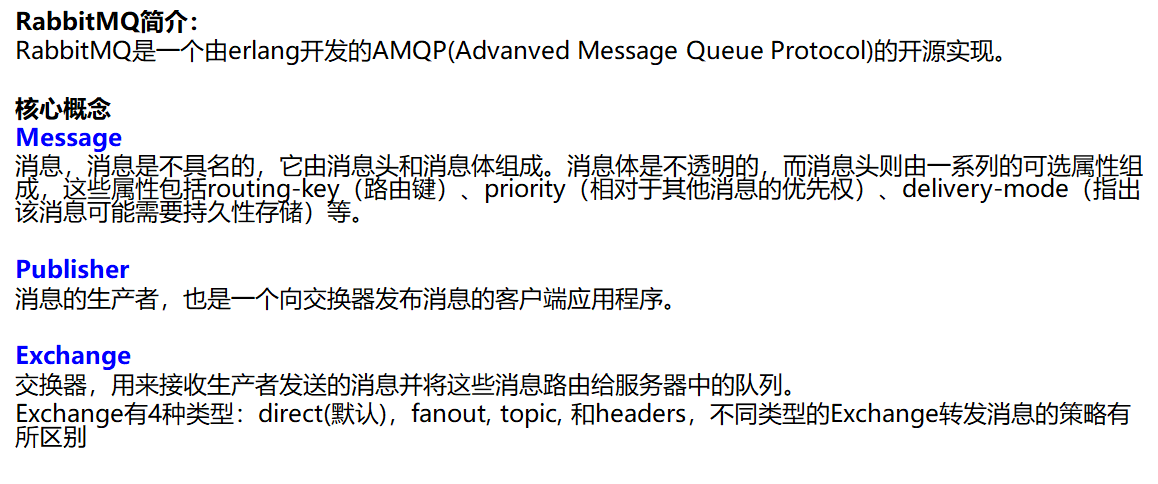
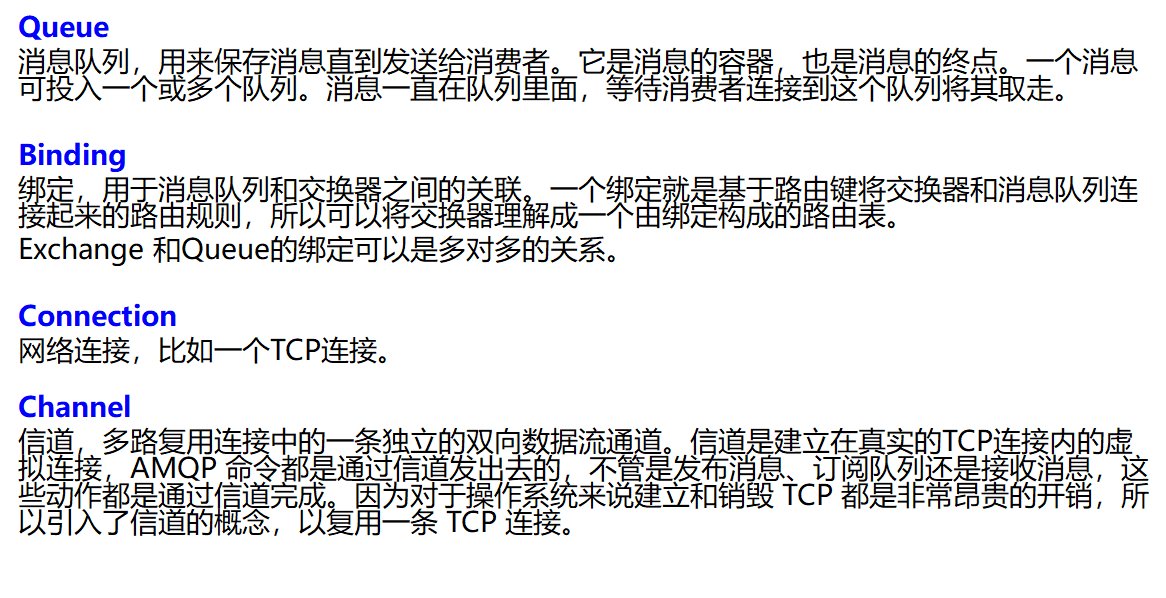


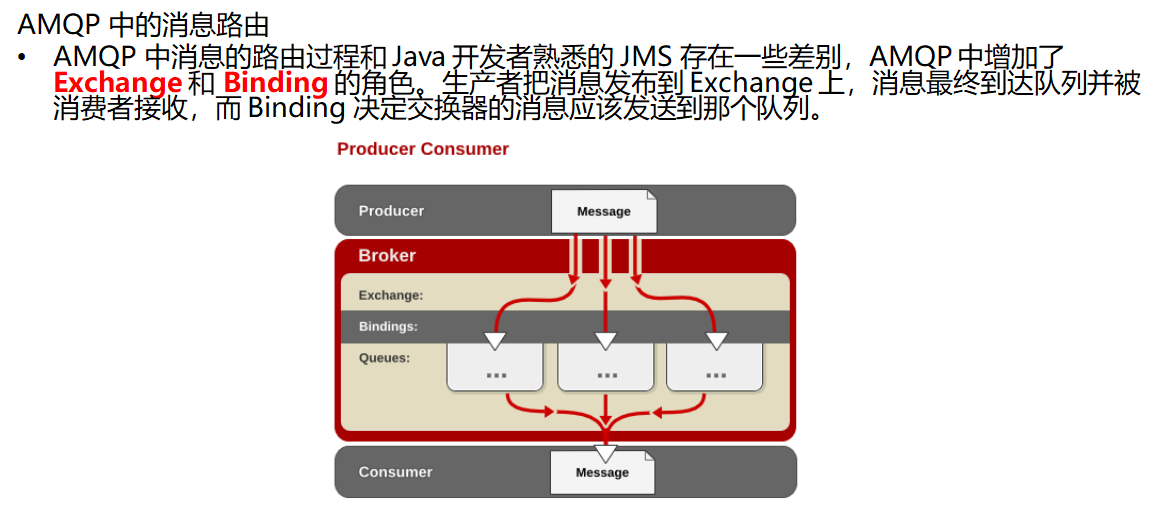
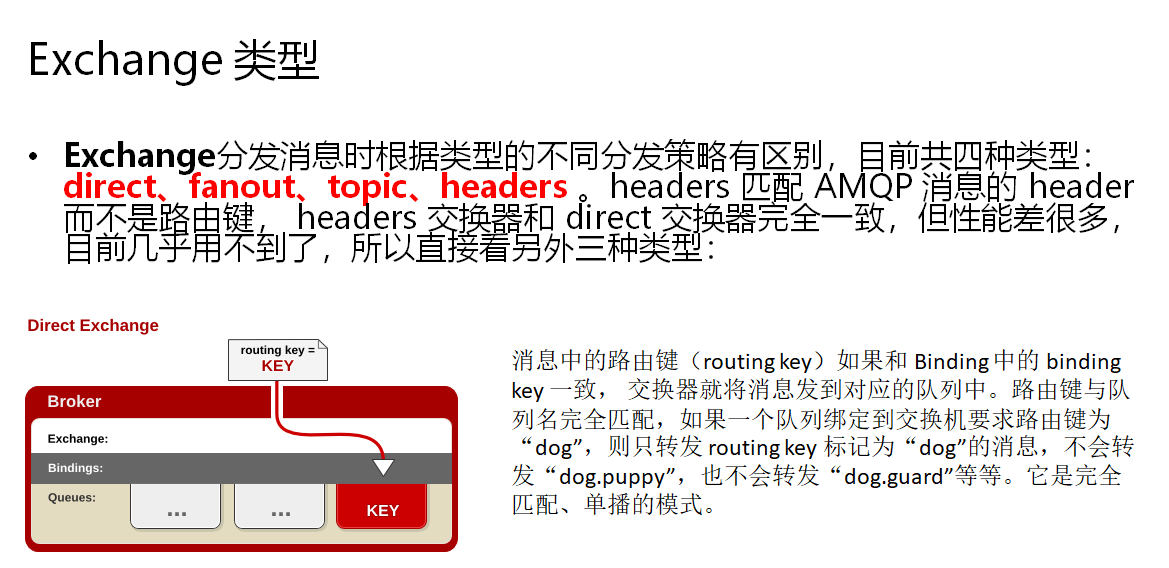
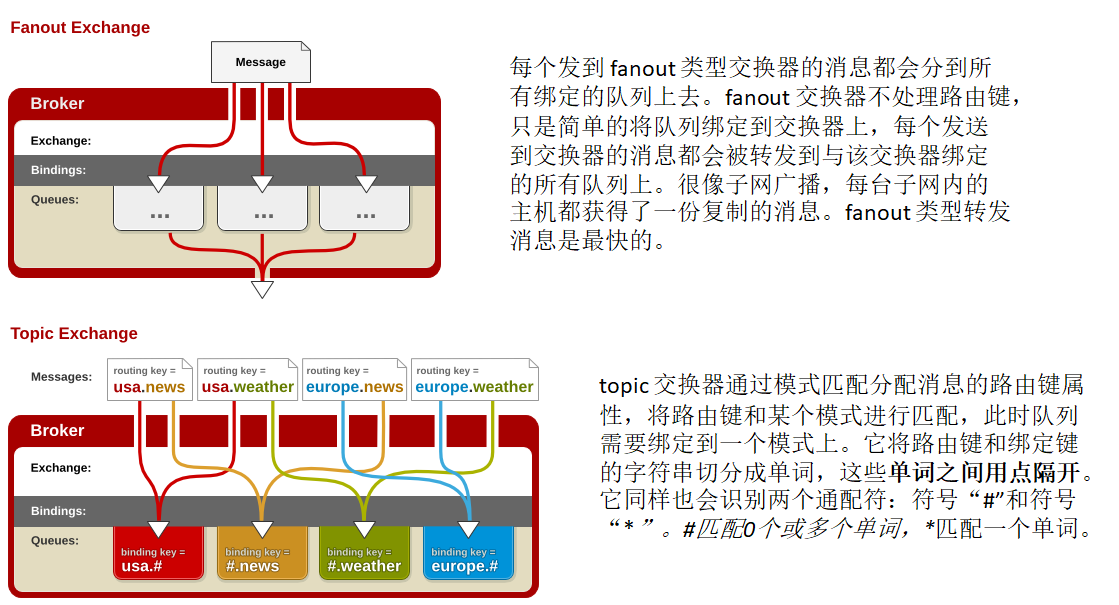
1. 拉取rabbitmq镜像
docker pull rabbitmq:3.4-management
2. 启动镜像
docker run -d -p 5672:5672 -p 15672:15672 rabbitmq:3.4-management

3. 测试访问
如:访问地址:host - ip:15672
登录账户/密码:guest
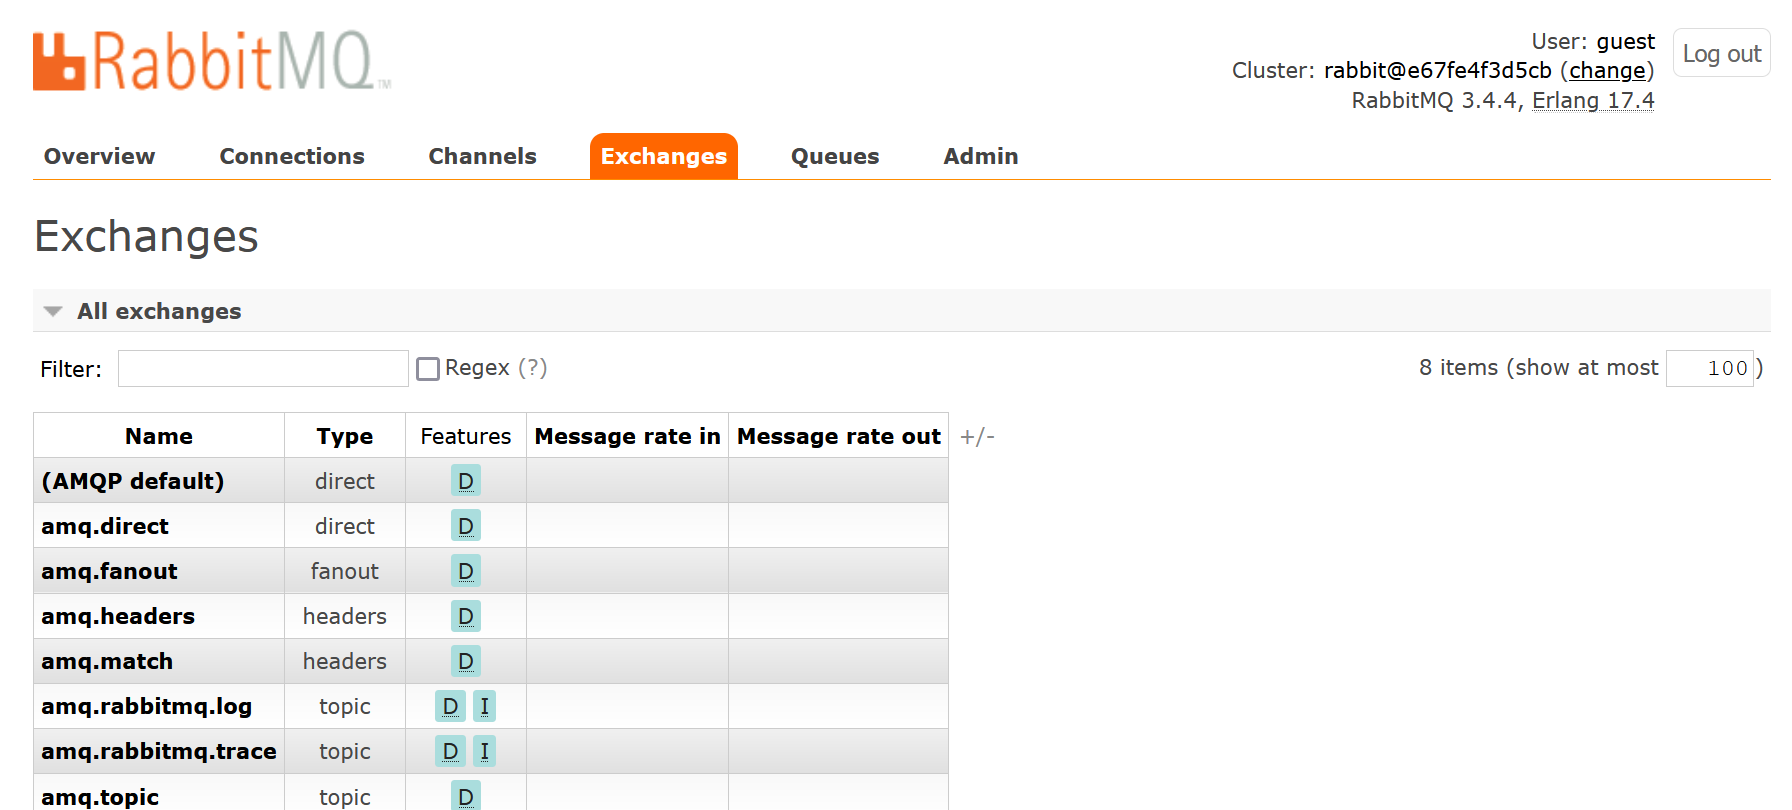
4. 整合RabbitMQ
1、加入依赖
<dependency>
	<groupId>org.springframework.boot</groupId>
    <artifactId>spring-boot-starter-amqp</artifactId>
</dependency>
2、配置文件
application.properties
spring.rabbitmq.host=192.168.2.175
spring.rabbitmq.username=guest
spring.rabbitmq.password=guest
5. 测试
发送消息:
@Test
    void direct() {
        //send方法可以自定义Message的消息体内容和消息头
        //rabbitTemplate.send(exchange, routingKey, message);
        rabbitTemplate.convertAndSend("amq.direct", "atcpl", "这是一个消息");
        HashMap<String, Object> map = new HashMap<>();
        map.put("msg", "这是一个消息");
        map.put("list", Arrays.asList("hello rabbitmq",123,true) );
        rabbitTemplate.convertAndSend("amq.direct", "atcpl", map);
    }
接收消息:
@Test
    void receive(){
        Object o = rabbitTemplate.receiveAndConvert("atcpl");
        System.out.println(o.getClass());
        System.out.println(o);
    }
如果发送的是message是String类型可以看到消息;但如果是发送对象类型的消息又或者是接收到的消息是一个序列化后的消息的情况。所以需要自定义MessageConverte
@Configuration
public class MyRabbitMQConf {
    @Bean
    public MessageConverter messageConverter(){
       return new Jackson2JsonMessageConverter();
    }
}
在此测试发现已经是Json类型的数据。
**监听消息:**使用@EnableRabbit 、 @RabbitListener监听消息队列内容
举例:
@Service
public class BookService {
    @RabbitListener(queues = "atcpl")
    public void receive(Book book){
        System.out.println("收到消息"+book);
    }
}

启动主程序,使用单元测试发送消息,可以看到。

6. AmqpAdmin
使用AmqpAdmin(RabbitMQ)系统管理功能组件创建或删除Exchange/Queue/Binding
 	@Autowired
    AmqpAdmin amqpAdmin;
    @Test
    void createAmqp(){
        //创建Exchange交换器
        amqpAdmin.declareExchange(new FanoutExchange("cpl.direct"));
        System.out.println("创建交换器完成");
        //创建队列名
        amqpAdmin.declareQueue(new Queue("atcpl.amqadmin.news"));
        //创建绑定关系  Binding("目的地","目的地类型","交换器名字","路由键",null)
        amqpAdmin.declareBinding(new Binding("atcpl.amqadmin.news", Binding.DestinationType.QUEUE, "cpl.direct", "atcpl-amqadmin", null));
    }
7. 原理
自动配置:
- RabbitAutoConfiguration
- 有一个自动配置连接工厂ConnectionFactory
- RabbitProperties封装了RabbitMQ的配置;
- RabbitTemplate 给RabbitMQ发送和接收消息
- AmqpAdmin RabbitMQ系统管理组件
- 创建或删除Queue、Exchange、Binding
- @EnableRabbit @RabbitListener监听消息队列的内容
三、SpringBoot与ElasticSearch检索


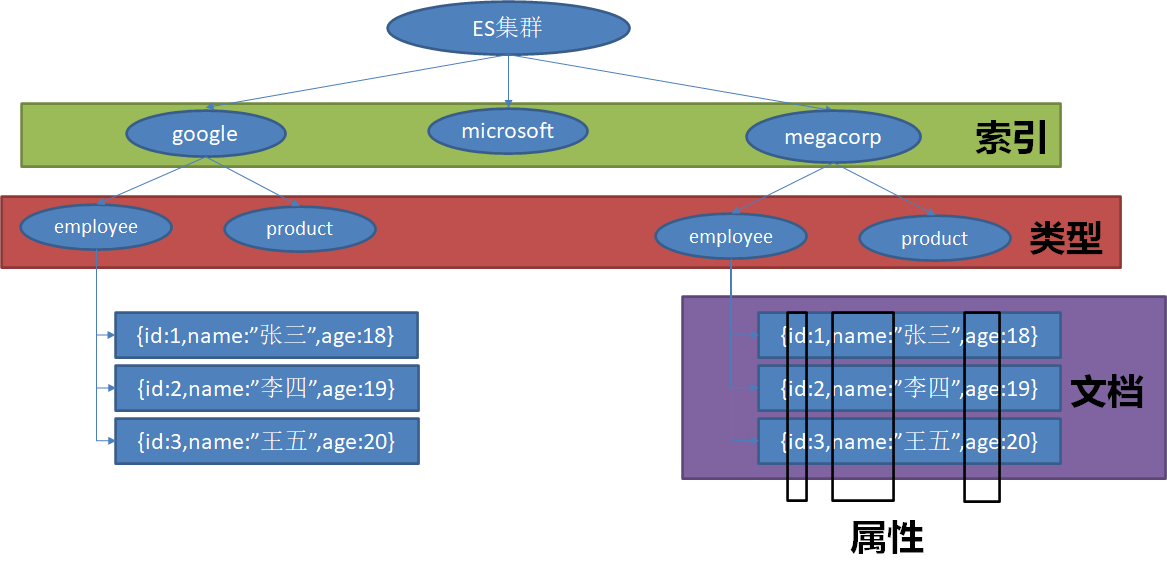
1.安装ElasticSearch
docker pull elasticsearch:5.6.9
2.运行elasticSearch镜像
docker run -d -e ES_JAVA_OPTS="-Xms512m -Xmx512m" -e "discovery.type=single-node" -p 9200:9200 -p 9300:9300 elasticsearch:5.6.9
3.测试访问
http://192.168.2.175:9200/
可能不能访问到。原因是虚拟机中9200端口被限制为本机访问。ES默认外部无法访问9200端口,因为我们需要修改配置文件
解决步骤:
docker exec -it 容器ID /bin/bash
docker exec -it b4d90553ae23 /bin/bash
进入容器内部,可以使用ls查看内容文件夹,可以看到有config文件夹,进去
cd config
再ls,可以看到有elasticsearch.yml文件,修改它
vi elasticsearch.yml
添加上
network.host: 0.0.0.0
http.port: 9200
然后按Esc,再按:wq 退出。随后重启容器,可以访问9200了。
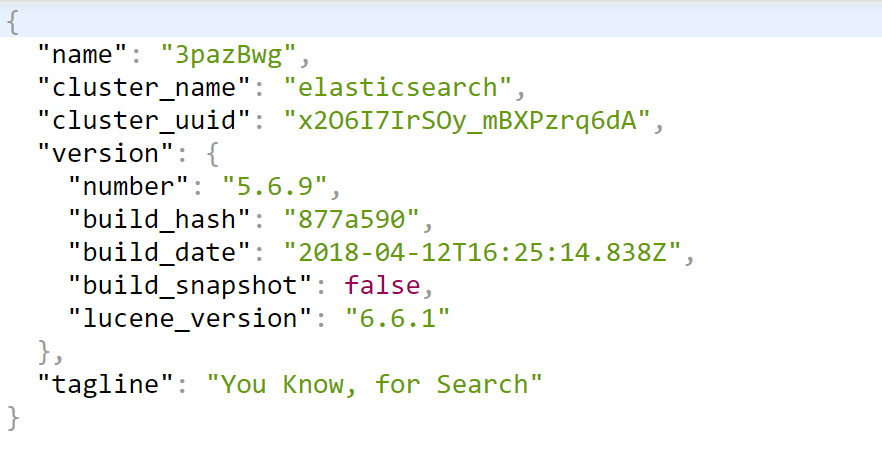
4.SpringBoot整合ES
ES官方文档
springboot默认支持两种技术和ES交互:
RestClient(官方推荐SpringBoot2.3以上不在支持Jest而换成了Rest)、SpringData-ElasticSearch
1.使用RestClient操作ES:
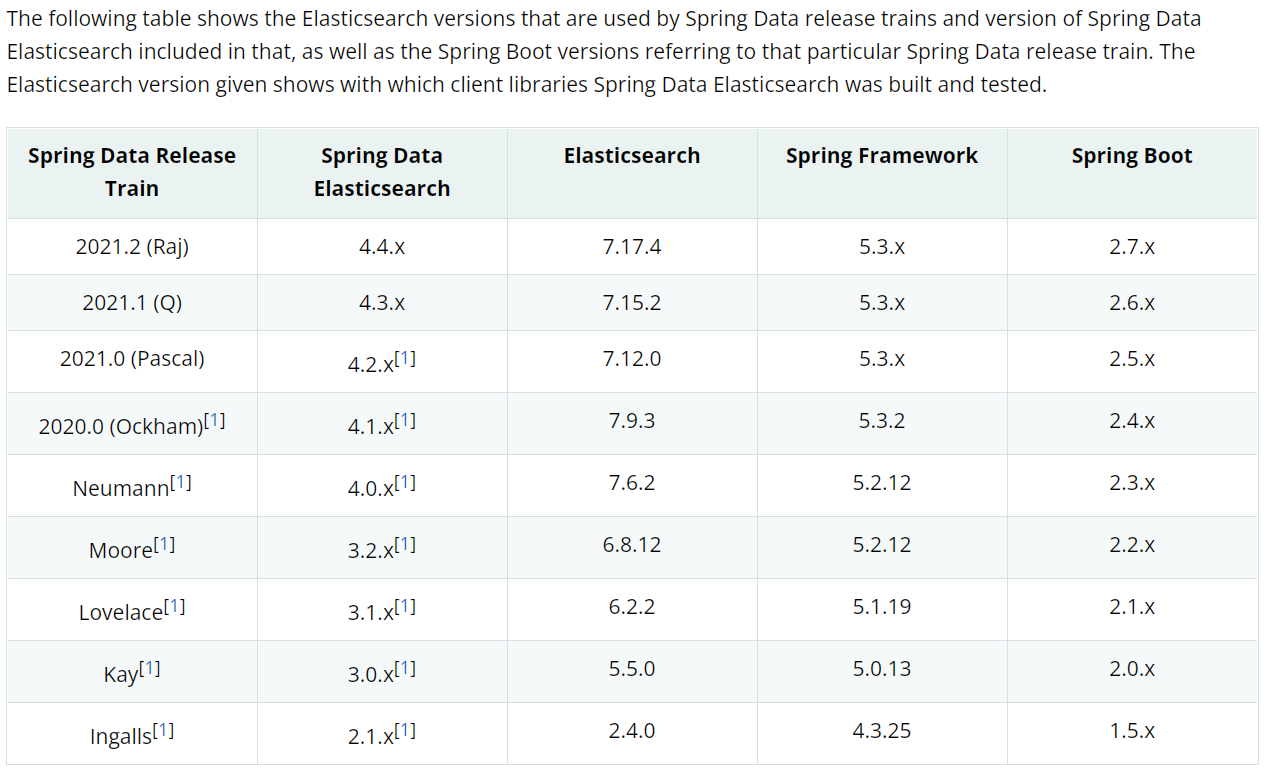
1.加入依赖
<dependency>
    <groupId>org.elasticsearch.client</groupId>
    <artifactId>elasticsearch-rest-high-level-client</artifactId>
    <version>7.17.4</version>
</dependency>
从官方文档可以看到各个版本SpringBoot对应的es
2.添加RestHighLevelClient配置类
@Configuration
public class MyRestHighLevelClient {

    @Bean
    public RestHighLevelClient restHighLevelClient(){
        return new RestHighLevelClient(
                RestClient.builder(
                        new HttpHost("192.168.2.175",9200,"http")));
    }
}
3.测试
 //添加文档
    @Test
    void indexData() throws IOException {
        IndexRequest indexRequest = new IndexRequest("user");
        User user = new User("张三",20,"男");
        String source = JSON.toJSONString(user);
        indexRequest.id("1").source(source, XContentType.JSON);
        //操作ES
        IndexResponse response = client.index(indexRequest, RequestOptions.DEFAULT);
        System.out.println(response);
    }
执行结果:

//搜索文档
    @Test
    void search() throws IOException {
        // SearchRequest
        SearchRequest searchRequest = new SearchRequest();
        searchRequest.indices("user");
        // 构建检索条件
        SearchSourceBuilder sourceBuilder = new SearchSourceBuilder();
        // 分页采用简单的from + size分页,适用数据量小的,了解更多分页方式可自行查阅资料
        //        searchSourceBuilder.from((page - 1) * rows);
        //        searchSourceBuilder.size(rows);
        // 查询所有
        //        QueryBuilder queryBuilder = QueryBuilders.matchAllQuery();
        MatchQueryBuilder builder = QueryBuilders.matchQuery("userName", "张三");
        sourceBuilder.query(builder);
        searchRequest.source(sourceBuilder);
        //查询Es
        SearchResponse response = client.search(searchRequest, RequestOptions.DEFAULT);
        System.out.println("查询结果:" + response.toString());
        SearchHits hits = response.getHits();
        // 遍历封装列表对象
        List<User> userList = new ArrayList<>();
        SearchHit[] searchHits = hits.getHits();
        for (SearchHit searchHit : searchHits) {
            userList.add(JSON.parseObject(searchHit.getSourceAsString(), User.class));
        }
        System.out.println(userList);
    }
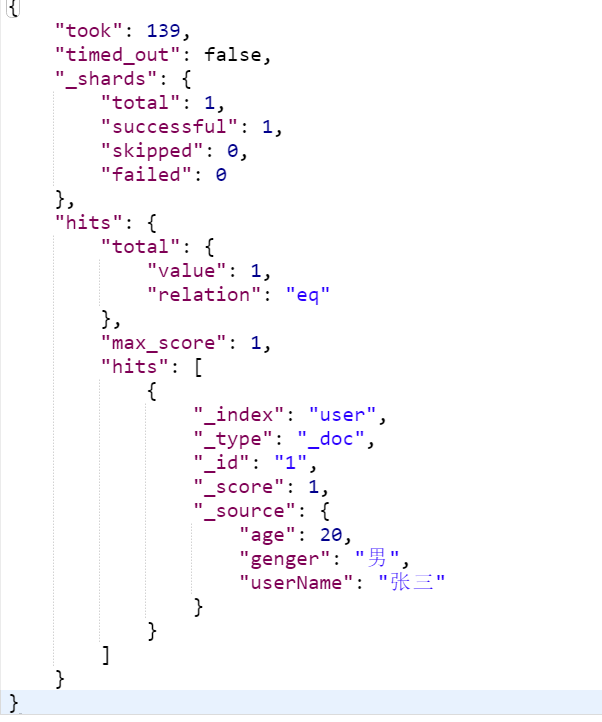
执行结果:(控制台显示不完,使用postman发送请求)
//修改文档
@Test
public void updateData() throws IOException {
    // UpdateRequest
    UpdateRequest updateRequest = new UpdateRequest("users", "1");
    User user = new User();
    user.setUserName("李四");
    user.setAge(20);
    user.setGender("女");
    updateRequest.doc(JSON.toJSONString(user), XContentType.JSON);
    // 操作ES
    restHighLevelClient.update(updateRequest, RequestOptions.DEFAULT);
}
执行结果:(在postman中再次执行查询)
	//修改文档
	@Test
    public void delete() throws IOException {
        // DeleteRequest
        DeleteRequest deleteRequest = new DeleteRequest("user", "1");
        // 操作ES
        DeleteResponse deleteResponse = client.delete(deleteRequest, RequestOptions.DEFAULT);
    }
[外链图片转存失败,源站可能有防盗链机制,建议将图片保存下来直接上传(img-gcoug9rZ-1687158000746)(C:\Users\蜡笔小新\AppData\Roaming\Typora\typora-user-images\image-20220731122511364.png)]
2.使用SpringData-ElasticSearch操作ES
1.加入依赖
<dependency>
   	<groupId>org.springframework.boot</groupId>
 	<artifactId>spring-boot-starter-data-			elasticsearch</artifactId>
</dependency>
三种方式:
- 实现ElasticsearchRepository接口
- 引入ElasticsearchRestTemplate
- 引入ElasticsearchOperations
使用 Repository 来获取、保存、删除 ES 数据;使用 ElasticsearchRestTemplate 或 ElasticsearchOperations 来进行分页/滚动查询。
2.实现索引对应的Repository
//参数1 索引类  参数2 索引id
@Repository
public interface BookRepository extends ElasticsearchRepository<Book,Integer> {

}
3.编写索引类型
import org.springframework.data.elasticsearch.annotations.Document;
//该注解标注索引名字
@Document(indexName = "book")
public class Book {
    private Integer id;
    private String bookName;
    private String author;

    public Book() {
    }

    public Book(Integer id, String bookName, String author) {
        this.id = id;
        this.bookName = bookName;
        this.author = author;
    }

    public Integer getId() {
        return id;
    }

    public void setId(Integer id) {
        this.id = id;
    }

    public String getBookName() {
        return bookName;
    }

    public void setBookName(String bookName) {
        this.bookName = bookName;
    }

    public String getAuthor() {
        return author;
    }

    public void setAuthor(String author) {
        this.author = author;
    }
}
4.测试
	@Autowired
    BookRepository bookRepository;
    //测试SpringData-ES
    @Test
    void testSpringData_ES(){
        Book book = new Book(1,"红楼梦","曹雪芹");
        bookRepository.save(book);
    }
	@Test
    void testFindAll(){
        Iterable<Book> books = bookRepository.findAll();
        for(Book book : books){
            System.out.println(book.toString());
        }
    }
[外链图片转存失败,源站可能有防盗链机制,建议将图片保存下来直接上传(img-ldlgoIys-1687158000747)(C:\Users\蜡笔小新\AppData\Roaming\Typora\typora-user-images\image-20220731131844983.png)]
四、SpringBoot整合SpringSecurity


1.加入依赖
<dependency>
    <groupId>org.springframework.boot</groupId>
    <artifactId>spring-boot-starter-security</artifactId>
</dependency>
2.编写配置类
由于SpringBoot2.7以后WebSecurityConfigurerAdapter这个类就过期了(也可以继续使用)。以前只要有Security模块就必用到这个类。以前我们自定义类继承自 WebSecurityConfigurerAdapter 来配置我们的 Spring Security,我们主要是配置两个东西:
- configure(HttpSecurity http) 配置 Spring Security 中的过滤器链,主要定制一些请求规则
- configure(WebSecurity web) 主要是配置一些路径放行规则,比如静态资源
- configure(AuthenticationManagerBuilder auth) 定制认证规则
只要项目中加入了SpringSecurity模块,默认情况下,项目中的所有接口都会被保护起来。启动项目会出现SpringSecurity的默认登录页: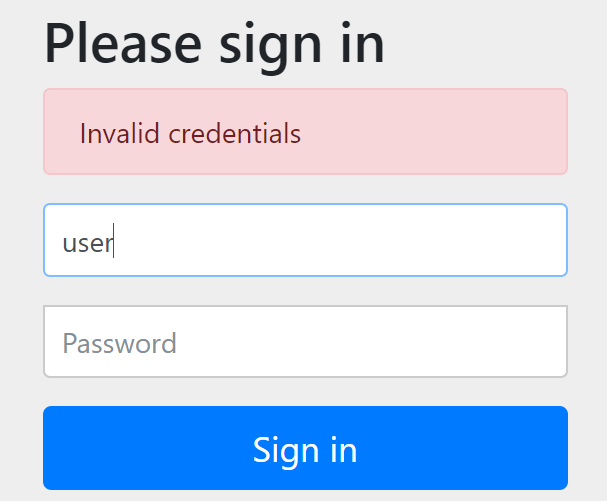
而用户名默认是user,密码在启动项目时,控制台会随机生成,如:

开始配置:
@EnableWebSecurity
public class SecurityConfig extends WebSecurityConfigurerAdapter {
    @Override
    public void configure(WebSecurity web) throws Exception {

    }

    @Override
    protected void configure(HttpSecurity http) throws Exception {
        //定制授权请求规则
        http.authorizeRequests().antMatchers("/").permitAll()
                .antMatchers("/level1/**").hasRole("Vip1")
                .antMatchers("/level2/**").hasRole("Vip2")
                .antMatchers("/level3/**").hasRole("Vip3");
        //开启自动配置的登录功能,如果没有权限的请求,
        // 默认会发送/login请求来到SpringSecurity自带的登陆页面,
        // 登录失败会重定向到/login?error
        //默认发送的是post形式的请求
        http.formLogin();
        //开启自动配置的注销功能,访问/logout,清空session,
        http.logout();
        //开启记住我功能,登陆成功以后,将cookie发送给浏览器,以后访问页面带上这个cookie,只要通过检查就可以免登录
        //点击注销会删除cookie
        http.rememberMe();
    }

    @Override
    protected void configure(AuthenticationManagerBuilder auth) throws Exception {
        //定制认证规则
        auth.inMemoryAuthentication().passwordEncoder(new MyPasswordEncoder())
                .withUser("zhangsan").password("123456").roles("Vip1")
                .and()
                .withUser("lisi").password("123456").roles("Vip2")
                .and()
                .withUser("wangwu").password("123456").roles("Vip3");
    }
}
在发送需要验证的请求后,可能会出现错误:(不是所有的版本都会出现)

意思是,SpringSecurity强制我们提供一个PasswordEncoder
方法一:
public class MyPasswordEncoder implements PasswordEncoder {
    @Override
    public String encode(CharSequence charSequence) {
        return charSequence.toString();
    }

    @Override
    public boolean matches(CharSequence charSequence, String s) {
        return s.equals(charSequence.toString());
    }
}
方法二:(推荐,这种方法可以将密码加密)
   	@Bean
    public PasswordEncoder passWordEncoder(){
        //返回一个加密类
        return PasswordEncoderFactories.createDelegatingPasswordEncoder();
    }
修改后:

实现不同用户登录显示不同的内容(使用Vue比较简单)
引入依赖
<dependency>
    <groupId>org.thymeleaf.extras</groupId>
    <artifactId>thymeleaf-extras-springsecurity5</artifactId>
    <version>3.0.4.RELEASE</version>
</dependency>
html页面头部引入
html xmlns:th="http://www.thymeleaf.org"
      xmlns:sec= "http://www.thymeleaf.org/thymeleaf-extras-springsecurity4">
前端代码:
<body>
<h1 align="center">欢迎光临武林秘籍管理系统</h1>
<div sec:authorize="!isAuthenticated()">
    <h2 align="center">游客您好,如果想查看武林秘籍 <a th:href="@{/login}">请登录</a></h2>
</div>
<div sec:authorize="isAuthenticated()">
    <h2><span sec:authentication="name"></span>,你好,你的角色有:
        <span sec:authentication="principal.authorities"></span></h2>
    <form th:action="@{/logout}" method="post">
        <input type="submit" value="注销">
    </form>
</div>

<hr>

<div sec:authorize="hasRole('Vip1')">
    <h3>普通武功秘籍</h3>
    <ul>
        <li><a th:href="@{/level1/1}">罗汉拳</a></li>
        <li><a th:href="@{/level1/2}">武当长拳</a></li>
        <li><a th:href="@{/level1/3}">全真剑法</a></li>
    </ul>
</div>

<div sec:authorize="hasRole('Vip2')">
    <h3>高级武功秘籍</h3>
    <ul>
        <li><a th:href="@{/level2/1}">太极拳</a></li>
        <li><a th:href="@{/level2/2}">七伤拳</a></li>
        <li><a th:href="@{/level2/3}">梯云纵</a></li>
    </ul>
</div>

<div sec:authorize="hasRole('Vip3')">
    <h3>绝世武功秘籍</h3>
    <ul>
        <li><a th:href="@{/level3/1}">葵花宝典</a></li>
        <li><a th:href="@{/level3/2}">龟派气功</a></li>
        <li><a th:href="@{/level3/3}">独孤九剑</a></li>
    </ul>
</div>

</body>
解释:
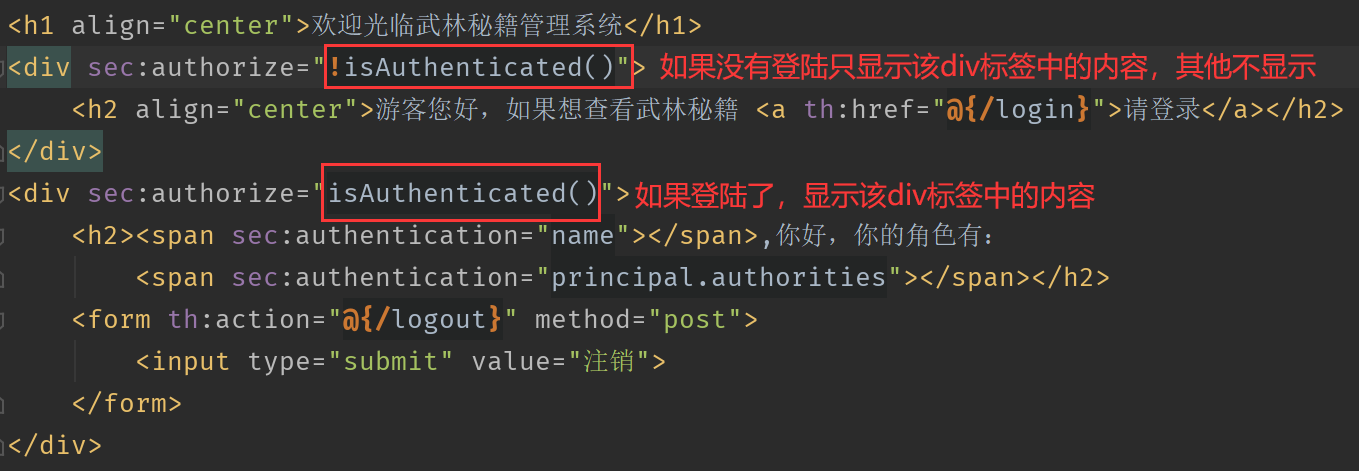
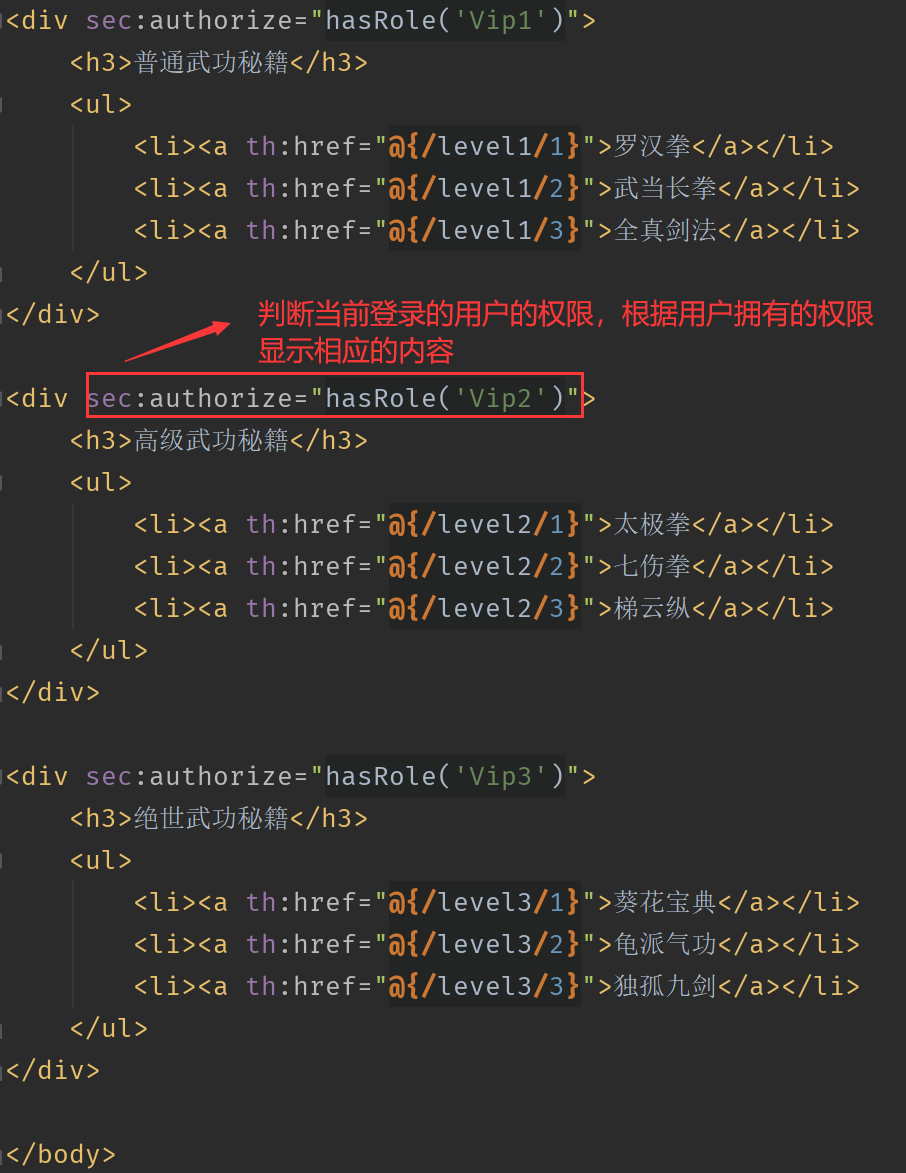
补充:
SpringBoot2.7版本以后,如果想要配置过滤器链(就是原来的这个方法configure(HttpSecurity http)),可以通过自定义 SecurityFilterChain Bean 来实现。如果想要配置 WebSecurity,可以通过 WebSecurityCustomizer Bean 来实现。如果自定义认证规则(亦可以说是自定义用户,也就是以前的configure(AuthenticationManagerBuilder auth)),可以通过UserDetailsService Bean来实现。
@Configuration
public class MySecurityConf {
    //定制认证规则
    @Bean
    UserDetailsService userDetailsService (){
        InMemoryUserDetailsManager userDetailsManager = new InMemoryUserDetailsManager();
        userDetailsManager.createUser(User.withUsername("admin").password("admin").roles("admin").build());
        userDetailsManager.createUser(User.withUsername("张三").password("zs123").roles("student").build());
        return userDetailsManager;
    }

    @Bean
    SecurityFilterChain securityFilterChain(HttpSecurity http) throws Exception {
        http.authorizeRequests()
                .anyRequest().authenticated()
                .and()
                .formLogin()
                .permitAll()
                .and()
                .csrf().disable();
        return http.build();
    }

    @Bean
    WebSecurityCustomizer webSecurityCustomizer() {
        return new WebSecurityCustomizer() {
            @Override
            public void customize(WebSecurity web) {
                web.ignoring().antMatchers("/hello");
            }
        };
    }
}
    //定制过滤器链
    @Bean
    DefaultSecurityFilterChain securityWebFilterChain(){
        //释放所有请求,
        //参数1 是拦截请求规则  参数2 是过滤器链
        List<Filter> filters = new ArrayList<>();
        return new DefaultSecurityFilterChain(new AntPathRequestMatcher("/**"),filters );
    }
Spring Security 的底层实际上就是一堆过滤器,所以我们之前在 configure(HttpSecurity) 方法中的配置,实际上就是配置过滤器链。现在过滤器链的配置,我们通过提供一个 SecurityFilterChain Bean 来配置过滤器链,SecurityFilterChain 是一个接口,这个接口只有一个实现类 DefaultSecurityFilterChain,构建 DefaultSecurityFilterChain 的第一个参数是拦截规则,也就是哪些路径需要拦截,第二个参数则是过滤器链,这里我给了一个空集合,也就是我们的 Spring Security 会拦截下所有的请求,然后在一个空集合中走一圈就结束了,相当于不拦截任何请求。
ion {
http.authorizeRequests()
.anyRequest().authenticated()
.and()
.formLogin()
.permitAll()
.and()
.csrf().disable();
return http.build();
}
@Bean
WebSecurityCustomizer webSecurityCustomizer() {
    return new WebSecurityCustomizer() {
        @Override
        public void customize(WebSecurity web) {
            web.ignoring().antMatchers("/hello");
        }
    };
}
}
```java
    //定制过滤器链
    @Bean
    DefaultSecurityFilterChain securityWebFilterChain(){
        //释放所有请求,
        //参数1 是拦截请求规则  参数2 是过滤器链
        List<Filter> filters = new ArrayList<>();
        return new DefaultSecurityFilterChain(new AntPathRequestMatcher("/**"),filters );
    }
Spring Security 的底层实际上就是一堆过滤器,所以我们之前在 configure(HttpSecurity) 方法中的配置,实际上就是配置过滤器链。现在过滤器链的配置,我们通过提供一个 SecurityFilterChain Bean 来配置过滤器链,SecurityFilterChain 是一个接口,这个接口只有一个实现类 DefaultSecurityFilterChain,构建 DefaultSecurityFilterChain 的第一个参数是拦截规则,也就是哪些路径需要拦截,第二个参数则是过滤器链,这里我给了一个空集合,也就是我们的 Spring Security 会拦截下所有的请求,然后在一个空集合中走一圈就结束了,相当于不拦截任何请求。

