目录
背景
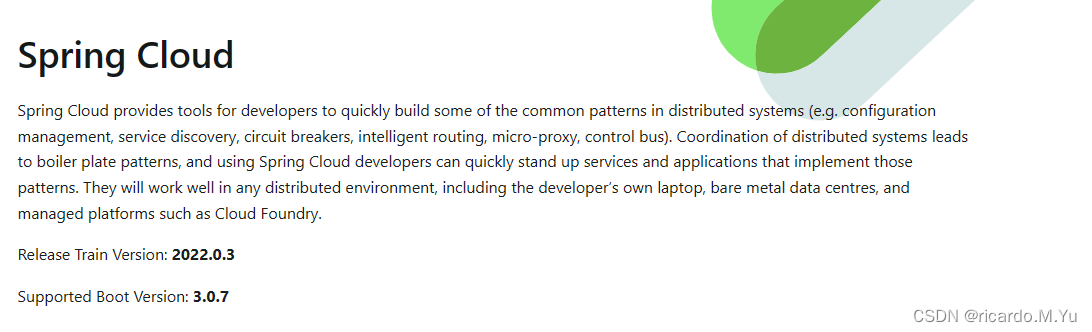
版本
Spring Boot 3.1
Spring Authorization Server 1.1.0官方文档
基础
spring security
OAuth2.0
模块构成
授权方式
集成过程
官方demo
代码集成
依赖
授权服务AuthorizationServerConfig配置
重要组件
测试
查看授权服务配置
访问授权服务
授权
回调
获取 access_token
个性化改造
集成GateWay
代办事项
sql脚本
背景
基于 Spring Cloud Alibaba 架构下,需要一个统一授权中心,与 gateway 配合使用实现微服务的授权与认证,下面主要介绍整个集成过程,基于springboot3.1最新版
版本
Spring Boot 3.1
最新发布的springboot3.1版本对 oauth2 提供了默认的支持,可以引用下面的依赖来快速构建,为了体验新版本特性,我这边切换到了 3.1版本
Spring Boot 3.1 提供了一个 spring-boot-starter-oauth2-authorization-server 启动器,可以支持 Spring Authorization Server 的自动配置,轻松配置基于 Servlet 的 OAuth2 授权服务器,同时@EnableAuthorizationServer这些注解也早已废弃
Spring Authorization Server 1.1.0官方文档
Spring Authorization Server
基础
spring security
关于springsecurity的基础知识,之前写过一篇 springboot 与 Spring Security 集成的基于 jwt的授权的,可以看下面的
(296条消息) springboot 2.7整合spring security 5.7整合jwt实现用户登录注册与鉴权全记录_ricardo.M.Yu的博客-CSDN博客
OAuth2.0
OAuth2.0可以提供一个统一的认证服务。主要模块如下:
模块构成
- Resource owner(资源拥有者):拥有该资源的服务或用户,如我们自己或者资源网站
- Authorization server(认证服务器):即用来认证与颁发令牌(如token)的服务
- Resource server(资源服务器):拥有资源的服务,如我们要访问的网站
- Client(客户端):即访问的客户端,如我们自己用的访问网站
授权方式
- 授权码模式(authorization_code):最正规的模式,客户端先将用户导向认证服务器,登录后获取授权码,然后进行授权,最后根据授权码获取访问令牌
- 刷新模式(refresh_token):用刷新码获取
- 客户端模式(client_credentials):第三方应用自己本身需要获取资源
详见 AuthorizationGrantType 这个类
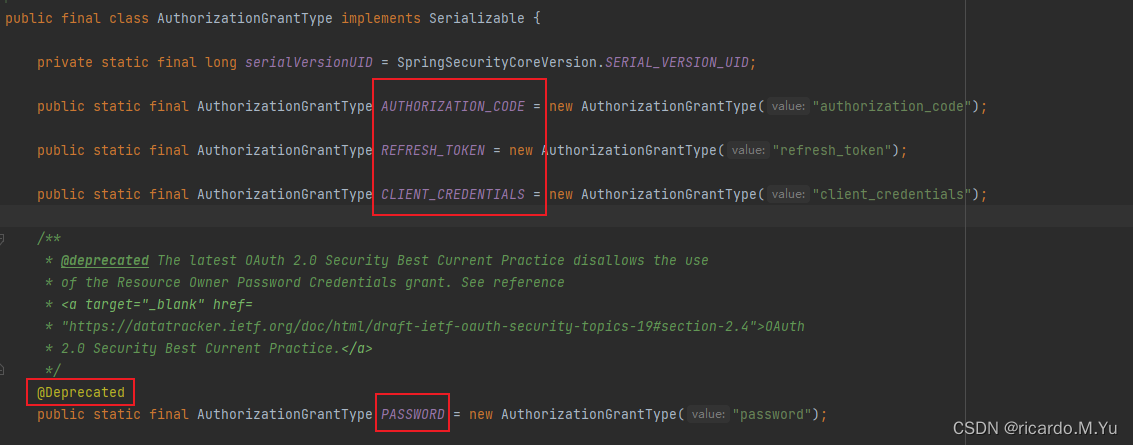
下面的密码模式已经被废弃
- 密码模式(resource owner password credentials):直接带用户名和密码去向认证服务器申请令牌
集成过程
我下面会分为三个阶段逐次递进改造,
- 第一阶段:官方demo演示与组件讲解测试
- 第二阶段:个性化改造
- 第三阶段:集成 springcloud gateway 完成分布式授权改造
官方demo
代码集成
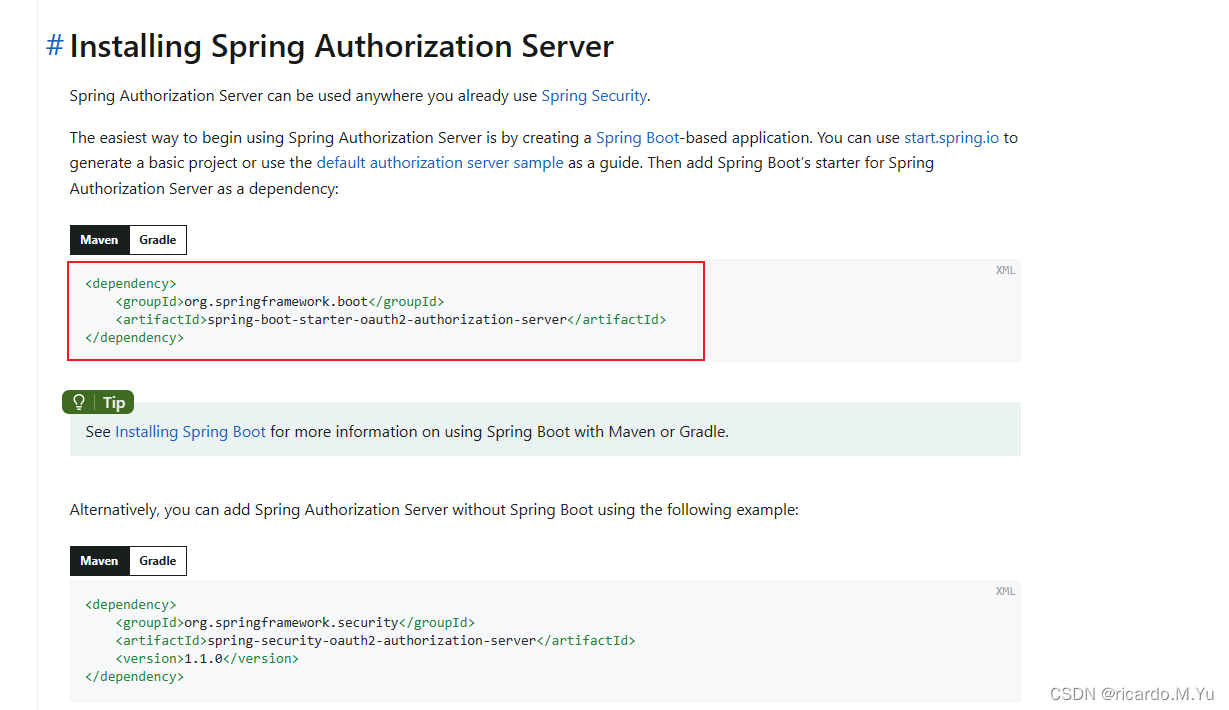
依赖
只需要下面的这一个依赖,前提springboot 版本为 3.1
<parent>
    <groupId>org.springframework.boot</groupId>
    <artifactId>spring-boot-starter-parent</artifactId>
    <version>3.1.0</version>
    <relativePath/>
</parent>


<dependency>
    <groupId>org.springframework.boot</groupId>
    <artifactId>spring-boot-starter-oauth2-authorization-server</artifactId>
</dependency>
授权服务AuthorizationServerConfig配置
spring 官方在快速开始里面给出了下面的默认最小配置,
Getting Started (spring.io)
我先粘下来再介绍,代码结构大概这样,一共两个配置类
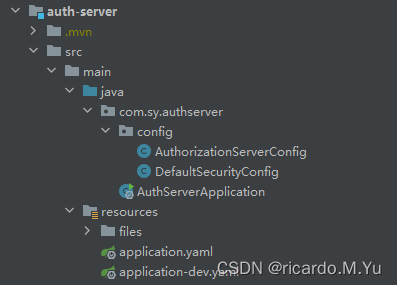
AuthorizationServerConfig
@Configuration
public class AuthorizationServerConfig {

    @Bean
    @Order(1)
    public SecurityFilterChain authorizationServerSecurityFilterChain(HttpSecurity http)
            throws Exception {
        //针对 Spring Authorization Server 最佳实践配置
        OAuth2AuthorizationServerConfiguration.applyDefaultSecurity(http);
        http.getConfigurer(OAuth2AuthorizationServerConfigurer.class)
                .oidc(Customizer.withDefaults());	// Enable OpenID Connect 1.0

        http
                // Redirect to the login page when not authenticated from the
                // authorization endpoint
                .exceptionHandling((exceptions) -> exceptions
                        .defaultAuthenticationEntryPointFor(
                                new LoginUrlAuthenticationEntryPoint("/login"),
                                new MediaTypeRequestMatcher(MediaType.TEXT_HTML)
                        )
                )
                // Accept access tokens for User Info and/or Client Registration
                .oauth2ResourceServer((resourceServer) -> resourceServer
                        .jwt(Customizer.withDefaults()));

        return http.build();
    }

    @Bean
    public RegisteredClientRepository registeredClientRepository() {
        RegisteredClient oidcClient = RegisteredClient.withId(UUID.randomUUID().toString())
                .clientId("oidc-client")
                .clientSecret("{noop}secret")
                .clientAuthenticationMethod(ClientAuthenticationMethod.CLIENT_SECRET_BASIC)
                .authorizationGrantType(AuthorizationGrantType.AUTHORIZATION_CODE)
                .authorizationGrantType(AuthorizationGrantType.REFRESH_TOKEN)
                .authorizationGrantType(AuthorizationGrantType.CLIENT_CREDENTIALS)
                .redirectUri("http://www.baidu.com")
                .redirectUri("http://127.0.0.1:8080/login/oauth2/code/oidc-client")
                .postLogoutRedirectUri("http://127.0.0.1:8080/")
                .scope(OidcScopes.OPENID)
                .scope(OidcScopes.PROFILE)
                .scope("message.read")
                .scope("message.write")
                .scope("all")
                // 设置 Client 需要页面审核授权
                .clientSettings(ClientSettings.builder().requireAuthorizationConsent(true).build())
                .build();

        return new InMemoryRegisteredClientRepository(oidcClient);
    }

    /**
     * 默认发放令牌
     * @return
     */
    @Bean
    public JWKSource<SecurityContext> jwkSource() {
        KeyPair keyPair = generateRsaKey();
        RSAPublicKey publicKey = (RSAPublicKey) keyPair.getPublic();
        RSAPrivateKey privateKey = (RSAPrivateKey) keyPair.getPrivate();
        RSAKey rsaKey = new RSAKey.Builder(publicKey)
                .privateKey(privateKey)
                .keyID(UUID.randomUUID().toString())
                .build();
        JWKSet jwkSet = new JWKSet(rsaKey);
        return new ImmutableJWKSet<>(jwkSet);
    }

    private static KeyPair generateRsaKey() {
        KeyPair keyPair;
        try {
            KeyPairGenerator keyPairGenerator = KeyPairGenerator.getInstance("RSA");
            keyPairGenerator.initialize(2048);
            keyPair = keyPairGenerator.generateKeyPair();
        }
        catch (Exception ex) {
            throw new IllegalStateException(ex);
        }
        return keyPair;
    }

    @Bean
    public JwtDecoder jwtDecoder(JWKSource<SecurityContext> jwkSource) {
        return OAuth2AuthorizationServerConfiguration.jwtDecoder(jwkSource);
    }

    @Bean
    public AuthorizationServerSettings authorizationServerSettings() {
        return AuthorizationServerSettings.builder().build();
    }
}
DefaultSecurityConfig
@EnableWebSecurity
@Configuration(proxyBeanMethods = false)
public class DefaultSecurityConfig {


    @Bean
    @Order(2)
    public SecurityFilterChain defaultSecurityFilterChain(HttpSecurity http)
            throws Exception {
        http
                .authorizeHttpRequests((authorize) -> authorize
                        .requestMatchers(new AntPathRequestMatcher("/actuator/**"),
                                new AntPathRequestMatcher("/oauth2/**"),
                                new AntPathRequestMatcher("/**/*.json"),
                                new AntPathRequestMatcher("/**/*.html")).permitAll()
                        .anyRequest().authenticated()
                )
                .cors(Customizer.withDefaults())
                .csrf((csrf) -> csrf.disable())
//                .httpBasic(Customizer.withDefaults())
//				// Form login handles the redirect to the login page from the
//				// authorization server filter chain
                .formLogin(Customizer.withDefaults())
        ;

        return http.build();
    }

    @Bean
    public UserDetailsService userDetailsService() {
        UserDetails userDetails = User.withDefaultPasswordEncoder()
                .username("user")
                .password("password")
                .roles("USER")
                .build();

        return new InMemoryUserDetailsManager(userDetails);
    }

}
分别介绍下这几个@Bean配置,也是 AuthorizationServer 的几个重要概念。
重要组件
SecurityFilterChain -> authorizationServerSecurityFilterChain: Spring Security的过滤器链,用于协议端点的。
SecurityFilterChain -> defaultSecurityFilterChain: Spring Security的过滤器链,用于Spring Security的身份认证
UserDetailsService :主要进行用户身份验证
RegisteredClientRepository:主要用于管理客户端
JWKSource:用于签名访问令牌
KeyPair: 启动时生成的带有密钥的KeyPair实例,用于创建上面的JWKSource
JwtDecoder:JwtDecoder的一个实例,用于解码已签名的访问令牌
AuthorizationServerSettings:用于配置Spring Authorization Server的AuthorizationServerSettings实例。
测试
为了方便测试,上面的配置中,客户端的回调地址我已经改成了 百度的,授权方式用授权码模式,认证方式用client_secret_basic
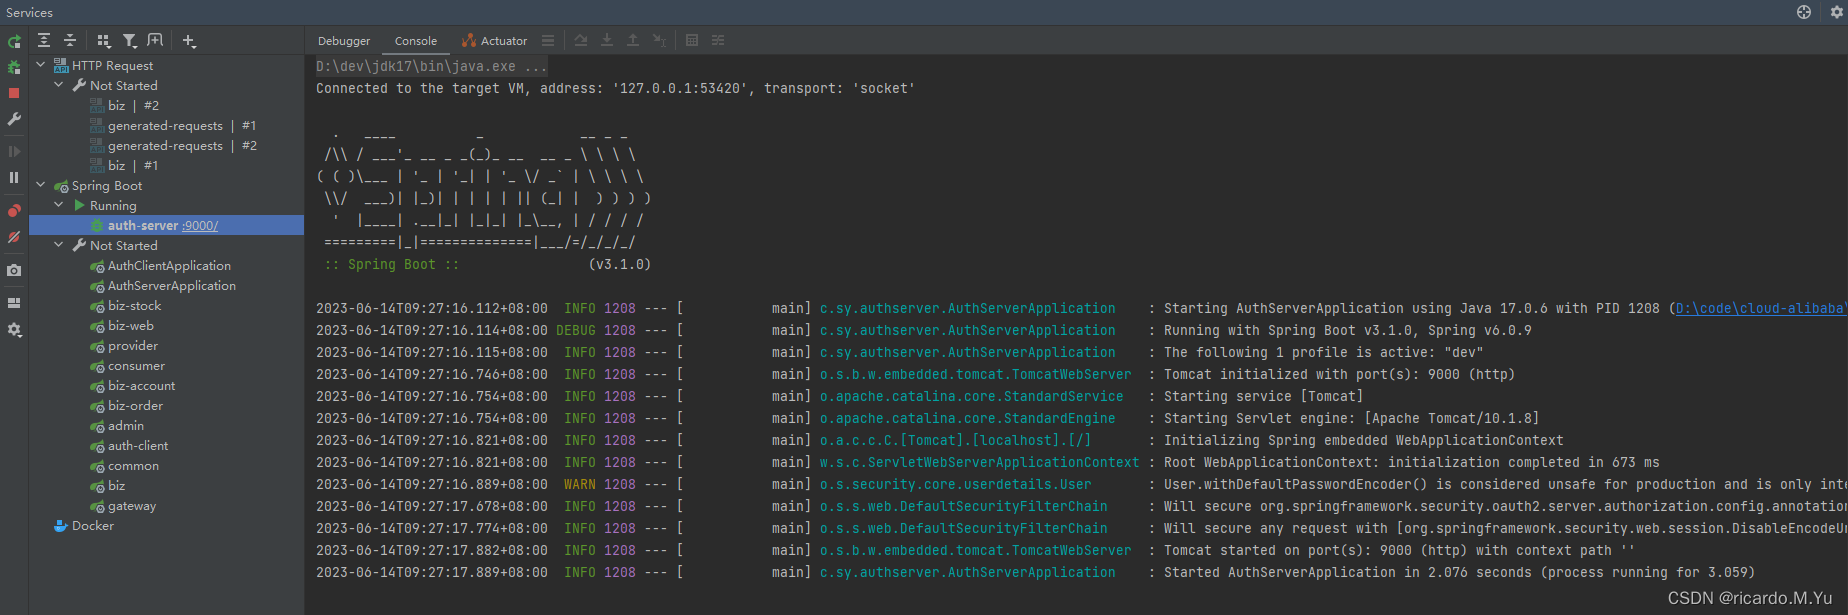
服务启动,端口为9000
查看授权服务配置
地址:
调用 http://127.0.0.1:9000/.well-known/openid-configuration
后,查看地址配置如下:其实就是每个请求的url
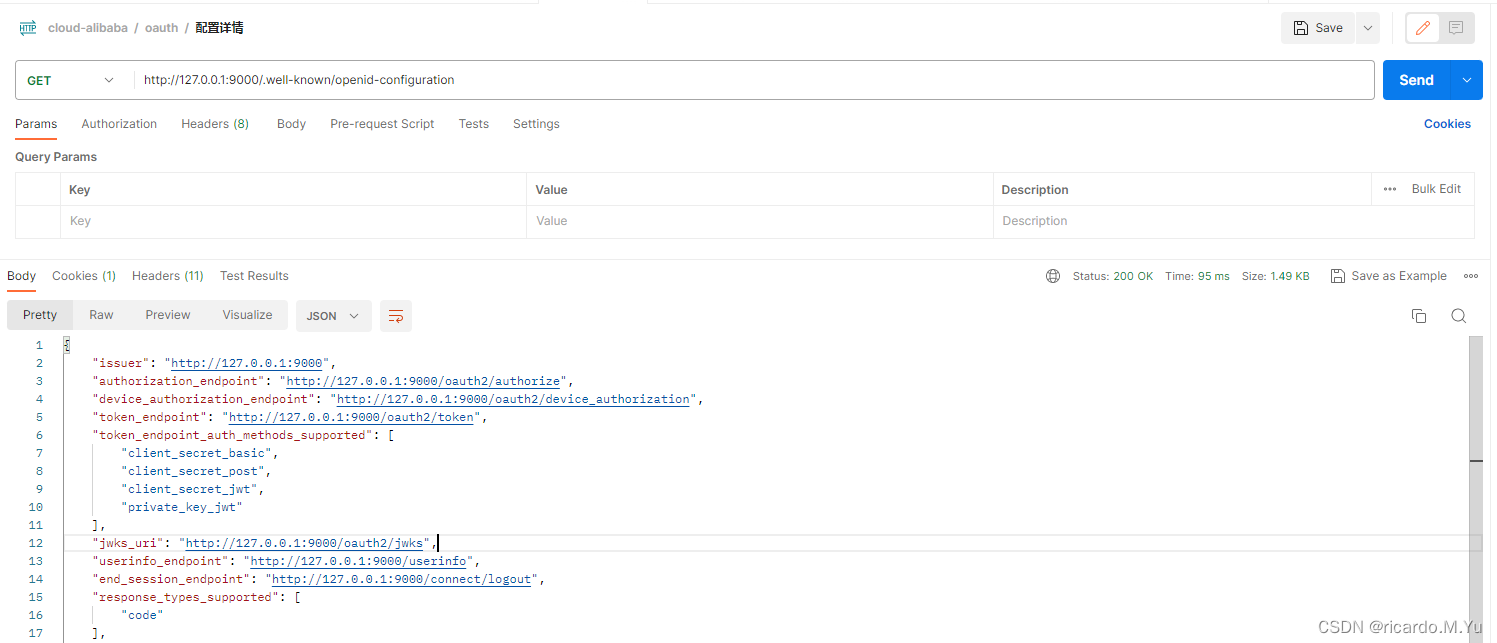
详细的是下面
{
"issuer": "http://127.0.0.1:9000",
"authorization_endpoint": "http://127.0.0.1:9000/oauth2/authorize",
"device_authorization_endpoint": "http://127.0.0.1:9000/oauth2/device_authorization",
"token_endpoint": "http://127.0.0.1:9000/oauth2/token",
"token_endpoint_auth_methods_supported": [
"client_secret_basic",
"client_secret_post",
"client_secret_jwt",
"private_key_jwt"
],
"jwks_uri": "http://127.0.0.1:9000/oauth2/jwks",
"userinfo_endpoint": "http://127.0.0.1:9000/userinfo",
"end_session_endpoint": "http://127.0.0.1:9000/connect/logout",
"response_types_supported": [
"code"
],
"grant_types_supported": [
"authorization_code",
"client_credentials",
"refresh_token",
"urn:ietf:params:oauth:grant-type:device_code"
],
"revocation_endpoint": "http://127.0.0.1:9000/oauth2/revoke",
"revocation_endpoint_auth_methods_supported": [
"client_secret_basic",
"client_secret_post",
"client_secret_jwt",
"private_key_jwt"
],
"introspection_endpoint": "http://127.0.0.1:9000/oauth2/introspect",
"introspection_endpoint_auth_methods_supported": [
"client_secret_basic",
"client_secret_post",
"client_secret_jwt",
"private_key_jwt"
],
"subject_types_supported": [
"public"
],
"id_token_signing_alg_values_supported": [
"RS256"
],
"scopes_supported": [
"openid"
]
}
访问授权服务
浏览器地址栏输入
http://localhost:9000/oauth2/authorize?response_type=code&client_id=oidc-client&scope=message.read&redirect_uri=http://www.baidu.com
用这个请求来模拟客户端,实际开发中,其实是先访问资源服务,由资源服务来拼接这几个参数来重定向到授权服务的,参数意义如下,这些参数都是需要再上面RegisteredClientRepository配置过的
- response_type:这个意思是相应的方式为code码
- client_id:即客户端的id,即上面配置中在 RegisteredClientRepository 配置的
- scope:请求授权范围,也需要在上面的配置中
- redirect_uri:授权通过后,重定向回来的地址
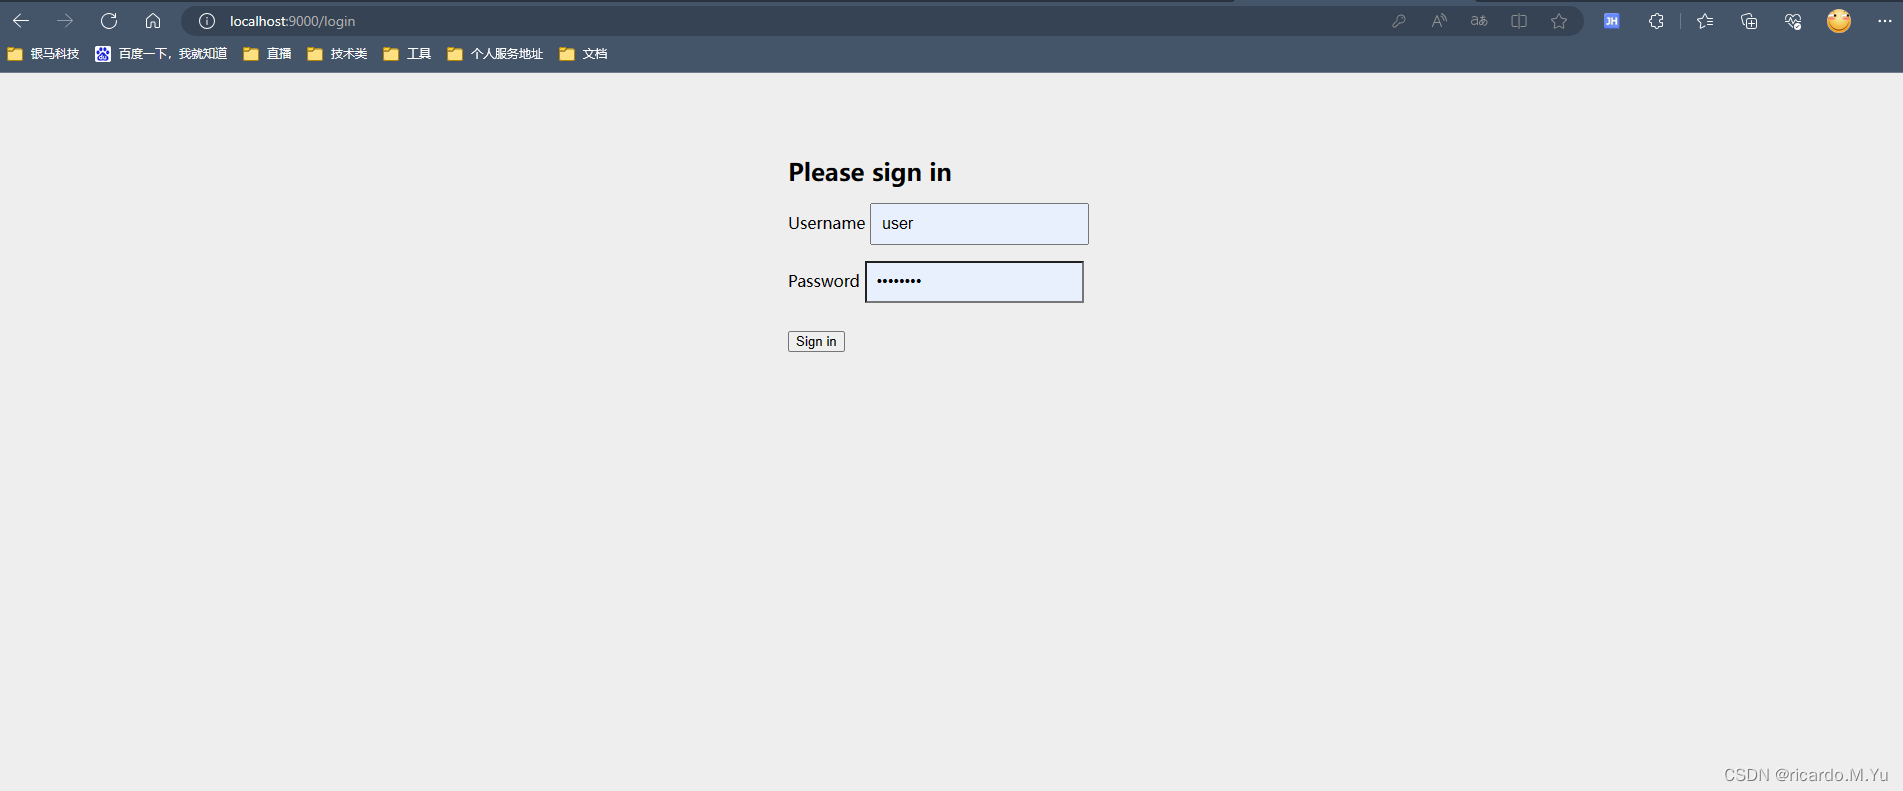
输入完上面的地址后,会重定向到下面这个登录页面,
我们输入上面配置好的用户名密码:
user
password
点击登录
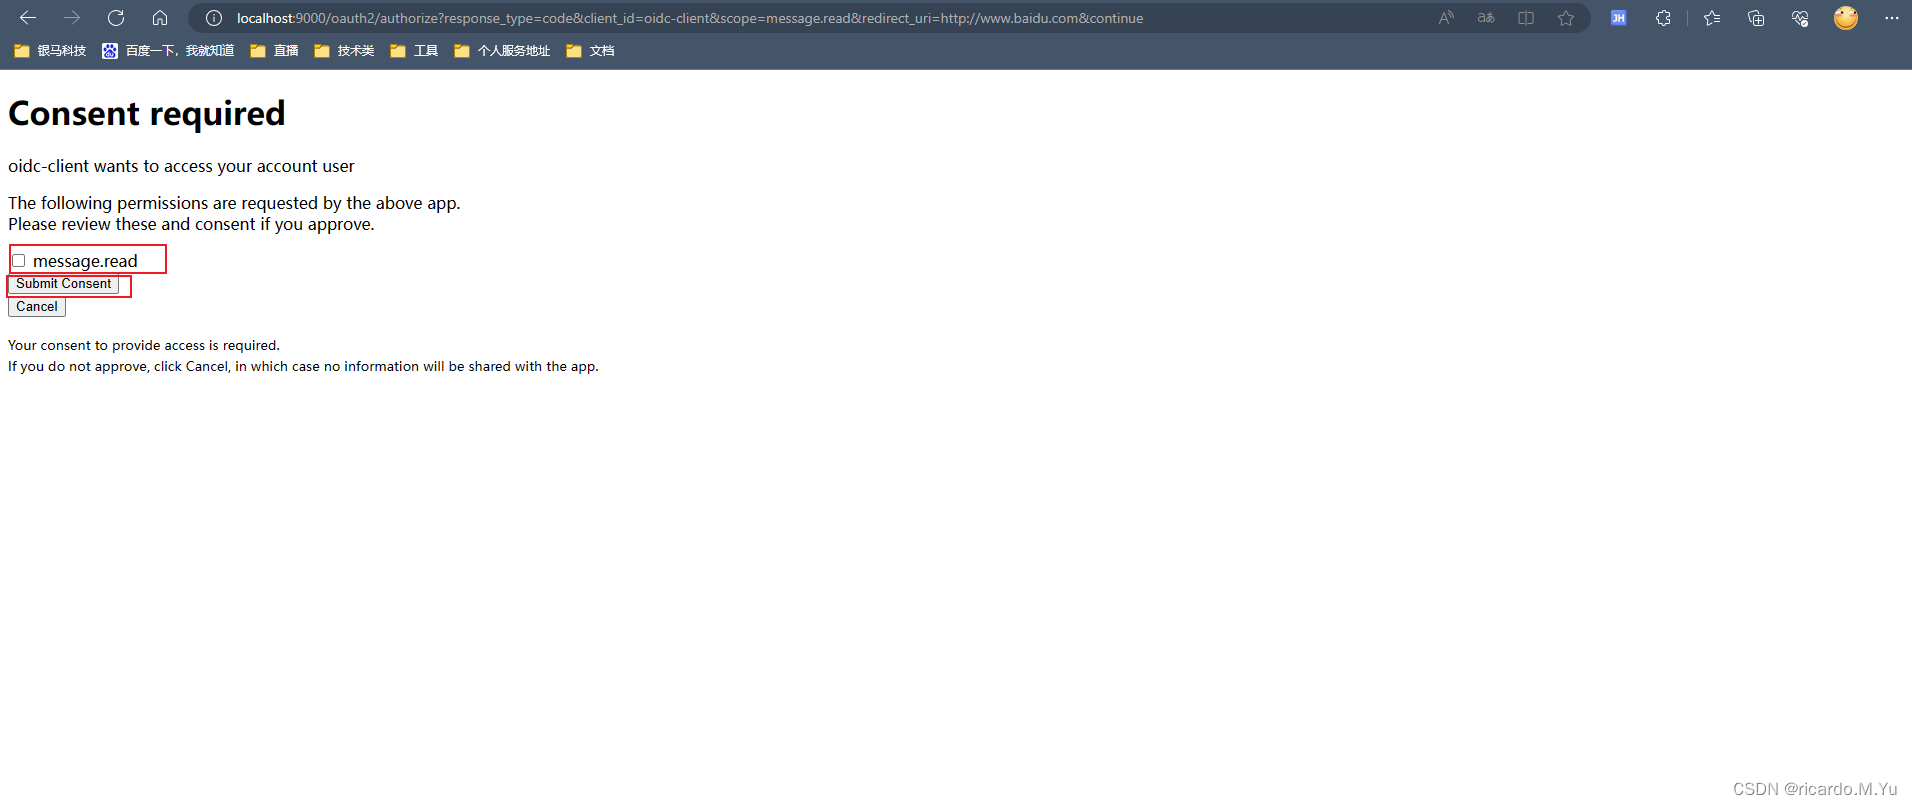
授权
登录过后,会到下面这个授权页面,点击授权范围,然后点击 submit
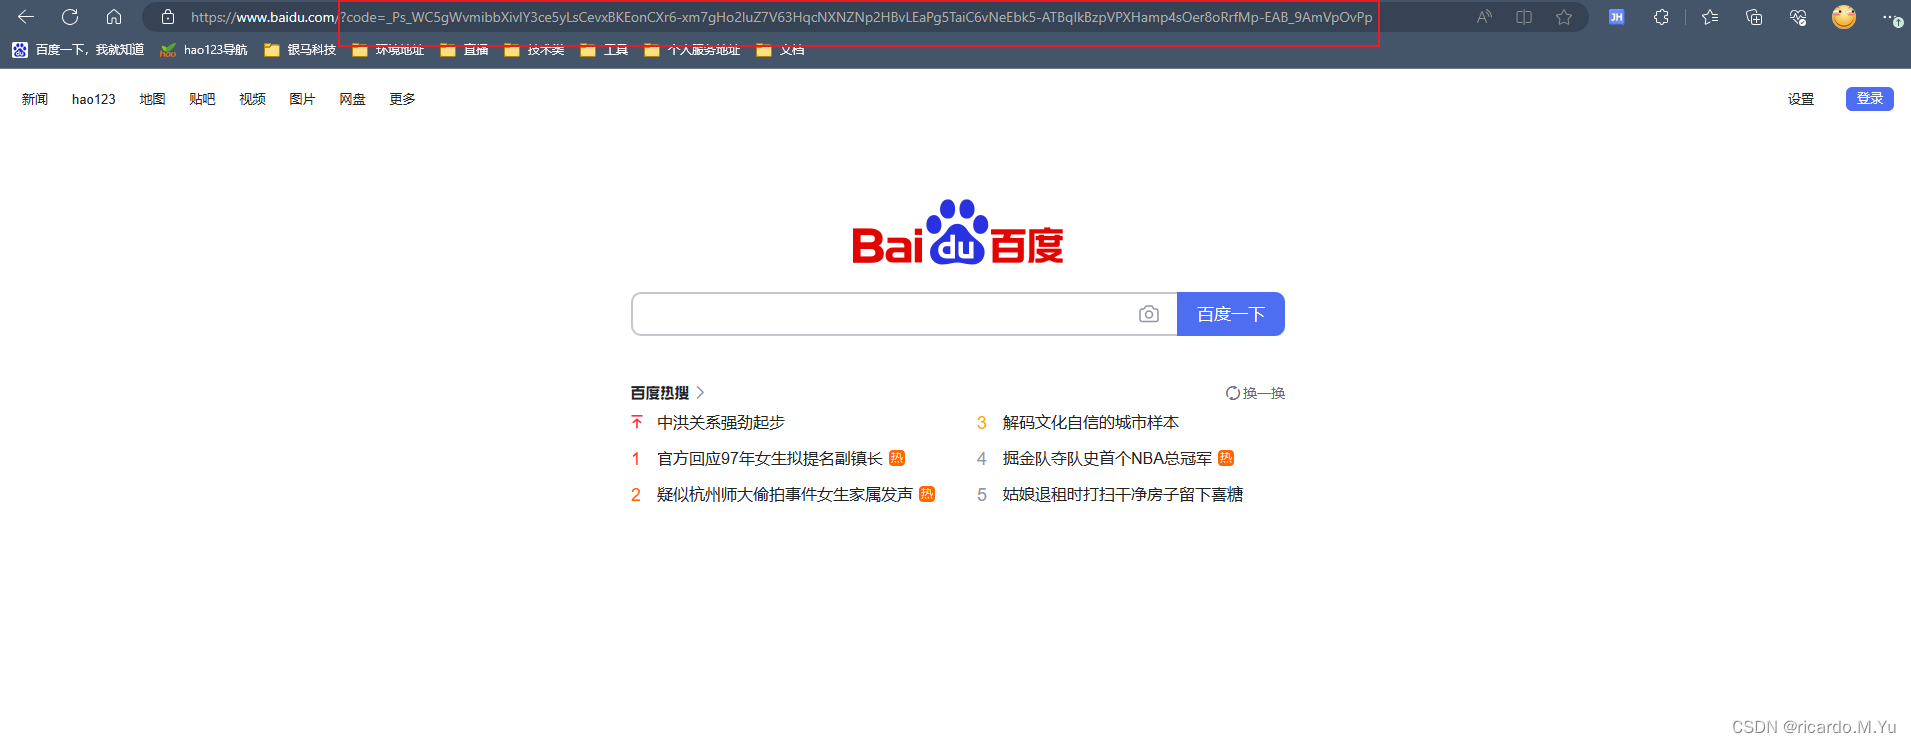
回调
授权通过后,授权服务回调到了百度的地址,然后附带这我们的授权码,如下图
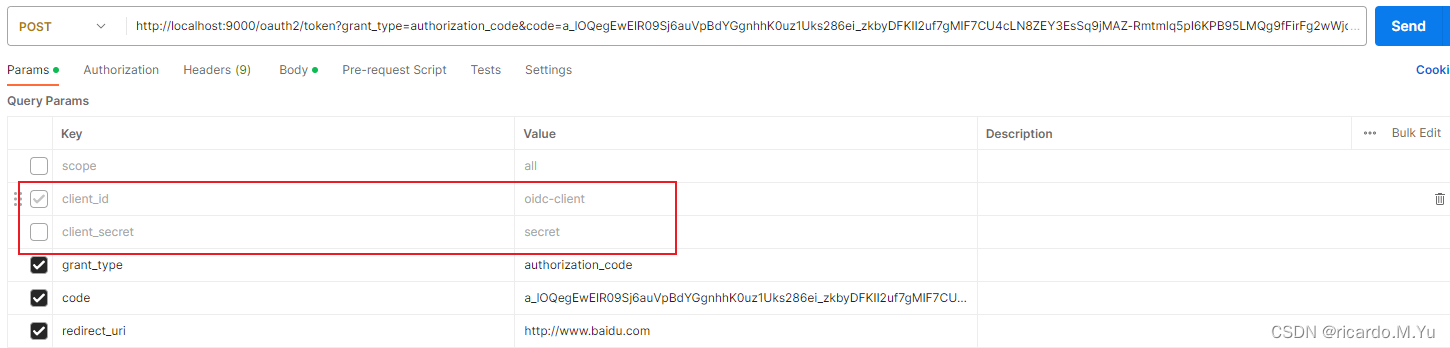
获取 access_token
拿到授权码之后,可以用postman测试来获取 access_token
测试接口参数
Header

请求体
http://localhost:9000/oauth2/token?grant_type=authorization_code&code=ajdNNIj8EiLjgw3OS8yu2q8n3XXCAb6cPY5LRsOHyRlAAB1ENKdmy8M4JBkJ8PrU-3K9QdpAZtyKg8QP5q0EHN2mR1k532FQUKz1ObSuH3EuSFy5LVzut9z1QVPuefoA&redirect_uri=http://www.baidu.com
curl命令如下
curl --location --request POST 'http://localhost:9000/oauth2/token?grant_type=authorization_code&code=a_lOQegEwElR09Sj6auVpBdYGgnhhK0uz1Uks286ei_zkbyDFKII2uf7gMIF7CU4cLN8ZEY3EsSq9jMAZ-Rmtmlq5pI6KPB95LMQg9fFirFg2wWjdd5PEwQLMEogY9B6&redirect_uri=http%3A%2F%2Fwww.baidu.com' \
--header 'Authorization: Basic b2lkYy1jbGllbnQ6c2VjcmV0'
参数说明:
- grant_type:即授权方式,authorization_code即授权码模式
- code:即授权码,上面重定向到百度给我们的授权码
- redirect_uri:重定向的url
- header中的 Authorization参数:因为我们用的客户端认证方式 为 client_secret_basic ,这个需要传参,还有一些其他的认证方式,具体参数说明如下
- client_secret_basic: 将 clientId 和 clientSecret 通过 ‘:’ 号拼接,( clientId 和 clientSecret 都在上面配置中,)并使用 Base64 进行编码得到一串字符,再在前面加个 注意有个 Basic 前缀(Basic后有一个空格), 即得到上面参数中的 Basic b2lkYy1jbGllbnQ6c2VjcmV0
- client_secret_post :clientId 和 clientSecret 放到表单去发送请求。如下图:
使用我们的 client_secret_basic 方式传参,接口调用结果:
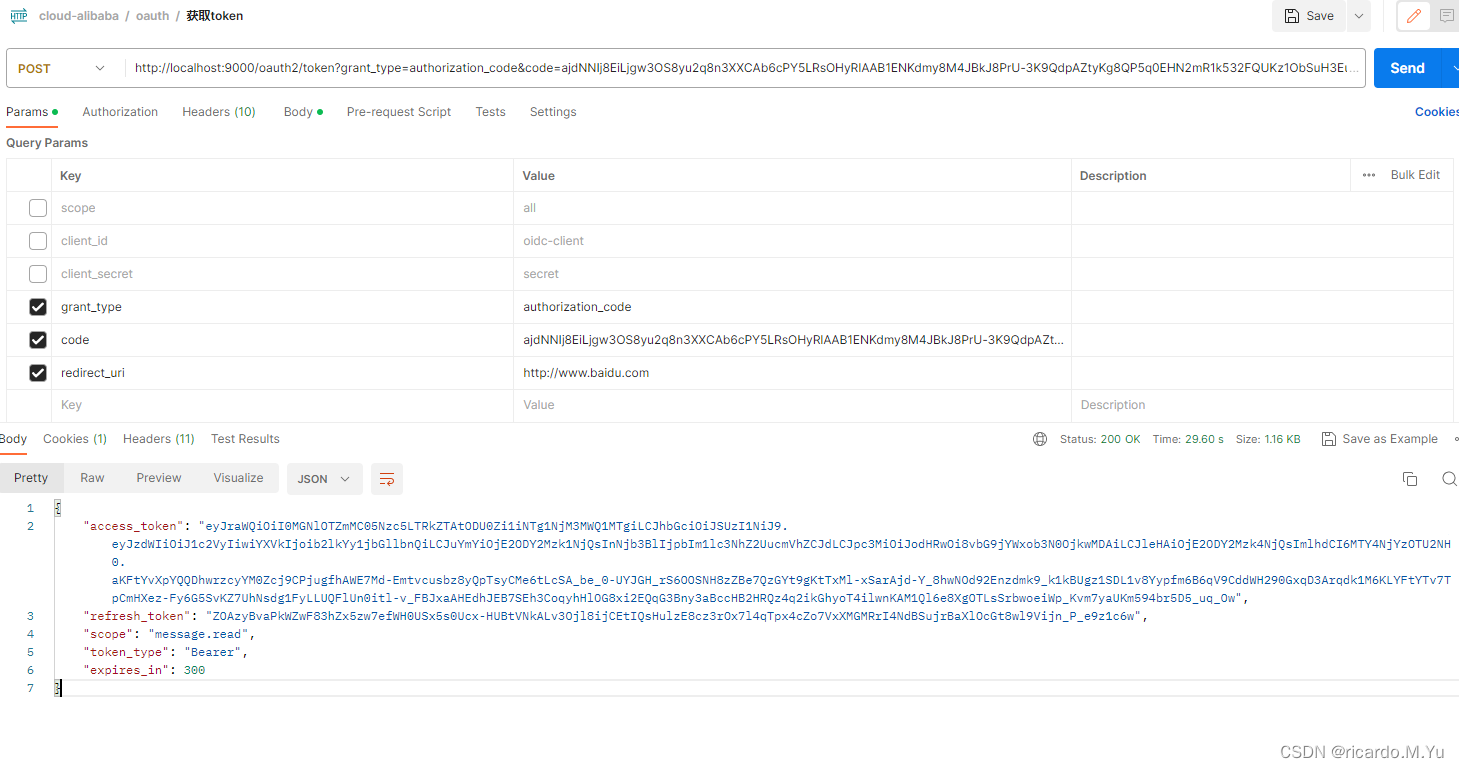
已经正常拿到了 access_token。
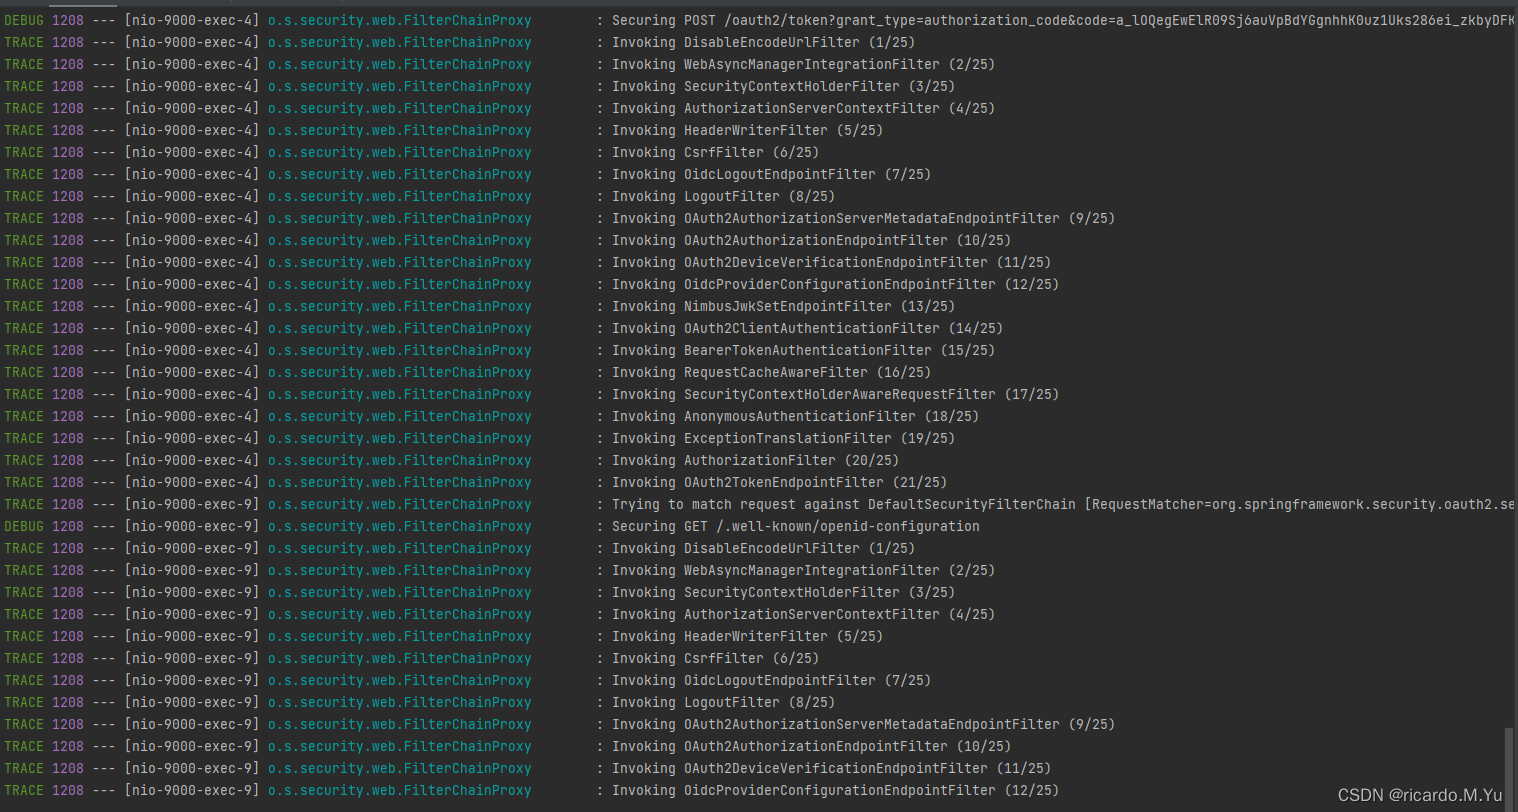
完整的过滤器执行顺序,控制台输出
个性化改造
正在改造中。。。
集成GateWay
正在集成中。。。
关于 Spring Cloud Alibaba 的基础环境搭建,可以看下面的文章,很详细,本文主要介绍集成OAuth2的过程
Spring Cloud Alibaba 最新版本整合完整使用及与各中间件集成(基于Spring Boot 3.0.x)_ricardo.M.Yu的博客-CSDN博客
代办事项
现在需要做的改造如下:
1、新建授权服务,集成 oauth2-authorization-server ,即auth模块做授权中心
2、修改业务模块,集成 oauth2-client,即做资源中心与客户端
3、修改网关模块,即 gateway 做相关修改
Oauth2主要结构
OAuth2AuthorizationEndpointFilter: 针对 /login 或自行请求 授权码的处理器
OAuth2TokenEndpointFilter:针对获取 token 时的处理器
ProviderManager:
OAuth2ClientAuthenticationFilter
OAuth2TokenEndpointFilter
ClientSecretAuthenticationProvider
DelegatingAuthenticationConverter
OAuth2AuthorizationCodeAuthenticationProvider
OAuth2AuthorizationEndpointFilter
UsernamePasswordAuthenticationFilter
sql脚本
我直接整理好了
/*
IMPORTANT:
    If using PostgreSQL, update ALL columns defined with 'blob' to 'text',
    as PostgreSQL does not support the 'blob' data type.
*/
CREATE TABLE oauth2_authorization (
    id varchar(100) NOT NULL,
    registered_client_id varchar(100) NOT NULL,
    principal_name varchar(200) NOT NULL,
    authorization_grant_type varchar(100) NOT NULL,
    authorized_scopes varchar(1000) DEFAULT NULL,
    attributes blob DEFAULT NULL,
    state varchar(500) DEFAULT NULL,
    authorization_code_value blob DEFAULT NULL,
    authorization_code_issued_at timestamp DEFAULT NULL,
    authorization_code_expires_at timestamp DEFAULT NULL,
    authorization_code_metadata blob DEFAULT NULL,
    access_token_value blob DEFAULT NULL,
    access_token_issued_at timestamp DEFAULT NULL,
    access_token_expires_at timestamp DEFAULT NULL,
    access_token_metadata blob DEFAULT NULL,
    access_token_type varchar(100) DEFAULT NULL,
    access_token_scopes varchar(1000) DEFAULT NULL,
    oidc_id_token_value blob DEFAULT NULL,
    oidc_id_token_issued_at timestamp DEFAULT NULL,
    oidc_id_token_expires_at timestamp DEFAULT NULL,
    oidc_id_token_metadata blob DEFAULT NULL,
    refresh_token_value blob DEFAULT NULL,
    refresh_token_issued_at timestamp DEFAULT NULL,
    refresh_token_expires_at timestamp DEFAULT NULL,
    refresh_token_metadata blob DEFAULT NULL,
    user_code_value blob DEFAULT NULL,
    user_code_issued_at timestamp DEFAULT NULL,
    user_code_expires_at timestamp DEFAULT NULL,
    user_code_metadata blob DEFAULT NULL,
    device_code_value blob DEFAULT NULL,
    device_code_issued_at timestamp DEFAULT NULL,
    device_code_expires_at timestamp DEFAULT NULL,
    device_code_metadata blob DEFAULT NULL,
    PRIMARY KEY (id)
);

CREATE TABLE oauth2_authorization_consent (
    registered_client_id varchar(100) NOT NULL,
    principal_name varchar(200) NOT NULL,
    authorities varchar(1000) NOT NULL,
    PRIMARY KEY (registered_client_id, principal_name)
);

CREATE TABLE oauth2_registered_client (
    id varchar(100) NOT NULL,
    client_id varchar(100) NOT NULL,
    client_id_issued_at timestamp DEFAULT CURRENT_TIMESTAMP NOT NULL,
    client_secret varchar(200) DEFAULT NULL,
    client_secret_expires_at timestamp DEFAULT NULL,
    client_name varchar(200) NOT NULL,
    client_authentication_methods varchar(1000) NOT NULL,
    authorization_grant_types varchar(1000) NOT NULL,
    redirect_uris varchar(1000) DEFAULT NULL,
    post_logout_redirect_uris varchar(1000) DEFAULT NULL,
    scopes varchar(1000) NOT NULL,
    client_settings varchar(2000) NOT NULL,
    token_settings varchar(2000) NOT NULL,
    PRIMARY KEY (id)
);
![深度学习应用篇-元学习[14]:基于优化的元学习-MAML模型、LEO模型、Reptile模型](https://img-blog.csdnimg.cn/img_convert/d227e3465fa19ff1bc8bdd5b73afc2ed.png)


![[PostgreSQL-16新特性之EXPLAIN的GENERIC_PLAN选项]](https://img-blog.csdnimg.cn/img_convert/411da8850ca399e994c3839eb1f6ae1d.png)