文章目录
- SpringBoot启动过程
- 启动详解
- 启动演示
- 启动过程总结
SpringBoot启动过程
启动详解
SpringBoot的启动分为两个部分:
- 构造SpringApplication
- 执行run方法

接下来我们先来看看构造方法里面都做了什么事情。
第一步:记录 BeanDefinition 源
大家知道我们的Spring容器刚开始内部的BeanFactory是空的,它要从各个源头去寻找BeanDefinition, 这些源有可能来自于配置类,也有可能来自于XML文件等等。而在SpringApplication的构造方法里我们要获取一个主源,也就是那些配置类,当然我们也可以设置其他来源。
我们使用代码演示一下:
@Configuration
public class A39_1 {

    public static void main(String[] args) throws Exception {
        System.out.println("1. 演示获取 Bean Definition 源");
        SpringApplication spring = new SpringApplication(A39_1.class);

        System.out.println("2. 演示推断应用类型");
        System.out.println("3. 演示 ApplicationContext 初始化器");
        System.out.println("4. 演示监听器与事件");
        System.out.println("5. 演示主类推断");

		// 创建 ApplicationContext
        ConfigurableApplicationContext context = spring.run(args);


        for (String name : context.getBeanDefinitionNames()) {
            //打印容器中bean的名字和来源
            System.out.println("name: " + name + " 来源:" + context.getBeanFactory().getBeanDefinition(name).getResourceDescription());
        }
        context.close();

    }

    static class Bean1 {

    }

    static class Bean2 {

    }

    static class Bean3 {

    }

    @Bean
    public Bean2 bean2() {
        return new Bean2();
    }

    @Bean
    public TomcatServletWebServerFactory servletWebServerFactory() {
        return new TomcatServletWebServerFactory();
    }
}
结果如下:

这些来源为null,说明并不是来源于某一个配置类,而是属于Spring内置的一些bean。
接下来我们增加一个源:

我们在xml配置文件中定义了一个bean:
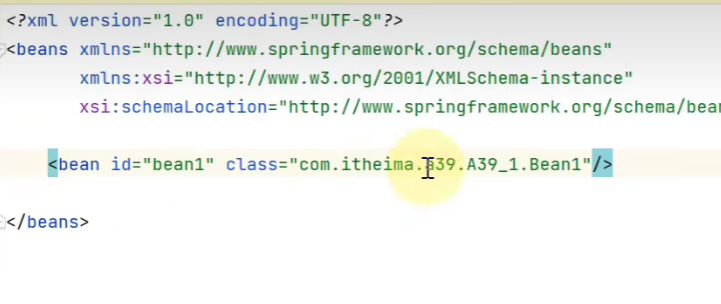
接下来我们再次运行:

第二步:推断应用类型
SpringBoot程序一共支持三种类型:
- 非web程序
- 基于Servlet的web程序
- 基于Reactive的web程序
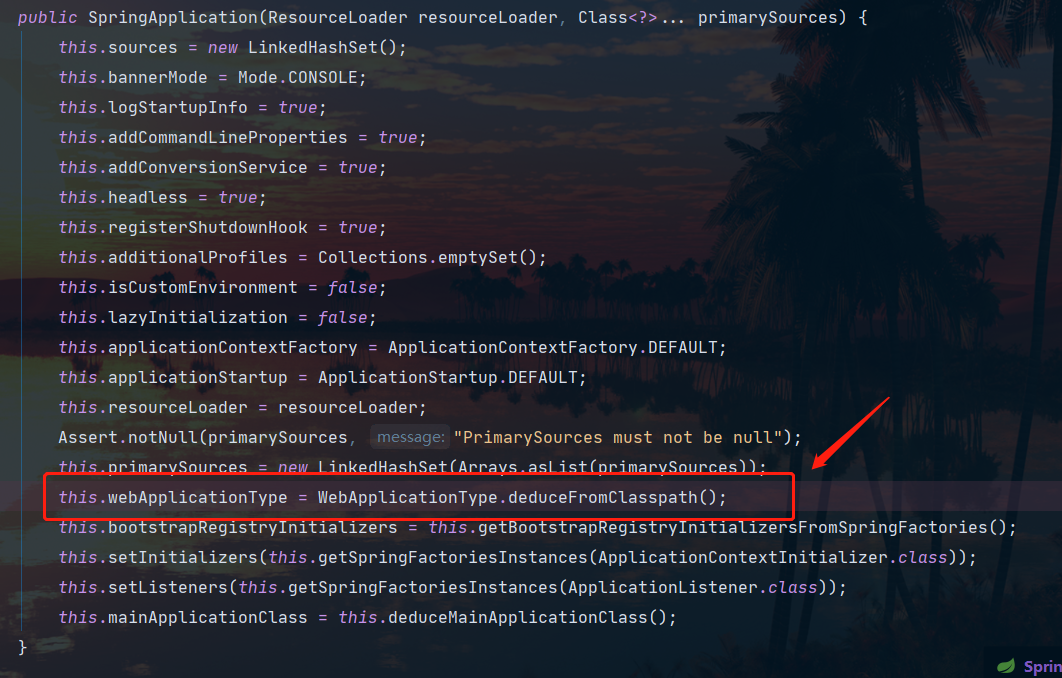
它会根据当前类路径下的JAR包中的关键类来看看到底应该是哪一种程序,根据不同类型的程序后期创建不同的ApplicationContext
这里我们直接到源码的构造方法中去查看他的逻辑:
    static WebApplicationType deduceFromClasspath() {
        if (ClassUtils.isPresent("org.springframework.web.reactive.DispatcherHandler", (ClassLoader)null) && !ClassUtils.isPresent("org.springframework.web.servlet.DispatcherServlet", (ClassLoader)null) && !ClassUtils.isPresent("org.glassfish.jersey.servlet.ServletContainer", (ClassLoader)null)) {
            return REACTIVE;
        } else {
            String[] var0 = SERVLET_INDICATOR_CLASSES;
            int var1 = var0.length;

            for(int var2 = 0; var2 < var1; ++var2) {
                String className = var0[var2];
                if (!ClassUtils.isPresent(className, (ClassLoader)null)) {
                    return NONE;
                }
            }

            return SERVLET;
        }
    }
- ClassUtils.isPresent方法用来判断类路径下是否存在某个类
- 判断逻辑:
-
先判断是不是Reactive类型

-
在判断是不是非web类型:
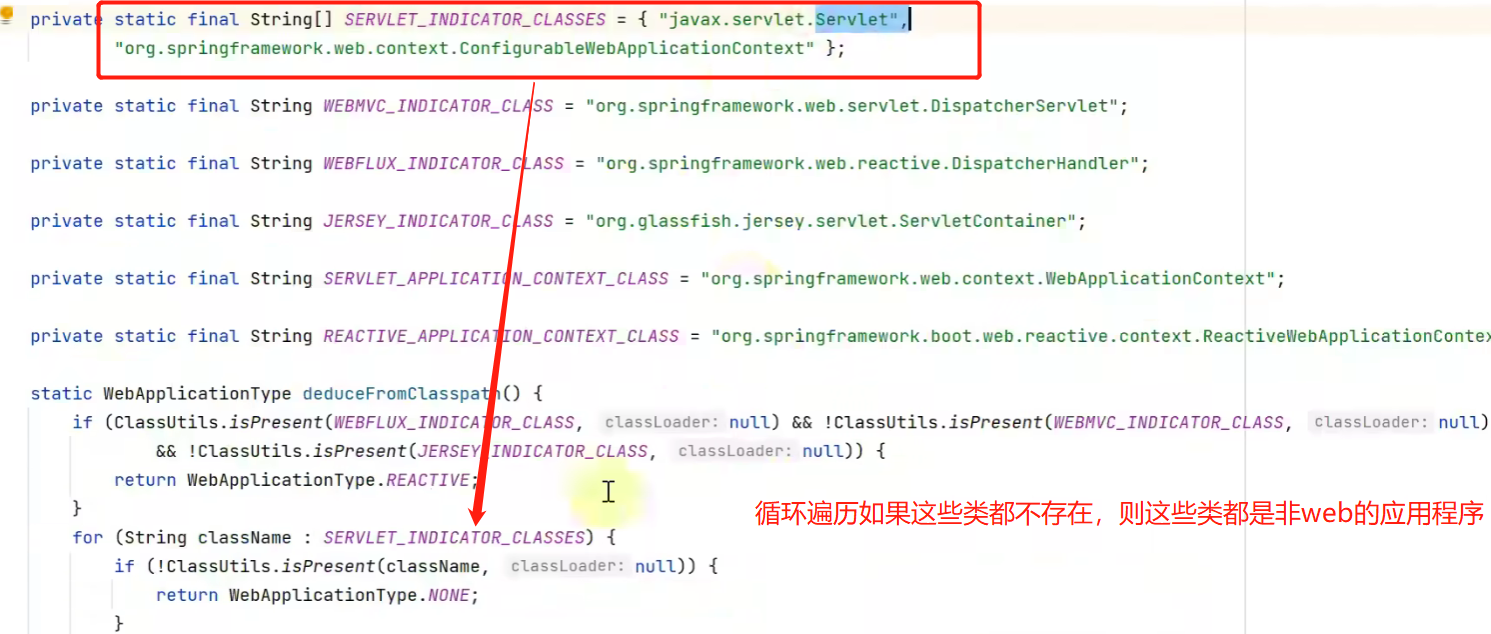
-
如果两种类型都不是就是Servlet类型
-
第三步:记录 ApplicationContext 初始化器
当我们把前两步做完之后就可以把Spring容器创建出来了(这里只是具备创建的条件,而真正的创建是在run方法中),而这个时候我们可能会要对他进行一个扩展,而这个工作就可以交给我们的ApplicationContext 初始化器来做。
我们这里还要了解一下ApplicationContext容器创建时的一些步骤:
- 第一步:创建 ApplicationContext
- 第二步:调用初始化器 对 ApplicationContext 做扩展
- 第三步:调用ApplicationContext.refresh方法完成对容器的初始化
我们这里也是使用代码模拟一下。需要注意的是在SpringApplication的构造方法里它是去读取了配置文件中的初始化器,这里我们简单点自己实现一个:
		System.out.println("3. 演示 ApplicationContext 初始化器");
        spring.addInitializers(applicationContext -> {
            if (applicationContext instanceof GenericApplicationContext gac) {
                gac.registerBean("bean3", Bean3.class);
            }
        });
- 初始化器的类型是ApplicationContextInitializer
- 这个初始化器会提供一个参数就是刚刚创建但是尚未refresh的容器
- 这里我们在初始化器里面注册了一个bean3,模拟了初始化器对容器中beanDefinition的拓展
结果:

可以看到初始化器提供的difinition其来源也是null
第四步:记录监听器
通过监听器监听SpringBoot启动中发布的一些重要事件。
在SpringApplication的构造方法中,同样也是通过配置文件读取一些监听器实现。


我们使用代码模拟一下:

第五步:推断主启动类
就是推断SpringBoot中运行main方法所在的类是谁
在SpringApplication中对应的方法:

接下来我们看看SpringBoot启动的第二个部分:也就是run方法的执行
阶段二:执行 run 方法
-
得到 SpringApplicationRunListeners,名字取得不好别被误导了,实际是事件发布器
-
作用:在SpringBoot程序启动过程中一些重要节点执行完了就会发布相应的事件(后面的蓝标就是各个过程中发布的事件)
-
事件发布器的接口是SpringApplicationRunListener,SpringApplicationRunListeners是多个事件发布器的组合器
-
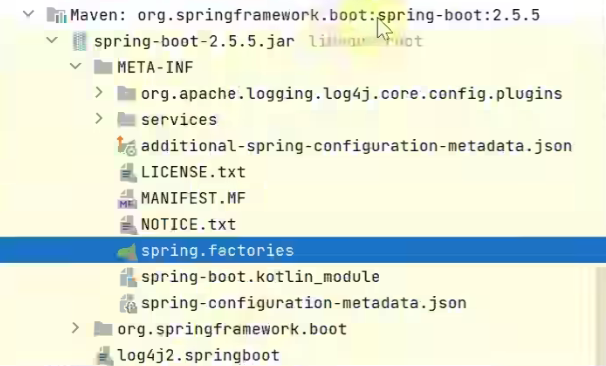
SpringApplicationRunListener接口只有一个实现类EventPublishingRunListener,虽然只有一个实现但是SpringBoot也没有把它写死在java代码里,而是把这个接口和实现的对应关系写在了一个配置文件里:


-
发布 application starting 事件1️⃣
-
-
封装启动 args
-
准备 Environment 添加命令行参数
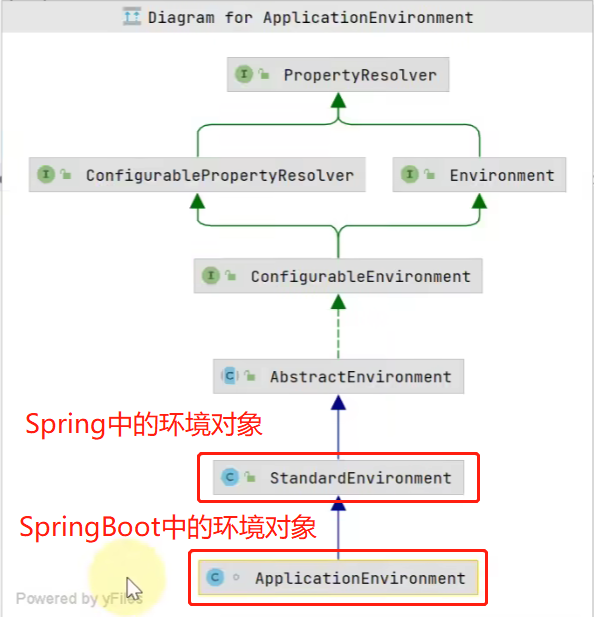
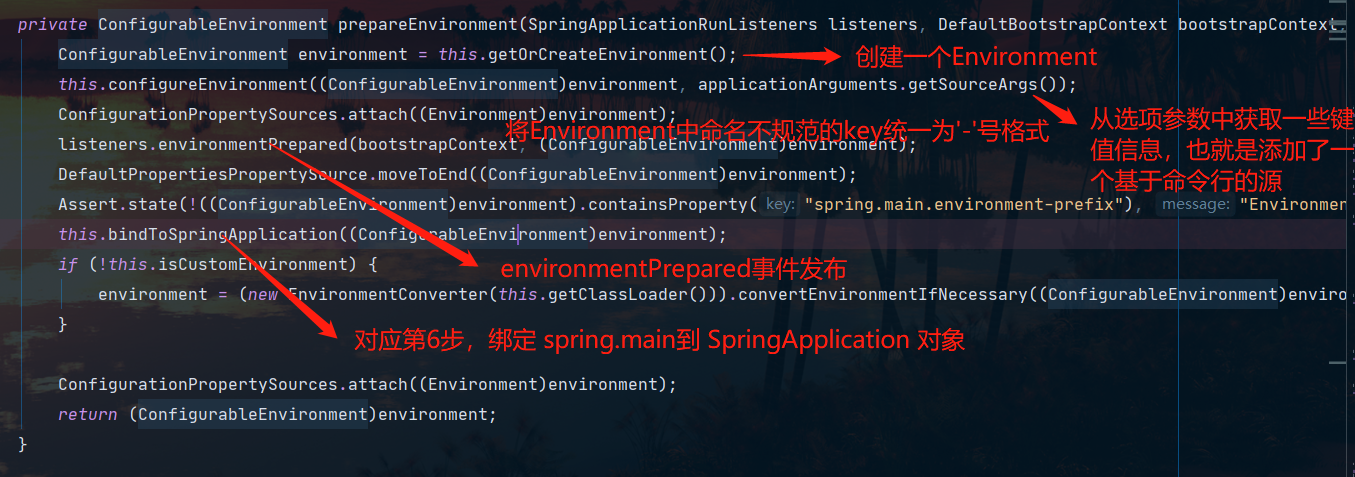
- 环境对象其实就是对我们配置信息的一个抽象。配置信息又分为多种来源,例如:系统环境变量、properties文件、yaml文件。这个环境对象就可以把多个来源综合到一起,将来如果要找这些键值信息的时候,就可以到环境中去找。
- 默认情况下我们创建的环境对象只有两个来源:系统属性和系统变量
- 在这一步SpringBoot中只添加了一个命令行配置源,至于properties、yaml配置源是在后续的步骤里面加的
-
ConfigurationPropertySources 处理
- 这一步会往环境对象中添加一个优先级最高的源ConfigurationPropertySourcesPropertySource
- 它的作用就是将配置中key的格式进行统一
- 发布 application environment 已准备事件2️⃣
-
调用Environment的后处理器进行增强,从而增加更多的源
-
这里的Environment后处理器是通过spring.factories配置文件拿到的


-
通过ConfigDataEnvironmentPostProcessor后处理器添加application.properties配置文件源
-
通过RandomValuePropertySourceEnvironmentPostProcessor后处理器添加随即配置源
-
那么是谁来读取这些Environment后处理器,并调用它们的方法呢?其实它是通过 EnvironmentPostProcessorApplicationListener 监听器来完成的。它监听的就是我们第4步中发布的事件。
-
-
绑定 spring.main(配置文件中以spring.main打头的属性) 到 SpringApplication 对象
- 举个例子:
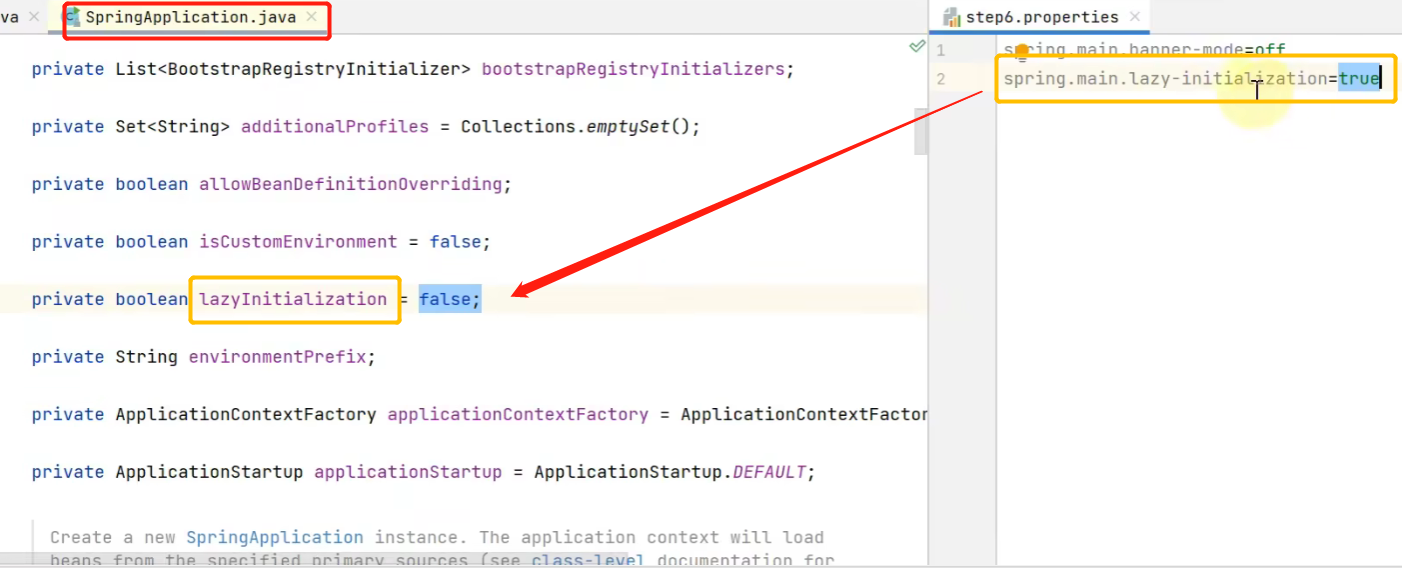
- 举个例子:
-
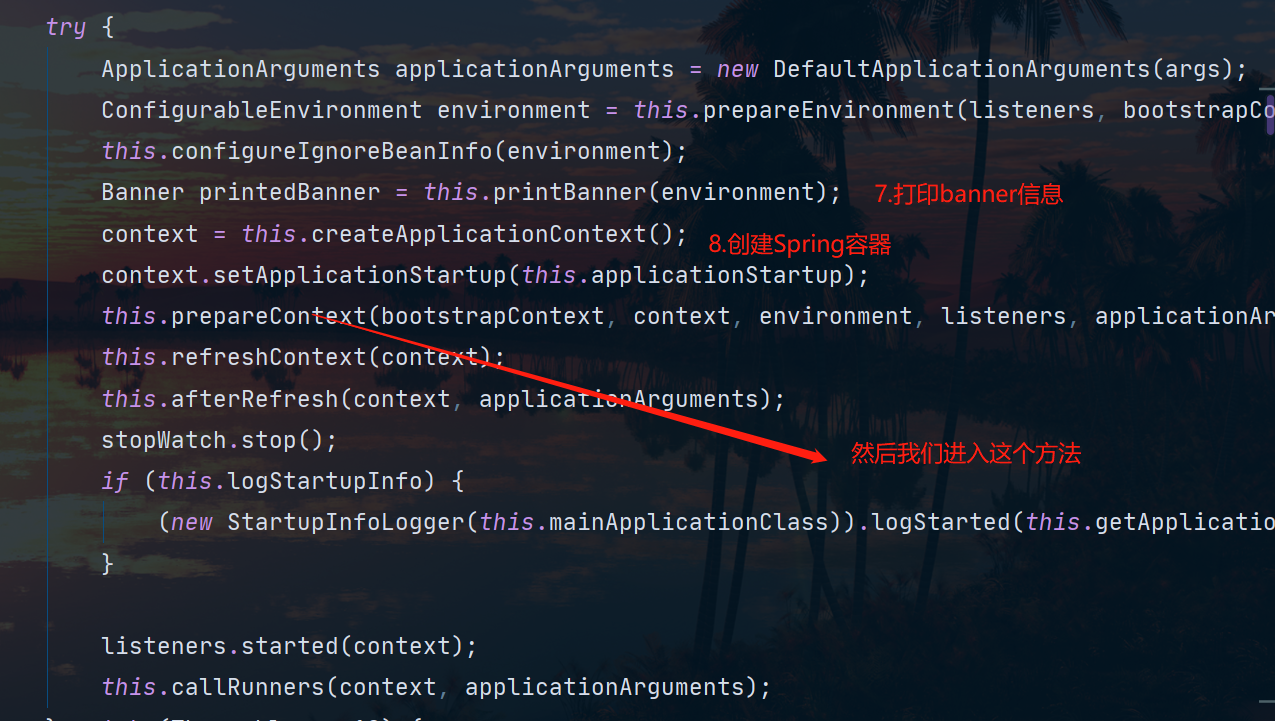
打印 banner
-
创建容器
-
准备容器
- 发布 application context 已初始化事件3️⃣
-
加载 bean 定义
- 发布 application prepared 事件4️⃣
-
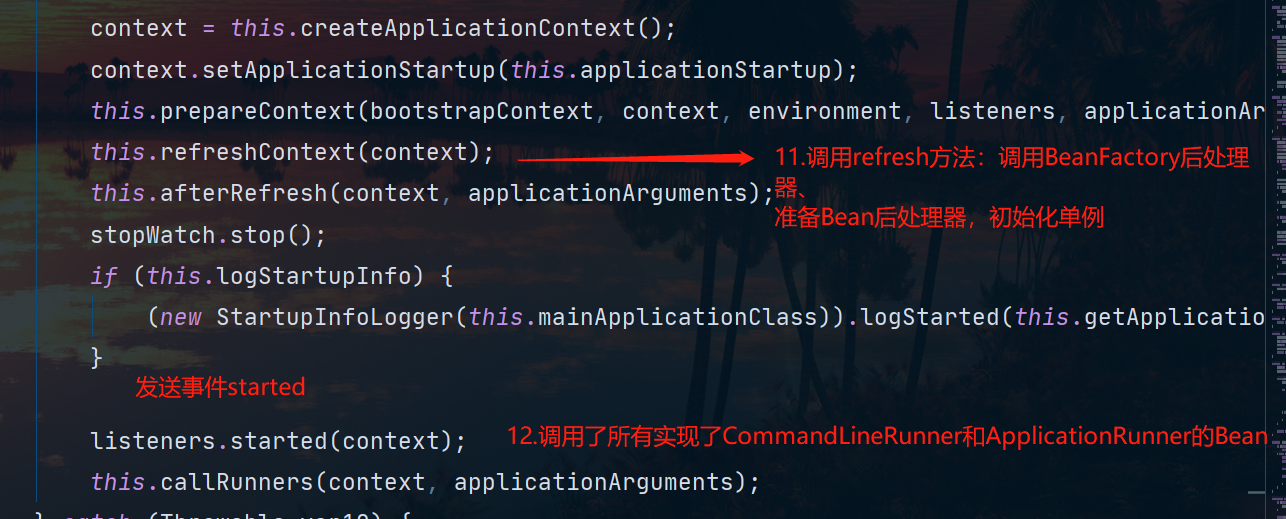
refresh 容器
- 发布 application started 事件5️⃣
-
执行 runner
-
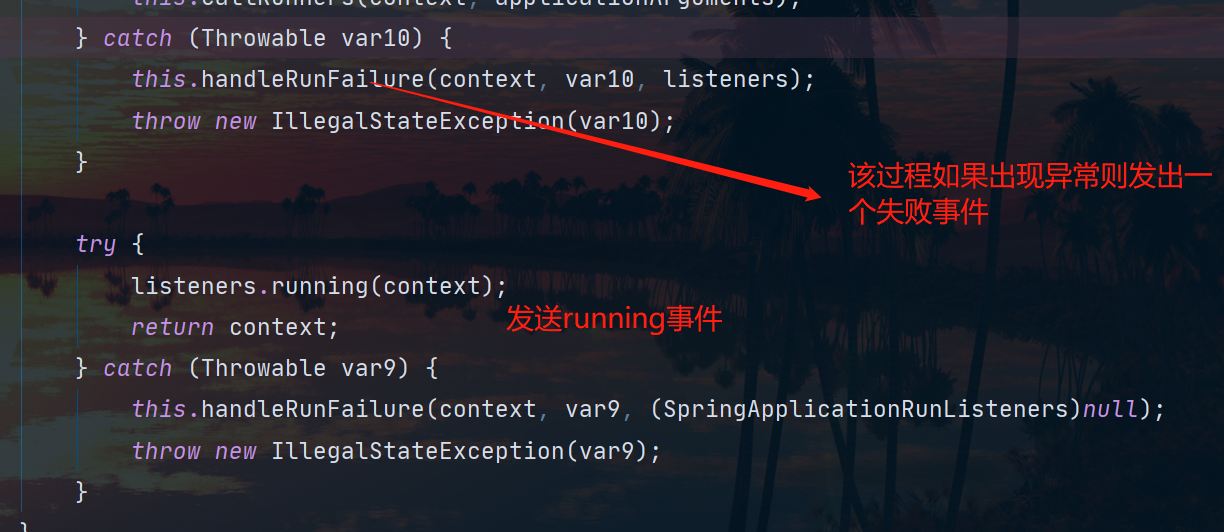
发布 application ready 事件6️⃣
-
这其中有异常,发布 application failed 事件7️⃣
-
启动演示
该部分对应执行run方法的第1步骤:得到事件发布器,并演示 7 个事件
public class A39_2 {
    public static void main(String[] args) throws Exception{

        // 添加 app 监听器
        SpringApplication app = new SpringApplication();
        app.addListeners(e -> System.out.println(e.getClass()));

        // 获取事件发送器实现类名
        List<String> names = SpringFactoriesLoader.loadFactoryNames(SpringApplicationRunListener.class, A39_2.class.getClassLoader());
        for (String name : names) {
            System.out.println(name);
            Class<?> clazz = Class.forName(name);
            Constructor<?> constructor = clazz.getConstructor(SpringApplication.class, String[].class);
            SpringApplicationRunListener publisher = (SpringApplicationRunListener) constructor.newInstance(app, args);

            // 发布事件
            DefaultBootstrapContext bootstrapContext = new DefaultBootstrapContext();
            publisher.starting(bootstrapContext); // spring boot 开始启动
            publisher.environmentPrepared(bootstrapContext, new StandardEnvironment()); // 环境信息准备完毕
            GenericApplicationContext context = new GenericApplicationContext();
            publisher.contextPrepared(context); // 在 spring 容器创建,并调用初始化器之后,发送此事件
            publisher.contextLoaded(context); // 所有 bean definition 加载完毕
            context.refresh();
            publisher.started(context); // spring 容器初始化完成(refresh 方法调用完毕)
            publisher.running(context); // spring boot 启动完毕

            publisher.failed(context, new Exception("出错了")); // spring boot 启动出错
        }
- SpringFactoriesLoader:专门用来读取spring.factories文件的
- publisher.starting方法:发送一个事件代表Spring程序刚开始启动
- publisher.running方法:发送一个事件代表整个SpringBoot程序已经启动完毕了
- 创建SpringBoot容器之前我们要先准备环境,这个环境包括从系统环境变量、properties文件、yaml文件等中读取键值信息。当把环境准备完毕之后会调用publisher.environmentPrepared方法发送一个事件代表环境信息已经准备完毕
- 环境信息准备完毕之后,他会开始创建Spring容器,并且还会调用我们之前提过的SpringApplicationContext的初始化器进行增强,当把这个容器创建好,初始化器也执行完毕了,它又会使用publisher.contextPrepared方法发布一个事件
- 在这之后可能还需要补充一些BeanDefinition,我们之前说过BeanDefiniton有很多来源,包括从XML配置文件、从配置类来的、从组件扫描来的等等。当这所有的BeanDefinition加载完毕了,它又会通过publisher.contextLoaded发送一个事件
- 这一系列步骤做完之后,就可以调用context.refresh()方法了,代表着Spring容器已经准备完毕了。refresh方法中会开始准备各种后处理器,初始化所有单例等等。当refresh完之后就开始调用publisher.started发送一个事件,代表Spring容器已经初始化完成。
- 当我们这个过程中一旦出现异常,他也会通过publisher.failed发一个事件
我们运行之后得到的结果:
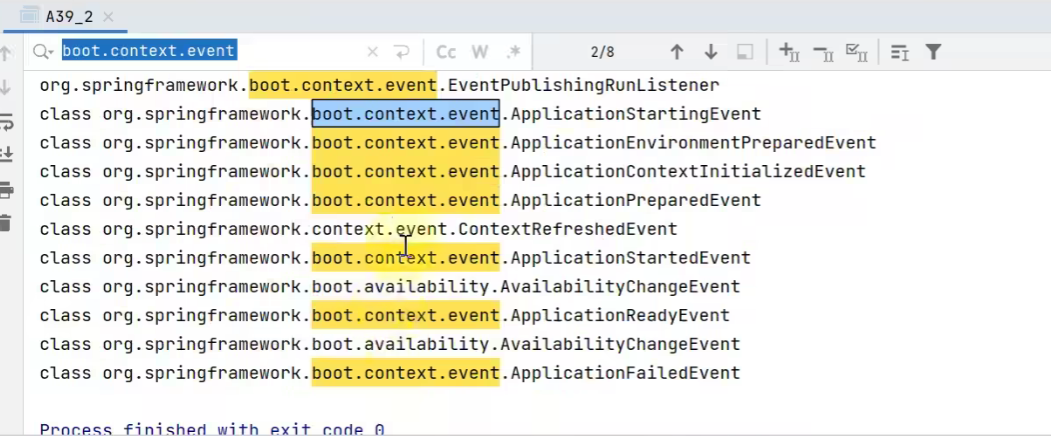
是用黄色记号标注的就是SpringApplicationRunListener 发布的
该部分对应run方法的第2、8、9、10、11、12步骤
// 运行时请添加运行参数 --server.port=8080 debug
public class A39_3 {
    @SuppressWarnings("all")
    public static void main(String[] args) throws Exception {
        SpringApplication app = new SpringApplication();
        //我们随便添加一个初始化器,会在初始化器的时候被调用
        app.addInitializers(new ApplicationContextInitializer<ConfigurableApplicationContext>() {
            @Override
            public void initialize(ConfigurableApplicationContext applicationContext) {
                System.out.println("执行初始化器增强...");
            }
        });

        System.out.println(">>>>>>>>>>>>>>>>>>>>>>>> 2. 封装启动 args");
        //也就是对12步中runnner参数的封装
        DefaultApplicationArguments arguments = new DefaultApplicationArguments(args);

        System.out.println(">>>>>>>>>>>>>>>>>>>>>>>> 8. 创建容器");
        //因为已经在构造方法推断出容器类型了,我们根据类型在三种容器中选一种就行
        GenericApplicationContext context = createApplicationContext(WebApplicationType.SERVLET);

        System.out.println(">>>>>>>>>>>>>>>>>>>>>>>> 9. 准备容器");
        //这里的准备容器就是指我们要执行使用SpringApplication添加的容器初始化器
        //循环遍历所有初始化器并执行
        for (ApplicationContextInitializer initializer : app.getInitializers()) {
            initializer.initialize(context);
        }

        System.out.println(">>>>>>>>>>>>>>>>>>>>>>>> 10. 加载 bean 定义");
        /**
          模拟三种情况:
            1.读取配置类中的Bean定义
            2.读取XML文件中的Bean定义
            3.通过扫描读取Bean定义
        **/
        //将BeanFactory抽离出来,后面多处都会用到
        DefaultListableBeanFactory beanFactory = context.getDefaultListableBeanFactory();
        //AnnotatedBeanDefinitionReader 就放在SpringApplication的内部,一旦发现来源是配置类,就会调用它来读取配置类中的BeanDefinition,这个参数就是设置读取出来的bean放在哪(BeanFactory)
        AnnotatedBeanDefinitionReader reader1 = new AnnotatedBeanDefinitionReader(beanFactory);
        //与上面同理,只用来读XML配置文件中BeanDefinition的
        XmlBeanDefinitionReader reader2 = new XmlBeanDefinitionReader(beanFactory);
        //与上面同理,通过扫描来读取BeanDefinition
        ClassPathBeanDefinitionScanner scanner = new ClassPathBeanDefinitionScanner(beanFactory);
		//开始解析配置类的BeanDefinition,并加入到BeanFactory
        reader1.register(Config.class);
        reader2.loadBeanDefinitions(new ClassPathResource("b03.xml"));
        scanner.scan("com.zyb.a39.sub");

        System.out.println(">>>>>>>>>>>>>>>>>>>>>>>> 11. refresh 容器");
        context.refresh();

        for (String name : context.getBeanDefinitionNames()) {
            System.out.println("name:" + name + " 来源:" + beanFactory.getBeanDefinition(name).getResourceDescription());
        }

        System.out.println(">>>>>>>>>>>>>>>>>>>>>>>> 12. 执行 runner");
        //得到所有实现了CommandLineRunner的bean进行回调
        for (CommandLineRunner runner : context.getBeansOfType(CommandLineRunner.class).values()) {
        	//不用封装直接把main方法的参数传进去
            runner.run(args);
        }

		//得到所有实现了ApplicationRunner的bean进行回调
        for (ApplicationRunner runner : context.getBeansOfType(ApplicationRunner.class).values()) {
        	//将main方法的参数进行封装了之后再传
            runner.run(arguments);
        }


    }

	//创建容器
    private static GenericApplicationContext createApplicationContext(WebApplicationType type) {
        GenericApplicationContext context = null;
        switch (type) {
            case SERVLET -> context = new AnnotationConfigServletWebServerApplicationContext();
            case REACTIVE -> context = new AnnotationConfigReactiveWebServerApplicationContext();
            case NONE -> context = new AnnotationConfigApplicationContext();
        }
        return context;
    }

    static class Bean4 {

    }

    static class Bean5 {

    }

    static class Bean6 {

    }

    @Configuration
    static class Config {
        @Bean
        public Bean5 bean5() {
            return new Bean5();
        }

        @Bean
        public ServletWebServerFactory servletWebServerFactory() {
            return new TomcatServletWebServerFactory();
        }

        @Bean
        public CommandLineRunner commandLineRunner() {
            return new CommandLineRunner() {
                @Override
                public void run(String... args) throws Exception {
                    System.out.println("commandLineRunner()..." + Arrays.toString(args));
                }
            };
        }

        @Bean
        public ApplicationRunner applicationRunner() {
            return new ApplicationRunner() {
                @Override
                public void run(ApplicationArguments args) throws Exception {
                    System.out.println("applicationRunner()..." + Arrays.toString(args.getSourceArgs()));
                    System.out.println(args.getOptionNames());
                    System.out.println(args.getOptionValues("server.port"));
                    System.out.println(args.getNonOptionArgs());
                }
            };
        }
    }
}
- 我们在加载bean定义的步骤中涉及到很多来源,例如配置类、XML文件、扫描涉及的包的名称,他们都是通过解析而来的。SpringApplication有一个setSources方法,它里面可以传入一个集合,这个集合里面就是各种来源,然后针对这些来源一个个的尝试不同的解析器进行解析
- runner就是一种实现了特定接口的bean,这个bean有一个run方法,在第12步这个时机进行调用。至于调用它干什么,这个由我们的业务来决定。比如说这个时候我们的Spring容器已经启动完毕了,我们可以使用这个runner去执行一些数据的预加载或者测试啥的。这个runner实现的接口有两类:
-
CommandLineRunner:其中args一般就是我们从main方法那传递过来的参数数组,不需要包装
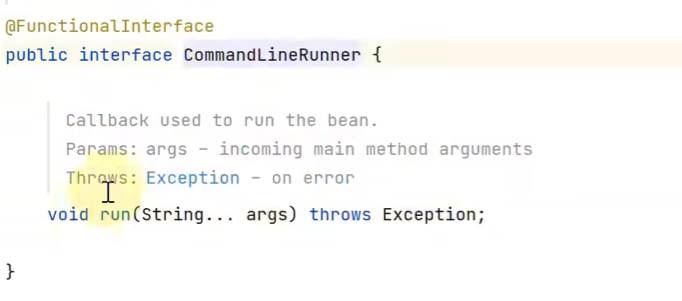
-
ApplicationRunner:这里的args是经过封装后的参数对象。而这个封装步骤我们会在第2步:封装启动args中进行。
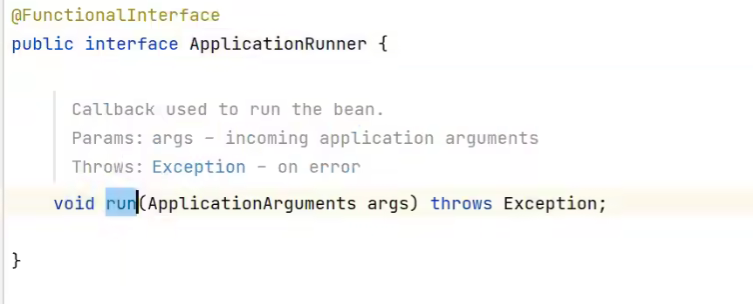
- 这里封装后的参数对象有一个额外的功能:可以将选项参数单独分类,例如
--server.port=8080
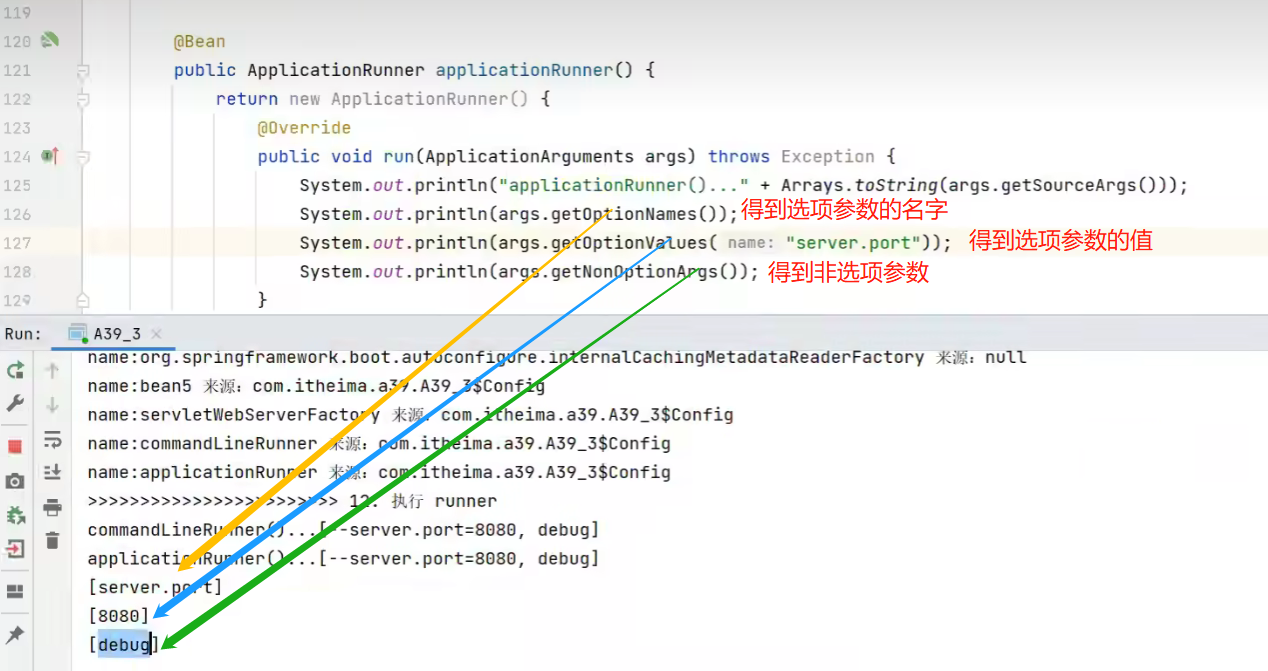
- 这里封装后的参数对象有一个额外的功能:可以将选项参数单独分类,例如
-
该部分对应run方法的第3步骤
public class Step3 {
    public static void main(String[] args) throws IOException {
        //默认情况下我们创建的环境对象只有两个来源:系统属性和系统变量
        ApplicationEnvironment env = new ApplicationEnvironment();
        //添加一个新的配置源:properties配置文件
        //从尾部加入优先级最低
        env.getPropertySources().addLast(new ResourcePropertySource(new ClassPathResource("step3.properties")));
        //添加一个新的配置源:命令行
        //从头部加入优先级最高
        env.getPropertySources().addFirst(new SimpleCommandLinePropertySource(args));
        //打印所有来源
        for (PropertySource<?> ps : env.getPropertySources()) {
            System.out.println(ps);
        }
//        System.out.println(env.getProperty("JAVA_HOME"));

        System.out.println(env.getProperty("server.port"));
    }
}
该部分对应run方法的第4步骤
public class Step4 {

    public static void main(String[] args) throws IOException, NoSuchFieldException {
        ApplicationEnvironment env = new ApplicationEnvironment();
        env.getPropertySources().addLast(
                new ResourcePropertySource("step4", new ClassPathResource("step4.properties"))
        );
        ConfigurationPropertySources.attach(env);
        for (PropertySource<?> ps : env.getPropertySources()) {
            System.out.println(ps);
        }

        System.out.println(env.getProperty("user.first-name"));
        System.out.println(env.getProperty("user.middle-name"));
        System.out.println(env.getProperty("user.last-name"));
    }
}
结果:

如果我们不添加ConfigurationPropertySourcesPropertySource源,那么key就必须严格匹配否则读不出来:
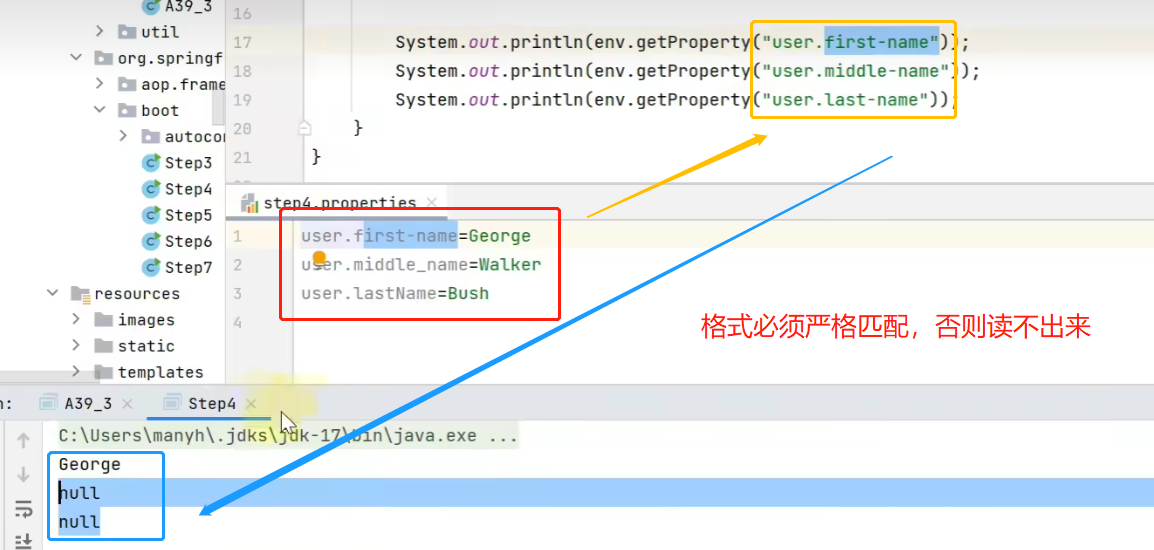
该部分对应run方法的第5步骤
/*
    可以添加参数 --spring.application.json={\"server\":{\"port\":9090}} 测试 SpringApplicationJsonEnvironmentPostProcessor
 */
public class Step5 {
    private static void test1() {
        SpringApplication app = new SpringApplication();
        ApplicationEnvironment env = new ApplicationEnvironment();

        System.out.println(">>>>>>>>>>>>>>>>>>>>>>>>> 增强前");
        for (PropertySource<?> ps : env.getPropertySources()) {
            System.out.println(ps);
        }
        //创建用来读取application.properties文件的环境后处理器
        ConfigDataEnvironmentPostProcessor postProcessor1 = new ConfigDataEnvironmentPostProcessor(new DeferredLogs(), new DefaultBootstrapContext());
        //向环境中添加一些配置源
        postProcessor1.postProcessEnvironment(env, app);
        System.out.println(">>>>>>>>>>>>>>>>>>>>>>>>> 增强后");
        for (PropertySource<?> ps : env.getPropertySources()) {
            System.out.println(ps);
        }
        //像环境中添加一些随即配置源
        RandomValuePropertySourceEnvironmentPostProcessor postProcessor2 = new RandomValuePropertySourceEnvironmentPostProcessor(new DeferredLog());
        postProcessor2.postProcessEnvironment(env, app);
        System.out.println(">>>>>>>>>>>>>>>>>>>>>>>>> 增强后");
        for (PropertySource<?> ps : env.getPropertySources()) {
            System.out.println(ps);
        }
        System.out.println(env.getProperty("server.port"));
        System.out.println(env.getProperty("random.int"));
        System.out.println(env.getProperty("random.int"));
        System.out.println(env.getProperty("random.int"));
        System.out.println(env.getProperty("random.uuid"));
        System.out.println(env.getProperty("random.uuid"));
        System.out.println(env.getProperty("random.uuid"));
    }
}


这个随机源的作用就是通过Environment去getProperty的时候,写一些random开头的key,可以获取一些随机值:
- random.int:产生一个随机整数
- random.uuid:产生一个uuid
    public static void main(String[] args) {
        SpringApplication app = new SpringApplication();
        app.addListeners(new EnvironmentPostProcessorApplicationListener());

        /*
		用来读取spring.factories配置文件
		List<String> names = SpringFactoriesLoader.loadFactoryNames(EnvironmentPostProcessor.class, Step5.class.getClassLoader());
        for (String name : names) {
            System.out.println(name);
        }*/

        EventPublishingRunListener publisher = new EventPublishingRunListener(app, args);
        ApplicationEnvironment env = new ApplicationEnvironment();
        System.out.println(">>>>>>>>>>>>>>>>>>>>>>>>> 增强前");
        for (PropertySource<?> ps : env.getPropertySources()) {
            System.out.println(ps);
        }
        publisher.environmentPrepared(new DefaultBootstrapContext(), env);
        System.out.println(">>>>>>>>>>>>>>>>>>>>>>>>> 增强后");
        for (PropertySource<?> ps : env.getPropertySources()) {
            System.out.println(ps);
        }

    }
结果:

这里有的后处理器没有生效,他跟你的配置环境有关,比如说你使用yaml文件进行配置,就会有一个新的后处理器生效。
该部分对应run方法的第6步骤
public class Step6 {
    // 绑定 spring.main 前缀的 key value 至 SpringApplication, 请通过 debug 查看
    public static void main(String[] args) throws IOException {
        SpringApplication application = new SpringApplication();
        ApplicationEnvironment env = new ApplicationEnvironment();
        env.getPropertySources().addLast(new ResourcePropertySource("step4", new ClassPathResource("step4.properties")));
        env.getPropertySources().addLast(new ResourcePropertySource("step6", new ClassPathResource("step6.properties")));


        System.out.println(application);
        Binder.get(env).bind("spring.main", Bindable.ofInstance(application));
        System.out.println(application);
    }

    static class User {
        private String firstName;
        private String middleName;
        private String lastName;

}
我们先了解一下如何将Environment中的键值与java对象进行绑定,也就是我们之前说过的@ConfigurationProperties这个注解的原理:

其底层就是如下的API:
        User user = Binder.get(env).bind("user", User.class).get();

        System.out.println(user);

		//基于已有的对象进行绑定
        User user = new User();
        Binder.get(env).bind("user", Bindable.ofInstance(user));
        System.out.println(user);
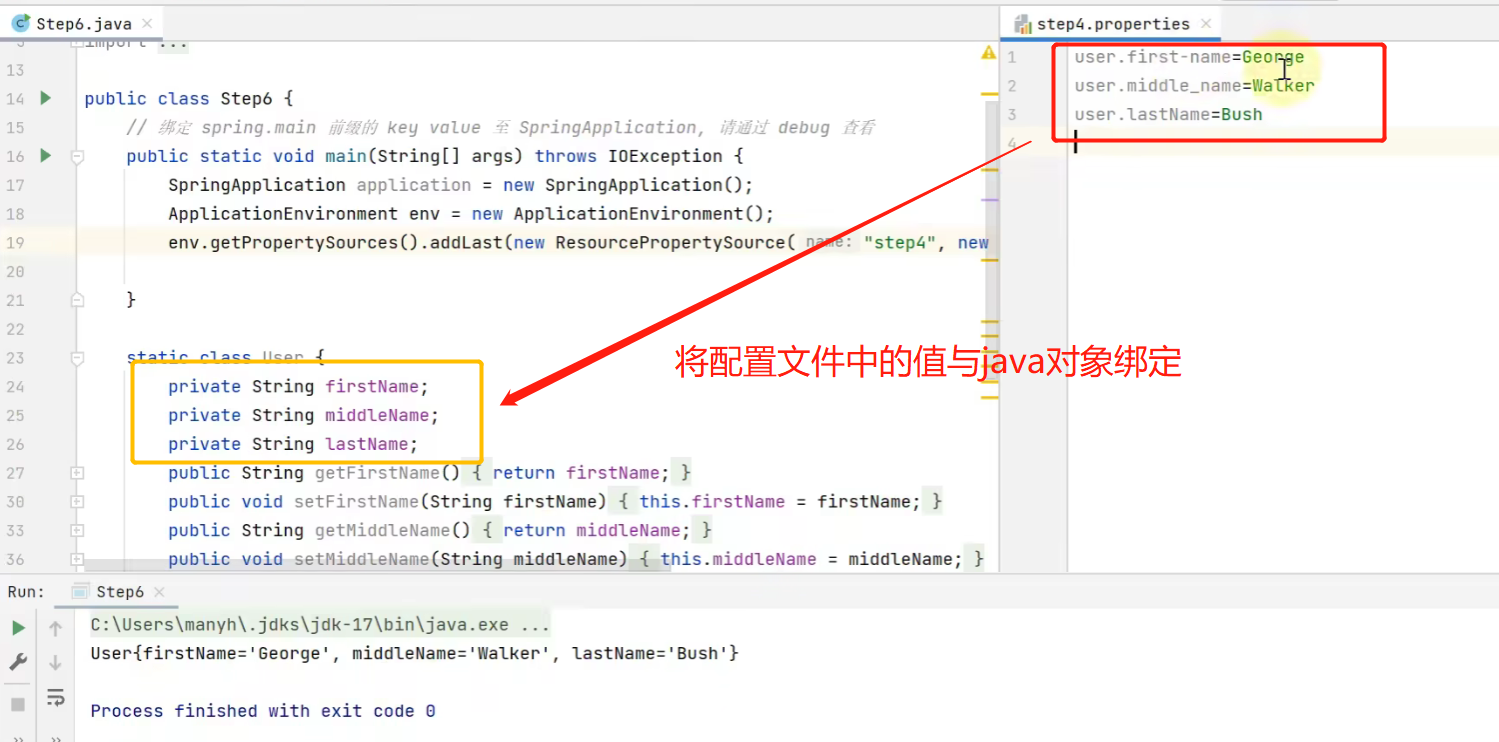
该部分对应run方法的第7步骤
public class Step7 {
    public static void main(String[] args) {
        ApplicationEnvironment env = new ApplicationEnvironment();
        SpringApplicationBannerPrinter printer = new SpringApplicationBannerPrinter(
                new DefaultResourceLoader(),
                new SpringBootBanner()
        );
        // 自定义文字 banner
//        env.getPropertySources().addLast(new MapPropertySource("custom", Map.of("spring.banner.location","banner1.txt")));
        // 自定义图片 banner
//        env.getPropertySources().addLast(new MapPropertySource("custom", Map.of("spring.banner.image.location","banner2.png")));
        // 版本号的获取
        System.out.println(SpringBootVersion.getVersion());
        printer.print(env, Step7.class, System.out);
    }
}
我们总结几个注意点:
- SpringApplication 构造方法中所做的操作
- 可以有多种源用来加载 bean 定义
- 应用类型推断
- 添加容器初始化器
- 添加监听器
- 演示主类推断
- 如何读取 spring.factories 中的配置
- 从配置中获取重要的事件发布器:SpringApplicationRunListeners
- 容器的创建、初始化器增强、加载 bean 定义等
- CommandLineRunner、ApplicationRunner 的作用
- 环境对象
- 命令行 PropertySource
- ConfigurationPropertySources 规范环境键名称
- EnvironmentPostProcessor 后处理增强
- 由 EventPublishingRunListener 通过监听事件2️⃣来调用
- 绑定 spring.main 前缀的 key value 至 SpringApplication
- Banner
启动过程总结
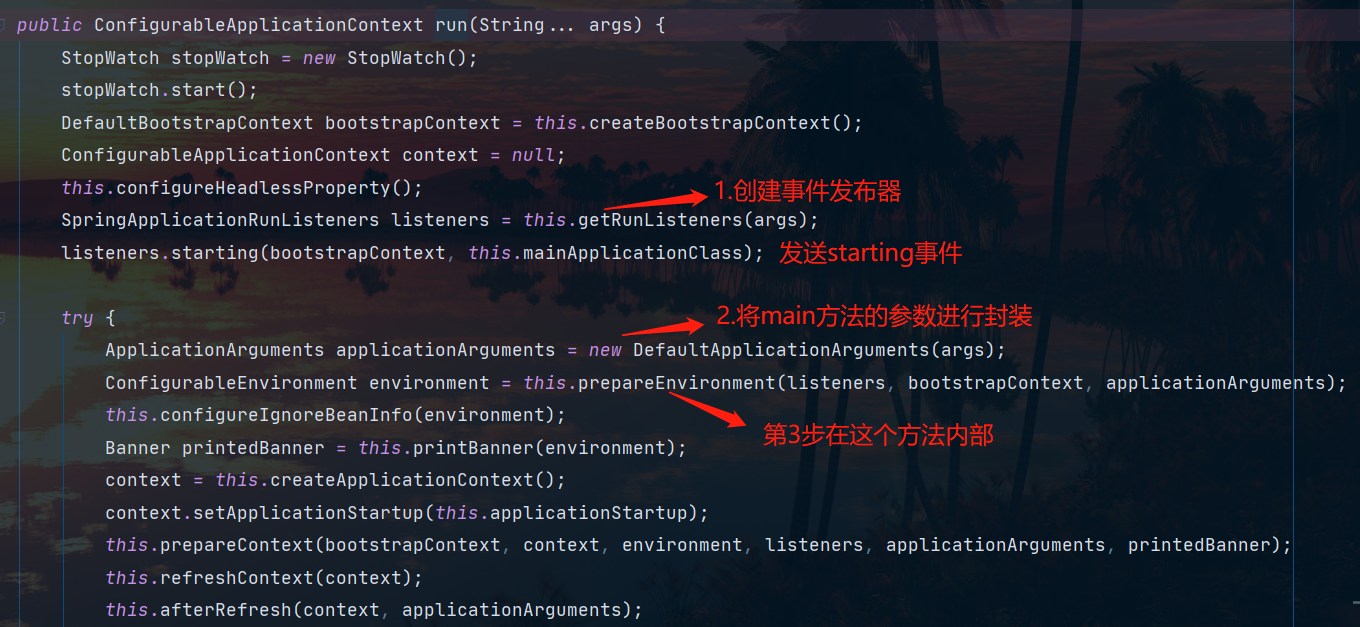
回到run方法:


再次回到run方法:
