目录
一、案例说明
二、数据库
三、案例源码
3.1、pom文件
3.2、Application.yml
3.3、项目结构
a)整体结构
b)Java代码部分
c)资源文件部分
3.4、业务功能的实现
1)配置类
2)实体类
3)Mapper文件
4)Service
5)Controller
6)视图
四、测试效果图
启动项目
浏览器访问
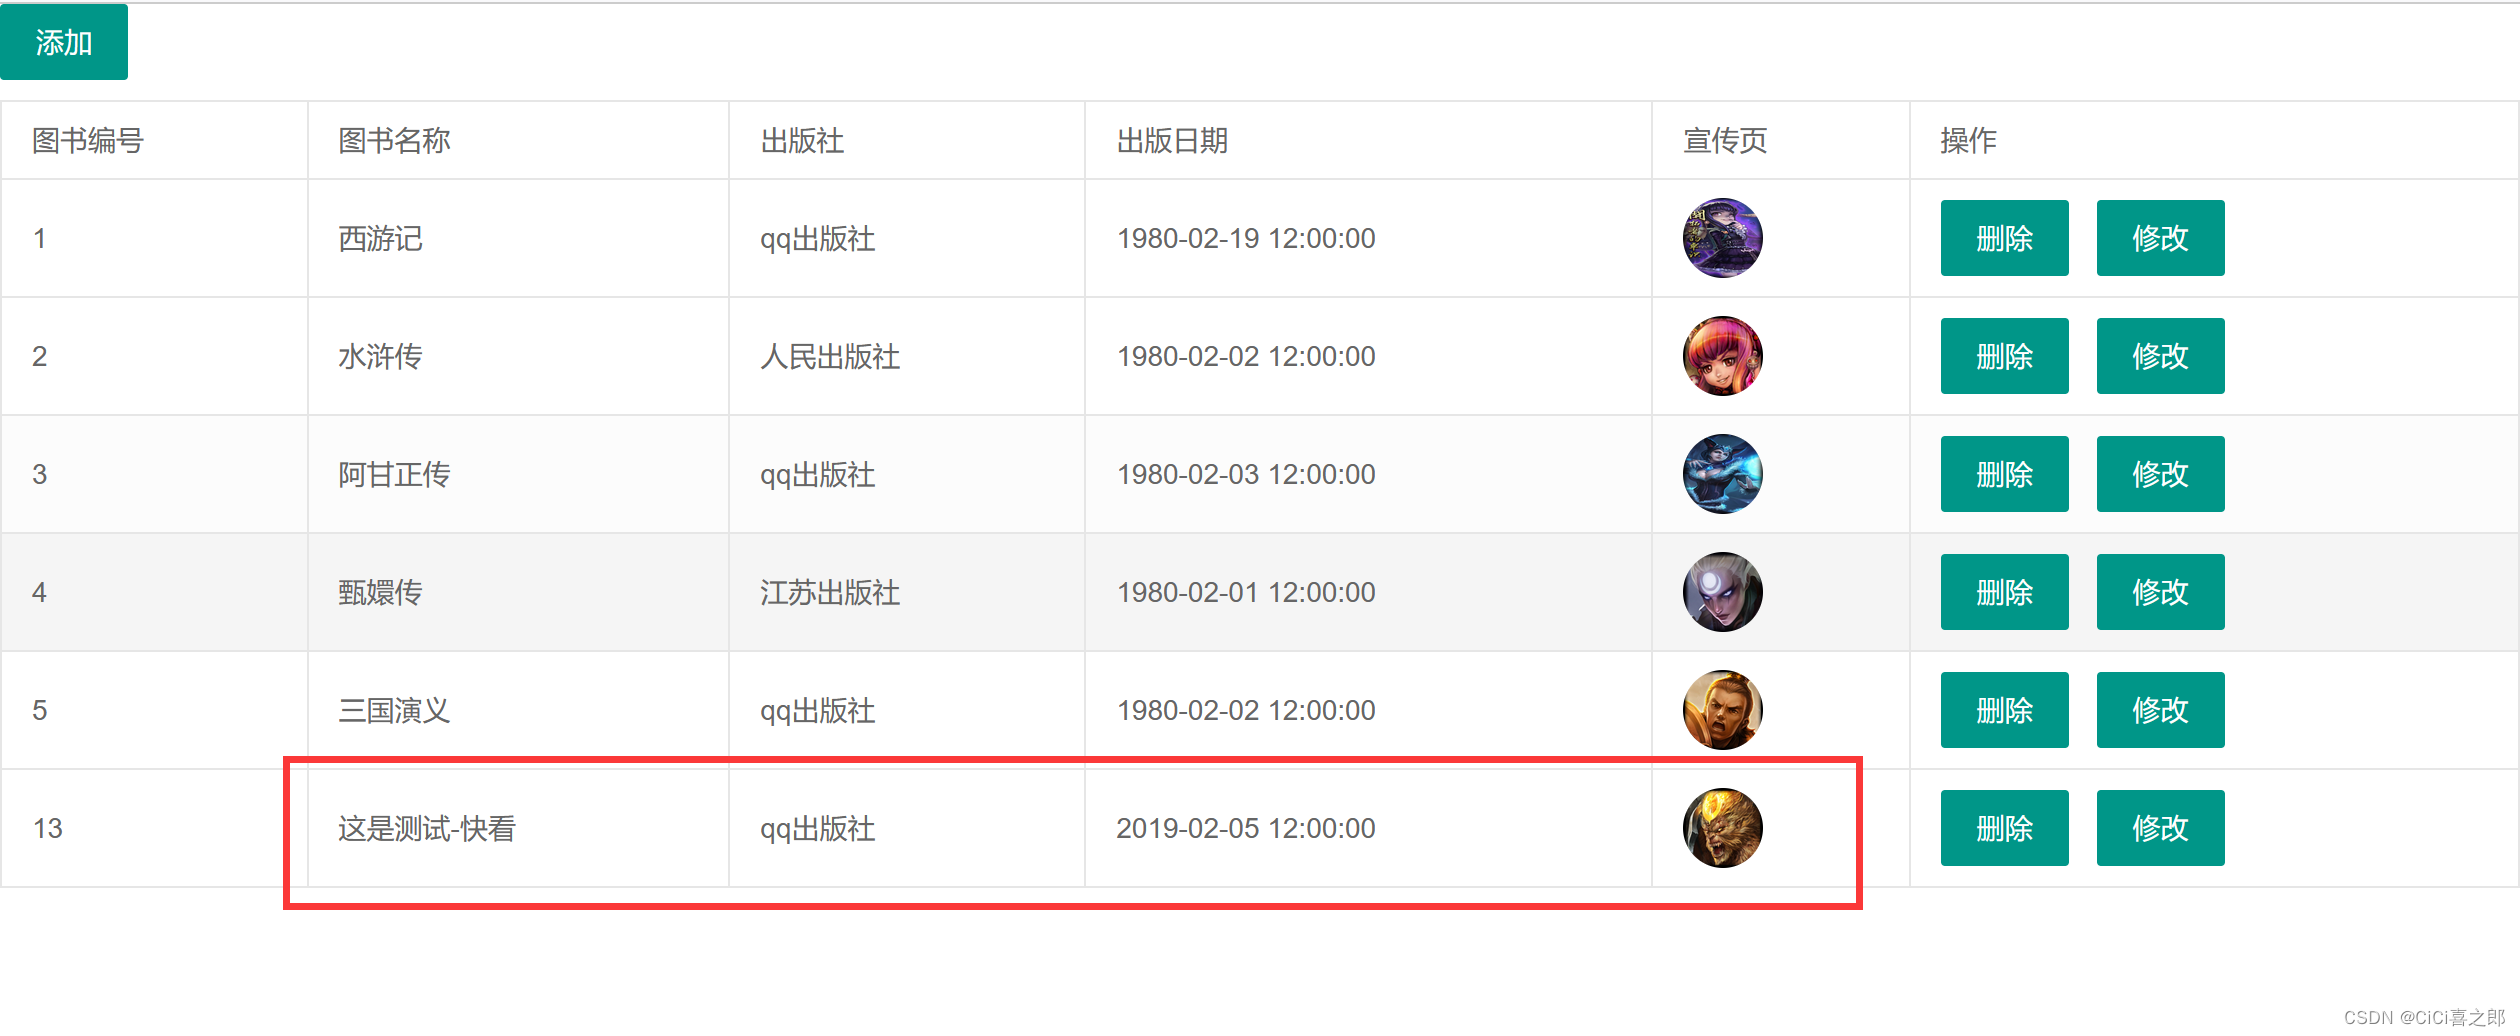
添加功能
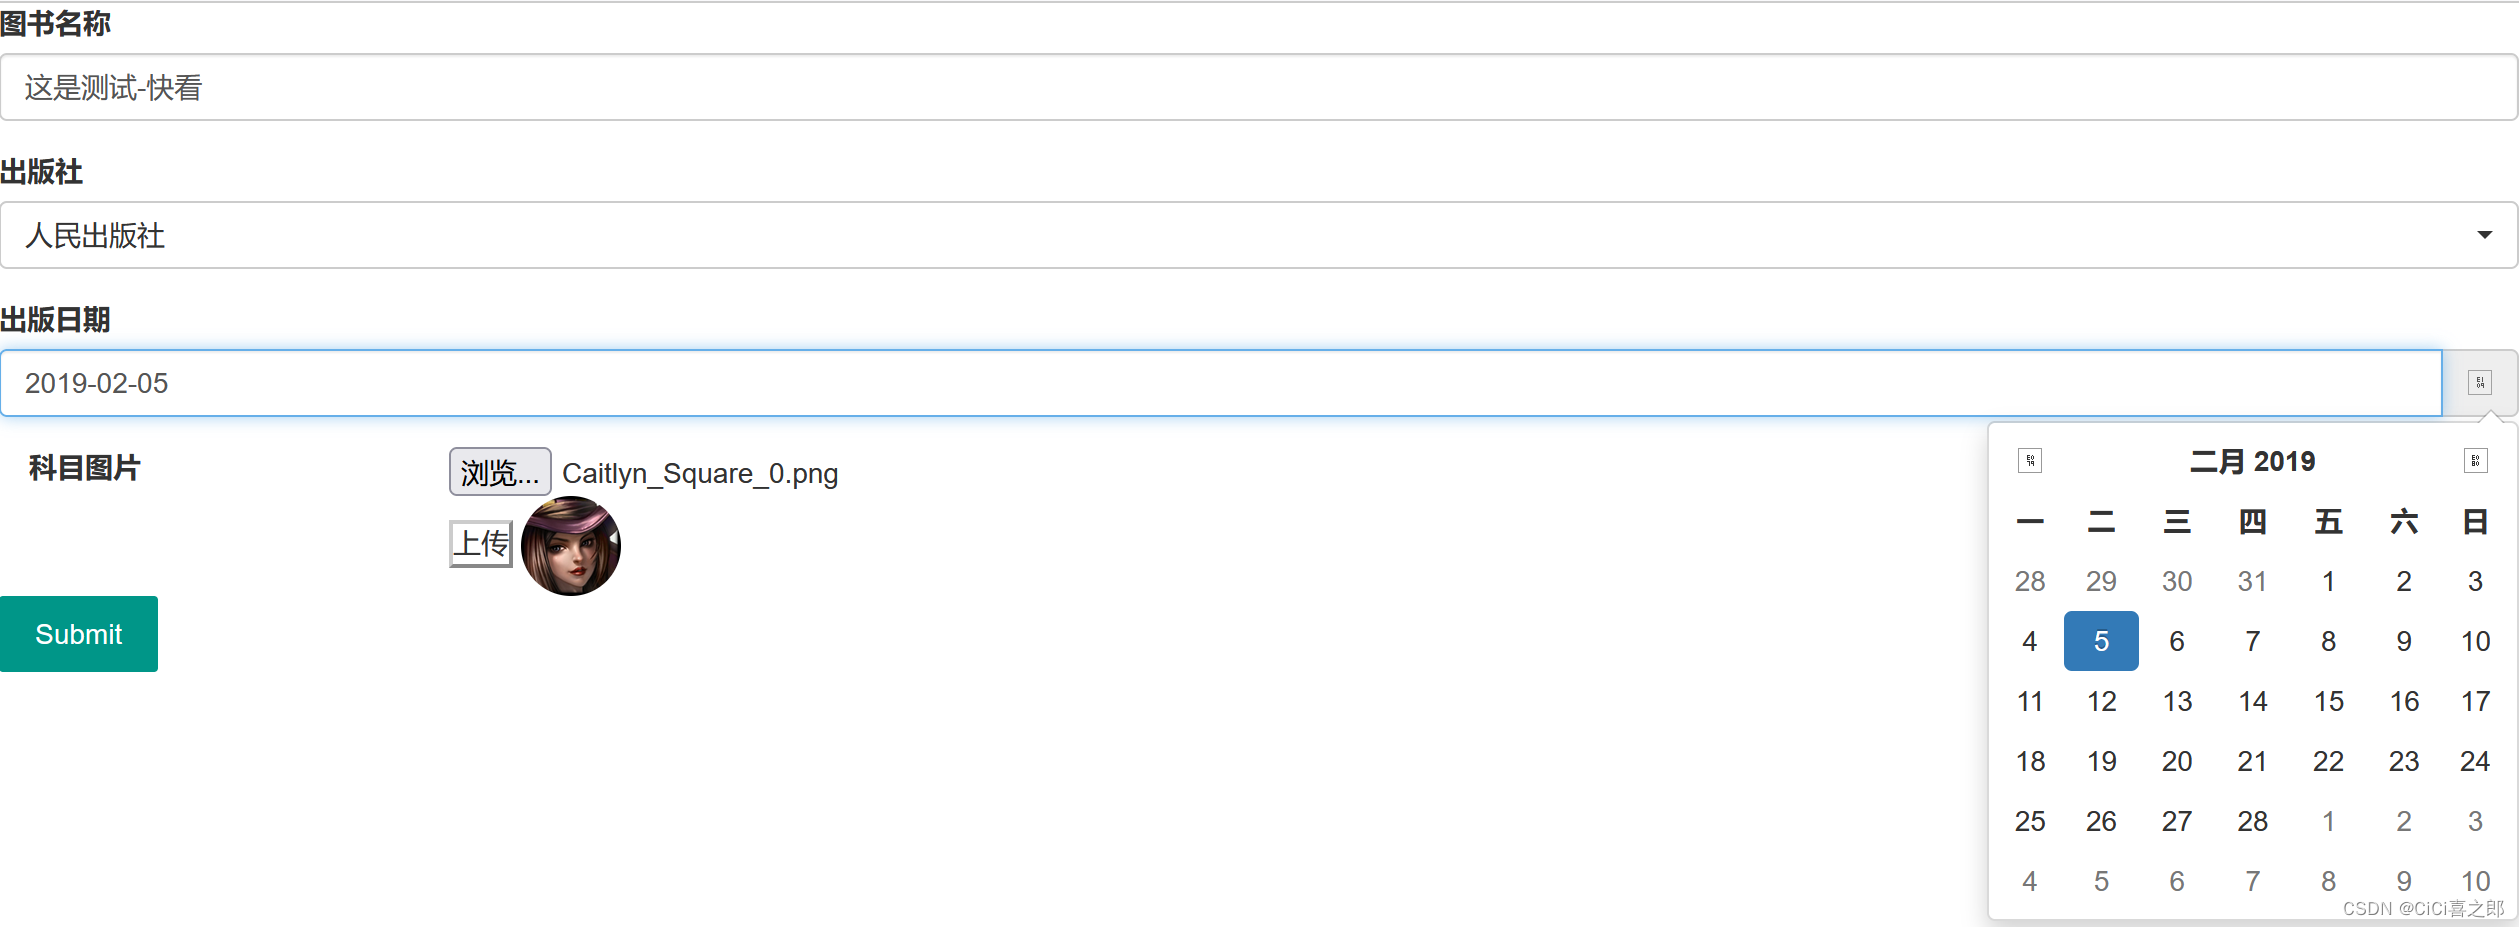
修改
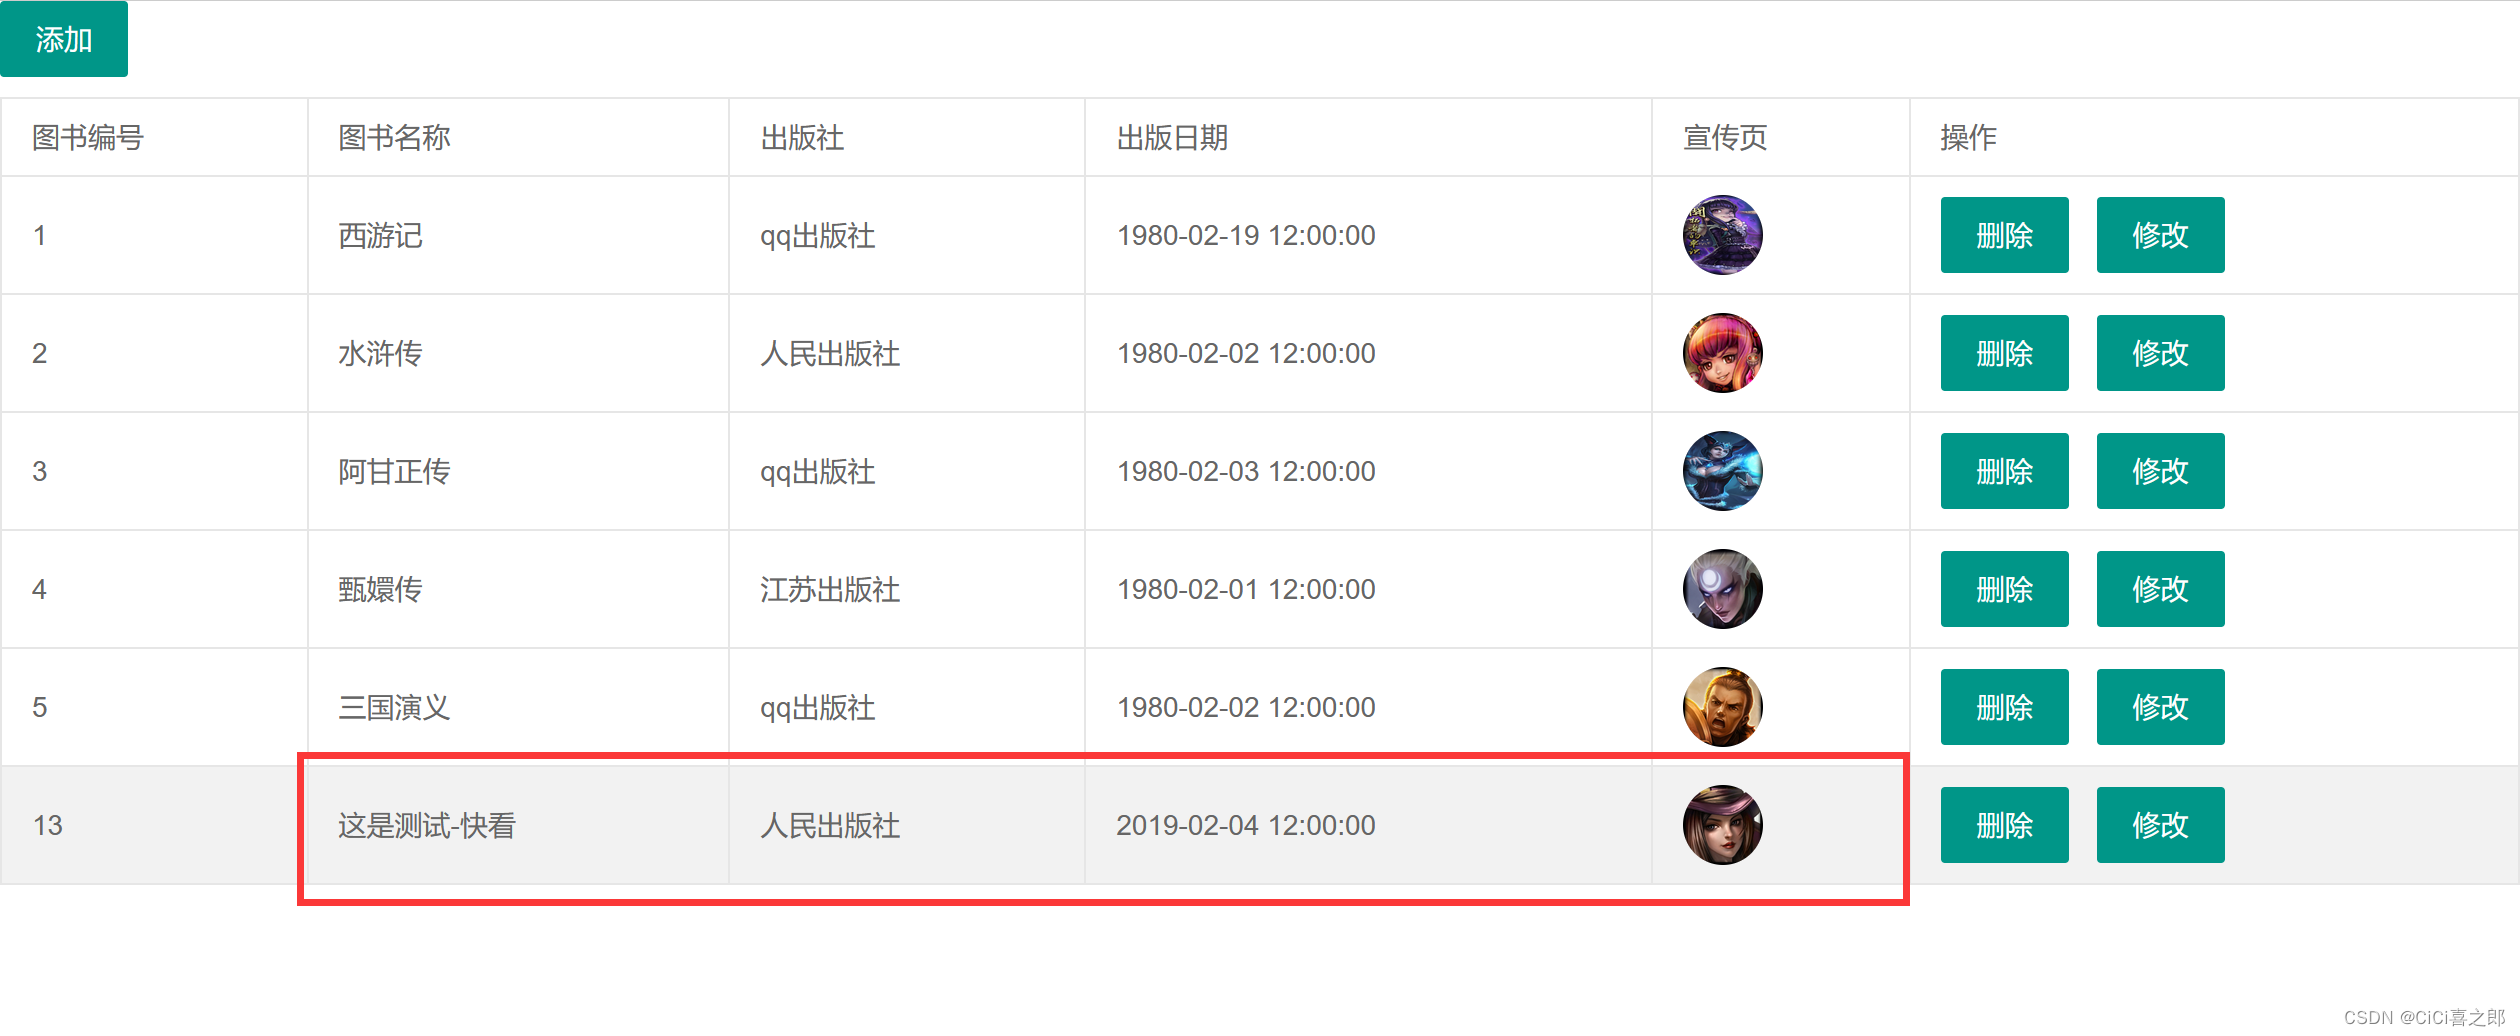
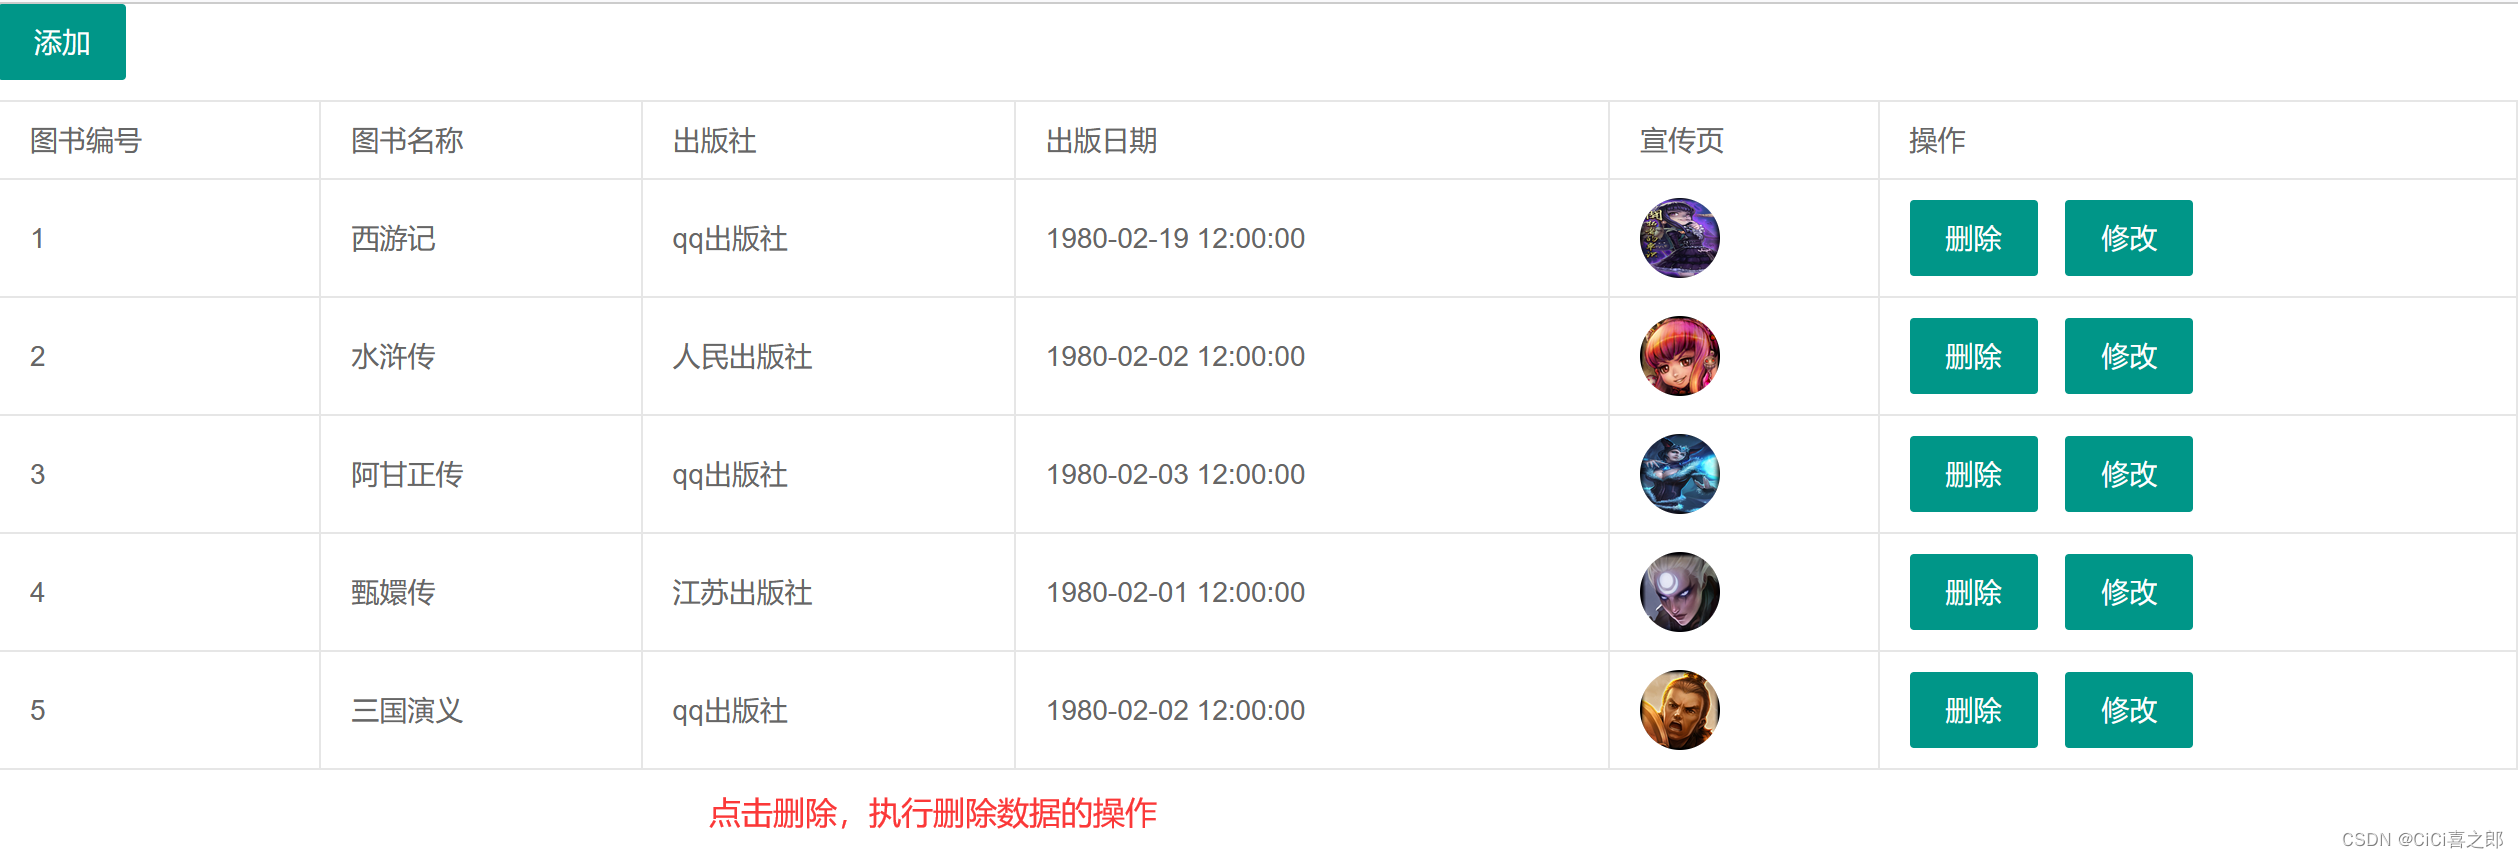
删除
附件:pom文件
一、案例说明
Idea 2022.3.3汉化版 、mysql 5.7 、 JDK 8
springboot + thymeleaf + restful + layui.css + bootstrap
图书表和出版社表为例,实现增删改查的功能。
该案例需要准备一些样式表:
layui官网
bootstrap的下载地址
bootstrap-select下载地址
bootstrap-table下载地址
(在bootstrap-select和bootstrap-table中也都是使用文件中dist目录下的文件)
commons-lang3的官方教程
commons-lang3的官方API
1. commons-lang3是Apache提供的一个java.lang包的增强版本,Lang3为java.lang API提供了许多帮助程序实用程序,特别是字符串操作方法,基本数值方法,对象反射,并发,创建和序列化以及系统属性。此外,它还包含对java.urti.Date的基本增强,以及一系列专用于构建方法的实用程序,例如hashCode,toString和equals。
2.提供了官方的API地址,可通过文档获取需要的支持。
二、数据库
Book表

Publish表
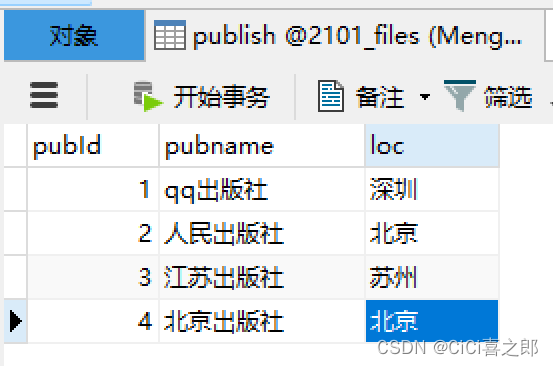
温馨小贴士:book 表中字段 pic 为图片路径(表中是图片名字和格式)。
在案例中使用到了文件(图片)上传。则需要注意的是:文件保存位置。
//将所有/upimg/的访问请求都拦截到指定目录
registry.addResourceHandler("/upimg/**").addResourceLocations("file:D://uploadImg//");
由于在配置类BeanConfig中配置了拦截器(👆),将所有/upimg/的访问请求都拦截到指定目录。
所以,需要根据指定目录存放文件(图片)。
本案例文件(图片)存放地址为:
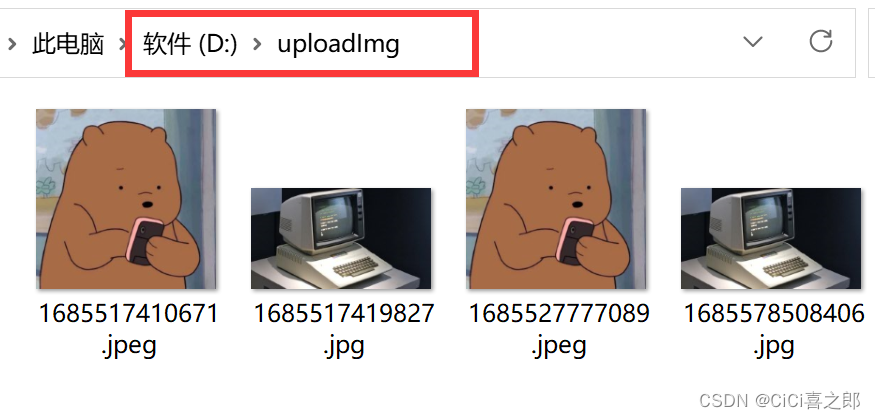
没有文件夹的要根据自己的设置进行创建,并存放使用的图片。否则,项目运行无法加载图片。
三、案例源码
3.1、pom文件
1、需要加载各种所需依赖坐标。
2、构建资源。
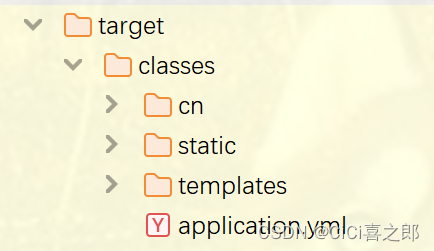
target文件夹是项目编译之后的资源文件夹。该文件夹中存在的内容才可以被项目中读取使用。
如果target中没有所需要的文件资源时, 检查pom.xml文件中是否拥有以下配置:
 <!-- 使得程序在执行过程中,能够解析到各个mapper.xml文件 。
				否则target目录下没有对应的mapper文件,程序不能正常执行。  -->
        <resources>
            <resource>
                <directory>src/main/java</directory>
                <includes>
                    <include>**/*.yml</include>
                    <include>**/*.properties</include>
                    <include>**/*.xml</include>
                </includes>
                <filtering>false</filtering>
            </resource>
            <resource>
                <directory>src/main/resources</directory>
                <includes>
                    <include>**/*.css</include>
                    <include>**/*.js</include>
                    <include>**/*.html</include>
                    <include>**/*.png</include>
                    <include>**/*.jpg</include>
                    <include>**/*.properties</include>
                    <include>**/*.yml</include>
                    <include>**/*.xml</include>
                    <include>**/*.conf</include>
                </includes>
                <filtering>false</filtering>
            </resource>
        </resources>
3.2、Application.yml
# 服务器设置:  端口号和访问路径
server:
  port: 8088
  servlet:
    context-path: /shq
# 数据源设置
spring:
  datasource:
    driver-class-name: com.mysql.cj.jdbc.Driver
    url: jdbc:mysql://localhost:3306/2101_files?serverTimezone=UTC
    username: root
    password: 123456
  thymeleaf:
    cache: false
    suffix: .html
  web:
    resources:
      static-locations: classpath:/templates/,classpath:/static/image/
# 让控制台显示执行的SQL语句
logging:
  level:
    cn:
      shq:
        mapper: debug
# mybatis配置
mybatis:
  type-aliases-package: cn.shq.model   # 别名
  configuration:
    auto-mapping-behavior: full  #设置全自动映射
    use-column-label: true    # 列标签代替字段名
#设置mapper的路径
  mapper-locations: classpath:cn/shq/mapper/*.xml
3.3、项目结构
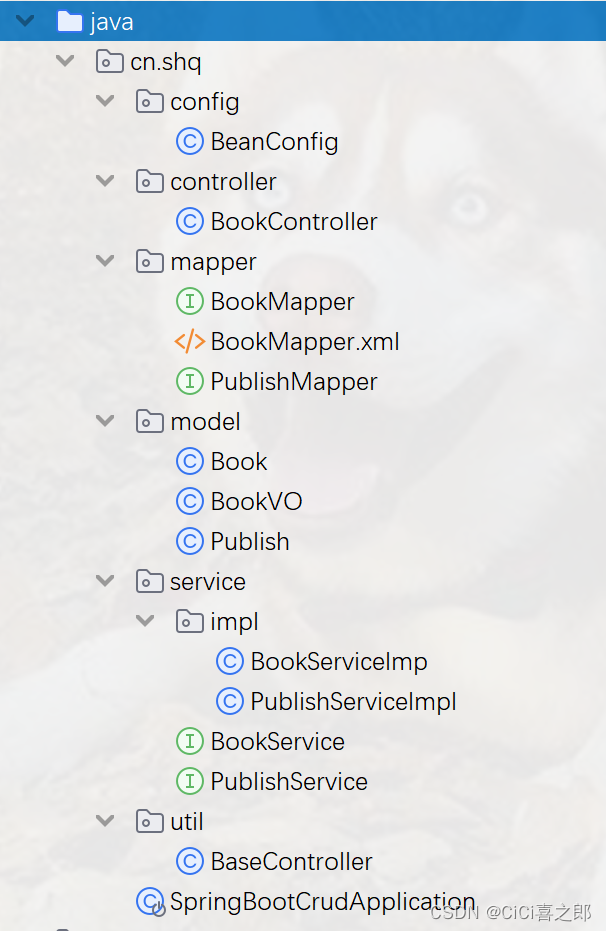
a)整体结构

b)Java代码部分
c)资源文件部分
案例中所使用的CSS、JS文件需要从各个官网上下载(本文头部👆提供的有各个网址)。
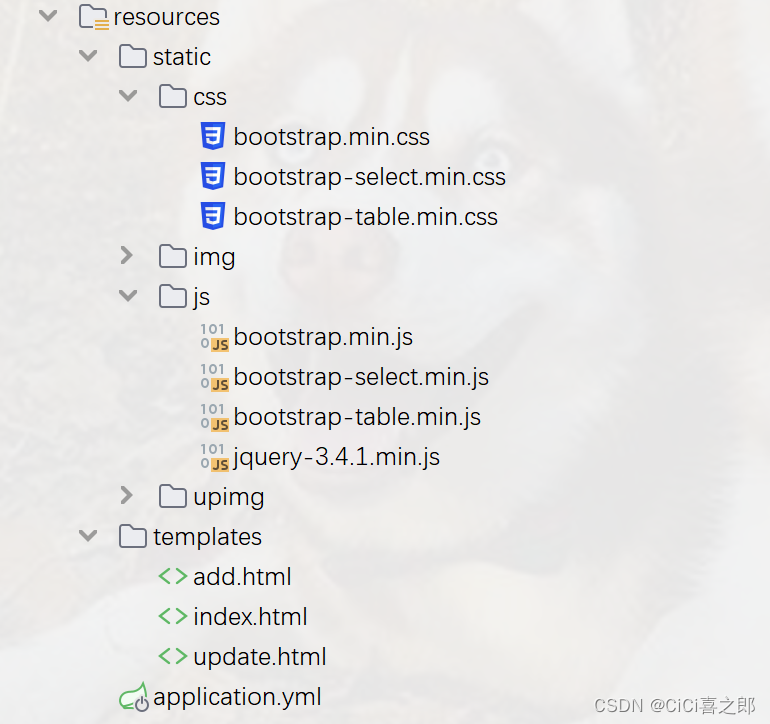
把静态文件放到static下面;把HTML文件放到templates下面;
3.4、业务功能的实现
1)配置类
BeasConfig.java
package cn.shq.config;


import org.springframework.context.annotation.Bean;
import org.springframework.context.annotation.Configuration;
import org.springframework.util.ResourceUtils;
import org.springframework.web.filter.HiddenHttpMethodFilter;
import org.springframework.web.servlet.config.annotation.ResourceHandlerRegistry;
import org.springframework.web.servlet.config.annotation.WebMvcConfigurationSupport;

@Configuration
public class BeanConfig extends WebMvcConfigurationSupport {
    /**
     *    拦截器
     * */
    @Override
    protected void addResourceHandlers(ResourceHandlerRegistry registry) {
// 自定义设置:指定程序中 路径为 /upimg/** 的文件,统统都到指定的Locations中去找(即 D://uploadImg//目录下去找)
        registry.addResourceHandler("/upimg/**").addResourceLocations("file:D://uploadImg//");
//  访问路径为/static/的请求,都到项目中static目录中。
        registry.addResourceHandler("/static/**").addResourceLocations("classpath:/static/");
//   在pom文件中 加载的各种前端文件 保存在resources/webjar目录下。
//        如果没有这一行代码的配置,则运行测试发现:没有样式表,找不到对应的样式文件。
        registry.addResourceHandler("/webjars/**").addResourceLocations(ResourceUtils.CLASSPATH_URL_PREFIX +"/META-INF/resources/webjars/");
        super.addResourceHandlers(registry);
    }
    /**
     * 添加restful支持
     */
    @Bean
    public HiddenHttpMethodFilter hiddenHttpMethodFilter() {
        HiddenHttpMethodFilter hiddenHttpMethodFilter = new HiddenHttpMethodFilter();
        hiddenHttpMethodFilter.setBeanName("HiddenHttpMethodFilter");
        hiddenHttpMethodFilter.setMethodParam("_method");
        return hiddenHttpMethodFilter;
    }
}
2)实体类
Book.java
package cn.shq.model;


import lombok.AllArgsConstructor;
import lombok.Data;
import lombok.NoArgsConstructor;
import org.springframework.format.annotation.DateTimeFormat;

import java.util.Date;
@Data
@NoArgsConstructor
@AllArgsConstructor
public class Book {

  private long bookId;
  private String bookName;
  private String author;
  private long price;
  private long pubId;
  /**
   * @DateTimeFormat:可以解决日期格式问题。
   *   因为页面传递过来的是String类型,而java中需要是Date类型。所以使用该注解可以进行类型转换。
   *   也可以使用另外一种方式实现类型转换:自己写一个日期格式转换类。
   * */
  @DateTimeFormat(pattern = "yyyy-MM-dd")
  private Date pubDate;

  private String pic;

}
Publish.java
package cn.shq.model;

import lombok.AllArgsConstructor;
import lombok.Data;
import lombok.NoArgsConstructor;

@Data
@NoArgsConstructor
@AllArgsConstructor
public class Publish {

  private long pubId;
  private String pubName;
  private String loc;

}
BookVO.java
package cn.shq.model;


import lombok.AllArgsConstructor;
import lombok.Data;
import lombok.NoArgsConstructor;
import org.springframework.format.annotation.DateTimeFormat;

import java.util.Date;

@Data
@NoArgsConstructor
@AllArgsConstructor
public class BookVO {

// book类中的属性
    private long bookId;
    private String bookName;
    private String author;
    private long price;
    private Date pubDate;
    private String pic;
//    👇  publish 出版社
    private Publish publish;
}
3)Mapper文件
BookMapper.java
package cn.shq.mapper;

import cn.shq.model.Book;
import cn.shq.model.BookVO;
import org.apache.ibatis.annotations.Mapper;
import org.springframework.stereotype.Component;

import java.util.List;
@Mapper
@Component
public interface BookMapper {
    //    查询全部
    List<BookVO> selectAll();
    //    添加
    int insert(Book book);
    //    删除    (根据编号进行删除)
    int del(Integer bookId);
    //    修改
    int update(Book book);
    //    条件查询 -----> 根据编号查找对应信息
    Book findByID(Integer bookId);

}
BookMapper.xml
<?xml version="1.0" encoding="UTF-8"?>
<!DOCTYPE mapper PUBLIC "-//mybatis.org//DTD Mapper 3.0//EN"
        "http://mybatis.org/dtd/mybatis-3-mapper.dtd">
<mapper namespace="cn.shq.mapper.BookMapper">
    <!-- 查询全部-->
    <select id="selectAll" resultMap="allRs">
        select b.*,p.* from book b,publish p where b.pubId=p.pubId
    </select>

    <resultMap id="allRs" type="BookVO">
        <id column="bookId" jdbcType="INTEGER" property="bookId"></id>
        <association column="pubId" property="publish" javaType="Publish">
            <id column="pubId" property="pubId"></id>
        </association>
    </resultMap>
    <!--增加-->
    <insert id="insert" parameterType="Book">
        insert into book(bookName,pubId,pubDate,pic)values(#{bookName},#{pubId,jdbcType=INTEGER},#{pubDate,jdbcType=TIMESTAMP},#{pic})
    </insert>
    <!--    删除-->
    <delete id="del" parameterType="int">
        delete from book where bookId = #{bookId}
    </delete>
    <!--    修改-->
    <update id="update" parameterType="Book">
        update book set bookName= #{bookName},pubId = #{pubId},pubDate = #{pubDate},pic = #{pic}
        where bookId = #{bookId}
    </update>
    <!--  根据ID 查找单条信息 -->
    <select id="findByID" parameterType="int" resultType="Book">
        select * from book where bookId = #{bookId}
    </select>


</mapper>
PublishMapper.java
package cn.shq.mapper;

import cn.shq.model.Publish;
import org.apache.ibatis.annotations.Mapper;
import org.apache.ibatis.annotations.Select;
import org.springframework.stereotype.Component;

import java.util.List;

@Mapper
@Component
public interface PublishMapper {
    @Select("select * from publish")
    List<Publish> selectAll();
}
4)Service
BookService.java
package cn.shq.service;

import cn.shq.model.Book;
import cn.shq.model.BookVO;

import java.util.List;

public interface BookService {
    //    查询全部
    List<BookVO> selectAll();
    //    添加
    int insert(Book book);
    //    删除    (根据编号进行删除)
    int del(Integer bookId);
    //    修改
    int update(Book book);
    //    条件查询 -----> 根据编号查找对应信息
    Book findByID(Integer bookId);
}
BookServiceImpl.java
package cn.shq.service.impl;

import cn.shq.mapper.BookMapper;
import cn.shq.model.Book;
import cn.shq.model.BookVO;
import cn.shq.service.BookService;
import org.springframework.beans.factory.annotation.Autowired;
import org.springframework.stereotype.Service;
import org.springframework.transaction.annotation.Transactional;

import java.util.List;
@Service
@Transactional
public class BookServiceImp implements BookService {
    @Autowired
    BookMapper bookMapper;
    @Override
    public List<BookVO> selectAll() {
        return bookMapper.selectAll();
    }

    @Override
    public int insert(Book book) {
        return bookMapper.insert(book);
    }

    @Override
    public int del(Integer bookId) {
        return bookMapper.del(bookId);
    }

    @Override
    public int update(Book book) {
        return bookMapper.update(book);
    }

    @Override
    public Book findByID(Integer bookId) {
        return bookMapper.findByID(bookId);
    }


}
PublicServiceImpl.java
package cn.shq.service.impl;

import cn.shq.mapper.PublishMapper;
import cn.shq.model.Publish;
import cn.shq.service.PublishService;
import org.springframework.beans.factory.annotation.Autowired;
import org.springframework.stereotype.Service;
import org.springframework.transaction.annotation.Transactional;

import java.util.List;
@Service
@Transactional
public class PublishServiceImpl implements PublishService {
    @Autowired
    PublishMapper mapper;

    @Override
    public List<Publish> selectAll() {
        return mapper.selectAll();
    }
}
5)Controller
在控制器中使用到了图片的文件上传以及页面传递的日期格式,所以需要写一个工具类。
工具类BaseController.java
该工具类在本案例中放在util包中。
package cn.shq.util;


import org.apache.commons.lang3.time.DateUtils;
import org.springframework.web.bind.WebDataBinder;
import org.springframework.web.bind.annotation.InitBinder;

import java.beans.PropertyEditorSupport;
import java.io.File;
import java.text.ParseException;
import java.util.Date;

public class BaseController extends DateUtils {
    //定义真实的上传路径 :  案例中所用到的文件(图片)保存在改目录下。
    public final String REAL_PATH = "D:"+ File.separator+"uploadImg"+File.separator;
    //访问路径
    public final String VISIT_PATH = File.separator+"upimg"+File.separator;
    /**
     * 将前台传递过来的日期格式的字符串,自动转化为Date类型
     */
    private static String[] parsePatterns = {
            "yyyy-MM-dd", "yyyy-MM-dd HH:mm:ss", "yyyy-MM-dd HH:mm", "yyyy-MM",
            "yyyy/MM/dd", "yyyy/MM/dd HH:mm:ss", "yyyy/MM/dd HH:mm", "yyyy/MM",
            "yyyy.MM.dd", "yyyy.MM.dd HH:mm:ss", "yyyy.MM.dd HH:mm", "yyyy.MM"
    };
    /**
     * 日期型字符串转化为日期 格式
     */
    public static Date parseDate(Object str) {
        if (str == null)
        {
            return null;
        }
        try
        {
            return parseDate(str.toString(), parsePatterns);
        }
        catch (ParseException e)
        {
            return null;
        }
    }
    @InitBinder
    public void initBinder(WebDataBinder binder)
    {
        // Date 类型转换
        binder.registerCustomEditor(Date.class, new PropertyEditorSupport()
        {
            @Override
            public void setAsText(String text)
            {
                setValue(parseDate(text));
            }
        });
    }
}
控制器类BookController.java
package cn.shq.controller;

import cn.shq.model.*;
import cn.shq.service.BookService;
import cn.shq.service.PublishService;
import cn.shq.util.BaseController;
import org.springframework.beans.factory.annotation.Autowired;
import org.springframework.beans.factory.annotation.Value;
import org.springframework.stereotype.Controller;
import org.springframework.ui.Model;
import org.springframework.web.bind.annotation.*;
import org.springframework.web.multipart.MultipartFile;


import java.io.File;
import java.io.IOException;
import java.util.HashMap;
import java.util.List;
import java.util.Map;

@Controller
public class BookController extends BaseController {
    @Autowired
    BookService bookService;
    @Autowired
    PublishService publishService;

    //          应用的上下文路径,也可以称为项目路径
    @Value("${server.servlet.context-path}")
    String projName;    //  将项目路径 注入到  projName中。

    /**
     *  查询全部
     * */
    @GetMapping("/books")
    public String books(Model model){
        List<BookVO> bs = bookService.selectAll();
        System.out.println("bs:"+bs);
        model.addAttribute("bs",bs);
        return "index";
    }
    /**
     * 文件上传
     * */
    @PostMapping("/doUpload")
    @ResponseBody
    public Map<String,String> doUpload(MultipartFile photo) throws IOException {
        Map<String,String> result = new HashMap<>();
        //判断是否为空
        if(null ==photo){
            result.put("type","error");
            result.put("msg","请选择上传的图片");
            return result;
        }
        //判断大小
        long size = photo.getSize();
        if(size > 2000000){
            result.put("type","error");
            result.put("msg","上传的图片超过限定大小,请上传2M以内的图片!");
            return result;
        }
        //拿到图片的后缀
        int index = photo.getOriginalFilename().lastIndexOf(".");
        String suffix = photo.getOriginalFilename().substring(index);
        //判断后缀是否是图片
        if(!".jpg,.jpeg,.png,.gif".toUpperCase().contains(suffix.toUpperCase())){
            result.put("type","error");
            result.put("msg","必须上传指定格式的图片.jpg,.jpeg,.png,.gif");
            return result;
        }
        //修改文件的名字
        String newFileName = System.currentTimeMillis()+""+suffix;
        //建立文件              ↓ 因为上面继承了工具类,则可以直接使用this表示。
        File file = new File(this.REAL_PATH,newFileName);
        //写入磁盘
        photo.transferTo(file);//把文件写入到指定的路径中;
        //返回给前端数据
        result.put("type","success");
        result.put("msg","上传成功!");
        result.put("fileName",newFileName);
        result.put("imgName",projName+File.separator+this.VISIT_PATH+newFileName);
        result.put("filePath",this.VISIT_PATH);
        return result;
    }

    /**
     *   添加
     *     1、点击添加按钮,先执行查询所有的出版社,然后跳往添加的页面。
     *     2、执行添加操作。
     * */
    @GetMapping("/toAdd")
    public String toAdd(Model model){
        List<Publish> pubs = publishService.selectAll();
        model.addAttribute("pubs",pubs);
        return "add";
    }
    @PostMapping("/doAdd")
    public String doAdd(Book book){
        bookService.insert(book);
        return "redirect:/books";
    }

    //删除
    @GetMapping("/doDel/{bookId}")
    public String doDel(@PathVariable Integer bookId){
        bookService.del(bookId);
        return "redirect:/books";
    }
    /**
     * 修改:
     *     1、点击修改按钮,先根据ID查询到对应书籍的信息,和出版社信息,跳往修改页面。
     *     2、执行修改操作。
     * */
    @GetMapping("/toUpdate/{bookId}")
    public String toUpdate(@PathVariable Integer bookId,Model model){
        Book book = bookService.findByID(bookId);
        List<Publish> pubs = publishService.selectAll();
        model.addAttribute("book",book);
        model.addAttribute("pubs",pubs);
        return "update";
    }
    @PutMapping("/doUpdate")
    public String doUpdate(Book book){
        bookService.update(book);
        return "redirect:/books";
    }
}
6)视图
index.html
<!DOCTYPE html>
<!--   引入 thymeleaf -->
<html lang="en" xmlns:th="http://www.thymeleaf.org">
<!--
    th:fragment="common"  起了个名字叫 common的模板片段
    在其他页面可以使用  th:insert 或 th:replace属性轻易地包含进需要的页面中
   -->
<head th:fragment="common">
    <meta charset="UTF-8">
    <title>首页</title>
    <!--
        开始引入各种样式文件和脚本文件
    -->
    <script type="text/javascript" th:src="@{/static/js/jquery-3.4.1.min.js}"></script>
    <!--
        此处使用的webjars 路径,是在pom文件中已经引入的,可以直接拿来使用。
    -->
    <link rel="stylesheet" th:href="@{/webjars/layui/2.5.6/css/layui.css}"/>

    <link th:href="@{/static/css/bootstrap.min.css}" rel="stylesheet">
    <script type="text/javascript" th:src="@{/static/js/bootstrap.min.js}"></script>

    <link th:href="@{/static/css/bootstrap-table.min.css}" rel="stylesheet">
    <script type="text/javascript" th:src="@{/static/js/bootstrap-table.min.js}"></script>

    <link th:href="@{/static/css/bootstrap-select.min.css}" rel="stylesheet">
    <script type="text/javascript" th:src="@{/static/js/bootstrap-select.min.js}"></script>

    <link href="https://cdn.bootcss.com/bootstrap-datetimepicker/4.17.47/css/bootstrap-datetimepicker.min.css" rel="stylesheet">
    <script src="https://cdn.bootcss.com/moment.js/2.24.0/moment-with-locales.js"></script>
    <script src="https://cdn.bootcss.com/bootstrap-datetimepicker/4.17.47/js/bootstrap-datetimepicker.min.js"></script>

</head>
<body>

<a class="layui-btn" th:href="@{/toAdd}">添加</a>
<th:block th:if="!${#lists.isEmpty(bs)}">
    <table class="layui-table" width="70%">
        <tr>
            <td>图书编号</td>
            <td>图书名称</td>
            <td>出版社</td>
            <td>出版日期</td>
            <td>宣传页</td>
            <td>操作</td>
        </tr>
        <tr th:each="b:${bs}" th:object="${b}">
            <td th:text="*{bookId}"></td>
            <td th:text="*{bookName}">图书名称</td>
            <td th:text="*{publish.pubName}">出版社</td>
            <td th:text="*{#dates.format(pubDate,'yyyy-MM-dd hh:mm:ss')}">出版日期</td>
            <td>
                <img th:src="@{|/upimg/${b.pic}|}" class="img-circle" width="40px" height="40px">
            </td>
            <td>
                <a th:href="@{/doDel/{bookId}(bookId=*{bookId})}" class="layui-btn">删除</a>
                <a th:href="@{/toUpdate/{bookId}(bookId=*{bookId})}" class="layui-btn">修改</a>
            </td>
        </tr>
    </table>
</th:block>
</body>
</html>
add.html
<!DOCTYPE html>
<html lang="en" xmlns:th="http://www.thymeleaf.org">
<!--
    th:insert:将被引用的模板片段插⼊到自己的标签体中
    th:replace:将被引用的模板片段替换掉自己
-->
<head th:replace="index::common">
  <meta charset="UTF-8">
  <title>添加图书</title>
</head>
<body>

<form th:action="@{/doAdd}" method="post" id="myFrm">

  <div class="form-group">
    <label for="bookName">图书名称</label>
    <input type="text" class="form-control" id="bookName" placeholder="bookName" name="bookName">
  </div>
  <div class="form-group">
    <label for="uppubId">出版社</label>
    <select class="form-control selectpicker" id="uppubId" name="pubId">
      <option value="-1">请选择</option>
      <th:block th:each="p:${pubs}" th:object="${p}">
        <option th:value="*{pubId}" th:text="*{pubName}"></option>
      </th:block>
    </select>
  </div>
  <div class="form-group">
    <label for="pubDate">出版日期</label>
    <div class='input-group date' id='datetimepicker1'>

      <input type='text' class="form-control" name="pubDate"  id="pubDate" />

      <span class="input-group-addon">
                <span class="glyphicon glyphicon-calendar"></span>
            </span>
    </div>
  </div>
  <div class="form-group">
    <label class="col-sm-2 control-label"> 科目图片</label>
    <div class="col-sm-10">
      <input type="hidden" name="pic" value="" id="pic"/>
      <input type="file" name="photo" id="photoFile"/>
      <input type="button" value="上传" id="upload" class="btn-default">
      <img alt="宣传图片" src="" width="50px" height="50px" id="preview_photo" class="img-circle" style="border:1px solid gray;border-radius: 10px;"/>
    </div>
  </div>
  <button type="submit" class="layui-btn">添加</button>
</form>
<script type="module">
  $(function () {
    //  日期插件   : 日期格式  和 中国区域
    $('#datetimepicker1').datetimepicker({
      format: 'YYYY-MM-DD',
      locale: moment.locale('zh-cn')
    });

    //点击上传
    $("#upload").click(function(){
      //判断是否选中一个文件
      if($("#photoFile").val() == ""){
        alert('必须选择图片!');
        return;
      }
      //封装传给后台的数据
      var formData = new FormData();//虚拟出来一个表单数据
      formData.append("photo",document.getElementById("photoFile").files[0]);
      $.ajax({
        url:'[[@{/doUpload}]]',
        type:'POST',
        data:formData,
        contentType: false,
        processData: false,
        dataType:'json',
        success:function(result){
          $("#preview_photo").attr("src",result.filePath+result.fileName);
          alert($("#preview_photo").attr("src"));
          $("#pic").val(result.fileName);
        },
        error:function(msg){
          console.log(msg);
        }
      });
    });
  });
</script>
</body>
</html>
update.html
<!DOCTYPE html>
<html lang="en" xmlns:th="http://www.thymeleaf.org">
<head th:replace="index::common">
    <meta charset="UTF-8">
    <title>修改界面</title>
</head>
<body>
<form th:action="@{/doUpdate}" method="post" id="myFrm" th:object="${book}">
    <input type="hidden" name="_method" value="PUT"/>
    <input type="hidden" th:field="*{bookId}"/>
    <div class="form-group">
        <label for="bookName">图书名称</label>
        <input type="text" class="form-control" id="bookName" placeholder="请输入图书名称" th:field="*{bookName}">
    </div>
    <div class="form-group">
        <label for="uppubId">出版社</label>
        <select class="form-control selectpicker" id="uppubId" th:field="*{pubId}">
            <option value="-1">请选择</option>
            <th:block th:each="p:${pubs}">
                <option th:value="${p.pubId}" th:text="${p.pubName}"></option>
            </th:block>
        </select>
    </div>
    <div class="form-group">
        <label for="pubDate">出版日期</label>
        <div class='input-group date' id='datetimepicker1'>

            <input type='text' class="form-control" name="pubDate" th:value="*{#dates.format(pubDate,'yyyy-MM-dd')}"  id="pubDate" />

            <span class="input-group-addon">
                <span class="glyphicon glyphicon-calendar"></span>
            </span>
        </div>
    </div>
    <div class="form-group">
        <label class="col-sm-2 control-label"> 科目图片</label>
        <div class="col-sm-10">
            <input type="hidden" th:field="*{pic}" value="" id="pic"/>
            <input type="file" name="photo" id="photoFile"/>
            <input type="button" value="上传" id="upload" class="btn-default">
            <!--                        ↓  此处|是个分隔符, 可以去掉。    -->
            <img alt="宣传图片" th:src="@{|/upimg/${book.pic}|}" width="50px" height="50px" id="preview_photo" class="img-circle"/>
        </div>
    </div>
    <button type="submit" class="layui-btn">Submit</button>
</form>
<script>
    $(function(){
        $('#datetimepicker1').datetimepicker({
            format: 'YYYY-MM-DD',
            locale: moment.locale('zh-cn')
        });
        $('.selectpicker').selectpicker({});
        //点击上传
        $("#upload").click(function(){
            //判断是否选中一个文件
            if($("#photoFile").val() == ""){
                alert('必须选择图片!');
                return;
            }
            //封装传给后台的数据
            var formData = new FormData();//虚拟出来一个表单数据
            formData.append("photo",document.getElementById("photoFile").files[0]);
            $.ajax({
                url:'[[@{/doUpload}]]',
                type:'POST',
                data:formData,
                contentType: false,
                processData: false,
                dataType:'json',
                success:function(result){

                    $("#preview_photo").attr("src",result.imgName);
                    $("#pic").val(result.fileName);

                },
                error:function(msg){
                    console.log(msg);
                }
            });
        });
    });
</script>
</body>
</html>
四、测试效果图
启动项目

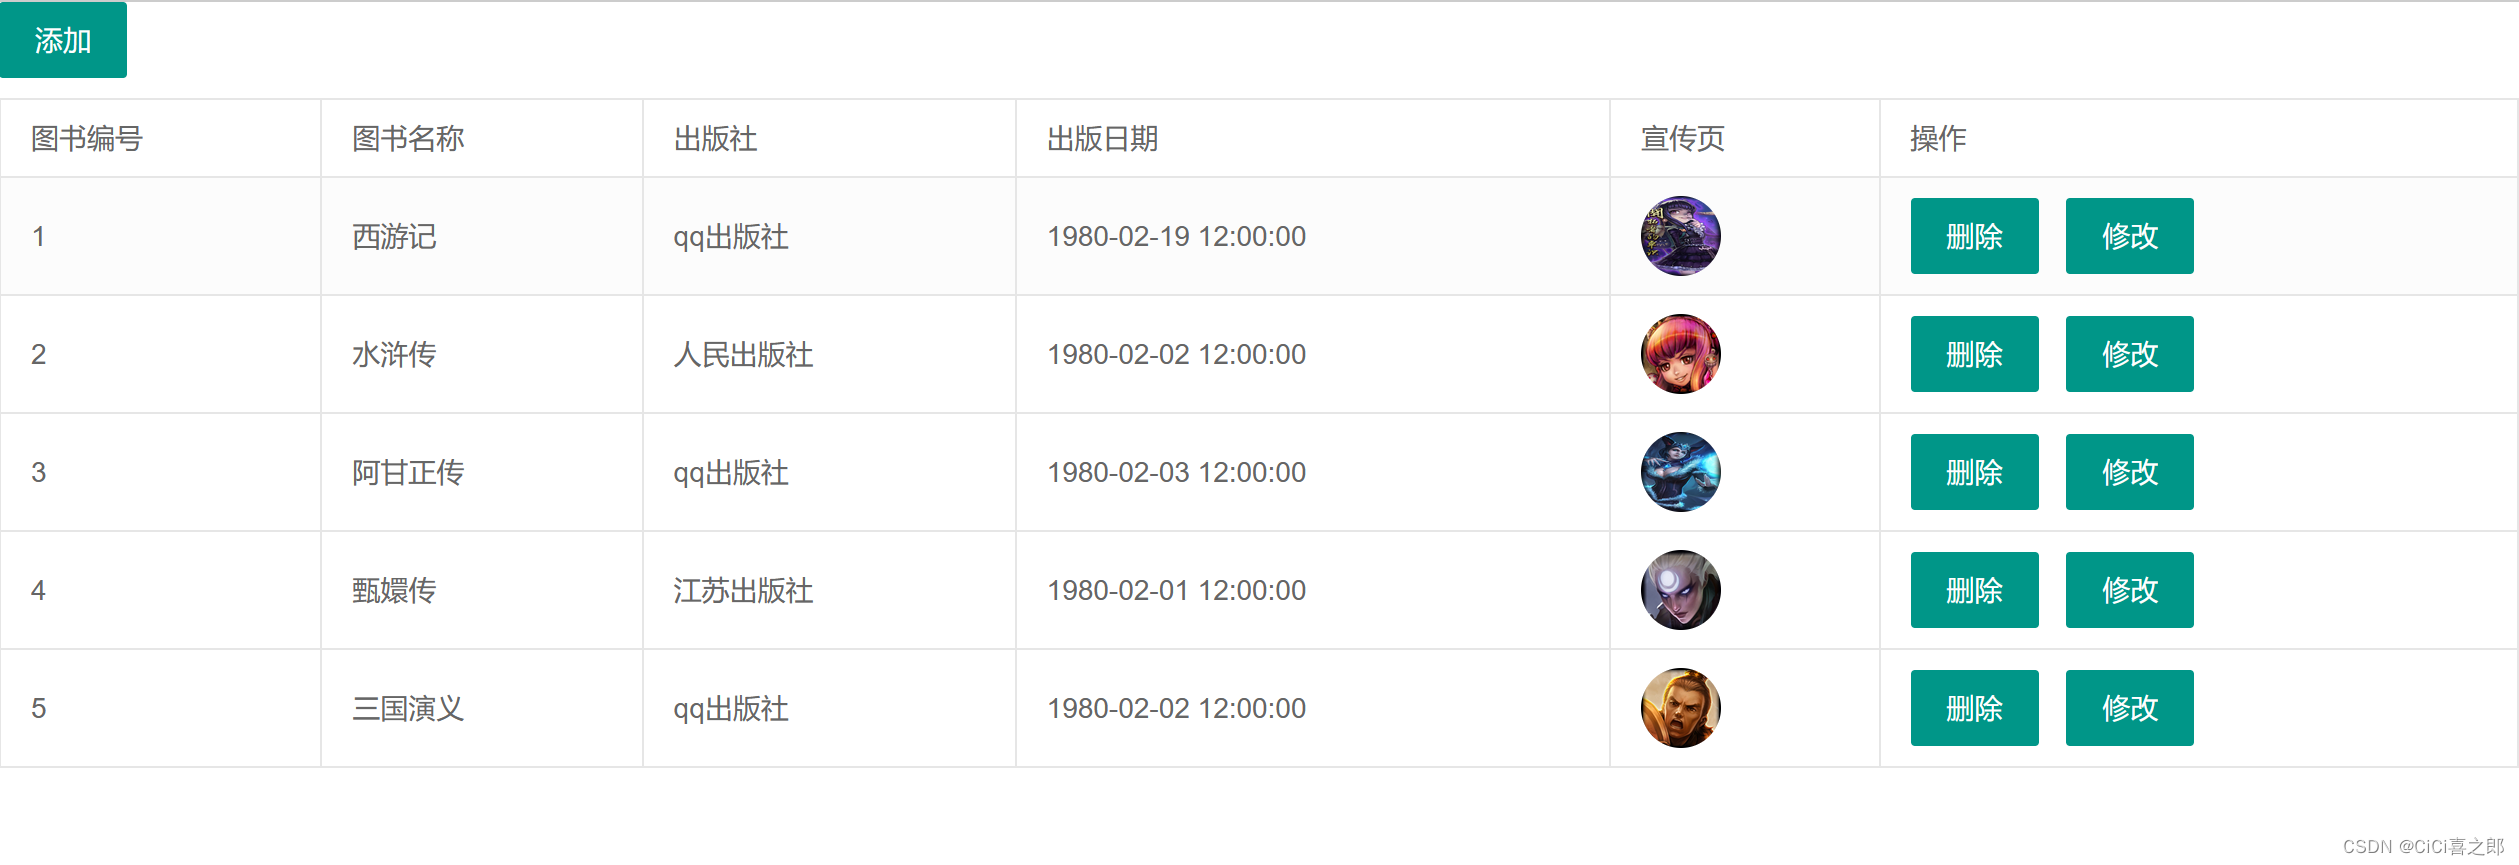
浏览器访问
地址:http://localhost:8088/shq/books
效果:
添加功能

修改
删除
附件:pom文件
<?xml version="1.0" encoding="UTF-8"?>
<project xmlns="http://maven.apache.org/POM/4.0.0" xmlns:xsi="http://www.w3.org/2001/XMLSchema-instance"
         xsi:schemaLocation="http://maven.apache.org/POM/4.0.0 https://maven.apache.org/xsd/maven-4.0.0.xsd">
    <modelVersion>4.0.0</modelVersion>
    <parent>
        <groupId>org.springframework.boot</groupId>
        <artifactId>spring-boot-starter-parent</artifactId>
        <version>2.7.12</version>
        <relativePath/> <!-- lookup parent from repository -->
    </parent>
    <groupId>cn.shq</groupId>
    <artifactId>springBoot_CRUD</artifactId>
    <version>0.0.1-SNAPSHOT</version>
    <name>springBoot_CRUD</name>
    <description>springBoot_CRUD</description>
    <properties>
        <java.version>1.8</java.version>
    </properties>
    <dependencies>
        <!--     thymeleaf   -->
        <dependency>
            <groupId>org.springframework.boot</groupId>
            <artifactId>spring-boot-starter-thymeleaf</artifactId>
        </dependency>
        <!--      web      -->
        <dependency>
            <groupId>org.springframework.boot</groupId>
            <artifactId>spring-boot-starter-web</artifactId>
        </dependency>
        <!--        mybatis-->
        <dependency>
            <groupId>org.mybatis.spring.boot</groupId>
            <artifactId>mybatis-spring-boot-starter</artifactId>
            <version>2.2.0</version>
        </dependency>
        <!--      前端开发者工具  -->
        <dependency>
            <groupId>org.springframework.boot</groupId>
            <artifactId>spring-boot-devtools</artifactId>
            <scope>runtime</scope>
            <optional>true</optional>
        </dependency>
        <!--        mysql -->
        <dependency>
            <groupId>mysql</groupId>
            <artifactId>mysql-connector-java</artifactId>
            <version>8.0.25</version>
        </dependency>
        <!--       lombok插件-->
        <dependency>
            <groupId>org.projectlombok</groupId>
            <artifactId>lombok</artifactId>
            <optional>true</optional>
        </dependency>
        <!--        测试-->
        <dependency>
            <groupId>org.springframework.boot</groupId>
            <artifactId>spring-boot-starter-test</artifactId>
            <scope>test</scope>
            <exclusions>
                <exclusion>
                    <groupId>org.junit.vintage</groupId>
                    <artifactId>junit-vintage-engine</artifactId>
                </exclusion>
            </exclusions>
        </dependency>
        <dependency>
            <groupId>org.springframework.boot</groupId>
            <artifactId>spring-boot-configuration-processor</artifactId>
            <optional>true</optional>
        </dependency>
        <!--        前端开始-->
        <dependency>
            <groupId>org.webjars</groupId>
            <artifactId>jquery</artifactId>
            <version>3.3.1</version>
        </dependency>
        <dependency>
            <groupId>org.webjars</groupId>
            <artifactId>layui</artifactId>
            <version>2.5.6</version>
        </dependency>
        <dependency>
            <groupId>org.webjars</groupId>
            <artifactId>bootstrap</artifactId>
            <version>4.5.2</version>
        </dependency>
        <dependency>
            <groupId>org.webjars</groupId>
            <artifactId>bootstrap-select</artifactId>
            <version>1.13.17</version>
        </dependency>
        <dependency>
            <groupId>org.webjars</groupId>
            <artifactId>bootstrap-datetimepicker</artifactId>
            <version>2.4.4</version>
        </dependency>
        <dependency>
            <groupId>org.webjars</groupId>
            <artifactId>bootstrap-table</artifactId>
            <version>1.16.0</version>
        </dependency>
        <dependency>
            <groupId>org.webjars</groupId>
            <artifactId>momentjs</artifactId>
            <version>2.24.0</version>
        </dependency>
        <!--  前端结束-->

        <!--     lang包的增强版   -->
        <dependency>
            <groupId>org.apache.commons</groupId>
            <artifactId>commons-lang3</artifactId>
            <version>3.9</version>
        </dependency>

        <dependency>
            <groupId>tk.mybatis</groupId>
            <artifactId>mapper-spring-boot-starter</artifactId>
            <version>2.1.5</version>
        </dependency>
        <dependency>
            <groupId>com.alibaba</groupId>
            <artifactId>druid</artifactId>
            <version>1.1.10</version>
        </dependency>
        <dependency>
            <groupId>org.springframework.boot</groupId>
            <artifactId>spring-boot-starter-jdbc</artifactId>
        </dependency>


    </dependencies>

    <build>
        <!-- 使得程序在执行过程中,能够解析到各个mapper.xml文件 。
				否则target目录下没有对应的mapper文件,程序不能正常执行。  -->
        <resources>
            <resource>
                <directory>src/main/java</directory>
                <includes>
                    <include>**/*.yml</include>
                    <include>**/*.properties</include>
                    <include>**/*.xml</include>
                </includes>
                <filtering>false</filtering>
            </resource>
            <resource>
                <directory>src/main/resources</directory>
                <includes>
                    <include>**/*.css</include>
                    <include>**/*.js</include>
                    <include>**/*.html</include>
                    <include>**/*.png</include>
                    <include>**/*.jpg</include>
                    <include>**/*.properties</include>
                    <include>**/*.yml</include>
                    <include>**/*.xml</include>
                    <include>**/*.conf</include>
                </includes>
                <filtering>false</filtering>
            </resource>
        </resources>
        <plugins>
            <plugin>
                <groupId>org.springframework.boot</groupId>
                <artifactId>spring-boot-maven-plugin</artifactId>
                <configuration>
                    <excludes>
                        <exclude>
                            <groupId>org.projectlombok</groupId>
                            <artifactId>lombok</artifactId>
                        </exclude>
                    </excludes>
                </configuration>
            </plugin>
        </plugins>
    </build>

</project>

