深入Mybatis框架
文章目录
- 深入Mybatis框架
- 了解数据源
- 解读Mybatis数据源实现
- 非池化的数据源实现
- 池化的数据源实现
- 整合Mybatis框架
- 使用HikariCP连接池
- Mybatis事务管理
- 使用Spring事务管理
- 集成JUnit测试
前面已经了解了JavaBean的创建和注入到IoC容器中,接下来深入MyBatis框架
了解数据源
在之前,如果需要创建一个JDBC的连接,那么必须使用DriverManager.getConnection()来创建连接,连接建立后,我们才可以进行数据库操作。
而学习了Mybatis之后,我们就不用再去使用DriverManager为我们提供连接对象,而是直接使用Mybatis为我们提供的SqlSessionFactory工具类来获取对应的SqlSession通过会话对象去操作数据库。
那么,它到底是如何封装JDBC的呢?看Mybatis的源码:
public SqlSession openSession(boolean autoCommit) {
    return this.openSessionFromDataSource(this.configuration.getDefaultExecutorType(), (TransactionIsolationLevel)null, autoCommit);
}
在通过SqlSessionFactory调用openSession方法之后,它调用了内部的一个私有的方法openSessionFromDataSource:
private SqlSession openSessionFromDataSource(ExecutorType execType, TransactionIsolationLevel level, boolean autoCommit) {
    Transaction tx = null;

    DefaultSqlSession var8;
    try {
      	//获取当前环境(由配置文件映射的对象实体)
        Environment environment = this.configuration.getEnvironment();
      	//事务工厂(暂时不提,下一板块讲解)
        TransactionFactory transactionFactory = this.getTransactionFactoryFromEnvironment(environment);
      	//配置文件中:<transactionManager type="JDBC"/>
      	//生成事务(根据我们的配置,会默认生成JdbcTransaction),这里是关键,我们看到这里用到了environment.getDataSource()方法
        tx = transactionFactory.newTransaction(environment.getDataSource(), level, autoCommit);
      	//执行器,包括全部的数据库操作方法定义,本质上是在使用执行器操作数据库,需要传入事务对象
        Executor executor = this.configuration.newExecutor(tx, execType);
      	//封装为SqlSession对象
        var8 = new DefaultSqlSession(this.configuration, executor, autoCommit);
    } catch (Exception var12) {
        this.closeTransaction(tx);
        throw ExceptionFactory.wrapException("Error opening session.  Cause: " + var12, var12);
    } finally {
        ErrorContext.instance().reset();
    }

    return var8;
}
数据源配置信息存放在Transaction对象中,那么现在只需要知道执行器到底是如何执行SQL语句的,我们就知道到底如何创建Connection对象了,就需要获取数据库的链接信息了,来看看DataSource`:
public interface DataSource  extends CommonDataSource, Wrapper {

  Connection getConnection() throws SQLException;

  Connection getConnection(String username, String password)
    throws SQLException;
}
我们发现,它是在javax.sql定义的一个接口,它包括了两个方法,都是用于获取连接的。因此,现在我们可以断定,并不是通过之前DriverManager的方法去获取连接了,而是使用DataSource的实现类来获取的
数据库链接的建立和关闭是极其耗费系统资源的操作,通过DriverManager获取的数据库连接,一个数据库连接对象均对应一个物理数据库连接,每次操作都打开一个物理连接,使用完后立即关闭连接,频繁的打开、关闭连接会持续消耗网络资源,造成整个系统性能的低下。
因此,JDBC为我们定义了一个数据源的标准,也就是DataSource接口,告诉数据源数据库的连接信息,并将所有的连接全部交给数据源进行集中管理,当需要一个Connection对象时,可以向数据源申请,数据源会根据内部机制,合理地分配连接对象给我们。
一般比较常用的DataSource实现,都是采用池化技术,就是在一开始就创建好N个连接,这样之后使用就无需再次进行连接,而是直接使用现成的Connection对象进行数据库操作。
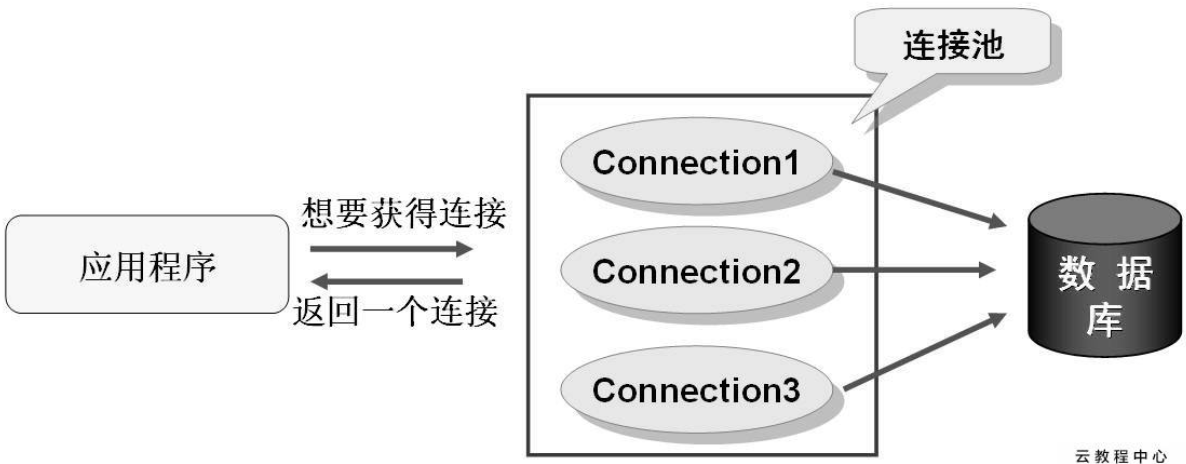
当然,也可以使用传统的即用即连的方式获取Connection对象,Mybatis为我们提供了几个默认的数据源实现,我们之前一直在使用的是官方的默认配置,也就是池化数据源:
<dataSource type="POOLED">
      <property name="driver" value="${driver}"/>
      <property name="url" value="${url}"/>
      <property name="username" value="${username}"/>
      <property name="password" value="${password}"/>
    </dataSource>
一共三个选项:
- UNPOOLED 不使用连接池的数据源
- POOLED 使用连接池的数据源
- JNDI 使用JNDI实现的数据源
解读Mybatis数据源实现
非池化的数据源实现
先看不使用池化的数据源实现,它叫做UnpooledDataSource,源码:
public class UnpooledDataSource implements DataSource {
    private ClassLoader driverClassLoader;
    private Properties driverProperties;
    private static Map<String, Driver> registeredDrivers = new ConcurrentHashMap();
    private String driver;
    private String url;
    private String username;
    private String password;
    private Boolean autoCommit;
    private Integer defaultTransactionIsolationLevel;
    private Integer defaultNetworkTimeout;
首先这个类中定义了很多的成员,包括数据库的连接信息、数据库驱动信息、事务相关信息等。
我们接着来看,它是如何实现DataSource中提供的接口的:
public Connection getConnection() throws SQLException {
    return this.doGetConnection(this.username, this.password);
}

public Connection getConnection(String username, String password) throws SQLException {
    return this.doGetConnection(username, password);
}
实际上,这两个方法都指向了内部的一个doGetConnection方法,那么我们接着来看:
private Connection doGetConnection(String username, String password) throws SQLException {
    Properties props = new Properties();
    if (this.driverProperties != null) {
        props.putAll(this.driverProperties);
    }

    if (username != null) {
        props.setProperty("user", username);
    }

    if (password != null) {
        props.setProperty("password", password);
    }

    return this.doGetConnection(props);
}
首先它将数据库的连接信息也给添加到Properties对象中进行存放,并交给下一个doGetConnection来处理,接着来看下一层源码:
private Connection doGetConnection(Properties properties) throws SQLException {
  	//若未初始化驱动,需要先初始化,内部维护了一个Map来记录初始化信息
    this.initializeDriver();
  	//传统的获取连接的方式
    Connection connection = DriverManager.getConnection(this.url, properties);
  	//对连接进行额外的一些配置
    this.configureConnection(connection);
    return connection;
}
到这里,就返回Connection对象了,而此对象正是通过DriverManager来创建的,因此,非池化的数据源实现依然使用的是传统的连接创建方式
池化的数据源实现
接着来看池化的数据源实现,它是PooledDataSource类:
public class PooledDataSource implements DataSource {
    private static final Log log = LogFactory.getLog(PooledDataSource.class);
    private final PoolState state = new PoolState(this);
    private final UnpooledDataSource dataSource;
    protected int poolMaximumActiveConnections = 10;
    protected int poolMaximumIdleConnections = 5;
    protected int poolMaximumCheckoutTime = 20000;
    protected int poolTimeToWait = 20000;
    protected int poolMaximumLocalBadConnectionTolerance = 3;
    protected String poolPingQuery = "NO PING QUERY SET";
    protected boolean poolPingEnabled;
    protected int poolPingConnectionsNotUsedFor;
    private int expectedConnectionTypeCode;
由于要考虑并发以及如何合理存放并分配大量的链接对象,在这里的定义就比非池化的实现复杂得多
首先注意,它存放了一个UnpooledDataSource,此对象是在构造时就被创建,其实创建Connection还是依靠数据库驱动创建,来看看它是如何实现接口方法的:
public Connection getConnection() throws SQLException {
    return this.popConnection(this.dataSource.getUsername(), this.dataSource.getPassword()).getProxyConnection();
}

public Connection getConnection(String username, String password) throws SQLException {
    return this.popConnection(username, password).getProxyConnection();
}
可以看到,它调用了popConnection()方法来获取连接对象,然后进行了一个代理,我们可以猜测,有可能整个连接池就是一个类似于栈的集合类型结构实现的。来看看popConnection方法:
private PooledConnection popConnection(String username, String password) throws SQLException {
    boolean countedWait = false;
  	//返回的是PooledConnection对象,
    PooledConnection conn = null;
    long t = System.currentTimeMillis();
    int localBadConnectionCount = 0;

    while(conn == null) {
        synchronized(this.state) {   //加锁,因为有可能很多个线程都需要获取连接对象
            PoolState var10000;
          	//PoolState存了两个List,一个是空闲列表,一个是活跃列表
            if (!this.state.idleConnections.isEmpty()) {   //有空闲连接时,可以直接分配Connection
                conn = (PooledConnection)this.state.idleConnections.remove(0);  //ArrayList中取第一个元素
                if (log.isDebugEnabled()) {
                    log.debug("Checked out connection " + conn.getRealHashCode() + " from pool.");
                }
              //如果已经没有多余的连接可以分配,那么就检查一下活跃连接数是否达到最大的分配上限,如果没有,就new一个
            } else if (this.state.activeConnections.size() < this.poolMaximumActiveConnections) {
              	//注意new了之后并没有立即往List里面塞,只是存了一些基本信息
              	//我们发现,这里依靠UnpooledDataSource创建了一个Connection对象,并将其封装到PooledConnection中
                conn = new PooledConnection(this.dataSource.getConnection(), this);
                if (log.isDebugEnabled()) {
                    log.debug("Created connection " + conn.getRealHashCode() + ".");
                }
              //以上条件都不满足,那么只能从之前的连接中寻找了,看看有没有那种卡住的链接(由于网络问题有可能之前的连接一直被卡住,然而正常情况下早就结束并且可以使用了,所以这里相当于是优化也算是一种捡漏的方式)
            } else {
              	//获取最早创建的连接
                PooledConnection oldestActiveConnection = (PooledConnection)this.state.activeConnections.get(0);
                long longestCheckoutTime = oldestActiveConnection.getCheckoutTime();
              	//判断是否超过最大的使用时间
                if (longestCheckoutTime > (long)this.poolMaximumCheckoutTime) {
                  	//超时统计信息(不重要)
                    ++this.state.claimedOverdueConnectionCount;
                    var10000 = this.state;
                    var10000.accumulatedCheckoutTimeOfOverdueConnections += longestCheckoutTime;
                    var10000 = this.state;
                    var10000.accumulatedCheckoutTime += longestCheckoutTime;
                  	//从活跃列表中移除此链接信息
                    this.state.activeConnections.remove(oldestActiveConnection);
                  	//如果开启事务,还需要回滚一下
                    if (!oldestActiveConnection.getRealConnection().getAutoCommit()) {
                        try {
                            oldestActiveConnection.getRealConnection().rollback();
                        } catch (SQLException var15) {
                            log.debug("Bad connection. Could not roll back");
                        }
                    }

                  	//这里就根据之前的连接对象直接new一个新的连接(注意使用的还是之前的Connection对象,只是被重新封装了)
                    conn = new PooledConnection(oldestActiveConnection.getRealConnection(), this);
                    conn.setCreatedTimestamp(oldestActiveConnection.getCreatedTimestamp());
                    conn.setLastUsedTimestamp(oldestActiveConnection.getLastUsedTimestamp());
                  	//过期
                    oldestActiveConnection.invalidate();
                    if (log.isDebugEnabled()) {
                        log.debug("Claimed overdue connection " + conn.getRealHashCode() + ".");
                    }
                } else {
                  //确实是没得用了,只能卡住了(阻塞)
                  //然后记录一下有几个线程在等待当前的任务搞完
                    try {
                        if (!countedWait) {
                            ++this.state.hadToWaitCount;
                            countedWait = true;
                        }

                        if (log.isDebugEnabled()) {
                            log.debug("Waiting as long as " + this.poolTimeToWait + " milliseconds for connection.");
                        }

                        long wt = System.currentTimeMillis();
                        this.state.wait((long)this.poolTimeToWait);   //要是超过等待时间还是没等到,只能放弃
                      	//注意这样的话con就为null了
                        var10000 = this.state;
                        var10000.accumulatedWaitTime += System.currentTimeMillis() - wt;
                    } catch (InterruptedException var16) {
                        break;
                    }
                }
            }

          	//经过之前的操作,已经成功分配到连接对象的情况下
            if (conn != null) {
                if (conn.isValid()) {  //是否有效
                    if (!conn.getRealConnection().getAutoCommit()) {  //清理之前遗留的事务操作
                        conn.getRealConnection().rollback();
                    }

                    conn.setConnectionTypeCode(this.assembleConnectionTypeCode(this.dataSource.getUrl(), username, password));
                    conn.setCheckoutTimestamp(System.currentTimeMillis());
                    conn.setLastUsedTimestamp(System.currentTimeMillis());
                  	//添加到活跃表中
                    this.state.activeConnections.add(conn);
                    //统计信息(不重要)
                    ++this.state.requestCount;
                    var10000 = this.state;
                    var10000.accumulatedRequestTime += System.currentTimeMillis() - t;
                } else {
                  	//无效的连接,直接抛异常
                    if (log.isDebugEnabled()) {
                        log.debug("A bad connection (" + conn.getRealHashCode() + ") was returned from the pool, getting another connection.");
                    }

                    ++this.state.badConnectionCount;
                    ++localBadConnectionCount;
                    conn = null;
                    if (localBadConnectionCount > this.poolMaximumIdleConnections + this.poolMaximumLocalBadConnectionTolerance) {
                        if (log.isDebugEnabled()) {
                            log.debug("PooledDataSource: Could not get a good connection to the database.");
                        }

                        throw new SQLException("PooledDataSource: Could not get a good connection to the database.");
                    }
                }
            }
        }
    }

  	//最后该干嘛干嘛,拿不到连接直接抛异常
    if (conn == null) {
        if (log.isDebugEnabled()) {
            log.debug("PooledDataSource: Unknown severe error condition.  The connection pool returned a null connection.");
        }

        throw new SQLException("PooledDataSource: Unknown severe error condition.  The connection pool returned a null connection.");
    } else {
        return conn;
    }
}
我们可以得到以下信息:
如果最后得到了连接对象(有可能是从空闲列表中得到,有可能是直接创建的新的,还有可能是经过回收策略回收得到的),那么连接(Connection)对象一定会被放在活跃列表中(state.activeConnections)
获取一个链接会直接进入到活跃列表中,那么,如果一个连接被关闭,又会发生什么事情呢,我们来看看此方法返回之后,会调用getProxyConnection来获取一个代理对象,实际上就是PooledConnection类:
class PooledConnection implements InvocationHandler {
  private static final String CLOSE = "close";
    private static final Class<?>[] IFACES = new Class[]{Connection.class};
    private final int hashCode;
  	//会记录是来自哪一个数据源创建的的
    private final PooledDataSource dataSource;
  	//连接对象本体
    private final Connection realConnection;
  	//代理的链接对象
    private final Connection proxyConnection;
  ...
它直接代理了构造方法中传入的Connection对象,也是使用JDK的动态代理实现的,那么我们来看一下,它是如何进行代理的:
public Object invoke(Object proxy, Method method, Object[] args) throws Throwable {
    String methodName = method.getName();
  	//如果调用的是Connection对象的close方法,
    if ("close".equals(methodName)) {
      	//这里并不会真的关闭连接(这也是为什么用代理),而是调用之前数据源的pushConnection方法,将此连接改为为空闲状态
        this.dataSource.pushConnection(this);
        return null;
    } else {
        try {
            if (!Object.class.equals(method.getDeclaringClass())) {
                this.checkConnection();
              	//任何操作执行之前都会检查连接是否可用
            }

          	//该干嘛干嘛
            return method.invoke(this.realConnection, args);
        } catch (Throwable var6) {
            throw ExceptionUtil.unwrapThrowable(var6);
        }
    }
}
看pushConnection方法:
protected void pushConnection(PooledConnection conn) throws SQLException {
    synchronized(this.state) {   //老规矩,先来把锁
      	//先从活跃列表移除此连接
        this.state.activeConnections.remove(conn);
      	//判断此链接是否可用
        if (conn.isValid()) {
            PoolState var10000;
          	//看看闲置列表容量是否已满(容量满了就回不去了)
            if (this.state.idleConnections.size() < this.poolMaximumIdleConnections && conn.getConnectionTypeCode() == this.expectedConnectionTypeCode) {
                var10000 = this.state;
                var10000.accumulatedCheckoutTime += conn.getCheckoutTime();
                if (!conn.getRealConnection().getAutoCommit()) {
                    conn.getRealConnection().rollback();
                }

              	//把唯一有用的Connection对象拿出来,然后重新创建一个PooledConnection
                PooledConnection newConn = new PooledConnection(conn.getRealConnection(), this);
              	//放入闲置列表,成功回收
                this.state.idleConnections.add(newConn);
                newConn.setCreatedTimestamp(conn.getCreatedTimestamp());
                newConn.setLastUsedTimestamp(conn.getLastUsedTimestamp());
                conn.invalidate();
                if (log.isDebugEnabled()) {
                    log.debug("Returned connection " + newConn.getRealHashCode() + " to pool.");
                }

                this.state.notifyAll();
            } else {
                var10000 = this.state;
                var10000.accumulatedCheckoutTime += conn.getCheckoutTime();
                if (!conn.getRealConnection().getAutoCommit()) {
                    conn.getRealConnection().rollback();
                }

                conn.getRealConnection().close();
                if (log.isDebugEnabled()) {
                    log.debug("Closed connection " + conn.getRealHashCode() + ".");
                }

                conn.invalidate();
            }
        } else {
            if (log.isDebugEnabled()) {
                log.debug("A bad connection (" + conn.getRealHashCode() + ") attempted to return to the pool, discarding connection.");
            }

            ++this.state.badConnectionCount;
        }

    }
}
无论Connection管理方式如何变换,无论数据源再高级,它都最终都会使用DriverManager来创建连接对象,而最终使用的也是DriverManager提供的Connection对象。
整合Mybatis框架
Mybatis实际上是在使用自己编写的数据源(数据源有很多,之后我们再聊其他的)默认使用的是池化的数据源,它预先存储了很多的连接对象。
那么我们来看一下,如何将Mybatis与Spring更好的结合呢,比如我们现在希望将SqlSessionFactory交给IoC容器进行管理,而不是我们自己创建工具类来管理(我们之前一直都在使用工具类管理和创建会话)
首先导入依赖:
<dependency>
    <groupId>mysql</groupId>
    <artifactId>mysql-connector-java</artifactId>
    <version>8.0.25</version>
</dependency>
<dependency>
    <groupId>org.mybatis</groupId>
    <artifactId>mybatis</artifactId>
    <version>3.5.7</version>
</dependency>
<dependency>
    <groupId>org.mybatis</groupId>
    <artifactId>mybatis-spring</artifactId>
    <version>2.0.6</version>
</dependency>
<dependency>
    <groupId>org.springframework</groupId>
    <artifactId>spring-jdbc</artifactId>
    <version>5.3.13</version>
</dependency>
在mybatis-spring依赖中,为我们提供了SqlSessionTemplate类,它其实就是官方封装的一个工具类,可以将其注册为Bean,这样我们随时都可以向IoC容器索要,而不用自己再去编写一个工具类了:
@Configuration
@ComponentScan("com.test")
public class TestConfiguration {
    @Bean
    public SqlSessionTemplate sqlSessionTemplate() throws IOException {
        SqlSessionFactory factory = new SqlSessionFactoryBuilder().build(Resources.getResourceAsReader("mybatis-config.xml"));
        return new SqlSessionTemplate(factory);
    }
}
配置XML文件
<?xml version="1.0" encoding="UTF-8" ?>
<!DOCTYPE configuration
        PUBLIC "-//mybatis.org//DTD Config 3.0//EN"
        "http://mybatis.org/dtd/mybatis-3-config.dtd">
<configuration>
    <environments default="development">
        <environment id="development">
            <transactionManager type="JDBC"/>
            <dataSource type="POOLED">
                <property name="driver" value="com.mysql.cj.jdbc.Driver"/>
                <property name="url" value="jdbc:mysql://localhost:3306/study"/>
                <property name="username" value="root"/>
                <property name="password" value="123456"/>
            </dataSource>
        </environment>
    </environments>
  	<mappers>
        <mapper class="com.test.mapper.TestMapper"/>
    </mappers>
</configuration>
编写主方法
public static void main(String[] args) {
    ApplicationContext context = new AnnotationConfigApplicationContext(TestConfiguration.class);
    SqlSessionTemplate template = context.getBean(SqlSessionTemplate.class);
    TestMapper testMapper = template.getMapper(TestMapper.class);
    System.out.println(testMapper.getStudent());
}
设置TestMapper,非常熟悉的一套操作
@Mapper
public interface TestMapper {

    @Select("select * from student where sid = 1")
    Student getStudent();
}
加上Lombok插件的注解
@Data
public class Student {
    int sid;
    String name;
    String sex;
}
最后成功得到Student实体类,证明SqlSessionTemplate成功注册为Bean可以使用了。虽然这样已经很方便了,但是还不够方便,我们依然需要手动去获取Mapper对象,那么能否直接得到对应的Mapper对象呢,我们希望让Spring直接帮助我们管理所有的Mapper,当需要时,可以直接从容器中获取,我们可以直接在配置类上方添加注解:
@MapperScan("com.test.mapper")
这样,Spring会自动扫描所有的Mapper,并将其实现注册为Bean,那么我们现在就可以直接通过容器获取了:
public static void main(String[] args) throws InterruptedException {
    ApplicationContext context = new AnnotationConfigApplicationContext(TestConfiguration.class);
    TestMapper mapper = context.getBean(TestMapper.class);
    System.out.println(mapper.getStudent());
}
请一定注意,必须存在SqlSessionTemplate或是SqlSessionFactoryBean的Bean,否则会无法初始化(毕竟要数据库的链接信息)
如果希望直接去除Mybatis的配置文件,可以使用SqlSessionFactoryBean类:
@Configuration
@ComponentScan("com.test")
@MapperScan("com.test.mapper")
public class TestConfiguration {
    @Bean
    public DataSource dataSource(){
        return new PooledDataSource("com.mysql.cj.jdbc.Driver",
                "jdbc:mysql://localhost:3306/study", "root", "123456");
    }

    @Bean
    public SqlSessionFactoryBean sqlSessionFactoryBean(@Autowired DataSource dataSource){
        SqlSessionFactoryBean bean = new SqlSessionFactoryBean();
        bean.setDataSource(dataSource);
        return bean;
    }
}
首先需要创建一个数据源的实现类,因为这是数据库最基本的信息,然后再给到SqlSessionFactoryBean实例,这样相当于直接在一开始通过IoC容器配置了SqlSessionFactory,只需要传入一个DataSource的实现
删除配置文件,重新再来运行,同样可以正常使用Mapper。从这里开始,通过IoC容器,Mybatis已经不再需要使用配置文件了,之后基于Spring的开发将不会再出现Mybatis的配置文件
使用HikariCP连接池
前面我们提到了数据源还有其他实现,比如C3P0、Druid等,它们都是非常优秀的数据源实现(可以自行了解),不过这里介绍之后SpringBoot中还会遇到的HikariCP连接池。
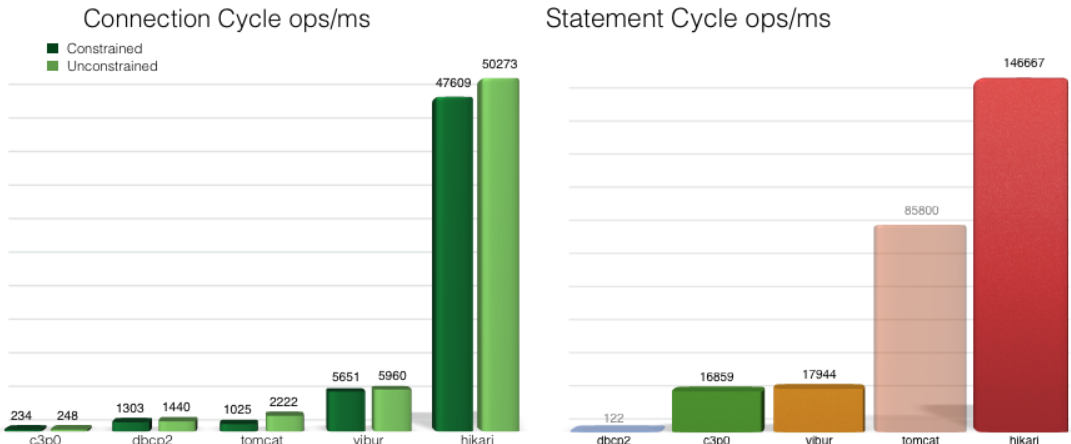
HikariCP是由日本程序员开源的一个数据库连接池组件,代码非常轻量,并且速度非常的快。根据官方提供的数据,在酷睿i7开启32个线程32个连接的情况下,进行随机数据库读写操作,HikariCP的速度是现在常用的C3P0数据库连接池的数百倍。在SpringBoot2.0中,官方也是推荐使用HikariCP。
首先,我们需要导入依赖:
<dependency>
    <groupId>com.zaxxer</groupId>
    <artifactId>HikariCP</artifactId>
    <version>3.4.5</version>
</dependency>
接着修改一下Bean的定义:
@Bean
public DataSource dataSource() throws SQLException {
    HikariDataSource dataSource = new HikariDataSource();
    dataSource.setJdbcUrl("jdbc:mysql://localhost:3306/study");
    dataSource.setDriverClassName("com.mysql.cj.jdbc.Driver");
    dataSource.setUsername("root");
    dataSource.setPassword("123456");
    return dataSource;
}
最后我们发现,同样可以得到输出结果,但是出现了一个报错:
SLF4J: Failed to load class "org.slf4j.impl.StaticLoggerBinder".
SLF4J: Defaulting to no-operation (NOP) logger implementation
SLF4J: See http://www.slf4j.org/codes.html#StaticLoggerBinder for further details.
此数据源实际上是采用了SLF4J日志框架打印日志信息,但是现在没有任何的日志实现(slf4j只是一个API标准,它规范了多种日志框架的操作,统一使用SLF4J定义的方法来操作不同的日志框架)我们这里就使用JUL作为日志实现,我们需要导入另一个依赖:
<dependency>
    <groupId>org.slf4j</groupId>
    <artifactId>slf4j-jdk14</artifactId>
    <version>1.7.25</version>
</dependency>
注意版本一定要和slf4j-api保持一致!
随便提一嘴:别随意改版本号,真的很容易出问题;言归正传
这样就能得到日志信息:
十二月 07, 2021 8:46:41 下午 com.zaxxer.hikari.HikariDataSource getConnection
信息: HikariPool-1 - Starting...
十二月 07, 2021 8:46:41 下午 com.zaxxer.hikari.HikariDataSource getConnection
信息: HikariPool-1 - Start completed.
Student(sid=1, name=小明, sex=男)
在SpringBoot阶段,还会遇到HikariPool-1 - Starting...和HikariPool-1 - Start completed.同款日志信息。
当然,Lombok肯定也是支持这个日志框架快速注解的:
@Slf4j
public class Main {
    public static void main(String[] args) {
        log.info("项目正在启动...");
        ApplicationContext context = new AnnotationConfigApplicationContext(TestConfiguration.class);
        TestMapper mapper = context.getBean(TestMapper.class);
        System.out.println(mapper.getStudent());
    }
}
Mybatis事务管理
回顾一下事务机制。首先事务遵循一个ACID原则:
- 原子性(Atomicity):事务是一个原子操作,由一系列动作组成。事务的原子性确保动作要么全部完成,要么完全不起作用。
- 一致性(Consistency):一旦事务完成(不管成功还是失败),系统必须确保它所建模的业务处于一致的状态,而不会是部分完成部分失败。在现实中的数据不应该被破坏。
- 隔离性(Isolation):可能有许多事务会同时处理相同的数据,因此每个事务都应该与其他事务隔离开来,防止数据损坏。
- 持久性(Durability):一旦事务完成,无论发生什么系统错误,它的结果都不应该受到影响,这样就能从任何系统崩溃中恢复过来。通常情况下,事务的结果被写到持久化存储器中。
简单来说,事务就是要么完成,要么就啥都别做!并且不同的事务直接相互隔离,互不干扰。
那么我们接着来深入了解一下事务的隔离机制,事务之间是相互隔离互不干扰的,那么如果出现了下面的情况,会怎么样呢:
当两个事务同时在执行,并且同时在操作同一个数据,这样很容易出现并发相关的问题,比如一个事务先读取了某条数据,而另一个事务此时修改了此数据,当前一个事务紧接着再次读取时,会导致和前一次读取的数据不一致,这就是一种典型的数据虚读现象。
因此,为了解决这些问题,事务之间实际上是存在一些隔离级别的:
- ISOLATION_READ_UNCOMMITTED(读未提交):其他事务会读取当前事务尚未更改的提交(相当于读取的是这个事务暂时缓存的内容,并不是数据库中的内容)
- ISOLATION_READ_COMMITTED(读已提交):其他事务会读取当前事务已经提交的数据(也就是直接读取数据库中已经发生更改的内容)
- ISOLATION_REPEATABLE_READ(可重复读):其他事务会读取当前事务已经提交的数据并且其他事务执行过程中不允许再进行数据修改(注意这里仅仅是不允许修改数据)
- ISOLATION_SERIALIZABLE(串行化):它完全服从ACID原则,一个事务必须等待其他事务结束之后才能开始执行,相当于挨个执行,效率很低
首先是读未提交级别,此级别属于最低级别,相当于各个事务共享一个缓存区域,任何事务的操作都在这里进行。那么它会导致以下问题:
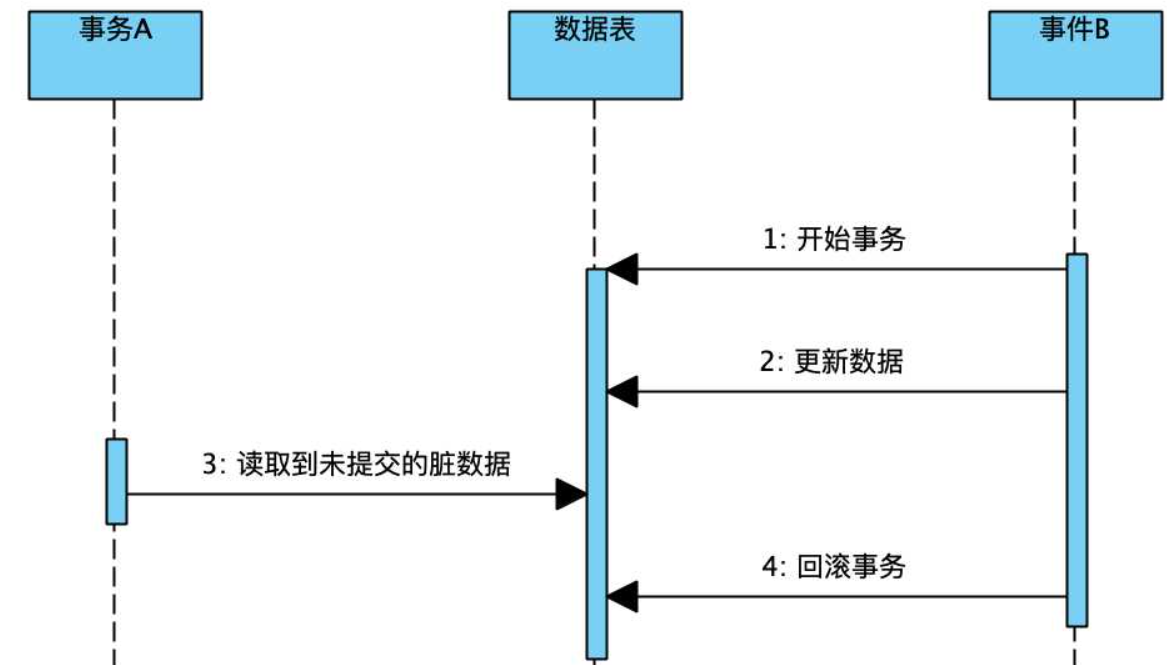
也就是说,事务A最后得到的实际上是一个毫无意义的数据(事务B已经回滚了)我们称此数据为"脏数据",这种现象称为脏读
我们接着来看读已提交级别,事务只能读取其他事务已经提交的内容,相当于直接从数据中读取数据,这样就可以避免脏读问题了,但是它还是存在以下问题:
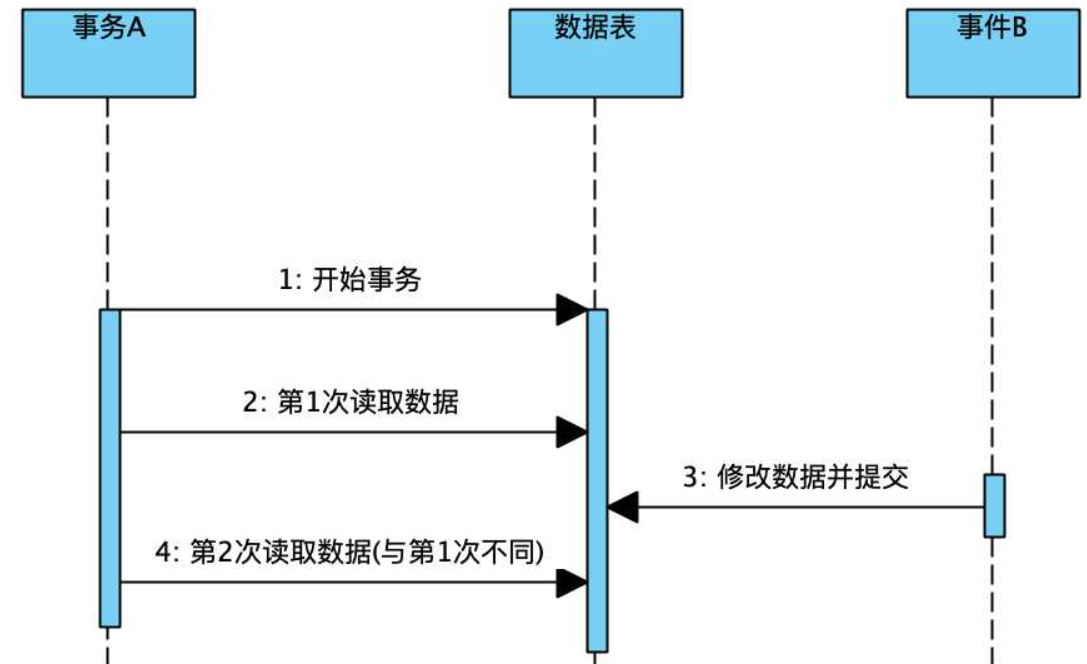
这正是我们前面例子中提到的问题,虽然它避免了脏读问题,但是如果事件B修改并提交了数据,那么实际上事务A之前读取到的数据依然不是最新的数据,直接导致两次读取的数据不一致,这种现象称为虚读也可以称为不可重复读
因此,下一个隔离级别可重复读就能够解决这样的问题(MySQL的默认隔离级别),它规定在其他事务执行时,不允许修改数据,这样,就可以有效地避免不可重复读的问题,但是这样就一定安全了吗?这里仅仅是禁止了事务执行过程中的UPDATE操作,但是它并没有禁止INSERT这类操作,因此,如果事务A执行过程中事务B插入了新的数据,那么A这时是毫不知情的,比如:
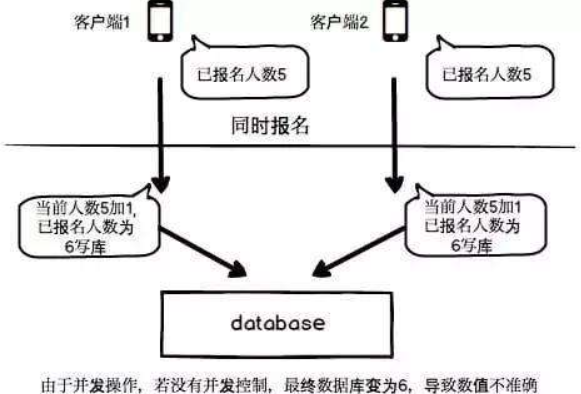
两个人同时报名一个活动,两个报名的事务同时在进行,但是他们一开始读取到的人数都是5,而这时,它们都会认为报名成功后人数应该变成6,而正常情况下应该是7,因此这个时候就发生了数据的幻读现象。
要解决这种问题,只能使用最后一种隔离级别串行化来实现了,每个事务不能同时进行,直接避免所有并发问题,简单粗暴,但是效率爆减
最后总结三种情况:
- 脏读:读取到了被回滚的数据,它毫无意义。
- 虚读(不可重复读):由于其他事务更新数据,两次读取的数据不一致。
- 幻读:由于其他事务执行插入删除操作,而又无法感知到表中记录条数发生变化,当下次再读取时会莫名其妙多出或缺失数据,就像产生幻觉一样。
(对于虚读和幻读的区分:虚读是某个数据前后读取不一致,幻读是整个表的记录数量前后读取不一致)
最后这张图:

Mybatis对于数据库的事务管理,也有着相应的封装。一个事务无非就是创建、提交、回滚、关闭,因此这些操作被Mybatis抽象为一个接口:
public interface Transaction {
    Connection getConnection() throws SQLException;

    void commit() throws SQLException;

    void rollback() throws SQLException;

    void close() throws SQLException;

    Integer getTimeout() throws SQLException;
}
对于此接口的实现,MyBatis的事务管理分为两种形式:
- 使用JDBC的事务管理机制:即利用对应数据库的驱动生成的
Connection对象完成对事务的提交(commit())、回滚(rollback())、关闭(close())等,对应的实现类为JdbcTransaction - 使用MANAGED的事务管理机制:这种机制MyBatis自身不会去实现事务管理,而是让程序的容器(比如Spring)来实现对事务的管理,对应的实现类为
ManagedTransaction
而我们之前一直使用的其实就是JDBC的事务,相当于直接使用Connection对象(之前JavaWeb阶段已经讲解过了)在进行事务操作,并没有额外的管理机制,对应的配置为:
<transactionManager type="JDBC"/>
那么我们来看看JdbcTransaction是不是像我们上面所说的那样管理事务的,直接上源码:
public class JdbcTransaction implements Transaction {
    private static final Log log = LogFactory.getLog(JdbcTransaction.class);
    protected Connection connection;
    protected DataSource dataSource;
    protected TransactionIsolationLevel level;
    protected boolean autoCommit;

    public JdbcTransaction(DataSource ds, TransactionIsolationLevel desiredLevel, boolean desiredAutoCommit) {
      	//数据源
        this.dataSource = ds;
      	//事务隔离级别,上面已经提到过了
        this.level = desiredLevel;
      	//是否自动提交
        this.autoCommit = desiredAutoCommit;
    }

  //也可以直接给个Connection对象
   public JdbcTransaction(Connection connection) {
        this.connection = connection;
    }

    public Connection getConnection() throws SQLException {
      	//没有就通过数据源新开一个Connection
        if (this.connection == null) {
            this.openConnection();
        }

        return this.connection;
    }

    public void commit() throws SQLException {
      	//连接已经创建并且没开启自动提交才可以使用
        if (this.connection != null && !this.connection.getAutoCommit()) {
            if (log.isDebugEnabled()) {
                log.debug("Committing JDBC Connection [" + this.connection + "]");
            }
						//实际上使用的是数据库驱动提供的Connection对象进行事务操作
            this.connection.commit();
        }

    }
相当于JdbcTransaction只是为数据库驱动提供的Connection对象套了层壳,所有的事务操作实际上是直接调用Connection对象。
接着来看ManagedTransaction的源码:
public class ManagedTransaction implements Transaction {
    ...

    public void commit() throws SQLException {
    }

    public void rollback() throws SQLException {
    }

    ...
}
大体内容和JdbcTransaction差不多,但是它并没有实现任何的事务操作。也就是说,它希望将实现交给其他的管理框架来完成,而Spring就为Mybatis提供了一个非常好的事务管理实现。
使用Spring事务管理
Spring提供的事务管理(Spring事务管理分为编程式事务和声明式事务,但是编程式事务过于复杂并且具有高度耦合性,违背了Spring框架的设计初衷,因此这里只讲解声明式事务)声明式事务是基于AOP实现的。
使用声明式事务非常简单,我们只需要在配置类添加@EnableTransactionManagement注解即可,这样就可以开启Spring的事务支持了。接着,我们只需要把一个事务要做的所有事情封装到Service层的一个方法中即可,首先需要在配置文件中注册一个新的Bean,事务需要执行必须有一个事务管理器:
@Bean
public TransactionManager transactionManager(@Autowired DataSource dataSource){
    return new DataSourceTransactionManager(dataSource);
}
接着编写Mapper操作:
@Mapper
public interface TestMapper {

    @Insert("insert into student(name, sex) values('测试', '男')")
    void insertStudent();
}
这样会向数据库中插入一条新的学生信息,接着,假设我们这里有一个业务需要连续插入两条学生信息,首先编写业务层的接口:
public interface TestService {

    void test();
}
接着,我们再来编写业务层的实现,我们可以直接将其注册为Bean,交给Spring来进行管理,这样就可以自动将Mapper注入到类中了,并且可以支持事务:
@Component
public class TestServiceImpl implements TestService{

    @Resource
    TestMapper mapper;

    @Transactional
    @Override
    public void test() {
        mapper.insertStudent();
        if(true) throw new RuntimeException("我是测试异常!");
        mapper.insertStudent();
    }
}
只需在方法上添加@Transactional注解,即可表示此方法执行的是一个事务操作,在调用此方法时,Spring会通过AOP机制为其进行增强,一旦发现异常,事务会自动回滚。最后我们来调用一下此方法:
@Slf4j
public class Main {
    public static void main(String[] args) {
        log.info("项目正在启动...");
        ApplicationContext context = new AnnotationConfigApplicationContext(TestConfiguration.class);
        TestService service = context.getBean(TestService.class);
        service.test();
    }
}
得到的结果是出现错误:
十二月 08, 2021 3:09:29 下午 com.test.Main main
信息: 项目正在启动...
十二月 08, 2021 3:09:29 下午 com.zaxxer.hikari.HikariDataSource getConnection
信息: HikariPool-1 - Starting...
十二月 08, 2021 3:09:29 下午 com.zaxxer.hikari.HikariDataSource getConnection
信息: HikariPool-1 - Start completed.
Exception in thread "main" java.lang.RuntimeException: 我是测试异常!
	at com.test.service.TestServiceImpl.test(TestServiceImpl.java:22)
	at sun.reflect.NativeMethodAccessorImpl.invoke0(Native Method)
	at sun.reflect.NativeMethodAccessorImpl.invoke(NativeMethodAccessorImpl.java:62)
	at sun.reflect.DelegatingMethodAccessorImpl.invoke(DelegatingMethodAccessorImpl.java:43)
	at java.lang.reflect.Method.invoke(Method.java:498)
	at org.springframework.aop.support.AopUtils.invokeJoinpointUsingReflection(AopUtils.java:344)
	at org.springframework.aop.framework.ReflectiveMethodInvocation.invokeJoinpoint(ReflectiveMethodInvocation.java:198)
	at org.springframework.aop.framework.ReflectiveMethodInvocation.proceed(ReflectiveMethodInvocation.java:163)
	at org.springframework.transaction.interceptor.TransactionInterceptor$1.proceedWithInvocation(TransactionInterceptor.java:123)
	at org.springframework.transaction.interceptor.TransactionAspectSupport.invokeWithinTransaction(TransactionAspectSupport.java:388)
	at org.springframework.transaction.interceptor.TransactionInterceptor.invoke(TransactionInterceptor.java:119)
	at org.springframework.aop.framework.ReflectiveMethodInvocation.proceed(ReflectiveMethodInvocation.java:186)
	at org.springframework.aop.framework.JdkDynamicAopProxy.invoke(JdkDynamicAopProxy.java:215)
	at com.sun.proxy.$Proxy30.test(Unknown Source)
	at com.test.Main.main(Main.java:17)
整个栈追踪信息中包含了大量aop包下的相关内容,也就印证了,它确实是通过AOP实现的,那么我们接着来看一下,数据库中的数据是否没有发生变化(出现异常回滚了)
结果显而易见,确实被回滚了,数据库中没有任何的内容。
来研究一下@Transactional注解的一些参数:
@Target({ElementType.TYPE, ElementType.METHOD})
@Retention(RetentionPolicy.RUNTIME)
@Inherited
@Documented
public @interface Transactional {
    @AliasFor("transactionManager")
    String value() default "";

    @AliasFor("value")
    String transactionManager() default "";

    String[] label() default {};

    Propagation propagation() default Propagation.REQUIRED;

    Isolation isolation() default Isolation.DEFAULT;

    int timeout() default -1;

    String timeoutString() default "";

    boolean readOnly() default false;

    Class<? extends Throwable>[] rollbackFor() default {};

    String[] rollbackForClassName() default {};

    Class<? extends Throwable>[] noRollbackFor() default {};

    String[] noRollbackForClassName() default {};
}
几个比较关键的信息:
- transactionManager:指定事务管理器
- propagation:事务传播规则,一个事务可以包括N个子事务
- isolation:事务隔离级别,不多说了
- timeout:事务超时时间
- readOnly:是否为只读事务,不同的数据库会根据只读属性进行优化,比如MySQL一旦声明事务为只读,那么久不允许增删改操作了。
- rollbackFor和noRollbackFor:发生指定异常时回滚或是不回滚,默认发生任何异常都回滚
除了事务的传播规则,其他的内容其实已经给大家讲解过了,那么我们就来看看事务的传播。事务传播一共有七种级别:
Spring默认的传播级别是PROPAGATION_REQUIRED,那么我们来看看,它是如何传播的,现在我们的Service类中一共存在两个事务,而一个事务方法包含了另一个事务方法:
@Transactional
public void test() {
    test2();
    if(true) throw new RuntimeException("我是测试异常!");  //发生异常时,会回滚另一个事务吗?
}

@Transactional
public void test2() {
    mapper.insertStudent();
}
最后我们得到结果,另一个事务被回滚了,也就是说,相当于另一个事务直接加入到此事务中了,也就是表中所描述的那样。
如果单独执行test2()则会开启一个新的事务,而执行test()则会直接让内部的test2()加入到当前事务中。
@Transactional
public void test() {
    test2();
}

@Transactional(propagation = Propagation.SUPPORTS)
public void test2() {
    mapper.insertStudent();
   	if(true) throw new RuntimeException("我是测试异常!");
}
现在我们将test2()的传播级别设定为SUPPORTS,那么这时如果单独调用test2()方法,并不会以事务的方式执行,当发生异常时,虽然依然存在AOP增强,但是不会进行回滚操作,而现在再调用test()方法,才会以事务的方式执行。
我们接着来看MANDATORY,它非常严格,如果当前方法并没有在任何事务中进行,会直接出现异常:
@Transactional
public void test() {
    test2();
}

@Transactional(propagation = Propagation.MANDATORY)
public void test2() {
    mapper.insertStudent();
    if(true) throw new RuntimeException("我是测试异常!");
}
直接运行test2()方法,报错如下:
Exception in thread "main" org.springframework.transaction.IllegalTransactionStateException: No existing transaction found for transaction marked with propagation 'mandatory'
	at org.springframework.transaction.support.AbstractPlatformTransactionManager.getTransaction(AbstractPlatformTransactionManager.java:362)
	at org.springframework.transaction.interceptor.TransactionAspectSupport.createTransactionIfNecessary(TransactionAspectSupport.java:595)
	at org.springframework.transaction.interceptor.TransactionAspectSupport.invokeWithinTransaction(TransactionAspectSupport.java:382)
	at org.springframework.transaction.interceptor.TransactionInterceptor.invoke(TransactionInterceptor.java:119)
	at org.springframework.aop.framework.ReflectiveMethodInvocation.proceed(ReflectiveMethodInvocation.java:186)
	at org.springframework.aop.framework.JdkDynamicAopProxy.invoke(JdkDynamicAopProxy.java:215)
	at com.sun.proxy.$Proxy29.test2(Unknown Source)
	at com.test.Main.main(Main.java:17)
NESTED级别表示如果存在外层事务,则此方法单独创建一个子事务,回滚只会影响到此子事务,实际上就是利用创建Savepoint,然后回滚到此保存点实现的。NEVER级别表示此方法不应该加入到任何事务中,其余类型适用于同时操作多数据源情况下的分布式事务管理,这里暂时不做介绍。
至此,有关Spring的核心内容就讲解完毕了。
集成JUnit测试
既然使用了Spring,那么怎么集成到JUnit中进行测试呢,首先大家能够想到的肯定是:
public class TestMain {

    @Test
    public void test(){
        ApplicationContext context = new AnnotationConfigApplicationContext(TestConfiguration.class);
        TestService service = context.getBean(TestService.class);
        service.test();
    }
}
直接编写一个测试用例即可,但是这样的话,如果我们有很多个测试用例,那么我们不可能每次测试都去创建ApplicationContext吧?我们可以使用@Before添加一个测试前动作来提前配置ApplicationContext,但是这样的话,还是不够简便,能不能有更快速高效的方法呢?
Spring为我们提供了一个Test模块,它会自动集成Junit进行测试,我们可以导入一下依赖:
<dependency>
    <groupId>org.junit.jupiter</groupId>
    <artifactId>junit-jupiter</artifactId>
    <version>5.8.1</version>
    <scope>test</scope>
</dependency>
<dependency>
    <groupId>org.springframework</groupId>
    <artifactId>spring-test</artifactId>
    <version>5.3.12</version>
</dependency>
这里导入的是JUnit5和SpringTest模块依赖,然后直接在我们的测试类上添加两个注解就可以搞定:
@ExtendWith(SpringExtension.class)
@ContextConfiguration(classes = TestConfiguration.class)
public class TestMain {

    @Autowired
    TestService service;

    @Test
    public void test(){
        service.test();
    }
}
@ExtendWith是由JUnit提供的注解,等同于旧版本的@RunWith注解,然后使用SpringTest模块提供的@ContextConfiguration注解来表示要加载哪一个配置文件,可以是XML文件也可以是类,我们这里就直接使用类进行加载。
配置完成后,我们可以直接使用@Autowired来进行依赖注入,并且直接在测试方法中使用注入的Bean,现在就非常方便了。

